Tutorial: Develop a Mobile App With Ionic and Spring Boot
You already know that building APIs with Spring Boot is incredibly easy. But, your API isn’t complete without a UI, right? Well, building UIs with Ionic is pretty easy too, especially if you know Angular!
Ionic is an open source framework designed to help you build mobile applications with web technologies. It started out as a framework based on AngularJS. Ionic 3.0 was recently released, with support for Angular 4, TypeScript 2.2, and lazy loading. When developing an Ionic app, you’ll use Angular and have access to native APIs via Ionic Native and Apache Cordova. This means you can develop slick-looking UIs using the technologies you know and love: HTML, CSS, and TypeScript.
This tutorial will show you how to build a Spring Boot API and an Ionic app, and then how to deploy the finished product to your iOS or Android-based mobile device. Together, these technologies provide an excellent developer experience, with hot reloading so you see immediate feedback whenever you change files.
Prerequisites: Java 8 and Node.js installed.
Create a New Spring Boot Project
To begin, create a directory on your hard drive called spring-boot-ionic-example. During this tutorial, you will create server and ionic-beer directories to hold the server and client applications, respectively.
Build a Spring Boot API
I recently wrote about how to build a Spring Boot API in Bootiful Development with Spring Boot with Angular. Rather than covering that again, you can clone the existing project and copy the server directory into spring-boot-ionic-example.
git clone https://github.com/oktadeveloper/spring-boot-angular-example.git
cp -r spring-boot-angular-example/server ~/spring-boot-ionic-example/.
This project contains a beers API that allows you to CRUD a list of beer names. It also contains a /good-beers endpoint that filters out less-than-great beers. A BeerCommandLineRunner class creates the default list of beers:
@Component
class BeerCommandLineRunner implements CommandLineRunner {
    private final BeerRepository repository;

    public BeerCommandLineRunner(BeerRepository repository) {
        this.repository = repository;
    }

    @Override
    public void run(String... strings) throws Exception {
        // Top beers from https://www.beeradvocate.com/lists/top/
        Stream.of("Kentucky Brunch Brand Stout", "Good Morning", "Very Hazy", "King Julius",
                "Budweiser", "Coors Light", "PBR").forEach(name ->
                repository.save(new Beer(name))
        );
        repository.findAll().forEach(System.out::println);
    }
}
The BeerRepository interface is decorated with @RepositoryRestResource to expose CRUD endpoints for the Beer entity.
@RepositoryRestResource
interface BeerRepository extends JpaRepository<Beer, Long> {}
The last piece of the API is the BeerController that exposes /good-beers and specifies cross-origin resource sharing (CORS) settings.
@RestController
public class BeerController {
    private BeerRepository repository;

    public BeerController(BeerRepository repository) {
        this.repository = repository;
    }

    @GetMapping("/good-beers")
    @CrossOrigin(origins = "http://localhost:4200")
    public Collection<Beer> goodBeers() {

        return repository.findAll().stream()
                .filter(this::isGreat)
                .collect(Collectors.toList());
    }

    private boolean isGreat(Beer beer) {
        return !beer.getName().equals("Budweiser") &&
                !beer.getName().equals("Coors Light") &&
                !beer.getName().equals("PBR");
    }
}
You should be able to start the server application by running it in your favorite IDE or from the command line using mvn spring-boot:run. You’ll want to do this from the server directory. If you don’t have Maven installed, you can use the Maven wrapper that’s included in the project (./mvnw spring-boot:run).
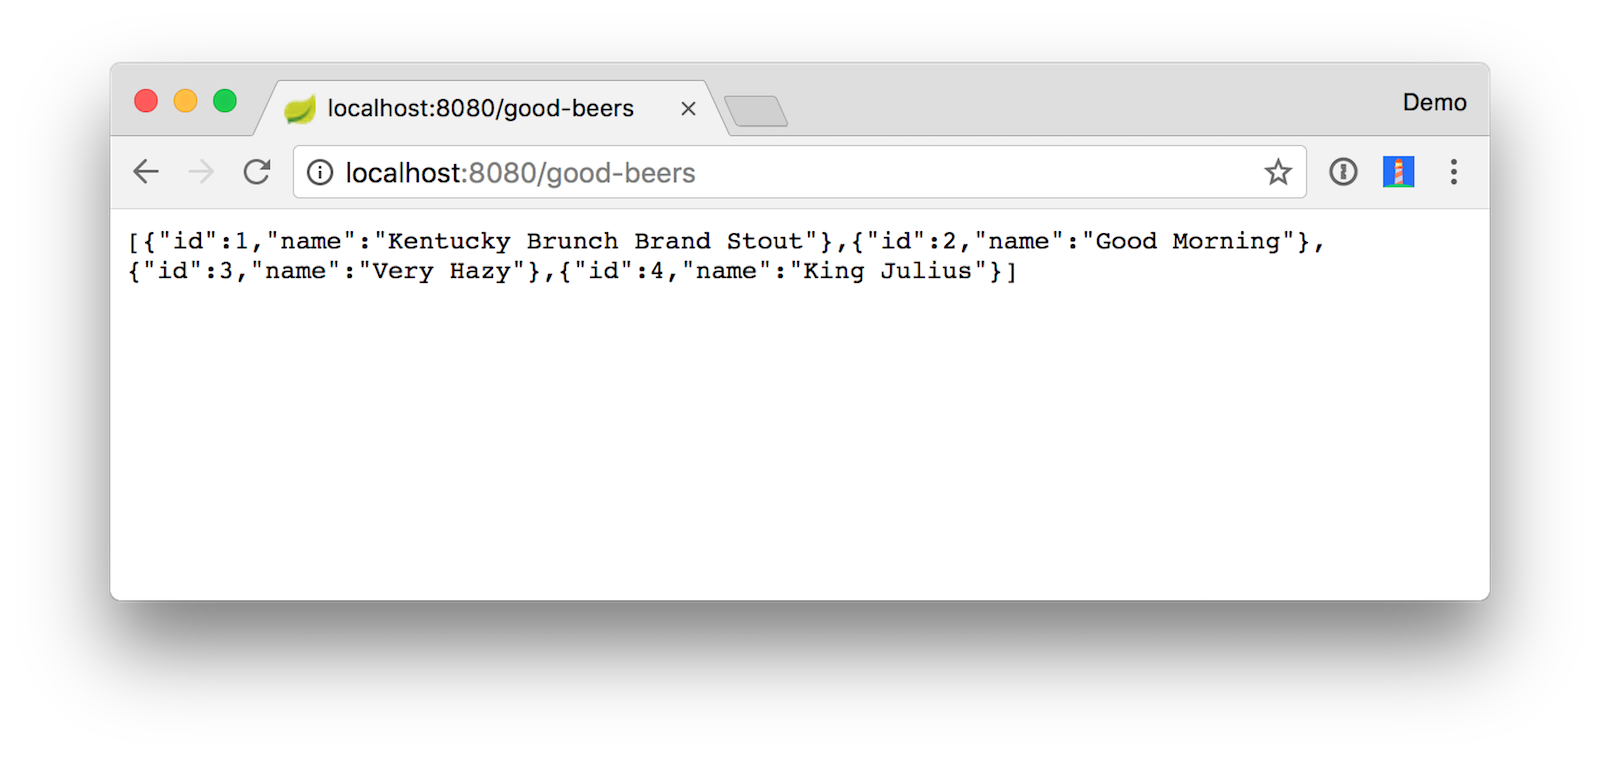
After the app has started, navigate to http://localhost:8080/good-beers. You should see the list of good beers in your browser.
Create an Ionic App
To create an Ionic app to display data from your API, you’ll first need to install Ionic CLI and Cordova:
npm install -g ionic cordova
The Ionic CLI is a command-line tool that significantly reduces the time it takes to develop an Ionic app. It’s like a Swiss Army Knife: It brings together a bunch of miscellaneous tools under a single interface. The CLI contains a number of useful commands for Ionic development, such as start, build, generate, serve, and run.
After installation completes, cd into spring-boot-ionic-example and create a new application using the following command:
ionic start ionic-beer
You will be prompted to select a starter project and optionally integrate with Cordova to target native iOS and Android. For the purposes of this tutorial, choose the tabs starter project and answer Yes to Cordova.
cd ionic-beer
ionic serve
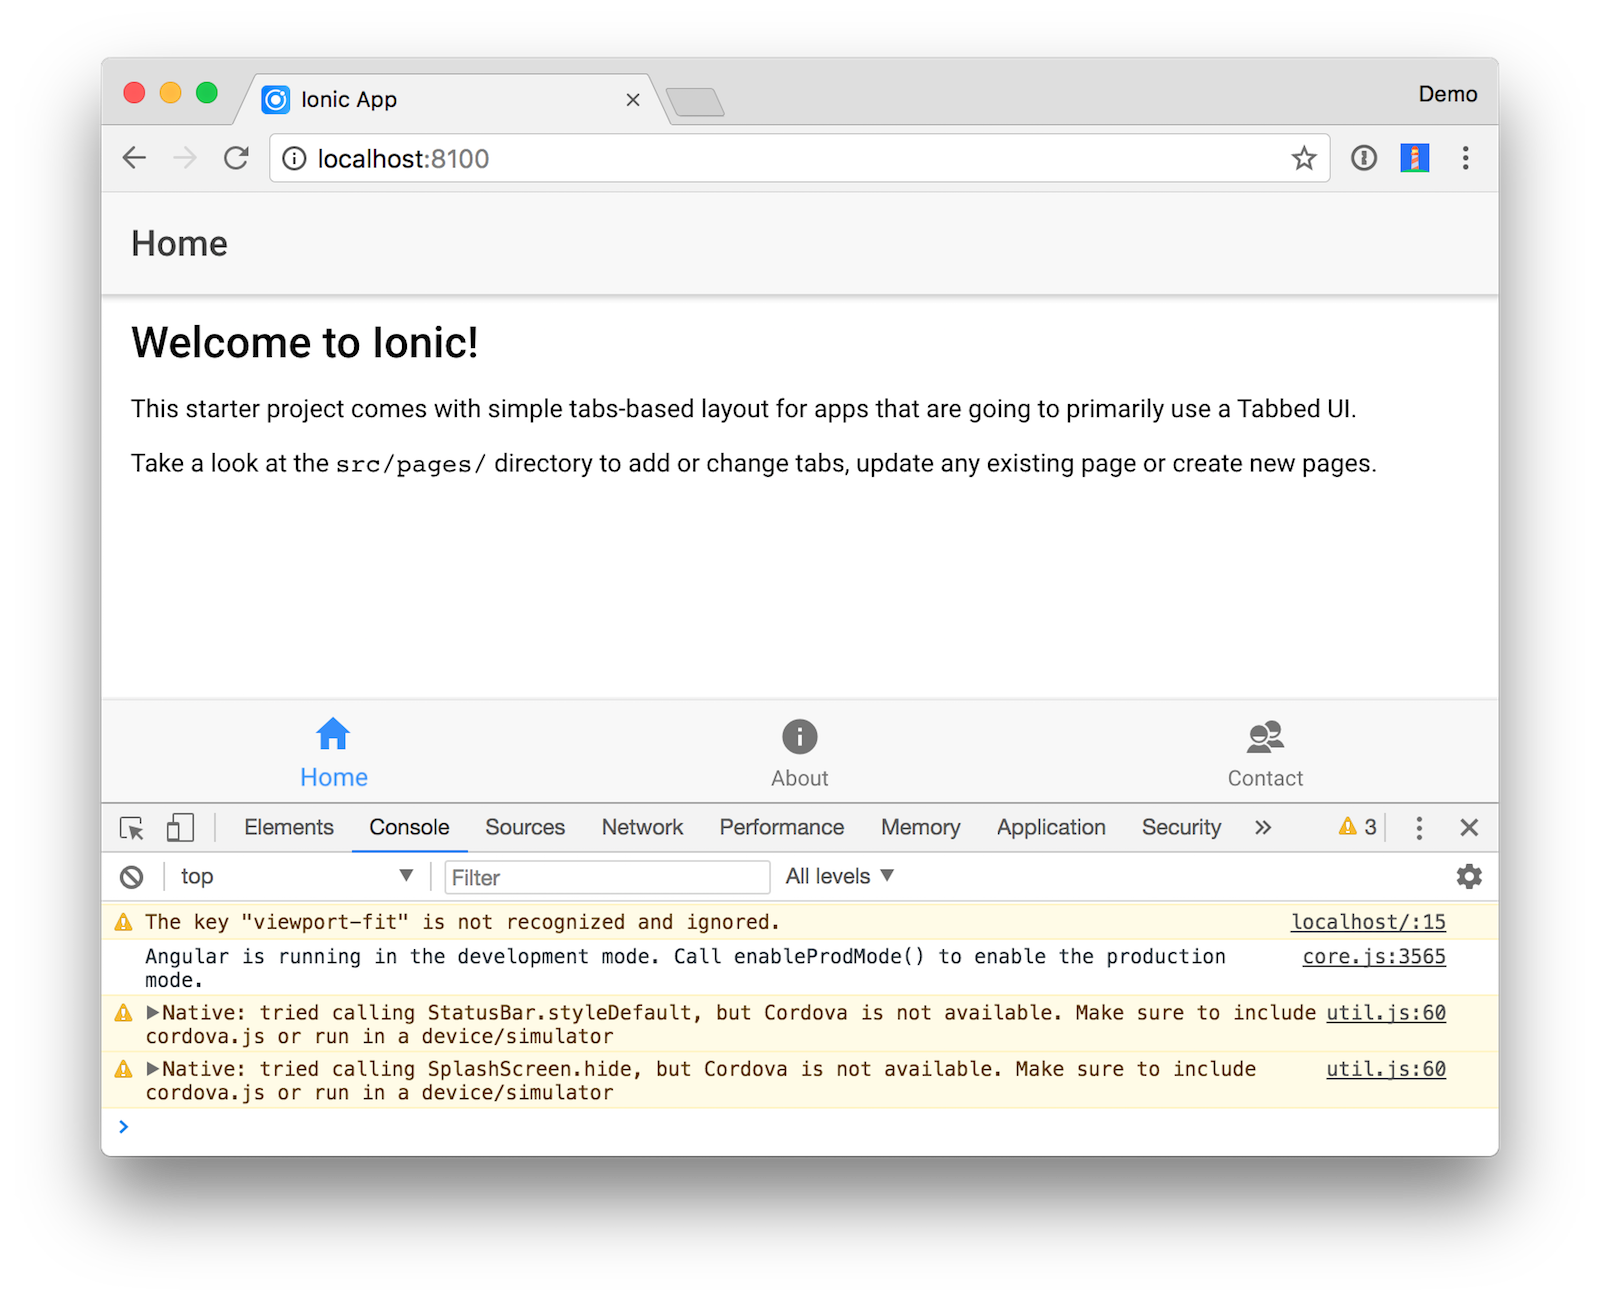
This will open your default browser on http://localhost:8100. You can click through the tabbed interface to see the default structure of the app.
Open the ionic-beer project in your preferred IDEA to start creating your UI. I recommend using IntelliJ IDEA because it has good TypeScript support and can auto-import classes just like it does for Java project.
Create a Good Beers UI
Run ionic generate page beer to create a component and a template to display the list of good beers. This creates a number of files in src/pages/beer:
beer.html
beer.module.ts
beer.scss
beer.ts
Open src/app/app.module.ts and add BeerPageModule to the imports list in app.module.ts.
import { BeerPageModule } from '../pages/beer/beer.module';

@NgModule({
  ...
  imports: [
    BrowserModule,
    IonicModule.forRoot(MyApp),
    BeerPageModule
  ],
  ...
})
Create src/providers/beer-service.ts to hold a BeerService that fetches the beer list from the Spring Boot API. Populate it with constants for the API path and add a getGoodBeers() method.
import { Injectable } from '@angular/core';
import { Observable } from 'rxjs';
import { HttpClient } from '@angular/common/http';

@Injectable()
export class BeerService {
  public API = 'http://localhost:8080';
  public BEER_API = this.API + '/beers';

  constructor(public http: HttpClient) {
  }

  getGoodBeers(): Observable<any> {
    return this.http.get(this.API + '/good-beers');
  }
}
Replace the HTML in src/pages/beer/beer.html to show the list of beers.
<ion-header>
  <ion-navbar>
    <ion-title>Good Beers</ion-title>
  </ion-navbar>
</ion-header>

<ion-content padding>
  <ion-list>
    <ion-item *ngFor="let beer of beers">
      <h2>{{beer.name}}</h2>
    </ion-item>
  </ion-list>
</ion-content>
Modify src/pages/beer/beer.module.ts to import BeerService and add it as a provider. You could add it as a provider in each component, but adding it in the module allows all components to use it.
import { BeerService } from '../../providers/beer-service';

@NgModule({
  ...
  providers: [
    BeerService
  ]
})
Update src/pages/beer/beer.ts to import BeerService and add it as a dependency in the constructor. Call the getGoodBeers() method in the ionViewDidLoad() lifecycle method.
import { Component } from '@angular/core';
import { IonicPage, NavController, NavParams } from 'ionic-angular';
import { BeerService } from '../../providers/beer-service';

@IonicPage()
@Component({
  selector: 'page-beer',
  templateUrl: 'beer.html'
})
export class BeerPage {
  private beers: Array<any>;

  constructor(public navCtrl: NavController, public navParams: NavParams,
              public beerService: BeerService) {
  }

  ionViewDidLoad() {
    this.beerService.getGoodBeers().subscribe(beers => {
      this.beers = beers;
    })
  }
}
To expose this page on the tab bar, modify src/pages/tabs/tabs.ts and re-arrange things so BeerPage is second in the list.
import { Component } from '@angular/core';

import { HomePage } from '../home/home';
import { AboutPage } from '../about/about';
import { ContactPage } from '../contact/contact';
import { BeerPage } from '../beer/beer';

@Component({
  templateUrl: 'tabs.html'
})
export class TabsPage {
  tab1Root = HomePage;
  tab2Root = BeerPage;
  tab3Root = AboutPage;
  tab4Root = ContactPage;

  constructor() {}
}
You’ll also need to update src/pages/tabs/tabs.html to have the new tab order and to specify which icon to use.
<ion-tabs>
  <ion-tab [root]="tab1Root" tabTitle="Home" tabIcon="home"></ion-tab>
  <ion-tab [root]="tab2Root" tabTitle="Beer" tabIcon="beer"></ion-tab>
  <ion-tab [root]="tab3Root" tabTitle="Contact" tabIcon="contacts"></ion-tab>
  <ion-tab [root]="tab4Root" tabTitle="About" tabIcon="information-circle"></ion-tab>
</ion-tabs>
Add Some Fun with Animated GIFs
Create a GiphyService class in src/providers/giphy-service.ts with code that searches Giphy’s API.
import { Injectable } from '@angular/core';
import { HttpClient } from '@angular/common/http';
import 'rxjs/add/operator/map';

@Injectable()
// http://tutorials.pluralsight.com/front-end-javascript/getting-started-with-angular-2-by-building-a-giphy-search-application
export class GiphyService {

  giphyApi = 'https://api.giphy.com/v1/gifs/search?api_key=dc6zaTOxFJmzC&limit=1&q=';

  constructor(public http: HttpClient) {
  }

  get(searchTerm) {
    const apiLink = this.giphyApi + searchTerm;
    return this.http.get(apiLink).map((response: any) => {
      if (response.data.length > 0) {
        return response.data[0].images.original.url;
      } else {
        return 'https://media.giphy.com/media/YaOxRsmrv9IeA/giphy.gif'; // dancing cat for 404
      }
    });
  }
}
Update beer.module.ts to import GiphyService and include it as a provider.
import { GiphyService } from '../../providers/giphy-service';

@NgModule({
  ...
  providers: [
    BeerService,
    GiphyService
  ]
})
Modify beer.ts to import GiphyService and set a giphyUrl on each beer.
import { Component } from '@angular/core';
import { IonicPage, NavController, NavParams } from 'ionic-angular';
import { BeerService } from '../../providers/beer-service';
import { GiphyService } from '../../providers/giphy-service';

@IonicPage()
@Component({
  selector: 'page-beer',
  templateUrl: 'beer.html'
})
export class BeerPage {
  private beers: Array<any>;

  constructor(public navCtrl: NavController, public navParams: NavParams,
              public beerService: BeerService, public giphyService: GiphyService) {
  }

  ionViewDidLoad() {
    this.beerService.getGoodBeers().subscribe(beers => {
      this.beers = beers;
      for (const beer of this.beers) {
        this.giphyService.get(beer.name).subscribe(url => {
          beer.giphyUrl = url
        });
      }
    })
  }
}
Update beer.html to display the image retrieved:
<ion-item *ngFor="let beer of beers">
  <ion-avatar item-left>
    <img src="{{beer.giphyUrl}}">
  </ion-avatar>
  <h2>{{beer.name}}</h2>
</ion-item>
Start the Spring Boot app in one terminal window and run ionic serve in another. Open http://localhost:8100 in your browser. Click on the Beer icon, and you’ll likely see an error in your browser.
Error: Uncaught (in promise): Error: StaticInjectorError[HttpClient]:
  StaticInjectorError[HttpClient]:
    NullInjectorError: No provider for HttpClient!
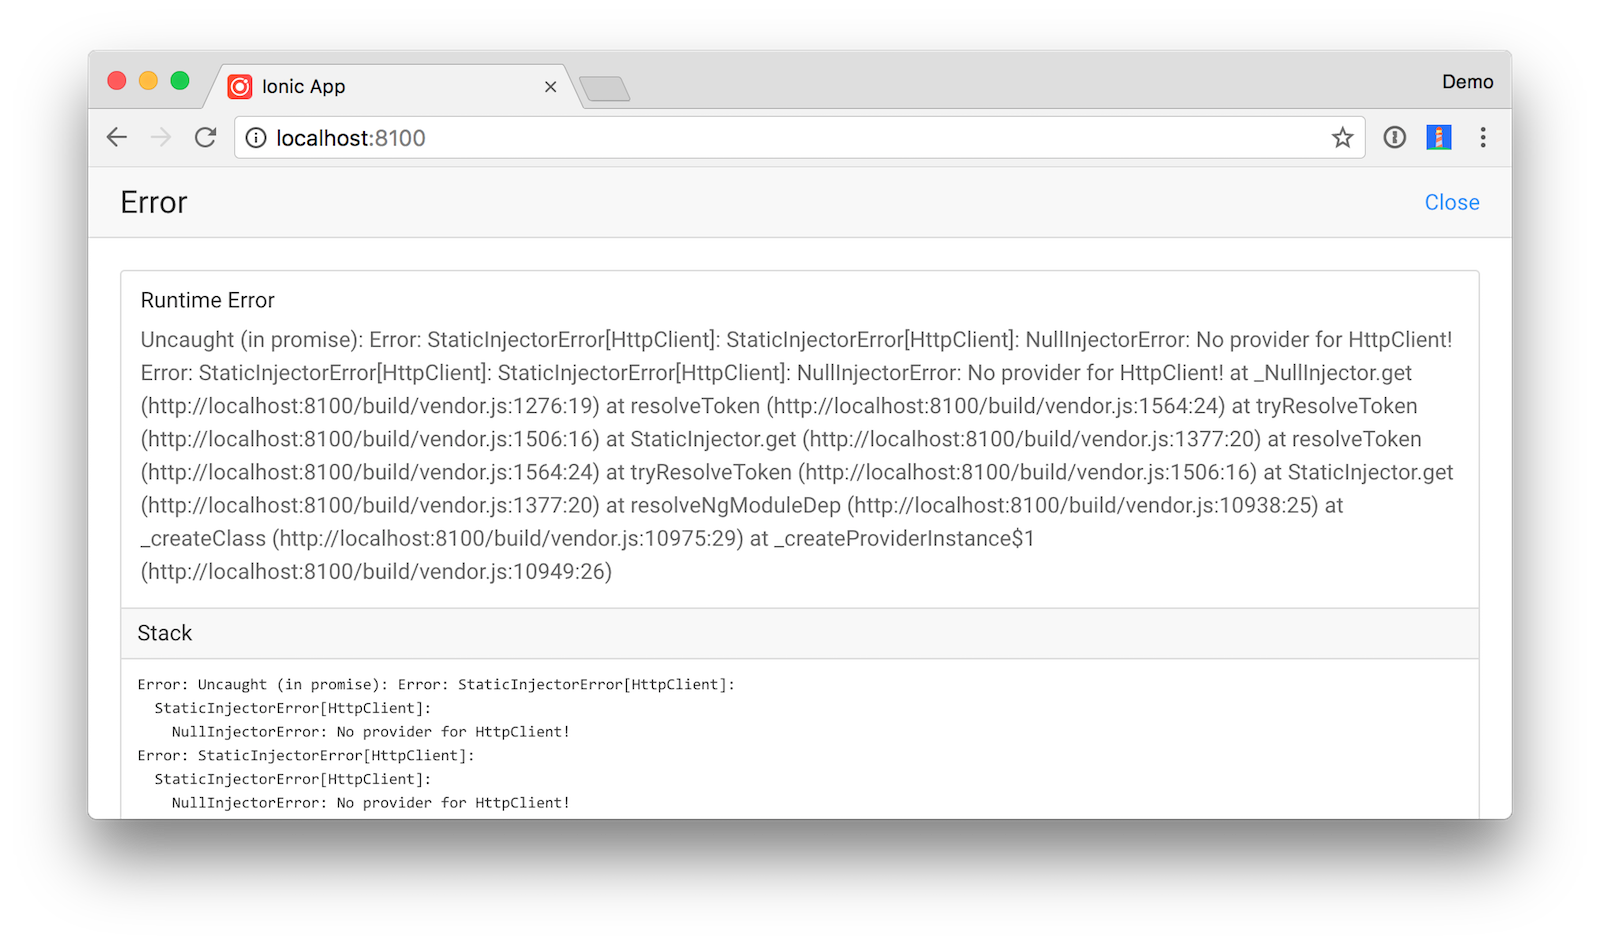
This highlights one of the slick features of Ionic: errors display in your browser, not just the browser’s console. Add HttpClientModule to the list of imports in src/app/app.module.ts to solve this issue.
import { HttpClientModule } from '@angular/common/http';

@NgModule({
  ...
  imports: [
    BrowserModule,
    HttpClientModule,
    IonicModule.forRoot(MyApp),
    BeerPageModule
  ],
After making this change, you’ll likely see the following error in your browser’s console.
XMLHttpRequest cannot load http://localhost:8080/good-beers. No 'Access-Control-Allow-Origin' header is present on the requested resource. Origin 'http://localhost:8100' is therefore not allowed access. The response had HTTP status code 401.
To fix this, open your Spring Boot application’s BeerController.java class and change its @CrossOrigin annotation to allow http://localhost:8100 and http://localhost:8080. This enables cross-origin resource sharing (CORS) from both the browser and the mobile client (http://localhost:8080 is used by iOS Simulator).
@CrossOrigin(origins = {"http://localhost:8100","http://localhost:8080"})
public Collection<Beer> goodBeers() {
Recompile this class, and DevTools should restart the application.
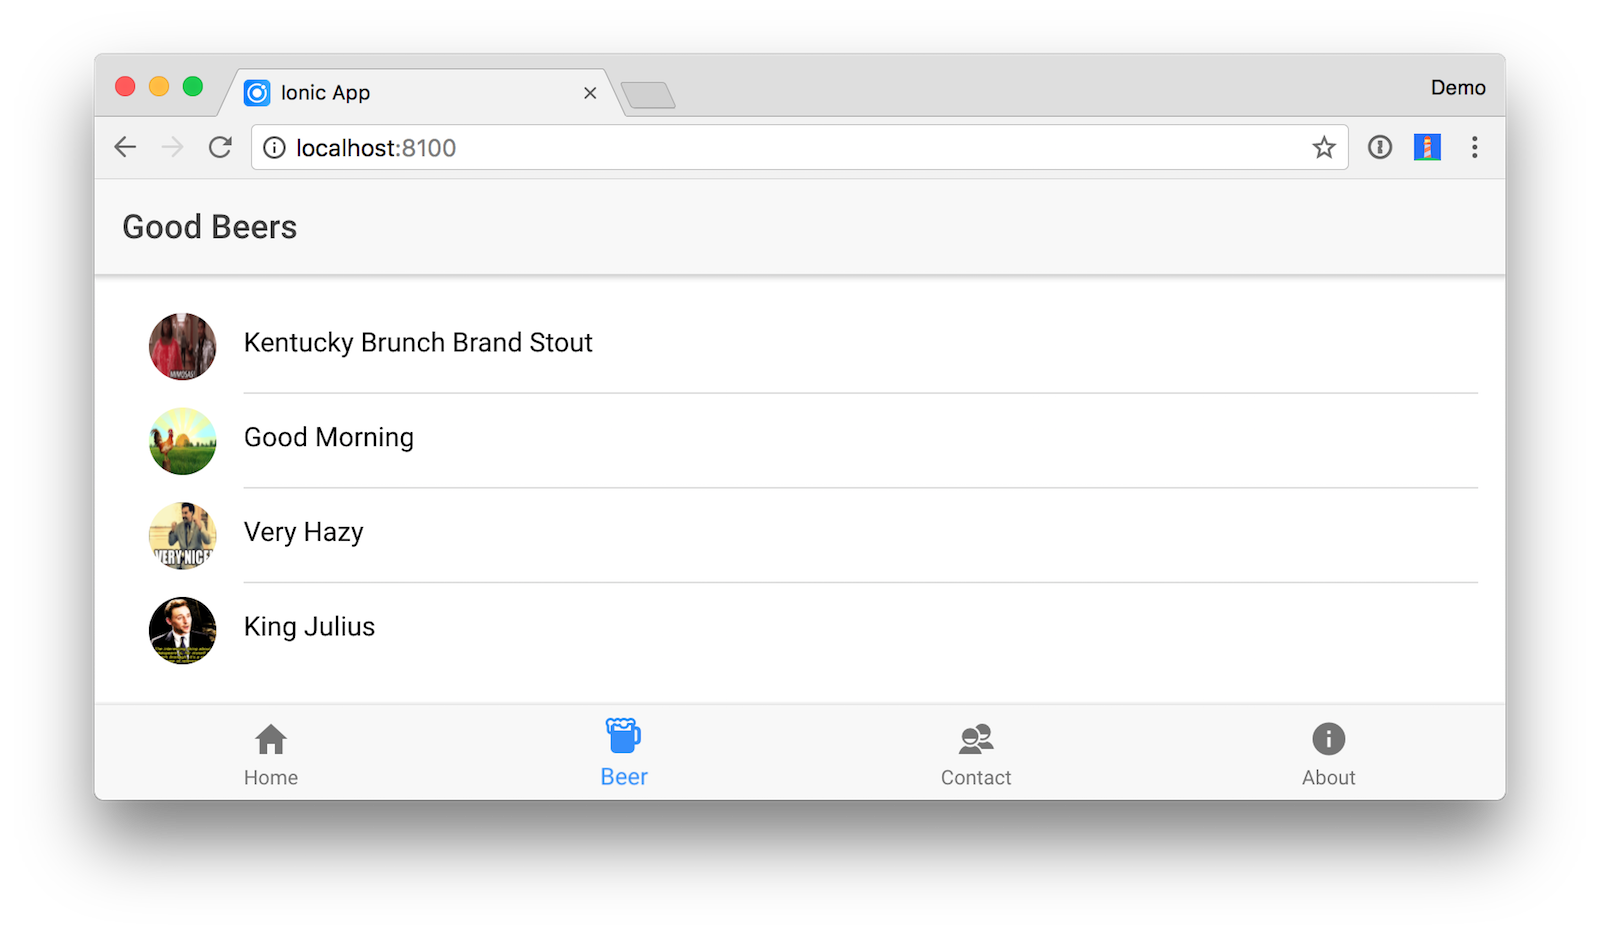
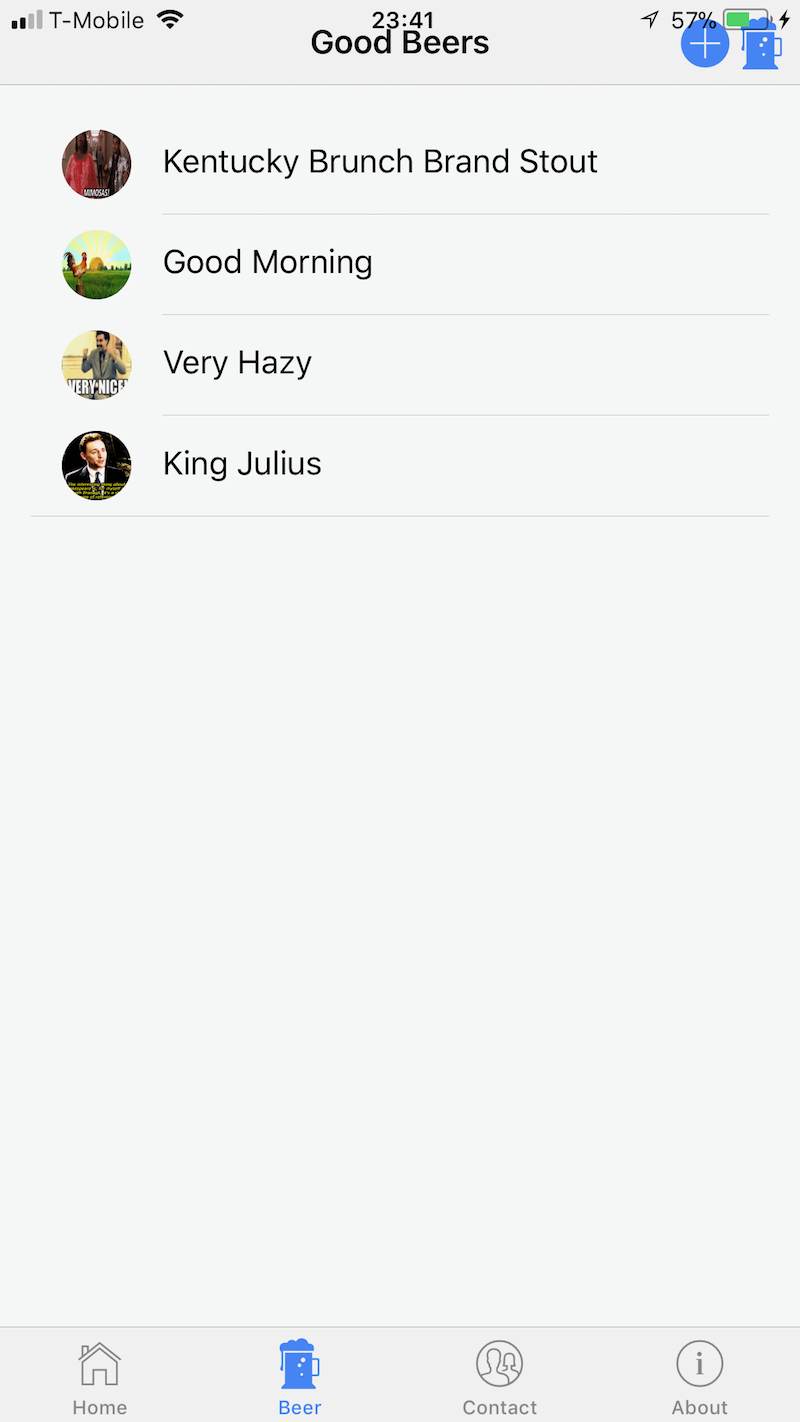
If everything works as expected, you should see a page similar to the one below in your browser.
Add a Modal for Editing
Change the header in beer.html to have a button that opens a modal to add a new beer.
<ion-header>
  <ion-navbar>
    <ion-title>Good Beers</ion-title>
    <ion-buttons end>
      <button ion-button icon-only (click)="openModal()" color="primary">
        <ion-icon name="add-circle"></ion-icon>
        <ion-icon name="beer"></ion-icon>
      </button>
    </ion-buttons>
  </ion-navbar>
</ion-header>
In this same file, change <ion-item> to have a click handler for opening the modal for the current item.
<ion-item *ngFor="let beer of beers" (click)="openModal({id: beer.id})">
Add ModalController as a dependency in beer.ts and add an openModal() method.
import { IonicPage, ModalController, NavController, NavParams } from 'ionic-angular';

export class BeerPage {
  private beers: Array<any>;

  constructor(public navCtrl: NavController, public navParams: NavParams,
              public beerService: BeerService, public giphyService: GiphyService,
              public modalCtrl: ModalController) {
  }

  // ionViewDidLoad()

  openModal(beerId) {
    let modal = this.modalCtrl.create(BeerModalPage, beerId);
    modal.present();
    // refresh data after modal dismissed
    modal.onDidDismiss(() => this.ionViewDidLoad())
  }
}
This won’t compile because BeerModalPage doesn’t exist. Create beer-modal.ts in the same directory. This page will retrieve the beer from the beerId that’s passed in. It will render the name, allow editing, and show the Giphy image found for the name.
import { BeerService } from '../../providers/beer-service';
import { Component, ViewChild } from '@angular/core';
import { GiphyService } from '../../providers/giphy-service';
import { NavParams, ViewController, ToastController, NavController } from 'ionic-angular';
import { NgForm } from '@angular/forms';

@Component({
  templateUrl: './beer-modal.html'
})
export class BeerModalPage {
  @ViewChild('name') name;
  beer: any = {};
  error: any;

  constructor(public beerService: BeerService,
              public giphyService: GiphyService,
              public params: NavParams,
              public viewCtrl: ViewController,
              public toastCtrl: ToastController,
              public navCtrl: NavController) {
    if (this.params.data.id) {
      this.beerService.get(this.params.get('id')).subscribe((beer: any) => {
        this.beer = beer;
        this.beer.href = beer._links.self.href;
        this.giphyService.get(beer.name).subscribe(url => beer.giphyUrl = url);
      });
    }
  }

  dismiss() {
    this.viewCtrl.dismiss();
  }

  save(form: NgForm) {
    let update: boolean = form['href'];
    this.beerService.save(form).subscribe(result => {
      let toast = this.toastCtrl.create({
        message: 'Beer "' + form.name + '" ' + ((update) ? 'updated' : 'added') + '.',
        duration: 2000
      });
      toast.present();
      this.dismiss();
    }, error => this.error = error)
  }

  ionViewDidLoad() {
    setTimeout(() => {
      this.name.setFocus();
    },150);
  }
}
Add the import for BeerModalPage to beer.ts, then create src/pages/beer/beer-modal.html as a template for this page.
<ion-header>
  <ion-toolbar>
    <ion-title>
      {{beer ? 'Beer Details' : 'Add Beer'}}
    </ion-title>
    <ion-buttons start>
      <button ion-button (click)="dismiss()">
        <span ion-text color="primary" showWhen="ios,core">Cancel</span>
        <ion-icon name="md-close" showWhen="android,windows"></ion-icon>
      </button>
    </ion-buttons>
  </ion-toolbar>
</ion-header>
<ion-content padding>
  <form #beerForm="ngForm" (ngSubmit)="save(beerForm.value)">
    <input type="hidden" name="href" [(ngModel)]="beer.href">
    <ion-row>
      <ion-col>
        <ion-list inset>
          <ion-item>
            <ion-input placeholder="Beer Name" name="name" type="text"
                       required [(ngModel)]="beer.name" #name></ion-input>
          </ion-item>
        </ion-list>
      </ion-col>
    </ion-row>
    <ion-row>
      <ion-col *ngIf="beer" text-center>
        <img src="{{beer.giphyUrl}}">
      </ion-col>
    </ion-row>
    <ion-row>
      <ion-col>
        <div *ngIf="error" class="alert alert-danger">{{error}}</div>
        <button ion-button color="primary" full type="submit"
                [disabled]="!beerForm.form.valid">Save</button>
      </ion-col>
    </ion-row>
  </form>
</ion-content>
You’ll also need to modify beer-service.ts to have get() and save() methods.
get(id: string) {
  return this.http.get(this.BEER_API + '/' + id);
}

save(beer: any): Observable<any> {
  let result: Observable<Object>;
  if (beer['href']) {
    result = this.http.put(beer.href, beer);
  } else {
    result = this.http.post(this.BEER_API, beer)
  }
  return result.catch(error => Observable.throw(error));
}
At this point, if you try to add or edit a beer name, you’ll likely see an error in your browser’s console.
Uncaught (in promise): Error: No component factory found for BeerModalPage.
Did you add it to @NgModule.entryComponents?
To fix this problem, add BeerModalPage to the declarations and entryComponent lists in beer.module.ts.
import { BeerModalPage } from './beer-modal';

@NgModule({
  declarations: [
    BeerPage,
    BeerModalPage
  ],
  ...
  entryComponents: [
    BeerModalPage
  ]
})
Now if you try to edit a beer’s name, you’ll see another CORS in your browser’s console. Add a @CrossOrigin annotation to BeerRepository.java (in your Spring Boot project) that matches the one in BeerController.
@RepositoryRestResource
@CrossOrigin(origins = {"http://localhost:8100","http://localhost:8080"})
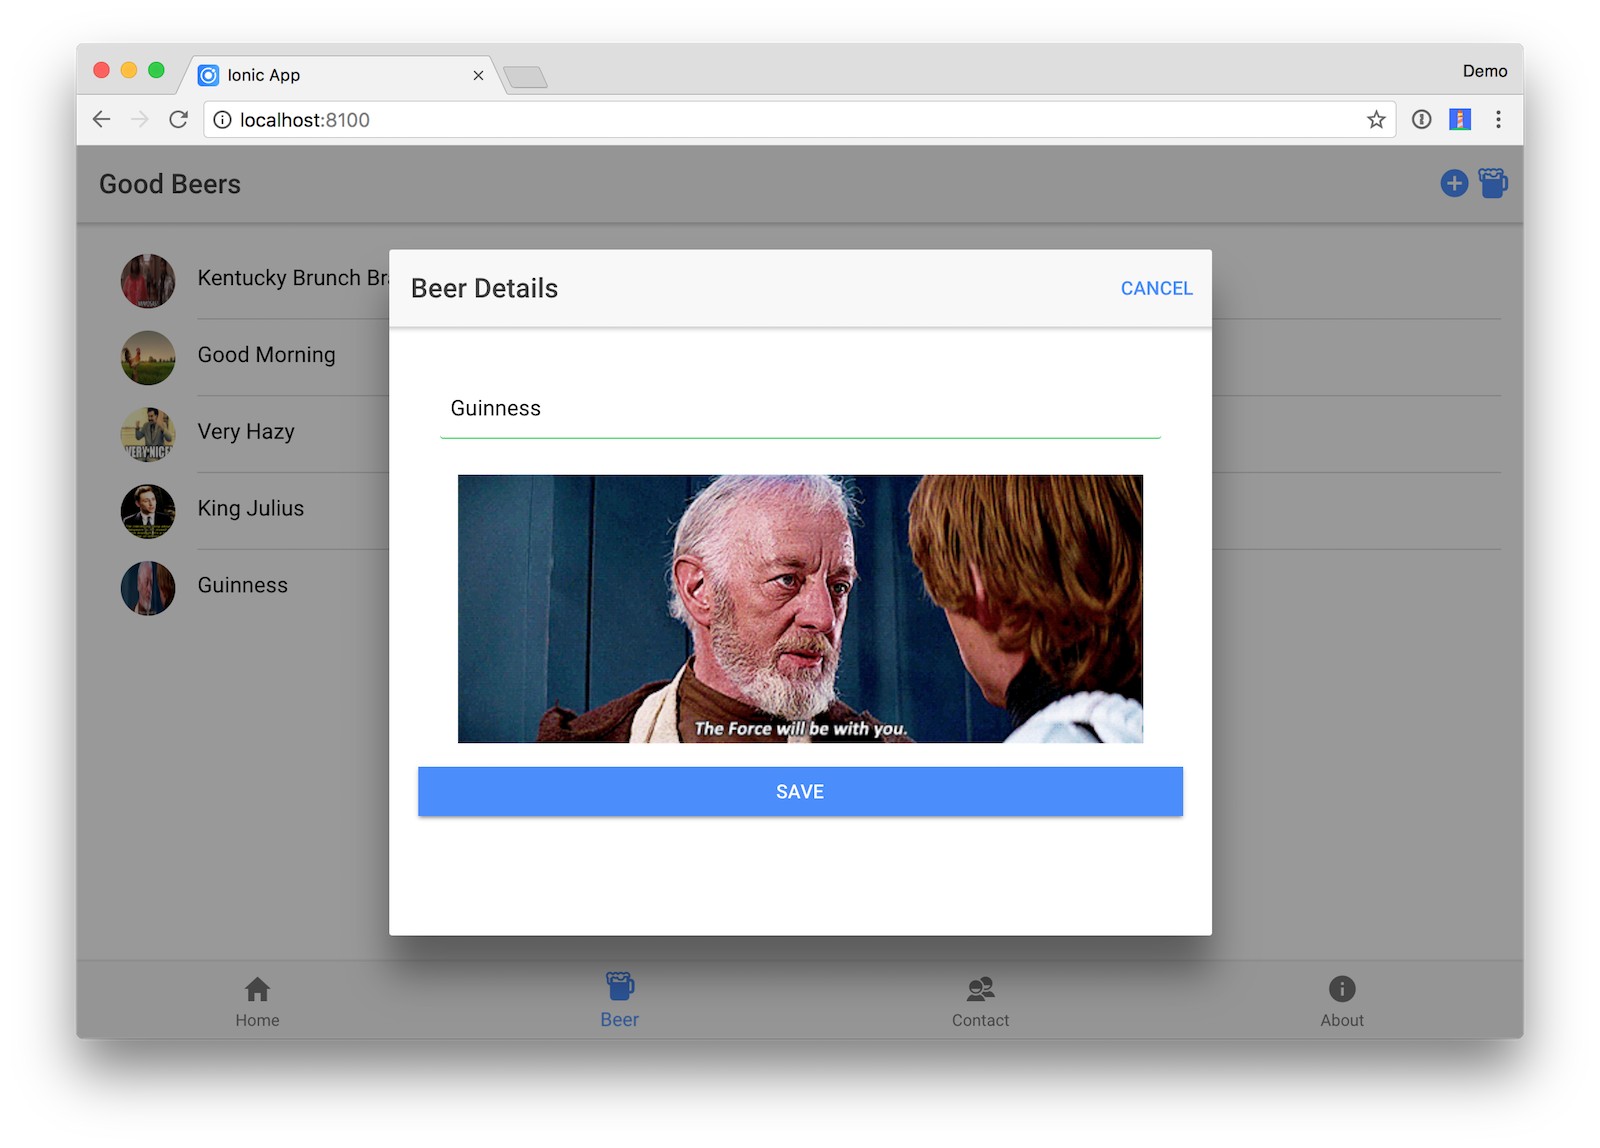
Re-compile and now everything should work as expected. For example, below is a screenshot that shows I added a new beer and what it looks like when editing it.
Add Swipe to Delete
To add swipe-to-delete functionality on the list of beers, open beer.html and make it so <ion-item-sliding> wraps <ion-item> and contains the *ngFor. Add a delete button using <ion-item-options>.
<ion-content padding>
  <ion-list>
    <ion-item-sliding *ngFor="let beer of beers">
      <ion-item (click)="openModal({id: beer.id})">
        <ion-avatar item-left>
          <img src="{{beer.giphyUrl}}">
        </ion-avatar>
        <h2>{{beer.name}}</h2>
      </ion-item>
      <ion-item-options>
        <button ion-button color="danger" (click)="remove(beer)">
          <ion-icon name="trash"></ion-icon> Delete
        </button>
      </ion-item-options>
    </ion-item-sliding>
  </ion-list>
</ion-content>
Add a remove() method to beer.ts.
remove(beer) {
  this.beerService.remove(beer.id).subscribe(response => {
    for (let i = 0; i < this.beers.length; i++) {
      if (this.beers[i] === beer) {
        this.beers.splice(i, 1);
        let toast = this.toastCtrl.create({
          message: 'Beer "' + beer.name + '" deleted.',
          duration: 2000,
          position: 'top'
        });
        toast.present();
      }
    }
  });
}
Add and import ToastController as a dependency in the constructor, so everything compiles.
constructor(public navCtrl: NavController, public navParams: NavParams,
          public beerService: BeerService, public giphyService: GiphyService,
          public modalCtrl: ModalController, public toastCtrl: ToastController) {
}
You’ll also need to modify beer-service.ts to have a remove() method.
remove(id: string) {
  return this.http.delete(this.BEER_API + '/' + id);
}
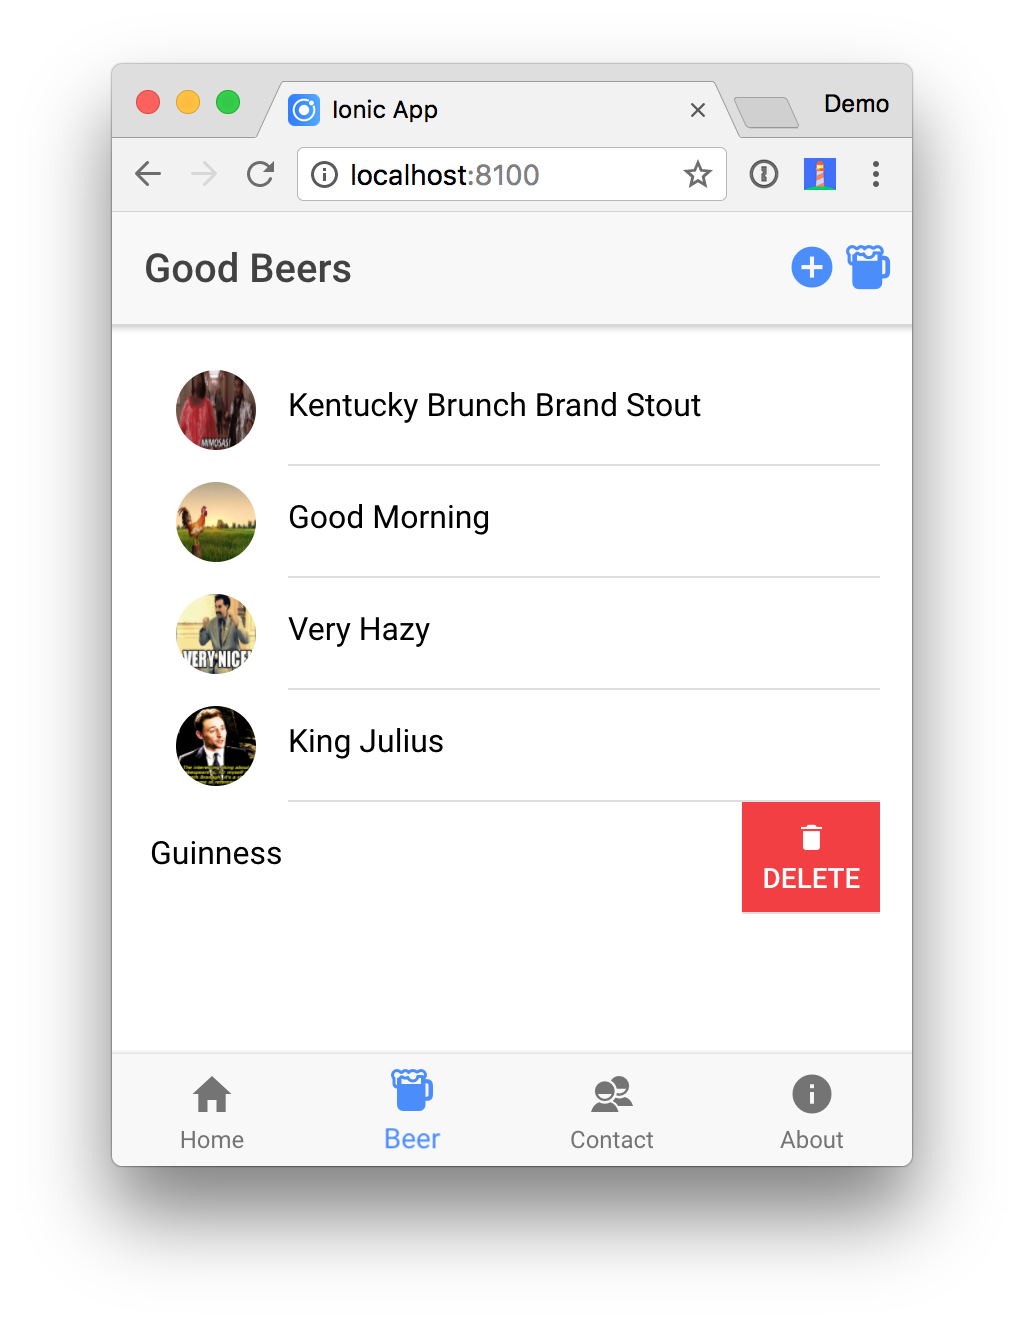
After making these additions, you should be able to delete beer names. To emulate a left swipe in your browser, click on the item and drag it to the left.
PWAs with Ionic
Ionic ships with support for creating progressive web apps (PWAs). If you’d like to learn more about what PWAs are, see Navigating the World of Progressive Web Apps with Ionic 2. This blog post is still relevant for Ionic 3.
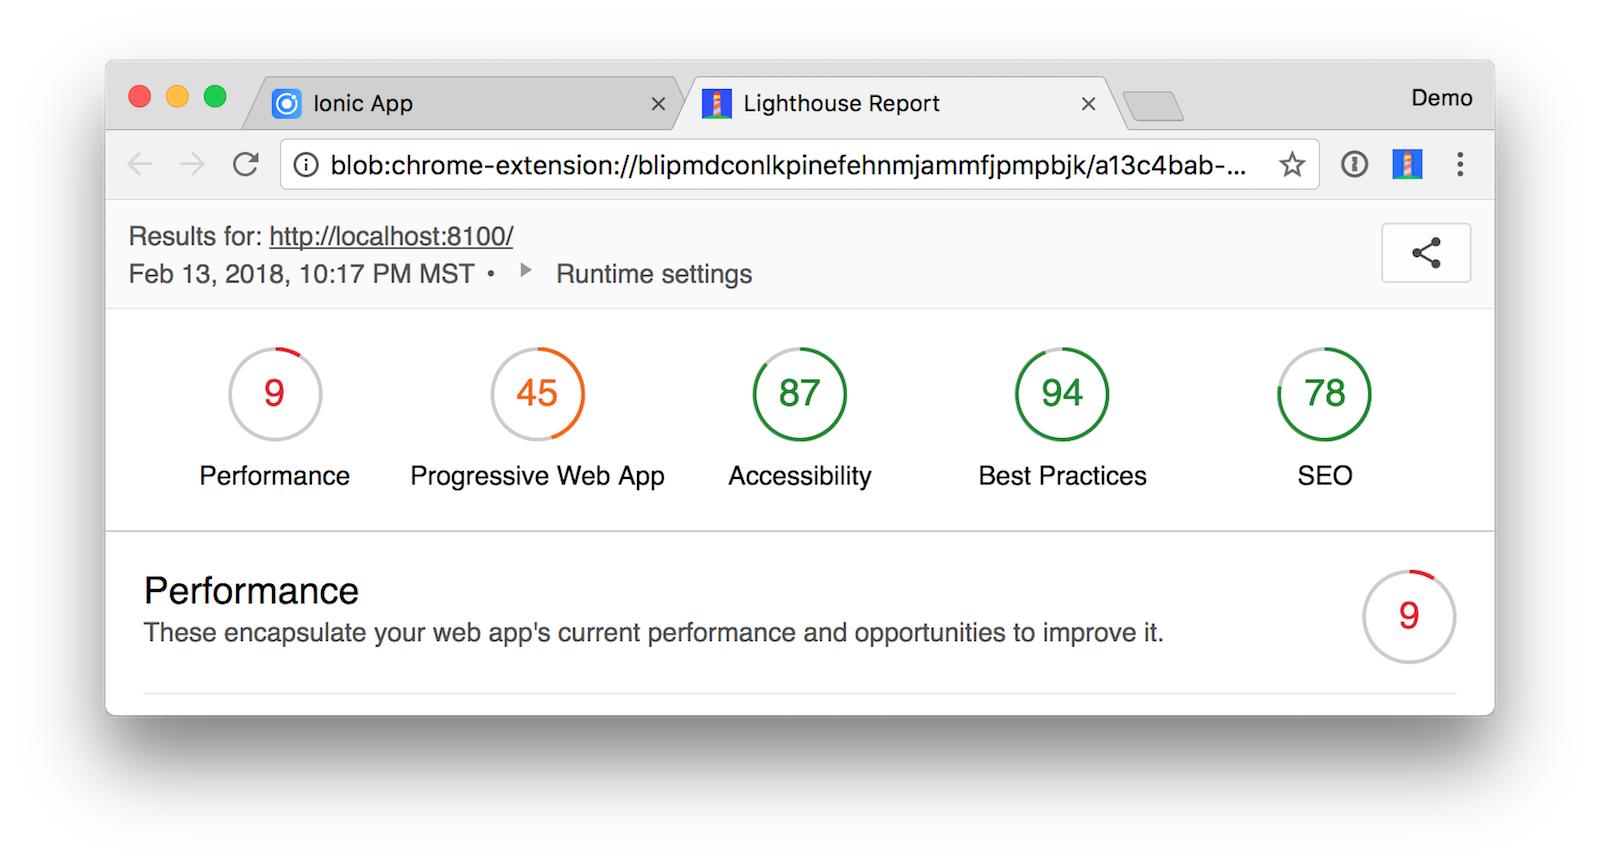
If you run the Lighthouse Chrome extension on this application, you’ll likely get a mediocre score in the 40s.
To register a service worker, and improve the app’s score, uncomment the following block in src/index.html.
<!-- un-comment this code to enable service worker
<script>
if ('serviceWorker' in navigator) {
  navigator.serviceWorker.register('service-worker.js')
    .then(() => console.log('service worker installed'))
    .catch(err => console.log('Error', err));
}
</script>-->
After making this change, the score should improve. In my tests, it increased to 73/100. The remaining issues were:
- Does not provide fallback content when JavaScript is not available.
- Does not redirect HTTP traffic to HTTPS
- Page load is not fast enough on 3G
- Has a tag with width or initial-scale
To fix the first issue, add the following HTML in src/index.html, just after the <body> tag.
<noscript>
  <h1>You must enable JavaScript to view this page.</h1>
</noscript>
To fix the last issue, remove viewport-fit=cover, from the <meta name="viewport"> tag’s content attribute.
<meta name="viewport" content="width=device-width, initial-scale=1.0, minimum-scale=1.0, maximum-scale=1.0, user-scalable=no">
Deploy to a Mobile Device
It’s pretty cool that you’re able to develop mobile apps with Ionic in your browser. However, it’s nice to see the fruits of your labor and see how awesome your app looks on a phone. It really does look and behave like a native app!
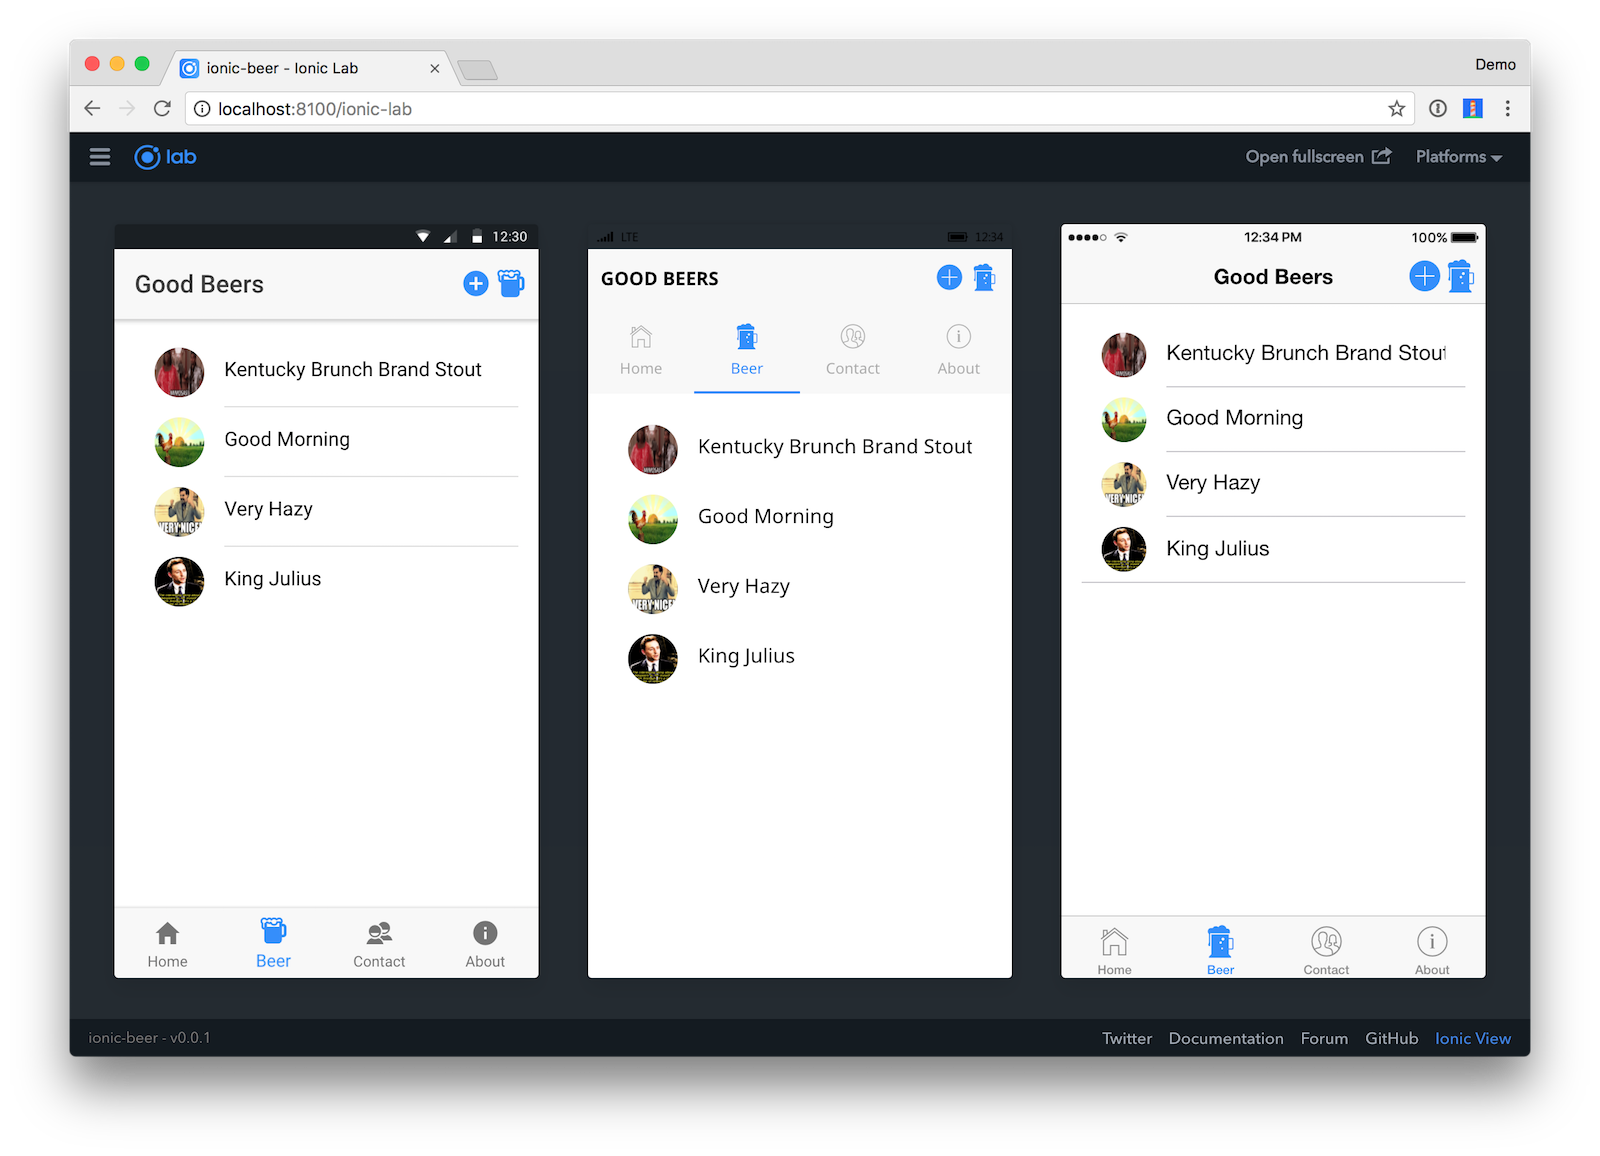
To see how your application will look on different devices you can run ionic serve --lab. The --lab flag opens a page in your browser that lets you see how your app looks on different devices.
iOS
To emulate or deploy to an iOS device, you’ll need a Mac and a fresh installation of Xcode. If you’d like to build iOS apps on Windows, Ionic offers an Ionic Package service.
Make sure to open Xcode to complete the installation. Then run ionic cordova emulate ios to open your app in Simulator.
TIP: The biggest problem I found when running the app in Simulator was that it was difficult to get the keyboard to popup. To workaround this, I used Hardware > Keyboard > Toggle Software Keyboard when I needed to type text in a field.
Deploying to your phone will likely fail because it won’t be able to connect to http://localhost:8080. To fix this, you can deploy your Spring Boot app to a public server, or use your computer’s IP address in beer.service.ts (if you’re on the same wireless network).
To deploy to Cloud Foundry, copy this deploy.sh script to your hard drive. It expects to be in a directory above your apps (e.g. spring-boot-ionic-example). It also expects your apps to be named ionic-beer and server.
If you don’t have a Cloud Foundry account, you’ll need to create one. Then install its command line tools (and login) for this script to work.
brew tap cloudfoundry/tap && brew install cf-cli
cf login -a api.run.pivotal.io
After logging into Cloud Foundry, you should be able to run ./deploy.sh. This script will deploy the server and modify beer.service.ts to point to it. It will also try to deploy to your phone, so you may need to complete the steps below before it will work.
To deploy the app to an iPhone, start by plugging it into your computer. Then run the following commands to install ios-deploy/ios-sim, build the app, and run it on your device.
npm install -g ios-deploy ios-sim
ionic cordova build ios --prod
open platforms/ios/ionic-beer.xcodeproj
Select your phone as the target in Xcode and click the play button to run your app. The first time you do this, Xcode may spin for a while with a “Processing symbol files” message at the top.
NOTE: If you run into code signing issues, see Ionic’s deployment documentation to see how to solve.
Once you’ve configured your phone, computer, and Apple ID to work, you should be able to open the app and see the beer list you created. Below is how it looks on my iPhone 7 Plus.
Android
To emulate or deploy to an Android device, you’ll first need to install Android Studio. As part of the install, it will show you where it installed the Android SDK. Set this path as an ANDROID_HOME environment variable. On a Mac, it should be ~/Library/Android/sdk/.
If you’ve just installed Android Studio, make sure to open it to complete the installation.
To deploy to the Android emulator, run ionic cordova emulate android. This will install Android support and display an error if you don’t have any AVD (Android Virtual Device) images.
(node:9300) UnhandledPromiseRejectionWarning: CordovaError: No emulator images (avds) found.
1. Download desired System Image by running: /Users/mraible/Library/Android/sdk/tools/android sdk
2. Create an AVD by running: /Users/mraible/Library/Android/sdk/tools/android avd
HINT: For a faster emulator, use an Intel System Image and install the HAXM device driver
To create a new AVD, open Android Studio and navigate to Tools > Android > AVD Manager. Create a new Virtual Device and click Play. I chose a Pixel 2.
After performing these steps, you should be able to run ionic cordova emulate android and see your app running in the AVD.
Learn More about Ionic and Angular
I hope you’ve enjoyed this tour of Ionic and Angular. I like how Ionic takes your web development skills up a notch and allows you to create mobile applications that look and behave natively.
You can find a completed version of the application created in this blog post on GitHub. If you encountered issues, please create an issue in GitHub or hit me up on Twitter @mraible.
To learn more about Ionic and Angular, please see the following resources:
- Get started with Ionic Framework
- Build Your First Progressive Web Application with Angular and Spring Boot
- Bootiful Development with Spring Boot and Angular
- Angular Authentication with OpenID Connect and Okta in 20 Minutes
- Use Ionic for JHipster to Create Mobile Apps with OIDC Authentication
Update: To learn how to add authentication to an Ionic app, see Build an Ionic App with User Authentication.
Changelog:
- Feb 14, 2018: Updated to use the latest versions of Ionic (3.19.1 with Angular 5) and Spring Boot (1.5.10). See the code changes in oktadeveloper/spring-boot-ionic-example#2. Changes to this article can be viewed in oktadeveloper/okta.github.io#1759.
Matt Raible is a well-known figure in the Java community and has been building web applications for most of his adult life. For over 20 years, he has helped developers learn and adopt open source frameworks and use them effectively. He's a web developer, Java Champion, and Developer Advocate at Okta. Matt has been a speaker at many conferences worldwide, including Devnexus, Devoxx Belgium, Devoxx France, Jfokus, and JavaOne. He is the author of The Angular Mini-Book, The JHipster Mini-Book, Spring Live, and contributed to Pro JSP. He is a frequent contributor to open source and a member of the JHipster development team. You can find him online @mraible and raibledesigns.com.
Okta Developer Blog Comment Policy
We welcome relevant and respectful comments. Off-topic comments may be removed.