Use Okta (Instead of Local Storage) to Store Your User's Data Securely
Local Storage is a JavaScript API technically known as localStorage that arrived with HTML5. It allows you to store information on a user’s browser quickly and easily. There are many debates on the web as to whether it’s better than cookies. Some say it’s faster (because it doesn’t send data with every request like cookies do) and more secure.
Whether it’s more secure or not is debatable, especially when compared with secure cookies that have an HttpOnly flag. It does, however, offer the ability to store a lot more data than cookies. Cookies can hold up to 4KB, while local storage can hold 5MB or more, depending on your browser.
Note: In May 2025, the Okta Integrator Free Plan replaced Okta Developer Edition Accounts, and the Okta CLI was deprecated.
We preserved this post for reference, but the instructions no longer work exactly as written. Replace the Okta CLI commands by manually configuring Okta following the instructions in our Developer Documentation.
The Local Storage API
The local storage API is simple in that it only has a couple of methods to set and get data. In a previous article, I showed you how to build a PWA that stores your cryptocurrency holdings. In its src/providers/holdings/holdings.ts service, you can see how the local storage API works.
saveHoldings(): void {
  this.storage.set('cryptoHoldings', this.holdings);
}

loadHoldings(): void {
  this.storage.get('cryptoHoldings').then(holdings => {

    if (holdings !== null) {
      this.holdings = holdings;
      this.fetchPrices();
    }
  });
}
Switch from Local Storage to Okta Custom Profile Attributes
In a previous article, I showed you how to add Okta to an Ionic PWA for authentication. To complete this tutorial, you’ll need to sign up for a free Okta Developer account.
Once you have an Okta Developer account, you can leverage our API to store your holdings as custom profile attributes instead of local storage. While LocalStorage is great for demos, using custom profile attributes will allow you to access your holdings across different devices.
To learn more about Okta’s Universal Directory and its Profile Editor features, see our manage user profiles documentation.
Add a Holdings Attribute to your User Profiles
The first thing you’ll need to do is add a holdings attribute to your organization’s user profiles. Log in to the Okta Developer Console, then navigate to Users > Profile Editor. Click on Profile button for the first profile in the table. You can identify it by its Okta logo. Click Add Attribute and use the following values:
- Display name:
Holdings - Variable name:
holdings - Description:
Cryptocurrency Holdings
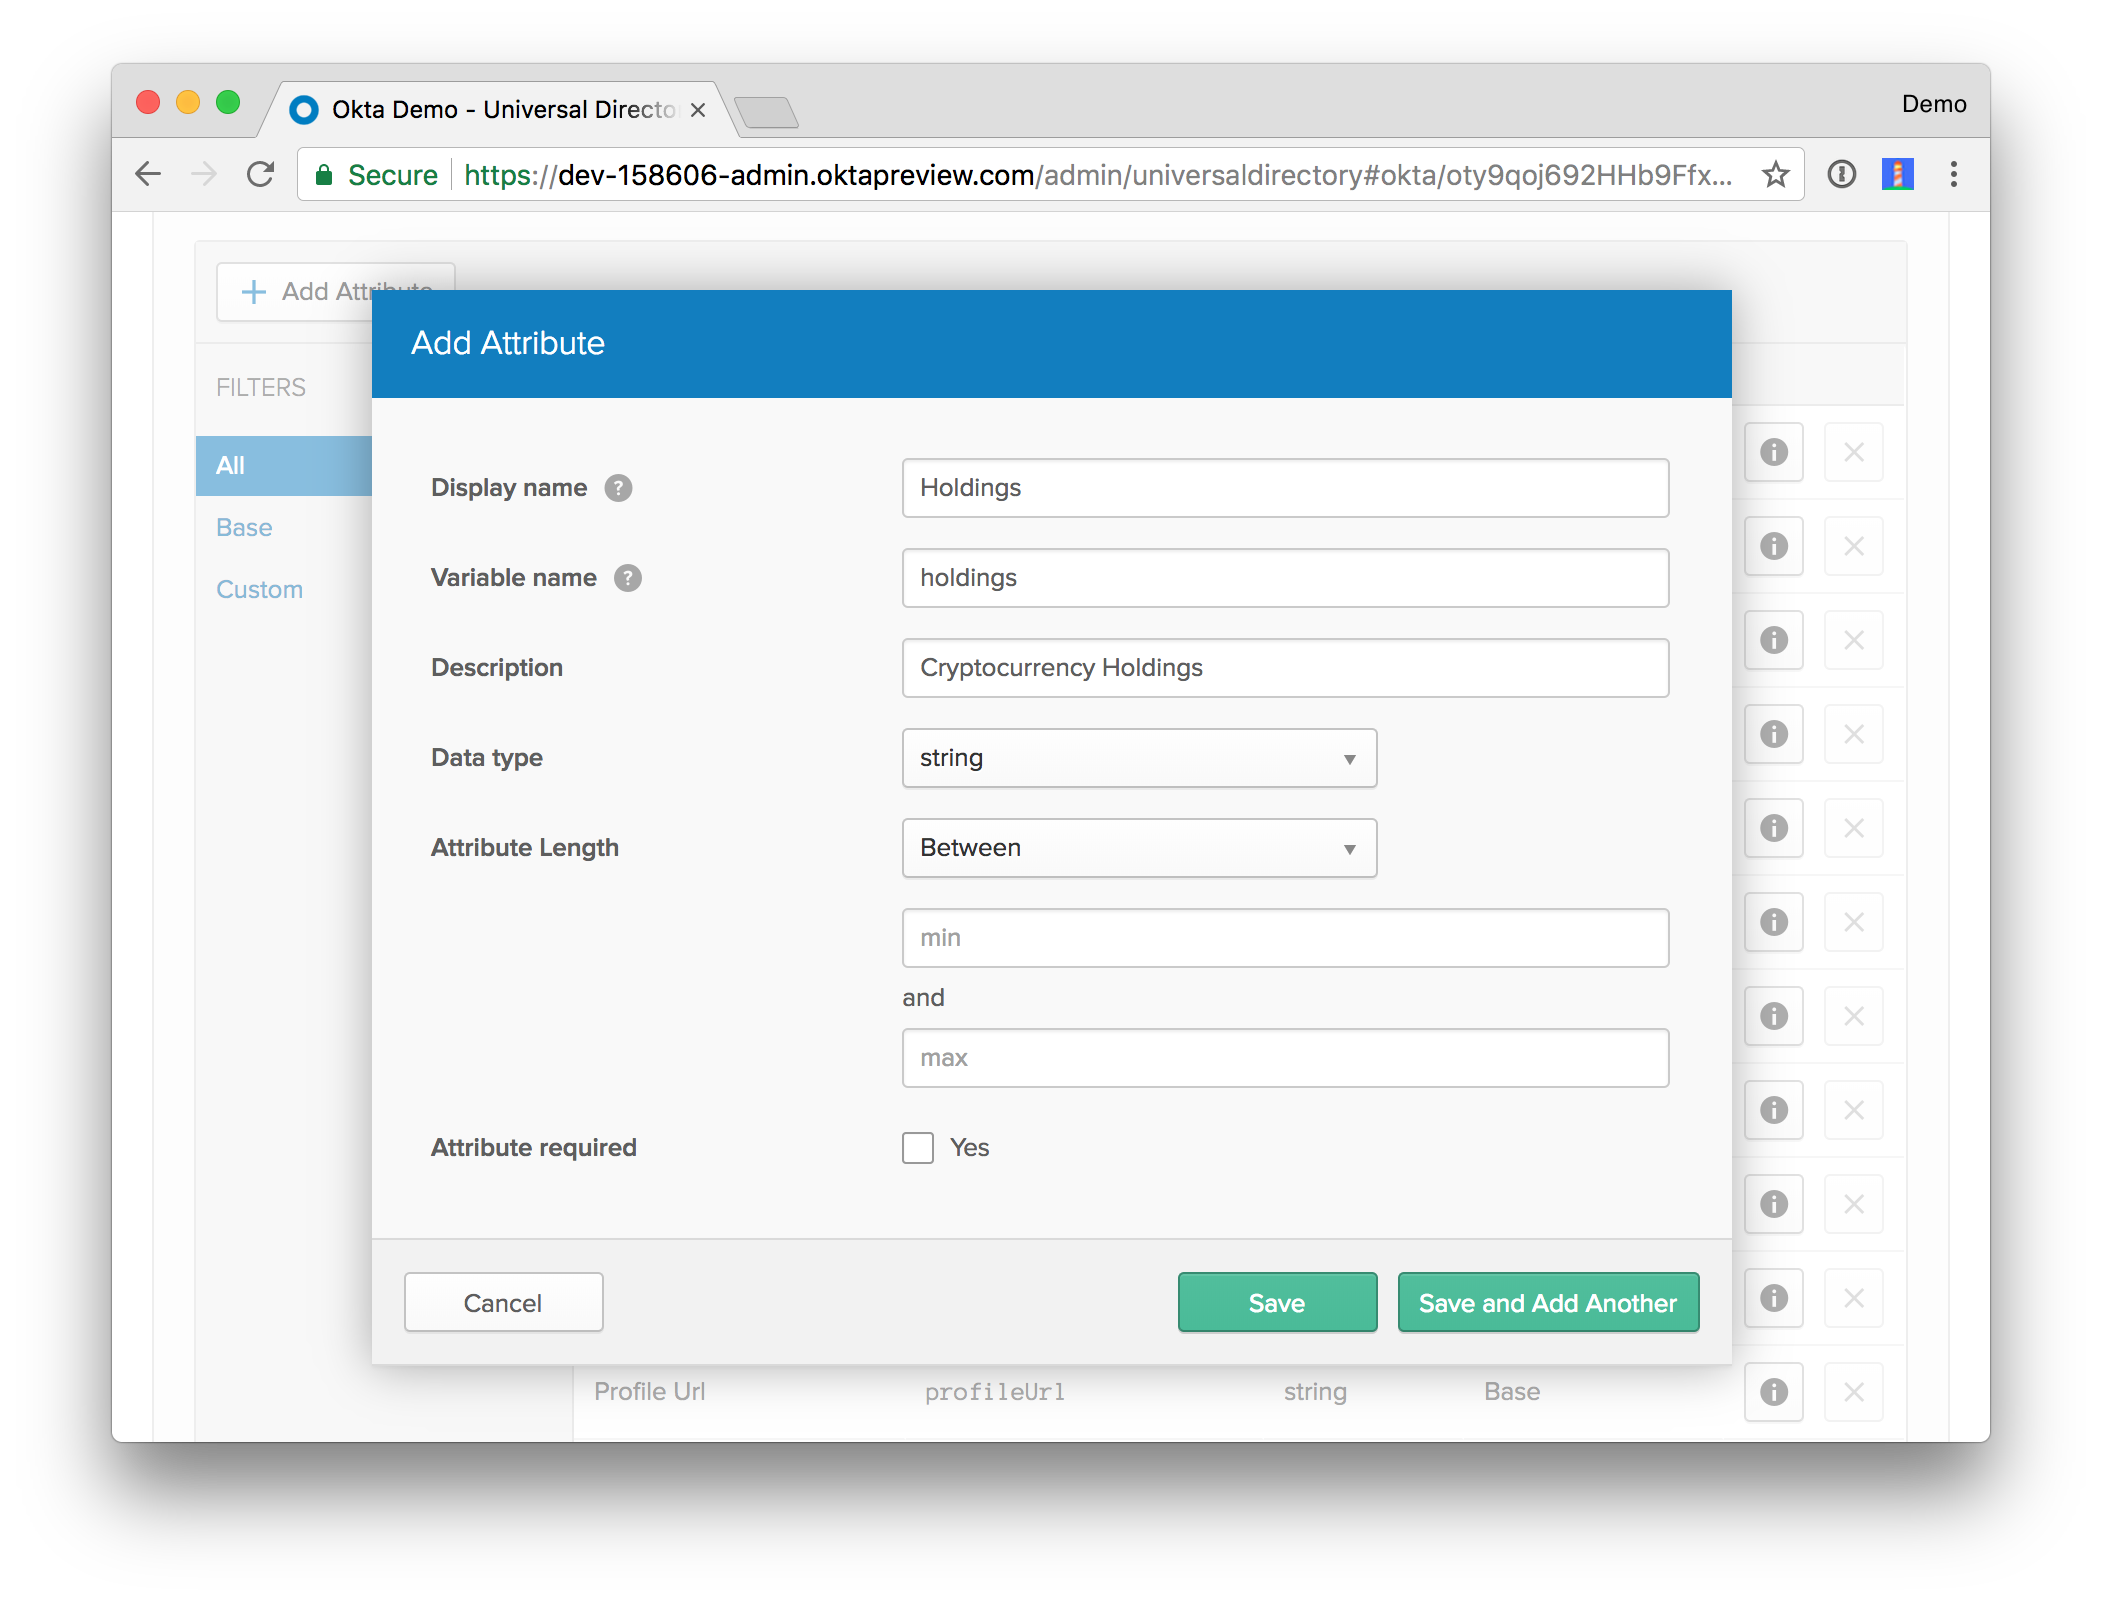
Use the default values for everything else and click Save.
Create a Spring Boot App
Head on over to start.spring.io and create a new Spring Boot (1.5.x) project with a dependency on Web. You can use whatever group and artifact coordinates you like, but the code in this tutorial will match the following:
- Group:
com.okta.developer - Artifact:
holdings-api
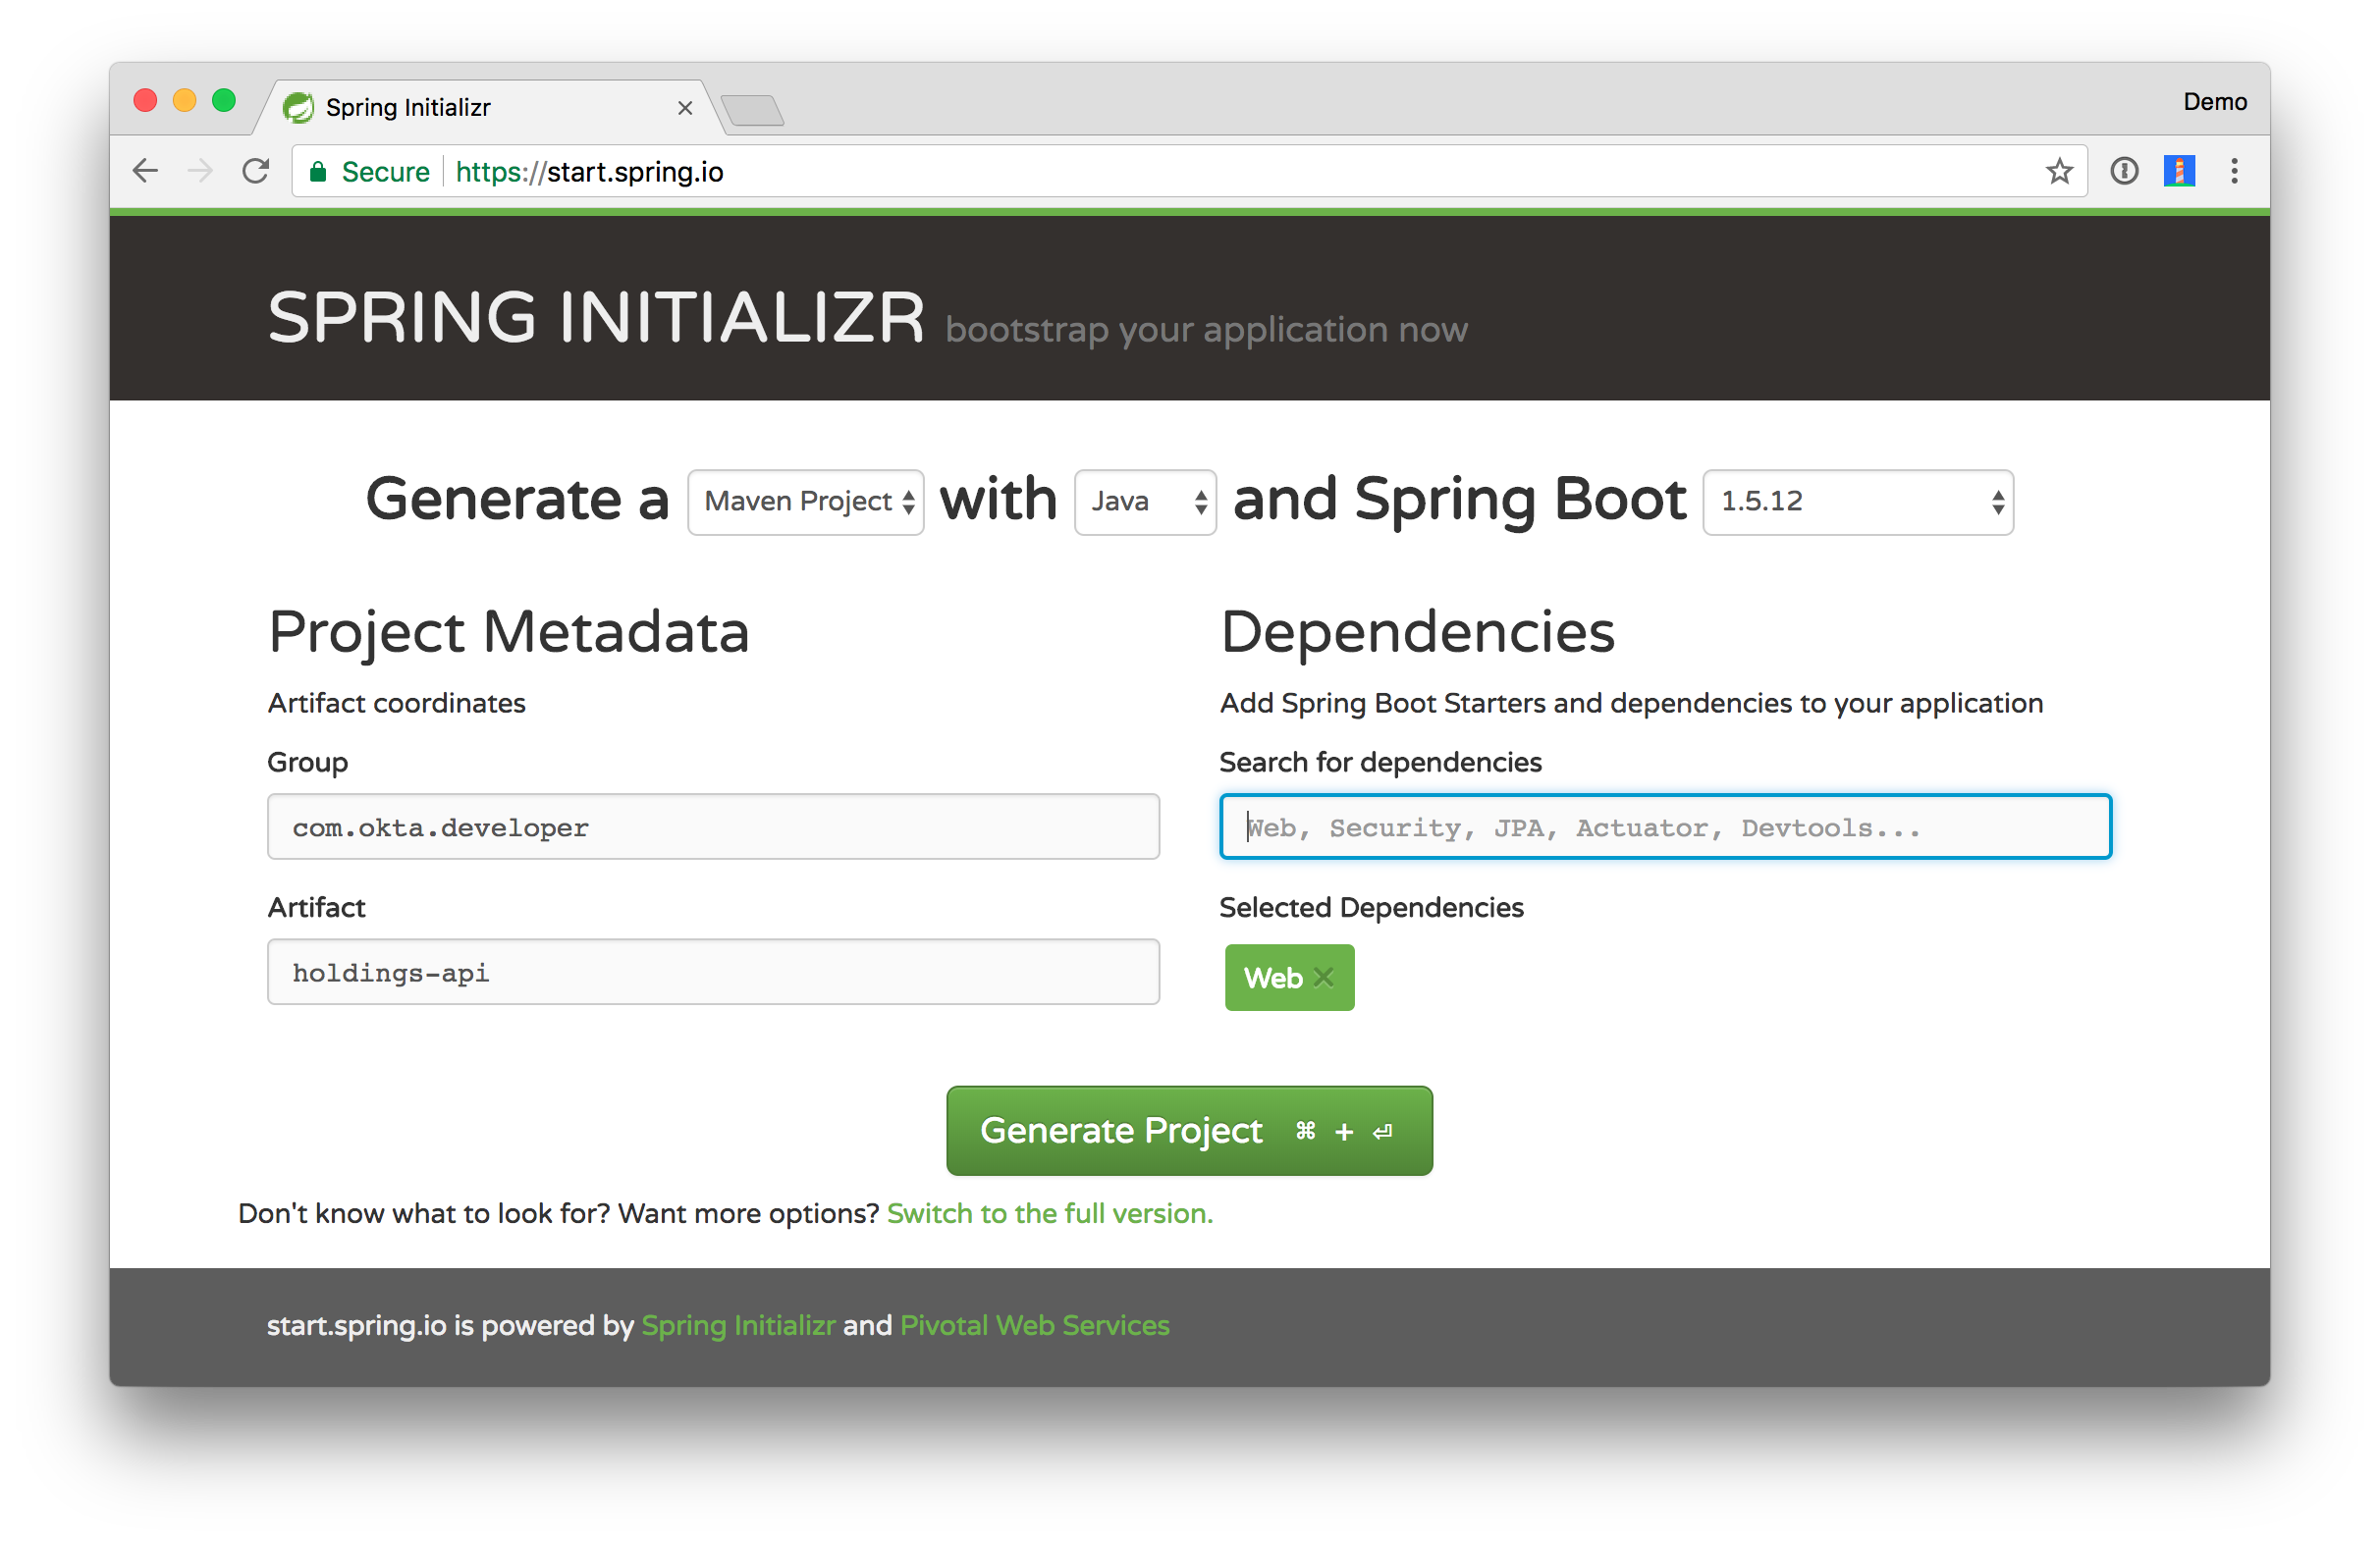
Click Generate Project and expand holdings-api.zip after it finishes downloading.
Create a directory to hold your Spring Boot project and the Cryptocurrency PWA from the previous tutorial.
mkdir okta-ionic-crypto-java-sdk
mv ~/Downloads/holdings-api okta-ionic-crypto-java-sdk
git clone https://github.com/oktadeveloper/okta-ionic-crypto-pwa.git crypto-pwa
rm -rf crypto-pwa/.git
mv crypto-pwa okta-ionic-crypto-java-sdk
When finished, you should have a directory structure like the following:
okta-ionic-crypto-java-sdk
  - holdings-api
  - crypto-pwa
Open the project in your favorite IDE or text editor.
Add the Okta Spring Boot Starter and Okta’s Java SDK
Open holdings-api/pom.xml and add dependencies for the Okta Spring Boot Starter and the Okta Java SDK.
<properties>
   ...
   <okta.version>0.4.0</okta.version>
</properties>

<dependencies>
   ...
   <dependency>
       <groupId>com.okta.spring</groupId>
       <artifactId>okta-spring-boot-starter</artifactId>
       <version>${okta.version}</version>
   </dependency>
   <dependency>
       <groupId>com.okta.spring</groupId>
       <artifactId>okta-spring-sdk</artifactId>
       <version>${okta.version}</version>
   </dependency>
   ...
</dependencies>

<dependencyManagement>
   <dependencies>
       <dependency>
           <groupId>org.springframework.security.oauth</groupId>
           <artifactId>spring-security-oauth2</artifactId>
           <version>2.3.0.RELEASE</version>
       </dependency>
   </dependencies>
</dependencyManagement>

<build>
   <defaultGoal>spring-boot:run</defaultGoal>
   ...
</build>
NOTE: The defaultGoal is optional, but it allows you to run ./mvnw instead of ./mvnw spring-boot:run. If you choose not to add it, please use ./mvnw spring-boot:run wherever I use ./mvnw.
Create an API Token
For the Okta Java SDK to talk to Okta’s API, you’ll need to create an API token. The abbreviated steps are as follows:
- Log in to your Developer Console
- Navigate to API > Tokens and click Create Token
- Give your token a name, then copy its value
Open holdings-api/src/main/resources/application.properties and add your API token as a property.
okta.client.token=XXX
I’d recommend leaving XXX as the value in your properties file. The token’s value is not something you want to check into source control, but you want to make other developers aware of it. You can override this property on your machine by setting an OKTA_CLIENT_TOKEN environment variables. For example:
export OKTA_CLIENT_TOKEN=<real value you copied>
While you’re editing application.properties, add properties for the issuer and client ID. You should have these from the last tutorial. If you didn’t complete it, you can create a new OIDC app in Okta using the step below.
- Log in to your Okta account and navigate to Applications > Add Application
- Select SPA and click Next
- Give your application a name (e.g. “Crypto PWA”)
- Add the following values for Base URI and Login redirect URI:
http://localhost:8100(for development)https://<name-of-your-choosing>.firebaseapp.com(for production)
- Click Done.
Copy the app’s clientId into application.properties and change {yourOktaDomain} to match your account. These properties will allow the client to pass an access token to the server and validate it.
okta.oauth2.issuer=https://{yourOktaDomain}/oauth2/default
okta.oauth2.clientId={clientId}
NOTE: The values for issuer and clientId in crypto-pwa/src/pages/login/login.ts should match these values.
Enable Your Spring Boot App as a Resource Server
Configure your Spring Boot app to be a resource server and allow CORS requests by modifying its HoldingsApiApplication.java class.
package com.okta.developer.holdingsapi;

import org.springframework.boot.SpringApplication;
import org.springframework.boot.autoconfigure.SpringBootApplication;
import org.springframework.boot.web.servlet.FilterRegistrationBean;
import org.springframework.context.annotation.Bean;
import org.springframework.core.Ordered;
import org.springframework.security.oauth2.config.annotation.web.configuration.EnableResourceServer;
import org.springframework.web.cors.CorsConfiguration;
import org.springframework.web.cors.UrlBasedCorsConfigurationSource;
import org.springframework.web.filter.CorsFilter;

import java.util.Collections;

@EnableResourceServer
@SpringBootApplication
public class HoldingsApiApplication {

    public static void main(String[] args) {
        SpringApplication.run(HoldingsApiApplication.class, args);
    }

    @Bean
    public FilterRegistrationBean simpleCorsFilter() {
        UrlBasedCorsConfigurationSource source = new UrlBasedCorsConfigurationSource();
        CorsConfiguration config = new CorsConfiguration();
        config.setAllowCredentials(true);
        config.setAllowedOrigins(Collections.singletonList("*"));
        config.setAllowedMethods(Collections.singletonList("*"));
        config.setAllowedHeaders(Collections.singletonList("*"));
        source.registerCorsConfiguration("/**", config);
        FilterRegistrationBean bean = new FilterRegistrationBean(new CorsFilter(source));
        bean.setOrder(Ordered.HIGHEST_PRECEDENCE);
        return bean;
    }
}
Create a HoldingsController to Communicate with Okta’s API
Create a HoldingsController.java class in the same package as HoldingsApiApplication.
package com.okta.developer.holdingsapi;

import com.fasterxml.jackson.core.JsonProcessingException;
import com.fasterxml.jackson.core.type.TypeReference;
import com.fasterxml.jackson.databind.ObjectMapper;
import com.okta.sdk.client.Client;
import com.okta.sdk.resource.user.User;
import org.slf4j.Logger;
import org.slf4j.LoggerFactory;
import org.springframework.web.bind.annotation.*;

import java.io.IOException;
import java.security.Principal;
import java.util.*;

@RestController
@RequestMapping("/api/holdings")
public class HoldingsController {
    private final Logger logger = LoggerFactory.getLogger(this.getClass());
    private final ObjectMapper mapper = new ObjectMapper();
    private final Client client;
    private final String HOLDINGS_ATTRIBUTE_NAME = "holdings";

    public HoldingsController(Client client) {
        this.client = client;
    }

    @GetMapping
    public List<Holding> getHoldings(Principal principal) {
        User user = client.getUser(principal.getName());

        String holdingsFromOkta = (String) user.getProfile().get(HOLDINGS_ATTRIBUTE_NAME);
        List<Holding> holdings = new LinkedList<>();

        if (holdingsFromOkta != null) {
            try {
                holdings = mapper.readValue(holdingsFromOkta, new TypeReference<List<Holding>>() {});
            } catch (IOException io) {
                logger.error("Error marshalling Okta custom data: " + io.getMessage());
                io.printStackTrace();
            }
        }

        return holdings;
    }

    @PostMapping
    public Holding[] saveHoldings(@RequestBody Holding[] holdings, Principal principal) {
        User user = client.getUser(principal.getName());
        try {
            String json = mapper.writeValueAsString(holdings);
            user.getProfile().put(HOLDINGS_ATTRIBUTE_NAME, json);
            user.update();
        } catch (JsonProcessingException e) {
            logger.error("Error saving Okta custom data: " + e.getMessage());
            e.printStackTrace();
        }
        return holdings;
    }
}
This class has a few things I’d like to point out:
com.okta.sdk.client.Clientis injected into the constructor by Spring and auto-configured with the API tokenclient.getUser(principal.getName())provides an easy way to get theUserobject- Jackson’s
ObjectMappermakes it easy to marshall theHoldingobject to and from JSON - Retrieving user profile attributes is done with
user.getProfile().get(ATTRIBUTE_NAME) - Saving user profile attributes is done with
user.getProfile().put(ATTRIBUTE_NAME)
NOTE: The call to user.getProfile() returns a UserProfile. This implements java.util.Map and PropertyRetriever, which allows for more type-safe operations (getString(), getBoolean(), etc.).
Speaking of Holding, you’ll need to create a com.okta.developer.holdingsapi.Holding class to handle the values coming from (and sending to) the client.
package com.okta.developer.holdingsapi;

public class Holding {
    private String crypto;
    private String currency;
    private String amount;

    public String getCrypto() {
        return crypto;
    }

    public void setCrypto(String crypto) {
        this.crypto = crypto;
    }

    public String getCurrency() {
        return currency;
    }

    public void setCurrency(String currency) {
        this.currency = currency;
    }

    public String getAmount() {
        return amount;
    }

    public void setAmount(String amount) {
        this.amount = amount;
    }

    @Override
    public String toString() {
        return "Holding{" +
                "crypto='" + crypto + '\'' +
                ", currency='" + currency + '\'' +
                ", amount='" + amount + '\'' +
                '}';
    }
}
Congrats, you’ve done the hard work to create a Holdings API with Spring Boot! Now, modify the client to talk to this API instead of local storage.
Modify the Crypto PWA Client to Store Holdings in Okta
Below are the abbreviated changes you’ll need to make to crypto-pwa/src/providers/holdings/holdings.ts to talk to the API.
import { HttpClient, HttpHeaders } from '@angular/common/http';
...
import { OAuthService } from 'angular-oauth2-oidc';

...
@Injectable()
export class HoldingsProvider {

  public HOLDINGS_API = 'http://localhost:8080/api/holdings';
  ...

  constructor(private http: HttpClient, private oauthService: OAuthService) {
  }

  ...

  onError(error): void {
    console.error('ERROR: ', error);
  }

  getHeaders(): HttpHeaders {
    return new HttpHeaders().set('Authorization', this.oauthService.authorizationHeader())
  }

  saveHoldings(): void {
    this.http.post(this.HOLDINGS_API, this.holdings,{headers: this.getHeaders()}).subscribe(data => {
      console.log('holdings', data);
    }, this.onError);
  }

  loadHoldings(): void {
    this.http.get(this.HOLDINGS_API,{headers: this.getHeaders()}).subscribe((holdings: Holding[]) => {
      if (holdings !== null) {
        this.holdings = holdings;
        this.fetchPrices();
      }
    }, this.onError);
  }
  ...
}
You’ll also want to remove the following line from the fetchPrices() method:
this.saveHoldings();
After making these changes, use a terminal to run npm install && ionic serve in the crypto-pwa directory. Then open another terminal window and run ./mvnw from the holdings-api directory.
Log in to the application at http://localhost:8100 and add a couple of holdings. For example, here’s what the Crypto PWA looks like after I added data:
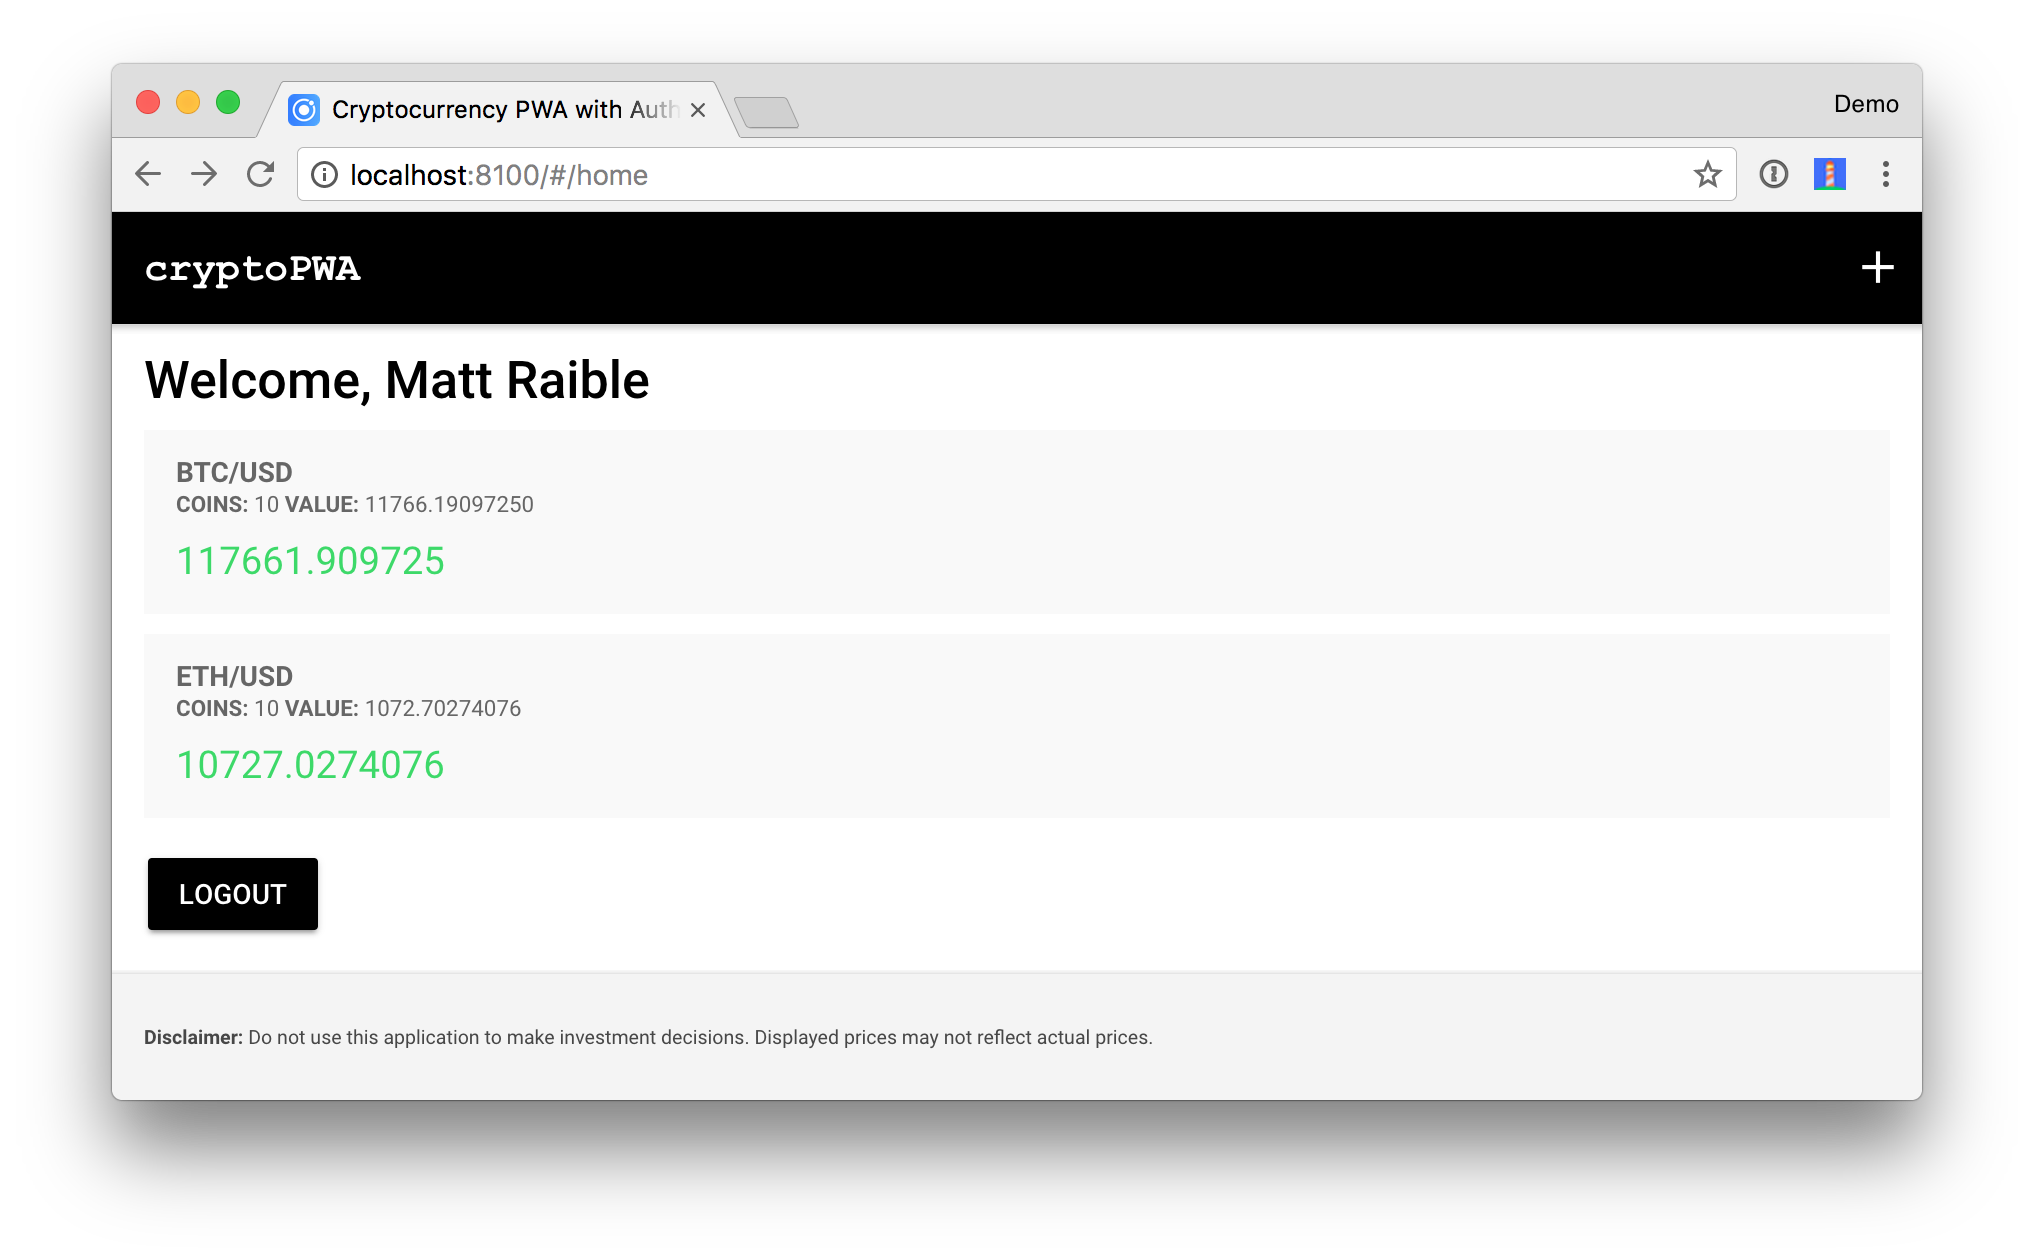
Local storage can be handy because the data is cached locally and it’ll work offline. However, service workers cache network requests, so this application will work offline too. To prove it, toggle offline mode in Chrome’s Developer Tools > Network > Offline. Your holdings should still render when you refresh your browser.

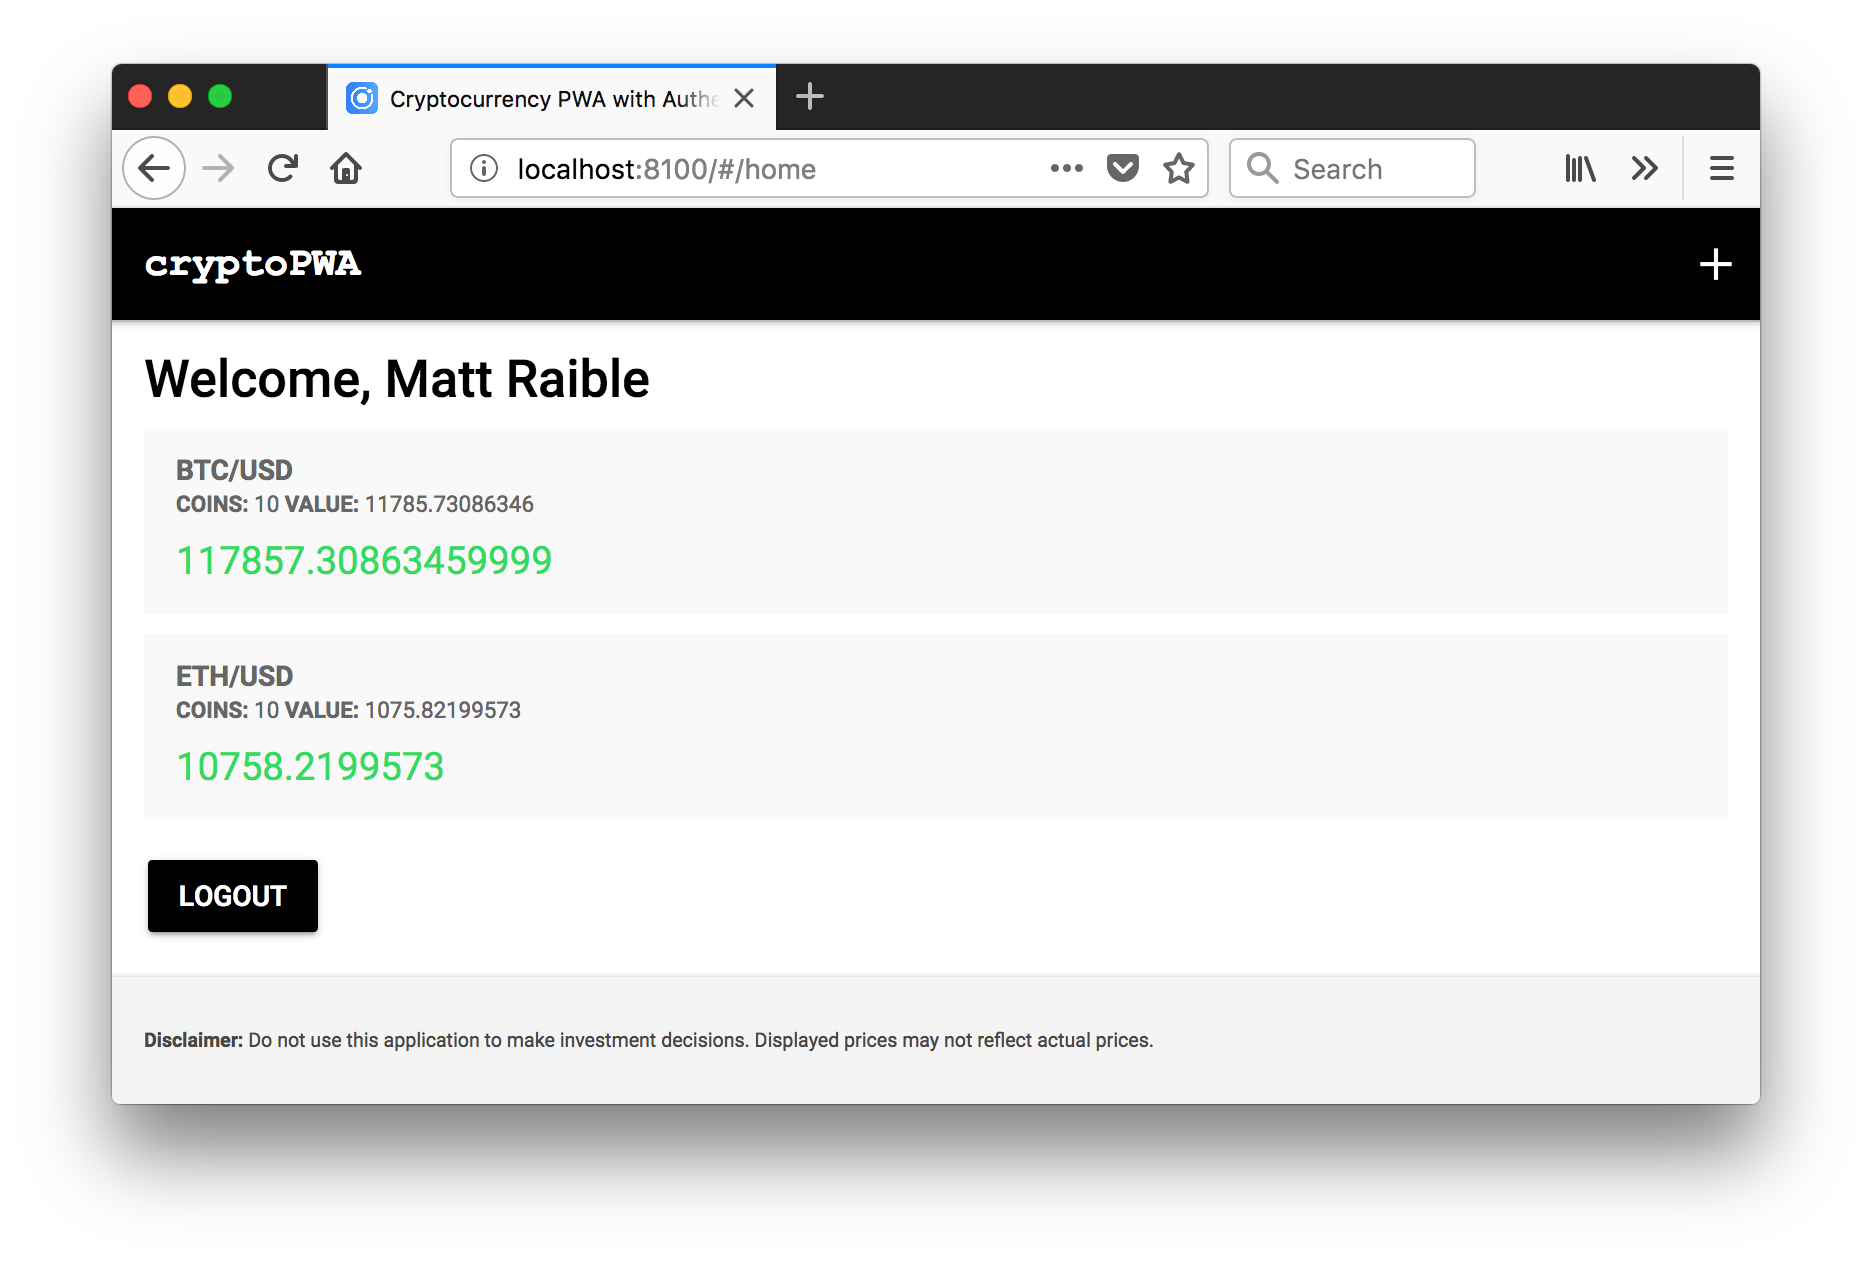
Even better, you can open another browser, e.g., Firefox, and retrieve your holdings by logging in. You can’t do that when using local storage!
Source Code
You can find the source code for the application shown in this tutorial at https://github.com/oktadeveloper/okta-ionic-crypto-java-sdk-example.
Okta + Java = ❤️
Okta loves Java and has a team of experts working on its Java SDK. The lead developer of the Java SDK is Brian Demers. Not only has he helped create the Spring Boot Starter and the Okta Java SDK, but he did most of the work to port the Stormpath Java SDK to work with Okta.
You might remember the Stormpath Java SDK from my Secure a Spring Microservices Architecture with Spring Security, JWTs, Juiser, and Okta. I recently updated it to work with the latest releases of its libraries, so check it out if you get a chance!
To learn more about Okta’s Java support, you can review the following documentation:
I think you’ll find the following blog posts useful too!
- Add Single Sign-On to Your Spring Boot Web App in 15 Minutes
- Secure your SPA with Spring Boot and OAuth
- Add Role-Based Access Control to Your App with Spring Security and Thymeleaf
If you love Java too, follow @oktadev on Twitter and let us know if you have any issues with this tutorial. You can also post your questions to the Okta Developer Forums or simply leave a comment on this post.
Update: To learn how to test this application, see The Hitchhiker’s Guide to Testing Spring Boot APIs and Angular Components with WireMock, Jest, Protractor, and Travis CI.
Changelog:
- Apr 10, 2018: Updated dependencies in the example app to use Okta Spring Boot Starter and Java SDK version 0.4.0. See the code changes in the example app on GitHub. Changes to this article can be viewed in oktadeveloper/okta.github.io#1941.
Matt Raible is a well-known figure in the Java community and has been building web applications for most of his adult life. For over 20 years, he has helped developers learn and adopt open source frameworks and use them effectively. He's a web developer, Java Champion, and Developer Advocate at Okta. Matt has been a speaker at many conferences worldwide, including Devnexus, Devoxx Belgium, Devoxx France, Jfokus, and JavaOne. He is the author of The Angular Mini-Book, The JHipster Mini-Book, Spring Live, and contributed to Pro JSP. He is a frequent contributor to open source and a member of the JHipster development team. You can find him online @mraible and raibledesigns.com.
Okta Developer Blog Comment Policy
We welcome relevant and respectful comments. Off-topic comments may be removed.