Secure a Spring Microservices Architecture with Spring Security, JWTs, Juiser, and Okta
Heads up... this blog post is old!
For an updated version of this blog post, see Java Microservices with Spring Boot and Spring Cloud.
You’ve built a microservices architecture with Spring Boot and Spring Cloud. You’re happy with the results, and you like how it adds resiliency to your application. You’re also pleased with how it scales and how different teams can deploy microservices independently. But what about security?
Are you using Spring Security to lock everything down? Are your microservices locked down too, or are they just behind the firewall?
This tutorial shows you how you can use Spring Security, Okta, and a few Java libraries to secure your microservices architecture. Not only that, but I’ll show you how to secure everything, so even your backend services communicate securely. You’ll learn how to use JWTs and Juiser to read an X-Forwarded-User header and turn it into a Spring Security User.
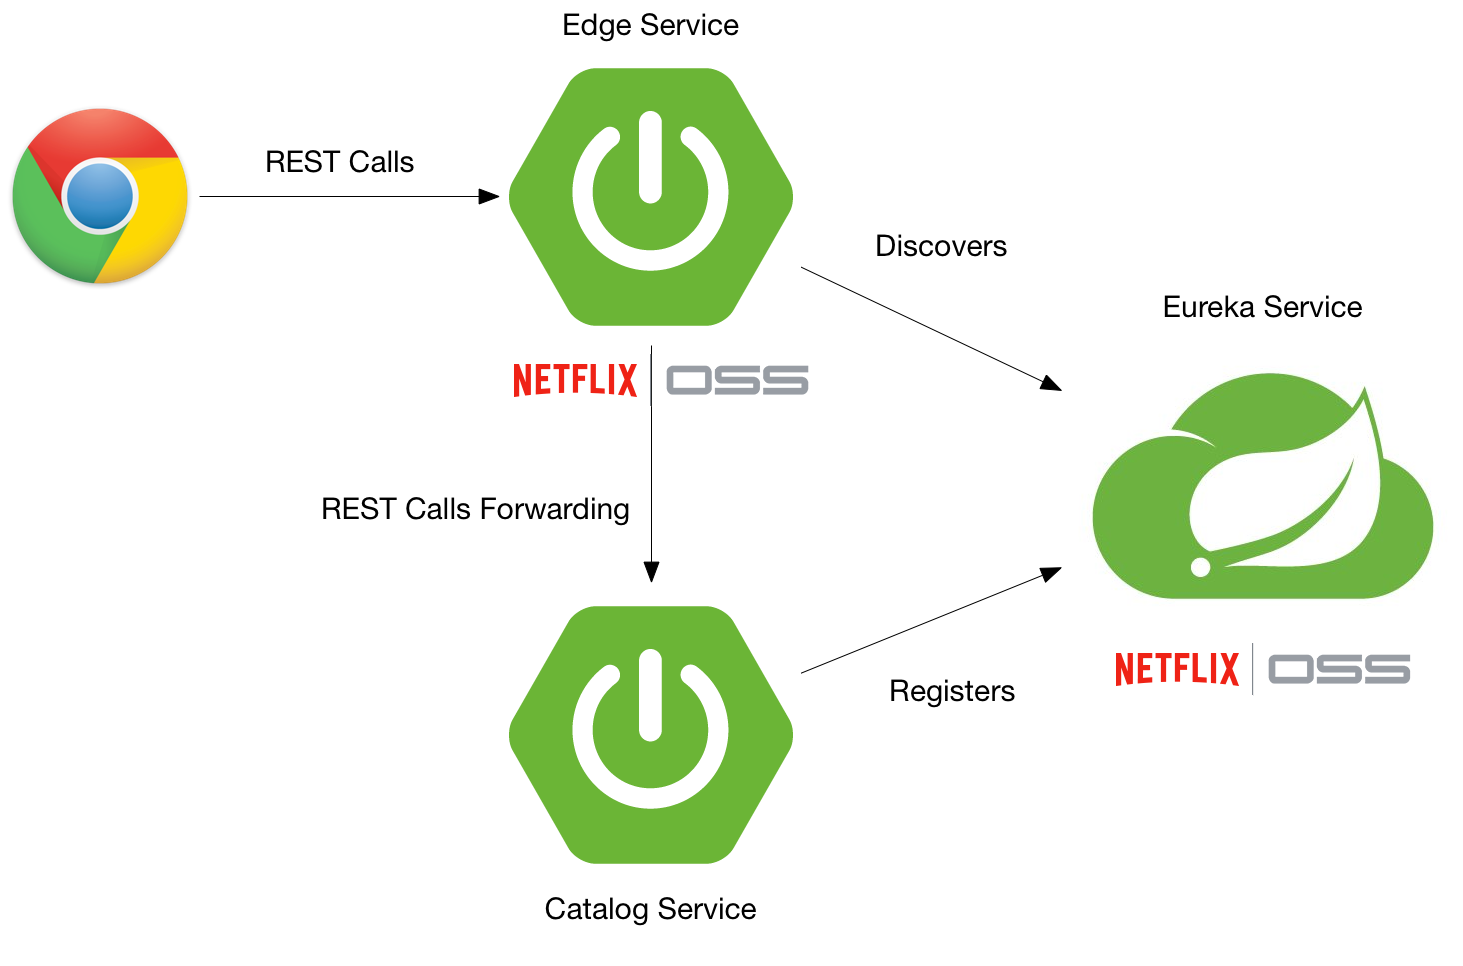
This tutorial builds off Build a Microservices Architecture for Microbrews with Spring Boot. A simple microservices architecture with Spring Boot and Spring Cloud looks as follows. It uses Stormpath’s Spring Boot Starter (it’s been modified to work with Okta while we work on building up Okta’s Java support) and Juiser, a library created by Les Hazlewood. Juiser is independent and open source, and is not tied to a particular identity provider.
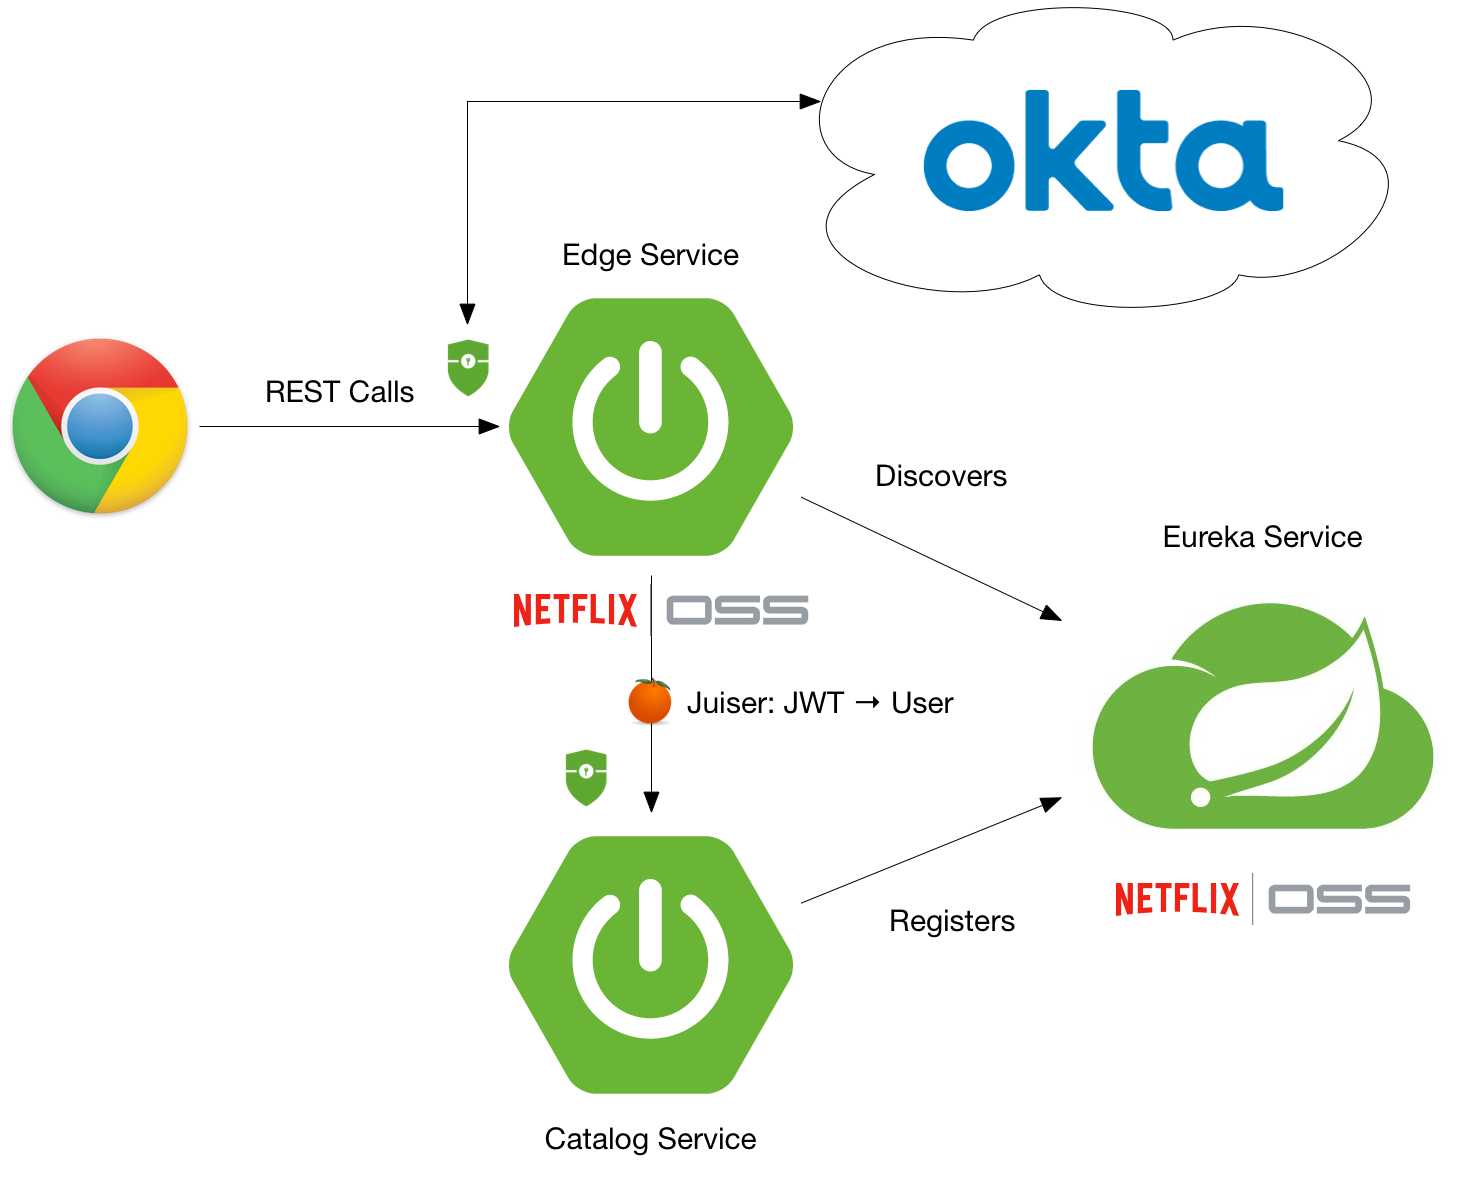
Once you’ve completed this tutorial, you’ll have Spring Security locking things down, and Okta providing authentication and JWT validation.
In this tutorial, you’ll build a microservices architecture with Spring Boot and related projects. To add security with Okta, you’ll have to create two applications in your developer console. The first will be a “Native” application that supports the Stormpath Java SDK, and OAuth grant types authorization code, refresh token, and resource owner password. This type of application is typically reserved for native mobile applications, but it also includes the Stormpath Java SDK. This is because the Stormpath SDK was retrofitted to work with Okta, and not built specifically for the Okta API, per se. For the Angular client, you’ll need a second “SPA” application.
To begin, you’ll need to clone the aforementioned article’s completed project.
git clone -b v1.0 https://github.com/oktadeveloper/spring-boot-microservices-example.git
Create an Okta Developer account, and create a “Native” application that works with the Stormpath Spring Boot Starter. Here’s an abbreviated list of steps:
- In the developer console, navigate to Applications > Add Application
- Click Native and Next
- On the next page, enter the following values and click Done
- Application Name:
My Test App - Login redirect URIs:
http://localhost:8080/client/callback
- Application Name:
After your application has been created, you still have a few settings you need to change:
- On the General tab, click Edit on the General Settings panel
- Select Refresh Token and Resource Owner Password and click Save
- Click Edit on the Client Credentials panel
- Select Use Client Authentication and click Save
- Copy and save the Client ID for your application
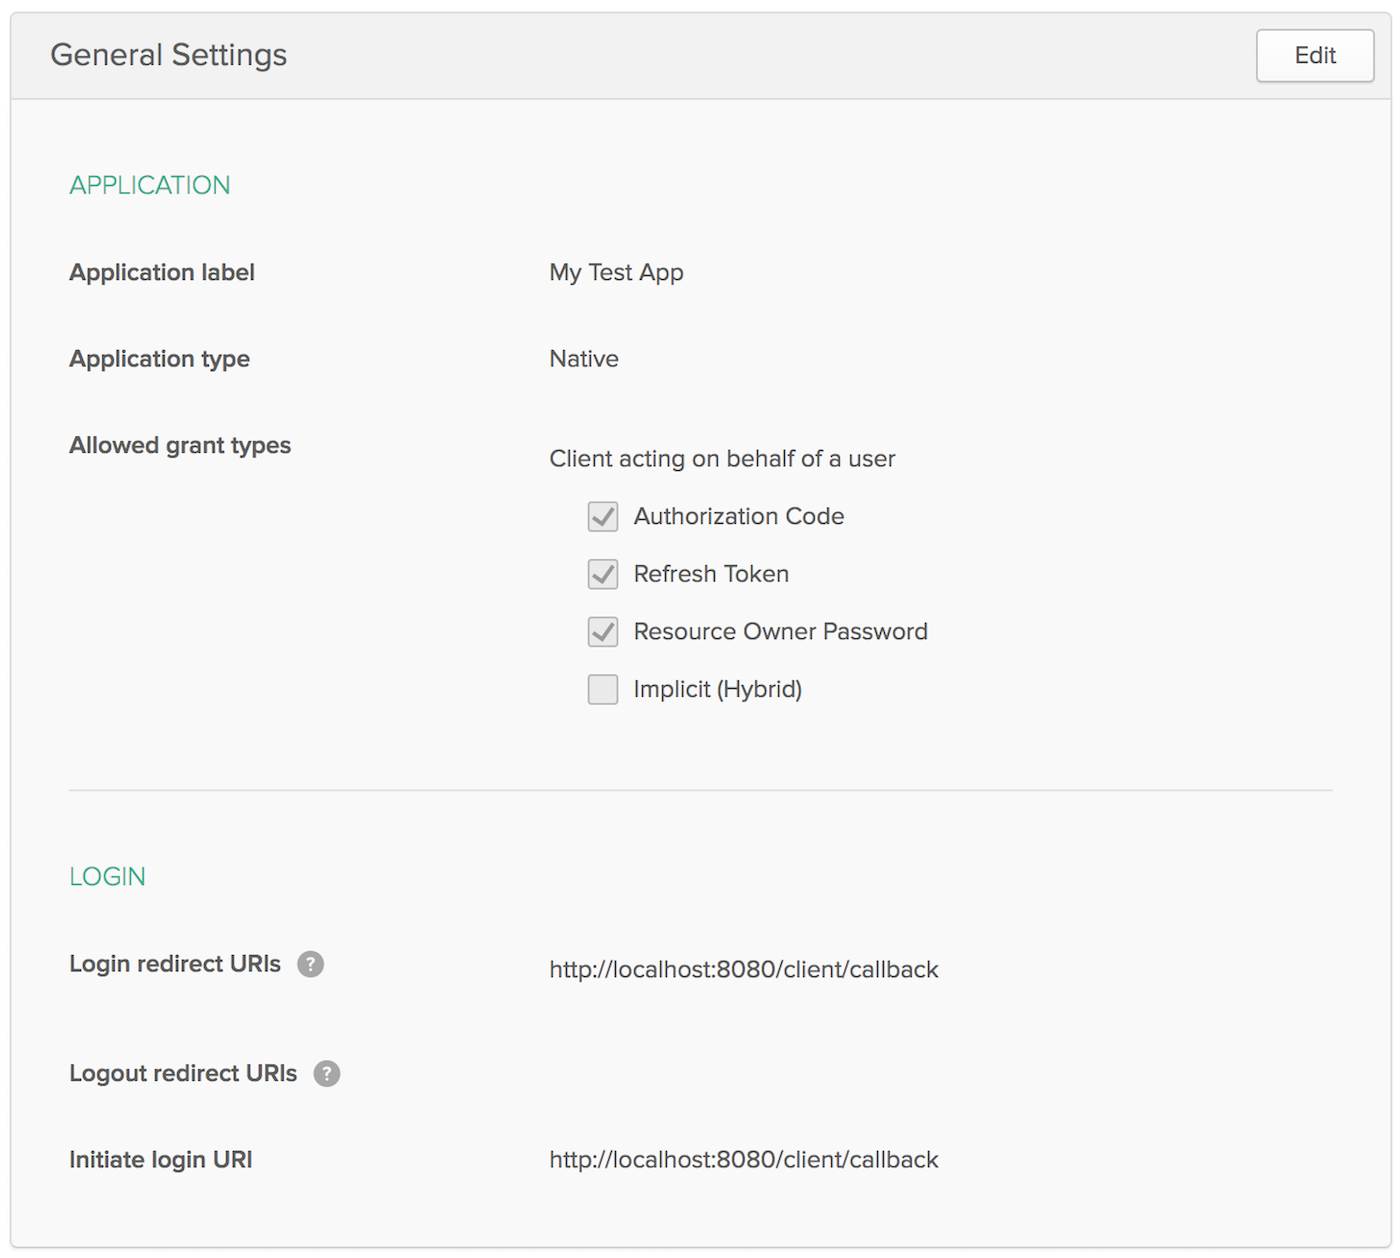
At this point, your application’s settings should look as follows:
You’ll also need to create an API token:
- On the top menu, click on API > Tokens
- Click Create Token
- On the modal, give your new token a name, for example:
Microservices, and click Create Token - Important: You will need to remember this token value, so copy/paste it somewhere safe.
After completing these steps, you should have the information you need to set the following environment variables.
export STORMPATH_CLIENT_BASEURL=https://{yourOktaDomain}
export OKTA_APPLICATION_ID={clientId}
export OKTA_API_TOKEN={apiToken}
export OKTA_AUTHORIZATIONSERVER_ID=default
Note: In May 2025, the Okta Integrator Free Plan replaced Okta Developer Edition Accounts, and the Okta CLI was deprecated.
We preserved this post for reference, but the instructions no longer work exactly as written. Replace the Okta CLI commands by manually configuring Okta following the instructions in our Developer Documentation.
Add Stormpath’s Zuul Support to the Edge Service
NOTE: I’m using Stormpath’s Java SDK in this example. It has been updated to work with Okta’s API. If you’d like to see how to do this same tutorial using Spring Security and its OAuth support, please Secure a Spring Microservices Architecture with OAuth 2.0.
The edge-service application handles the routing to the backend beer-catalog-service, so it’s the best place to start securing things. Add the Stormpath BOM (Bill Of Materials) in the dependencyManagement section of edge-service/pom.xml.
<dependency>
    <groupId>com.stormpath.sdk</groupId>
    <artifactId>stormpath-bom</artifactId>
    <version>2.0.4-okta</version>
    <type>pom</type>
    <scope>import</scope>
</dependency>
Then add a dependency for Stormpath’s Zuul integration.
<dependency>
    <groupId>com.stormpath.spring</groupId>
    <artifactId>stormpath-zuul-spring-cloud-starter</artifactId>
</dependency>
Add the following properties and values to edge-server/src/main/resources/application.properties.
server.use-forward-headers=true

zuul.routes.beer-catalog-service.path=/beers
zuul.routes.beer-catalog-service.url=http://localhost:8080

zuul.routes.home.path=/home
zuul.routes.home.url=http://localhost:8080

stormpath.web.cors.allowed.originUris=http://localhost:4200

stormpath.zuul.account.header.jwt.key.resource=classpath:rsatest.priv.pem
# This is just one example of a key ID - anything that the origin server can make sense of to lookup
# the corresponding public key is fine. Here we use the public key file name.
stormpath.zuul.account.header.jwt.key.id=rsatest.pub.pem
Copy the rsatest.* files from the Stormpath Zuul example project, or create new ones using the following command:
openssl genrsa -out rsatest.priv.pem 2048
Generate the private key’s corresponding rsatest.pub.pem public key with:
openssl rsa -in rsatest.priv.pem -pubout > rsatest.pub.pem
After copying (or generating), both rsatest.priv.pem and rsatest.pub.pem files should be in
edge-service/src/main/resources.
Add Juiser to the Beer Catalog Service
Juiser is a small Java library that automates token authentication during an HTTP request. In this example, Juiser reads the X-Forwarded-User header and creates a Spring Security User for you.
For Juiser to read the JWT sent by Stormpath’s Zuul support, you need to copy the public key (rsatest.pub.pem) from edge-service/src/main/resources to beer-catalog-service/src/main/resources. Then add the following dependencies to the Beer Catalog Service’s pom.xml.
<properties>
    ...
    <bouncycastle.version>1.56</bouncycastle.version>
    <juiser.version>1.0.0</juiser.version>
</properties>

<dependencies>
    <dependency>
        <!-- To handle the X-Forwarded-User header: -->
        <groupId>org.juiser</groupId>
        <artifactId>juiser-spring-boot-starter</artifactId>
        <version>${juiser.version}</version>
    </dependency>
    <dependency>
        <!-- So juiser can read *.pem public key files to verify the signature of the JWT in the
             X-Forwarded-User header: -->
        <groupId>org.bouncycastle</groupId>
        <artifactId>bcpkix-jdk15on</artifactId>
        <version>${bouncycastle.version}</version>
        <scope>runtime</scope>
    </dependency>
    <dependency>
        <groupId>org.springframework.boot</groupId>
        <artifactId>spring-boot-starter-security</artifactId>
    </dependency>
    <dependency>
        <groupId>org.springframework.security</groupId>
        <artifactId>spring-security-config</artifactId>
    </dependency>
    <dependency>
        <groupId>org.springframework.security</groupId>
        <artifactId>spring-security-web</artifactId>
    </dependency>
    <dependency>
        <groupId>org.springframework.boot</groupId>
        <artifactId>spring-boot-starter-thymeleaf</artifactId>
    </dependency>
    ...
</dependencies>
Create a HomeController in src/main/java/com/example/beercatalogservice/HomeController.java to render the user’s information so you can verify authentication is working.
package com.example.beercatalogservice;

import org.juiser.model.User;
import org.springframework.stereotype.Controller;
import org.springframework.ui.Model;
import org.springframework.web.bind.annotation.GetMapping;

@Controller
public class HomeController {

    private final User user;

    public HomeController(User user) {
        this.user = user;
    }

    @GetMapping("/home")
    public String howdy(Model model) {
        model.addAttribute("user", user);
        return "home";
    }
}
NOTE: There is an issue with Juiser 1.0.0 that it won’t initialize if you don’t have at least one @Controller in your project.
Create a home.html template in beer-catalog-service/src/main/resources/templates/home.html and populate it with the following code.
<!DOCTYPE HTML>
<html xmlns:th="http://www.thymeleaf.org">
<head>
    <style>
        th {
            text-align: left;
        }
        td {
            white-space: nowrap;
        }
        td:first-child {
            font-family: "Courier", monospace;
            font-size: 0.9em;
            color: #343434;
        }
    </style>
</head>
<body>
<h1>Hello<span th:if="${user.authenticated}" th:text="' ' + ${user.givenName}"> Joe</span>!</h1>
<div th:unless="${user.authenticated}">
    <a th:href="@{/login}">Login</a>
</div>
<div th:if="${user.authenticated}">
    <form id="logoutForm" th:action="@{/logout}" method="post">
        <input type="submit" value="Logout"/>
    </form>
</div>

<h2>User Properties</h2>
<table>
    <thead>
    <tr>
        <th>Name</th>
        <th>Value</th>
    </tr>
    </thead>
    <tbody>
    <tr>
        <td>anonymous</td>
        <td th:text="${user.anonymous}"></td>
    </tr>
    <tr>
        <td>authenticated</td>
        <td th:text="${user.authenticated}"></td>
    </tr>
    <tr>
        <td>href</td>
        <td th:text="${user.href}"></td>
    </tr>
    <tr>
        <td>id</td>
        <td th:text="${user.id}"></td>
    </tr>
    <tr>
        <td>name</td>
        <td th:text="${user.name}"></td>
    </tr>
    <tr>
        <td>givenName</td>
        <td th:text="${user.givenName}"></td>
    </tr>
    <tr>
        <td>middleName</td>
        <td th:text="${user.middleName}"></td>
    </tr>
    <tr>
        <td>familyName</td>
        <td th:text="${user.familyName}"></td>
    </tr>
    <tr>
        <td>nickname</td>
        <td th:text="${user.nickname}"></td>
    </tr>
    <tr>
        <td>username</td>
        <td th:text="${user.username}"></td>
    </tr>
    <tr>
        <td>profile</td>
        <td th:text="${user.profile}"></td>
    </tr>
    <tr>
        <td>picture</td>
        <td th:text="${user.picture}"></td>
    </tr>
    <tr>
        <td>website</td>
        <td th:text="${user.website}"></td>
    </tr>
    <tr>
        <td>email</td>
        <td th:text="${user.email}"></td>
    </tr>
    <tr>
        <td>emailVerified</td>
        <td th:text="${user.emailVerified}"></td>
    </tr>
    <tr>
        <td>gender</td>
        <td th:text="${user.gender}"></td>
    </tr>
    <tr>
        <td>birthdate</td>
        <td th:text="${user.birthdate}"></td>
    </tr>
    <tr>
        <td>zoneInfo</td>
        <td th:text="${user.zoneInfo}"></td>
    </tr>
    <tr>
        <td>phoneNumber</td>
        <td th:text="${user.phone}"></td>
    </tr>
    <tr>
        <td>phoneNumberVerified</td>
        <td th:text="${user.phoneNumberVerified}"></td>
    </tr>
    <tr>
        <td>createdAt</td>
        <td th:text="${user.createdAt}"></td>
    </tr>
    <tr>
        <td>updatedAt</td>
        <td th:text="${user.updatedAt}"></td>
    </tr>
    </tbody>
</table>
</body>
</html>
Add the following properties to beer-catalog-service/src/main/resources/application.properties to configure Juiser.
server.use-forward-headers=true
juiser.header.jwt.key.resource=classpath:rsatest.pub.pem
Create a SecurityConfig.java class in the same package as HomeController. This class configures Spring Security so it secures all endpoints.
package com.example.beercatalogservice;

import org.springframework.context.annotation.Configuration;
import org.springframework.security.config.annotation.web.builders.HttpSecurity;
import org.springframework.security.config.annotation.web.configuration.WebSecurityConfigurerAdapter;

@Configuration
public class SecurityConfig extends WebSecurityConfigurerAdapter {

    @Override
    protected void configure(HttpSecurity http) throws Exception {
        http.authorizeRequests().anyRequest().fullyAuthenticated();
    }
}
Add RequestInterceptor for Feign
The @FeignClient used to talk to beer-catalog-service is not aware of the X-Forwarded-User header. To make it aware, create a ForwardedAccountRequestInterceptor class in the same directory as EdgeServiceApplication.
package com.example.edgeservice;

import com.stormpath.sdk.servlet.http.Resolver;
import com.stormpath.zuul.account.ForwardedAccountHeaderFilter;
import feign.RequestInterceptor;
import feign.RequestTemplate;
import org.slf4j.Logger;
import org.slf4j.LoggerFactory;
import org.springframework.web.context.request.RequestContextHolder;
import org.springframework.web.context.request.ServletRequestAttributes;

import javax.servlet.http.HttpServletRequest;
import javax.servlet.http.HttpServletResponse;

public class ForwardedAccountRequestInterceptor implements RequestInterceptor {

    private static final Logger LOGGER = LoggerFactory.getLogger(ForwardedAccountRequestInterceptor.class);

    private final Resolver<String> valueResolver;

    public ForwardedAccountRequestInterceptor(Resolver<String> accountStringResolver) {
        this.valueResolver = accountStringResolver;
    }

    @Override
    public void apply(RequestTemplate template) {
        if (template.headers().containsKey(ForwardedAccountHeaderFilter.DEFAULT_HEADER_NAME)) {
            LOGGER.warn("The X-Forwarded-User has been already set");
        } else {
            LOGGER.debug("Constructing Header {} for Account", ForwardedAccountHeaderFilter.DEFAULT_HEADER_NAME);
            HttpServletRequest request = ((ServletRequestAttributes) RequestContextHolder.getRequestAttributes()).getRequest();
            HttpServletResponse response = ((ServletRequestAttributes) RequestContextHolder.getRequestAttributes()).getResponse();
            template.header(ForwardedAccountHeaderFilter.DEFAULT_HEADER_NAME, valueResolver.get(request, response));
        }
    }
}
Register it as a @Bean in EdgeServiceApplication.
import org.springframework.context.annotation.Bean;
import feign.RequestInterceptor;
import org.springframework.beans.factory.annotation.Qualifier;
import com.stormpath.sdk.servlet.http.Resolver;
...
public class EdgeServiceApplication {

    public static void main(String[] args) {
        SpringApplication.run(EdgeServiceApplication.class, args);
    }

    @Bean
    public RequestInterceptor forwardedAccountRequestInterceptor(
            @Qualifier("stormpathForwardedAccountHeaderValueResolver") Resolver<String> accountStringResolver) {
        return new ForwardedAccountRequestInterceptor(accountStringResolver);
    }
}
While you’re modifying EdgeServiceApplication, change the HystrixCommand in BeerController to make Hystrix execute on the calling thread (so it’s aware of the security context).
import com.netflix.hystrix.contrib.javanica.annotation.HystrixProperty;
...
@HystrixCommand(fallbackMethod = "fallback", commandProperties = {
        @HystrixProperty(name="execution.isolation.strategy", value="SEMAPHORE")
})
NOTE: There is an issue with the Stormpath Zuul Starter where it doesn’t work with Spring Cloud Edgeware.SR1. Change edge-service/pom.xml to have <spring-cloud.version>Dalston.RELEASE</spring-cloud.version> to workaround this issue.
Verify Secure Communication
Verify communication between the edge-service and beer-catalog-service works by starting all the Spring Boot applications. First, start eureka-service:
cd eureka-service
./mvnw spring-boot:run
In a new terminal window, start beer-catalog-service:
cd beer-catalog-service
./mvnw spring-boot:run
In another terminal window, start edge-service:
cd edge-service
./mvnw spring-boot:run
Open your browser and navigate to http://localhost:8081/home. You should see a login page, prompting for your credentials.
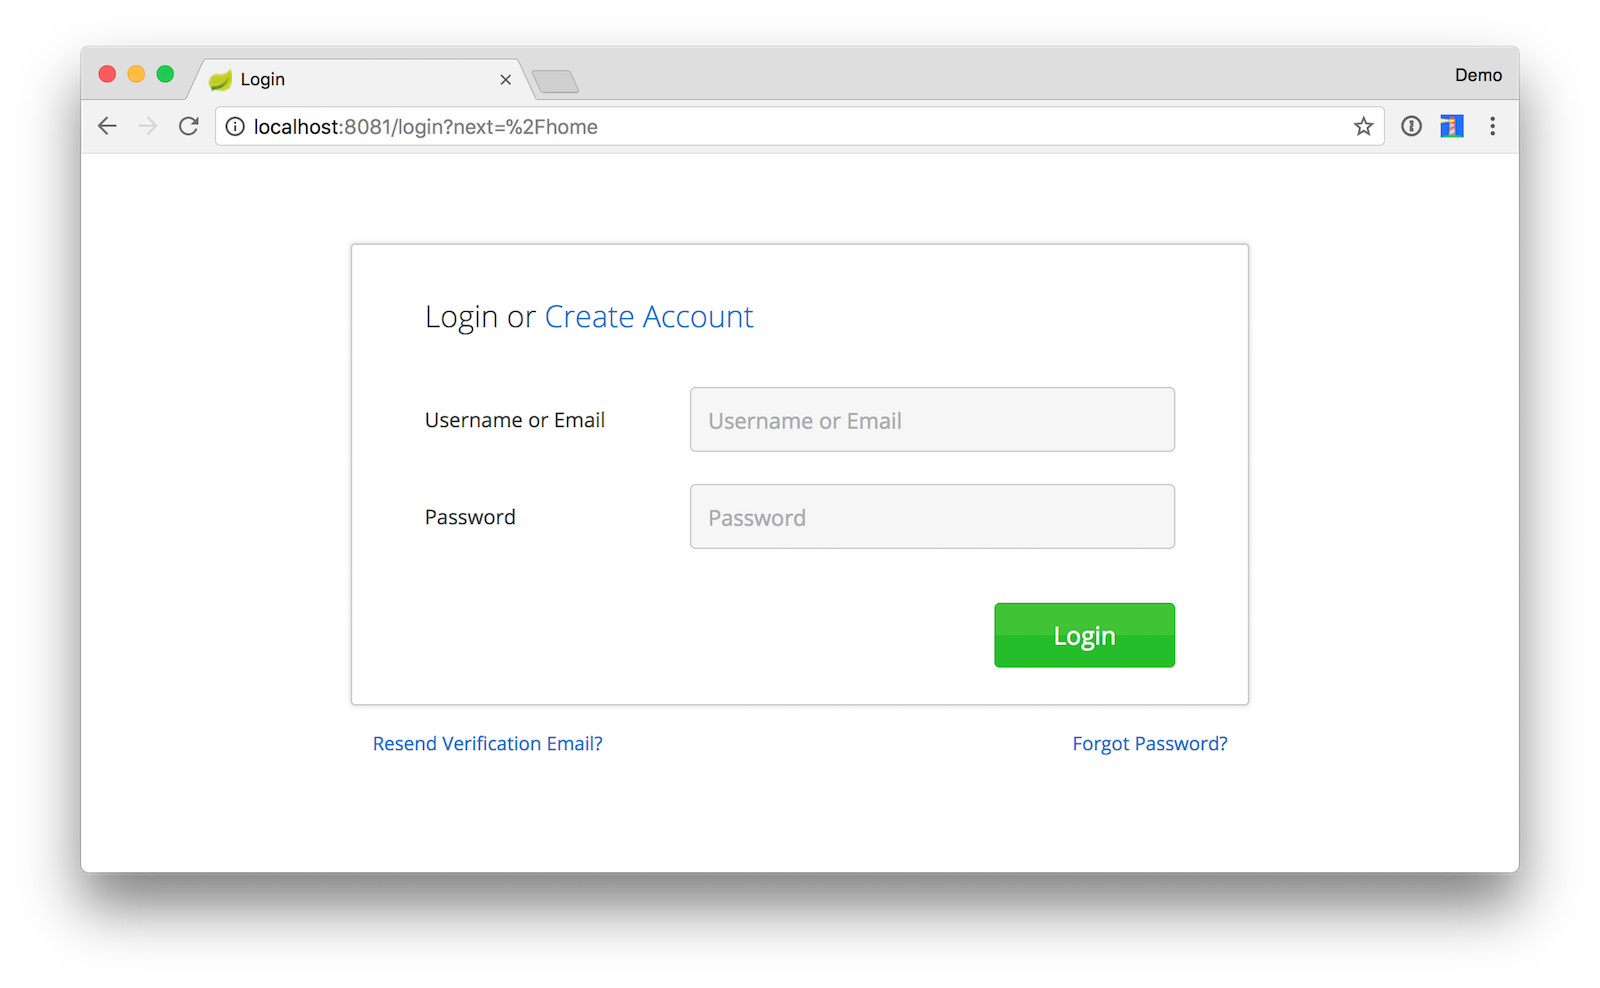
This page is served up from the stormpath-zuul-spring-cloud-starter using Thymeleaf. Spring Boot auto-activates Thymeleaf when it finds it in the classpath.
After logging in, you should see a page displaying your user’s information.
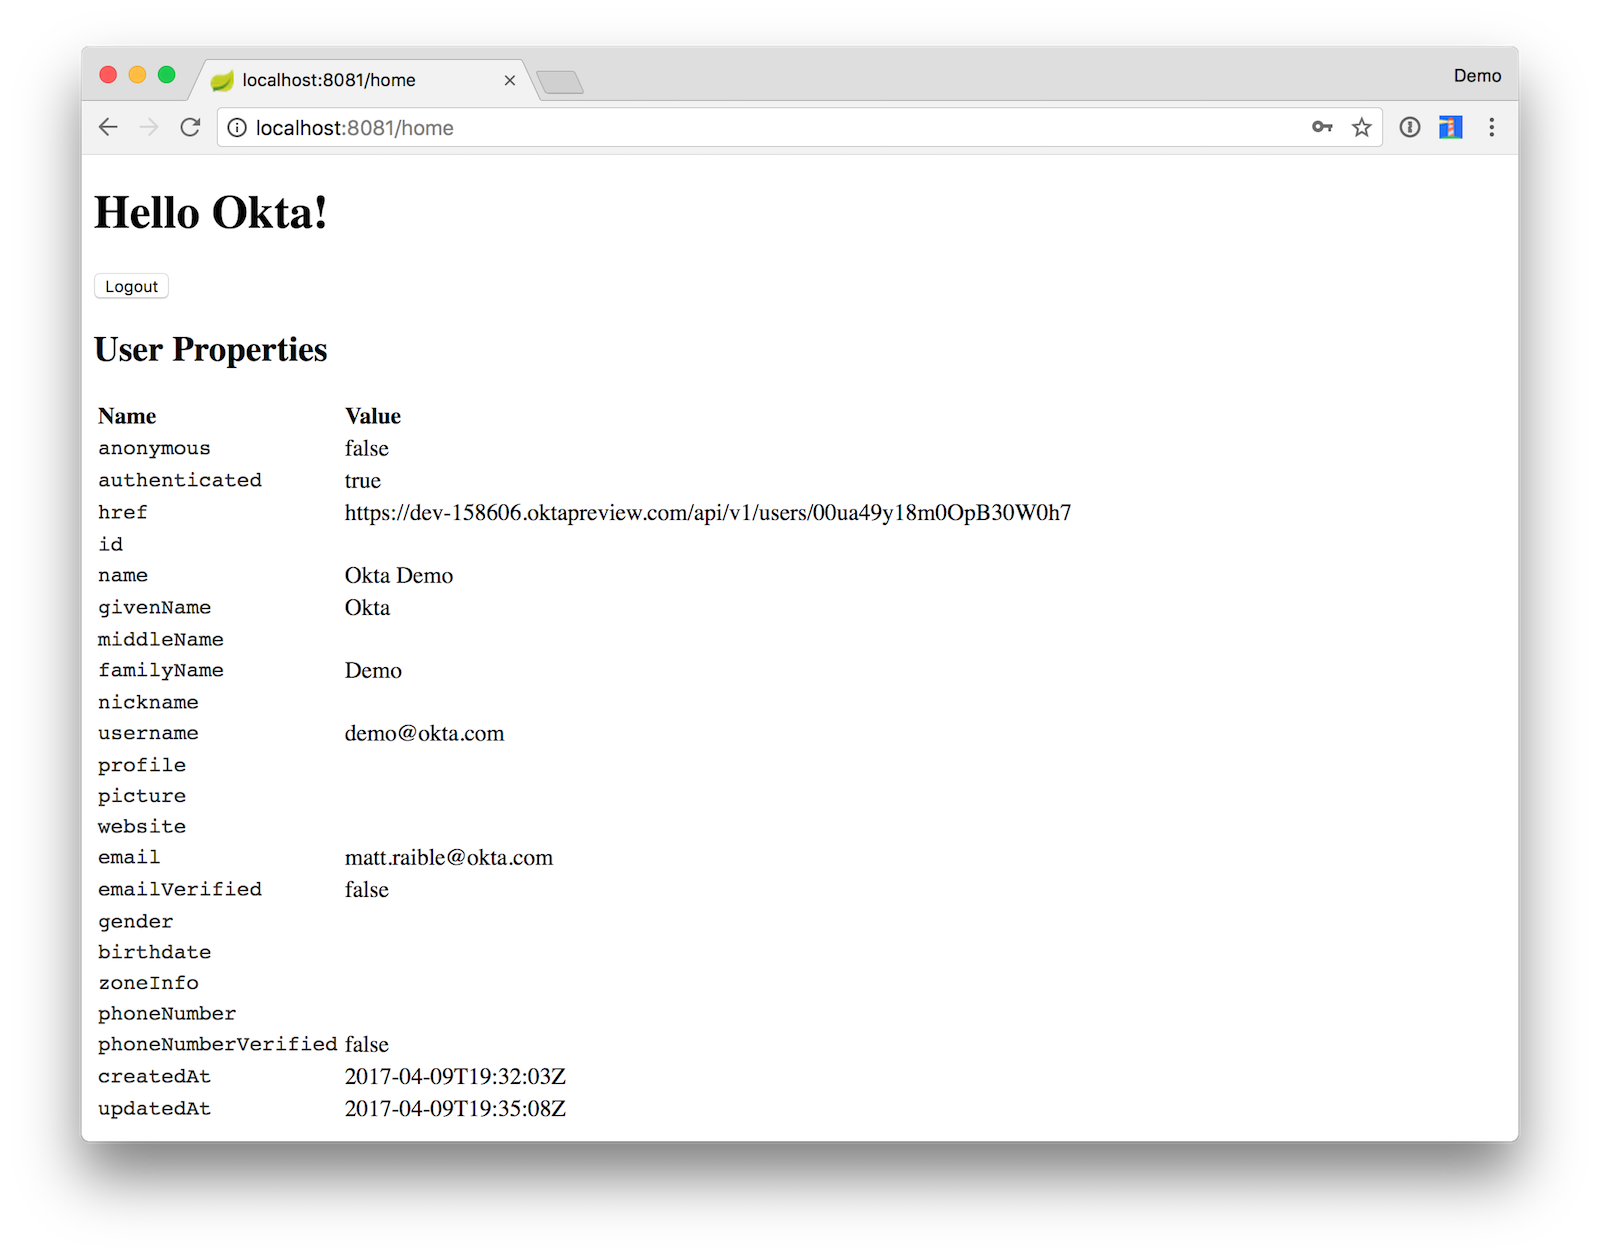
Click the Logout button to delete the cookies in your browser and end your session.
Add Okta’s Sign-In Widget to the Client
To use Okta’s Sign-In Widget, you’ll need to create an additional app in Okta, this time for a SPA (Single-Page Application).
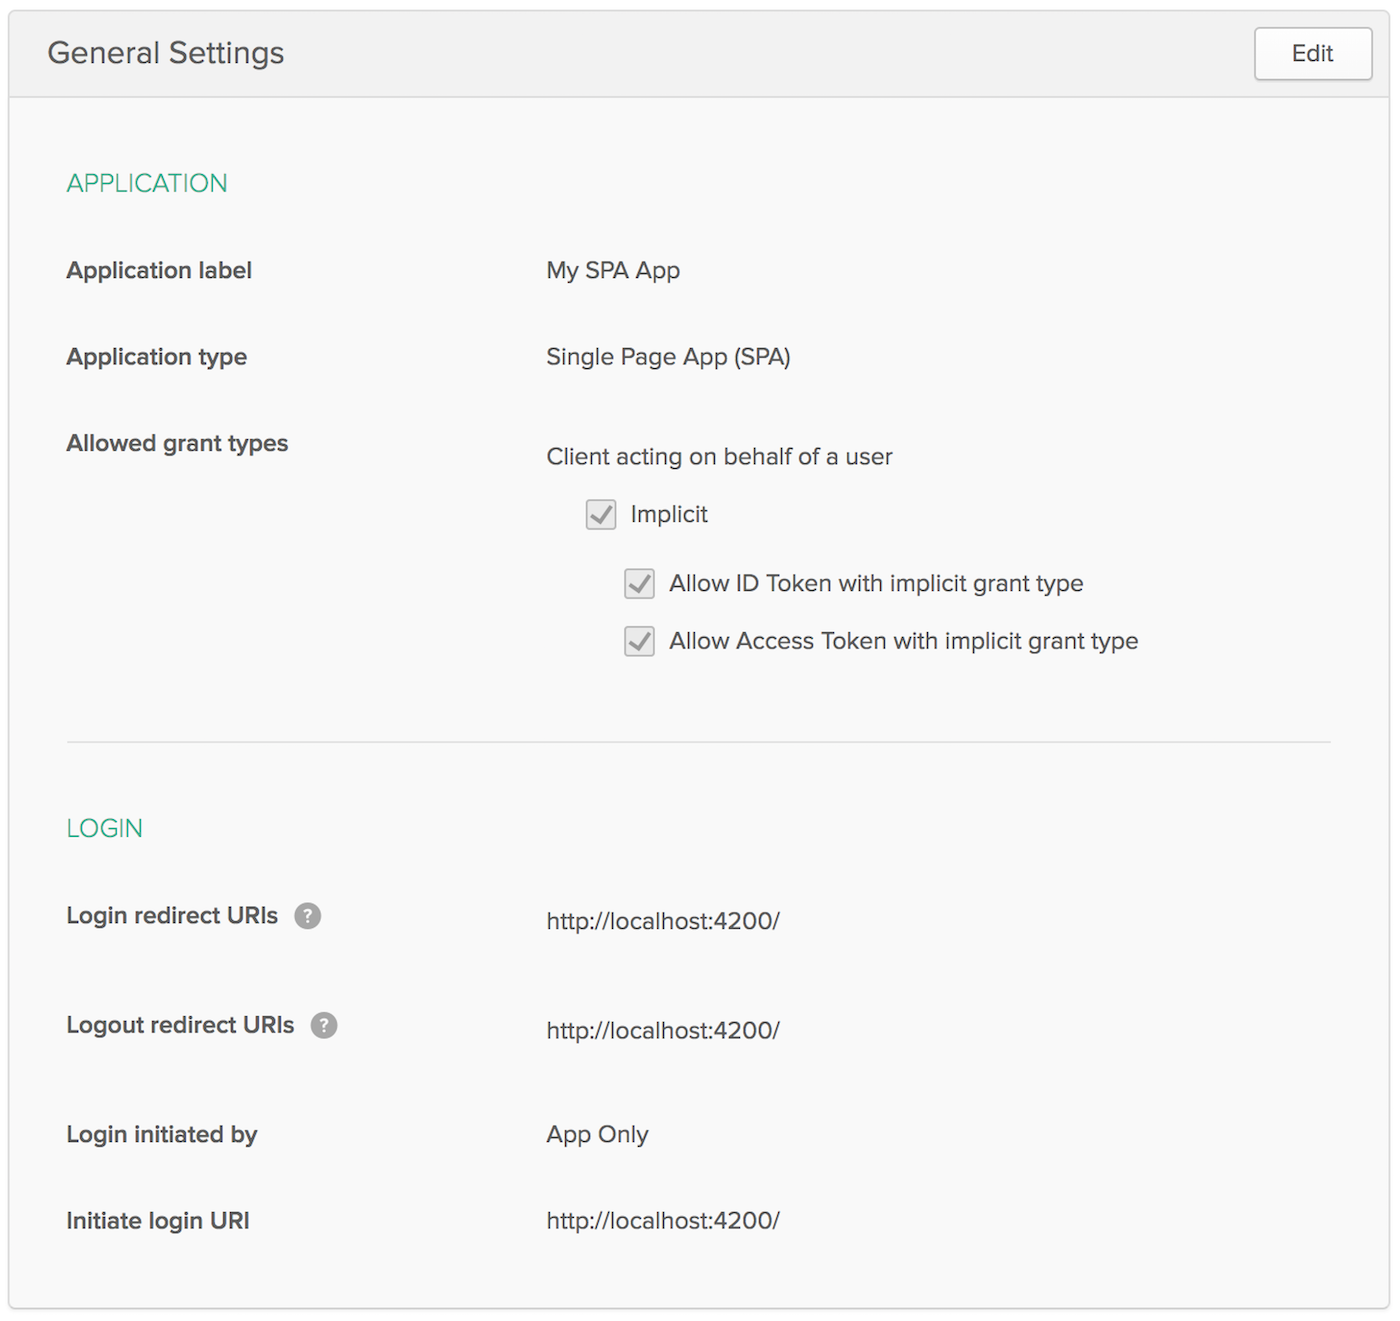
Create an OIDC app in Okta by going to the Developer Console and navigating to Applications and click on the Add Application button. Select SPA and click Next. On the next page, specify http://localhost:4200 as a Base URI, Login redirect URI, and Logout redirect URI. Click Done and you should see settings like the following.
Install Okta’s Sign-In Widget to make it possible to communicate with the secured server.
cd client
npm install
npm install @okta/okta-signin-widget --save
Add the widget’s CSS to src/styles.css:
@import '~@okta/okta-signin-widget/dist/css/okta-sign-in.min.css';
@import '~@okta/okta-signin-widget/dist/css/okta-theme.css';
Create client/src/app/shared/okta/okta.service.ts and use it to configure the widget to talk to your Okta instance.
import { Injectable } from '@angular/core';
import * as OktaSignIn from '@okta/okta-signin-widget';

@Injectable()
export class OktaService {
  widget;

  constructor() {
    this.widget = new OktaSignIn({
      baseUrl: 'https://{yourOktaDomain}',
      clientId: '{clientId}',
      authParams: {
        issuer: 'default',
        responseType: ['id_token', 'token'],
        scopes: ['openid', 'email', 'profile']
      }
    });
  }

  getWidget() {
    return this.widget;
  }

  getIdToken() {
    return this.widget.tokenManager.get('idToken');
  }

  getAccessToken() {
    return this.widget.tokenManager.get('accessToken');
  }
}
Make sure to replace {yourOktaDomain} and {clientId} in the above code.
Add OktaService as a provider to client/src/app/app.module.ts.
import { OktaService } from './shared/okta/okta.service';

@NgModule({
  ...
  providers: [OktaService],
  bootstrap: [AppComponent]
})
export class AppModule { }
Modify client/src/app/shared/beer/beer.service.ts to read the access token and set it in an Authorization header when
it exists.
import { Injectable } from '@angular/core';
import { HttpClient, HttpHeaders } from '@angular/common/http';
import { Observable } from 'rxjs/Observable';
import { OktaService } from '../okta/okta.service';

@Injectable()
export class BeerService {

  constructor(private http: HttpClient, private oktaService: OktaService) {
  }

  getAll(): Observable<any> {
    let headers: HttpHeaders = new HttpHeaders();
    if (this.oktaService.getAccessToken()) {
      const accessToken = this.oktaService.getAccessToken();
      // headers is immutable, so re-assign
      headers = headers.append('Authorization', accessToken.tokenType + ' ' + accessToken.accessToken);
    }
    return this.http.get('http://localhost:8081/good-beers', {headers: headers});
  }
}
Modify app.component.html to add a placeholder for the widget and a section to show the user’s name and a logout button.
<mat-toolbar color="primary">
  <span>Welcome to {{title}}!</span>
</mat-toolbar>

<!-- Container to inject the Sign-In Widget -->
<div id="okta-signin-container"></div>

<div *ngIf="user">
  <h2>
    Welcome {{user?.name}}!
  </h2>

  <button mat-raised-button (click)="logout()">Logout</button>

  <app-beer-list></app-beer-list>
</div>
You’ll notice the user variable in the HTML. To resolve this, you need to change your src/app/app.component.ts so it renders the Sign-In Widget. Angular’s ChangeDetectorRef is used to notify Angular when things have changed and rendering needs to process changed variables.
import { ChangeDetectorRef, Component, OnInit } from '@angular/core';
import { OktaService } from './shared/okta/okta.service';

@Component({
  selector: 'app-root',
  templateUrl: './app.component.html',
  styleUrls: ['./app.component.css']
})
export class AppComponent implements OnInit {
  title = 'app';
  user;
  signIn;

  constructor(private oktaService: OktaService, private changeDetectorRef: ChangeDetectorRef) {
    this.signIn = oktaService.getWidget();
  }

  showLogin() {
    this.signIn.renderEl({el: '#okta-signin-container'}, (response) => {
      if (response.status === 'SUCCESS') {
        response.forEach(token => {
          if (token.idToken) {
            this.signIn.tokenManager.add('idToken', token);
            this.user = this.getUser(token);
          }
          if (token.accessToken) {
            this.signIn.tokenManager.add('accessToken', token);
          }
        });
        this.signIn.remove();
        this.changeDetectorRef.detectChanges();
      }
    });
  }

  getUser(token) {
    return {
      name: token.claims.name,
      email: token.claims.email,
      username: token.claims.preferred_username
    };
  }

  ngOnInit() {
    this.signIn.session.get((response) => {
      if (response.status !== 'INACTIVE') {
        const token = this.oktaService.getIdToken();
        this.user = this.getUser(token);
        this.changeDetectorRef.detectChanges();
      } else {
        this.showLogin();
      }
    });
  }

  logout() {
    this.signIn.signOut(() => {
      this.user = undefined;
      this.changeDetectorRef.detectChanges();
      this.showLogin();
    });
  }
}
In order for the BeerListComponent (at src/app/beer-list/beer-list.component.ts) to detect that you’ve logged in, you need to use add a constructor dependency on ChangeDetectorRef and invoke its detectChanges() method when you set the giphyUrl property on each beer.
import { ChangeDetectorRef, Component, OnInit } from '@angular/core';
import { BeerService, GiphyService } from '../shared';

@Component({
  selector: 'app-beer-list',
  templateUrl: './beer-list.component.html',
  styleUrls: ['./beer-list.component.css'],
  providers: [BeerService, GiphyService]
})
export class BeerListComponent implements OnInit {
  beers: Array<any>;

  constructor(private beerService: BeerService, private giphyService: GiphyService,
              private changeDetectorRef: ChangeDetectorRef) { }

  ngOnInit() {
    this.beerService.getAll().subscribe(
      data => {
        this.beers = data;
        for (const beer of this.beers) {
          this.giphyService.get(beer.name).subscribe(url => {
            beer.giphyUrl = url;
            this.changeDetectorRef.detectChanges();
          });
        }
      },
      error => console.log(error)
    )
  }
}
Verify Authentication Works
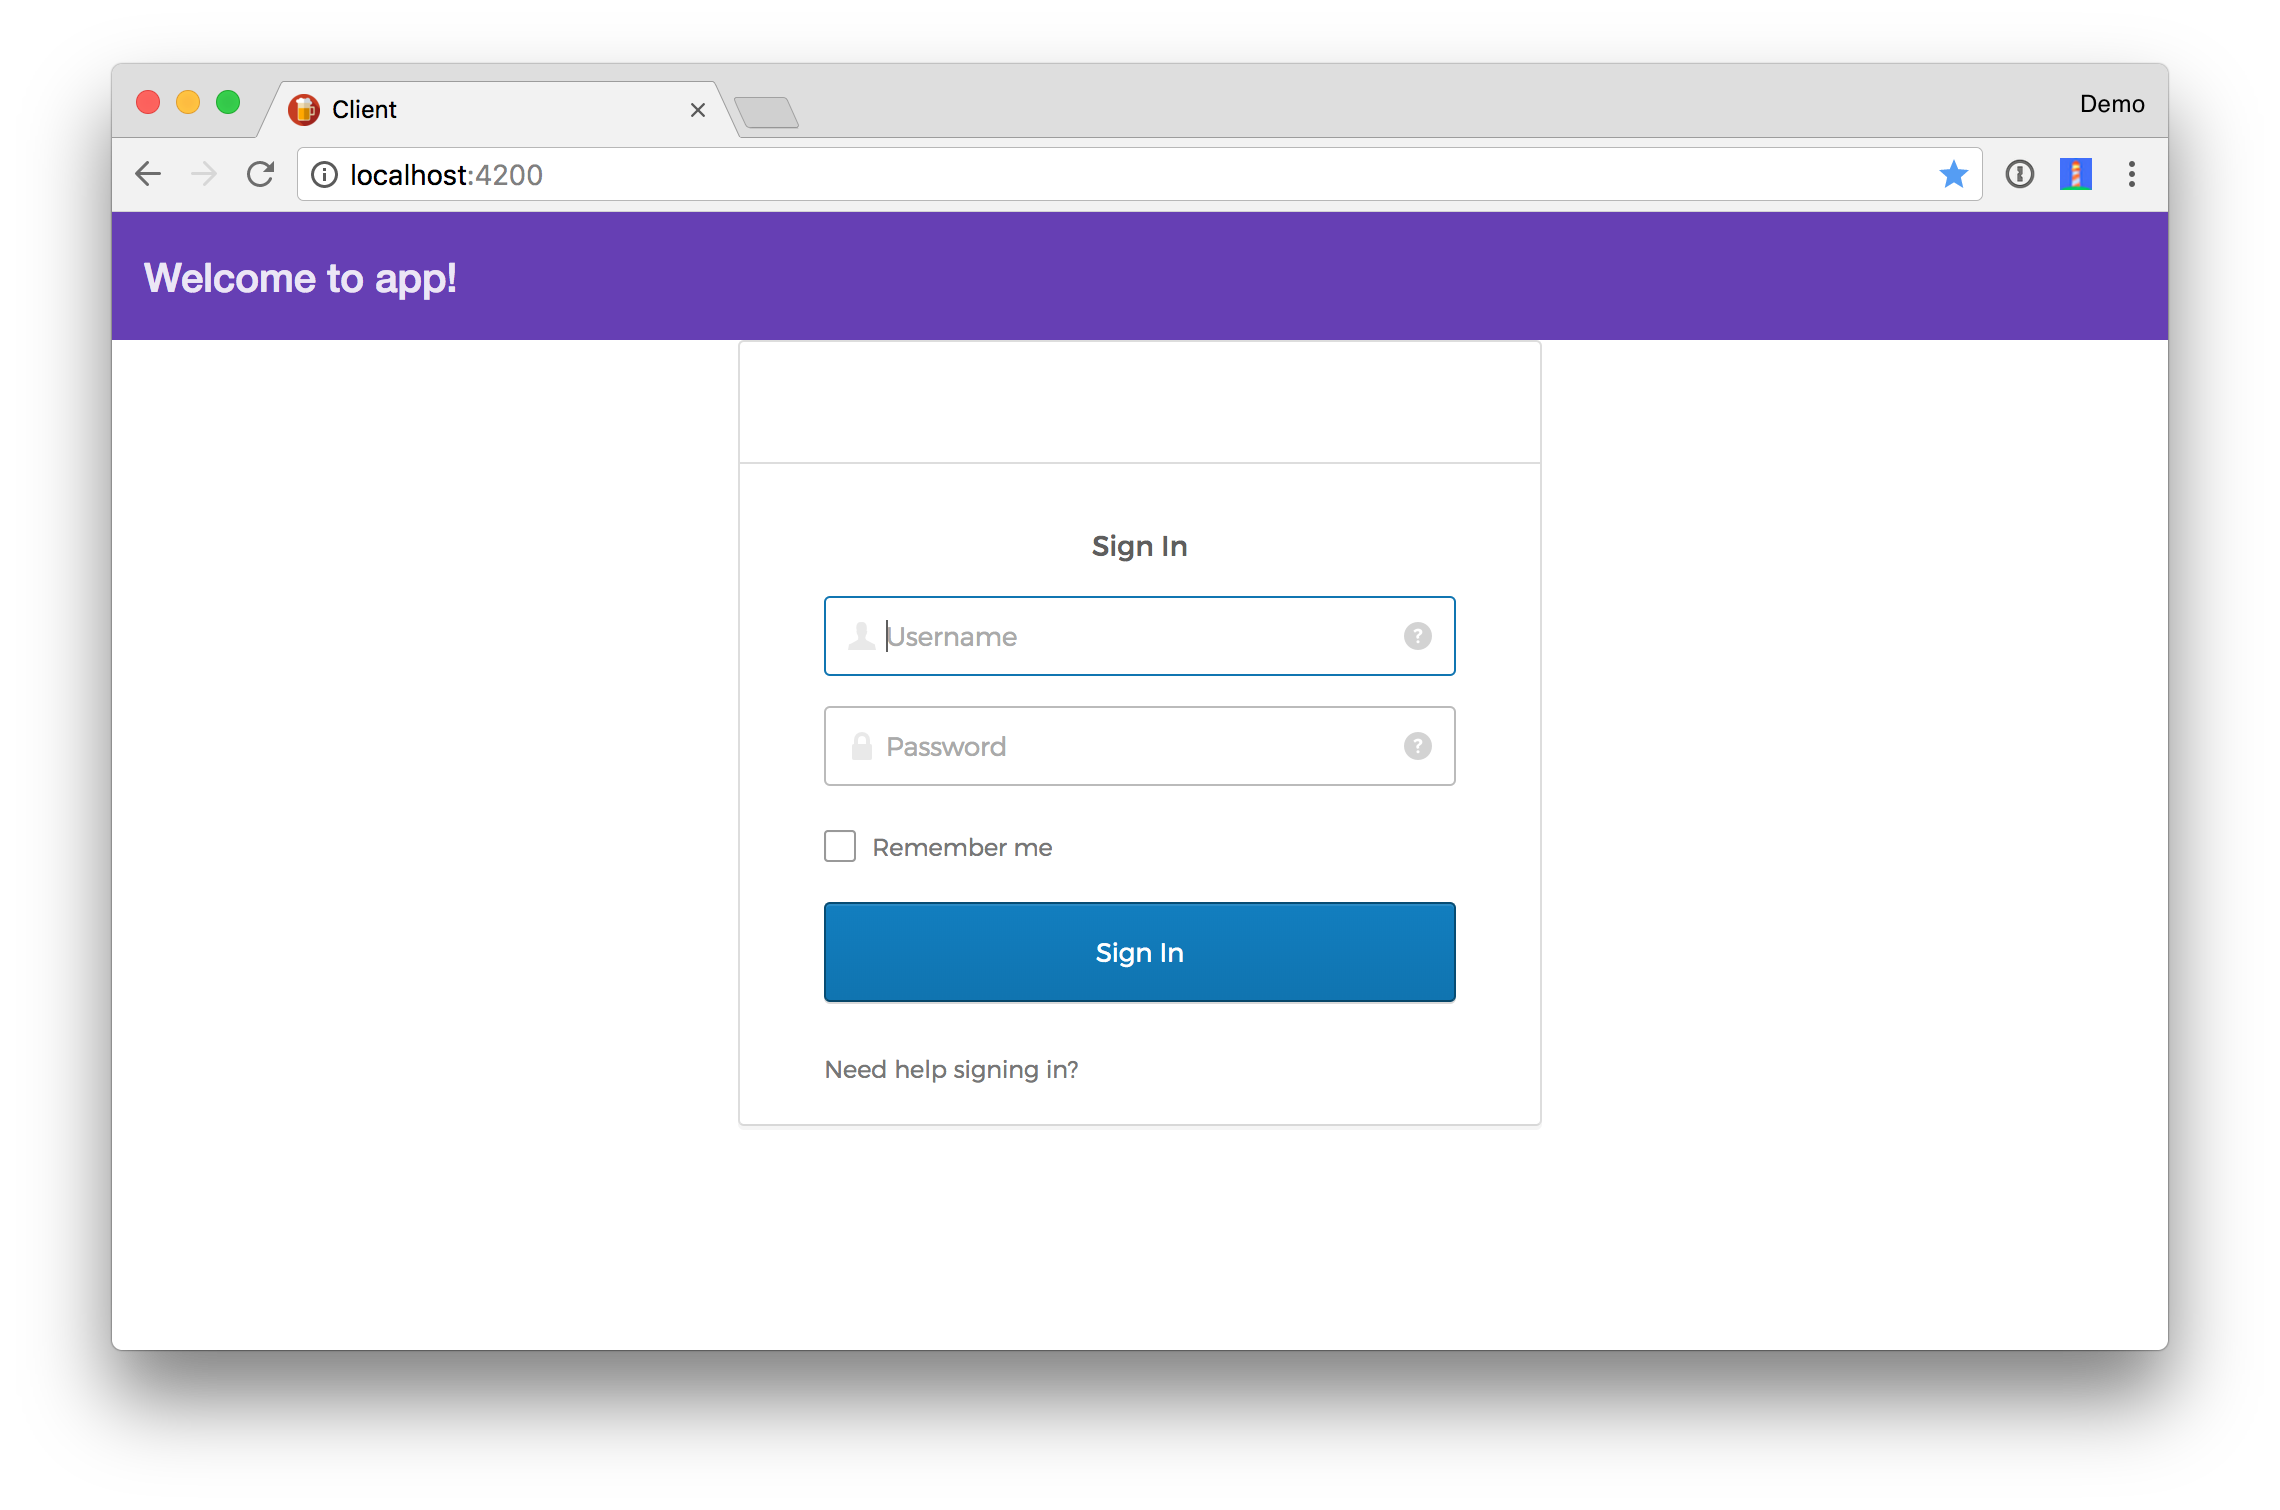
Start the client with npm start, navigate to http://localhost:4200, and you should see a login form like the following.
NOTE: If it logs you in automatically, this is likely because you have cookies for http://localhost:8080 still in your browser. Clear your cookies, or try an incognito window.
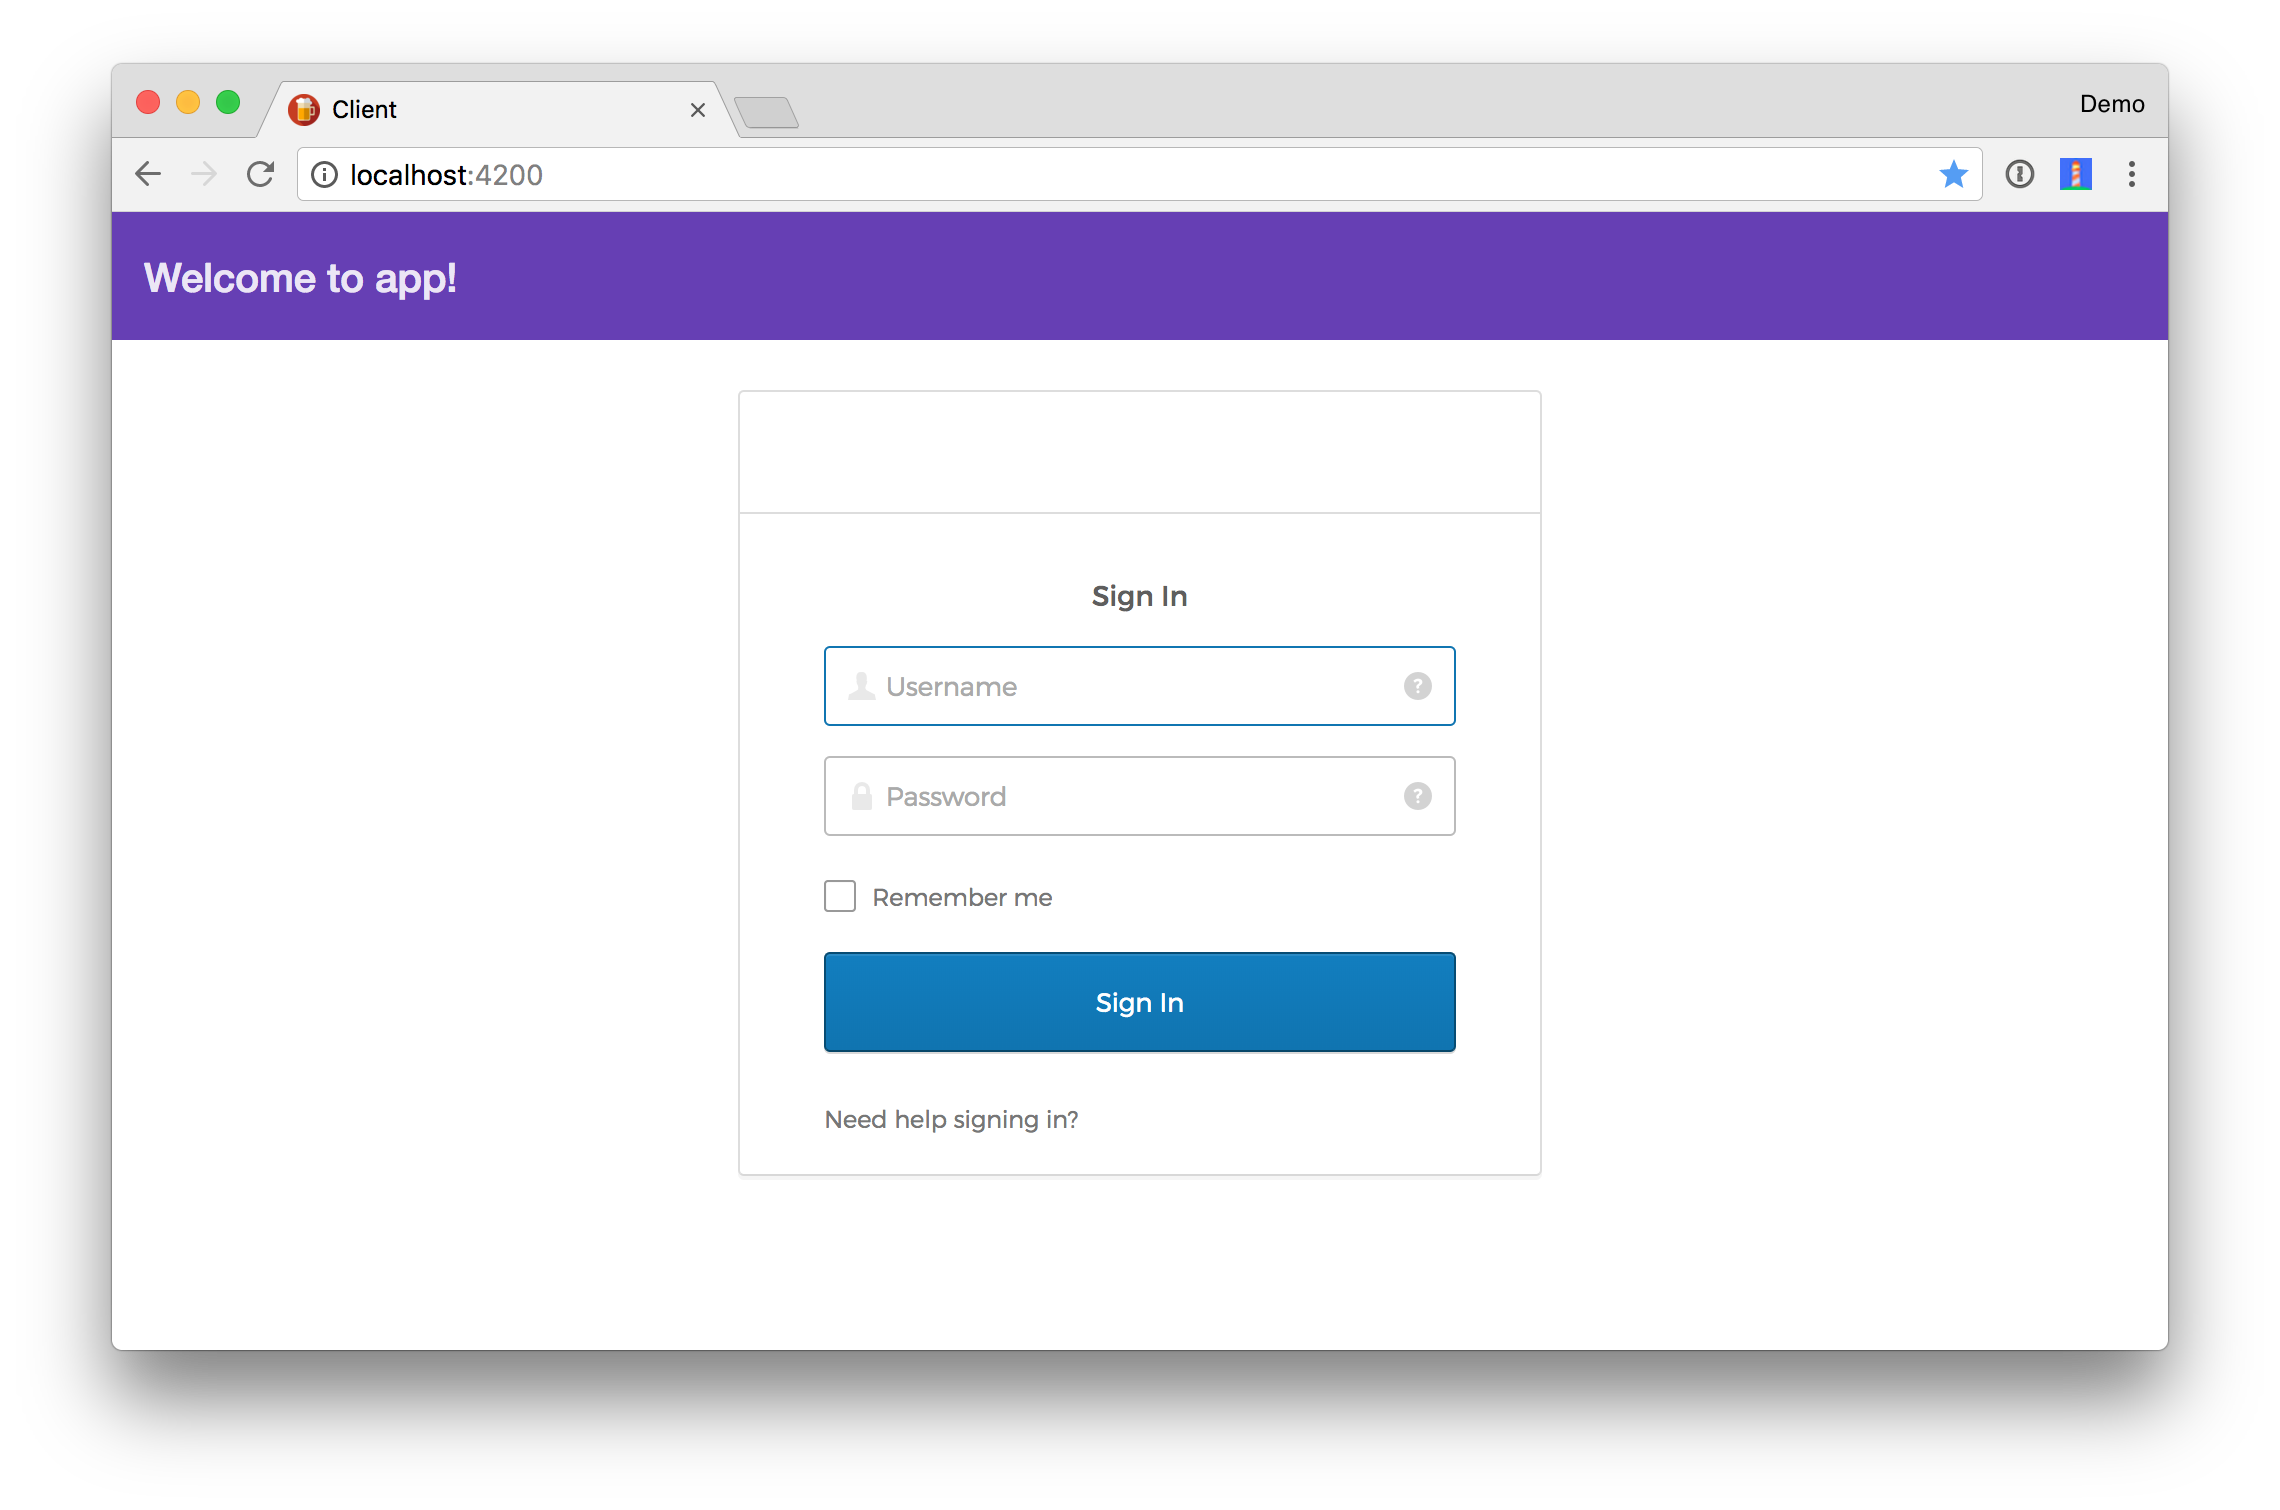
If you want to adjust the style of the form, so it isn’t right up against the top toolbar, add the following to client/src/styles.css.
#okta-signin-container {
  margin-top: 25px;
}
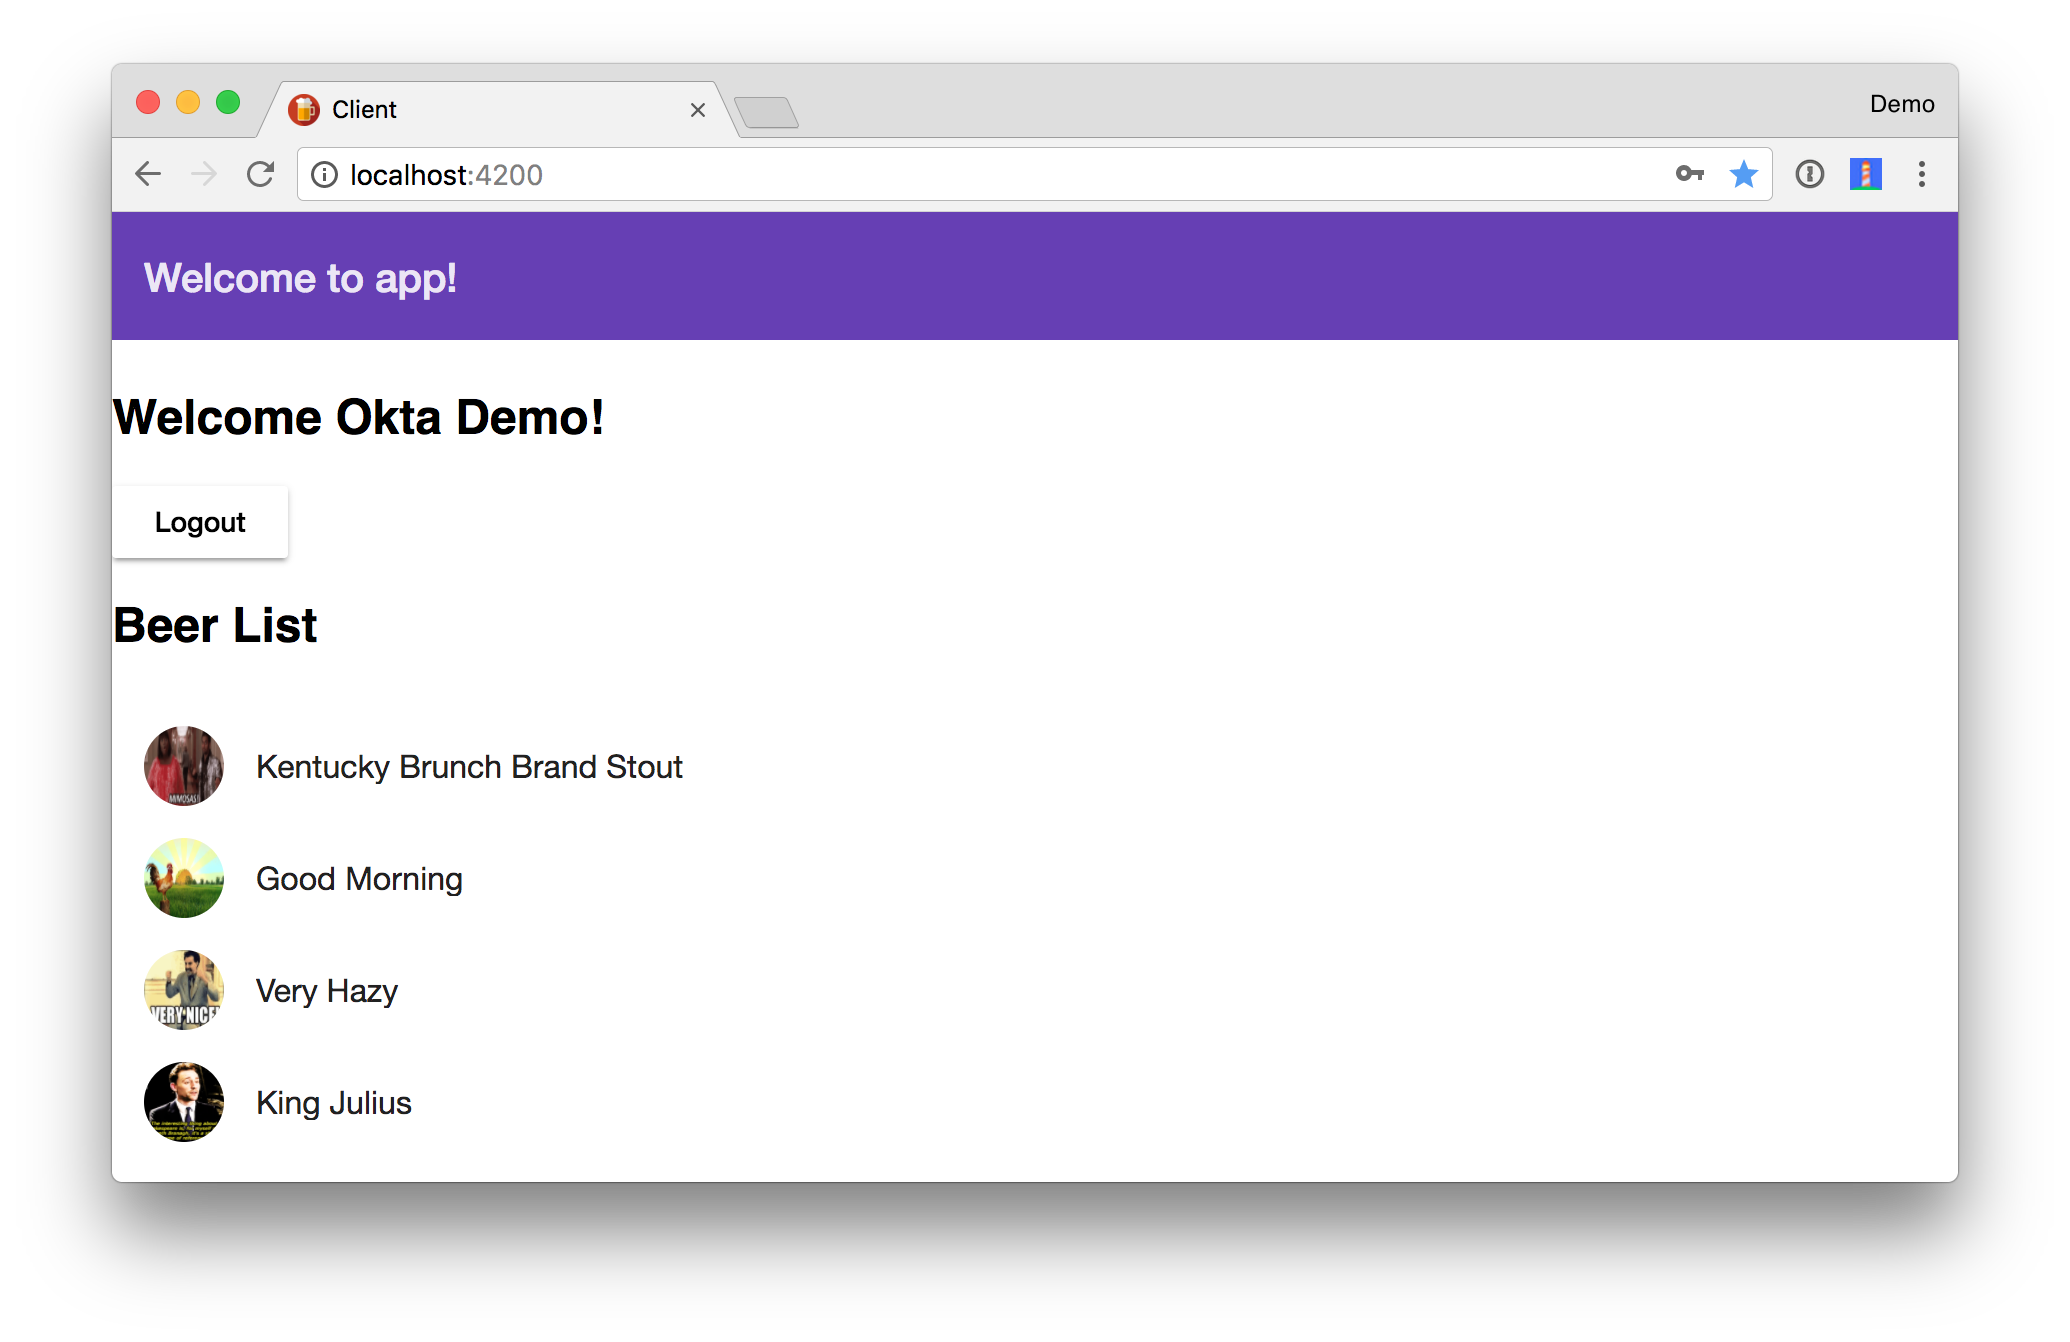
You should be able to log in, see a welcome message, as well as a logout button.
Learn More
This article showed you how to use Spring Security, Okta, and a few Java libraries to secure a microservices architecture. With JWTs, Zuul, Spring Security, and Juiser, you can ensure your backend services communicate securely.
The source code for this tutorial is available on GitHub, in the “okta” branch.
git clone https://github.com/oktadeveloper/spring-boot-microservices-example.git
git checkout okta
Learn more about Okta and its APIs at developer.okta.com. If you have questions about this tutorial, please hit me up on Twitter @mraible or post a question to Stack Overflow with an “okta” tag.
Update: To learn how to lock down this application with Spring Security and OAuth, see Secure a Spring Microservices Architecture with Spring Security and OAuth 2.0.
Changelog:
- Feb 8, 2018: Updated to use Spring Boot 1.5.10, Angular 5.2.0, and the Okta Sign-In Widget v2.6.0. See the code changes in the example app on GitHub. Changes to this article can be viewed in this pull request.
- Jan 18, 2018: Updated to use latest client from Build Your First Progressive Web Application with Angular and Spring Boot and the Okta Sign-In Widget v2.5.0. See the code changes in the example app on GitHub. Changes to this article can be viewed in this pull request.
Matt Raible is a well-known figure in the Java community and has been building web applications for most of his adult life. For over 20 years, he has helped developers learn and adopt open source frameworks and use them effectively. He's a web developer, Java Champion, and Developer Advocate at Okta. Matt has been a speaker at many conferences worldwide, including Devnexus, Devoxx Belgium, Devoxx France, Jfokus, and JavaOne. He is the author of The Angular Mini-Book, The JHipster Mini-Book, Spring Live, and contributed to Pro JSP. He is a frequent contributor to open source and a member of the JHipster development team. You can find him online @mraible and raibledesigns.com.
Okta Developer Blog Comment Policy
We welcome relevant and respectful comments. Off-topic comments may be removed.