Build Your Own Invoicing Service with Node, Coinbase, Bitcoin, and Okta
I got into Bitcoin back in 2011. Since then, I’ve been a fan of cryptocurrencies and have always had an interest in them. I’ve also built several Bitcoin projects over the years (an information website, an ecommerce site, and several others) to help promote the usage of the cryptocurrency (while having some fun).
The idea of being able to send and receive money almost instantly from anywhere in the world with no middleman is really appealing to a lot of people.
Today, I thought it’d be fun to build a small web invoicing portal (something similar to FreshBooks, but much less sophisticated) that allows you to easily invoice your clients over email and collect payment in Bitcoin.
The client can then pay their invoices using their local currency or Bitcoin (if they have it). In the end: you’ll be able to manage and bill your clients and receive payment in Bitcoin.
I do a bit of consulting work myself and will be using this in the future. =)
PS: If you want to skip the article and go straight to the code, go for it! I’m using Node.js, Express.js, and Coinbase to power the application.

Note: In May 2025, the Okta Integrator Free Plan replaced Okta Developer Edition Accounts, and the Okta CLI was deprecated.
We preserved this post for reference, but the instructions no longer work exactly as written. Replace the Okta CLI commands by manually configuring Okta following the instructions in our Developer Documentation.
Get Started with Coinbase, Okta, and Node.js
Before I walk you through building the application, there are a few things you’ll need to do.
You’ll need to go create an account with Coinbase. Coinbase is the largest and most popular Bitcoin exchange in the US. It allows you to easily get started using Bitcoin without needing to install software, learn a lot, etc.
You’ll also need to create an Okta developer account. Okta is an API service that allows you to create user accounts, and perform simple authentication and authorization for your web apps, mobile apps, and API services.
Finally, you’ll need to have Node.js setup on your computer and be ready to do some coding! >:)
Set Up Coinbase
To send invoices and request money from different clients you might be consulting for, you’ll need to first generate a Coinbase API key with the proper permissions.
Coinbase has an expansive API that you can use to do a number of things: one of which is send invoices requesting money. To do this, you’ll need to visit the Coinbase API management page, then click the button to create a new API key.
When you see the popup modal that prompts you for permissions, use the settings below:
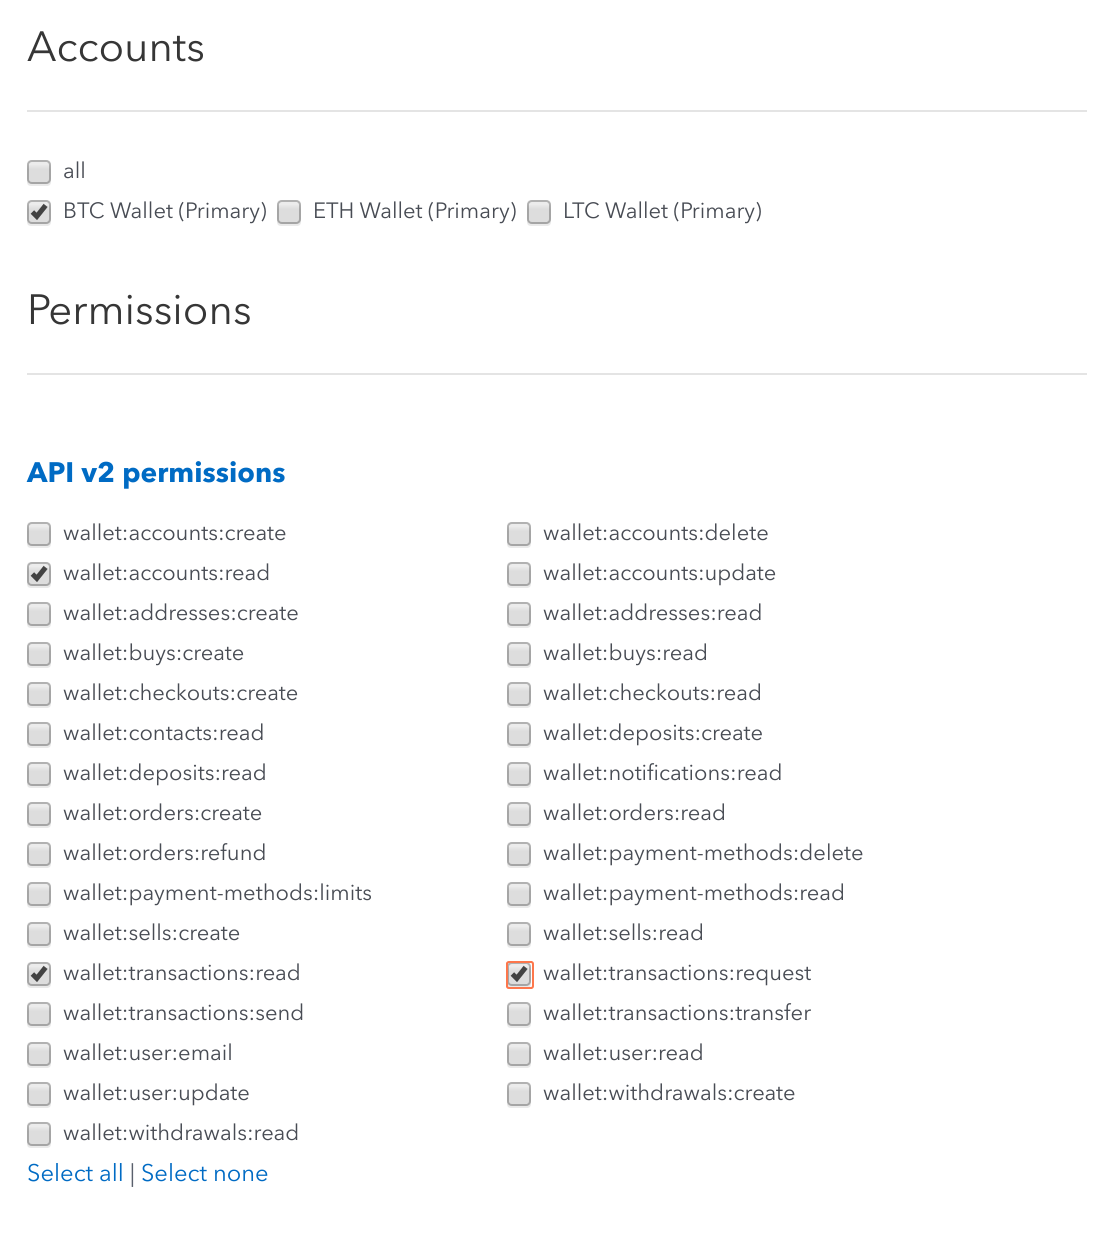
What you’re doing here is requesting API permission to:
- View your different Coinbase accounts (wallet:accounts:read)
- View any past transactions you’ve made (wallet:transactions:read)
- Create new transactions to request money (wallet:transactions:request)
Once you’ve finished creating the key, you’ll be able to see an API key and API secret value. Copy these down, you’ll need them later.
Set Up Okta
Now that your Coinbase account is ready for usage, you need to set up your Okta account. This is what you’ll be using to protect your portal so only you can access it.
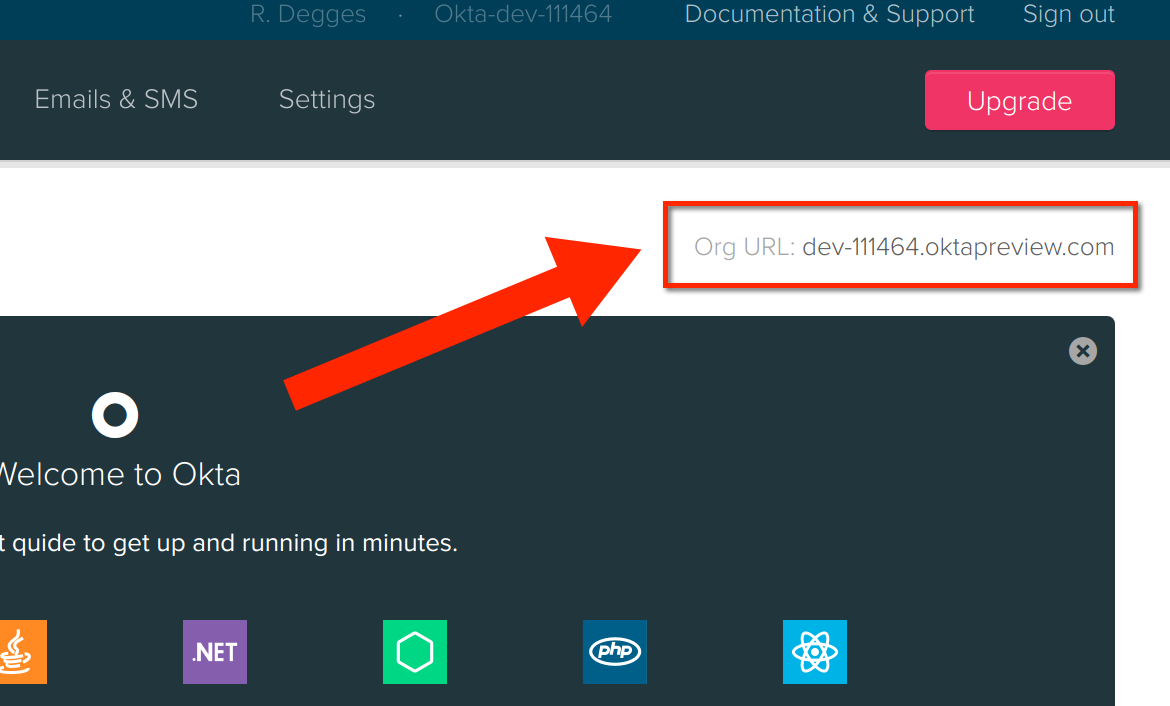
Log into your Okta dashboard and copy down the Org URL value you see at the top right of the page. You will need this value later. It looks something like this:
You next need to create a new Okta Application. Using Okta, you can manage users for many applications you might have.
To do this, click the large Applications menu item and click Add Application. Then when you are prompted, select the Web application option. This tells Okta that you are building a web application (not an API service, for instance). Behind the scenes, Okta uses this information to set your app up with the proper types of OAuth 2.0 and OpenID Connect.
Now you’ll see a page asking you to define your Application settings. Use the values below:
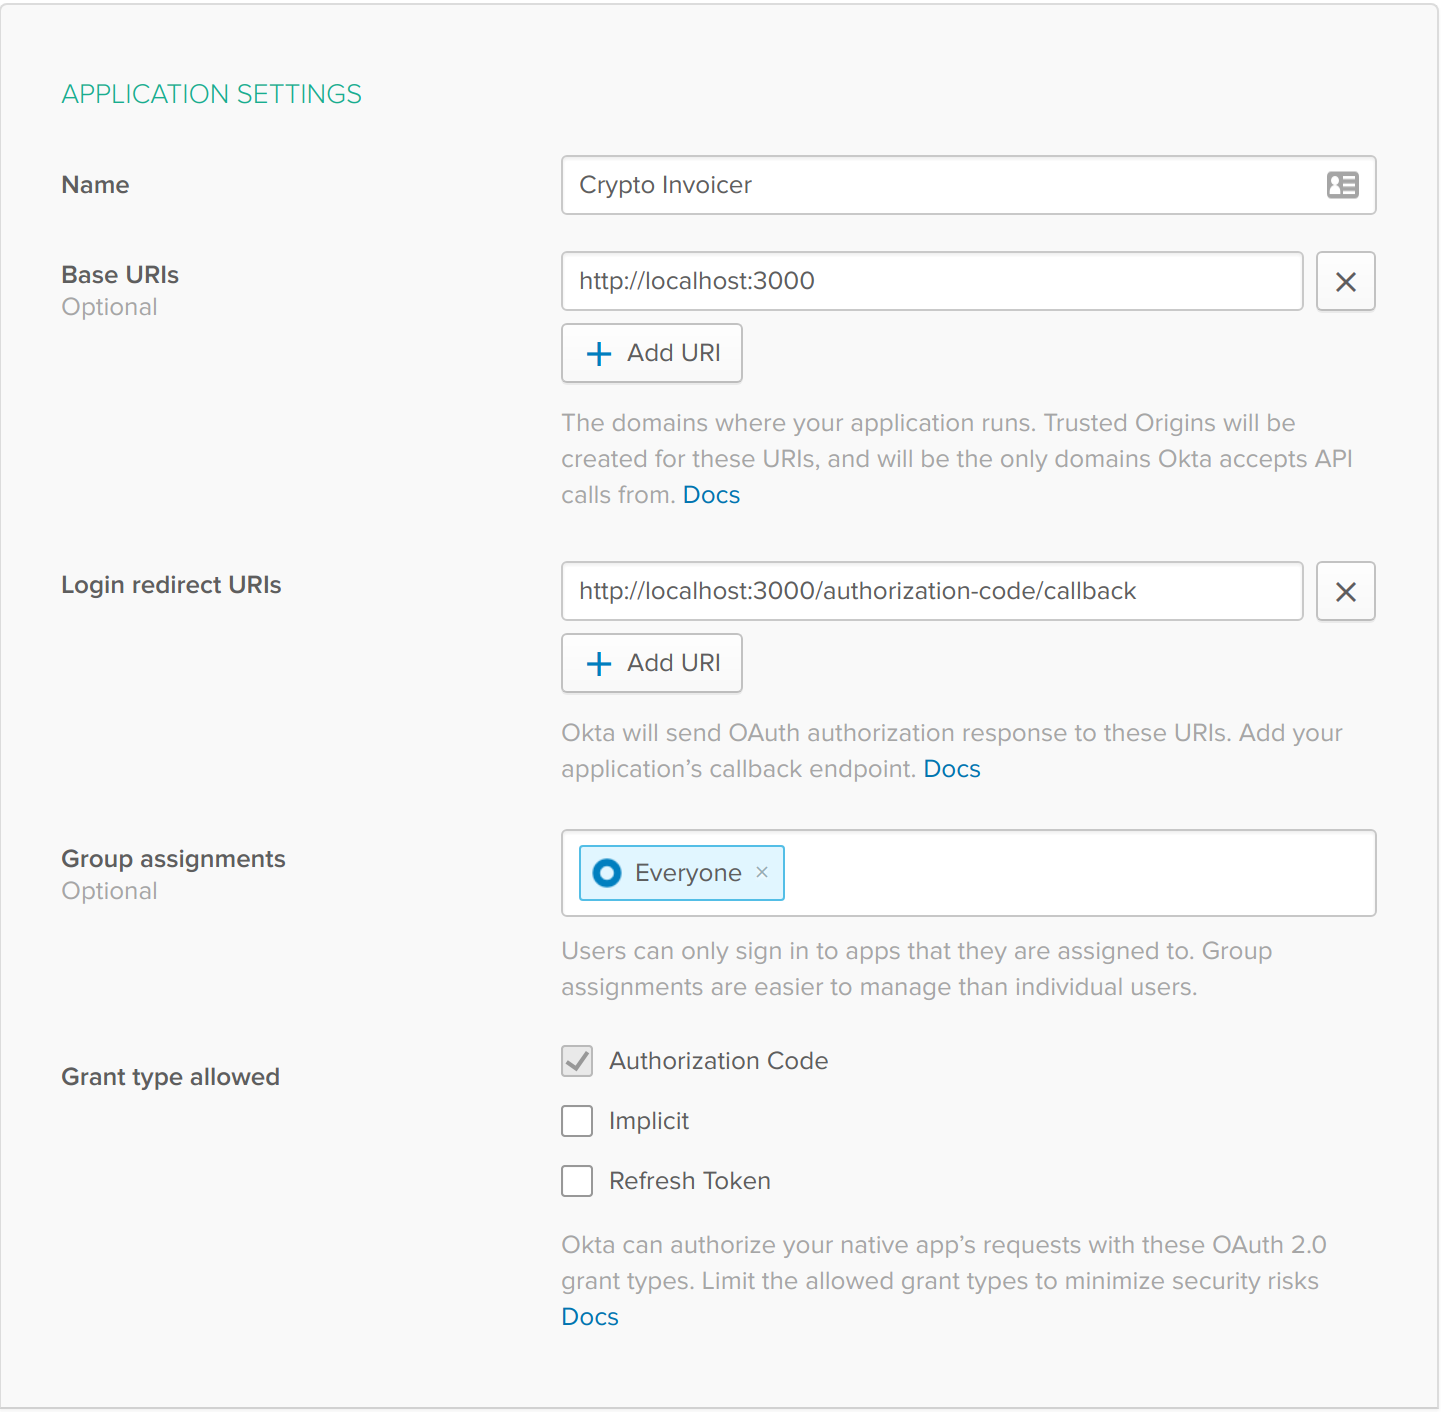
These settings basically tell Okta where your web app will be running (locally in this example) and what sort of security rules to apply.
Once you’ve finished creating the Application, you’ll then be taken to your settings page for this newly created Application. You’ll want to copy down two values, your Client ID and Client Secret. These will be needed later.
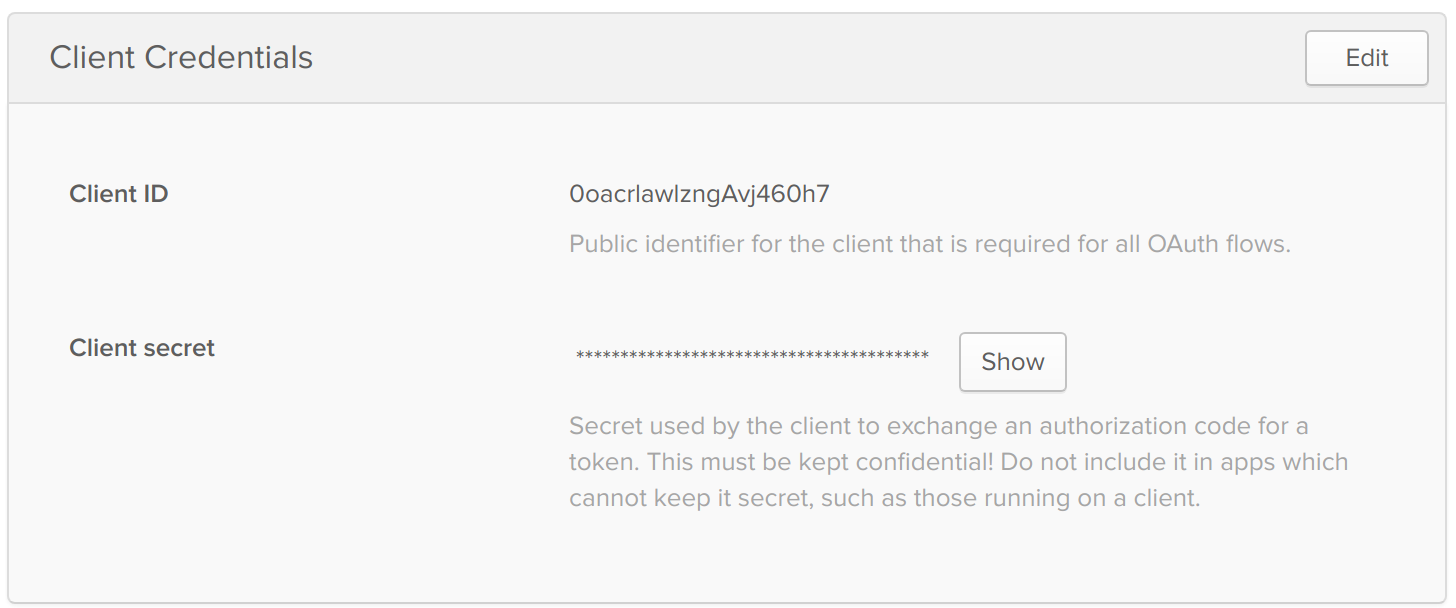
These credentials will be used to communicate securely with Okta in order to authenticate yourself into the web portal later.
Clone the Project
Now that we’ve done the boring stuff, let’s take a look at some code.
You can either clone the project locally from my GitHub repository:
$ git clone https://github.com/oktadeveloper/crypto-invoicer
Or you can fork the project to your own GitHub account and then clone that locally. This might make it easier to make changes and play around with the code as you follow along below.
Through the rest of this article, I’ll assume that you’re working inside of the cloned/forked project directory.
Set Up Your Credentials
Now let’s take the credentials you gathered earlier and define them as environment variables that you’ll use to store these sensitive values.
To do this, you’ll want to create a file named .env which looks like the following:
# .env
export OKTA_ISSUER_URI=https://xxx/oauth2/default
export OKTA_CLIENT_ID=xxx
export OKTA_CLIENT_SECRET=xxx
export REDIRECT_URI=http://localhost:3000/authorization-code/callback
export PORT=3000
export SECRET=xxx
export COINBASE_APIKEY_ID=xxx
export COINBASE_APIKEY_SECRET=xxx
Substitute your credentials where you see the xxx placeholder:
OKTA_ISSUER_URIshould be set to the value of the org URL value you copied down earlier, and placed into the URL. The final URL should look likehttps://{yourOktaDomain}/oauth2/default.OKTA_CLIENT_IDandOKTA_CLIENT_SECRETare the Application credentials you generated when you created your Okta Application previouslyREDIRECT_URIis a hard-coded URL that will be used as part of the authentication flow. More on this later.PORTis the HTTP port you’ll be running your webserver on.3000is standard for Node.js appsSECRETshould be a long, random string you define. This is used to secure your HTTP sessions and keep your authentication data safe. I like to generate these by bashing my hands on the keyboard for a second or two.COINBASE_APIKEY_IDandCOINBASE_APIKEY_SECRETare your Coinbase API credentials
Once you have these settings defined, you’ll need to tell your terminal to use these variables. To do this, if you’re using a standard Linux/Mac/BSD terminal, you can run the command:
$ source .env
The source command will tell your shell to take the variables defined in this file and make them available to the terminal for usage in your programs later on.
If you’re using Windows, you’ll need to do something different. Sorry!
Install Dependencies
Now that the setup is completely finished, install all of the project dependencies using npm, the Node.js package manager:
$ npm install
This command will install all of the dependent packages by analyzing the package.json and package-lock.json file in the project directory.
Among these dependencies, there are a few interesting ones:
- express is the web framework you’ll use to build the app
- coinbase-node is the officially supported Coinbase developer library you’ll be using to interact with the Coinbase API
- oidc-middleware is a popular OpenID Connect middleware maintained by Okta that handles user authentication and authorization for Node.js apps
Build the Frontend
Fair warning: I’m not a great frontend developer. I’m more of a server-side developer.
The first thing I like to do when starting new projects is quickly define the frontend views. This part is more difficult for me, so I like to get it out of the way upfront.
If you take a look at the views directory, you’ll notice that there are only three files: base.pug, index.pug, and dashboard.pug. These three views render the entire website.
base.pugis a shared base template that the other two templates extend. More on this in a moment.index.htmlis the home page of the sitedashboard.pugis the site’s dashboard view
I’ve defined these HTML views using the pug templating language. This lets you write HTML without all the closing tags and allows you to use whitespace to infer structure.
The base.pug template provides some common HTML that the other two views extend. This prevents you from needing to duplicate HTML that is shared between one or more pages.
Here’s what the base.pug template looks like:
doctype html
html(lang="en")
  head
    <!-- Required meta tags -->
    meta(charset="utf-8")
    meta(name="viewport", content="width=device-width, initial-scale=1, shrink-to-fit=no")

    <!-- Bootstrap CSS -->
    link(rel="stylesheet", href="https://bootswatch.com/4/sketchy/bootstrap.min.css")
    link(rel="stylesheet", href="/static/css/style.css")

  body
    .container
      block body

    <!-- Optional JavaScript -->
    <!-- jQuery first, then Popper.js, then Bootstrap JS -->
    script(src="https://code.jquery.com/jquery-3.2.1.slim.min.js", integrity="sha384-KJ3o2DKtIkvYIK3UENzmM7KCkRr/rE9/Qpg6aAZGJwFDMVNA/GpGFF93hXpG5KkN", crossorigin="anonymous")
    script(src="https://cdnjs.cloudflare.com/ajax/libs/popper.js/1.12.3/umd/popper.min.js", integrity="sha384-vFJXuSJphROIrBnz7yo7oB41mKfc8JzQZiCq4NCceLEaO4IHwicKwpJf9c9IpFgh", crossorigin="anonymous")
    script(src="https://maxcdn.bootstrapcdn.com/bootstrap/4.0.0-beta.2/js/bootstrap.min.js", integrity="sha384-alpBpkh1PFOepccYVYDB4do5UnbKysX5WZXm3XxPqe5iKTfUKjNkCk9SaVuEZflJ", crossorigin="anonymous")
This is a pretty standard HTML page that uses the Bootstrap CSS library with the Sketchy Bootswatch theme. This theme makes the entire site look like a mockup. Since this is an example application, I thought the theme was fitting.
The index.pug view is also quite simple:
extends base.pug
block body
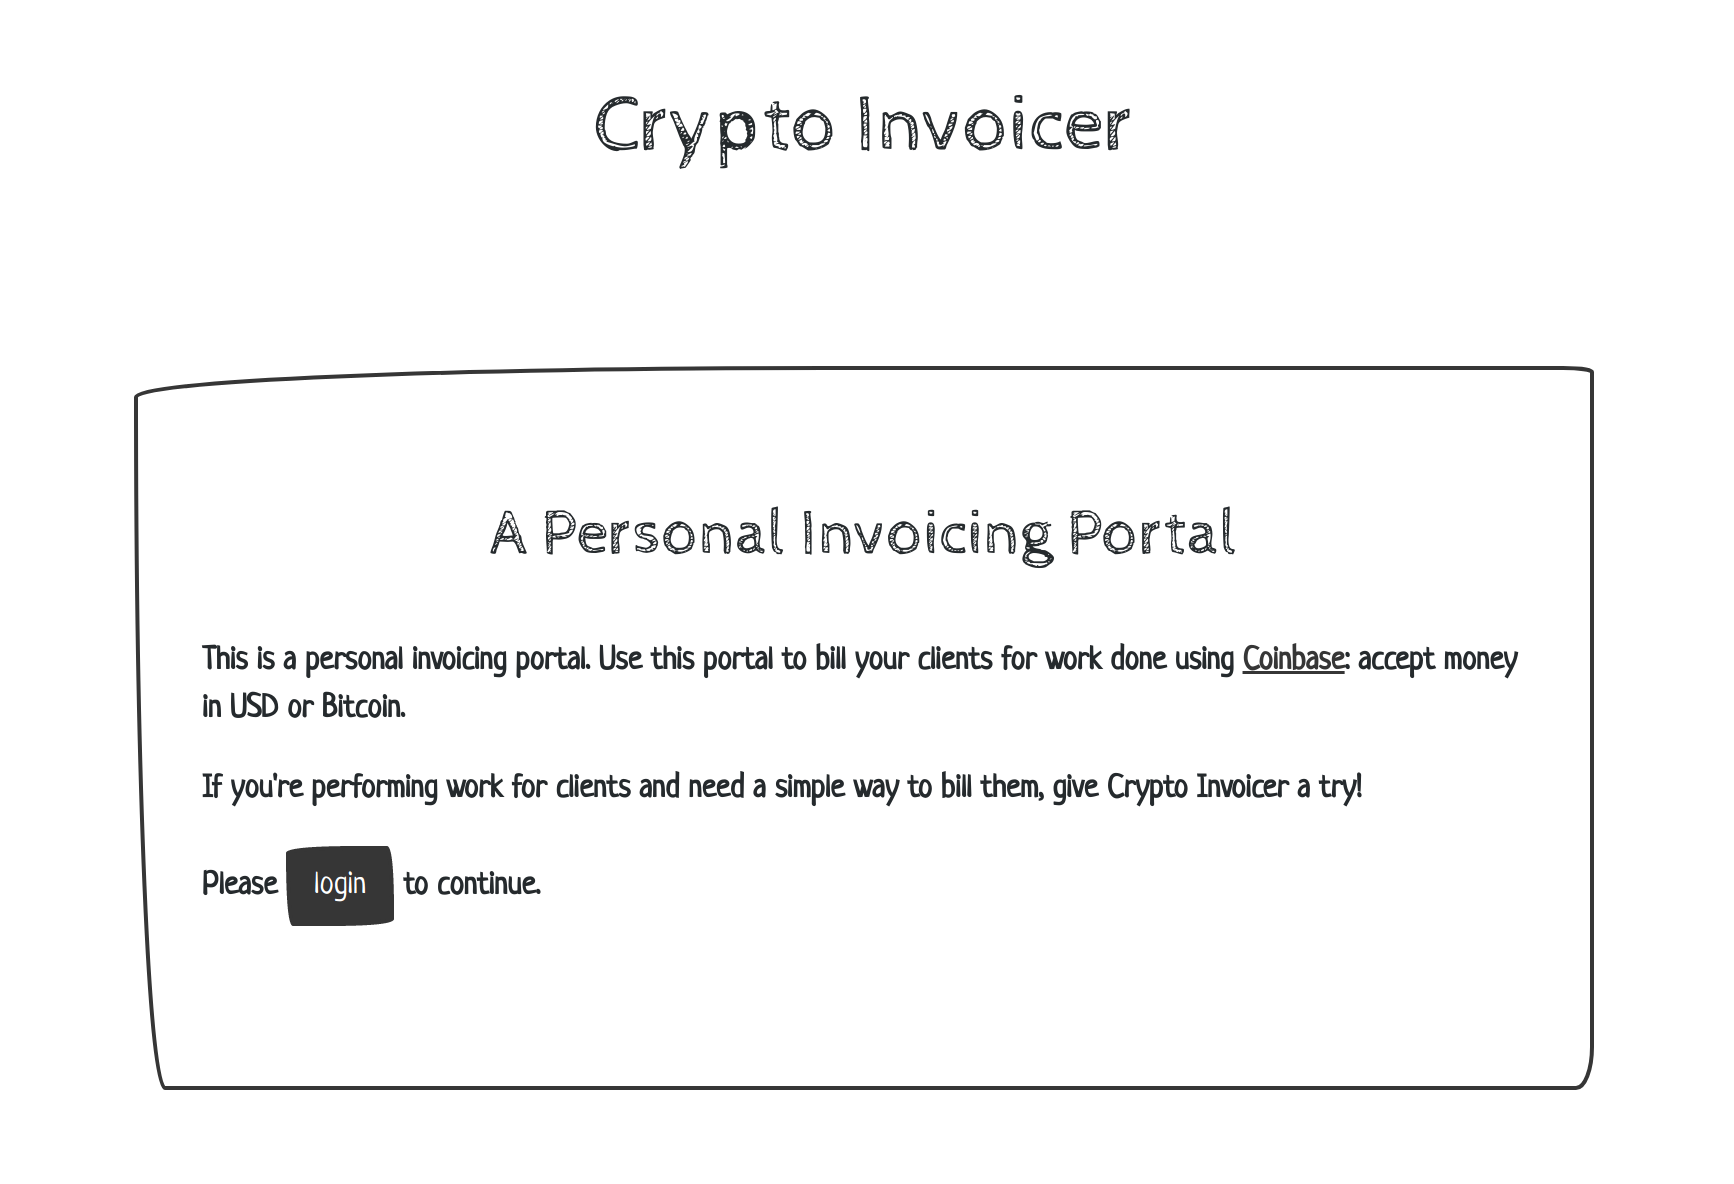
h1.text-center.head Crypto Invoicer
.row.intro
.col
.col-8
.jumbotron
h2.text-center A Personal Invoicing Portal
p.
This is a personal invoicing portal. Use this portal to bill your clients
for work done using #[a(href="https://www.coinbase.com/") Coinbase]:
accept money in USD or Bitcoin.
p.
If you're performing work for clients and need a simple way to bill
them, give Crypto Invoicer a try!
p.
Please #[a.btn.btn-primary(href="/login") login] to continue.
.col
This template simply displays a basic home page that prompts the user to log into their account to continue:
The last view you need to inspect is the dashboard.pug view. This view renders the dashboard page that allows a user to create and view their invoices.
extends base.pug
block body
script(src="/static/js/sorttable.js")
ul.nav.nav-pills.justify-content-end
li.nav-item
a.nav-link.active(href="/") Home
li.nav-item
a.nav-link.active(href="/logout") Logout
h1.text-center Dashboard
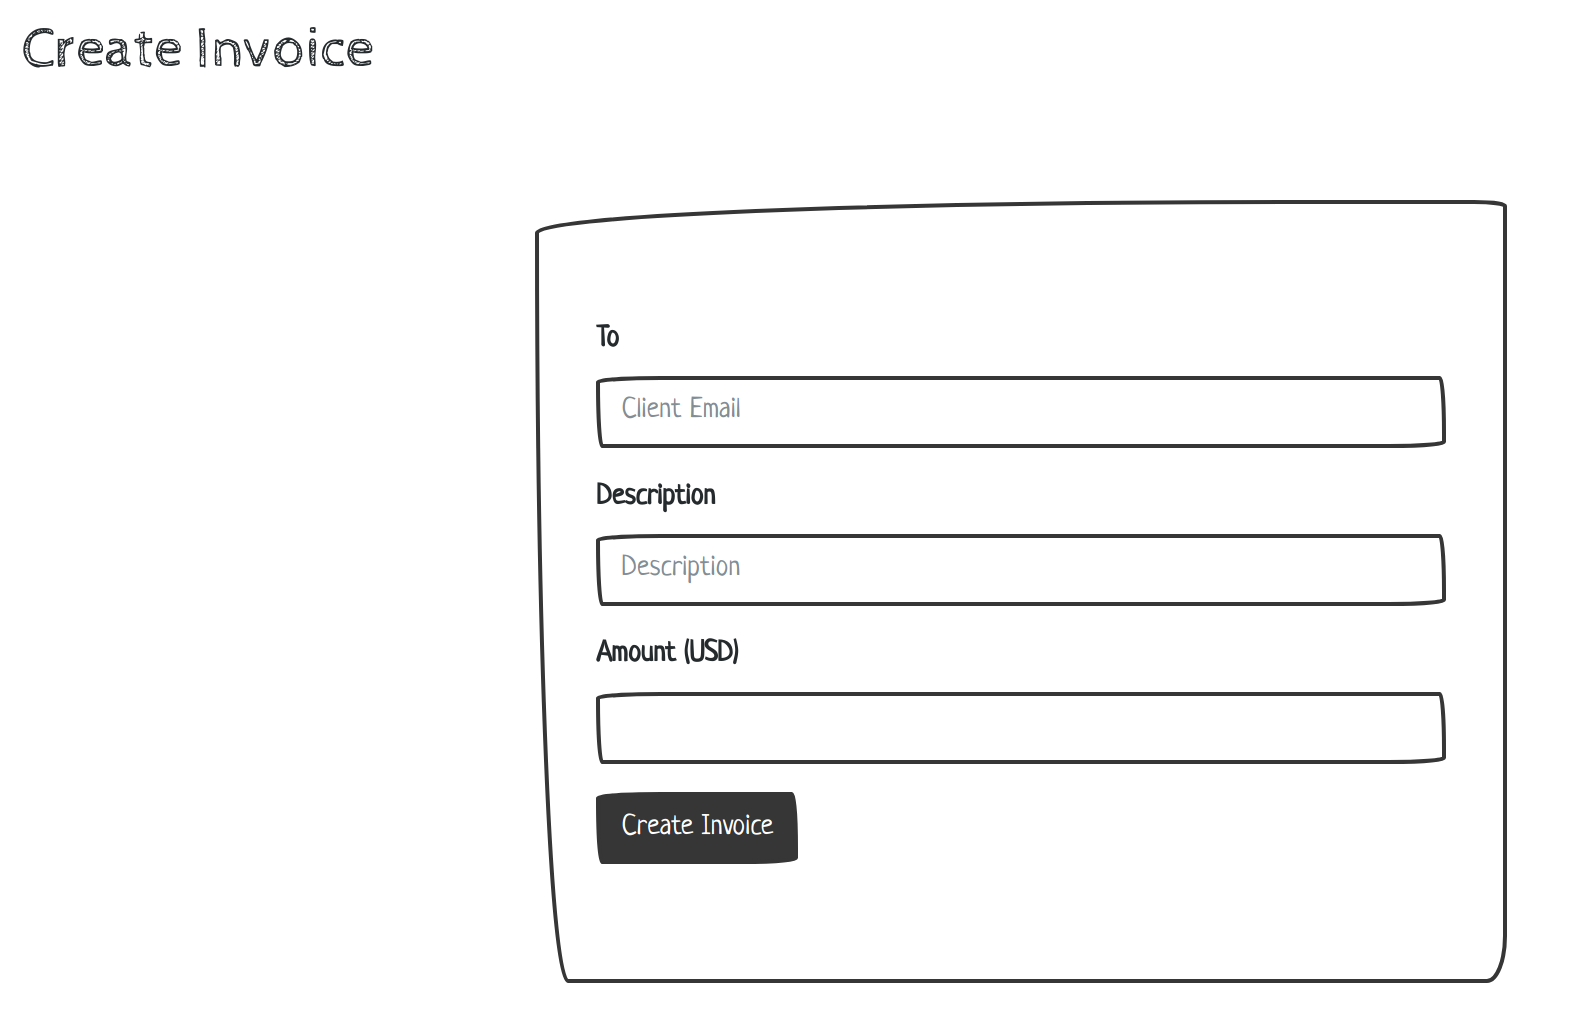
h2.create-invoice Create Invoice
.row
.col
.col-6
.jumbotron
if error
p.error #{error}
form.form(method="post")
.form-group
label(for="email") To
input#email.form-control(type="email", placeholder="Client Email", name="email", required=true)
.form-group
label(for="description") Description
input#description.form-control(type="text", placeholder="Description", name="description", required=true)
.form-group
label(for="amount") Amount (USD)
input#amount.form-control(type="number", min="1", step="any", name="amount", required=true)
button.btn.btn-primary(type="submit") Create Invoice
.col
if transactions
h2 Invoices
table.table.sortable
thead.thead-dark
tr
td Invoice #
td Date Created
td Completed?
td Client Email
td Description
td Amount (USD)
tbody
each transaction in transactions
tr
td #{transaction.id}
td #{new Date(transaction.created_at).toLocaleDateString("en-US", { hour12: false, year: "numeric", month: "2-digit", day: "2-digit", hour: "2-digit", minute: "2-digit", second: "2-digit" })}
td #{transaction.status}
td #{transaction.to.email}
td #{transaction.description}
td $#{transaction.native_amount.amount}
This page is a bit more complex. It does a few key things:
- It creates a form that allows the user to send a client an invoice. This form takes a few input parameters: the client’s email address, a description of what is being billed, and finally an amount (in USD) to bill the client.
- It lists all past invoices in an HTML table that can be sorted with JavaScript. To do this, you’ll use pug to loop through all past transaction objects, and display their data as appropriate.
When you render this page, you’ll see the invoice creation form:
And… If you’ve generated any past invoices, you’ll see them listed below:
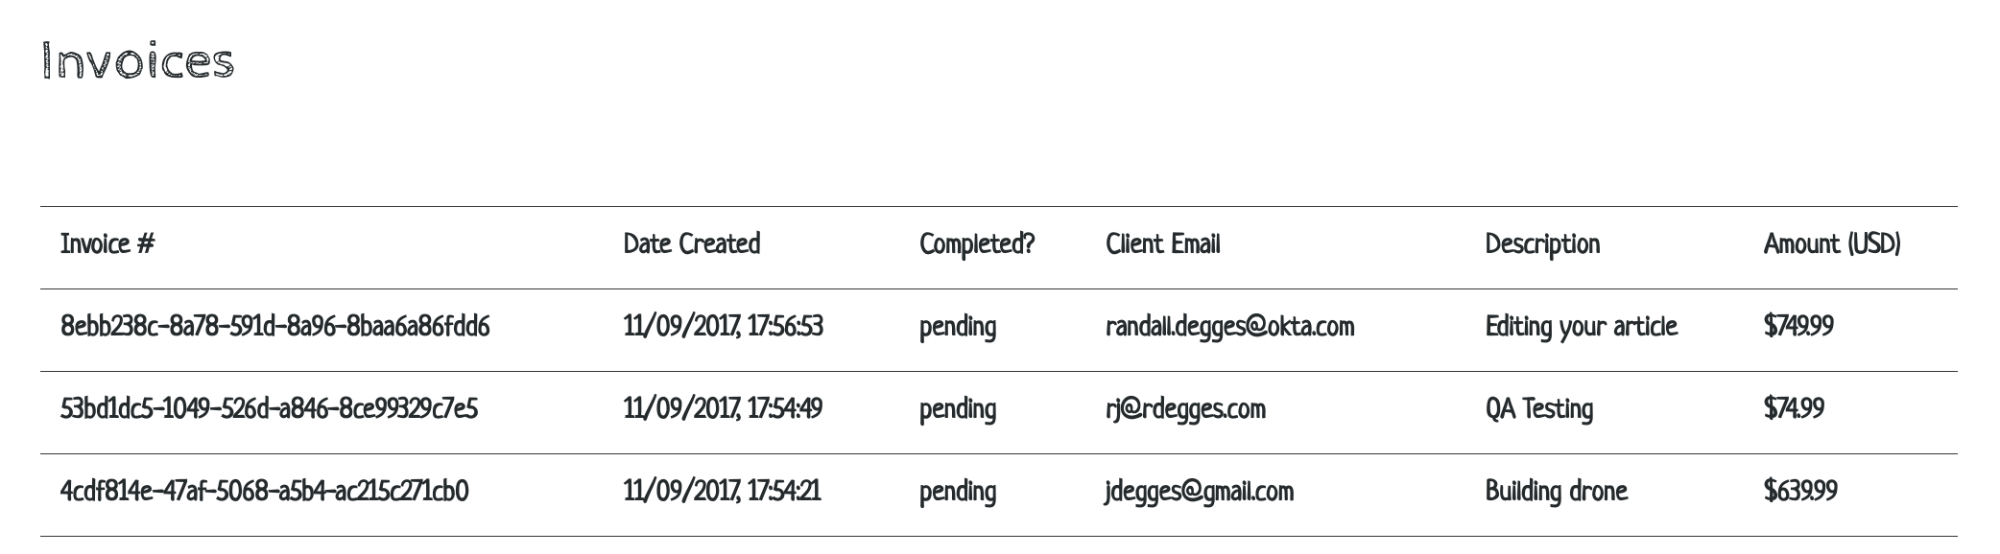
You’ll also notice that if you click one of the table headers, you’re able to sort all of the invoices by any column you want.
If you take a look at the dashboard.pug template code above, you can see how this works:
- The sorttable JavaScript library is used to provide automatic table sorting in the browser
- Pug is being used to display transaction details
Other than these two things, the rest of the page is plain old HTML. Nothing fancy!
Build the Server
Now that you’ve seen how the frontend code works, let’s take a look at the server-side codebase.
Open up the server.js file found in the root of the project folder and follow along below.
Import Dependencies
The first thing I do in the server.js is import all the Node.js dependencies needed to run the app:
"use strict";

const Client = require("coinbase").Client;
const async = require("async");
const bodyParser = require("body-parser");
const express = require("express");
const session = require("express-session");
const ExpressOIDC = require("@okta/oidc-middleware").ExpressOIDC;
Nothing special here! Importing dependencies is standard in just about every app.
Define Globals
The next thing you’ll notice in server.js is a section of code that defines a number of global variables:
// Globals
const OKTA_ISSUER_URI = process.env.OKTA_ISSUER_URI;
const OKTA_CLIENT_ID = process.env.OKTA_CLIENT_ID;
const OKTA_CLIENT_SECRET = process.env.OKTA_CLIENT_SECRET;
const REDIRECT_URI = process.env.REDIRECT_URI;
const PORT = process.env.PORT || "3000";
const SECRET = process.env.SECRET;
const client = new Client({
  apiKey: process.env.COINBASE_APIKEY_ID,
  apiSecret: process.env.COINBASE_APIKEY_SECRET
});

let account;
let transactions;

let app = express();
All the const definitions are fairly straightforward: they pull in the environment variable values that were set previously, and store them as JavaScript variables so they can be easily referenced.
The client variable defines a new Coinbase API client (which is later used to talk to the Coinbase API).
The account variable represents a Coinbase Account object. In Coinbase you can have any number of “Accounts”: Bitcoin wallets, USD wallets, etc. You can move money between these much like checking accounts at a normal bank. When implementing the invoicing later, you’ll need to know which Coinbase Account you want to issue the request for, this determines how you receive the money.
The transactions variable will be our own in-memory cache of all recent invoice transactions available to us via the Coinbase API. This is what we’ll use when rendering our dashboard page later on: we’ll store a cache of the transactions to avoid making API calls to Coinbase on each page load.
Finally, you’ll notice the app variable. This is a standard Express.js convention: create an app object and use that to start up the web server later on.
Configure App Settings and Middleware
Once the globals have been defined, the next thing you need to do is define the app settings and middleware.
There’s a section of code commented that contains these two blocks of functionality:
// App settings
app.set("view engine", "pug");

// App middleware
app.use("/static", express.static("static"));

app.use(session({
  cookie: { httpOnly: true },
  secret: SECRET
}));

// Authentication
let oidc = new ExpressOIDC({
  issuer: OKTA_ISSUER_URI,
  client_id: OKTA_CLIENT_ID,
  client_secret: OKTA_CLIENT_SECRET,
  redirect_uri: REDIRECT_URI,
  routes: { callback: { defaultRedirect: "/dashboard" } },
  scope: "openid profile"
});

app.use(oidc.router);
There’s only one actual app setting here: app.set("view engine", "pug");, and all it does is tell Express to use the pug templating engine when rendering views.
Below that are the middleware definitions.
The first middleware defined is express.static. This middleware is configured to serve static assets (css, images, javascript) from the static directory in the root of the project folder. This definition tells Express that any requests that start with /static should be routed to that folder, and automatically return whatever files exist there.
This might be a good time to inspect the static folder and see what’s in it. There are only two files:
- A
style.cssfile which holds some custom styling, and - A
sorttable.jsscript which is used in our frontend to make our HTML table sortable
Next you’ll see the express-session middleware defined. What this middleware does is configure Express to store sensitive user information in cookies (which are the safest way to store authentication data). When you are logged into the website via Okta later on, your authentication information will be stored in these cookies that are managed by this library.
NOTE: The SECRET variable that’s used when initializing the session library is incredibly important. This long, random string that you previously defined is what keeps your cookies safe from tampering. If this value is ever leaked publicly (on GitHub, etc.) it would be a security catastrophe. All cookie-based systems require a secret key to be used to cryptographically validate the cookie.
The last middleware you’ll see is the oidc-middleware. This is a little more complex, as it handles a lot of magic behind the scenes, and makes all the authentication logic in the application work.
The way this middleware works is by fully enabling your app to use OpenID Connect (OIDC) for authentication. When you define the new ExpressOIDC and give it your Okta configuration information, it builds an OIDC object that remembers all your application rules: what URL your application runs one, where to redirect the user after they’ve logged in, what your secret application keys are, etc.
Once this new object is created, it contains an Express router object that is then enabled below with the app.use(oidc.router); call. This line registers some magical routes behind the scenes: the main one of which is /login.
When this line of code is executed any requests to /login will redirect you to your dedicated login page (hosted by Okta), and prompt you to log into the application. Once the user has been logged in, they will then be redirected BACK to your Node.js application, where they will be logged in and able to access the dashboard page.
Define Helpers
Let’s skip towards the bottom of the server.js file now and take a look at the updateTransactions function:
// Helpers
function updateTransactions(cb) {
  transactions = [];
  let pagination = null;

  async.doWhilst(
    function(callback) {
      account.getTransactions(pagination, (err, txns, page) => {
        if (err) {
          return callback(err);
        }

        pagination = page.next_uri ? page : false;

        txns.forEach(txn => {
          if (txn.type === "request") {
            transactions.push(txn);
          }
        });

        callback();
      });
    },
    function() {
      return pagination ? true: false;
    },
    function(err) {
      if (err) {
        return cb(err);
      }

      cb(null, transactions);
    }
  );
}
The purpose of this helper function is to build an in-memory cache of Coinbase transactions.
Each time you request money from a client and send them an invoice, Coinbase creates a transactional record. There are many different types of transactions that Coinbase logs, so what this function does is iterate through all available transactions, pruning out just the ones relevant to invoicing, then stores them in the global transactions array variable for later usage.
The idea here is that each time the dashboard is displayed, instead of talking to the Coinbase API and performing this logic in real-time, the app will simply pull the latest list of transactions out of the cache instead.
In this function I’m using the async library to perform a do-while loop that:
- Talks to the Coinbase API and requests a list of transactions
- Tries to determine whether there are any more “pages” of transactions left to iterate through (because there may be many transactions, it might require many requests to the Coinbase API to retrieve them all)
- Filters out only the transactions that are of the type “request”, as these are the “request” money transactions that this app generates
- Stores them in the global
transactionsarray for later usage
Define Startup Jobs
The next thing you’ll do is define the jobs that need to run each time this Node.js server starts up.
If you take a look at the startup jobs code block, you’ll see what I mean:
// Startup jobs
client.getAccounts({}, (err, accounts) => {
  if (err) {
    console.error(err);
  }

  accounts.forEach(acct => {
    if (acct.primary) {
      account = acct;
      console.log("Found primary account: " + account.name + ". Current balance: " + account.balance.amount + " " + account.currency + ".");

      console.log("Downloading initial list of transactions.");
      updateTransactions(err => {
        if (err) {
          console.error(err);
        }
      });
    }
  });
});
What this code does is:
- Use the Coinbase API to list all Accounts (these are the places you can store money in Coinbase)
- Look through each Account until it finds the primary (this is usually your Bitcoin wallet used to store Bitcoin)
- Sets the global
accountvariable to this value
Then, once the proper Account object has been found, this code will execute the updateTransactions helper function defined earlier, to build the initial in-memory cache of transactions.
This way, shortly after the web server starts running all transaction data will be available for querying.
Define Server Management Code
Towards the bottom of the server.js file you’ll see a few things:
// Cron jobs
setInterval(() => {
  updateTransactions(err => {
    if (err) {
      console.error(err);
    }
  })
}, 1000 * 60 * 60);

// Server management
oidc.on("ready", () => {
  app.listen(PORT);
});

oidc.on("error", err => {
  console.error(err);
});
The setInterval() call essentially tells this Node.js process to update the cache of transaction data once per hour (in milliseconds). This way, all transaction information will be at most one hour old.
Finally, the Express app itself will be launched once the authentication library has finished preparing itself.
NOTE: It’s important not to run the web server (app.listen(PORT);) until the OIDC library emits the “ready” event. This could result in odd security edge cases where a user making requests to protected pages on your website runs into errors if they make a request before the OIDC library has finished configuring itself.
Create Routes
Now that we’ve gone through the rest of the server.js code, let’s look at the final section we skipped from earlier (the routes):
// App routes
app.get("/", (req, res) => {
  res.render("index");
});

app.get("/dashboard", oidc.ensureAuthenticated(), (req, res) => {
  res.render("dashboard", { transactions: transactions });
});

app.post("/dashboard", oidc.ensureAuthenticated(), bodyParser.urlencoded(), (req, res) => {
  account.requestMoney({
    to: req.body.email,
    amount: req.body.amount,
    currency: "USD",
    description: req.body.description
  }, (err, txn) => {
    if (err) {
      console.error(err);
      return res.render("dashboard", { error: err });
    }

    updateTransactions((err, transactions) => {
      if (err) {
        console.error(err);
        return res.render("dashboard", { error: err.message });
      }

      return res.render("dashboard", { transactions: transactions })
    });
  });
});

app.get("/logout", (req, res) => {
  req.logout();
  res.redirect("/");
});
The first route just displays the home page of the site. Since all we need here is to show a simple template, there’s nothing special we need to do other than render the page.
The app.get("/dashboard") route is what displays the dashboard page when requested. What’s important to note here is the additional middleware it uses: oidc.ensureAuthenticated(). This middleware forces the user to log in before being able to access this page.
If you try to visit the /dashboard page before logging in, for instance, you’ll be redirected to the login page and forced to authenticate.
Once the user has authenticated, however, they’ll be allowed into the dashboard page, which simply renders itself using the in-memory cache of transaction data.
The app.post("/dashboard") route is what handles the invoicing.
When a user fills out the invoice form and clicks “submit”, this route is processed and receives the invoicing data. It then talks to Coinbase using the Coinbase API and generates a proper money request (and email). Finally, before refreshing the page and showing the new list of transactions, this code will force a refresh of the transaction data cache.
By forcing the cache refresh after each new invoice is created, this prevents an issue where after creating an invoice you would not see it appear in the list below.
When invoices are generated and Coinbase sends out an email, the client receives an email that looks something like this:
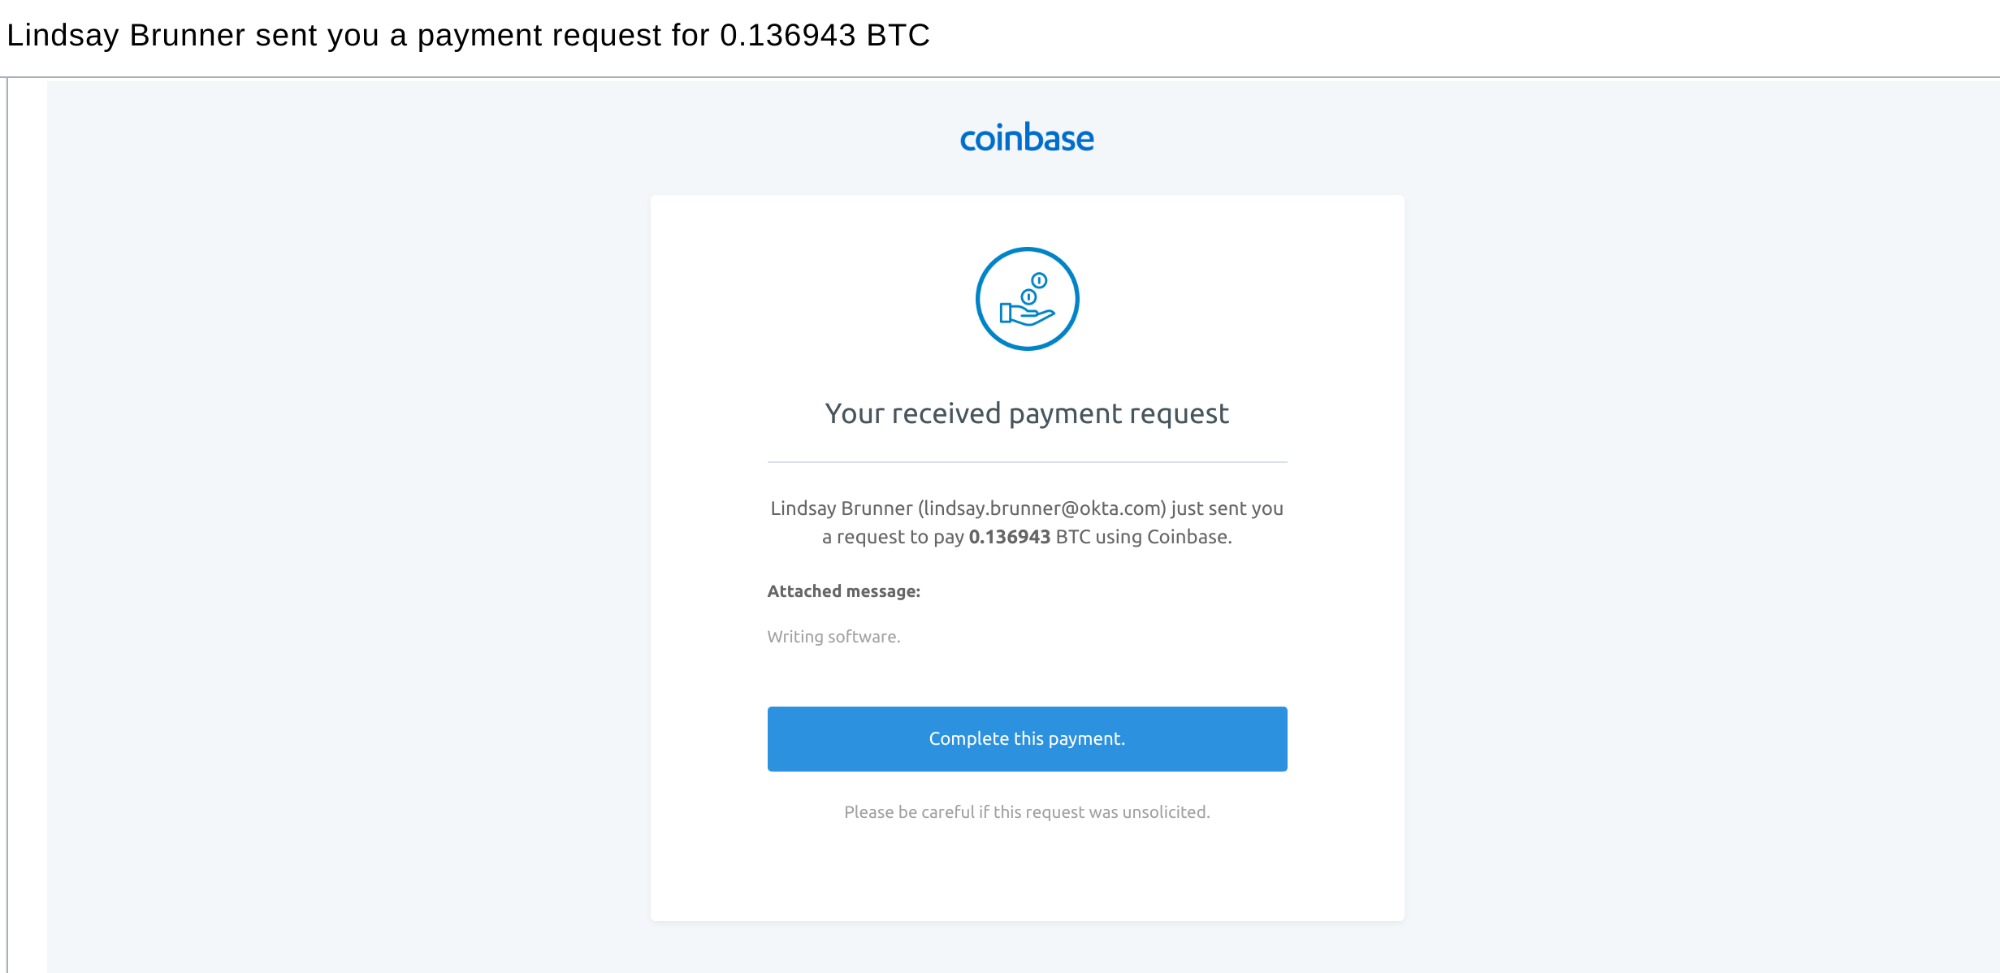
This is quite nice, because then a click can simply click the “Complete this payment.” button, and be redirected to Coinbase where they can complete the transaction using either Bitcoin or their local currency (USD) to pay.
Piece It Together
As I’ve hopefully shown you, building Bitcoin invoicing software using Node.js can be fairly straightforward.
The Coinbase API provides a lot of rich functionality. Paired with Okta for authentication and several open source Node.js libraries, you can quickly throw together complicated applications in a small amount of time.
If you’re interested in building cryptocurrency apps of your own, I highly recommend you create a Coinbase account and check out their fantastic API documentation. They have a good number of libraries and tools available to help you build your applications in a fun and fast way.
I’d also recommend creating an Okta developer account which you can use to store users for your web apps, mobile apps, and API services, as well as handle authentication, authorization, OAuth 2.0, OpenID Connect, Single Sign-On, etc.
Finally, if you’d like to see more articles like this, tweet @oktadev and let me know! <3 You can also look at some similar articles we’ve written recently:
- Protect Your Cryptocurrency Wealth Tracking PWA with Okta written by my colleague @mraible
- Build a Cryptocurrency Comparison Site with Vue.js by yours truly
Randall Degges runs Evangelism at Okta where he works on security research, development, and education. In his spare time, Randall writes articles and gives talks advocating for security best practices. Randall also builds and contributes to various open-source security tools.
Randall's realm of expertise include Python, JavaScript, and Go development, web security, cryptography, and infrastructure security. Randall has been writing software for ~20 years and has built some of the most-used API services on the internet.
Okta Developer Blog Comment Policy
We welcome relevant and respectful comments. Off-topic comments may be removed.