Comparing Authentication in Laravel Versions 6, 7, and 8
Laravel is one of the most popular PHP frameworks in use today. Version 8 was released in September 2020, and while the bulk of the framework hasn’t changed, each of the three most recent versions have included updates to the authentication pattern.
While Laravel 7 and 8 will both stop receiving updates in 2021, Laravel 6 is a long-term support version and will include security fixes until September 2022. So, if you’re upgrading or starting a new Laravel application, you should weigh your options for user authentication before you select one. In this article, I’ll highlight the similarities and differences between user authentication in Laravel 6, 7, and 8.
Authentication in Laravel 6
Laravel 6 was the first version of the framework that split the user interface package out into its own package (laravel/ui). This means you can choose whether or not to include the user interface elements of the framework.
For example, if you’re building a Laravel API that uses JWTs for authentication, you can skip installation of the UI package and save yourself some disk space. Breaking the Laravel UI into a new package also allows you to to choose whether you want to use Bootstrap, Vue.js, or React for your frontend, and it opens the framework up to other options in the future.
# Generate Laravel UI scaffolding:
php artisan ui bootstrap
php artisan ui vue
php artisan ui react
From an authentication perspective, the big change here is that the artisan make:auth command has been replaced with your choice of artisan ui commands like this:
# Generate login / registration scaffolding:
php artisan ui bootstrap --auth
php artisan ui vue --auth
php artisan ui react --auth
Improved Authorization Responses
Tangentially related to authentication, Laravel 6 added better authorization responses. Laravel has used Gates since version 5 to prevent users from performing forbidden actions. These gates let you define rules about which resources a user can create, update, delete, or view.
For example, if you want to define a Gate that ensures a user’s ID matches the user_id field on a post, you could write one like this:
Gate::define('update-post', function ($user, $post) {
    return $user->id == $post->user_id;
});
Before Laravel 6, you couldn’t retrieve “access denied” messages from the gate easily, but in newer versions, you can display or log the response message like this:
$response = Gate::inspect('view', $flight);

if ($response->denied()) {
    echo $response->message();
}
Again, this isn’t directly related to authentication, but because authorization and authentication are closely linked security concepts, it bears mentioning.
If you’d like a complete example of authentication in Laravel 5 using Okta, check out this post from 2019. To adapt it to Laravel 6, you will just need to install and configure the Laravel UI package mentioned above.
Authentication in Laravel 7
Laravel 7 was released in March 2020, and unlike Laravel 6, it is not a long-term support version. The only major feature directly related to user authentication in Laravel 7 was a new package called Sanctum.
Sanctum is helpful if you use Laravel as a back-end for a single-page application, or if you issue API tokens for each of your users. It extends the built-in Laravel authentication system by allowing users to create tokens with varying permission levels and authenticating single-page app users via the Laravel cookie-based session system.
Once installed, you can add the HasApiTokens trait to any of your models to indicate the model can be authenticated using a token. In your application, call the createToken() method with any specific “abilities” you want to attach to it like this:
$token = $user->createToken('token-name', ['posts:delete'])->plainTextToken;
Later, when the user makes a call to your API using the token, you can check whether the action can be performed.
if ($user->tokenCan('posts:delete')) {
    return $post->delete();
}
The other use case for Sanctum is authenticating users for a single-page application. The process varies depending on your frontend framework, but Sanctum can improve your app’s security by adding CSRF protection and session-based authentication.
Blade Components
One of the most significant new features added in Laravel 7 is Blade components. While not necessary for authentication, many applications will find this new feature helpful for login links or other authentication components that reuse frontend code.
Blade sections and layouts have always provided some level of composability to Laravel UIs, but components make it even easier to add custom logic without duplicating code. Unlike sections, components can have a PHP class associated with them, giving them the ability to make database or API calls, while maintaining separation concerns between display and logic.
For example, you can create a component that uses Laravel’s authentication system to either display a login or home page link to users depending on whether they’re logged in or not.
To generate a new component, use the Artisan CLI.
php artisan make:component LoginLink
This creates two files:
app/View/Components/LoginLink.phpresources/views/components/login-link.blade.php
The LoginLink class extends Laravel’s Component class and must implement the render() method to display the view. Any public method or property you add to the component will be available in the Blade template. For example, if you want a link’s text and path to change depending on the user’s logged-in state, replace the LoginLink class with the following:
<?php
namespace App\View\Components;
use Illuminate\Support\Facades\Auth;
use Illuminate\View\Component;

class LoginLink extends Component
{
    public $linkPath = '/login/okta';
    public $linkText = 'Log in with Okta';

    public function __construct()
    {
        if (Auth::check()) {
            $this->linkPath = '/home';
            $this->linkText = 'Your Home Page';
        }
    }

    public function render()
    {
        return view('components.login-link');
    }
}
Now you don’t need to have any logic in your login-link.blade.php file. Just use the $linkPath and $linkText variables as needed.
<a href="{{ url($linkPath) }}">{{ $linkText }}</a>
To display this new component, add <x-login-link /> in any of your existing Blade templates or layouts.
You can also create components without a template file by rendering them inline. To demonstrate this, replace the render() method above with the following:
public function render() {
    return <<<'blade'
        <a href="{{ url($linkPath) }}">{{ $linkText }}</a>
    blade;
}
While rendering your component inline might be convenient for small components like this, it’s better in most cases to keep the Blade template. Separation of concerns between logic and display is one of the primary benefits of using an MVC framework like Laravel.
Authentication in Laravel 8
I covered all the major updates to Laravel 8 in this detailed post, but I’ll mention two updates here that specifically affect authentication. The first is Jetstream.
Back in 2016, Laravel’s creator released Laravel Spark, which gives you advanced authentication, billing, team management, and security features for a small one-time fee. Jetstream offers many of the same features, but it’s now a free part of the Laravel framework ecosystem.
Jetstream is an alternative to the Laravel UI package released in version 6. It adds advanced authentication features like email verification, two-factor authentication, profile photos, account deletion, and integration with Laravel Sanctum, in addition to login and registration. This allows you to start new Laravel applications with less boilerplate code than ever before, and it ensures that these features will be supported by other packages in the Laravel ecosystem.
While Jetstream only supports the Livewire or Intertia.js frontend frameworks by default, you can publish the scaffolding files and customize them to meet your frontend framework’s needs. This will probably be too much work for an existing application, but it might save you hours on setting up your next new Laravel app.
The other change in Laravel 8 that affects authentication is the addition of an app/Models/ directory. In previous versions of Laravel, all your application’s logic lived in subdirectories within the app/ directory (eg: app/Console/, app/Exceptions, etc.), but models were tossed right into the app/ folder directly.
Laravel 8 made this more consistent by moving the default User.php file into a new subdirectory. Now a fresh Laravel 8 installation’s app/ directory looks like this:
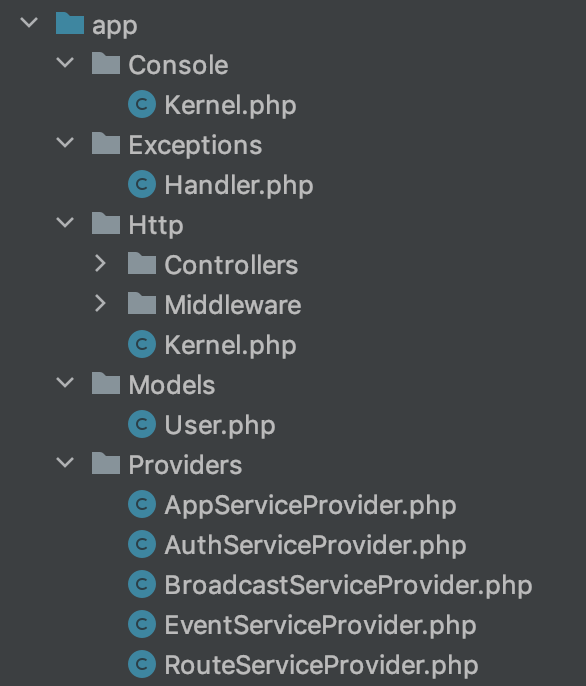
One side effect of this change is that models also have a new namespace.
// Old namespace
namespace App;

// New namespace
namespace App\Models;
The nice thing is that if you upgrade to Laravel 8, you don’t need to create this directory and move your models. Laravel will assume you don’t want to use the new directory if it doesn’t exist. The only implication of this change is that older Laravel tutorials will now use the wrong namespaces for the User model when describing authentication.
Conclusion
While most of the changes to Laravel over the past three versions have been backwards-compatible, newer versions of the framework offer more options and slight variations for authenticating users. If you’re looking to add authentication using Okta to your Laravel 8 application, check out this step-by-step guide.
Learn More About Laravel and Okta
If you are interested in learning more about Larave, PHP and Okta, check out these other great articles:
- What’s New in Laravel 8
- Protecting a Laravel API with JWT
- Validating Okta Access Tokens in PHP using AWS API Gateway and Lambda Authorizers
Don’t forget to follow us on Twitter and subscribe to our YouTube channel for more great tutorials.
Okta Developer Blog Comment Policy
We welcome relevant and respectful comments. Off-topic comments may be removed.