Validating Okta Access Tokens in PHP using AWS API Gateway and Lambda Authorizers

Running REST APIs with AWS Lambda and AWS API Gateway has recently become a very popular option. Although AWS provides its own mechanisms to add an authentication and authorization layer to these APIs, you may want to use your Okta centralized user database and credentials instead.
Today we’ll talk about how you can use Okta as the authentication and authorization layer of your REST API hosted in AWS Lambda, validating Okta access tokens using a Lambda authorizer function implemented in PHP.
Note: In May 2025, the Okta Integrator Free Plan replaced Okta Developer Edition Accounts, and the Okta CLI was deprecated.
We preserved this post for reference, but the instructions no longer work exactly as written. Replace the Okta CLI commands by manually configuring Okta following the instructions in our Developer Documentation.
About Lambda authorizers
Lambda authorizers are the method provided by AWS API Gateway to manage authorization and authentication features. They are independent AWS Lambda methods that are called by the AWS API Gateway in order to validate the provided credentials and provide information about the authorized access level. Like other AWS Lambda methods, Authorizers can be implemented in any language and are run in a limited, managed environment.
This is the workflow of an API call when using an AWS Lambda authorizer:
- The client calls a method on an API Gateway API method, passing a bearer token or request parameters.
- The API Gateway checks whether a Lambda authorizer is configured for the called method. If it is, API Gateway calls the corresponding authorizer Lambda function.
- The authorizer Lambda function checks the provided token or parameters and determines if the requested API action will be authorized or not (just by analyzing the provided token, or by calling external services).
- If the API action must be authorized, the Lambda function grants access by returning an output object containing at least an IAM policy object and a principal identifier.
- The API Gateway evaluates the returned policy object. If access is denied, the API Gateway returns a suitable HTTP error status code—such as a 403 error. If access is allowed, the API Gateway executes the method.
You can add authentication and authorization to your API methods without using a Lambda authorizer, buta Lambda authorizer will allow you to separate and centralize responsibilities in your code. This way, if you ever introduce a change in your auth methods, you’ll only have to change and re-deploy the Lambda authorizer.
Additionally, using a Lambda authorizer will allow the API Gateway to cache the auth result for an hour. This cache will be used by any subsequent API call from the same user. This could represent significant savings both in time and money, especially if the implemented Lambda authorizer launches external calls.
Interface of Lambda authorizers
All Lambda authorizers must be implemented so they receive a defined data structure from the AWS API Gateway. This structure depends on the configured type of Lambda authorizer. There are two possible types: token-based and request-based.
- Token-based Lambda authorizers (also known as a
TOKENauthorizers) receive the caller’s identity as provided in a bearer token, such as a JSON Web Token (JWT) or an OAuth token. It also receives the Amazon Resource Name (ARN) corresponding to the called API method.
{
    "type":"TOKEN",
    "authorizationToken":"{caller-supplied-token}",
"methodArn":"arn:aws:execute-api:{regionId}:{accountId}:{apiId}/{stage}/{httpVerb}/[{resource}/[{child-resources}]]"
}
- Request-parameter-based Lambda authorizers (also known as
REQUESTauthorizers) receive the caller’s identity through a combination of headers, query string parameters, and stage and context variables.
After deciding the result of an auth request, the Lambda authorizer method must return an object with the following structure:
{
    "principalId": "{uniqueUserId}",
    "policyDocument": {
   	 "Version": "2012-10-17",
   	 "Statement": [
   		 {
   			 "Action": "execute-api:Invoke",
   			 "Effect": "Allow",
   			 "Resource": "arn:aws:execute-api:{regionId}:{accountId}:{apiId}/{stage}/{httpVerb}/[{resource}/[{child-resources}]]"
        }
   	 ]
    },
    "context": {
   	 "custom": "1",
   	 "data": ["custom", "example", "data"],
    }
}
Where:
- principalId will be a unique identifier for the user (as the user ID, a unique user name, or a unique email address).
- policyDocument is an IAM policy document describing the action that we are allowing or disallowing. It includes:
- Version: must be
2012-10-17. - Statement: an object including:
- Action: What we are allowing or disallowing. In our case, it will be
execute-api:Invoke. - Effect: This field specifies if the user will be authorized or not to carry out the intended action.
- Resource: The resource for which we want to allow or deny this action
- Action: What we are allowing or disallowing. In our case, it will be
- Version: must be
In our example, we’ll focus on building a token-based authorizer that receives a JWT token in order to allow or deny access.
Generating JWT tokens with client credentials in Okta
In this example, we’ll use an app with client credentials to keep things simple. You may follow these steps.
- If you still don’t have one, create your free developer account at developer.okta.com.
- Create a new application of type Service.
- Click on API -> Authorization Servers and then click the Scopes tab.
- Add a new scope called
demo
Now, to obtain a JWT token you can call Okta’s token endpoint, giving it the application’s client ID and client secret.
curl -X POST 'https://<Client-ID>:<Client-secret>@<your-okta-server>/oauth2/default/v1/token' -d grant_type=client_credentials -d scope=demo
This will return a JSON structure including a valid access token generated by Okta that we’ll be able to use when accessing our protected API.
{
  "token_type": "Bearer",
  "expires_in": 3600,
  "access_token": "eyJraWQiOiJQTnk1OGR(...)e6z-UOv4pGUnbIAMAHxmVsb2h4PXpblaH4",
  "scope": "demo"
}
The access_token field is the one we’ll use as a Bearer token in our requests to the API.
In a production environment, you’ll want to use an OAuth 2.0 flow to retrieve a token. I thoroughly recommend this great Illustrated Guide to OAuth and OpenID Connect and all the other articles it references.
Prevent API slowness—Keep things local
It’s very important that we keep the Lambda authorizer quick, as it will be called in every API request. Because of this, our Lambda authorizer should do only local JWT validation.
If we call out to Okta’s token introspection, we add an additional network request to every authorization call. This is not a good idea, especially when gateway requests need to pass through very quickly, and Lambda limits the amount of time that functions can run.
Local JWT validation should be more than enough, as the generated JWT tokens are signed. We just need the Authorizer function to keep a local updated copy of the public part of the key used to generate the signature.
How to write a Lambda authorizer function in PHP
Now that we know the inputs our Lambda authorizer function must process and the outputs it must generate, let’s get it done.
Prepare PHP runtime environment
For the first step, we’ll need to circumvent a little problem: at the time I’m writing this article (September 2020), PHP is not one of the languages AWS Lambda supports out of the box. Because of this, we’ll have to prepare the PHP runtime environment, including the PHP binary that will run inside Lambda’s containers, and its related libraries and extensions. The easiest way to do this is to compile it on the same platform as Lambda, so we’ll use EC2 for this.
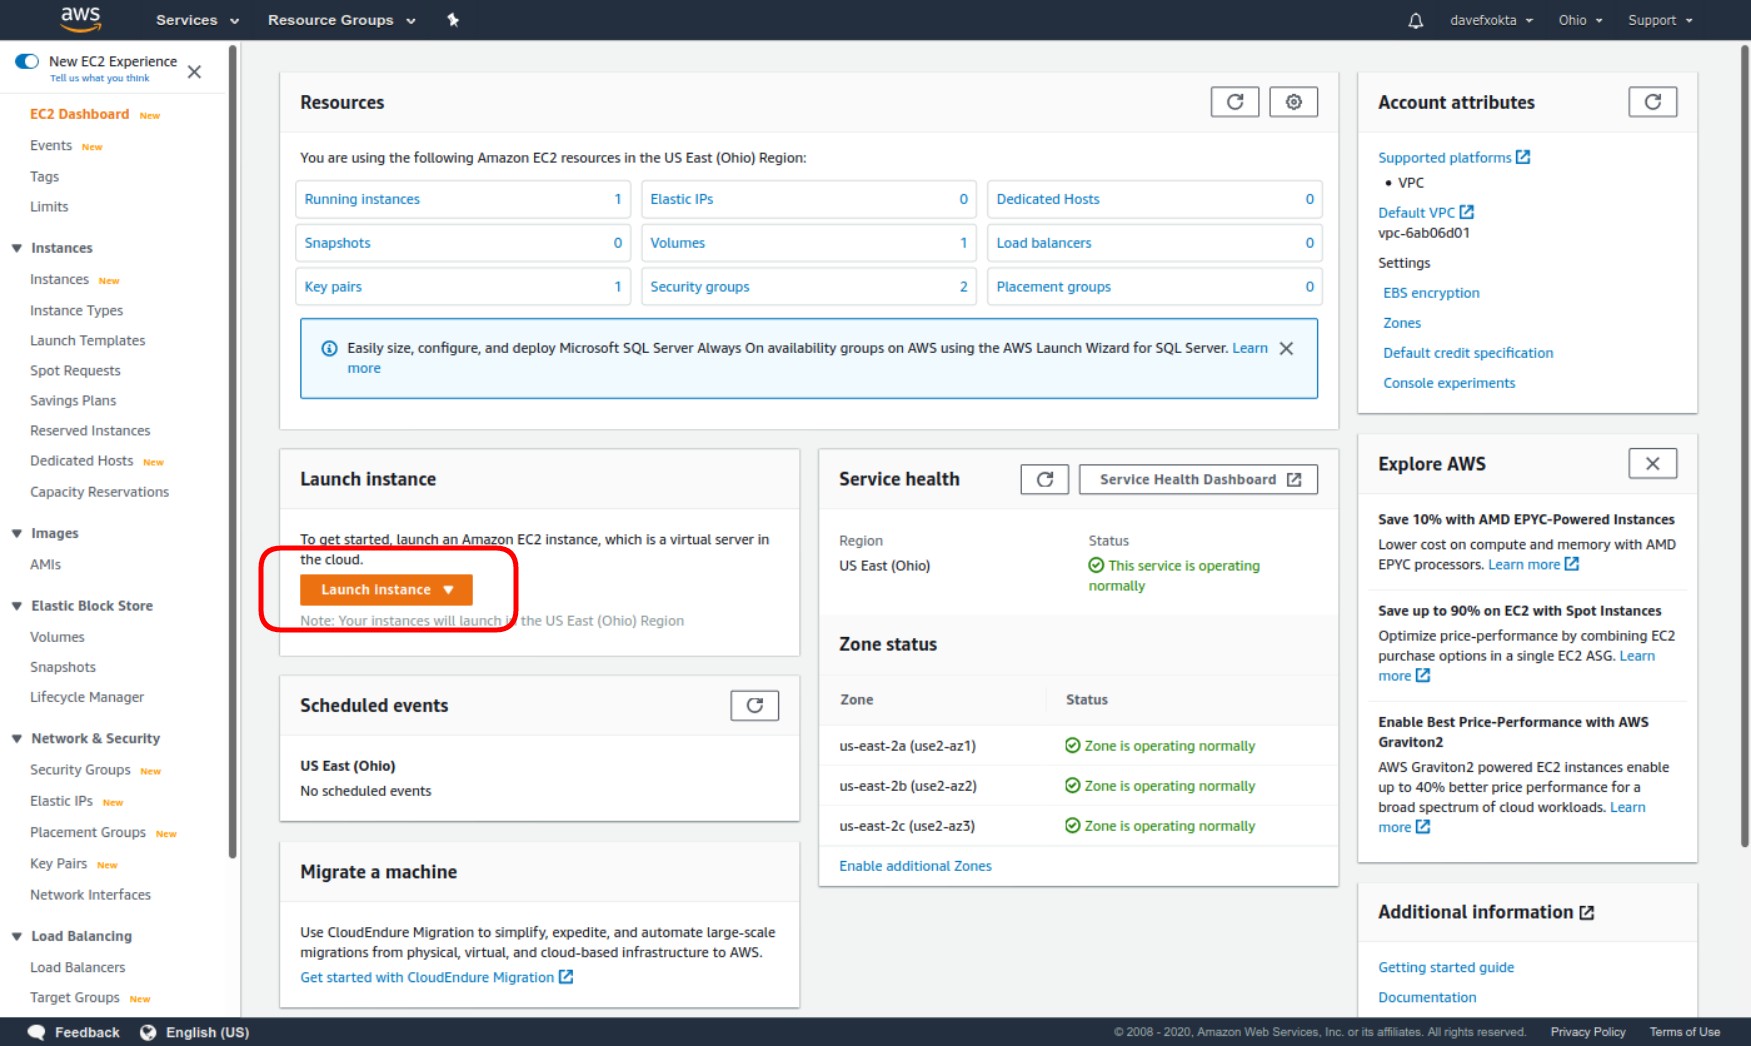
In the Amazon EC2 console, choose Launch instance.
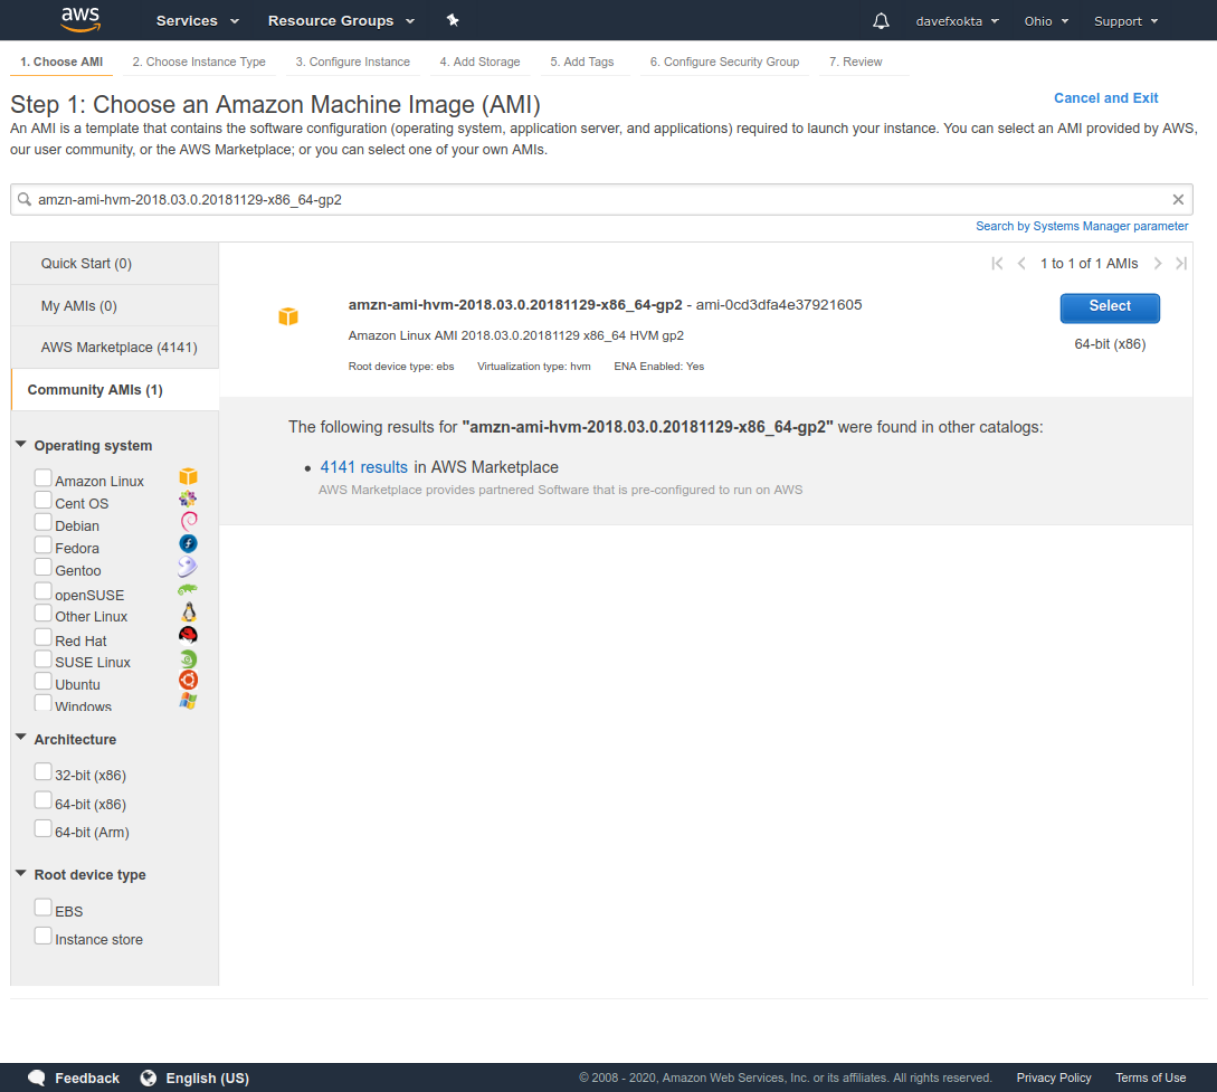
Then, when choosing an AMI, you must use the same image that is currently being used by the Lambda Execution Environment (see https://docs.aws.amazon.com/lambda/latest/dg/lambda-runtimes.html).
While writing this article, AWS Lambdas can be configured to use a runtime based on Amazon Linux or a runtime based on Amazon Linux 2. Unfortunately, the Amazon Linux 2 runtime is a custom runtime that is not based on any available AMI image.
In order to avoid problems and build a PHP environment compatible with the Lambda runtime, we need to use the image that is available as an AMI image. When writing this article, this was the Amazon Linux-based AMI image amzn-ami-hvm-2018.03.0.20181129-x86_64-gp2.
You won’t find this image in the default Quick Start list that appears immediately when launching a new instance. Copy the image name and paste it into the search box. You’ll find it as a community AMI.
Launch the EC2 instance and connect to it.
Now we’ll compile the last version of PHP. In order to do that:
- Update packages and install needed compilation dependencies
sudo yum update -y
sudo yum install autoconf bison gcc gcc-c++ libcurl-devel libxml2-devel git openssl-devel -y
- Then, we need to download the latest stable version of PHP. At the time of writing, it was 7.4.10.
mkdir ~/php-7-bin
curl -sL https://www.php.net/distributions/php-7.4.10.tar.bz2 | tar -xvj
cd php-7.4.10
- Let’s compile PHP with OpenSSL and libcurl support and install to
/home/ec2-user/php-7-bin
./buildconf --force
./configure --prefix=/home/ec2-user/php-7-bin/ --with-openssl --with-curl --with-zlib --without-sqlite3 --without-pdo-sqlite
make install
Here, we are disabling SQLite3 extension compilation, as SQLite3 development library is not installed by default in the selected AMI image. Depending on the requirements of your PHP Lambda functions, you may have to customize the ./configure line to add extra libraries. ./configure --help will give you a full list of parameters.
Once these commands are completed, please run ~/php-7-bin/bin/php -v to verify everything has worked correctly. The runtime environment will be ready if you should see a message similar to this one:
PHP 7.4.10 (cli) (built: Sep 10 2020 23:14:12) ( NTS )
Copyright (c) The PHP Group
Zend Engine v3.4.0, Copyright (c) Zend Technologies
Validating Okta JWT access tokens in a Lambda function
Now, let’s start building our PHP authorizer. We’ll create a working folder to make the needed infrastructure. In order to do this, download the project from GitHub, and copy the generated PHP runtime into it:
cd ~
git clone https://github.com/oktadeveloper/php-jwt-okta-lambda-auth-validator.git
cd php-jwt-okta-lambda-auth-validator
cp ~/php-7-bin/bin/php ./bin
Now we’ll install composer, and use it to retrieve the PHP libraries that our bootstrap file uses to call the authorizer and other libraries related to the management of JWT tokens.
curl -sS https://getcomposer.org/installer | ./bin/php
bin/php composer.phar install
After this, you should just configure your settings in the classes/Config.php file:
<?php

namespace OktaLambdaAuth;

class Config {

    // Define here your Okta server hostname, like 'dev-XXXXX.okta.com' or
    // 'xxxxx.okta-emea.com'
    const OKTA_SERVER_HOSTNAME = 'dev-XXXXX.okta.com';

}
Let’s examine the bootstrap file:
#!/opt/bin/php
<?php

// This invokes Composer's autoloader so that we'll be able to use Guzzle and any other 3rd party libraries we need.
// Depending on the configured runtime, its location may vary
if ( file_exists(__DIR__ . '/vendor/autoload.php' ) ) {
    require __DIR__ . '/vendor/autoload.php';
} else {
    require '/opt/vendor/autoload.php';
}

// Initialize signing-key manager, and retrieve the current JWT signing keys from Okta
$keyManager = OktaLambdaAuth\KeyManager::instance();
if ( ! $keyManager->updateKeys() ) {
    die();
}

// This is the request processing loop. Barring unrecoverable failure, this loop runs until the environment shuts down.
do {

    // Ask the runtime API for a request to handle.
    $request = getNextRequest();

    require_once $_ENV['LAMBDA_TASK_ROOT'] . '/src/authorizer.php';

    // Execute the desired function and obtain the response.
    $response = authorizer($request['payload']);

    // Submit the response back to the runtime API.
    sendResponse($request['invocationId'], $response);
} while (true);

function getNextRequest()
{
    $client = new \GuzzleHttp\Client();
    $response = $client->get('http://' . $_ENV['AWS_LAMBDA_RUNTIME_API'] . '/2018-06-01/runtime/invocation/next');

    return [
   	 'invocationId' => $response->getHeader('Lambda-Runtime-Aws-Request-Id')[0],
   	 'payload' => json_decode((string) $response->getBody(), true)
    ];
}

function sendResponse($invocationId, $response)
{
    $client = new \GuzzleHttp\Client();
    $client->post(
   	 'http://' . $_ENV['AWS_LAMBDA_RUNTIME_API'] . '/2018-06-01/runtime/invocation/' . $invocationId . '/response',
   	 ['body' => $response]
    );
}
As we can see, we retrieve the JWT signing keys from the Okta server. These keys will be the ones used to validate the received JWT tokens.
Then we have an endless loop that will execute until the environment is finished. This loop will launch the authorizer function and any other existing functions corresponding to other methods in the API.
Let’s take a look at the KeyManager class (classes/KeyManager.php).
<?php
namespace OktaLambdaAuth;

use CoderCat\JWKToPEM\JWKConverter;

class KeyManager {

    // Static class
    protected static $instance;

    private $base_url;

    /**
     * @return KeyManager
     */
    public static function instance() {
   	 if ( static::$instance === null ) {
   		 static::$instance = new static();
   	 }

   	 return static::$instance;
    }
This class is designed as a singleton, as it will contain the currently valid keys that will be used in all the API calls; we’ll want to access it from anywhere.
    private $keys;
    private $valid_until;

    public function __construct() {
   	 $this->keys = [];
   	 $this->valid_until = 0;
    }
I’ll keep the keys returned by the server in the $keys object. I’ll keep the Unix timestamp when the keys expire in $valid_until, as returned by the Okta server cache headers.
Let’s go with the updateKeys() method. This method retrieves the current JWT-signing keys provided by the Okta server and saves them, along with their expiration timestamp, for future use from other functions.
    public function updateKeys() {

    	// Build the URL from Okta that we'll use to retrieve the current set of signing keys
      $server = Config::OKTA_SERVER_HOSTNAME;
      $url = 'https://' . $server . '/oauth2/default/v1/keys';

      $client = new \GuzzleHttp\Client();

      $query_response = $client->get( $url );

      $response = json_decode( (string) $query_response->getBody() );

      if ( isset( $response->errorCode ) ) {
       // Error
       fwrite( STDERR, 'Error retrieving JWT-signing key: ' . $response->errorSummary );
       return false;
      }

      // Let's convert the received keys into PEM format, usable from the key verifier library
      $keys = $response->keys;
      $pem_keys = [];
      $jwkConverter = new JWKConverter();

      foreach ( $keys as $key) {
       $pem_keys[] = $jwkConverter->toPEM( (array) $key );
      }

      if ( count( $pem_keys ) ) {
      	// Save both the keys and their expiring moment for future use
       $this->keys = $pem_keys;
       $this->valid_until = strtotime( $query_response->getHeader('expires')[0] );
      }

      return $this->keys;
    }
The method getKeys() returns the current JWT-signing key information. But if the expiration time of the current information is in the past, it will refresh the saved keys. The getValidUntil() method will return the timestamp until which the current keys are valid.
    public function getKeys() {
   	 if ( count( $this->keys ) && $this->valid_until > time() ) {
   		 return $this->keys;
   	 }
   	 return $this->updateKeys();
    }

    public function getValidUntil() {
   	 return date('Y-m-d H:i:s e', $this->valid_until );
    }
Now, let’s examine the authorizer() function code, in src/authorizer.php:
<?php

function authorizer($data) {

    $type = $data['type'];
    $jwt = $data['authorizationToken'];
    $method = $data['methodArn'];
The function receives the data from AWS through these three parameters. The authorization token will include the JWT token, possibly with the “Bearer “ prefix. So first, we’ll remove it.
    // Remove the "Bearer " prefix from $jwt, if it exists
    if ( strpos( $jwt,'Bearer ' ) === 0 ) {
   	 $jwt = str_replace( 'Bearer ', '', $jwt );
    }
Now it examines the correctness of the received JWT token:
    $key_manager = OktaLambdaAuth\KeyManager::instance();
    $keys = $key_manager->getKeys();

    $decoded_token = null;
    $jwt_valid = false;

    foreach ( $keys as $key ) {
   	 try {
   		 $decoded_token = JWT::decode( $jwt, $key, array( 'RS256' ) );
   		 unset( $error );
   		 $jwt_valid = true;
   	 } catch ( ExpiredException | BeforeValidException $e ) {
   		 $error = 'Token expired, or used before its validity';
   		 break;
   	 } catch ( SignatureInvalidException $e ) {
   		 $error = 'Token not valid';
   		 continue;
   	 } catch ( Exception $e ) {
   		 $error = 'Token problem: ' . $e->getMessage();
   		 continue;
   	 }
    }
If the token was valid, it’ll allow access. If not, it’ll deny it.
    if ( ! $jwt_valid || ! $decoded_token) {
   	 $result = [
   		 'principalId' => 'unknown',
   		 'policyDocument' => [
   			 'Version' => '2012-10-17',
   			 'Statement' => [
   				 [
   					 'Action' => 'execute-api:Invoke',
   					 'Effect' => 'Deny',
   					 'Resource' => $method,
   				 ]
   			 ],
   		 ]
   	 ];

    } else {

   	 $result = [
   		 'principalId'	=> $decoded_token->sub,
   		 'policyDocument' => [
   			 'Version'   => '2012-10-17',
   			 'Statement' => [
   				 [
   					 'Action'   => 'execute-api:Invoke',
   					 'Effect'   => 'Allow',
   					 'Resource' => $method,
   				 ]
   			 ],
   		 ]
   	 ];
    }

    return json_encode( $result );
}
Configuring authorizer Lambda function
So, we have all the code and the environment ready:
- We have a PHP binary compiled on the correct supported version of Amazon Linux
- We have a bootstrap file coded in PHP that will handle the authenticator initialization and will invoke the actual authenticator when receiving requests.
- We have a vendor directory with all the needed PHP libraries.
- We have our own src and class directories including the authenticator method itself, and other auxiliary classes.
Instead of uploading our software as a single, monolithic component, we’ll upload it using layers, which will allow us easier and quicker updates if we need them. Let’s build two layers for the code that don’t depend on us—one for the PHP runtime and other for the Composer vendor folder.
After this, we’ll create another ZIP package including our code for the authorizer:
zip -r runtime.zip bin
zip -r vendor.zip vendor/
zip -r authorizer.zip bootstrap classes/ src/authorizer.php
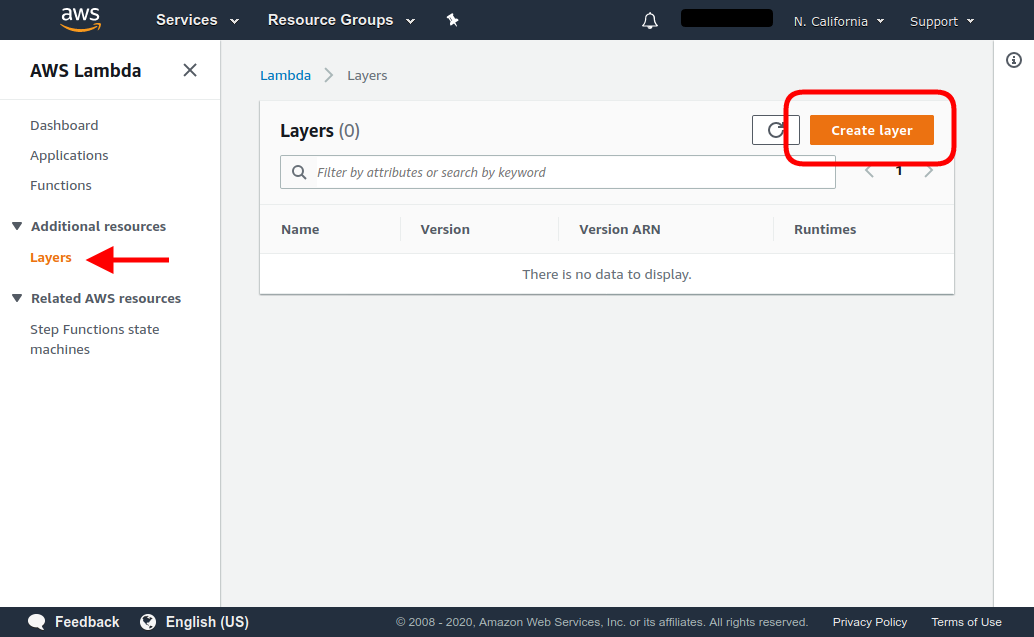
From the AWS Lambda console, we’ll create the two layers first.
- In Additional Resources > Layers menu, select Create Layer.
- Create a Layer Runtime, uploading the generated
runtime.zipfile. Select Custom runtime as the only compatible runtime.
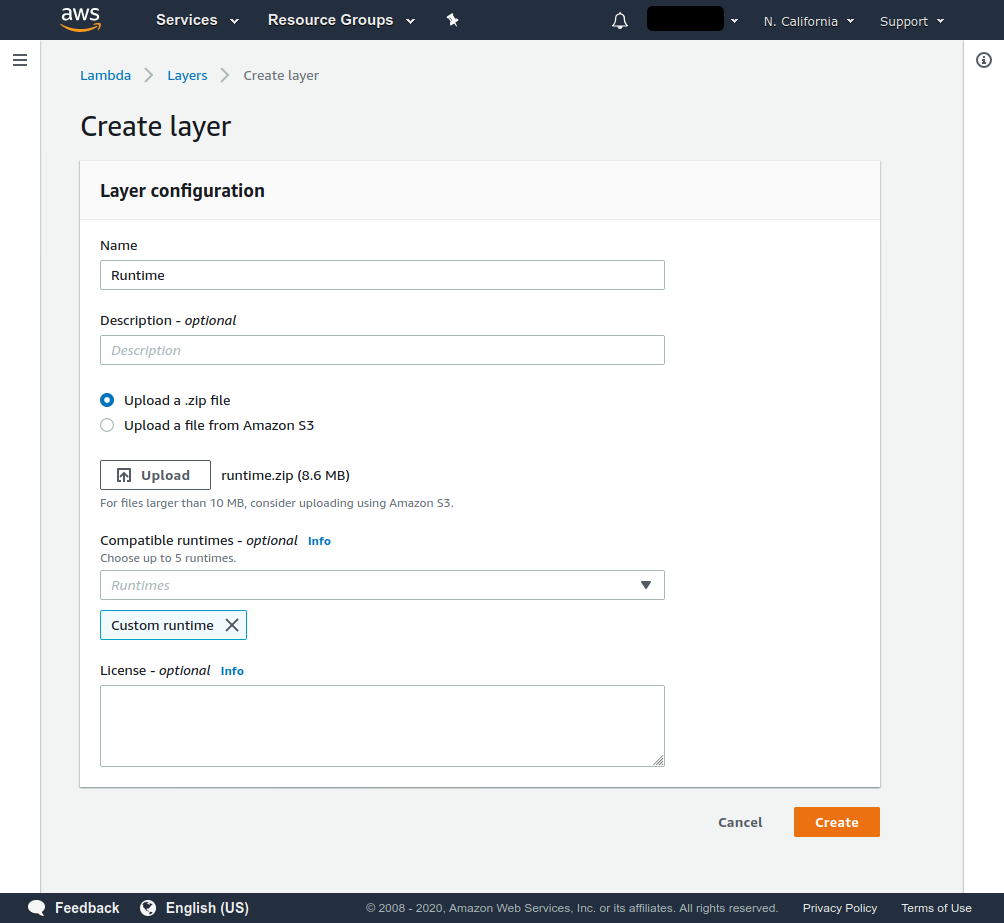
- Create another Layer “Vendor”, uploading the generated
vendor.zipfile. Select Custom runtime as the only compatible runtime.
Once this is done, let’s create the authorizer Lambda function.
- Click on the Create function button
- Select Author from scratch.
- Assign a name for the function. We’ll call it “phpAuthorizer”.
- As Runtime, select Custom runtime / Use default bootstrap.
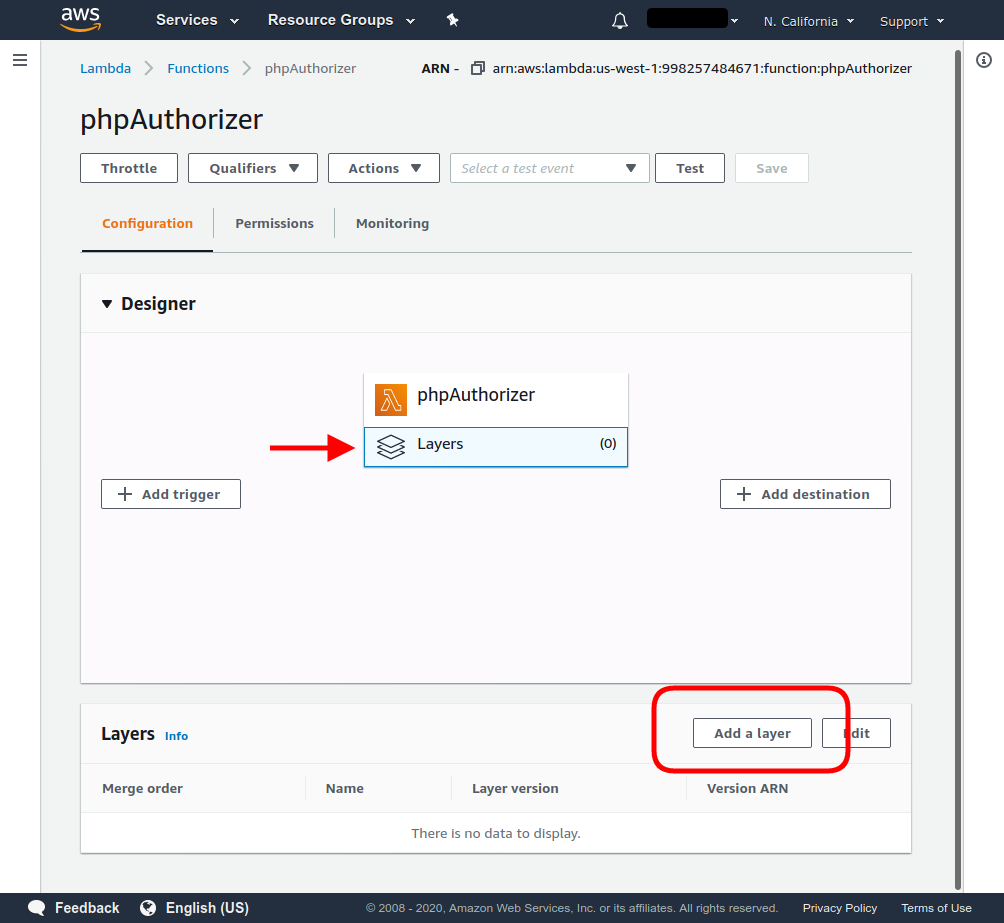
Add the two already created layers to the function, clicking Layers in the function designer below the name of the function, and then clicking Add a layer.
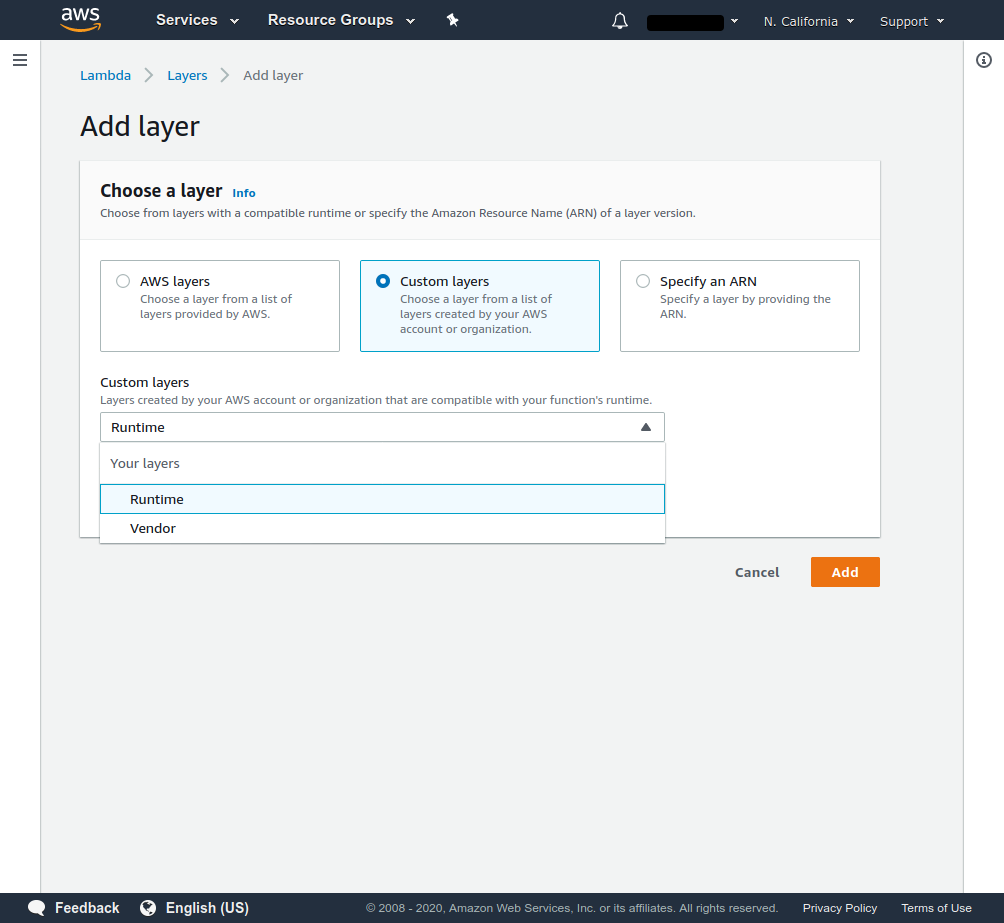
The created layers will be visible after selecting the Custom layers option.
Then, in the function code frame, click Actions and select Upload a .zip file.
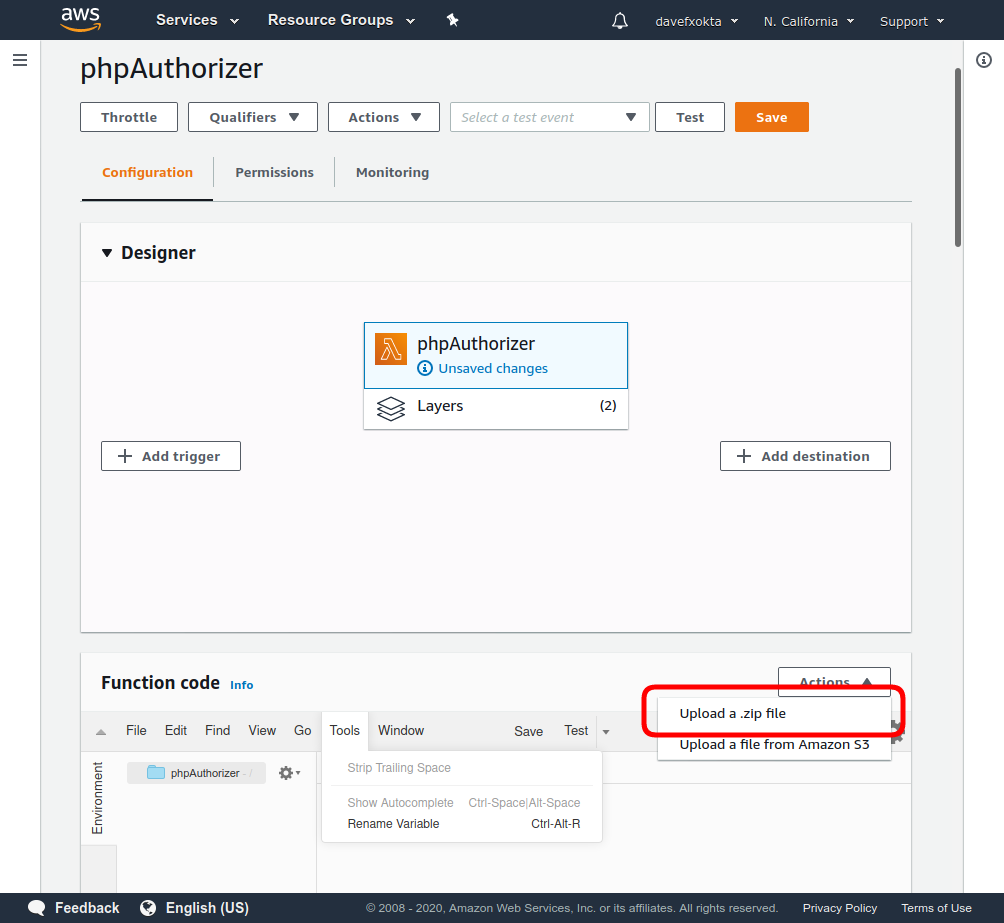
Select the already generated authorizer.zip file. You should be able to see and edit the code of the bootstrap and our other files from the AWS Lambda Console.
After this, the Authorizer Lambda function should be ready. Let’s test it.
- Click Test in the header bar.
- You’ll be able to configure the received test event. You must select a name for it (for example, “idtoken”). Then, use the Event template Amazon API Gateway Authorizer. This will create an event with the following JSON:
{
  "type": "TOKEN",
  "authorizationToken": "incoming-client-token",
  "methodArn": "arn:aws:execute-api:us-east-2:123456789012:example/prod/POST/{proxy+}"
}
-
Replace the string incoming-client-token in the generated event with the access token you generated earlier, and create the test event.
-
After this, you’ll be able to test the function by selecting the configured idtoken event and clicking Test in the header bar.
-
The test should always be successful, returning Deny for invalid or expired JWT tokens, and Allow for valid, non-expired JWT tokens generated by the Okta server.
Configuring API Gateway to pass through only authenticated requests to the backend API
Once we have our Lambda authorizer, let’s configure an API Gateway to use it.
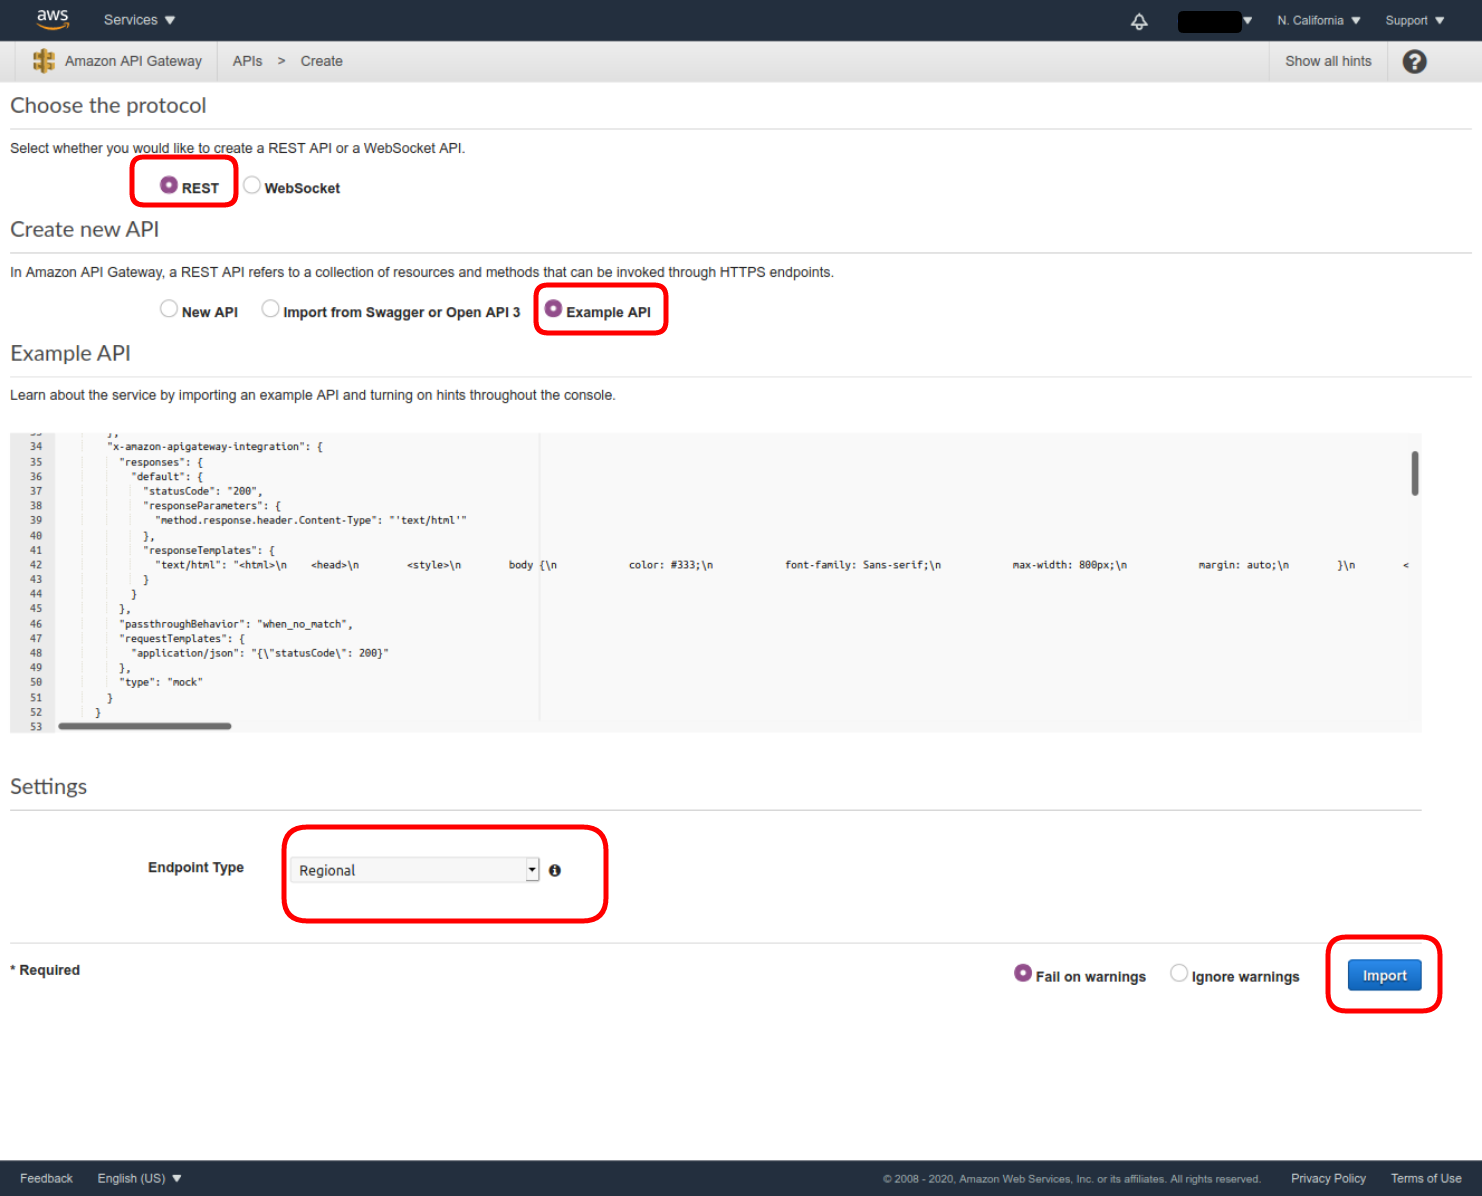
If you already have an API, you can use it. If not, let’s create a REST example API using the example “PetStore” provided by AWS:
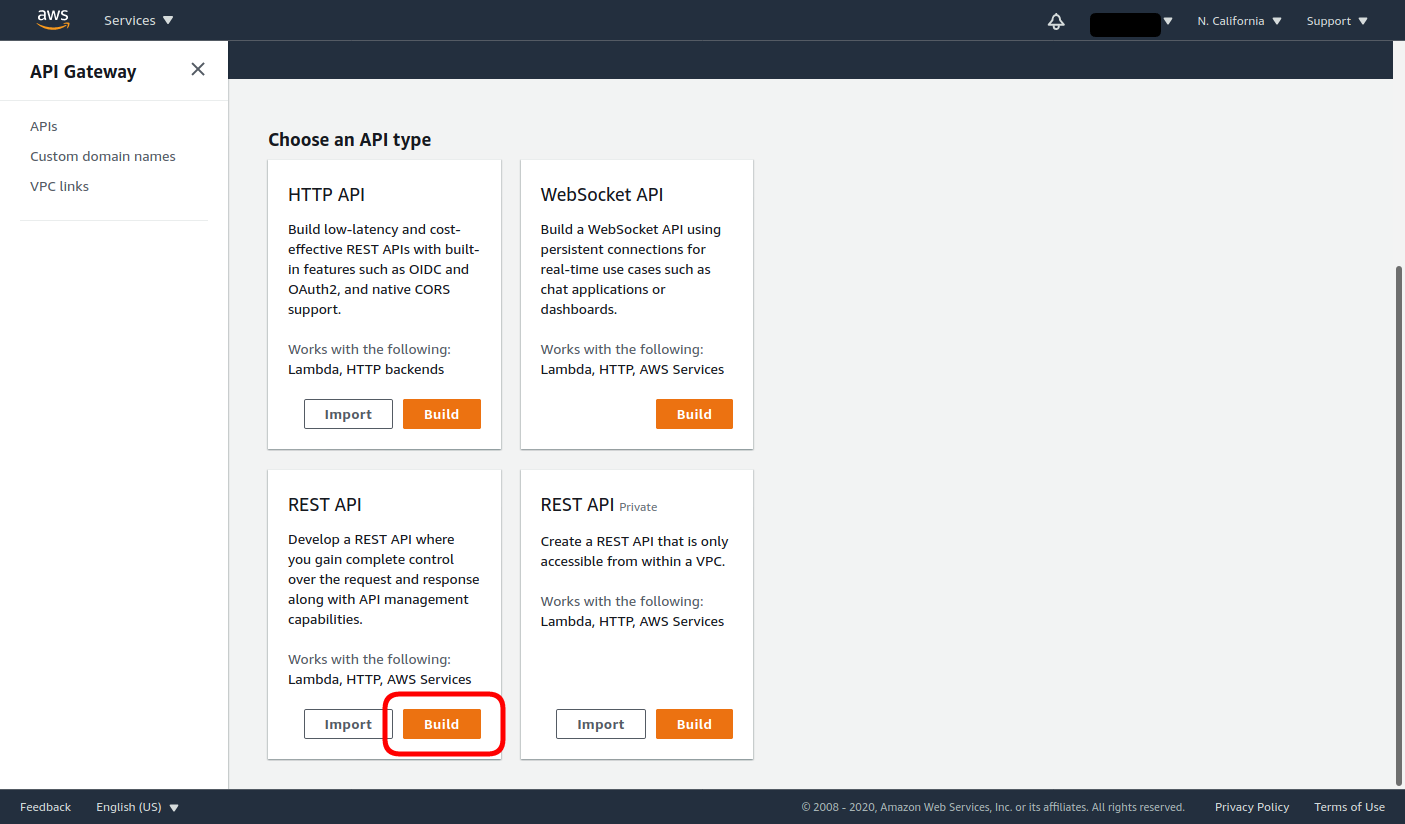
- Navigate to the API Gateway AWS service, then click Build under REST API.
- Choose the REST protocol, select to use the Example API and the Regional Endpoint Type, and click Import.
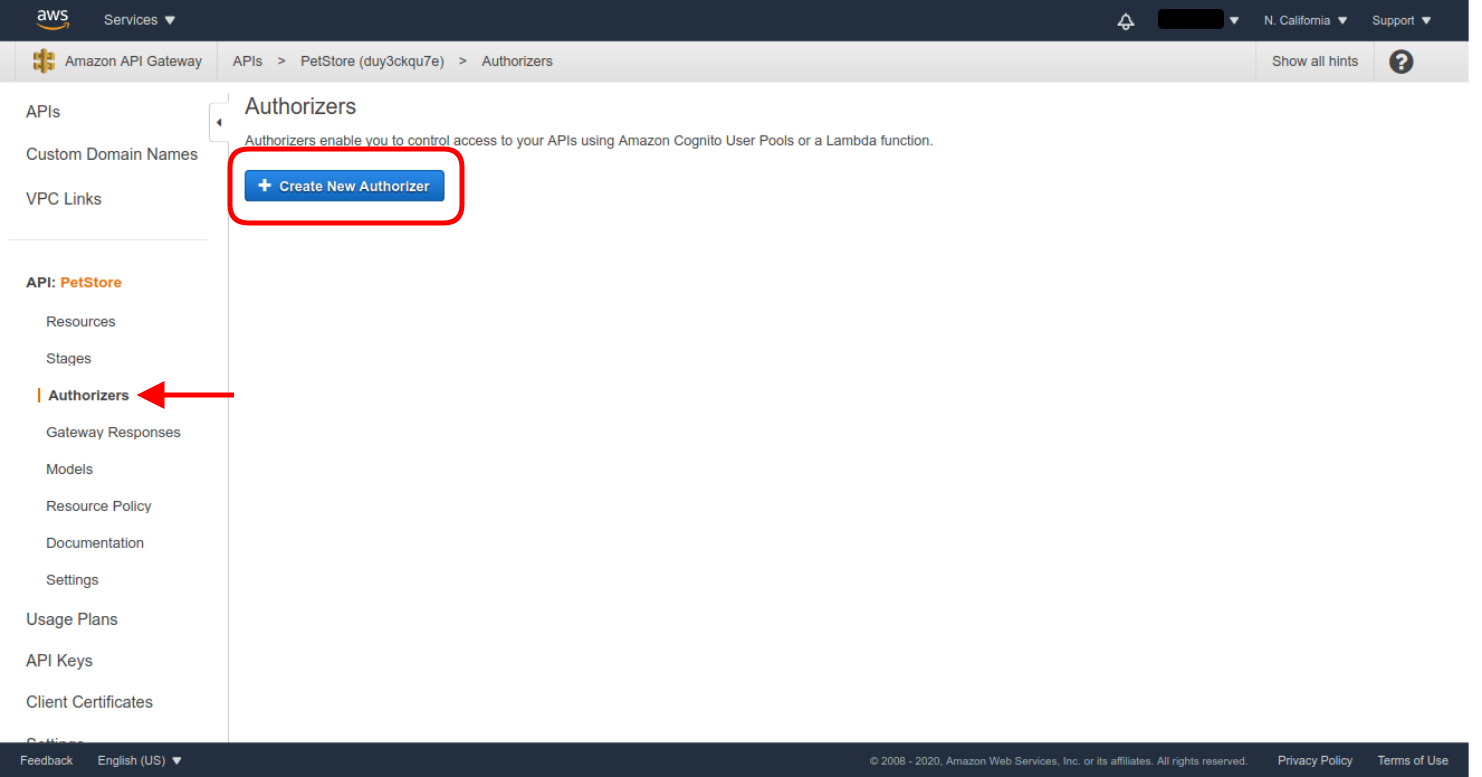
- Once the API PetStore is created, enter the Authorizers menu, and then click Create New Authorizer.
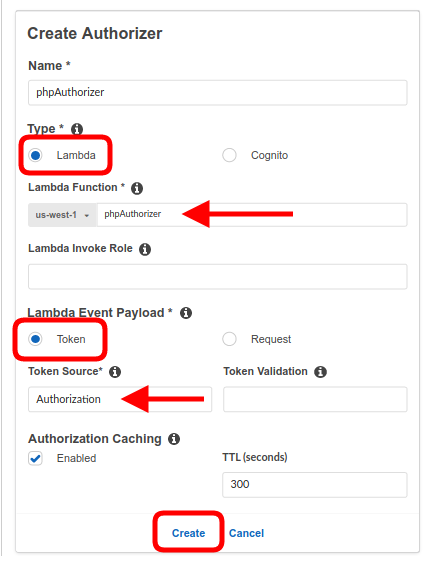
- Select the Lambda type, and use the already configured authorizer Lambda function (phpAuthorizer in our example).
- Select Token as the Lambda Event Payload.
- Enter Authorization as the Token Source.
- Leave the Authorization Caching enabled, with the default TTL of 300 seconds.
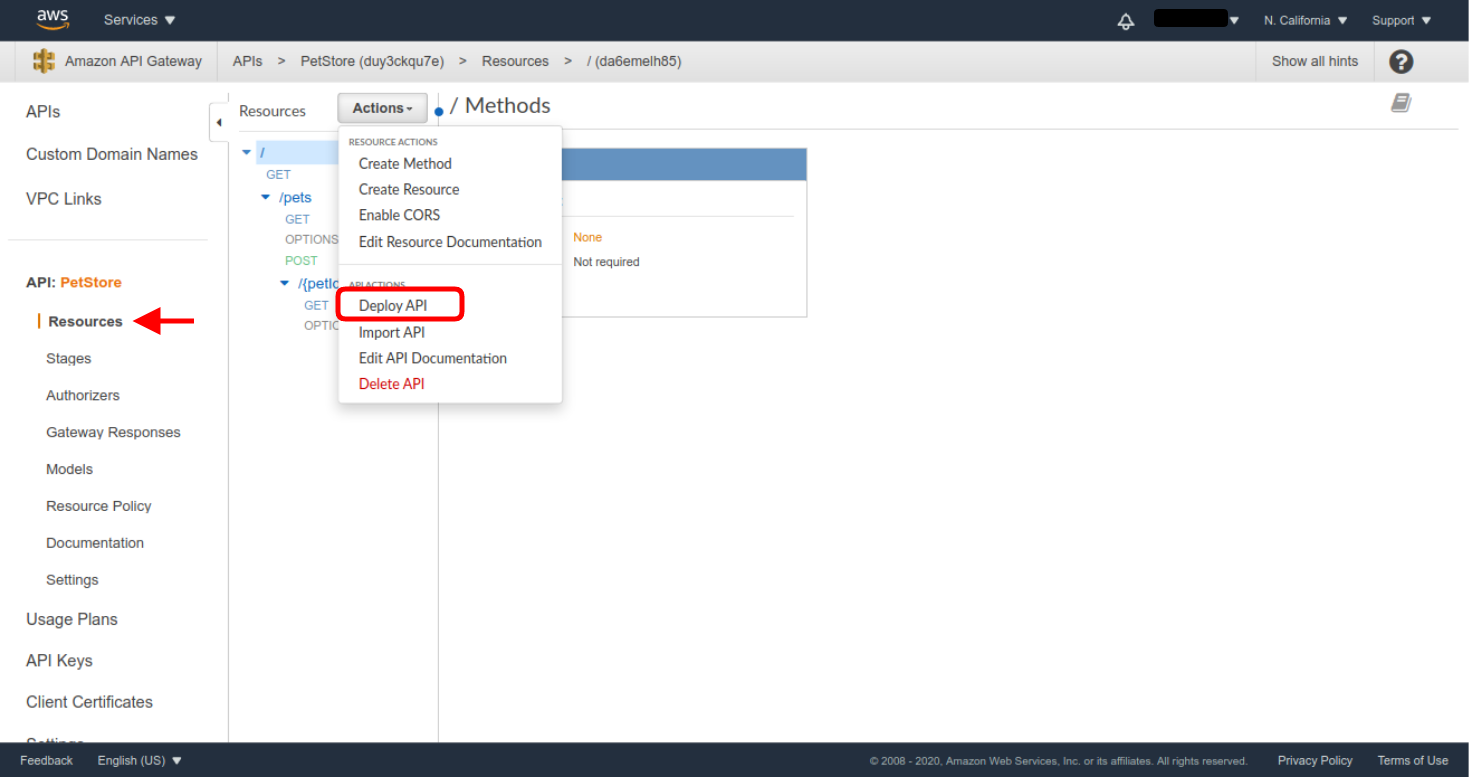
Grant all the requested permissions, and the authorizer will be created. Now we just need to configure all the endpoints of the API to use the new authorizer. Before you’ll be able to choose the authorizer, you need to deploy the API. Deploy the API without authentication first—click on Resources in the API menu, and then select the Deploy API action.
You’ll have to create a new Deployment Stage. Let’s use beta as the Stage name.
Next you’ll need to check all the existing methods you want to protect and set the defined Authorizer as its authorization method. Let’s see how this is done for the /pets GET method:
- In the created API Resources menu, select the /pets GET method. Then, click on the Method Request definition.
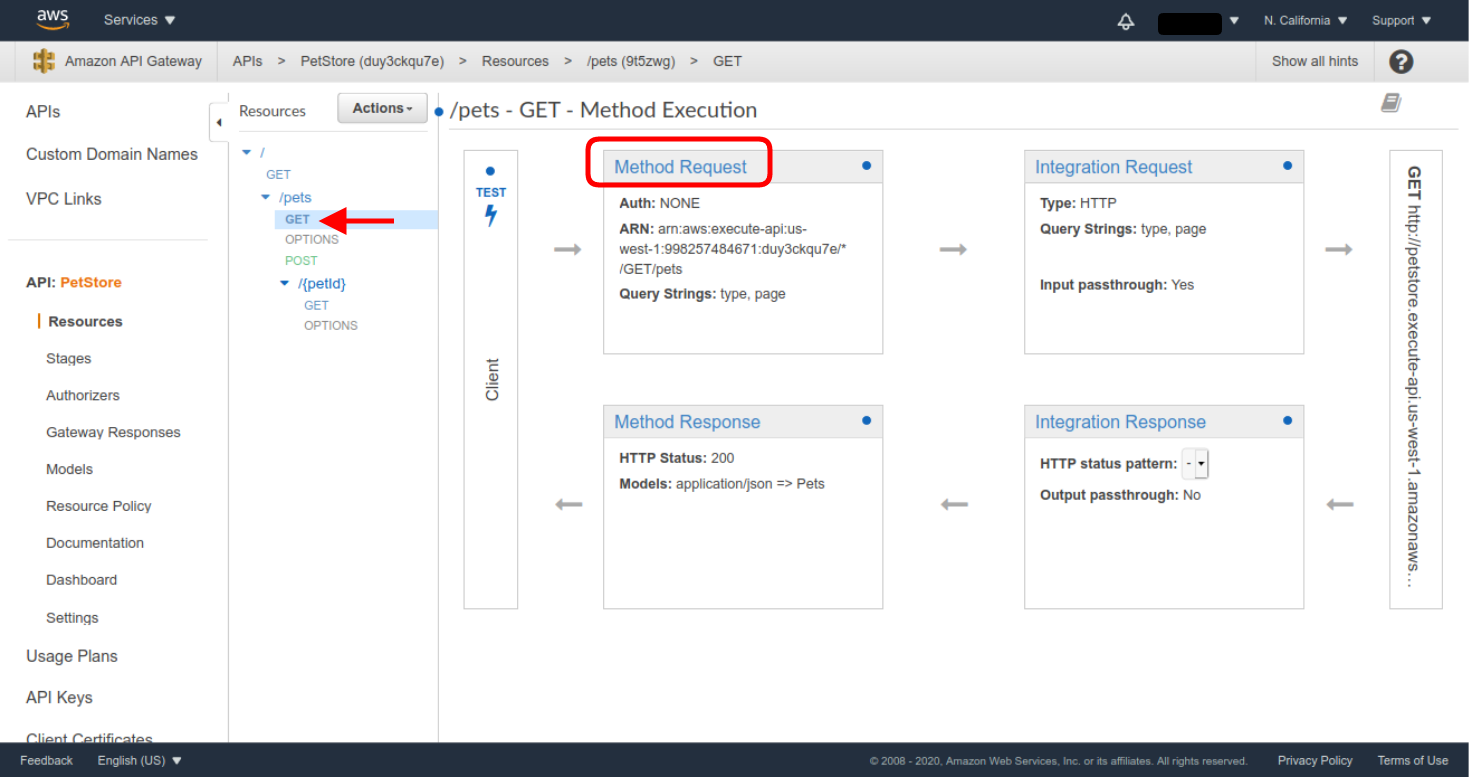
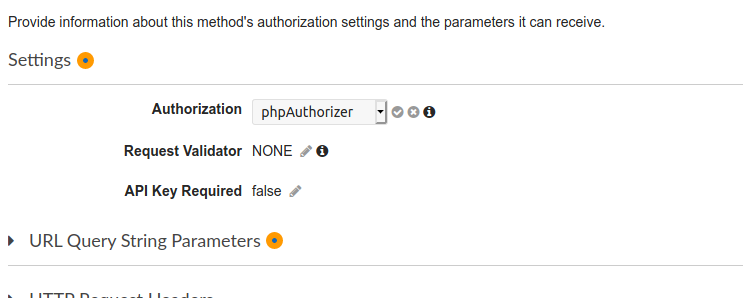
- Then click on the pencil icon in the Authorization setting, select the defined Authorizer as the authorization method, and click the check mark icon to save the selection.
You’ll have to repeat all these steps for all the endpoints you want to protect. For this example, I only left the root GET method unprotected, so we can test the difference between protected and unprotected methods.
After this, deploy a new version of the API. This time, you can reuse the previous stage you created in the last deployment.
Congratulations! All the protected API Methods will now require a valid JWT token.
You can test this by making a request from curl using the access token you generated at the beginning of this blog post. To do this, the URL for every API access point can be retrieved from the API Stages section, selecting the stage you just deployed and clicking on the corresponding endpoint. You’ll see the URL in the Invoke URL frame.
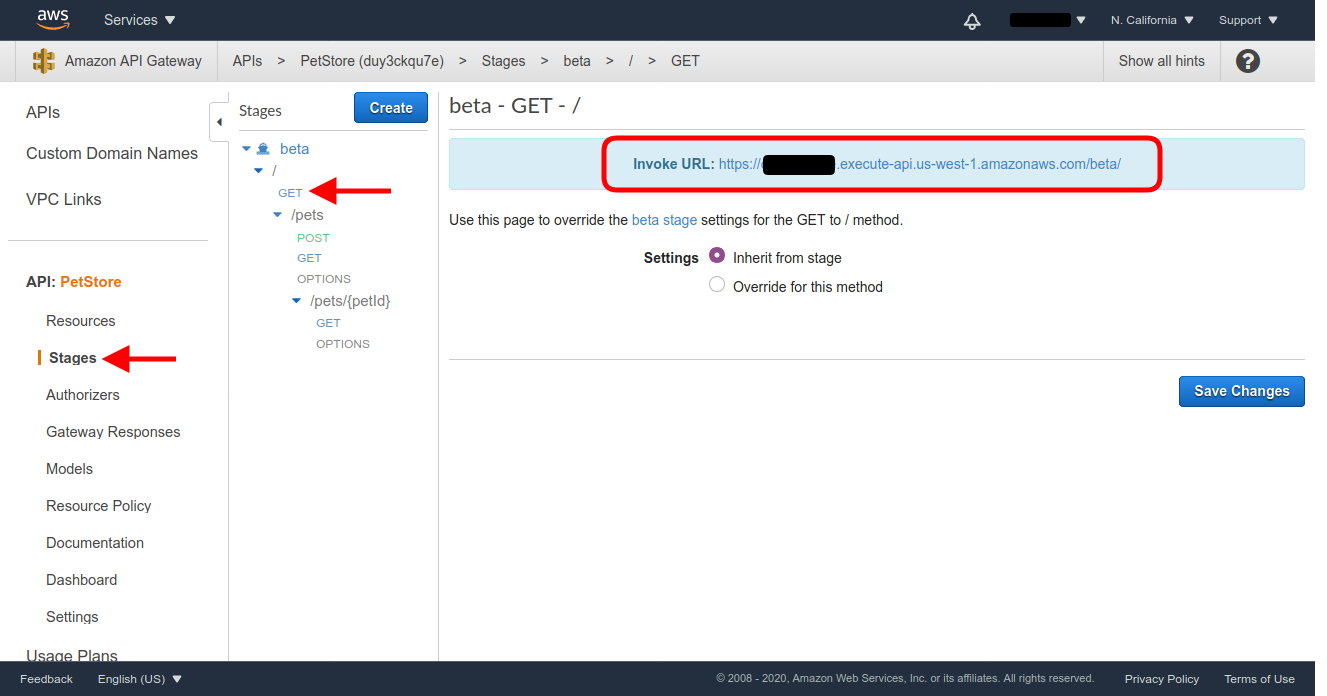
If you click on the provided Invoke URL for the / GET method, that we left unprotected, you’ll see the landing page of the Pet Store API which has a short description of the API.
To finish up,, let’s make a request to the Invoke URL for the /pets GET resource, first without an access token, and then with the access token. (You’ll have to retrieve the actual URL from the corresponding endpoint in the last deployed stage.)
curl -i 'https://XXXXXXXX.execute-api.us-west-1.amazonaws.com/beta/pets'
{"message":"Unauthorized"}
curl -i 'https://XXXXXXXX.execute-api.us-west-1.amazonaws.com/beta/pets' -H "Authorization: Bearer eyJraWQiOiI5VzhZV3Qxc2RqO..."
[
  {
    "id": 1,
    "type": "dog",
    "price": 249.99
  },
  {
    "id": 2,
    "type": "cat",
    "price": 124.99
  },
  {
    "id": 3,
    "type": "fish",
    "price": 0.99
  }
]
Learn more about web security and PHP
If you’d like to learn more about integrating Okta with your PHP applications, be sure to check out some of these resources:
- Build a Simple Laravel App with Authentication
- Protecting a PHP API Using OAuth
- Create and Verify JWTs in PHP with OAuth 2.0
If you liked this post, follow @oktadev on Twitter to see when we publish similar ones. We have a YouTube channel too! You should subscribe. 😊
We’re also streaming on Twitch, follow us to be notified when we’re live.
Okta Developer Blog Comment Policy
We welcome relevant and respectful comments. Off-topic comments may be removed.