Protecting a Laravel API with JWT

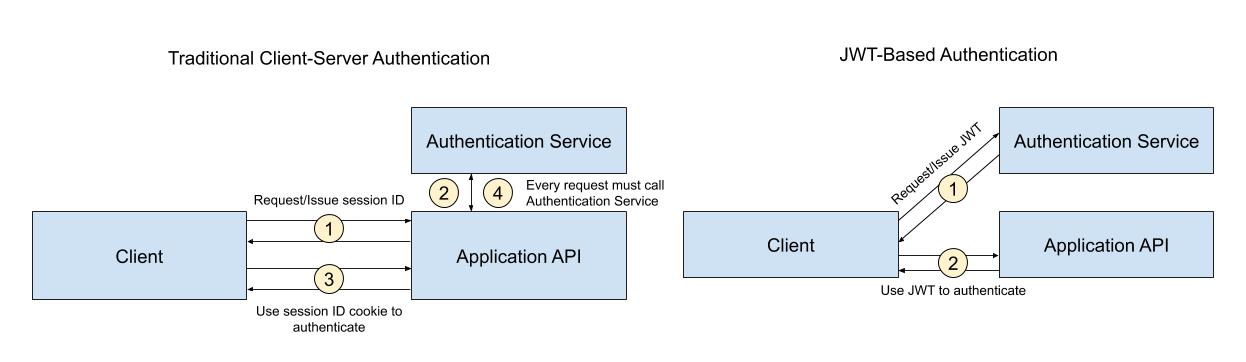
With the increasing popularity of single-page apps and the growing API economy, JSON Web Tokens (JWTs) are becoming a very popular method for authenticating users. Rather than relying on the server to store the user’s state, JWTs encode information in a keyed payload stored on the client.
JWTs are not inherently less secure than server-side session storage. But developers should understand the tradeoffs and know what to do if a JWT is compromised. You should expire JWTs frequently and always validate them before trusting them in your application.
If you’re using JWTs properly, they provide several benefits. For single-page applications—where much of the heavy-lifting is done in the browser—JWTs make a lot of sense. Assuming the client can decode the JWT and verify its signature, it doesn’t need to make another trip back to the server to authenticate the user. JWTs also make sense for highly performant, globally-distributed server-side applications. By storing user information in the JWT, each node can authenticate the user locally rather than querying an authentication service on every request.
In this tutorial, you’ll create a Laravel API that uses JWTs provided by Okta to authenticate users. You’ll use custom Laravel middleware and the Okta JWT Verifier package to verify requests and restrict access to your API to authenticated users. If you’d like to download the final codebase, it’s available on GitHub. Otherwise, read on for the step-by-step process.
Note: In May 2025, the Okta Integrator Free Plan replaced Okta Developer Edition Accounts, and the Okta CLI was deprecated.
We preserved this post for reference, but the instructions no longer work exactly as written. Replace the Okta CLI commands by manually configuring Okta following the instructions in our Developer Documentation.
Using JWT Authentication to Secure a Laravel API
In this tutorial, you’ll use Okta to generate a JWT that allows users to call your API securely. You’ll then verify the JWT using Okta’s JWT Verifier package to ensure that users have a valid, non-expired token before they get your data. To keep this example simple, you’ll use a client credentials grant, but the same JWT returned in standard Laravel authentication with Okta would also work.
Prerequisites: Please ensure you have already installed PHP, Composer, and have signed up for a free Okta developer account.
Setting Up a New Laravel Application
Before adding the API endpoints and authentication packages, you will need a fresh Laravel application with a database table and model. For this tutorial, you’ll create a Location model and database table that includes the names of several locations and their desirability on a scale of 1-10.
If you already have Composer installed, you can use it to create a new Laravel application from your command line:
composer create-project --prefer-dist laravel/laravel okta-laravel-jwt
Then you’ll need to cd into the folder and install the dependencies.
cd okta-laravel-jwt
composer install
php artisan key:generate
Note: This tutorial assumes you are using Laravel 8. While not considerably different from previous versions, you may notice some import paths have changed, so be sure to adjust this for your version of Laravel.
Laravel abstracts away most differences between database providers, so you can use any database you like, but the simplest way to get started is with SQLite. To use SQLite, create a new file to house your database:
touch database/database.sqlite
And update the DB_CONNECTION environment variable in your .env file to DB_CONNECTION=sqlite. Remove all the other DB_ environment variables as you don’t need them for a SQLite connection.
Next, use the Laravel Artisan command to create a new model and migration file:
php artisan make:model Location --migration
You will need to allow mass-assignment of the name and desirability attributes on this model, so open up the app/Models/Location.php model file. Add the following $fillable property to the class:
...
class Location extends Model
{
    protected $fillable = ['name', 'desirability'];
}
Next, you’ll need to add the model’s attributes to the database using the migration. Open up the new migration file Laravel created when you ran the above Artisan command. It should be the last file in your database/migrations folder. Modify the up() method to include the name and desirability fields:
...
public function up()
{
    Schema::create('locations', function (Blueprint $table) {
        $table->id();
        $table->string('name');
        $table->unsignedInteger('desirability');
        $table->timestamps();
    });
}
...
Commit the migration to your database using the migration Artisan command:
php artisan migrate
Finally, before you build the endpoints for your API, you can create some default seed data using Laravel’s Database Seeder. Open up the database/seeds/DatabaseSeeder.php file and replace the contents with the following:
<?php
namespace Database\Seeder;

use Illuminate\Database\Seeder;
use Illuminate\Support\Facades\DB;
use App\Models\Location;

class DatabaseSeeder extends Seeder
{
    /**
     * Seed the application's database.
     *
     * @return void
     */
    public function run()
    {
        DB::table('locations')->truncate();
        Location::create(['name' => 'Aruba', 'desirability' => 10]);
        Location::create(['name' => 'Jamaica', 'desirability' => 10]);
        Location::create(['name' => 'Bermuda', 'desirability' => 10]);
        Location::create(['name' => 'Bahama', 'desirability' => 10]);
        Location::create(['name' => 'Key Largo', 'desirability' => 10]);
        Location::create(['name' => 'Montego', 'desirability' => 10]);
    }
}
Run the seeder via the Artisan command to reset the database and create the six new locations:
php artisan db:seed
Your Laravel application, database table, and model are now ready. In the next step, you’ll add the API endpoints needed to retrieve, create, and delete data from this table.
Adding and Testing the API Endpoints
In a production application, you’ll probably want to create a controller to contain your API’s business logic. Because this is just a demonstration, you can do all the work in Laravel’s route file. Open up the routes/api.php file and replace it with the following:
<?php

use Illuminate\Http\Request;
use Illuminate\Support\Facades\Route;
use App\Models\Location;
use Illuminate\Support\Facades\Http;

Route::prefix('locations')->group(function () {
    Route::get('/', fn() => Location::all());
    Route::post('/', fn(Request $request) => Location::create($request->all()));
    Route::delete('/{id}', fn(int $id) => Location::destroy($id));
});
The first route will return all locations when GET /api/locations is called, the second will create a new location when POST /api/locations is called, and the third will delete a location based on the {id} you pass into the DELETE /api/locations/{id} call. To test these new endpoints out, start your local Laravel server:
php artisan serve
You can use curl or Postman to call each endpoint described above. For example, when I call http://localhost:8000/api/locations in Postman, I get the following JSON response back:
[
    {
        "id": 1,
        "name": "Aruba",
        "desirability": "10",
        "created_at": "2020-09-07T17:34:51.000000Z",
        "updated_at": "2020-09-07T17:34:51.000000Z"
    },
    {
        "id": 2,
        "name": "Jamaica",
        "desirability": "10",
        "created_at": "2020-09-07T17:34:51.000000Z",
        "updated_at": "2020-09-07T17:34:51.000000Z"
    },
    {
        "id": 3,
        "name": "Bermuda",
        "desirability": "10",
        "created_at": "2020-09-07T17:34:51.000000Z",
        "updated_at": "2020-09-07T17:34:51.000000Z"
    },
    {
        "id": 4,
        "name": "Bahama",
        "desirability": "10",
        "created_at": "2020-09-07T17:34:51.000000Z",
        "updated_at": "2020-09-07T17:34:51.000000Z"
    },
    {
        "id": 5,
        "name": "Key Largo",
        "desirability": "10",
        "created_at": "2020-09-07T17:34:51.000000Z",
        "updated_at": "2020-09-07T17:34:51.000000Z"
    },
    {
        "id": 6,
        "name": "Montego",
        "desirability": "10",
        "created_at": "2020-09-07T17:34:51.000000Z",
        "updated_at": "2020-09-07T17:34:51.000000Z"
    }
]
Now that your API is set up, you are ready to add JWT authentication.
Adding the Okta JWT Verifier
Middleware is usually the best place for custom authentication and request validation logic. In this step, you’ll create a new Laravel middleware, use the Okta JWT verifier to make sure the user has passed a valid JWT in as their bearer token, and add this middleware to all of the /api/locations routes described above.
First, install the Okta JWT verifier package and its peer dependencies using Composer:
composer require okta/jwt-verifier firebase/php-jwt guzzlehttp/psr7 http-interop/http-factory-guzzle
The JWT adapter we’ll use is firebase/php-jwt, guzzlehttp/psr7 provides HTTP interfaces for the API requests this library makes to Okta’s servers, and the http-interop/http-factory-guzzle adds PSR-17 support. The guzzlehttp/psr7 library will be getting this support in version 2.0, but in the meantime, the interop library allows you to fill in the missing pieces.
To use the JWT verifier, you’ll need a new Okta application with a Client ID and the Issuer URI of your Okta Authorization Server.
Log in to your Okta account and go to API > Authorization Servers. Copy the Issuer URI and add it as the environment variable OKTA_ISSUER_URI in your Laravel application.

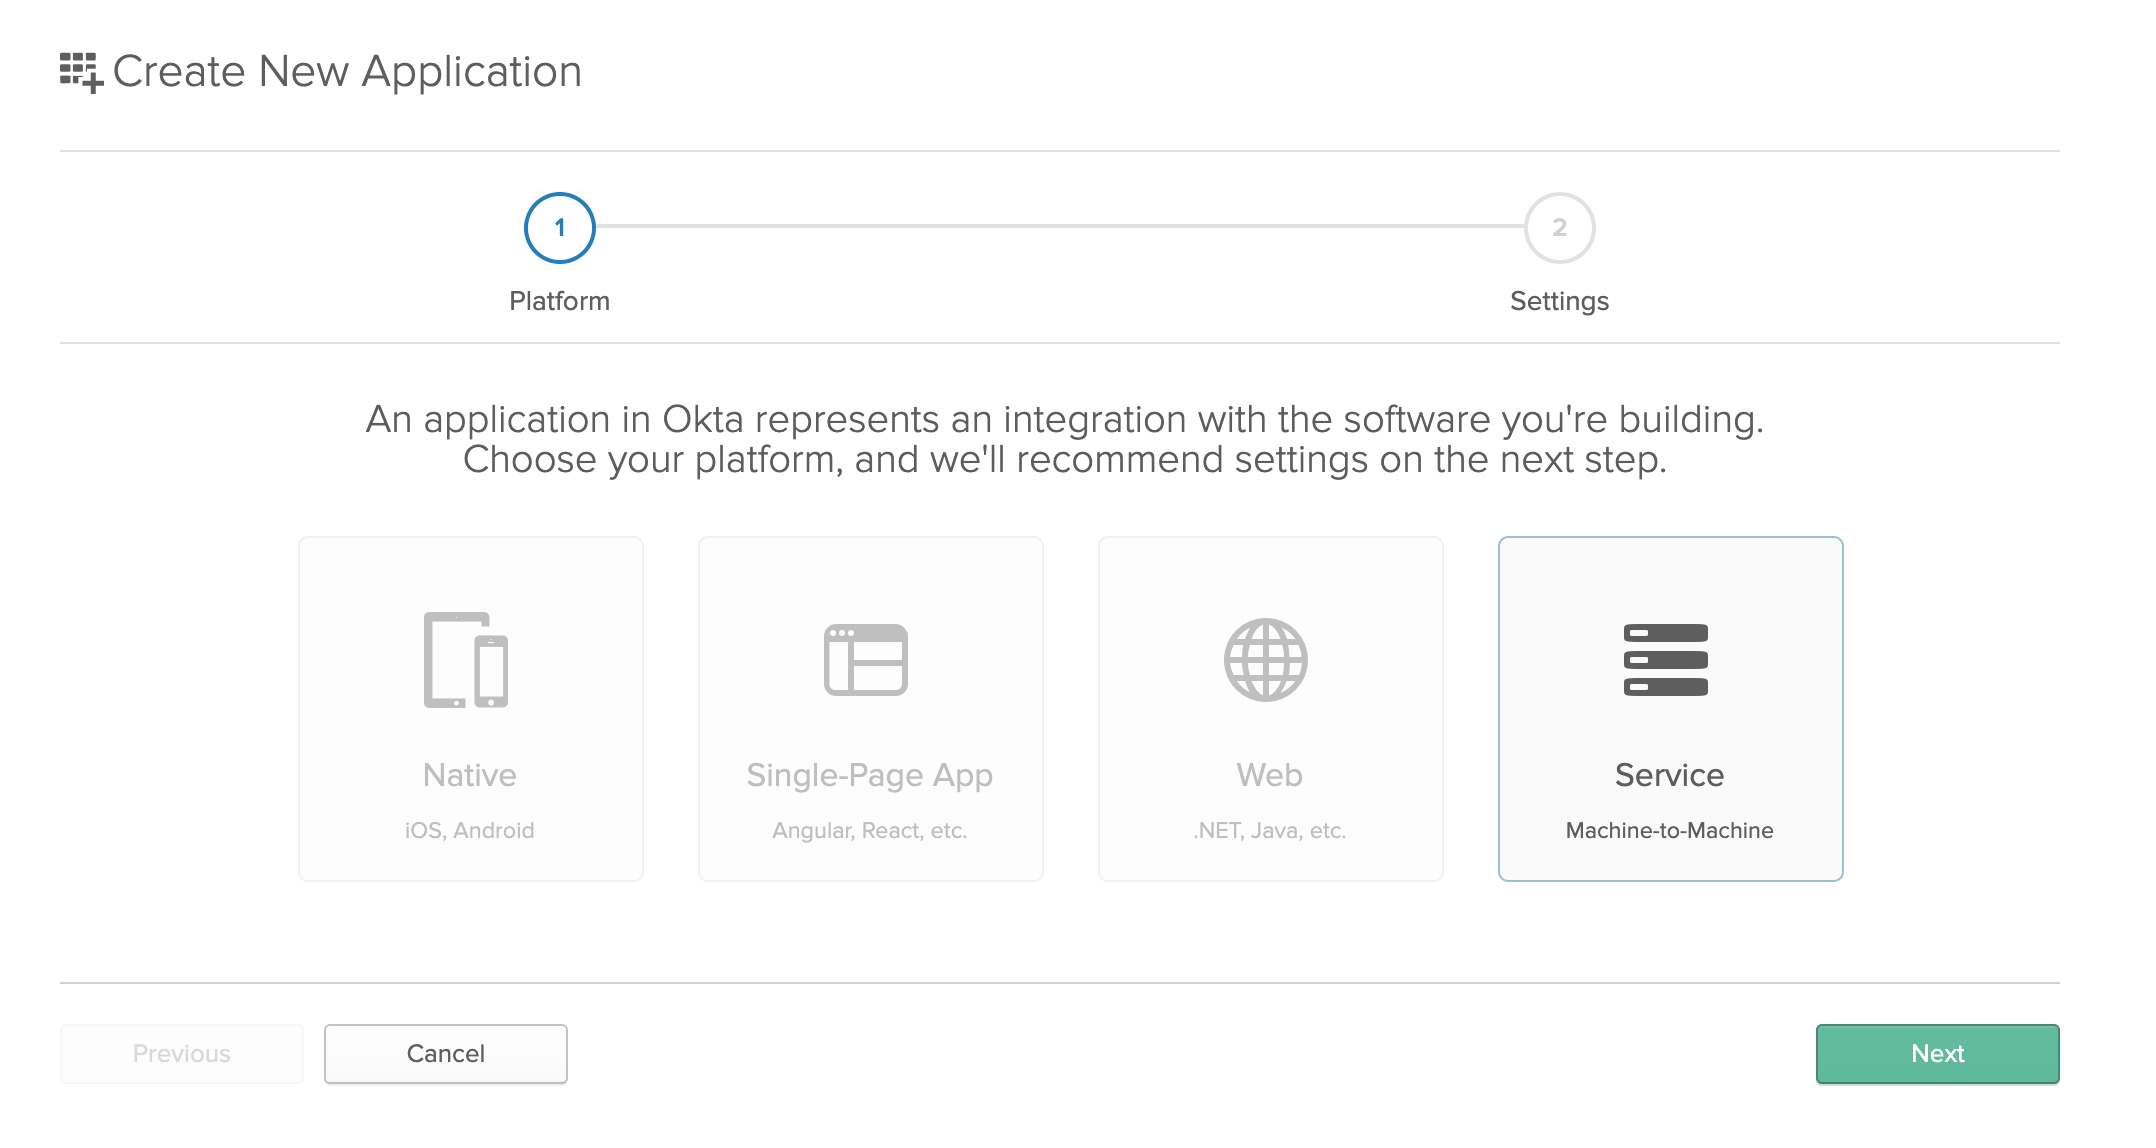
To create a new server application, go to Applications and click the Add Application button in the top left. Select Service, Machine-to-Machine and click Next.
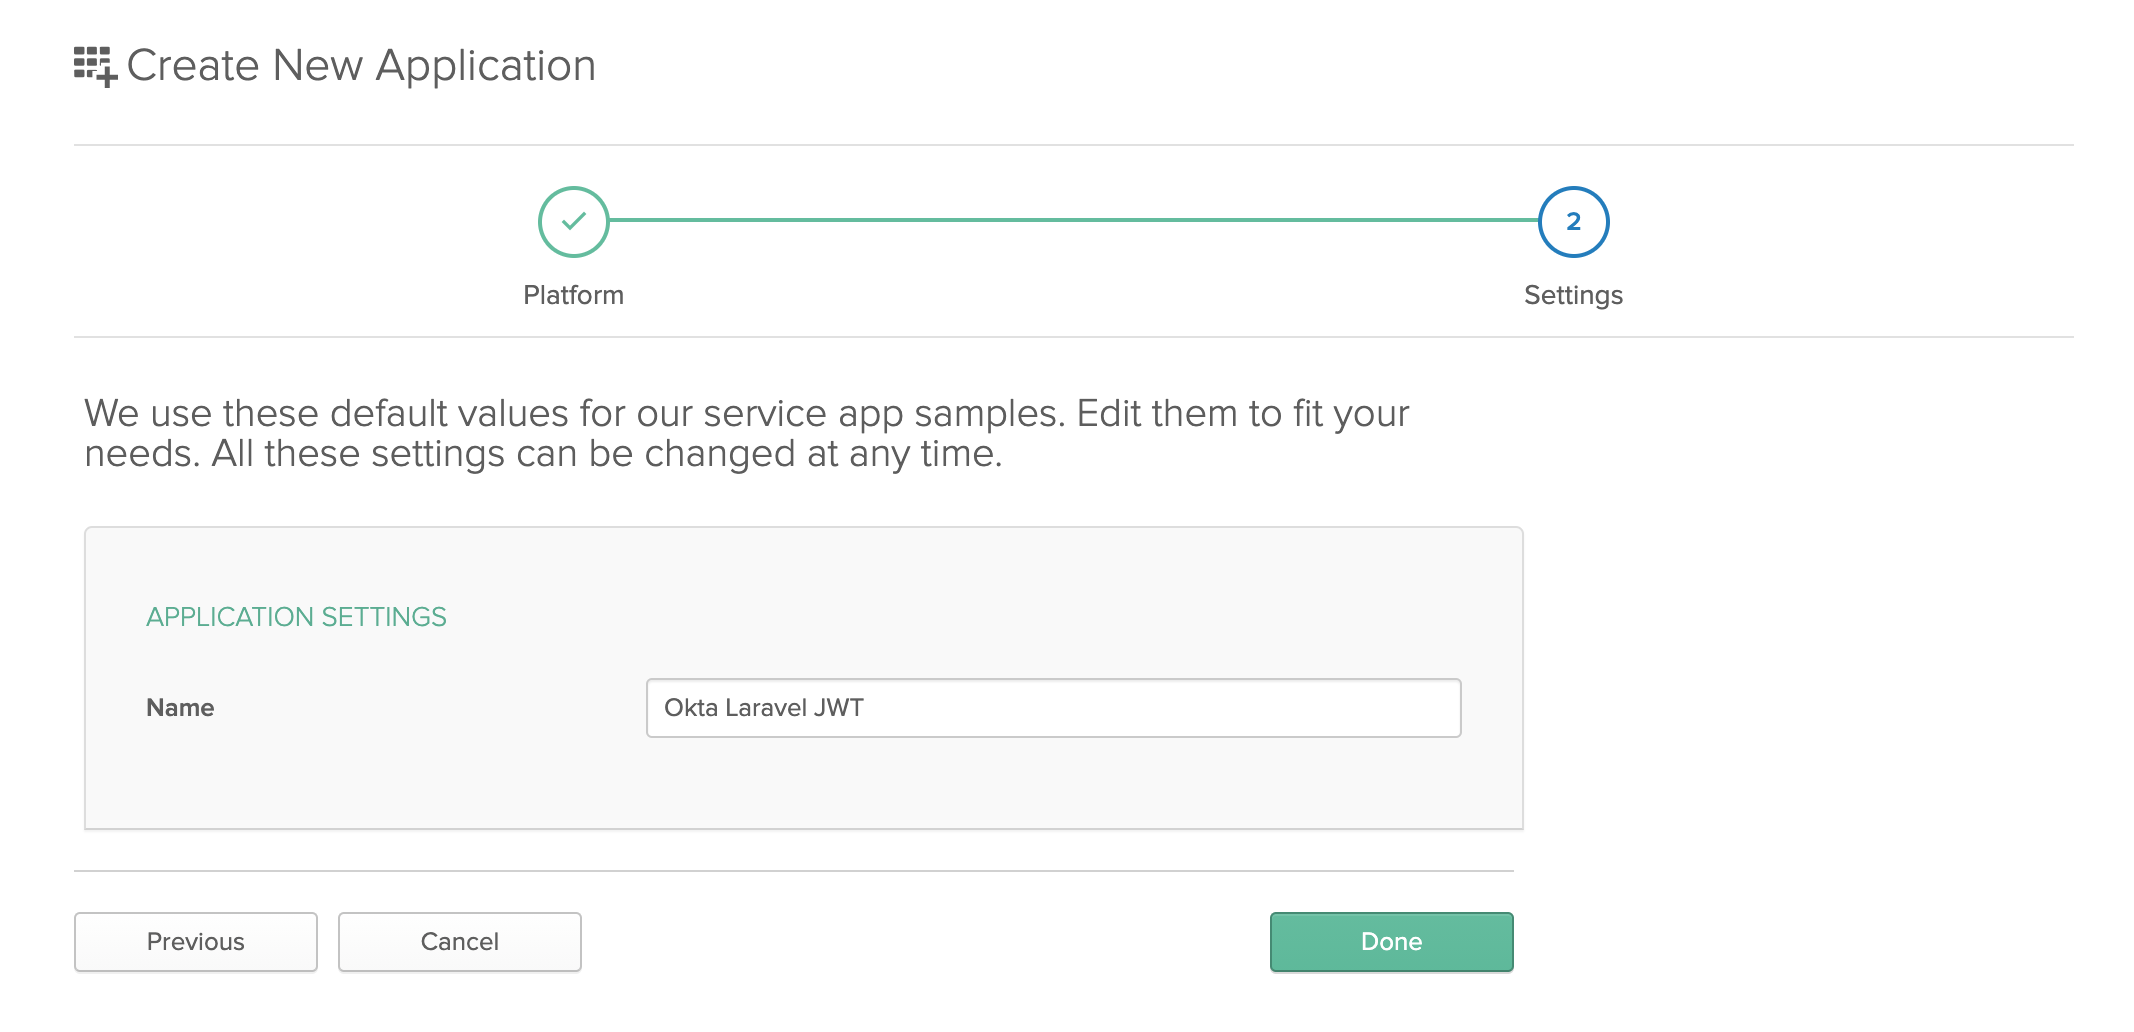
Enter a name for your application and click Next again.
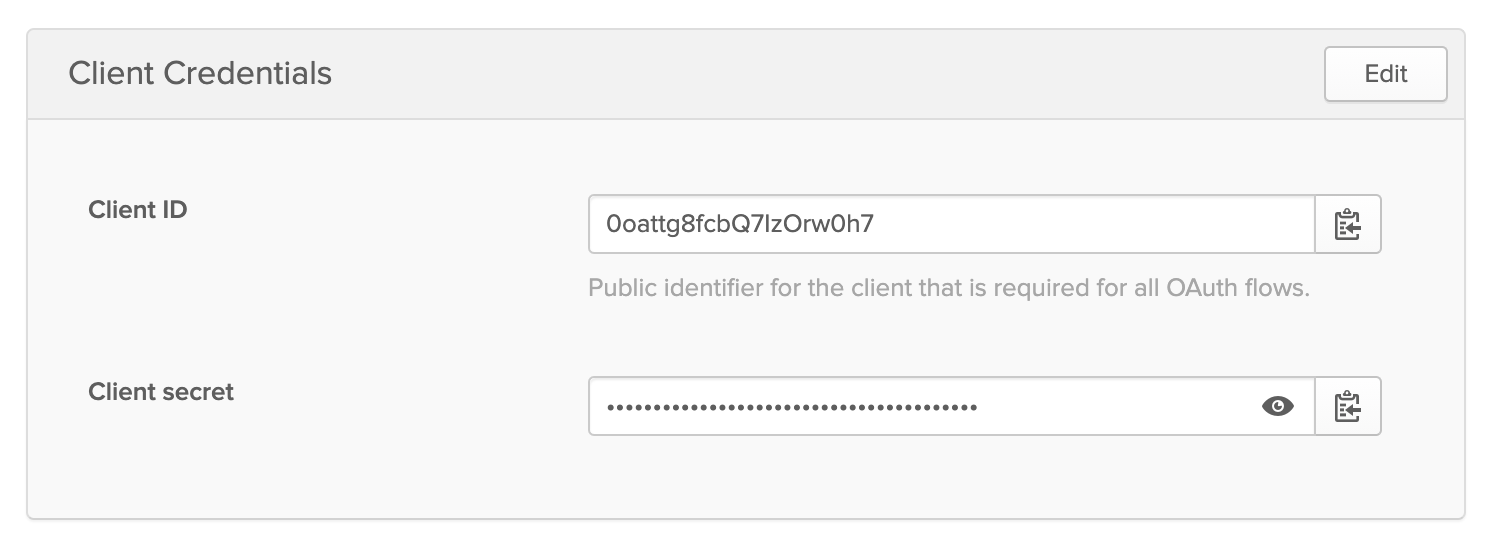
Copy the Client ID and Client Secret from this page and add them to your Laravel application’s .env file as OKTA_CLIENT_ID and OKTA_CLIENT_SECRET respectively.
Now that you have your Okta application and credentials, you are ready to use them to verify JWTs in Laravel. Create a new middleware using the Artisan command:
php artisan make:middleware VerifyJwt
Open up the new file at app/Http/Middleware/VerifyJwt.php and replace the contents with the following:
<?php

namespace App\Http\Middleware;

use Closure;
use Illuminate\Http\Request;
use Illuminate\Support\Facades\Log;
use Okta\JwtVerifier\Adaptors\FirebasePhpJwt;
use Okta\JwtVerifier\JwtVerifierBuilder;

class VerifyJwt
{
    public function handle(Request $request, Closure $next)
    {
        // Instantiate the Okta JWT verifier
        $jwtVerifier = (new JwtVerifierBuilder())
            ->setAdaptor(new FirebasePhpJwt())
            ->setAudience('api://default')
            ->setClientId(env('OKTA_CLIENT_ID'))
            ->setIssuer(env('OKTA_ISSUER_URI'))
            ->build();

        try {
            // Verify the JWT passed as a bearer token
            $jwtVerifier->verify($request->bearerToken());
            return $next($request);
        } catch (\Exception $exception) {
            // Log exceptions
            Log::error($exception);
        }

        // If we couldn't verify, assume the user is unauthorized
        return response('Unauthorized', 401);
    }
}
To use this middleware, you need to add it to your Kernel class and routes. Open app/Http/Kernel.php and add the following to your $routeMiddleware array:
...
'jwt' => \App\Http\Middleware\VerifyJwt::class,
...
Next, open your routes/api.php file again and add the middleware to your locations route group:
...
Route::prefix('locations')->middleware('jwt')->group(function () {
...
This applies the new middleware to every endpoint within the group, but you could apply it selectively to specific routes if you wanted.
Restart your Laravel application and try the endpoints again. This time, the API will return a 401 Unauthorized response because you have not added a valid JWT to your request. In the last section, you’ll issue a JWT and use it to make requests to the API.
Issuing JWTs
Before you can issue a JWT and use it to authenticate users trying to access your new Laravel API, you need to create a custom scope in Okta to provide access. Go back to the API > Authorization Servers page in the Okta Developer Console and click the pencil icon to edit the authorization server.

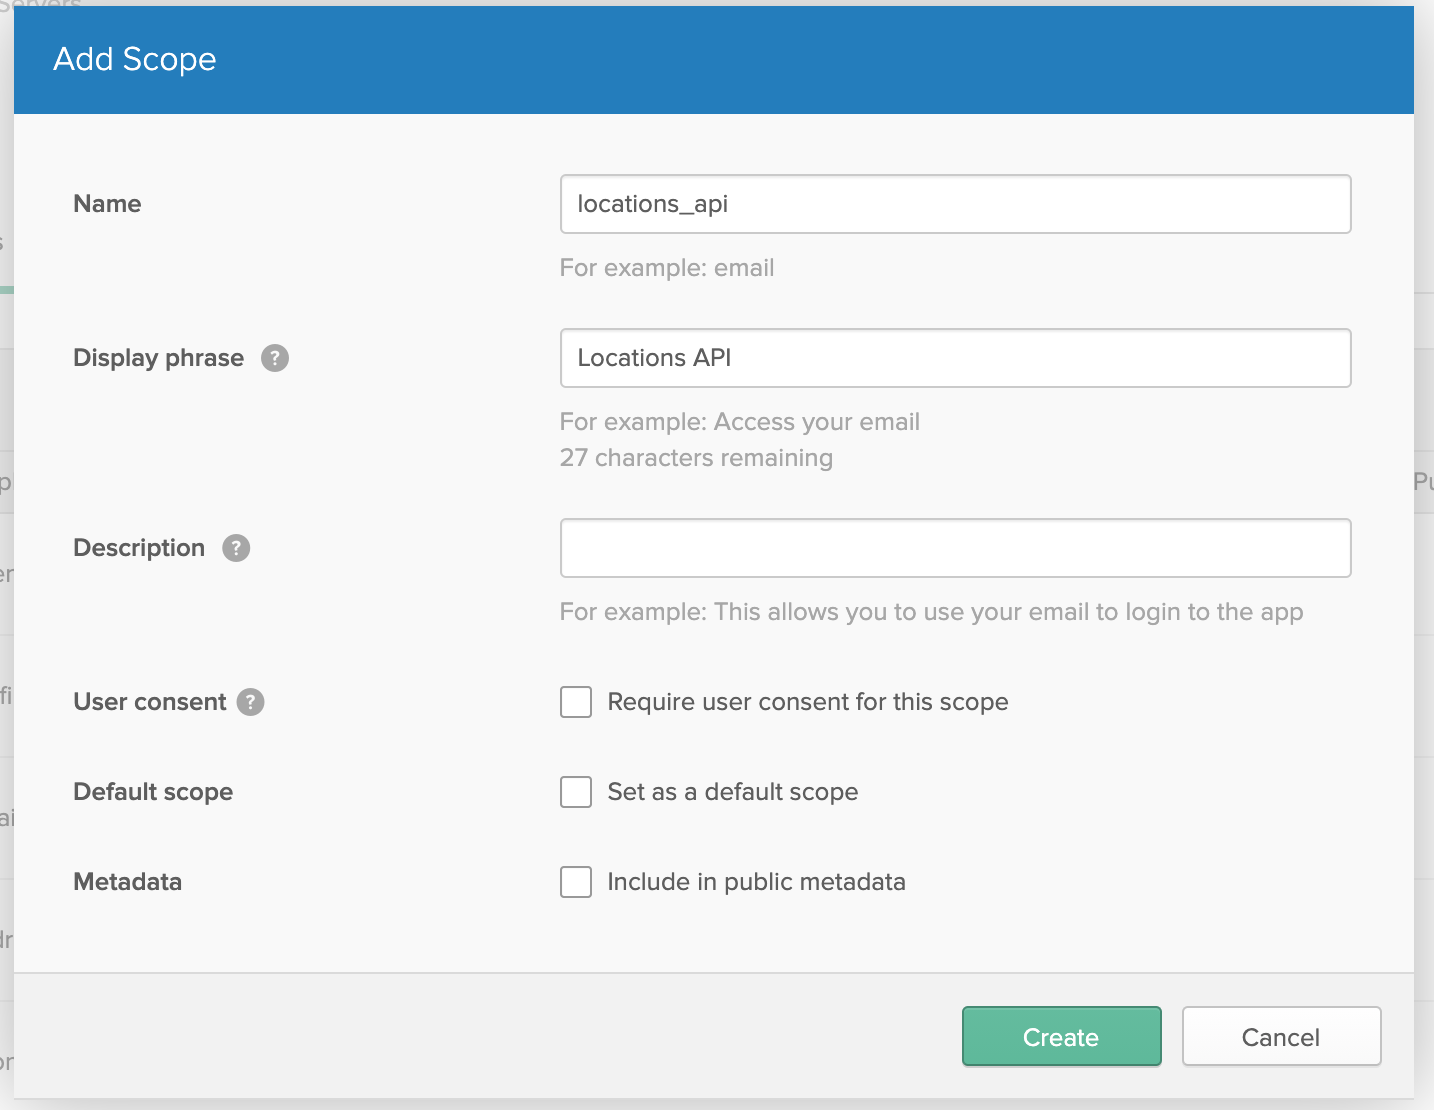
Click the Scopes tab and then the Add Scopes button.

Give your scope a Name and Display phrase so you can identify it. In this example we’ll use locations_api for the scope name. Click Create when you’re finished.
Now that your Okta authorization server has a new scope specifically for your new API, you can get an access token with this scope. For demonstration purposes, you’ll use the Client Credentials grant to get an access token without user interaction. In a real application, you would likely have the application use an OAuth login flow and then issue the access token to the client application.
On the command line, use curl to get an access token, replacing the placeholder values in the command below with your own application’s client ID and secret:
curl https://dev-XXXXXX.okta.com/oauth2/default/v1/token \
  -d grant_type=client_credentials \
  -d client_id=OKTA_CLIENT_ID \
  -d client_secret=OKTA_CLIENT_SECRET \
  -d scope=locations_api
When you run this command, Okta will issue an access token and return a JSON object which contains the JWT in a field called access_token.
{
    "token_type": "Bearer",
    "expires_in": 3600,
    "access_token": "eyJraWQiOiI5b1o2N...",
    "scope": "locations_api"
}
Copy the value of the access_token field. Make a GET call to the http://localhost:8000/api/locations endpoint with the JWT in your Authorization header as a bearer token. In curl, the request will look like this:
curl --location --request GET 'http://localhost:8000/api/locations' --header 'Authorization: Bearer eyJraWQiOiI5b1o2N...'
Laravel will use the Okta JWT verifier you added to your new middleware to verify and decode your token. If it’s valid and not expired, you should see the same list of locations as you did before you added authentication to the app. The same bearer token can be used to access the POST and DELETE endpoints until the JWT expires.
While this application used a machine-to-machine application to generate a JWT, you could use any Okta-issued JWT with the proper scopes to get the same access to the API above. This decoupling of authentication from your application logic is one of the most significant advantages of using a third-party authentication provider like Okta. It allows you to build scalable, distributed, and secure Laravel APIs.
Learn More About Using Okta with Laravel
If you’d like to learn more about integrating Okta with your Laravel and PHP applications, be sure to check out some of these resources:
- Build a Simple Laravel App with Authentication
- Protecting a PHP API Using OAuth
- Create and Verify JWTs in PHP with OAuth 2.0
If you like this blog post and want to see more like it, follow @oktadev on Twitter, subscribe to our YouTube channel, or follow us on LinkedIn. As always, please leave a comment below if you have any questions.
Okta Developer Blog Comment Policy
We welcome relevant and respectful comments. Off-topic comments may be removed.