Alexa, Sign In Every Time: Voice-Only Authentication Verification in .NET

Authentication for voice, specifically Amazon’s Alexa, has its limitations. The initial Account Linking process Amazon provides for identification works for many scenarios, but it is only done once (signing into the skill via the Alexa mobile app or website), and all subsequent sessions with the skill are linked - no log-in screen presented again. I’ve often been asked what the options are for verifying every time a user engages with an Alexa skill. For example; a financial institution with access to sensitive user data might want to ensure that a specific person in the household is accessing it, and not others in the home.
Another case is for purchases in skills, where verification might be useful to keep kids from buying something a parent has not agreed to. Don’t worry, Okta has you covered! This tutorial will guide you through an interaction-based authentication step that you can present to your users at any point, managed in Okta.
To make it more user-friendly, this example will demonstrate a voice-only verification - no phone or computer required for screen access. Let’s get started making voice experiences more secure and hands-free at the same time!

Note: In May 2025, the Okta Integrator Free Plan replaced Okta Developer Edition Accounts, and the Okta CLI was deprecated.
We preserved this post for reference, but the instructions no longer work exactly as written. Replace the Okta CLI commands by manually configuring Okta following the instructions in our Developer Documentation.
Create an Alexa Skill in ASP.NET Web API for Account Linking
Since this post focuses on how to set up voice-only verification, a great place to get started is to follow the tutorial on User Account Linking in Alexa with Web API and when you have that working, continue here. This will be an enhancement to the security flow for your users within Okta. You can also use this flow for .NET Core as well.
Store a Personal Key in Okta for Voice-Only Security Verification
Okta is an API service that allows you to create, edit, and securely store user accounts and user account data, and connect them with one or more applications. Our developer API can:
- Authenticate and authorize your users
- Store data about your users
- Perform password-based and social login
- Secure your application with multi-factor authentication
- And much more! Check out our product documentation for more information
If you haven’t done it yet, Register for a forever-free developer account, and when you’re done, continue below!
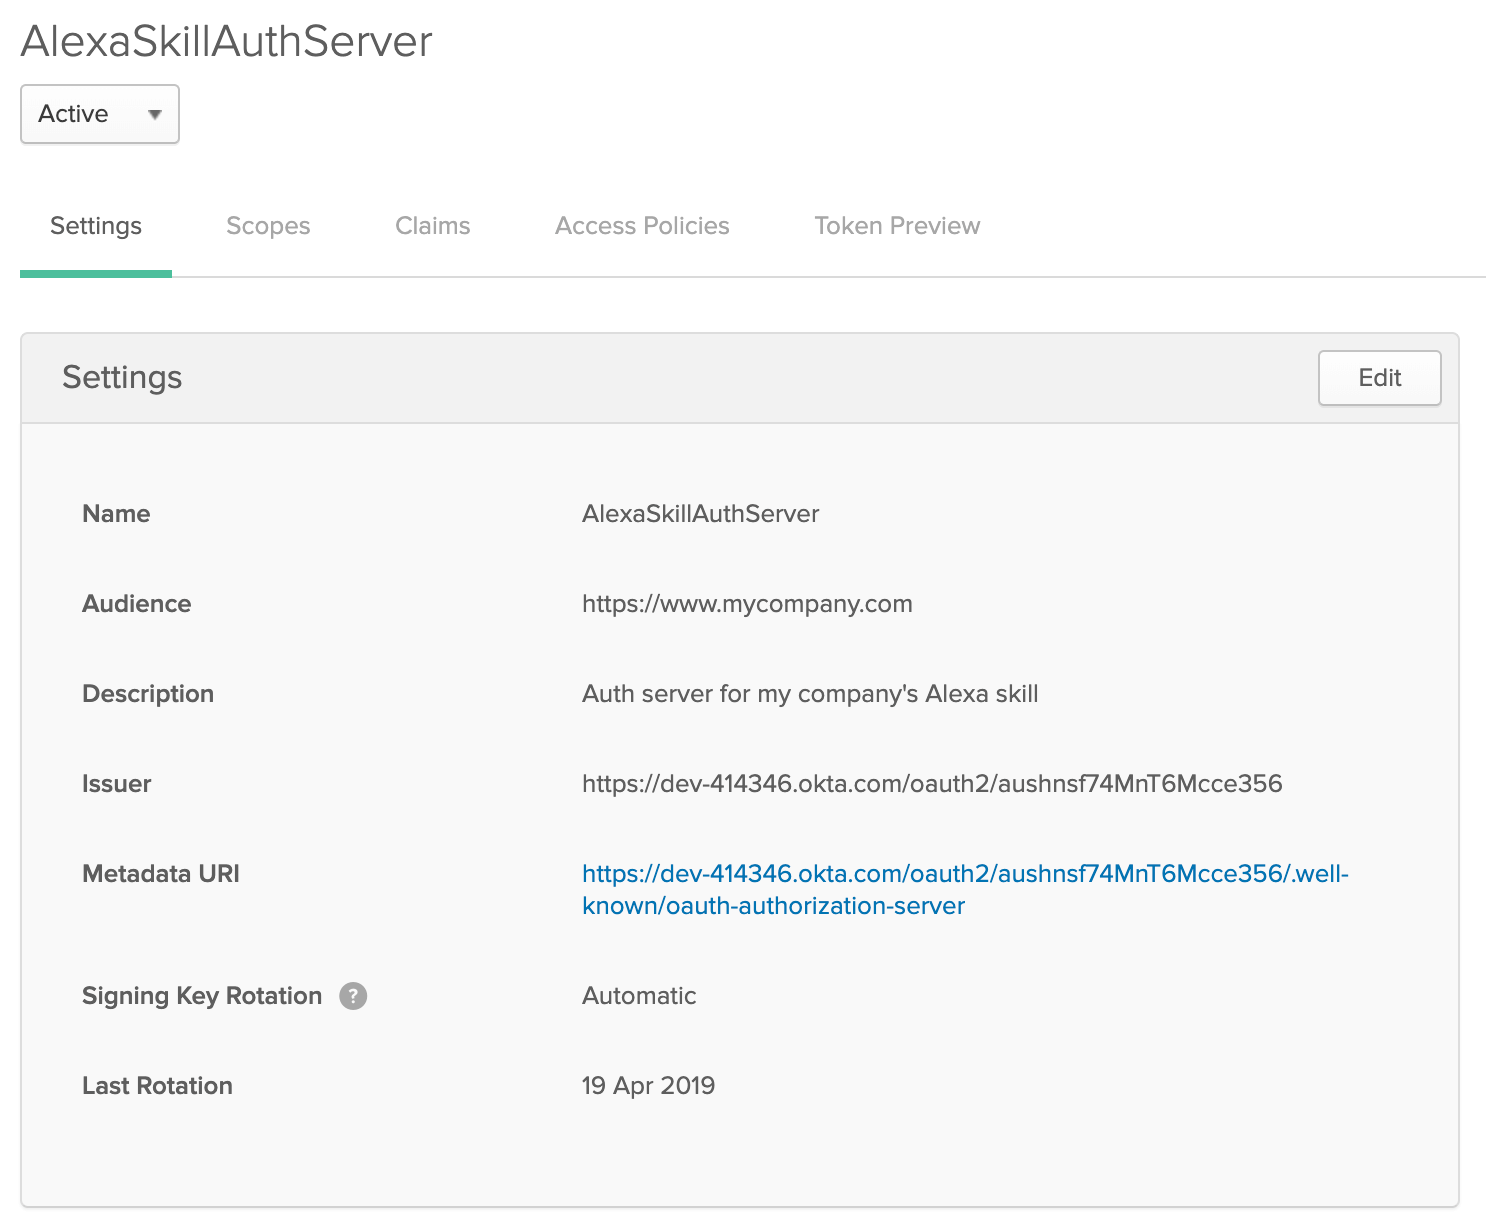
Log in using your Okta Org URL (should look something like this: https://dev-000000.okta.com/) with your Super Administrator account. Navigate to API > Authorization Servers and click on the AlexaSkillAuthServer that you created in the previous tutorial.
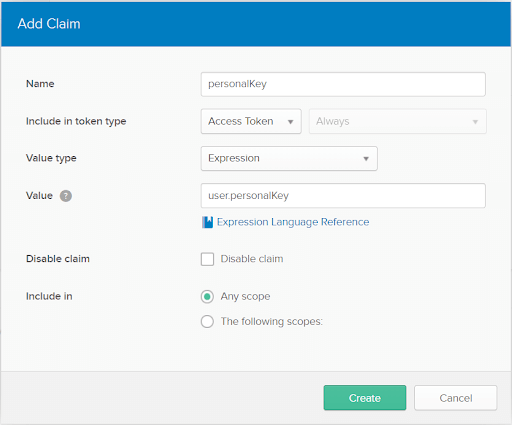
Now you will create a custom claim that will include a Personal Key field in the Access Token you can use for user verification. To add that, click on Claims and then Add Claim and add the following claim:
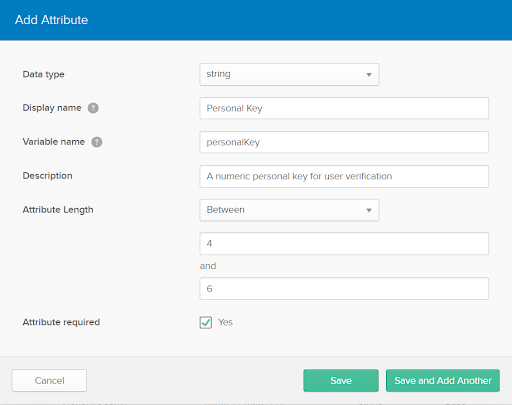
Great! The field is now included with the Access Token from Okta. Now, we need to create a custom user profile attribute to store the user’s personal key. Select Users > Profile Editor. Click the pencil icon to the right of the Okta logo.
Add a new attribute called personalKey. Click Add Attribute and enter “personalKey” for the Display name and Variable name. Fill in a description, set the Min value to 4 and the Max value to 6 and click Save.
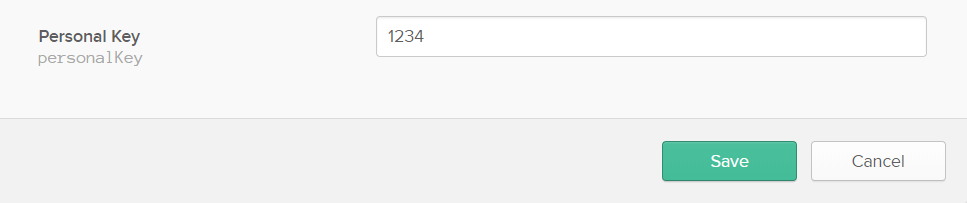
Now we’ve added a place to create and update the personal key for a user within your Okta org. Time to add one for a test user! Go to Users > People, select the test user you created in the previous tutorial, click on Profile > Edit, scroll down to the bottom and give a 4 to 6 digit numeric code in the Personal Key field and click Save.
That’s all you need to do in Okta!
Update the Skill in the Amazon Portal for Alexa Sign In
It’s time to let Alexa know that there will be an additional intent used for verification in this Skill. Log into the Amazon Developer Portal, navigate to https://developer.amazon.com/alexa/console/ask and click on My Company Skill. Once on the dashboard, click the Add+ button next to Intents. Add an intent called FavoriteBandVerifyIntent and click create custom intent. At the bottom, you will see a place to add Intent Slots. Type PersonalKey into the Name field click the + to set the slot type. Set it to AMAZON.Number.

The slot can now be used in a few Sample Utterances for this Intent. Add as shown below:

Click Save Model and then Build Model. Your Alexa Skill has been updated with the newly added intent.
Add a Verification Step in ASP.NET Web API for the Alexa Skill
Now that you have the basic skill set up, go to the switch case in the MyCompanySkill HttpPost at the top of your AlexaController, as indicated in the section Extend Your Web API project with an Alexa Endpoint in the previous tutorial. Replace the HTTPPost MyCompanySkill method with the code below:
[HttpPost, Route("mycompanyskill")]
public AlexaResponse MyCompanySkill(AlexaRequest request)
{
    AlexaResponse response = null;

    switch (request.Request.Intent.Name)
    {
        case "HelloIntent":
            response = HelloIntentHandler();
            break;
        case "FavoriteBandIntent":
            response = FavoriteBandIntentHandler(request);
        case "FavoriteBandVerifyIntent":
            response = FavoriteBandVerifyIntentHandler(request);
            break;
    }

    return response;
}
Now replace the existing FavoriteBandintentHandler with the following code:
private AlexaResponse FavoriteBandIntentHandler(AlexaRequest request)
{
    var response = new AlexaResponse(
            "This request requires user verification. Please say, Authorize Favorite Band and your personal key.");
    response.Response.Card.Title = "Favorite Band Verification Required";
    response.Response.Card.Content = "Say, 'Authorize Favorite Band [Personal Key]'.";
    response.Response.ShouldEndSession = false;
}
You have now added an additional user verification flow for the intent you wish to ensure is done by a person with proper access. Underneath the newly updated FavoriteBandIntentHandler method, add the following verification handler:
private AlexaResponse FavoriteBandVerifyIntentHandler(AlexaRequest request)
{
    var jwtEncodedString = request.Session.User.AccessToken;

    if (request.Session.User.AccessToken != null)
    {
        //Decode name and favorite band from the access token
        var token = new JwtSecurityToken(jwtEncodedString: jwtEncodedString);
        var personalKey = token.Claims.First(c => c.Type == "personalkey").Value;

        //Retrieve the user's input from the request object
        var userInputKey = request.Request.Intent.Slots["PersonalKey"].value.ToString();

        if (userInputKey == personalKey)
        {
            var bandName = token.Claims.First(c => c.Type == "favoriteBand").Value;
            var name = token.Claims.First(c => c.Type == "firstName").Value;

            var response = new AlexaResponse(
                "Hello " + name + ", your favorite band is " + bandName + ".");
            response.Response.Card.Title = name + "'s Favorite Band";
            response.Response.Card.Content = bandName;
            response.Response.ShouldEndSession = true;

            return response;
        }
        else
        {
            var response = new AlexaResponse(
            "Sorry, that is an invalid personal key. To try again, say Authorize Favorite Band, and your personal key");
            response.Response.Card.Title = "Invalid Personal Key to access Favorite Band";
            response.Response.Card.Content = "To try again, say, 'Authorize Favorite Band [Personal Key]'.";
            response.Response.ShouldEndSession = false;

            return response;
        }
    }
    else
    {
        var response = new AlexaResponse("You are not currently linked to this skill. Please go into your Alexa app and sign in.");
        response.Response.Card.Type = "LinkAccount";
        response.Response.ShouldEndSession = true;

        return response;
    }
}
Redeploy your code and try out your new flow with the user you updated and set-up previously for Beta testing. Now you should receive a voice prompt for the user to say their personal key before accessing their favorite band! While you used an existing intent to update with verification, this can be done at the beginning of any engagement with your skill. The flow is up to you!
Allow a User to Change their Personal Key
Setting a personal key might be something you want to allow the user to do while inside their Alexa skill right after they finish the initial Account Linking flow. You can accomplish this one of two ways:
Allow them to set their personal key vocally with the Okta .NET Management SDK Email or text them a link to their Okta account and have them set it there
If you are interested in programmatically updating the custom attribute values on a user’s profile (where the personal key is stored), Okta has provided a .NET Management SDK with the ability to set them. Simply add the package with NuGet to this project and follow the configuration steps outlined on GitHub to start accessing the Okta user profile. This library allows the user to reset their key completely by voice alone if you add another Intent in your Alexa Skill to walk the user through it.
A more secure way to allow your user to set their personal key is to email them after the Alexa skill is Account Linked by extracting their email from the JSON Web Token (JWT) and sending them a link to your company’s Okta Org URL. Include instructions in that email to have them update their Okta user profile by signing in and choosing their personal key and saving it before using it with their voice.
There you have it! Now you made your Alexa skill in ASP.NET just a bit more secure. Interested in using other kinds of factors for authentication? Comment below and we will add it to future blog posts.
Learn More About ASP.NET and Secure User Management
If you’d like to learn more about using secure OAuth 2.0 and user management in ASP.NET, we’ve also published a number of posts that might interest you:
- How to Secure Your .NET Web API with Token Authentication
- Build a CRUD App with ASP.NET Framework 4.x Web API and Angular
- Secure Your ASP.NET Web Forms Application with OpenID Connect and Okta
- Use OpenID Connect for Authorization in Your ASP.NET MVC Framework 4.x App
As always if you have any questions or comments about this post feel free to leave a comment below. For other great content from the Okta Dev Team, follow us on Twitter and Facebook!
Okta Developer Blog Comment Policy
We welcome relevant and respectful comments. Off-topic comments may be removed.