Build Login in Xamarin with Xamarin.Forms

Chuck Norris could easily make a single app run on all of the platforms iOS, Android, and Windows - without any frameworks or tools. Most of the rest of us could probably do with some help.
Happily, Xamarin Forms is the perfect tool for the job, and makes it a breeze to create an app! With Xamarin Forms your app will run on all three platforms from a single codebase. Xamarin Forms comes free with Visual Studio 2019 community edition from Microsoft. Let’s try it out - and have some fun. We’ll make a simple app that fetches Chuck Norris facts and collects your favorites.
This post will use these tools, libraries, and services:
- Visual Studio 2019 community edition
- Xamarin.Forms
- RestSharp - for REST calls
- Chuck Norris facts API at
https://api.chucknorris.io/ - System.IdentityModel.Tokens.Jwt
Start by downloading Visual Studio 2019 community edition from visualstudio.microsoft.com. Make sure to check the boxes “Mobile development” and “Universal Windows Platform development” during the installation process:

If you forget, no problem! Just open “Visual Studio Installer” from your start menu, select Modify and then you are back at the screen where you can tick off the workloads you want.
When you continue, it will open the Windows Settings window to turn on developer mode. Make sure to turn it on (it’s not defaulted).
You may also use Visual Studio 2017, but it would be wise to update it - to make sure you have the latest version of Xamarin.Forms. Start the Visual Studio installer and select Update if that is an option.
Note: In May 2025, the Okta Integrator Free Plan replaced Okta Developer Edition Accounts, and the Okta CLI was deprecated.
We preserved this post for reference, but the instructions no longer work exactly as written. Replace the Okta CLI commands by manually configuring Okta following the instructions in our Developer Documentation.
Scaffold Your Xamarin App for Secure Login
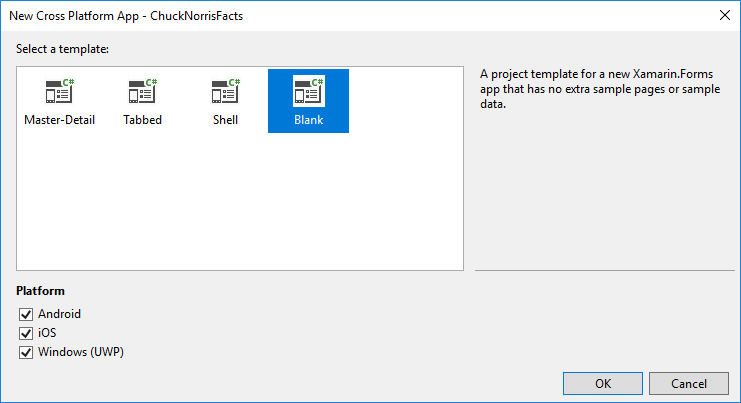
Start Visual Studio, select Create a new project, and select the template Mobile App (Xamarin.Forms) and then click Next:

Enter “ChuckNorrisFacts” for Project name and then click the button Next.
Then check all platforms and select the template Blank:
Then you’re in. Have a look around!
The Solution Explorer on the right contains four projects:
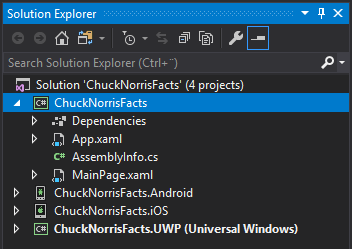
The first one is the only one you will work on. The others are for platform-specific code, and you may as well collapse them as I have done in the image above.
Notice that the last project, ChuckNorrisFacts.UWP (Universal Windows) is in bold text. This means that hitting F5 will run this as a Windows application. If you want to run the Android or iOS versions, you must right-click the project you want and then select Set as StartUp Project.
Now it’s time to build a user interface for getting Chuck Norris facts! Right-click the project ChuckNorrisFacts, select Add and then New Item…. Select Xamarin.Forms to the left and Content View in the middle (not the one with C# in a parenthesis), and enter “FactsView” in the Name field:
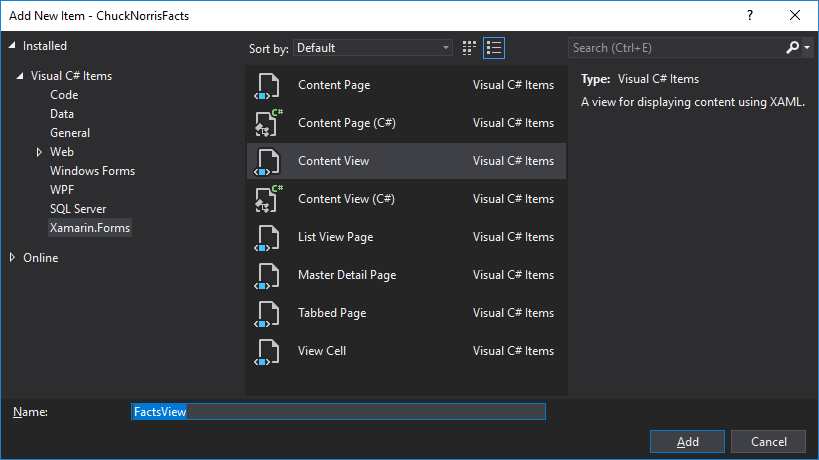
Click Add, and two new files will be created. FactsView.xaml is the view part of the component, declaring which components are included and their visual appearance, including layout. FactsView.xaml.cs is for C# and is called the code behind file.
Change the FactsView.xaml file’s content to this:
<?xml version="1.0" encoding="UTF-8"?>
<ContentView xmlns="http://xamarin.com/schemas/2014/forms"
             xmlns:x="http://schemas.microsoft.com/winfx/2009/xaml"
             x:Class="ChuckNorrisFacts.FactsView">
    <ContentView.Content>
        <StackLayout>
            <StackLayout Orientation="Horizontal">
                <Picker x:Name="CategoryPicker"></Picker>
                <Button x:Name="GetFactButton" Clicked="GetFactClicked" Text="Get fact"></Button>
                <Button x:Name="GetFavoriteButton" Clicked="GetFavoriteClicked"
                          Text="Get random favorite" IsEnabled="False"></Button>
                <Button x:Name="AddFavoriteButton" Clicked="AddFavoriteClicked"
                          Text="Add to favorites" IsEnabled="False"></Button>
            </StackLayout>
            <Label x:Name="FactLabel"/>
        </StackLayout>
    </ContentView.Content>
</ContentView>
The content of this view is a StackLayout, which by default lays out its content from top to bottom. In the first row is another StackLayout with Orientation="Horizontal", which means it lays out its content from left to right. Inside it, there are a combo box (which is called Picker in Xamarin.Forms) and three buttons.
The x:Name attribute gives a variable name to each component, which enables you to access them in the code behind file. You will see that soon.
The Clicked attribute tells which method be called when the button is clicked. The attribute Text specifies the text on the button.
The last two buttons are disabled, more about that later.
Run Your New Xamarin App
It is always wise to often test that everything is right. To actually see our FactsView, open MainPage.xaml and add <local:FactsView></local:FactsView> right after the comment <!-- Place new controls here -->. Also, to make it build without errors, you need to add the click-handlers. Open FactsView.xaml.cs and add these methods to the class - we will finish them later:
private void GetFavoriteClicked(object sender, EventArgs e)
{
}

private void GetFactClicked(object sender, EventArgs e)
{
}

private void AddFavoriteClicked(object sender, EventArgs e)
{
}
Now you can run the application. Make sure the UWP project is set as the startup project, and enable developer mode in Windows settings if you have not done it already. Then press F5, and Visual Studio will build your solution and run it. Building it takes a while the first time. When started, it should look something like this:
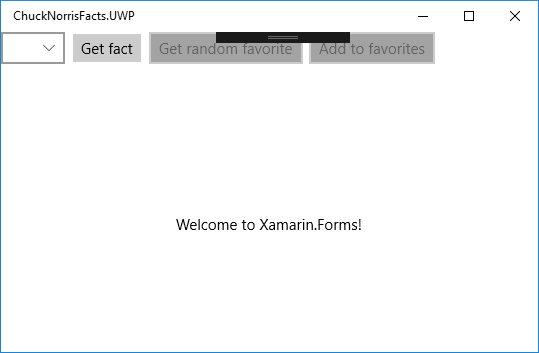
The black thing in the center almost at the top is a debug tool. Click on it to expand it. If you run with CTRL+F5 instead of F5 alone, Visual Studio will run your app without debug mode and without this debug tool.
Make a REST Call in You Xamarin App
Next up is actually getting some Chuck Norris Facts! That’s where Chuck Norris facts JSON API at https://api.chucknorris.io/ comes in handy. Go to https://api.chucknorris.io/jokes/random and you will get a random joke in JSON format.
You need to build a model class to parse this JSON. Let’s do it the easy way. Copy the JSON of the random joke you got from the browser. Then add a new class, either by the shortcut Shift+Alt+C or by right-clicking the project ChuckNorrisFacts, selecting Add and then New Item…. Call the class Fact. Once it has been created, delete the class
and the using statements so you are left with only this:
namespace ChuckNorrisFacts
{
}
Place the cursor between the curly braces and go to the Edit menu in the top bar of Visual Studio. Select Paste Special and then Paste JSON as Classes. Visual Studio creates all the properties for you! Change the name of the class back to Fact, and it should now look like this:
namespace ChuckNorrisFacts
{
    public class Fact
    {
        public object category { get; set; }
        public string icon_url { get; set; }
        public string id { get; set; }
        public string url { get; set; }
        public string value { get; set; }
    }
}
Now you will add some NuGet packages to do REST calls and parse JSON. Go to the Tools menu at the top bar of Visual Studio. Select NuGet Package Manager and then Manager NuGet Packages for Solution. Install RestSharp and Newtonsoft.JSON into the main project, ChuckNorrisFacts.
Now you can finish FactsView.xaml.cs. Add these two using-statements at the top:
using Newtonsoft.Json;
using RestSharp;
Add the two object variables from the code below to FactsView.xaml.cs - and also the initialization code at the end of the constructor:
public partial class FactsView : ContentView
{
    private readonly Dictionary<string, List<string>> _userFavorites;
    private string _userName;
    private List<string> Favorites => _userFavorites[_userName];
    private readonly RestClient _client = new RestClient("https://api.chucknorris.io");


    public FactsView()
    {
        InitializeComponent();

        var categoryList = new List<string> { "Random" };
        categoryList.AddRange(GetCategories());
        CategoryPicker.ItemsSource = categoryList;
        CategoryPicker.SelectedIndex = 0;
        _userFavorites = new Dictionary<string, List<string>>();
    }
Each user has its own favorites list for saving his or her favorite Chuck Norris Facts in-memory. The Dictionary maps a username to the correct List. is, and the read-only property Favorite does this for the current username. _client is for an object that will help us to do REST calls.
In the constructor, the list will be initialized with options to the Picker. The first option is to have a random fact, and the rest are the categories you will fetch from https://api.chucknorris.io/jokes/categories with a REST call.
Next, replace GetFactClicked with this:
private void GetFactClicked(object sender, EventArgs e)
{
    var isRandom = CategoryPicker.SelectedIndex == 0;
    FactLabel.Text = GetFact(isRandom ? null : CategoryPicker.SelectedItem.ToString());
}
You will make a method GetFact() that can take a category name as a parameter and get a fact in that category - or get a random fact if no category is provided.
To make GetFact() and GetCategories() actually work, add this:
public string GetFact(string category = null)
{
    var url = "/jokes/random";
    if (category != null) url += "?category=" + category;
    var fact = Get<Fact>(url);
    return fact?.value;
}

public string[] GetCategories()
{
    return Get<string[]>("/jokes/categories");
}

private T Get<T>(string url)
{
    var request = new RestRequest(url, Method.GET);
    var response = _client.Execute(request);
    return JsonConvert.DeserializeObject<T>(response.Content);
}
The last one is a helper method which gets a URL as a parameter, does the REST call, and converts the result to data type T. To make this as general as possible, you use generics, that’s the <T> in Get<T> and it lets you call this method with whatever class you want.
GetCategories() simply calls the helper method with the correct URL ending - and asks for the results to be interpreted as a string array.
GetFact() does something similar. If a category is set, it adds it to the URL the way that the Chuck Norris API wants it. And it wants the result as an object of the class you made earlier, Fact.
The logic for favorites simply works with the in-memory list. Add their implementations:
private void GetFavoriteClicked(object sender, EventArgs e)
{
    FactLabel.Text = Favorites.Count == 0
        ? "You have no favorites yet."
        : Favorites[new Random().Next(0, Favorites.Count)];
}

private void AddFavoriteClicked(object sender, EventArgs e)
{
    Favorites.Add(FactLabel.Text);
}
AddFavoriteClicked() will add the current fact to the favorites list. GetFavoriteClicked() will show a random favorite. If the list is empty, it lets the user know there are no favorites yet.
But wait - those buttons are disabled! Sure, you can enable them, but you don’t want users to see anything other than their own favorites. So you need a way to ensure that the user is who he or she claims to be.
Add Login to Your Xamarin App
No reason to write the authentication yourself. You can easily integrate Okta to handle the authentication for you and easily:
- Authenticate and authorize your users
- Store data about your users
- Perform password-based and social login
- Secure your application with multi-factor authentication
- And much more! Check out our product documentation
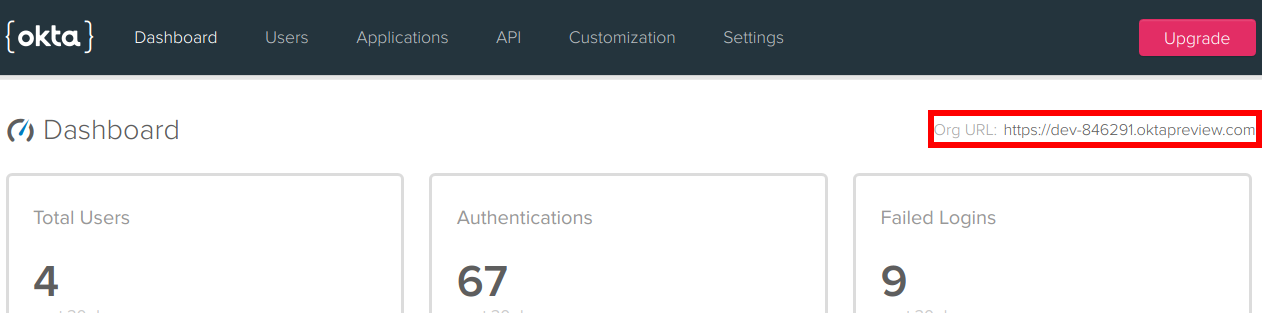
Sign up for a forever-free developer account (or login if you already have one). Once you have signed up and logged in, you’ll be taken to your dashboard. Make note of your Org URL in the top right corner.
Next, you will create an application. Select Applications in the menu bar, and then Add Application. Select Native and then Next. Enter Chuck Norris Facts for Name, check Implicit (Hybrid), and click Done.
Go back to Visual Studio, and create a new login component. Right-click the project ChuckNorrisFacts, select Add and then New Item…. Select Xamarin.Forms to the left and Content View in the middle, and enter “LoginView” in the Name field. Click Add.
Open LoginView.xaml and change its content to this:
<?xml version="1.0" encoding="UTF-8"?>
<ContentView xmlns="http://xamarin.com/schemas/2014/forms"
             xmlns:x="http://schemas.microsoft.com/winfx/2009/xaml"
             x:Class="ChuckNorrisFacts.LoginView">
    <ContentView.Content>
        <StackLayout>
            <StackLayout x:Name="LoginPanel">
                <Button Clicked="LoginClicked" Text="Login"></Button>
                <Label x:Name="ErrorLabel" TextColor="#FF0000"></Label>
            </StackLayout>
            <StackLayout x:Name="LogoutPanel" IsVisible="False" Orientation="Horizontal">
                <Label x:Name="LoggedInLabel" ></Label>
                <Button Clicked="LogoutClicked" Text="Logout"></Button>
            </StackLayout>
        </StackLayout>
    </ContentView.Content>
</ContentView>
So you have made a login panel and a logout panel. Only one of them will be visible at a time. The login panel has a button for logging in and a label to show a message if the login fails. The logout panel only shows a label and a button to log out.
You will make LoginView fire an event when the user has logged in. FactsView will listen to and react to this event. Open LoginView.xaml.cs and add the following line to the class:
public event EventHandler<string> LoginChanged;
Now install version 5.4.0 of the System.IdentityModel.Tokens.Jwt NuGet package in the main project, and add this using statement at the top of LoginView.xaml.cs:
using System.IdentityModel.Tokens.Jwt;
Then add this method to handle a click on the login button:
private async void LoginClicked(object sender, EventArgs e)
{
    var loginProvider = DependencyService.Get<ILoginProvider>();
    var idToken = await loginProvider.LoginAsync();

    string userName = null;
    if (idToken != null)
    {
        var jwtHandler = new JwtSecurityTokenHandler();
        var token = jwtHandler.ReadJwtToken(idToken);
        userName = token.Claims.FirstOrDefault(c => c.Type == "preferred_username")?.Value;
    }

    if (LoginChanged != null) LoginChanged(this, userName);

    if (userName == null)
    {
        ErrorLabel.Text = "Login failed.";
        return;
    }

    LoginPanel.IsVisible = false;
    LogoutPanel.IsVisible = true;
    ErrorLabel.Text = "";
    LoggedInLabel.Text = "You are logged in as " + userName;
}
The actual login process is handled in a separate class LoginProvider. It will have its own implementation on each of the platforms iOS, Android and Windows. This text describes how to implement it for Windows, and at the bottom of this article, there will be a link to another article about how it is implemented in iOS and Android.
Add a new interface ILoginProvider that will be implemented by LoginProvider. It will only contain one method:
using System.Threading.Tasks;

namespace ChuckNorrisFacts
{
    public interface ILoginProvider
    {
        Task<string> LoginAsync();
    }
}
The method LoginClicked first gets an object of a class that implements ILoginProvider. It does so with the DependencyService, which is a part of the Xamarin.Forms framework that allows apps to call into platform-specific functionality from shared code.
You will now add an implementation of this for the UWP project and register it with the DependencyService. Add a new class LoginProvider to the UWP project and replace its content with this:
using System;
using System.Linq;
using System.Threading.Tasks;
using Windows.Security.Authentication.Web;
using Windows.Security.Cryptography;
using Windows.Security.Cryptography.Core;
using Windows.Storage.Streams;
using ChuckNorrisFacts;
using ChuckNorrisFacts.UWP;


[assembly: Xamarin.Forms.Dependency(typeof(LoginProvider))]
namespace ChuckNorrisFacts.UWP
{
    class LoginProvider : ILoginProvider
    {
        public async Task<string> LoginAsync()
        {
            var clientId = "{yourClientId}";
            var url = "https://{yourOktaDomain}/oauth2/default/v1/authorize";
            var state = GetBase64UrlData(32);
            var nonce = GetBase64UrlData(12);
            var codeVerifier = GetBase64UrlData(32);
            var tmp = CryptographicBuffer.ConvertStringToBinary(codeVerifier, BinaryStringEncoding.Utf8);
            var codeVerifierBuffer = HashAlgorithmProvider.OpenAlgorithm(HashAlgorithmNames.Sha256).HashData(tmp);
            var codeChallenge = GetBase64UrlData(null, codeVerifierBuffer);

            var absoluteUri = WebAuthenticationBroker.GetCurrentApplicationCallbackUri().AbsoluteUri;
            var callback = Uri.EscapeDataString(absoluteUri);

            var authorizationRequest = string.Format(
                "{0}?response_type=id_token&scope=openid profile&redirect_uri={1}&client_id={2}&state={3}&code_challenge={4}&code_challenge_method=S256&nonce={5}",
                url, callback, clientId, state, codeChallenge, nonce);

            var result = await WebAuthenticationBroker.AuthenticateAsync(WebAuthenticationOptions.None,
                new Uri(authorizationRequest), new Uri(absoluteUri));
            if (result.ResponseStatus != WebAuthenticationStatus.Success) return null;
            var queryParams = result.ResponseData.Split("#?&".ToCharArray());
            var idToken = queryParams.FirstOrDefault(p => p.StartsWith("id_token"));
            return idToken?.Substring(9);
        }

        public static string GetBase64UrlData(uint? length = null, IBuffer buffer = null)
        {
            if (length != null) buffer = CryptographicBuffer.GenerateRandom(length.Value);
            return CryptographicBuffer.EncodeToBase64String(buffer)
                .Replace("+", "-")
                .Replace("/", "_")
                .Replace("=", "");
        }
    }
}
There is no need to explain everything that goes on in this code, but it implements the auth code flow with PKCE and redirect. That means it will open a modal popup with a login form hosted by Okta. If the login is successful, Okta will redirect this browser to a special callback URI that the WebAuthenticationBroker will pick up. The URI will contain the id token for the user. WebAuthenticationBroker will close to browser popup and return this value inside result.Data. The code then extracts and returns the id token.
There is one important thing you must do to make this work. In the Okta dashboard, you must register the callback URI, or else it will not work. Set a breakpoint at the code line below, and use the debugger to get the value of absoluteUri:
var absoluteUri = WebAuthenticationBroker.GetCurrentApplicationCallbackUri().AbsoluteUri;
Go to the app you created in the Okta dashboard. Select Edit to the right of the box General Settings. Then click Add URI to the right of Login redirect URIs. Paste in the value of absoluteURI (it should look something like this: ms-app://s-1-15-2-1887544707-1408717265-2456949125-1910559573-2904915393-20160902-2550841693/) and click Save.
You must get your client app id from the Okta dashboard and enter it in the first line of the method. Select Applications in the menu bar. Select your app. Select the tab General. Scroll down and find Client ID. Click the button to the right to copy this value to the clipboard. Paste it into your code, so that it is assigned to the variable clientId. On the next line, make sure the URL starts with your specific Okta URL.
Go back to LoginView.xaml.cs in the main project. In the second line, it calls the implementation of LoginAsync and gets an id token back - or null if the login fails. If it gets an id token it will decode it using JwtSecurityTokenHandler and extract the username field. Then it fires an event, which we will later work on in FactsView. On success, it shows the logout panel and hides the login panel. If the login fails it shows an error message.
Also, add a method to handle logout:
private void LogoutClicked(object sender, EventArgs e)
{
    LoginPanel.IsVisible = true;
    LogoutPanel.IsVisible = false;
    if (LoginChanged != null) LoginChanged(this, null);
}
It hides the logout panel, shows the login panel and fires the event.
Send Notifications in Your Xamarin App
To show LoginView and make the event work, open MainPage.xaml and change the content of the StackLayout to this:
<local:FactsView x:Name="FactsView"></local:FactsView>
<local:LoginView x:Name="LoginView" LoginChanged="HandleLoginChanged"></local:LoginView>
The main page will have both a FactsView and a LoginView. The event will be handled by a method HandleLoginChanged. Open MainPage.xaml.cs and add this:
private void HandleLoginChanged(object sender, string userName)
{
    FactsView.HandleLoginChanged(userName);
}
When the event occurs this code just passes it on to FactsView. Open FactsView.xaml.cs and add this:
public void HandleLoginChanged(string userName)
{
    FactLabel.Text = "";
    bool isLoggedIn = userName != null;
    AddFavoriteButton.IsEnabled = GetFavoriteButton.IsEnabled = isLoggedIn;
    _userName = isLoggedIn ? userName : null;
    if (userName != null && !_userFavorites.ContainsKey(userName))
        _userFavorites.Add(userName, new List<string>());
}
It will enable or disable to favorite buttons depending on if you are logged in or not. And it will add a new list to the Dictionary for this user if it does not exist.
Now run the app with CTRL-F5 or F5 and start collecting your favorite Chuck Norris Facts! The first time you log in with a new user, Okta will ask you to register a security question.
Learn More About Xamarin and Secure Login in .NET
I hope you enjoyed this tutorial, for iOS and Android use cases, please check out this post:
Add Authentication to Your Xamarin App with OpenID Connect
To learn more about authentication, OpenID Connect, and Okta, we encourage you to check out the following resources from our developer blog:
- Build a CRUD App with ASP.NET Core 2.2 and SQL Server
- Our OpenID Connect Primer in three parts:
Okta Developer Blog Comment Policy
We welcome relevant and respectful comments. Off-topic comments may be removed.