Take User Provisioning to the Next Level with Entitlements

When you work on B2B SaaS apps used by large customer organizations, synchronizing those customers’ users within your software system is tricky! You must synchronize user profile information and the user attributes required for access control management. Customers with large workforces may have thousands of users to manage. They demand a speedy onboarding process, including automated user provisioning from their identity provider!
Managing users across domains is critical to making B2B apps enterprise-scalable. In the Enterprise-Ready and Enterprise-Maturity on-demand workshop series, we tackle the dilemmas faced by developers of SaaS products wanting to scale their apps to enterprise customers. We iterate on a fictitious B2B Todo app more secure and capable for enterprise customers using industry-recognized standards such as OpenID Connect (OIDC) authentication and System for Cross-Domain Identity Management (SCIM) for user provisioning. In this workshop, you build upon a previous workshop introducing automated user provisioning to add support for users’ access management and permissions attributes—their entitlements.
| ️ℹ️ |
Note This post requires Okta Identity Governance (OIG) features in your Okta org. Sign up for a new Integrator Free plan to continue. |
| Posts in the on-demand workshop series |
|---|
| 1. How to Get Going with the On-Demand SaaS Apps Workshops |
| 2. Enterprise-Ready Workshop: Authenticate with OpenID Connect |
| 3. Enterprise-Ready Workshop: Manage Users with SCIM |
| 4. Enterprise Maturity Workshop: Terraform |
| 5. Enterprise Maturity Workshop: Automate with no-code Okta Workflows |
| 6. How to Instantly Sign a User Out across All Your Apps |
| 7. Take User Provisioning to the Next Level with Entitlements |
This workshop walks you through adding the code to support entitlements in a sample application with three broad sections:
- Introduction to the base application, tools, and the development process
- See your application’s user and entitlements information in Okta
- Use Okta to manage user roles and custom entitlements
If you want to skip to the completed code project for this workshop, you can find it in the entitlements-completed branch on the GitHub repo.
Table of Contents
- Manage users at scale using System for Cross-domain Identity Management (SCIM)
- Support user roles in the database
- Connect Okta to the SCIM server
- Create an Okta SCIM application for entitlements governance
- SCIM schemas and resources
- SCIM resource types
- Add roles to the SCIM Users endpoints
- Entitlements discovery in Okta
- Multi-tenant use cases for entitlements
- Use SCIM to manage user provisioning and entitlements
Manage users at scale using System for Cross-domain Identity Management (SCIM)
The Todo app tech stack uses a React frontend and an Express API backend. For this workshop, you need the following required tooling:
Required tools
- Node.js v18 or higher
- Command-line terminal application
- A code editor/Integrated development environment (IDE), such as Visual Studio Code (VS Code)
- An HTTP client testing tool, such as Postman or the HTTP Client VS Code extension
VS Code has integrated terminals and HTTP client extensions that allow you to work out of this one application for almost everything required in this workshop. The IDE also supports TypeScript, so you’ll get quicker responses on type errors and help with importing modules.
Follow the instructions in the getting started guide for installing the required tools and serving the Todo application.
Start your journey to identity maturity for your SaaS applications in the enterprise-ready workshops! This post covers installing and running the base application in preparation for the upcoming workshops.
You’ll build upon a prior workshop introducing syncing users across systems using the System for Cross-domain Identity Management (SCIM) protocol.
In this workshop, you’ll dive deeper into automated user provisioning by adding the user attributes required for access management, such as user roles, licensing, permissions, or something else you use to denote what actions a user has access to. The access management attributes of users are known by the generic term, user entitlements. Then, we will continue diving deeper into supporting customized user entitlements using the SCIM protocol.
Before we get going with user entitlements, you’ll first step through the interactive and fun Enterprise-Ready Workshop: Manage Users with SCIM workshop to get the SCIM overview, set up the code and your Okta account, and see how the protocol works. I’ll settle down with a cup of tea and a good book and wait while you learn about SCIM and are ready to continue! 🫖🍵📚
In this workshop, you will add SCIM support to a sample application, so that user changes made in your app can sync to your customer's Identity Provider!
Prepare the Express.js API project
Start from a clean code project by using the SCIM workshop’s completed project code from the scim-workshop-complete branch. I’ll post the instructions using Git, but you can download the code as a zip file if you prefer and skip the Git command.
Get a local copy of the completed SCIM workshop code and install dependencies by running the following commands in your terminal:
git clone -b scim-workshop-complete https://github.com/oktadev/okta-enterprise-ready-workshops.git
cd okta-enterprise-ready-workshops
npm ci
Open the code project in your IDE. We’ll work exclusively within the Express.js API for this project, and the code files for the API are in the okta-enterprise-ready-workshops/apps/api/src directory.
Create a file named entitlements.ts. We’ll define the API routes for user entitlements in the okta-enterprise-ready-workshops/apps/api/src/entitlements.ts file.
Let’s start by hard-coding an API endpoint for /Roles that returns a list of roles. In the entitlements.ts file, add the following code:
import { Router } from 'express';

export const rolesRoute = Router();

rolesRoute.route('/')
.get(async (req, res) => {
  const roles = [
    'Todo-er',
    'Admin'
  ];

  return res.json(roles);
});
Open okta-enterprise-ready-workshops/apps/api/src/scim.ts. We need to register the endpoint in the Express app by including it as part of the SCIM routes.
At the top of the file, import rolesRoutes
import { rolesRoute } from './entitlements';
At the bottom of the file below the existing code, add
scimRoute.use('/Roles', rolesRoute);
to register the endpoint. Let’s make sure everything works!
Serve the Express.js API and test the /Roles SCIM endpoint
In the terminal, start the API by running
npm run serve-api
This command serves the API on port 3333. Launch your HTTP client and call the /Roles endpoint:
GET http://localhost:3333/scim/v2/Roles HTTP/1.1
Do you see a successful response with a list of roles?
HTTP/1.1 200 OK

[
  "Todo-er",
  "Admin"
]
Take a look at the terminal output. You’ll see output recording the GET request!
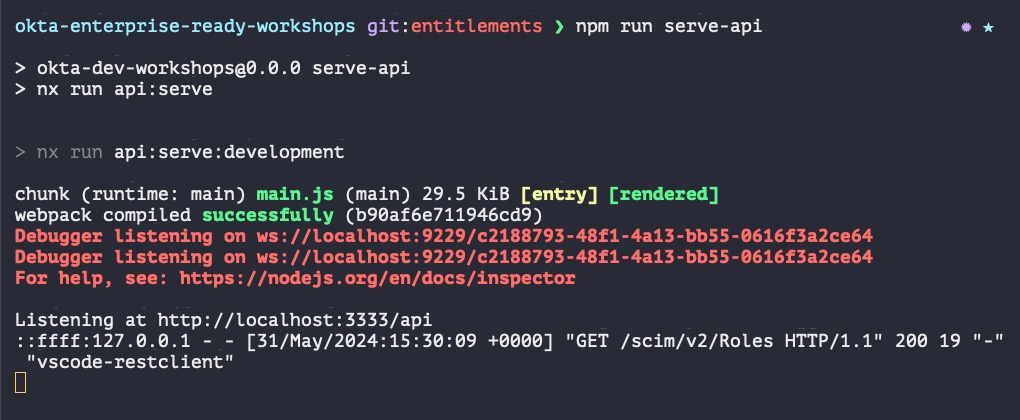
The project uses Morgan, a library that automatically adds HTTP logging to the Express API. The terminal output includes POST and PUT request payloads, so it’s an excellent way to track the SCIM calls as you work through the workshop.
The npm run serve-api process watches for changes and automatically updates the API, so we don’t need to stop and restart it constantly. But we’re about to make some significant changes. Stop serving the API by entering Ctrl+c in the terminal so we can prepare the database.
Support user roles in the database
The Todo app database needs to support roles; we’ve hardcoded roles so far. It’s time to bring the database to the party. A fancier SaaS app might allow each customer to define their roles. We’ll skip that level of customizability for now and focus on the simplest case. For this workshop, we’ll define supported roles for all Todo app customers instead of allowing role configurations per organization. Taking the position of application roles instead of organization roles makes our database modeling easier. I’ll discuss ways to add per-organization configurability later in the post.
Open okta-enterprise-ready-workshops/prisma/schema.prisma. Add the role model at the end of the file.
model Role {
  id Int @id @default(autoincrement())
  name String
  users User[]
}
A user may have zero or more roles. Update the user model to add roles so that the user model looks like this:
model User {
  id         Int    @id @default(autoincrement())
  email      String
  password   String?
  name       String
  Todo       Todo[]
  org        Org?    @relation(fields: [orgId], references: [id])
  orgId      Int?
  externalId String?
  active     Boolean?
  roles      Role[]
  @@unique([orgId, externalId])
}
With the roles model defined, it’s time to update the database to match the model. We’ll start with a fresh, clean database for this project. In the terminal run
npx prisma migrate reset -f
It helps to have some seed data so we can get going. Here, we’ll define roles available within the Todo app. A user can be a “Todo-er,” “Todo Auditor,” and “Manager.” Open okta-enterprise-ready-workshops/prisma/seed_script.ts and replace the entire file with the code below:
import { PrismaClient } from '@prisma/client';

const prisma = new PrismaClient();

async function main() {
  const org = await prisma.org.create({
    data: {
      domain: 'gridco.example',
      apikey: '123123'
    }
  });
  console.log('Created org Portal', org);

  // Roles defined by the Todo app
  const roles = [
    { name: 'Todo-er' },
    { name: 'Todo Auditor' },
    { name: 'Manager'}
  ];

  const createdRoles = await Promise.all(
    roles.map(data => prisma.role.create({data}))
  );

  for (const role of createdRoles) {
    console.log('Created role ', role);
  }

  const somnusUser = await prisma.user.create({
    data: {
      name: 'Somnus Henderson',
      email: 'somnus.henderson@gridco.example',
      password: 'correct horse battery staple',
      orgId: org.id,
      externalId: '31',
      active: true
    }
  });
  console.log('Created user Somnus', somnusUser)

 const trinityUser = await prisma.user.create({
    data: {
      name: 'Trinity JustTrinity',
      email: 'trinity@gridco.example',
      password: 'Zion',
      orgId: org.id,
      externalId: '32',
      active: true,
      roles: {
        connect: {
          id: createdRoles.find(r => r.name === 'Todo-er')?.id
        }
      }
    },
  })
  console.log('Created user Trinity', trinityUser)
}

main()
  .then(async () => {
    await prisma.$disconnect()
  })
  .catch(async (e) => {
    console.error(e)
    await prisma.$disconnect()
    process.exit(1)
  })
Save the file and run the npm script in the terminal to seed the database.
npm run init-db
You’ll see console output for each newly created database record. 🎉
Inspect the database records
You can inspect the database records using Prisma Studio. In a separate terminal, run
npx prisma studio
which launches a web interface to view the database. The site URL is usually http://localhost:5555, shown in the terminal output. Open the site in your browser to view the database tables, records, and relationships.
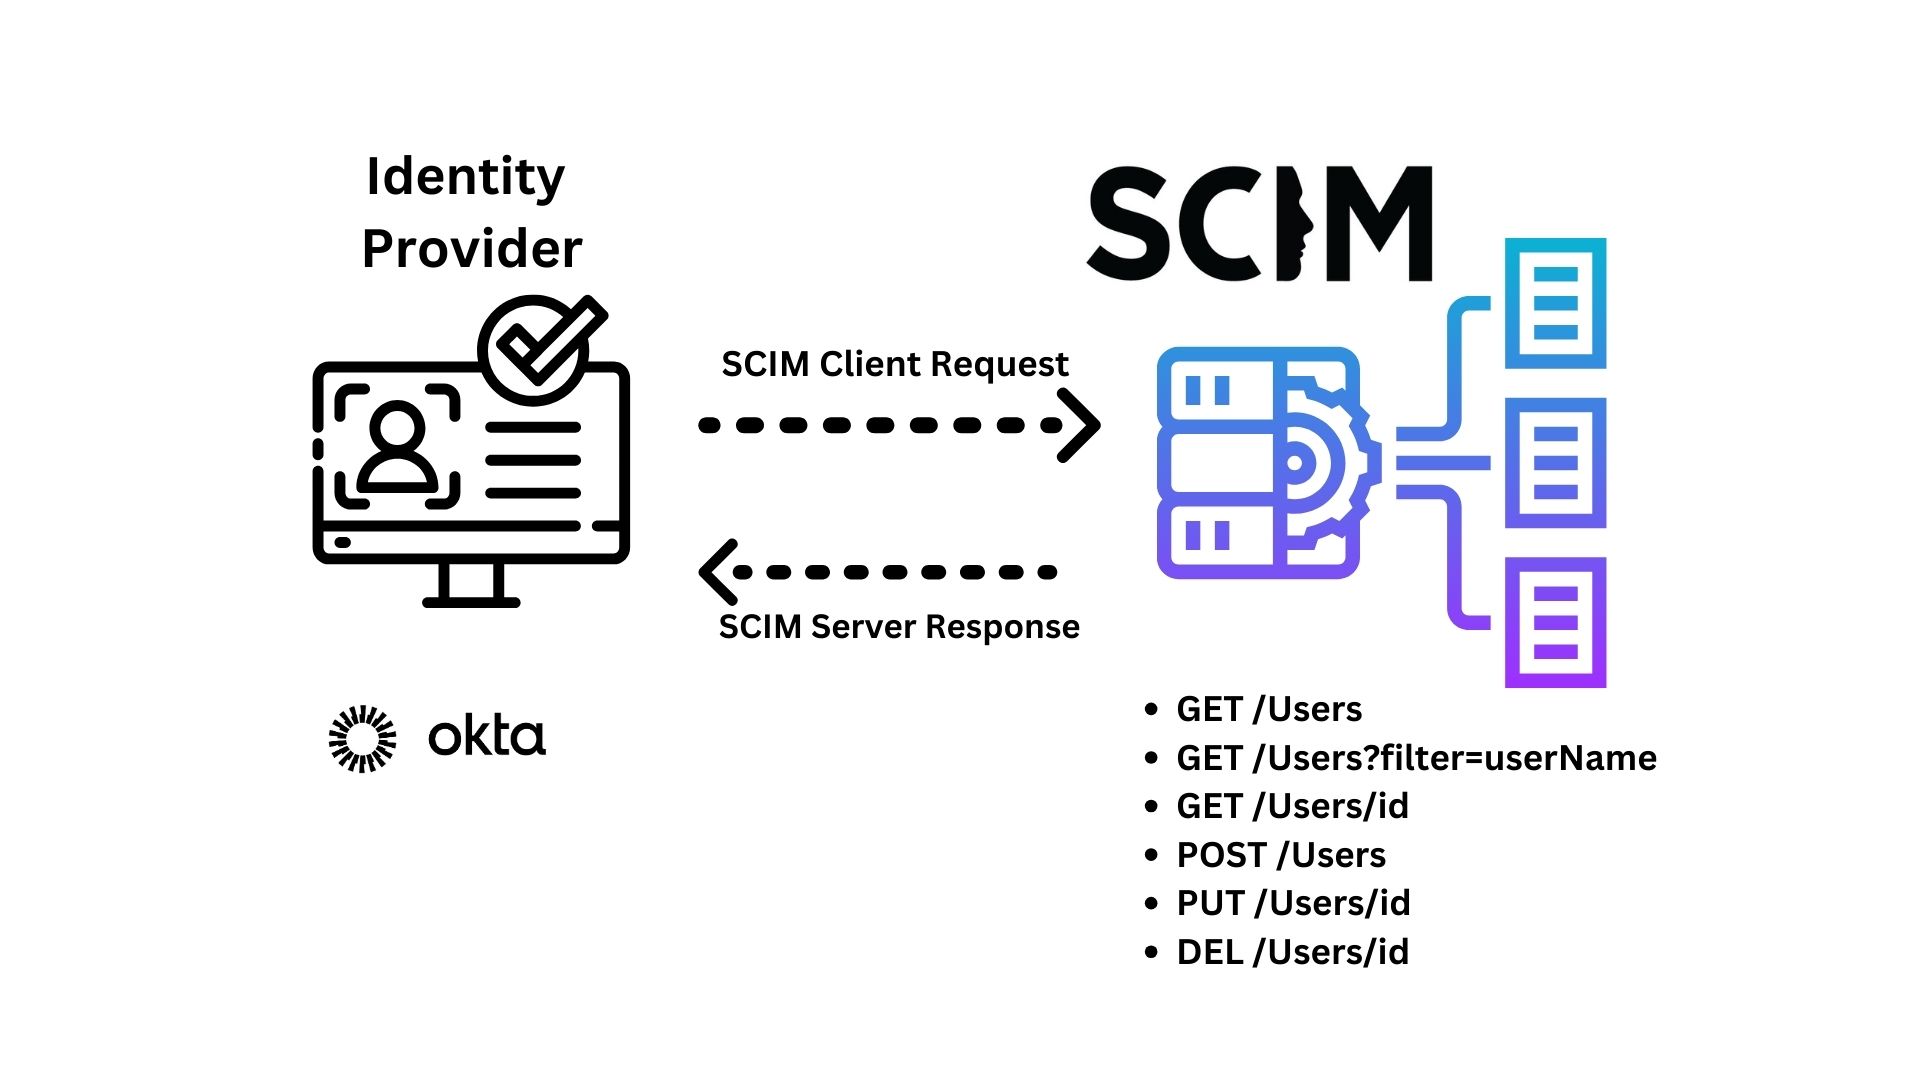
Connect Okta to the SCIM server
The SCIM Client (the identity provider, Okta) makes requests upon objects held by the SCIM Server (the Todo app).
First, we need to serve the API so Okta can access it. You’ll use a temporary tunnel for local development that makes localhost:3333 publicly accessible so that Okta, the SCIM client, can call your API, the SCIM server. I’ll include the instructions using an NPM library that we don’t have to install or sign up for, but feel free to use your favorite tunneling system if you have one.
You need two terminal sessions.
In one terminal, serve the API using the command:
npm run serve-api
In the second terminal, you’ll run the local tunnel. Run the command:
npx localtunnel --port 3333
This creates a tunnel for the application serving on port 3333. The console output displays the tunnel URL in the format https://{yourTunnelSubdomain}.loca.lt, such as:
your URL is: https://awesome-devs-club.loca.lt
You’ll need this tunnel URL to configure the Okta application.
Create an Okta SCIM application for entitlements governance
In the prerequisite SCIM workshop, you added a SCIM application in Okta to connect to the Todo app. We must do something similar to connect SCIM with entitlements support.
Sign into your Okta Integrator Free account. In the Admin Console, navigate to Applications > Applications. Press the Browse App Catalog button to create a new Okta SCIM application.
In the search bar, search for “(Header Auth) Governance with SCIM 2.0” and select the app. Press Add Integration.
You’ll see a configuration view with two tabs. Press Next on the General settings tab. Leave default settings on the Sign-On Options tab and press Done.
You’ll navigate to your newly created Okta application to add specific configurations about the Todo app.
First, you need to enable Identity Governance. Navigate to the General tab and find the Identity Governance section. Press Edit to select Enabled for Governance Engine. Remember to Save your change.
Navigate to the Provisioning tab and press the Configure API Integration button. Check the Enable API integration checkbox—two more form fields display.
-
In Base URL field, enter
https://{yourTunnelSubdomain}.loca.lt/scim/v2.It will look like
https://awesome-devs-club.loca.lt/scim/v2 -
In the API Token field, enter
Bearer 123123
press Save.
The Provisioning tab has more options to configure within the Settings side nav.
Navigate to the To App option and press Edit.
- Enable Create Users
- Enable Update User Attributes
- Enable Deactivate Users
Press Save.
Import users from the todo app into Okta. Navigate to the Import tab and press the Import Now button. Okta discovers users in your app and tries to match them with users already defined in Okta. A dialog shows Okta discovered the two users you added using the DB script. Select both users and press the Confirm Assignments to confirm the assignments.
You’ll see the imported users in the Assignments tab. But what about entitlements? They’re coming right up!
Stop the tunnel and the API using the Ctrl+c command in the terminal windows. We’ll make some changes to the API that won’t automatically reflect in the local tunnel, so we’ll get all our entitlements changes made and resynchronize with Okta.
SCIM schemas and resources
In the first SCIM workshop, you learned about SCIM’s User resource and built out operations around the user. You updated only a handful of user properties in the workshop, but SCIM is way more powerful thanks to its superpower – extensibility. ✨ User is not the only resource type defined in SCIM.
A Resource represents an object SCIM operates on, such as a user or group. SCIM identified core properties each Resource must define, such as id and a link to the resource’s schema definition. From there, a user extends from the core properties and adds attributes specific to the object, such as adding userName and their emails. A standard published schema exists for all those user-specific attributes within the SCIM spec. You can continue extending resources as needed to represent new resources, such as another SCIM standard-defined schema for Enterprise User.

What’s an example resource other than a user or group? If you said “role” or an “entitlement,” you’re correct! Those resource types must have an id and schemas. Here, Okta used SCIM’s extensibility to define a new resource type.

Okta defines a schema for the Role representation. We can use the schema to ensure we conform to the definition.
Harness TypeScript to conform to SCIM schemas
We can define an interface to model the Role representation. Add a new file to the project named okta-enterprise-ready-workshops/apps/api/src/scim-types.ts and open it up in the IDE. This file will contain the SCIM schema definitions, such as the SCIM core Resource. Each interface defines required and optional properties and the property’s type.
Copy and paste the first interface for the SCIM resource into the scim-types.ts file.
export interface IScimResource {
  id: string;
  schemas: string[];
  meta?: IMetadata;
}
A SCIM resource has an optional meta property containing the resource’s metadata. Your IDE shows errors, so we can fix this by adding the IMetadata definition to the file below the IScimResource:
export interface IMetadata {
  resourceType: RESOURCE_TYPES;
  location?: string;
}
You’ll have a new error for RESOURCE_TYPES. We’ll fix it soon.
Now, on to the Okta Role representation. The role representation extends from the core SCIM resource and adds extra properties. Okta’s schema overlaps with the SCIM standard User roles field, which includes a property for display text. Define the interface and add it to IMetadata below.
export interface IOktaRole extends IScimResource{
  displayName: string;
}
The IOktaRole extends from the core IScimResource interface and adds a new required property, displayName. Each resource requires a schema, a Uniform Resource Namespace (URN) string. Instead of repeatedly typing the string for each role resource, define it below the IOktaRole interface for reusability
export const SCHEMA_OKTA_ROLE = 'urn:okta:scim:schemas:core:1.0:Role';
Let’s fix the RESOURCE_TYPES error. Below the SCHEMA_OKTA_ROLE constant, add the following:
export type RESOURCE_TYPES = 'Role';
You can use the IOktaRole interface in the /Roles endpoint to ensure the response matches the expected structure. Open okta-enterprise-ready-workshops/apps/api/src/entitlements.ts, and update the code to use the interface.
import { Router } from 'express';
import { IOktaRole, SCHEMA_OKTA_ROLE } from './scim-types';

export const rolesRoute = Router();

rolesRoute.route('/')
.get(async (req, res) => {
  const roles: IOktaRole[] = [{
    schemas: [SCHEMA_OKTA_ROLE],
    id: 'one',
    displayName: 'Todo-er'
  }];

  return res.json(roles);
});
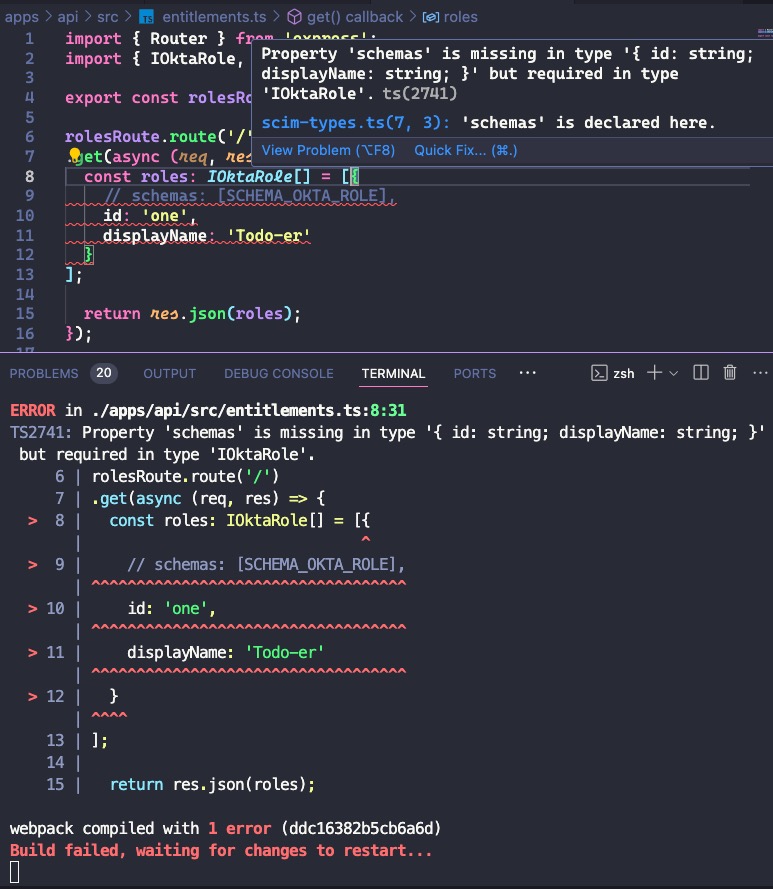
Why use TypeScript and interfaces?
TypeScript, a superset of JavaScript, supports type safety. Type safety means we’ll catch errors within the IDE or at build time instead of getting caught by surprise with a runtime error. Here, we state the
rolesarray is of typeIOktaRole[]. Try commenting out the requiredschemasproperty. You’ll see an error in an IDE that supports TypeScript or when you try to serve the API as console output. We can use type safety to ensure we meet the expectations of required SCIM properties in our calls.
Every code change deserves a quick check. Serve the API and double check everything still works for you when you make the HTTP call to
GET http://localhost:3333/scim/v2/Roles HTTP/1.1
Do you see the one ‘Todo-er’ role in the response? ✅
SCIM list response
We return the array of Okta roles directly in the API response, but this format doesn’t match SCIM list responses. SCIM has a structured response format for lists and a defined schema. This way, SCIM structures all communication between the client and the server so each side knows how to format and parse data.
Let’s define the ListResponse interface. Open okta-enterprise-ready-workshops/apps/api/src/scim-types.ts. The list response contains standard information supporting pagination, the schema for the list response, and the list of objects. Add the interface to the file. I like to organize my definitions, so I added the code between the IOktaRole interface and SCHEMA_OKTA_ROLE string constant.
export interface IListResponse {
  schemas: string[];
  totalResults: number;
  startIndex: number;
  itemsPerPage: number;
  Resources: IOktaRole[];
}
The list response also has a schema URN. Create a constant for this string as you did for the Okta role and add it after the role schema string.
export const SCHEMA_LIST_RESPONSE = 'urn:ietf:params:scim:api:messages:2.0:ListResponse';
The API response must match the list format. Open okta-enterprise-ready-workshops/apps/api/src/entitlements.ts and add IListResponse and SCHEMA_LIST_RESPONSE to the imports from the scim-types file:
import { IListResponse, IOktaRole, SCHEMA_LIST_RESPONSE, SCHEMA_OKTA_ROLE } from './scim-types';
Change rolesRoute response to use the list response:
rolesRoute.route('/')
.get(async (req, res) => {
  const roles: IOktaRole[] = [{
    schemas: [SCHEMA_OKTA_ROLE],
    id: 'one',
    displayName: 'Todo-er'
  }];

  const listResponse: IListResponse = {
    schemas: [SCHEMA_LIST_RESPONSE],
    totalResults: roles.length,
    itemsPerPage: roles.length,
    startIndex: 1,
    Resources: roles
  };

  return res.json(listResponse);
});
Double-check everything still works. Send the HTTP request to your API. ✅
GET http://localhost:3333/scim/v2/Roles HTTP/1.1
Return database-defined roles in the SCIM /Roles endpoint
Each role has an ID and a name. We can retrieve the roles from the database and populate the /Roles response.
Open okta-enterprise-ready-workshops/apps/api/src/entitlements.ts and make the changes to retrieve the roles from the database and map the database results to the IOktaRole properties. You’ll need to import some dependencies, so ensure the import statements match. The SCIM ListResponse supports pagination, so we’ll add the required code to consider the query parameters.
import { Router } from 'express';
import { PrismaClient } from '@prisma/client';
import { IListResponse, IOktaRole, SCHEMA_LIST_RESPONSE, SCHEMA_OKTA_ROLE } from './scim-types';

const prisma = new PrismaClient();

export const rolesRoute = Router();

rolesRoute.route('/')
.get(async (req, res) => {
  const startIndex = parseInt(req.query.startIndex as string ?? '1');
  const recordLimit = parseInt(req.query.recordLimit as string ?? '100');

  const roles = await prisma.role.findMany({
    take: recordLimit,
    skip: startIndex - 1
  });

const listResponse: IListResponse = {
    schemas: [SCHEMA_LIST_RESPONSE],
    totalResults: roles.length,
    startIndex,
    itemsPerPage: recordLimit,
    Resources: roles.map(role => ({
      schemas: [SCHEMA_OKTA_ROLE],
      id: role.id.toString(),
      displayName: role.name
    }))
  };

  return res.json(listResponse);
});
Run a quick check to ensure everything still works. Serve the API and call the /Roles endpoint using your HTTP client. ✅
You should see three roles matching the roles in the database. 🎉
SCIM resource types
We implemented the /Roles endpoint and discussed how SCIM defines a resource. But how would the SCIM client know about this Okta Role type? Enter discovery—learning about a SCIM server’s capabilities and supported objects such as resources!
SCIM clients and servers communicate about the types of resources through a standard endpoint, the/ResourceType endpoint. SCIM clients call the endpoint to discover what resources they can expect. The endpoint returns a SCIM list response outlining resources. You can add every resource type used, including the standard User and EnterpriseUser resources, but Okta expects resource definitions only for custom types.
First, we’ll create the interface for the ResourceType and define some strings. Open okta-enterprise-ready-workshops/apps/api/src/scim-types.ts. Add the interface for IResourceType above the IListResponse interface.
export interface IResourceType {
  id?: string;
  schemas: string[];
  name: string;
  description?: string;
  endpoint: string;
  schema: string;
  meta: IMetadata;
}
Notice the IResourceType doesn’t extend from the IScimResource interface. For example, the SCIM standard doesn’t require id for a resource type. Since the SCIM standard treats ResourceType as an exception case of Resource, we defined it separately without the relation instead of extending from IScimResource.
When following the SCIM protocol, responses that list values, such as the list of roles or resource types, use the SCIM list response format.
The IListResource interface must support IOktaRole and IResourceType. Using generics and union types, we can support different list response objects . Update the IListResource to match the code below.
export interface IListResponse<T extends IScimResource | IResourceType> {
  schemas: string[];
  totalResults: number;
  startIndex: number;
  itemsPerPage: number;
  Resources: T[];
}
You’ll see errors in the IDE and, if you’re running the API, within the console output. No worries; we’ll fix those errors soon!
Resource types have a schema URN and use “ResourceType” as the resourceType string in the metadata. Add SCHEMA_RESOURCE_TYPE and edit RESOURCE_TYPES so your string constants section looks like the code below.
export const SCHEMA_OKTA_ROLE = 'urn:okta:scim:schemas:core:1.0:Role';
export const SCHEMA_LIST_RESPONSE = 'urn:ietf:params:scim:api:messages:2.0:ListResponse';
export const SCHEMA_RESOURCE_TYPE = 'urn:ietf:params:scim:schemas:core:2.0:ResourceType';
export type RESOURCE_TYPES = 'Role' | 'ResourceType';
Open okta-enterprise-ready-workshops/apps/api/src/entitlements.ts. Let’s fix the IListResponse error for the /Roles endpoint and specify the object type in the list, the IOktaRole type. The code building out the list changes to
  const listResponse: IListResponse<IOktaRole> = {
    schemas: [SCHEMA_LIST_RESPONSE],
    totalResults: roles.length,
    startIndex,
    itemsPerPage: recordLimit,
    Resources: roles.map(role => ({
      schemas: [SCHEMA_OKTA_ROLE],
      id: role.id.toString(),
      displayName: role.name
    }))
  };
You shouldn’t see errors anymore! 🎉
We have a new endpoint to add. Update the imports from the ./scim-types file and declare a new route for resource types.
import { Router } from 'express';
import { PrismaClient } from '@prisma/client';
import {
  IListResponse, IOktaRole, IResourceType, SCHEMA_LIST_RESPONSE, SCHEMA_OKTA_ROLE, SCHEMA_RESOURCE_TYPE
} from './scim-types';

const prisma = new PrismaClient();
export const rolesRoute = Router();
export const resourceTypesRoute = Router();


// existing rolesRoute code below
Then create the /ResourceTypes route by adding the code below the rolesRoute
resourceTypesRoute.route('/')
.get((req, res) => {
  const resourceTypes: IResourceType[] = [{
    schemas: [SCHEMA_RESOURCE_TYPE],
    id: 'Role',
    name: 'Role',
    endpoint: '/Roles',
    description: 'Roles you can set on users of Todo App',
    schema: SCHEMA_OKTA_ROLE,
    meta: {
      resourceType: 'ResourceType'
    }
  }];

  const resourceTypesListResponse: IListResponse<IResourceType> = {
    schemas: [SCHEMA_LIST_RESPONSE],
    totalResults: resourceTypes.length,
    startIndex: 1,
    itemsPerPage: resourceTypes.length,
    Resources: resourceTypes
  };

  return res.json(resourceTypesListResponse);
});
Next, you must register the /ResourceTypes route in the API. Open okta-enterprise-ready-workshops/apps/api/src/scim.ts.
Update the import to include resourceTypesRoute
import { resourceTypesRoute, rolesRoute } from './entitlements';
Add the /ResourceTypes endpoint to the end of the file. You should have two routes defined.
scimRoute.use('/Roles', rolesRoute );
scimRoute.use('/ResourceTypes', resourceTypesRoute);
Double-check your new route by starting the API if it’s not running. Use your HTTP client to make the call
GET http://localhost:3333/scim/v2/ResourceTypes HTTP/1.1
If you see a response with the Okta role resource type, the API call works as expected! ✅
Add roles to the SCIM Users endpoints
Let’s add roles to the existing user calls. We want to reflect a user’s roles in Okta within the Todo app, so the GET and POST /Users calls must support roles. Near the top of the scim.ts file, find IUserSchema interface.
Update the interface to add the roles property:
interface IUserSchema {
  schemas: string[];
  userName?: string;
  id?: string;
  name?: {
    givenName: string;
    familyName: string;
  };
  emails?: {primary: boolean, value: string, type: string}[];
  displayName?: string;
  locale?: string;
  meta?: {
    resourceType: string;
  }
  externalId?: string;
  groups?: [];
  password?: string;
  active?: boolean;
  detail?: string;
  status?: number;
  roles?: {value: string, display: string}[];
}
The User SCIM schema defines roles property as a list of objects that may contain properties named value and display, among others. Okta uses these properties for role data.
Update the SCIM add users call to include roles
The first route defined is the POST /Users route definition. You need to add roles when saving to the database. Find the comment
// Create the User in the database
and update the database command and the as shown.
// Create the User in the database
const user = await prisma.user.create({
  data: {
    org : { connect: {id: ORG_ID}},
    name,
    email,
    password,
    externalId,
    active,
    roles: {
      connect: newUser.roles?.map(role => ({id: parseInt(role.value)})) || []
    }
  },
  include: {
    roles: true
  }
});

console.log('Account Created ID: ', user.id);
One more place to update in the POST /Users call. We need to return the roles in the response. Right below the console.log() update the userResponse to
userResponse = { ...defaultUserSchema,
  id: `${user.id}`,
  userName: user.email,
  name: {
    givenName,
    familyName
  },
  emails: [{
    primary: true,
    value: user.email,
    type: "work"
  }],
  displayName: name,
  externalId: user.externalId,
  active: user.active,
  roles: user.roles.map(role => ({display: role.name, value: role.id.toString()}))
};
Add roles when getting a list of users in SCIM
Continuing to the GET /Users call, search for the code to find users in the database
await prisma.user.findMany({...});
to add roles to the select argument.
const users = await prisma.user.findMany({
  take: recordLimit,
  skip: startIndex,
  select: {
    id: true,
    email: true,
    name: true,
    externalId: true,
    active: true,
    roles: true
  },
  where
});
The GET /Users response also needs roles, so update the
usersResponse['Resources'] = users.map(user => {...});
like this.
usersResponse['Resources'] = users.map(user => {
  const [givenName, familyName] = user.name.split(" ");
  return {
    ...defaultUserSchema,
    id: user.id.toString(),
    userName: user.email,
    name: {
      givenName,
      familyName
    },
    emails: [{
      primary: true,
      value: user.email,
      type: 'work'
    }],
    displayName: user.name,
    externalId: user.externalId,
    active: user.active,
    roles: user.roles.map(role => ({display: role.name, value: role.id.toString()}))
  }
});
Update the response for an individual user
On to the next call, GET /Users/:userId. We need to add roles to the
const user = await prisma.user.findFirst({...});
database command. Update it to match the code below.
const user = await prisma.user.findFirst({
  select: {
    id: true,
    email: true,
    name: true,
    externalId: true,
    active: true,
    roles: true
  },
  where: {
    id,
    org: {id: ORG_ID},
  }
});
Then, find the comment
// If no response from DB, return 404
to update the userResponse object inside the if statement. Update the userResponse to match the code shown.
userResponse = {
  ...defaultUserSchema,
  id: id.toString(),
  userName: email,
  name: {
    givenName,
    familyName
  },
  emails: [{
    primary: true,
    value: email,
    type: 'work'
  }],
  displayName: name,
  externalId: user.externalId,
  active: user.active,
  roles: user.roles.map(role => ({display: role.name, value: role.id.toString()}))
} satisfies IUserSchema;
Update the /Users call so SCIM clients can set their roles
Another endpoint down, but there’s one more left, the PUT /Users/:userId.
Find the code
const { name, emails } = updatedUserRequest;
and change it to the following code so we can work with the user’s updated roles and save the changes in the database.
const { name, emails, roles } = updatedUserRequest;

const updatedUser = await prisma.user.update({
  data: {
    email: emails.find(email => email.primary).value,
    name: `${name.givenName} ${name.familyName}`,
    roles: {
      set: roles?.map(role => ({id: parseInt(role.value)})) || []
    }
  },
  where : {
    id
  },
  include: {
    roles: true
  }
});
Lastly, we need to update the response from the PUT /Users/:userId call. Update the userResponse object to look like this.
userResponse = {
  ...defaultUserSchema,
  id: id.toString(),
  userName: updatedUser.email,
  name: {
    givenName,
    familyName
  },
  emails: [{
    primary: true,
    value: updatedUser.email,
    type: 'work'
  }],
  displayName: updatedUser.name,
  externalId: updatedUser.externalId,
  active: updatedUser.active,
  roles: updatedUser.roles?.map(role => ({display: role.name, value: role.id.toString()}))
} satisfies IUserSchema;
Serve the API if you aren’t running it using npm run serve-api. Let’s make an HTTP call to get all users to double-check our work.
GET http://localhost:3333/scim/v2/Users
Authorization: Bearer 123123
You will see the list of users. Each user object has a roles and entitlements property. ✅
Entitlements discovery in Okta
What can Okta do with user entitlements? Okta can discover defined entitlements, such as the roles you define for the Todo app, and applies existing roles on users. Now that you have all the endpoints needed for a SCIM client to discover resources held by a SCIM server, you can see this in action on Okta.
You’ll need to serve the API and create a local tunnel. Serve the API using the npm run serve-api command. In a second terminal window, run npx localtunnel --port 3333. Take note of your tunnel URL.
Sign into your Okta Developer Edition account. Navigate to Applications > Applications and select the “(Header Auth) Governance with SCIM 2.0” app. Navigate to the Provisioning tab and select Integration. Press Edit.
Update the Base URL field by replacing the tunnel URL with your new tunnel URL. Make sure you keep the /scim/v2 path. Your base URL might look something like https://beep-bop-boop.loca.lt/scim/v2. Press Save.
Updating the API integration kicks off a discovery process. Okta automatically looks for roles as a possible entitlement type. It then matches the roles it discovers for the Todo application and matches them again with roles defined on the users. You can see Okta working by looking at the terminal window serving the API. You can see the calls Okta makes by inspecting the HTTP requests and their payloads written to the console. 🔍
Make sure to keep the API running! There’s more work to do here!
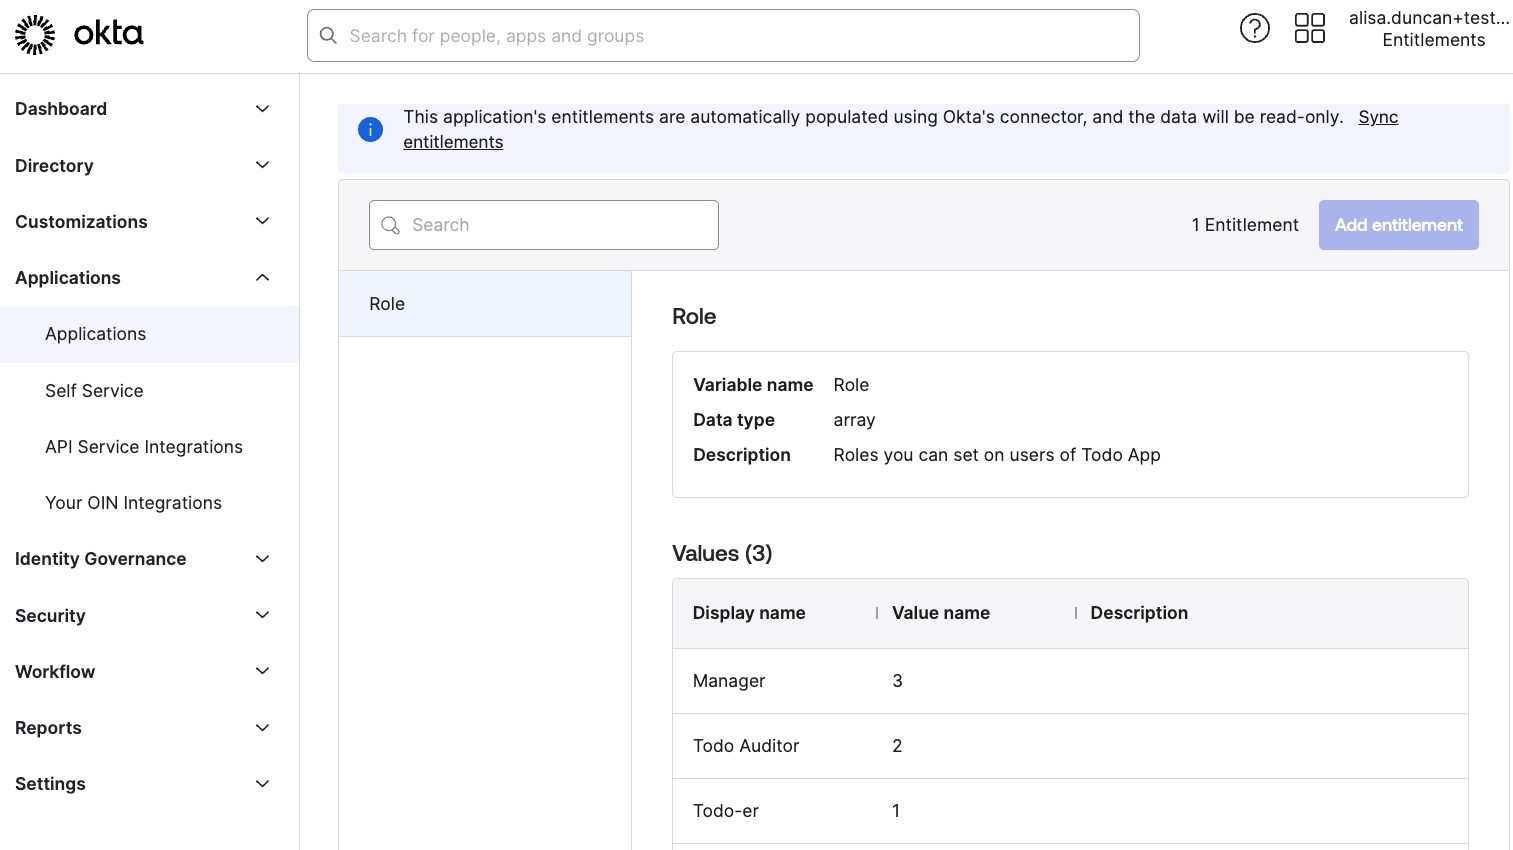
Navigate to the Governance tab. The tab you see is Entitlements. Do you see Role in the sidenav below the Search input? If not, hang tight. Because an app may have many defined entitlements, Okta starts a background job to discover roles asynchronously. It could take up to 10 minutes for the roles to populate.
Eventually, you’ll see Role; when you select it, you’ll see metadata about it, such as the variable name, data type, and description. We also see the values: “Manager,” “Todo Auditor,” and “Todo-er.”
You can define policies for users that automatically assign their entitlements when adding them to this integration app. While that’s pretty nifty, this post focuses on building out the SCIM endpoints for entitlements, so I’ll include links to resources that explain this feature in more detail at the end of the post.
Press < Back to application to return to the SCIM Okta app.
Syncing user entitlements
When you use an identity provider, you want that system to be the source of truth for managing the users’ identities and access levels. You want to set the roles you defined for the Todo app onto users within Okta. That would be pretty sweet, right?
Since we last ran our user import with hardcoded roles, let’s ensure we’ve synchronized everything from the starting state of the application before we start managing with Okta.
Within the SCIM application tab, navigate to Import and press the Import Now button. Okta scans the users in the todo app, but since there are no new users, there’s no confirmation process. The user scan synced the existing users and the roles!
Navigate to Assignments. Each user has a vertical 3-dot menu icon to display a context menu allowing you to Edit user assignment, View access details **, and **Unassign. Find “Trinity” and **View access details ** on them. A panel shows you Trinity’s role pre-assigned in the Todo app. 🎉 Exit the side panel by clicking outside the side panel.
Let’s assign a new role to “Somnus” using Okta. Open the context menu for “Somnus” and View access details. Press the Edit access button. You’ll see a page titled Edit access. Press the Customize entitlements button. You’ll see a warning followed by a section called Custom Entitlements.
You’ll see Role and a dropdown list with values. Select a role, such as “Todo-er,” and press Save to add the role to the user.
But how about the Todo app? Take a look at the terminal output where you’re serving the API. The HTTP call tracing shows a PUT request on the user adding the role. Can you see the role of the user in the database? You can check it out by opening another terminal window, running npx prisma studio, and navigating to the website. ✅
You can now use Okta to manage user roles centrally and automatically update the user’s grants!
Stop serving the local tunnel and API for this next section.
Schema discovery for custom entitlements
What if we have something other than roles in the application? Can SCIM support custom entitlement strategies? SCIM is extensible, meaning it has the structure for custom schemas and extends beyond the core resources. A SCIM server can publish a custom schema if it defines custom resource types.
Let’s say you have user roles but want to add a custom entitlement, such as licenses, profiles, or something else. Let’s walk through the example where we want to add a custom entitlement. We will call this “Characteristic,” such as whether the user is tall. We know Trinity is tall, so it’s logical to note their tallness as part of their user attributes.
SCIM clients must discover resources through schemas. So, we first need to define the schema describing “Characteristics.” Note that I came up with “Characteristics” as the name of this attribute, but you will need to change it for your user entitlements model, whether it be some sort of permissions system or something else. Custom schemas can extend from an existing schema, such as Okta’s entitlement schema, which tracks data as a key-value pair, and add our own flavoring to it.
In the IDE, open okta-enterprise-ready-workshops/apps/api/src/scim-types.ts.
Add new schema URNs after the SCHEMA_OKTA_ROLE definition towards the end of the file:
export const SCHEMA_OKTA_ENTITLEMENT = 'urn:okta:scim:schemas:core:1.0:Entitlement';
export const SCHEMA_CHARACTERISTIC = 'urn:bestapps:scim:schemas:extension:todoapp:1.0:Characteristic';
We defined a new schema URN for the characteristic SCIM resource. Following naming conventions for extension schemas, we substituted our company name (Best Apps) and added the app’s name (Todo app). The format looks like this
urn:<Company name>:scim:schemas:extension:<App name>:1.0:<Custom entitlement>
Right now, there’s a custom TypeScript type for RESOURCE_TYPES. Since we’ll have custom schemas as a resource type, update the code.
export type RESOURCE_TYPES = 'Role' | 'ResourceType' | 'Schema';
SCIM defines required and optional attributes to describe a schema resource. We’ll define the interfaces for a schema resource. Add the following interfaces to the scim-types.ts file. I added mine after the other interfaces and before the URNs.
export interface ISchema {
  id: string;
  name?: string;
  description?: string;
  attributes: IAttribute[];
  meta: IMetadata;
}

export interface IAttribute {
  name: string;
  description: string;
  type: string;
  multiValued: boolean;
  required: boolean;
  caseExact: boolean;
  mutability: string;
  returned: string;
  uniqueness: string;
}
Characteristic is a unique resource type because it’s a new, custom type extending from an existing schema. We must explicitly show this relationship for consuming SCIM clients, like Okta. Find the IResourceType interface. We’ll add a new optional property, schemaExtensions and inline the type definition.
export interface IResourceType {
  id?: string;
  schemas: string[];
  name: string;
  description?: string;
  endpoint: string;
  schema: string;
  schemaExtensions?: {schema: string, required: boolean}[];
  meta: IMetadata;
}
SCIM clients expect a list of schemas that you offer in the SCIM server. You might’ve guessed what that means. You must wrap all the schemas in a SCIM ListResponse. Find IListResponse and add ISchema as a supported type. The IListResponse interface changes to:
export interface IListResponse<T extends IScimResource | IResourceType | ISchema> {
  schemas: string[];
  totalResults: number;
  startIndex: number;
  itemsPerPage: number;
  Resources: T[];
}
Finally, we define what a characteristic attribute looks like by adding the interface shown below.
export interface ICharacteristic extends IScimResource {
  type: string;
  displayName: string;
}
With all the types and interfaces defined, it’s time to write the code for the route. Open okta-enterprise-ready-workshops/apps/api/src/entitlements.ts.
Update the import array from ./scim-types.ts:
import {
  ICharacteristic,
  IListResponse,
  IOktaRole,
  IResourceType,
  ISchema,
  SCHEMA_CHARACTERISTIC,
  SCHEMA_LIST_RESPONSE,
  SCHEMA_OKTA_ENTITLEMENT,
  SCHEMA_OKTA_ROLE,
  SCHEMA_RESOURCE_TYPE
} from './scim-types';
Below the other route definitions, add two new route definitions.
export const schemasRoute = Router();
export const characteristicsRoute = Router();
Now, it’s time to define the /Schemas route. The /Schemas endpoint returns a list of schemas. You can return schemas for all the resources you use, even for User, but Okta allows us to skip the strict SCIM requirements and only return custom schemas. The custom schema we’ll return has metadata about a user characteristic, specifically whether the user is tall. Add the following code at the end of the file.
schemasRoute.route('/')
  .get((_, res) => {
    const characteristic: ISchema = {
      id: SCHEMA_CHARACTERISTIC,
      name: 'Characteristic',
      description: 'User characteristics for entitlements',
      attributes: [{
        name: 'is_tall',
        description: 'Profile entitlement extension for tallness factor',
        type: 'string',
        multiValued: false,
        required: false,
        mutability: 'readWrite',
        returned: 'default',
        caseExact: false,
        uniqueness: 'none'
      }],
      meta: {
        resourceType: 'Schema',
        location: `/v2/Schemas/${SCHEMA_CHARACTERISTIC}`
      }
    };

    const schemas = {
      schemas: [SCHEMA_LIST_RESPONSE],
      totalResults: 1,
      startIndex: 1,
      itemsPerPage: 1,
      Resources: [
        characteristic
      ]
    };

    return res.json(schemas);
  });
And we must define a route for /Characteristics, in the same way one exists for /Roles. We won’t worry about updating the database for this as I don’t want to detract from the SCIM concepts. We’ll hardcode the characteristic for now so you can see what this looks like within Okta. Feel free to add the required code to connect it to the database as homework. 🏆 Add the following code below the schemas route:
characteristicsRoute.route('/')
  .get((_, res) => {
    const characteristicsListResponse: IListResponse<ICharacteristic> = {
      schemas: [
        SCHEMA_OKTA_ENTITLEMENT,
        SCHEMA_CHARACTERISTIC
      ],
      totalResults: 1,
      startIndex: 1,
      itemsPerPage: 1,
      Resources: [{
        schemas: [SCHEMA_CHARACTERISTIC],
        type: "Characteristic",
        id: "is_tall",
        displayName: "This user is so tall"
      }]
    };

    return res.json(characteristicsListResponse);
  });
Notice the ID is the string “is_tall”. I modeled it to look like an enum here so that it’s distinct from roles, but IDs in your system may be a UUID or an integer.
Lastly, we must add the new characteristic resource type to the /ResourceTypes response so that Okta knows the resource exists. Find the resourceTypes.route('/') definition and update the resourceTypes array to include both roles and characteristics.
  const resourceTypes: IResourceType[] = [{
    schemas: [SCHEMA_RESOURCE_TYPE],
    id: 'Role',
    name: 'Role',
    endpoint: '/Roles',
    description: 'Roles you can set on users of Todo App',
    schema: SCHEMA_OKTA_ROLE,
    meta: {
      resourceType: 'ResourceType'
    }
  },
  {
    schemas: [SCHEMA_RESOURCE_TYPE],
    id: 'Characteristic',
    name: 'Characteristic',
    endpoint: '/Characteristics',
    description: 'This resource type is user characteristics',
    schema: 'urn:okta:scim:schemas:core:1.0:Entitlement',
    schemaExtensions: [
      {
        schema: SCHEMA_CHARACTERISTIC,
        required: true
      }
    ],
    meta: {
      resourceType: 'ResourceType'
    }
  }
];
Now, we must register the routes in the API. Open okta-enterprise-ready-workshops/apps/api/src/scim.ts. At the top of the file, update the imports from ./entitlements to
import { characteristicsRoute, resourceTypesRoute, rolesRoute, schemasRoute } from './entitlements';
At the end of the file, add the code to register the /Schemas and /Charactertistics routes to the API.
scimRoute.use('/Schemas', schemasRoute);
scimRoute.use('/Characteristics', characteristicsRoute);
Serve the API by running npm run serve-api in a terminal window. In a second terminal window, run npx localtunnel --port 3333 to create a local tunnel for the API. Keep track of the tunnel URL.
Back in the Okta Admin console, navigate to Applications > Applications and open the SCIM with governance Okta app. Navigate to Provisioning > Integration. Press Edit and update the Base URL using the new tunnel URL. Don’t forget to keep the /scim/v2 at the end of the URL. The URL should look something like
https://{yourTunnelSubdomain}.loca.lt/scim/v2
Press Save.
Okta discovers schemas and resource types when updating the provisioning configuration. If you look at the HTTP call tracing in the terminal window serving the API, you’ll see that Okta made a GET request to both /Schemas and /Characteristics.
Navigate to the Governance. Characteristic may take 10-15 minutes to populate, but you’ll see the display name and value when it does. Go < Back to application and navigate to Assignments. Open the user context menu for “Trinity” by pressing the three vertical dots icon menu and opening View entitlements. Press Edit and Customize entitlements to add the is_tall user characteristic. Save the changes and navigate back to the Okta SCIM app.
Check out the terminal serving the API for the HTTP call tracing. You’ll see a PUT request on Trinity adding the new characteristic. The field goes into the core SCIM User entitlements property. Check it out by inspecting the HTTP tracing in the console output. ✅
Multi-tenant use cases for entitlements
In this workshop, we defined roles for the entire Todo app. But what if your SaaS app supports tenant-configurable roles? You must make structural changes to the Todo app database to support organization roles. Notice that an organization has a unique API key, and we included this API as a Bearer token value in the Authorization header. All the SCIM calls from Okta can target a specific organization in the Todo app, including the organization’s custom roles.
| ️ℹ️ |
Note We used an API key for demonstration purposes, but we recommend using OAuth to secure the calls from Okta to your API for production applications. |
Use SCIM to manage user provisioning and entitlements
In this workshop, you dived deeper into SCIM and learned about resources and schemas. You also synced users and their pre-existing entitlements from the Todo app and provisioned users within Okta. I hope you enjoyed this workshop and have ideas for using it for your SaaS applications! Check out the Identity Governance help docs to learn about Okta Identity Governance.
You can find the completed code project in the entitlements-workshop-completed branch within the GitHub repo.
If you want to learn more about what it means to be enterprise-ready and to have enterprise maturity, check out the other workshops in this series
| Posts in the on-demand workshop series |
|---|
| 1. How to Get Going with the On-Demand SaaS Apps Workshops |
| 2. Enterprise-Ready Workshop: Authenticate with OpenID Connect |
| 3. Enterprise-Ready Workshop: Manage Users with SCIM |
| 4. Enterprise Maturity Workshop: Terraform |
| 5. Enterprise Maturity Workshop: Automate with no-code Okta Workflows |
| 6. How to Instantly Sign a User Out across All Your Apps |
| 7. Take User Provisioning to the Next Level with Entitlements |
Want to learn about more exciting topics? Let us know by commenting below. To get notified about exciting new content, follow us on Twitter and subscribe to our YouTube channel.
Alisa Duncan is a Senior Developer Advocate at Okta, a full-stack developer, and a community builder who loves the thrill of learning new things. She is a Google Developer Expert in Angular and organizes coding workshops and community events locally and internationally. Her background is primarily working on enterprise software platforms, and she is a fan of all things TypeScript and JavaScript.
Okta Developer Blog Comment Policy
We welcome relevant and respectful comments. Off-topic comments may be removed.