Enterprise-Ready Workshop: Manage users with SCIM

Hello SaaS developers! You sell your software to technologically mature enterprises, and they expect it to interface seamlessly with all their other tools. In our Enterprise-Ready Workshop on OpenID Connect, you learned how to solve part of this problem, by creating user accounts in your application for your customers’ employees whenever they log in.
| Posts in the on-demand workshop series |
|---|
| 1. How to Get Going with the On-Demand SaaS Apps Workshops |
| 2. Enterprise-Ready Workshop: Authenticate with OpenID Connect |
| 3. Enterprise-Ready Workshop: Manage Users with SCIM |
| 4. Enterprise Maturity Workshop: Terraform |
| 5. Enterprise Maturity Workshop: Automate with no-code Okta Workflows |
| 6. How to Instantly Sign a User Out across All Your App |
But creating accounts when users log in is only one of your customers’ many expectations! Your app is also expected to know about users who haven’t logged in yet, and remove the accounts of employees who are removed from your customer’s identity provider.
In this workshop, we’ll solve those problems and more with SCIM, the System for Cross-domain Identity Management. SCIM is an open standard protocol that allows us to manage identities across systems as well as common user lifecycles. In this workshop, we will enhance a sample application by adding SCIM server functionality to it, and connect the sample application’s SCIM server to an Okta client.
For an in-depth walkthrough of developing and troubleshooting the code in this workshop, follow along on with the video:
In this workshop, we’ll cover the following:
Table of Contents
- Managing users across systems at scale
- Implement user management using SCIM in a SaaS application
- Set up the sample React and Express application
- Update the User model to support SCIM
- Add a SCIM file and create a scimRoute
- Build the SCIM interface
- Create the route to POST a user
- Test routes using Postman
- Create the route to GET users
- Support updating user info
- Support deleting users
- Connecting with an Identity Provider
- Test common user lifecycle operations
- Tool recommendations for development
- Debugging running code
- Scale your SCIM server to support multitenancy
- Adding SCIM support to SaaS applications
By following these steps, you will learn how to implement SCIM and support provisioning from multiple organizations/tenants. Although we’ll integrate with Okta as an example, remember that almost every identity provider on the web has SCIM support! If you want to jump to the completed project, you can find it in the scim-workshop-complete GitHub repository.
Managing users across systems at scale
SaaS customers have high expectations for the applications that they purchase. Customers, especially at enterprise scale, expect apps to seamlessly integrate with identity providers in order to maximize user productivity.
- Enterprise customers expect that onboarding a user in their identity provider will immediately create accounts for that user in all of SaaS apps where they grant that user access.
- For security as well as convenience, customers expect that deleting or deactivating a user account from their identity provider will delete that user’s accounts from all their enterprise SaaS apps.
- Manually adding accounts at scale
SCIM, the System for Cross-domain Identity Management, is an open standard which addresses those problems. SCIM:
- Provides near-instant updates to the SaaS app whenever someone joins, moves inside of, or leaves a company
- Allows management of user identities in cloud-based applications and services - i.e., you will have an awareness of your enterprise customers’ users’ up-to-date information
- Enables automated control of user lifecycle (governance): provisioning (joiner), synchronizing user changes (movers), and de-provisioning (leaver) between identity providers (IdPs) and service providers (SPs)
- Promotes interoperability via an open standard, which means allowing systems to exchange and make use of info being shared, e.g., I have worked with partners who have used SCIM as a solution to role-based access to resources
Why do we love SCIM for user management?
SCIM is a very well-designed standard; therefore, it can be implemented across systems that are compliant. It simplifies user identity management, thereby reducing manual admin tasks vs. having to manage user lifecycles across multiple applications. It allows user identity management by providing insight into up-to-date user information vs. having no governance over user information and assigned resources across services. Above all, it contributes to improved security! And now, who doesn’t want that in this day and age?
Now that I’ve provided you with some background on SCIM, let’s move on to building the server!
Implement user management using SCIM in a SaaS application
Before we build our SCIM server, let’s have a plan of action.
- Learn about functions that support SCIM: Create, Read, Update, Delete Functions and JSON formatted requests and responses
- Install the sample application and set up your development environment
- Build the SCIM Interface in the Todo sample app and test it with Postman
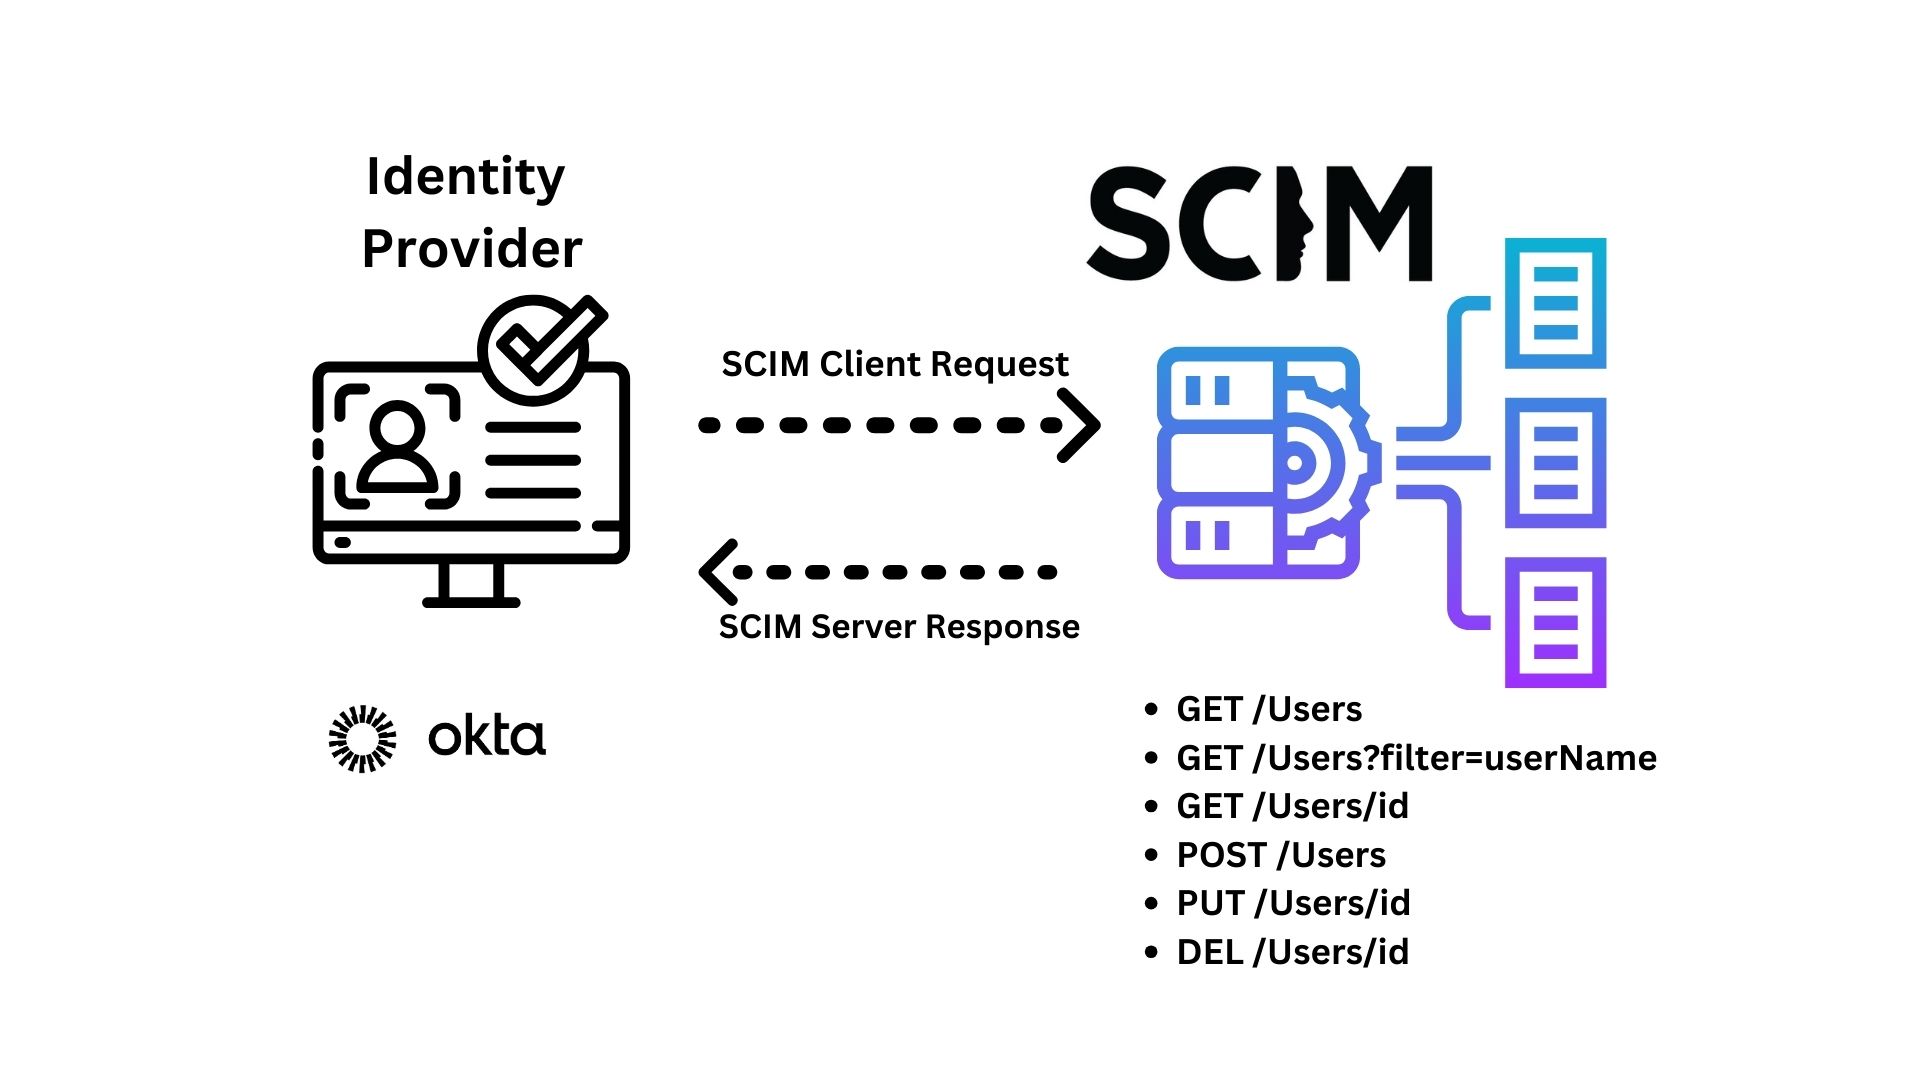
SCIM is implemented as a RESTful API. It uses Create, Read, Update, and Delete endpoints. The endpoints required by the SCIM spec are:
- GET /Users - Retrieve all users
- GET /Users?filter=userName - GET User with the filter “userName” (filtering is optional)
- GET /User/id - Retrieve a specific User by id
- POST /User - Create a user
- PUT /User/id - Update user info by id
- DEL /User/id - Delete a user by id (*Note: Okta users soft delete via PATCH)
SCIM uses the JSON format for requesting and responding to and from the Identity Provider and SCIM server.
Have you seen these endpoints before? Are they familiar to you? Perhaps you’ve built backend applications with these API endpoints. Let’s build on that knowledge.
Before we begin, please note that this implementation of SCIM is meant to be vendor-agnostic, and I will be adding notes on how Okta implements this standard throughout the demo. More importantly, we’ll refer to the SCIM 2.0 spec to build the server.
Set up the sample React and Express application
Follow these setup instructions to install and run the Todo sample app. Run node -v and make sure you have Node version 18 or newer.
We will build SCIM support atop the OIDC support added in the Enterprise-Ready Workshop on OpenID Connect. To start with a version of the sample app that already has OIDC support implemented, git checkout oidc-workshop-complete.
Update the User model to support SCIM
The SCIM specification contains optional features and room for interpretation, so not all clients implement it identically. When supporting a new client from your SCIM server, consult that client’s docs to see which optional features they expect you to support.
When integrating with Okta, we will need to track whether each user is active. To track this, we’ll add an active field to the Prisma database schema, specifically the user table. Here we will add the field attribute active and set that to be a Boolean to inform us whether or not the user is active. Although not required by the SCIM protocol as a core attribute, we will need this later when connecting with Okta.
Speaking of attributes, the SCIM core user schema requires only three attributes (all other attributes are optional):
id, service provider-defined identifieruserName, a unique identifier for the usermeta, read-only metadata maintained by the service provider
These are described in section 8.1 of the SCIM spec.
Update the user model in prisma/schema.prisma:
model User {
  id       Int    @id @default(autoincrement())
  email    String
  password String?
  name String
  Todo     Todo[]
  org       Org?    @relation(fields: [orgId], references: [id])
  orgId     Int?
  externalId String?
  active Boolean?
  @@unique([orgId, externalId])
}
Now that we have the user table with the necessary fields, we’ll need to edit the prisma/seed_script.ts file. In this workshop, we’ll design our SCIM server code to be extensible for supporting multiple separate organizations. Provisioning multiple separate orgs accommodates your customers who may be using different identity providers with different SCIM clients. By giving each organization its own endpoint and API token, we ensure that no org can accidentally update or overwrite another org’s users.
Let’s update the users in prisma/seed_script.ts. We’ll also need to hardcode externalId and active for both users. Note that externalId is a unique identifier issued by the provisioning client, and must be stored in the SCIM server. The externalId is also considered stable because a user’s name and email address can change, but its identifier in the SCIM client cannot. Along with the active attribute, externalId is not a SCIM protocol core attribute, but Okta’s scim implementation expects it. The Okta SCIM Docs tell us that this unique identifier is the user’s global id (GUID).
We’ll also give each org an apikey set to a random string. Using a different key for each org helps our code ensure that no client can accidentally view or edit users belonging to another.
This is how prisma/seed_script.ts looks after making the above changes:
import { PrismaClient } from '@prisma/client'

const prisma = new PrismaClient()

async function main() {
  const org = await prisma.org.create({
    data: {
      domain: 'portal.example',
      apikey: '131313'
    }
  });
  console.log('Created org Portal', org);
  const somnusUser = await prisma.user.create({
    data: {
      name: 'Somnus',
      email: 'somnus@portal.example',
      password: 'correct horse battery staple',
      orgId: org.id,
      externalId: '22',
      active: true
    },
  })
  console.log('Created user Somnus', somnusUser)

  const trinityUser = await prisma.user.create({
    data: {
      name: 'Trinity',
      email: 'trinity@portal.example',
      password: 'Zion',
      orgId: org.id,
      externalId: '23',
      active: true
    },
  })
  console.log('Created user Trinity', trinityUser)
}

main()
  .then(async () => {
    await prisma.$disconnect()
  })
  .catch(async (e) => {
    console.error(e)
    await prisma.$disconnect()
    process.exit(1)
  })
Now we are ready to seed the database. If you already added records to the database, you can run npx prisma migrate reset to remove them. Once your database is empty, seed it by running npm run init-db.
A neat feature with Prisma is the option to view the user table locally. To do this, using your terminal, go to the root of this workshop folder, and run npx prisma studio. Your browser should open to a web page where you can see all the tables you’ve created.
Add a SCIM file and create a scimRoute
For maintainability, we’ll aim to keep our SCIM implementation code in one place. Let’s create a SCIM file, scim.ts, in apps/api/src, and import it in main.ts. At the top of apps/api/src/scim.ts, import Router and create a scimRoute to export to apps/api/src/main.ts. Copy paste the following code to the top of your apps/api/src/scim.ts` file:
import { Router } from 'express';
export const scimRoute = Router();
You’ll then import the scimRoute in apps/api/src/main.ts and after import session from 'express-session'; as shown below:
import express from 'express';
import { PrismaClient, Todo, User } from '@prisma/client';
import passportLocal from 'passport-local';
import passportOIDC from 'passport-openidconnect';
import passport from 'passport';
import session from 'express-session';

// Import the scimRoute from the apps/api/src/scim.ts file
import { scimRoute } from './scim';
Additionally, I recommend adding a section for SCIM related routes; comment out a line as I have done below to mark the starting of your SCIM related code. To make use of the scim routes you’ve created in the apps/api/src/scim.ts, you’ll need to add the line app.use('/scim/v2', scimRoute); I recommend adding this just below the marker for your SCIM-related routes and before the block of code where we connect the server to localhost port 3333 as shown below:
///////////////////////////////////////////////////////
// SCIM-related routes


// '/scim/v2' path appends to every SCIM Endpoints
// Okta recommended url - https://developer.okta.com/docs/guides/scim-provisioning-integration-prepare/main/#base-url
app.use('/scim/v2', scimRoute);

const port = process.env.PORT || 3333;
const server = app.listen(port, () => {
  console.log(`Listening at http://localhost:${port}/api`);
});
server.on('error', console.error);
Note: /scim/v2 will append to every SCIM route. You can change this static path as needed, as there isn’t a specific URL path explicitly required by the SCIM spec. However, Okta’s SCIM Docs recommend using /scim/v2.
Build the SCIM interface
We’ll need to build each CRUD endpoint required by the SCIM spec and format the responses in JSON. After that, we’ll test our functions with Postman to see that they provide the responses required by the spec.
We’ll need to use express and Prisma in apps/api/src/scim.ts, so add them at the top of the file as shown below, replacing the existing import statement for Router:
import express, { Router } from 'express';
import { Prisma, PrismaClient } from '@prisma/client';
Some SCIM endpoints in apps/api/src/scim.ts will return user information from the Todo app’s database. To easily retrieve this information from the SCIM endpoints, implement an IUserSchema interface and instantiate it as the defaultUserSchema. The information in the IUserSchema matches the SCIM spec, as you’ll see soon.
To simplify the example code, we’ll support one org at first, by hardcoding the org ID as 1. When you’re ready to support multiple SCIM clients, you can replace this constant value with a function to look up the correct org ID based on based on the context of the request. The request context drives the associated organization allowing your SCIM server to scale for multiple organizations. For now, you’ll use the org ID to create a user in the database with the hardcoded value when the IdP calls the SCIM This hardcoded org ID. Add the following code to apps/api/src/scim.ts below the existing code in the file:
const prisma = new PrismaClient();

// To funnel users into their designated orgs
const ORG_ID = 1;
interface IUserSchema {
  schemas: string[];
  userName?: string;
  id?: string;
  name?: {
    givenName: string;
    familyName: string;
  };
  emails?: { primary: boolean, value: string, type: string }[];
  displayName?: string;
  locale?: string;
  meta?: {
    resourceType: string;
  }
  externalId?: string;
  groups?: [];
  password?: string;
  active?: boolean;
  detail?: string;
  status?: number;
}

const defaultUserSchema: IUserSchema = {
  schemas: ['urn:ietf:params:scim:schemas:core:2.0:User'],
  locale: 'en-US',
  groups: [],
  meta: {
    resourceType: 'User'
  }
};
Finally, we are ready to get started! Let’s work on our first CRUD endpoint.
Create the route to POST a user
Let’s refer to the SCIM spec on creating a user. The spec says the IdP sends a POST request containing a “User” to the /Users endpoint to create a user. In response to the POST, the server signals a successful creation with an HTTP status code 201 (Created) and returns a representation of the user created. If the server determines that the creation of the requested user conflicts with existing users (e.g., a “User” resource with a duplicate “userName”), the server MUST return HTTP status code 409 (Conflict) with a “scimType” error code of “uniqueness,” as per Section 3.12.
Our SCIM Server will define a user’s uniqueness by their externalId and orgId. You can see how this is done below when we check for a duplicate user.
Our /Users endpoint can fulfill those requirements with the following code. Go ahead and copy/paste the following code to your apps/api/src/scim.ts file:
// Create User Function
// POST /scim/v2/Users
// RFC Notes on Creating Users: https://www.rfc-editor.org/rfc/rfc7644#section-3.3
scimRoute.post('/Users', async (req, res) => {
  // console.log('POST: /Users');
  // Format to SCIM standard
  const newUser: IUserSchema = req.body;
  console.log(req.body)
  const { emails, password } = newUser;
  const externalId = newUser.externalId;
  const active = newUser.active;
  const givenName = newUser.name?.givenName ?? 'NAME';
  const familyName = newUser.name?.familyName ?? 'MISSING';
  const displayName = `${givenName} ${familyName}`;

  // Pull out primary email address
  const emailPrimary = emails.find(email => email.primary === true);
  const email = emailPrimary.value;
  console.log('email: ', email);

  // Set displayName to name
  const name = displayName;
  // Check if the User exists in the database
  // externalId + orgId = user uniqueness per SCIM RFC Section 3.3
  const duplicateUser = await prisma.user.findFirst({
    select: {
      id: true,
      email: true,
      name: true,
    },
    where: {
      externalId,
      org: { id: ORG_ID }
    }
  });
  let userResponse: IUserSchema;
  let httpStatus = 201;
  // If there are any records returned, then we have a duplicate
  if (duplicateUser) {
    // User Found... Error
    console.log('Account Exist ID: ', duplicateUser.id);
    userResponse = {
      schemas: ['urn:ietf:params:scim:api:messages:2.0:Error'],
      detail: 'User already exists in the database: ' + duplicateUser.id,
      status: 409
    };
    httpStatus = 409;
    // res.status(200).send(userResponse);
  } else { // If we don't find one Create...
    // Create the User in the database
    const user = await prisma.user.create({
      data: {
        org: { connect: { id: ORG_ID } },
        name,
        email,
        externalId,
        active
      }
    });
    console.log('Account Created ID: ', user.id);
    userResponse = { ...defaultUserSchema,
      id: `${user.id}`,
      userName: user.email,
      name: {
        givenName,
        familyName
      },
      emails: [{
        primary: true,
        value: user.email,
        type: "work"
      }],
      displayName: name,
      externalId: user.externalId,
      active: user.active
    };
  }
  res.status(httpStatus).json(userResponse);
});
With that code saved in apps/api/src/scim.ts, we have the first endpoint we can interact with. Now is the best time to test our code to ensure we are on the right track.
To test our code, we’ll be using Postman to make requests to our SCIM server.
Test routes using Postman
We’ll need to set up a few things for Postman to authenticate and interact with our local server.
Add Bearer Token auth to secure the SCIM routes
Disclaimer: We’re showing examples with an API key for authorization, but we recommend using OAuth tokens. However, building out the infrastructure to support OAuth tokens is beyond the scope of an introductory SCIM workshop. Here is more info using Okta as an Identity Provider for OAuth tokens.
When testing our routes, Postman (acting as the SCIM client) will authenticate to the Todo app backend using a bearer token. To support token auth, first install the appropriate passport libraries.
In your terminal, run:
npm install passport-http-bearer
npm install @types/passport-http-bearer -D
Then import passportBearer at the top of apps/api/src/main.ts. It should look like this:
import express from 'express';
import { PrismaClient, Todo, User } from '@prisma/client';
import passportLocal from 'passport-local';
import passportOIDC from 'passport-openidconnect';
import passport from 'passport';
import session from 'express-session';
import passportBearer from 'passport-http-bearer';
In addition, create a token auth strategy called BearerStrategy in apps/api/src/main.ts. List it at the top of apps/api/src/main.ts with the other token auth strategies.
import express from 'express';
import { PrismaClient, Todo, User } from '@prisma/client';
import passportLocal from 'passport-local';
import passportOIDC from 'passport-openidconnect';
import passport from 'passport';
import session from 'express-session';
import passportBearer from 'passport-http-bearer';

// Import the scimRoute from the scim.ts file
import { scimRoute } from './scim';

interface IUser {
  id: number;
}

const prisma = new PrismaClient();
const LocalStrategy = passportLocal.Strategy;
const OpenIDConnectStrategy = passportOIDC.Strategy;
const BearerStrategy = passportBearer.Strategy;
Lastly, to use the token auth strategy, add it to your SCIM related code, which would look like this:
///////////////////////////////////////////////////////
// SCIM-related routes

passport.use(new BearerStrategy(
  async (apikey, done) => {
    const org = await prisma.org.findFirst({
      where: {
        apikey: apikey
      }
    });

    return done(null, org);
  }
));


// '/scim/v2' path appends to every SCIM Endpoints
// Okta recommended url - https://developer.okta.com/docs/guides/scim-provisioning-integration-prepare/main/#base-url
app.use('/scim/v2', scimRoute);

const port = process.env.PORT || 3333;
const server = app.listen(port, () => {
  console.log(`Listening at http://localhost:${port}/api`);
});
server.on('error', console.error);
Apply passport’s bearer token auth to each SCIM route by adding the check as part of the scimRoute in apps/api/src/main.ts:
// '/scim/v2' path appends to every SCIM Endpoints
// Okta recommended url - https://developer.okta.com/docs/guides/scim-provisioning-integration-prepare/main/#base-url
app.use('/scim/v2', scimRoute, passport.authenticate('bearer'));
Support SCIM’s content-type headers requirement
You’ll also need to install body-parser for Express.js to accept Content-Type: application/scim+json, because Okta sends this in the request headers instead of Content-Type: application/json. We’ll need this to read the request body from Okta. Note: This specific content-type header is required by the SCIM spec
On the command line, run npm install body-parser to add the library to your project.
In apps/api/src/main.ts, import body-parser at the top of the file. It should look like this:
import express from 'express';
import { PrismaClient, Todo, User } from '@prisma/client';
import passportLocal from 'passport-local';
import passportOIDC from 'passport-openidconnect';
import passport from 'passport';
import session from 'express-session';
import passportBearer from 'passport-http-bearer';

// body-parser is required to accept the header content-type application/scim+json from Okta
// https://www.npmjs.com/package/body-parser
// RFC Notes: https://datatracker.ietf.org/doc/html/rfc7644#section-3.1
import bodyParser from 'body-parser';

// Import the scimRoute from the scim.ts file
import { scimRoute } from './scim';
And instruct the app to use bodyParser for the relevant content types below. Be sure to add this to your SCIM related code section in apps/api/src/main.ts as well. It should look like the following:
///////////////////////////////////////////////////////
// SCIM-related routes
passport.use(new BearerStrategy(
  async (apikey, done) => {
    const org = await prisma.org.findFirst({
      where: {
        apikey: apikey
      }
    });

    return done(null, org);
  }
));

app.use(bodyParser.json({ type: 'application/scim+json' }));

// '/scim/v2' path appends to every SCIM Endpoints
// Okta recommended url - https://developer.okta.com/docs/guides/scim-provisioning-integration-prepare/main/#base-url
app.use('/scim/v2', scimRoute, passport.authenticate('bearer'));

const port = process.env.PORT || 3333;
const server = app.listen(port, () => {
  console.log(`Listening at http://localhost:${port}/api`);
});
server.on('error', console.error);
Add HTTP Logging
Lastly, I’ll also be adding an external tool, Morgan, that will help log HTTP requests; by doing so, we’ll be able to confirm whether requests are reaching our server.
On the command line, npm install morgan to add the library to your project.
In apps/api/src/main.ts, import morgan at the top of the file. It should look like this:
import express from 'express';
import { PrismaClient, Todo, User } from '@prisma/client';
import passportLocal from 'passport-local';
import passportOIDC from 'passport-openidconnect';
import passport from 'passport';
import session from 'express-session';
import passportBearer from 'passport-http-bearer';

// body-parser is required to accept the header content-type application/scim+json from Okta
// https://www.npmjs.com/package/body-parser
// RFC Notes: https://datatracker.ietf.org/doc/html/rfc7644#section-3.1
import bodyParser from 'body-parser';

// For logging http requests - https://github.com/expressjs/morgan
import morgan from 'morgan';

// Import the scimRoute from the scim.ts file
import { scimRoute } from './scim';
And instruct the app to use morgan as shown below. Again, be sure to add this to your SCIM related code section in apps/api/src/main.ts as well. It should look like the following:
///////////////////////////////////////////////////////
// SCIM-related routes

passport.use(new BearerStrategy(
  async (apikey, done) => {
    const org = await prisma.org.findFirst({
      where: {
        apikey: apikey
      }
    });

    return done(null, org);
  }
));

app.use(bodyParser.json({ type: 'application/scim+json' }));

app.use(morgan('combined'));

// '/scim/v2' path appends to every SCIM Endpoints
// Okta recommended url - https://developer.okta.com/docs/guides/scim-provisioning-integration-prepare/main/#base-url
app.use('/scim/v2', scimRoute, passport.authenticate('bearer'));

const port = process.env.PORT || 3333;
const server = app.listen(port, () => {
  console.log(`Listening at http://localhost:${port}/api`);
});
server.on('error', console.error);
Now you’re ready to start testing! Start the API by running the following terminal command:
npm run serve-api
Sign up for Postman or sign in to your account, and configure it to communicate with your local instance of the Todo app.
In Postman, the request URL will behttp://localhost:3333/scim/v2/Users if you’re running the Todo app locally. In the Headers tab, add the key Content-Type and set its value to application/scim+json, and then add an additional key, Authorization, and set it to Bearer 131313.This bearer token value comes from the apikey variable you set earlier in the prisma/seed_script.ts .
Now we are ready to test with Postman with our local server. You can also make cURL requests directly from the terminal if you prefer. You can leave the server running for the remaining steps to build the SCIM server. The local API serve command automatically reloads upon any API code changes.
Test the POST request to add users
Next, to send a request in Postman, go to the Body tab and click the radio button raw to send a JSON request. Try sending the following POST request to http://localhost:3333/scim/v2/Users:
{
  "schemas": [
    "urn:ietf:params:scim:schemas:core:2.0:User"
  ],
  "userName": "test.user@portal.example",
  "name": {
    "givenName": "Test",
    "familyName": "User"
  },
  "emails": [
    {
      "primary": false,
      "value": "test.user@portal.example",
      "type": "work"
    },{
      "primary": true,
      "value": "test.user@portal.example",
      "type": "work"
    }
  ],
  "displayName": "Test User",
  "locale": "en-US",
  "externalId": "00ujl29u0le5T6Aj10h7",
  "groups": [],
  "password": "1mz050nq",
  "active": true
}
What response do you expect? If your code is working correctly, the Todo app backend will give a response with status 201 Created, and the following body:
{
  "schemas": [
    "urn:ietf:params:scim:schemas:core:2.0:User"
  ],
  "locale": "en-US",
  "groups": [],
  "meta": {
    "resourceType": "User"
  },
  "id": "5",
  "userName": "test.user@portal.example",
  "name": {
    "givenName": "Test",
    "familyName": "User"
  },
  "emails": [{
    "primary": true,
    "value": "test.user@portal.example",
    "type": "work"
  }],
  "displayName": "Test User",
  "externalId": "00ujl29u0le5T6Aj10h7",
  "active": true
}
If you send the same POST request again, re-creating an existing user, what should happen? Try it, and you’ll get a 409 Conflict response, with a body like this:
{
  "schemas": [
    "urn:ietf:params:scim:api:messages:2.0:Error"
  ],
  "detail": "User already exists in the database: 5",
  "status": 409
}
Remember you have the option using Prisma to view the user table locally. To do this, in your terminal, go to the root of this workshop folder, and run npx prisma studio. Your browser should open to a web page where you can see all the users you’ve created.
You can repeat this testing process for each SCIM route that you implement!
Create the route to GET users
According to the SCIM spec, a SCIM server may paginate users in the response for a GET request. Okta requests paginated users with a start index set to 1 and a count set to 100 per page.
In addition, filtering by username is an OPTIONAL parameter for SCIM service providers (refer to this section of the SCIM spec) However, Okta requires username filtering support as it checks to see if the user exists by username first before creating them. This behavior is described in more detail in the Okta Docs.
Why would a SCIM client, in this case the identity provider, ever want to ask our app’s SCIM server what users it knows about? Okta keeps track of the identifiers every SCIM integration uses for each user, and stores those as the user’s “externalId”. Okta uses this endpoint to test whether a user exists and find out what ID the SCIM server uses for that individual, so that it can send the correct request type with the correct ID: PUT to update an existing user, or POST to create a new account for a user in the SCIM server.
To fulfill these requirements, the sample app’s backend can handle GET requests to the /Users endpoint in apps/api/src/scim.ts with the following code below. Go ahead and copy/paste the following code to your apps/api/src/scim.ts file: :
// Retrieve Users
// GET /scim/v2/Users
// RFC Notes on Retrieving Users: https://www.rfc-editor.org/rfc/rfc7644#section-3.4.1
scimRoute.get('/Users', async (req, res) => {
  // RFC Notes on Pagination: https://www.rfc-editor.org/rfc/rfc7644#section-3.4.2.4
  const DEFAULT_START_INDEX = '1';
  const DEFAULT_RECORD_LIMIT = '100';
  let startIndex = parseInt(req.query.startIndex as string ?? DEFAULT_START_INDEX);
  startIndex--; // Prisma starts its indexing at 0, while Okta send starting index at 1, this is to make sure we start at 0
  const recordLimit = parseInt(req.query.recordLimit as string ?? DEFAULT_RECORD_LIMIT);
  let filterQuery: string | null = req.query.filter as string ?? null;
  let filterParams: string[] = [];
  let email = null;
  if (!!filterQuery) {
    // Get query string for filter that has operators eq
    // ?filter=userName%20eq%20%22bob%40tables.fake%22
    filterParams = filterQuery.split(' ');
    // RFC Notes on Filtering: https://www.rfc-editor.org/rfc/rfc7644#section-3.4.2.2
    const FILTER_EXPRESSION_LENGTH = 3;
    const FILTER_ATTRIBUTE_NAME = 0;
    const FILTER_OPERATOR = 1;
    const FILTER_VALUE = 2;
    if (filterParams.length !== FILTER_EXPRESSION_LENGTH || filterParams[FILTER_ATTRIBUTE_NAME] !== 'userName' || filterParams[FILTER_OPERATOR] !== 'eq') {
      filterParams = [];
      filterQuery = null;
    } else {
      // Email string is wrapped in "", remove the double quotes
      email = filterParams[FILTER_VALUE].replaceAll('"', '')
      console.log('Filter Detected: userName EQ ', email);
    }
  }
  let where: { org: {}, email?: string } = {
    org: {
      id: ORG_ID
    }
  };
  if (!!email) {
    where = { ...where, email };
  }
  const count = await prisma.user.count({ where });
  let usersResponse = {
    schemas: ["urn:ietf:params:scim:api:messages:2.0:ListResponse"],
    totalResults: count,
    startIndex: 1,
    itemsPerPage: 0,
    "Resources": []
  };
  if (count > 0) {
    const users = await prisma.user.findMany({
      take: recordLimit,
      skip: startIndex,
      select: {
        id: true,
        email: true,
        name: true,
        externalId: true,
        active: true
      },
      where
    });
    usersResponse['Resources'] = users.map(user => {
      const [givenName, familyName] = user.name.split(" ")
      return {
        ...defaultUserSchema,
        id: user.id.toString(),
        userName: user.email,
        name: {
          givenName,
          familyName
        },
        emails: [{
          primary: true,
          value: user.email,
            type: 'work'
          }],
        displayName: user.name,
        externalId: user.externalId,
        active: user.active
      }
    });
  }
  usersResponse.itemsPerPage = usersResponse.Resources.length
  res.json(usersResponse);
  console.log(usersResponse)
});
What will this code do if it finds the user? What if it gets a request to look up a user who doesn’t exist?
Test retrieving a user
Try using Postman to send a GET request with no body to http://localhost:3333/scim/v2/Users. What result would you expect?
If you seeded your database using the provided script, the result will look like this:
{
  "schemas": [
    "urn:ietf:params:scim:api:messages:2.0:ListResponse"
  ],
  "totalResults": 3,
  "startIndex": 1,
  "itemsPerPage": 3,
  "Resources": [
    {
      "schemas": [
        "urn:ietf:params:scim:schemas:core:2.0:User"
      ],
      "locale": "en-US",
      "groups": [],
      "meta": {
        "resourceType": "User"
      },
      "id": "1",
      "userName": "somnus@portal.example",
      "name": {
        "givenName": "Somnus"
      },
      "emails": [
        {
          "primary": true,
          "value": "somnus@portal.example",
          "type": "work"
        }
      ],
      "displayName": "Somnus",
      "externalId": "22",
      "active": true
    },
    {
      "schemas": [
        "urn:ietf:params:scim:schemas:core:2.0:User"
      ],
      "locale": "en-US",
      "groups": [],
      "meta": {
        "resourceType": "User"
      },
      "id": "2",
      "userName": "trinity@portal.example",
      "name": {
        "givenName": "Trinity",
      },
      "emails": [
        {
          "primary": true,
          "value": "trinity@portal.example",
          "type": "work"
        }
      ],
      "displayName": "Trinity",
      "externalId": "23",
      "active": true
    },
    {
      "schemas": [
        "urn:ietf:params:scim:schemas:core:2.0:User"
      ],
      "locale": "en-US",
      "groups": [],
      "meta": {
        "resourceType": "User"
      },
      "id": "3",
      "userName": "test.user@portal.example",
      "name": {
        "givenName": "Test",
        "familyName": "User"
      },
      "emails": [
        {
          "primary": true,
          "value": "test.user@portal.example",
          "type": "work"
        }
      ],
      "displayName": "Test User",
      "externalId": "00ujl29u0le5T6Aj10h7",
      "active": true
    }
  ]
}
The result lists all users in the database.
Test query parameters to filter by userName
Let’s look up whether any users in the Todo app have the email address trinity@portal.example. Try sending a GET request with no body to http://localhost:3333/scim/v2/Users?filter=userName eq "trinity@portal.example"&startIndex=1&count=100 What result do you expect?
If you seeded your database with prisma/seed_script.ts, the result will look like this.
{
  "schemas": [
    "urn:ietf:params:scim:api:messages:2.0:ListResponse"
  ],
  "totalResults": 1,
  "startIndex": 1,
  "itemsPerPage": 1,
  "Resources": [
    {
      "schemas": [
        "urn:ietf:params:scim:schemas:core:2.0:User"
      ],
      "locale": "en-US",
      "groups": [],
      "meta": {
        "resourceType": "User"
      },
      "id": "2",
      "userName": "trinity@portal.example",
      "name": {
        "givenName": "Trinity"
      },
      "emails": [
        {
          "primary": true,
          "value": "trinity@portal.example",
          "type": "work"
        }
      ],
      "displayName": "Trinity",
      "externalId": "23",
      "active": true
    }
  ]
}
Get a user by ID
According to the SCIM spec, the endpoint /Users/[id] can retrieve details about a user. If a user with the specified ID exists, the server responds with HTTP status code 200 (OK) and includes the user’s information in the body of the response. It should return a 404 if no user was found with the requested identifier. How can the SCIM server fulfill the spec’s requirements to look up users by their IDs? Go ahead and copy/paste the following code to your apps/api/src/scim.ts file to see what happens:
// Retrieve a specific User by ID
// GET /scim/v2/Users/{userId}
// RFC Notes on Retrieving Users by ID: https://www.rfc-editor.org/rfc/rfc7644#section-3.4.1
scimRoute.get('/Users/:userId', async (req, res) => {
  console.log('GET: /users/:userId');
  const id = parseInt(req.params.userId);
  const user = await prisma.user.findFirst({
    select: {
      id: true,
      email: true,
      name: true,
      externalId: true,
      active: true,
    },
    where: {
      id,
      org: { id: ORG_ID },
    }
  });
  let httpStatus = 200;
  let userResponse;
  // If no response from DB, return 404
  if (!!user) {
    const { id, name, email } = user;
    const [givenName, familyName] = name.split(" ");
    userResponse = {
      ...defaultUserSchema,
      id: id.toString(),
      userName: email,
      name: {
        givenName,
        familyName
      },
      emails: [{
        primary: true,
        value: email,
        type: 'work'
      }],
      displayName: name,
      externalId: user.externalId,
      active: user.active
    } satisfies IUserSchema;
  } else {
    httpStatus = 404;
    userResponse = `User ${id} not found`;
  };
  // Send Response
  res.status(httpStatus).json(userResponse);
  console.log(userResponse);
});
Test looking up a user by their ID
With Postman, send a request to look up the user with ID 1. What URL should you hit to look up that user? What type of request should you send?
A GET request to http://localhost:3333/scim/v2/Users/1 will look up the appropriate user. A successful response should look like this:
{
  "schemas": [
    "urn:ietf:params:scim:schemas:core:2.0:User"
  ],
  "locale": "en-US",
  "groups": [],
  "meta": {
    "resourceType": "User"
  },
  "id": "1",
  "userName": "somnus@portal.example",
  "name": {
    "givenName": "Somnus"
  },
  "emails": [
    {
      "primary": true,
      "value": "somnus@portal.example",
      "type": "work"
    }
  ],
  "displayName": "Somnus",
  "externalId": "22",
  "active": true
}
Support updating user info
Section 3.5.1 of the SCIM spec, tells us how to update a user’s information if we know their ID. Users are updated by a PUT to the /Users/[id] endpoint. if the user exists, the server updates its records for the user and responds with HTTP status code 200 (OK), including the user’s latest information in the body of the response. If no user with the specified ID is found, the server returns a 404.
Can you implement this behavior in the Todo app’s backend? One way to do it would be to add this code to apps/api/src/scim.ts:
// Update a specific User (PUT)
// PUT /scim/v2/Users/{userId}
// RFC Notes on Updating a User: https://www.rfc-editor.org/rfc/rfc7644#section-3.5.1
scimRoute.put('/Users/:userId', async (req, res) => {
  console.log(req.body);

  const id = parseInt(req.params.userId);
  const userCount = await prisma.user.count({
    where: {
      id,
      org: { id: ORG_ID },
    }
  });
  let userResponse;
  let httpStatus = 200;
  if (userCount === 1) {
    const updatedUserRequest: IUserSchema = req.body;
    const { name, emails } = updatedUserRequest;

    const updatedUser = await prisma.user.update({
      data: {
        email: emails.find(email => email.primary).value,
        name: `${name.givenName} ${name.familyName}`
      },
      where: {
        id
      }
    });
    const [givenName, familyName] = updatedUser.name.split(" ")

    userResponse = {
      ...defaultUserSchema,
      id: id.toString(),
      userName: updatedUser.email,
      name: {
        givenName,
        familyName
      },
      emails: [{
        primary: true,
        value: updatedUser.email,
        type: 'work'
      }],
      displayName: updatedUser.name,
      externalId: updatedUser.externalId,
      active: updatedUser.active
    } satisfies IUserSchema;
  } else if (userCount === 0) {
    httpStatus = 404;
    userResponse = `User ${id} not found`;
  } else {
    httpStatus = 500;
    userResponse = `Whoa there!`;
  }
  res.status(httpStatus).send(userResponse);
});
Does this code make any changes to the incoming data when updating a user? What errors will it catch if the update fails?
Test updating a user
Let’s change our user with ID 3. First, do you remember how to use Postman to look up a user’s information when you know their ID? Look up the user with ID 3 now.
As your GET request to http://localhost:3333/scim/v2/Users/3 revealed, this person is named Test User. Let’s update their userName, givenName, and primary email to newTest User.
To make this update, use Postman to send a PUT request to http://localhost:3333/scim/v2/Users/3, with the following body:
{
  "schemas": [
    "urn:ietf:params:scim:schemas:core:2.0:User"
  ],
  "locale": "en-US",
  "groups": [],
  "meta": {
    "resourceType": "User"
  },
  "id": "3",
  "userName": "newtest.user@portal.example",
  "name": {
    "givenName": "newTest",
    "familyName": "User"
  },
  "emails": [
    {
      "primary": true,
      "value": "newtest.user@portal.example",
      "type": "work"
    }
  ],
  "displayName": "Test User",
  "externalId": "00ujl29u0le5T6Aj10h7",
  "active": true
}
What response do you expect? You should get an HTTP 200 with a body like this:
{
  "schemas": [
    "urn:ietf:params:scim:schemas:core:2.0:User"
  ],
  "locale": "en-US",
  "groups": [],
  "meta": {
    "resourceType": "User"
  },
  "id": "3",
  "userName": "newtest.user@portal.example",
  "name": {
    "givenName": "newTest",
    "familyName": "User"
  },
  "emails": [
    {
      "primary": true,
      "value": "newtest.user@portal.example",
      "type": "work"
    }
  ],
  "displayName": "newTest User",
  "externalId": "00ujl29u0le5T6Aj10h7",
  "active": true
}
Remember you have the option using Prisma to view the user table locally. To do this, in your terminal, go to the root of this workshop folder, and run npx prisma studio. Your browser should open to a web page where you can see the changes you’ve made to the user.
Support deleting users
Section 3.6 of the SCIM spec, tells us that service providers may choose to permanently delete users with a 204 (No Content). If no user with the specified ID is found, the server returns a 404 (Not found).
When a user leaves an organization, some identity providers will delete that user entirely. Revoking the user’s access to all applications is an essential component of securely offboarding them. Additionally, when an enterprise purchases a subscription plan for a SaaS app with a limited number of seats, they expect that removing a user from that app will free up a seat in their license for another user to gain access.
Deleting accounts of removed users can help your application comply with data retention regulations. And over time, storing and backing up information every user who has ever used your app, instead of only tracking active accounts, can get expensive in both storage costs and backup/restore process duration.
Here’s how you can implement user deletion. Go ahead and copy/paste the following code to your apps/api/src/scim.ts file:
// Delete Users
// DELETE: /Users/:userId
// RFC Notes on Deleting Users: https://www.rfc-editor.org/rfc/rfc7644#section-3.6
scimRoute.delete('/Users/:userId', passport.authenticate('bearer'), async (req, res) => {
  const id  = parseInt(req.params.userId);
  await prisma.user.delete({
    where: { id }
  });

  res.sendStatus(204);
});
Test deleting a user
Test out the delete function by making a DELETE request with an empty body to http://localhost:3333/scim/v2/Users/3.
What response do you expect? You should get an HTTP 204 with no body in response. You can also confirm the user has been deleted in the user table by using Prisma built in commands. In your terminal, go to the root of this workshop folder, and run npx prisma studio. Your browser should open to a web page where you can see the user you’ve just deleted.
Test soft deleting or “deprovisioning” a user
Okta implements a soft delete aka deprovision via PUT or PATCH. This will cover the scenarios such as users reassignment from services and potentially auditing purposes. Add the following code to apps/api/src/scim.ts to support what the spec calls a partial delete:
// Soft Delete Users
// PATCH: /Users/:userId
// RFC Notes on Partial Update: https://www.rfc-editor.org/rfc/rfc7644#section-3.5.2
// Note: this does not a true "delete"; this will update the active flag to false (this is an Okta best practice)
scimRoute.patch('/Users/:userId', async (req, res) => {
  console.log(req.body);

  const id  = parseInt(req.params.userId);
  const active = req.body["Operations"][0]["value"]["active"]
  await prisma.user.update({
    data: {
      active
    },
    where: { id }
  });

  res.sendStatus(204);
});
Try sending a PATCH request with an empty body to http://localhost:3333/scim/v2/Users/2.
{
  "schemas": [
    "urn:ietf:params:scim:api:messages:2.0:PatchOp"
  ],
  "Operations": [
    {
      "op": "replace",
      "value": {
        "active": false
      }
    }
  ]
}
Just like the delete request, you should expect to receive a 204 response; this is in line with Okta’s docs. Double check that the user’s active attribute is set to false in the user table using Prisma’s built in commands. In your terminal, go to the root of this workshop folder, and run npx prisma studio.
Connecting with an Identity Provider
Now that we have a working SCIM application, let’s test it with an Identity Provider! In this workshop, we’re using Okta.
We’ll need to set up a few things for Okta to authenticate and interact with our local server.
Test locally using a tunnel
One way to give your app a public URL or IP would be to host it on a cloud instance with DNS that you control. For development purposes, you can use Ngrok or Localtunnel to provide a public address to the app running on your own computer.
Since some firewalls restrict Ngrok traffic, we’ll use Localtunnel in this demonstration. To run the tunnel, you’ll start the api with the following command on your terminal:
npm run serve-api
In another terminal, start the tunnel using the following command:
npx localtunnel --port 3333
It will ask for permission to install the npm package; say yes. And when you start localtunnel, it will print a URL to your terminal, such as http://unique-url-for-squirrels. You will need that URL when we create a SCIM app in Okta so that Okta can send requests to your Todo app.
Create a SCIM application in Okta
Log in to your Okta Integrator Free Plan account, or sign up if you don’t have one yet.
In this step, you will create an app integration in Okta. Although there are several ways to create apps, we will demonstrate the workflow you would use for an app that will eventually be published to customers on the Okta Integration Network. Don’t worry, we won’t submit the sample app to the integration network!
Log in to your Okta Integrator account. Make sure you’re in the Admin Console — when you’re in the Admin Console, the URL will be “dev-youraccountid-admin.okta.com”. In the sidebar, select Applications > Applications, and press the Browse App Catalog button.
Enter “SCIM 2.0 Test App” in the search box. Select the “SCIM 2.0 Test App (Header Auth)”, and press the + Add Integration button to confirm creating an integration using “SCIM 2.0 Test App (Header Auth)”.
You’ll see configuration options. Leave the General Settings tab as is and navigate to the Sign-On Options tab. Give the app a helpful name in the Application label field. For example, you can keep the default or change it to “SCIM Workshop”. Leave the Automatically log in when a user lands on login page checked, and click Next.
In the Sign-On Options dialog, keep the default settings, as these aren’t used by our app. Click the Done button at the bottom of the page.
In the Provisioning tab of the application, press the Configure API Integration button, check the Enable API Integration checkbox. Provide the Base URL, which is the localtunnel URL with /scim/v2 appended to the end. The API Token is Bearer 131313 if you’re using the values seeded by prisma/seed_script.ts. Press Save to save the settings.
When you save these settings or use the Test API Credentials button, Okta will make a GET /Users request with the API token you provided to verify a connection with your SCIM server.
Finally, under the Provisioning tab, click the To App heading in the left sidebar.In the Provisioning To App settings, press the Edit button. Enable Create Users, Update User Attributes, and Deactivate Users. Leave the Sync Passwords setting unchecked for now. Press Save. Remain on this screen for the next steps.
Test common user lifecycle operations
We are now ready to test common user lifecycle requests using the Okta SCIM server.
Import users
As you know, we have two users: somnus@portal.example and trinity@portal.example, in our SCIM server. Let’s sync them over to Okta so that we have visibility of all users. We can also designate Okta as the source of truth for info about users assigned to this app or organization.
In the Import tab of the SCIM Test App in Okta, click the Import Now button. You’ll see a dialog confirming Okta scanned your users and found new users. You’ll then have a screen to confirm assignments. When you try to confirm the assignments, you’ll get an error telling you that users must have a lastName field. How can you fix this error?
One solution would be to directly add surnames in the database with Prisma, but you could also use SCIM! Try using Postman to update each user in the Todo app and give them family names.
Once all users in your Todo app have their first and last names set, clear out unconfirmed users and try the Import Now button again. When the import succeeds, Okta will make a request to get all users and confirm those already not recorded. In the list of users to import, check the boxes by those you want to sync to Okta, and click Confirm Assignments. Then go to the Assignments tab and watch as the imported users appear.
Sync from Okta to the Todo app
To sync a user who exists in Okta but not our app, we’ll first need to create a user in Okta. From within the Okta Admin Console sidebar, navigate to Directory > People. Press the Add Person button and add a person with the default User type of “User” with a First name of “Tom”, Last name of “Anderson”, Username of “tom.anderson@portal.example”, and press Save.
You can now go back to your SCIM Application. Navigate to Applications > Applications in the sidebar. Find your SCIM app and press on the list item to edit it. In the Assignments tab, click the Assign v button and select Assign to People in the dropdown menu. Click the Assign button next to “Tom Anderson” in the user list, and press Save and Go Back to accept the default values. Press the Done button to save your changes.
In your Todo App’s server logs, you’ll see that a POST request immediately appeared from Okta to create Tom Anderson’s account on the Todo server.
Remember you have the option using Prisma to view the user table locally. To do this, in your terminal, go to the root of this workshop folder, and run npx prisma studio. Your browser should open to a web page where you can see all the users added from Okta.
Deprovision a user
Let’s say Tom decides to leave Portal, so we need to deprovision them from the application.
In the Assignments tab of the Okta SCIM application, find “Tom Anderson” and press the X button next to Tom’s entry to unassign them from the app. This unassignment makes Okta send the Todo App PATCH request, setting the unassigned user’s active attribute to false. This indicates that a user’s account is suspended.
We can confirm that Tom’s active attribute is now false in the Todo app’s database through the Prisma Studio web interface. To do this, in your terminal, go to the root of this workshop folder, and run npx prisma studio. Your browser should open to a web page where you can see all the users you’ve created.
Reprovision a user
Let’s say Tom later decides to return to Portal and needs access to this Todo app again.
To reactivate Tom’s account, we will repeat the steps for assigning his Okta account to the application. Re-activating Tom causes Okta to send a PATCH request to our app, setting their active attribute to true.
Again, we can confirm that Tom’s account is now active through our Prisma Studio database web interface. To do this, in your terminal, go to the root of this workshop folder, and run npx prisma studio. Your browser should open to a web page where you can see all the users you’ve created.
Change a user’s info in Okta
Let’s look at one more scenario. Let’s say not only has Tom returned, but they also changed their name! Worry not, as our SCIM connection will automatically propagate this profile update. Let’s change Tom’s name to Leo and watch how Okta sends the new name to the SCIM server built into our Todo app.
In Okta Admin Console sidebar, navigate to Directory > People, and click on Tom’s name in the user list to edit their settings. In the Profile tab, click Edit in the Attributes pane. Change the firstName field to “Leo”, and update their login and email to leo.anderson@portal.example. Use the Save button at the bottom of the page to save your changes.
In your Todo app logs, what request do you expect to see from Okta when a user’s information updates? You should see the PUT request to your /scim/v2/Users/4 endpoint automatically after saving Leo’s new name. Again you can use Prisma Studio’s web interface to confirm. To do this, in your terminal, go to the root of this workshop folder, and run npx prisma studio. Your browser should open to a web page where you can see the change you have made.
Tool recommendations for development
While troubleshooting and developing an application, it can be helpful to use tools that let you inspect your code’s behavior closely, including the way it handles secrets. These tools helped me as I developed the sample code used in the workshop, and might help you as you build your own projects.
The features that make these tools helpful for testing also make them terrible for production use. In a production context, security is essential. For troubleshooting production services, integrate your application with your team’s secure logging and secrets management infrastructure.
Public URLs for local apps
ngrok is my favorite solution for giving an app a public address, but it’s not allowed by all networks. When ngrok isn’t supported, localtunnel is a good alternative. Plus, localtunnel doesn’t require an account to use it.
View requests to and from the app
ngrok is also my favorite tool for viewing requests to and from a local server. Unfortunately, some firewalls and corporate policies prohibit ngrok. If you can’t use ngrok, use Okta’s system logs to see requests from the app to Okta. Morgan can help you log inbound HTTP requests to the server.
Wireshark is a powerful tool for examining all network traffic, including HTTP requests.
Testing server behavior
Postman and Hoppscotch offer a friendly interface for sending custom request bodies and headers to a server. If you prefer to work in the terminal, cURL can do the same things with the right arguments passed to it.
Debugging running code
If you are using Visual Studio Code as your IDE, I recommend enabling your built-in debugger tool. This will allow you to inspect the request body by adding breakpoints as needed.
Follow Visual Studio Code’s docs to find the Run And Debug view. I used the following launch.json configuration for Visual Studio when working on this app:
{
  "configurations": [
    {
      "name": "Debug Node App",
      "type": "node",
      "request": "attach",
      "port": 3333
    },
  ]
}
The version of Nx workspace tooling the application uses has a bug when running the debugger. Replace the Todo app’s apps/api/webpack.config.js with the following to facilitate debugging through Visual Studio Code:
const { composePlugins, withNx } = require('@nx/webpack');
const path = require('path')

// Nx plugins for webpack.
module.exports = composePlugins(withNx(), (config) => {
  // Update the webpack config as needed here.
  // e.g. `config.plugins.push(new MyPlugin())`
  config.output.devtoolModuleFilenameTemplate = function (info) {
    const rel = path.relative(process.cwd(), info.absoluteResourcePath);
    return `webpack:///./${rel}`
  }
  return config
});
Scale your SCIM server to support multitenancy
Enhance the scalability of your SCIM implementation with the following recommendations:
Improve security by replacing auto-increment
In the OIDC and SCIM video, I recommended to have a better way to assign the id attribute. And in both workshops, we used basic auto-increment for the user’s id to lessen the complexity of the projects. However, for production, we recommend using a unique id generator such as uuid. I know I mentioned using xid library in my accompanying video, but when considering which to use, keep in mind library use and frequency of maintenance as security best practices.
Enhance efficiency in managing multitenancy
As mentioned, to simplify the example code, I demonstrated supporting one org at first by hardcoding the org ID as 1.
// To funnel users into their designated orgs
const ORG_ID = 1;
When you’re ready to support multiple SCIM clients, you can retrieve the api string from the request headers sent from the IdP. Then do an org look-up with the findFirst SQL function and select the org id where the api key matches that of the one you extracted from the request headers. Doing so will automatically generate a user for the correct organization.
// Create the User in the database
const user = await prisma.user.create({
  data: {
    org: { connect: { id: ORG_ID } },
    name,
    email,
    externalId,
    active
  }
You’ll make a similar change to all the SCIM endpoints.
Adding SCIM support to SaaS applications
Congratulations, you’ve added SCIM support to an OIDC application! Not only have you supported SCIM for a single Okta organization, but the implementation choices made throughout this workshop prioritize scalability so that the Todo app can integrate with as many additional identity providers as necessary! By giving every integration its own unique SCIM endpoint and API token, you prepare your application to seamlessly integrate with as many customers as you want. Keep in mind, IdPs that support SCIM may implement SCIM differently, so you will need to reference the specific IdP’s implementation docs.
You can check out the completed SCIM server sample in the scim-workshop-complete GitHub repository. And if you have followed along with the workshops so far, you now have a Todo application secured by OpenID Connect with SCIM provisioning. Your users can now authenticate securely with OIDC and make use of this application once they have been provisioned and assigned to the application from an Identity Provider such as Okta.
| Posts in the enterprise-ready workshop series |
|---|
| 1. How to Get Going with the Enterprise-Ready SaaS Apps Workshops |
| 2. Enterprise-Ready Workshop: Authenticate with OpenID Connect |
| 3. Enterprise-Ready Workshop: Manage Users with SCIM |
| 4. Enterprise Maturity Workshop: Terraform |
| 5. Enterprise Maturity Workshop: Automate with no-code Okta Workflows |
| 6. How to Instantly Sign a User Out across All Your App |
Follow us on Twitter and subscribe to our YouTube channel to get notified about exciting new content. Please comment below if you have any questions or want to share problems you have used SCIM to solve or are planning to solve. As all our sample projects and SDKs are open source, we invite you to initiate a pull request if you see something you want us to improve. Thank you!
Changelog:
- Aug 21, 2023: Added a Supplemental section at the end
- Aug 28, 2023: Corrected hyperlink to OIDC Workshop blog, provided more clarity in accessing the Prisma web interface. Added a disclaimer for using API tokens.
- Aug 30, 2023: Improved instructions for bearer auth check
- Sep 15, 2023: Corrected url typos on SCIM diagram
- Sep 19, 2023: Clarified instructions and changed the Bearer auth handling to the SCIM route definition
- Sep 21, 2023: Removed auth0 logo as they don’t support SCIM at this time
Semona has been with Okta for three years supporting developers as a Developer Support Engineer. She is excited to transition to a Dev Advocate role - advocating for Okta developer community needs. Outside of work, Semona is a foodie, loves kombucha, and is interested in board games and ultimate frisbee.
Okta Developer Blog Comment Policy
We welcome relevant and respectful comments. Off-topic comments may be removed.