Enterprise Maturity Workshop: Automate with no-code Okta Workflows

This tutorial is part of the on-demand workshop series. In this workshop, you’ll enhance the base Todo application by creating an automated report using Okta’s no-code Workflows platform.
Table of Contents
- What is Okta Workflows?
- Getting access to Okta Workflows
- Creating a flow
- Okta Workflows building blocks
- Setting up the Todo application
- Enhancing the Todo application with a new API
- Launching the API in a local tunnel
- Building the Todo Report flow
- Updating the flow to send a pretty message
- The complete automation
- Testing the automation
- What you learned
- Next steps
- Okta Workflows resources
Watch this video to follow the workshop steps.
You built a software as a service (SaaS) Todo application:
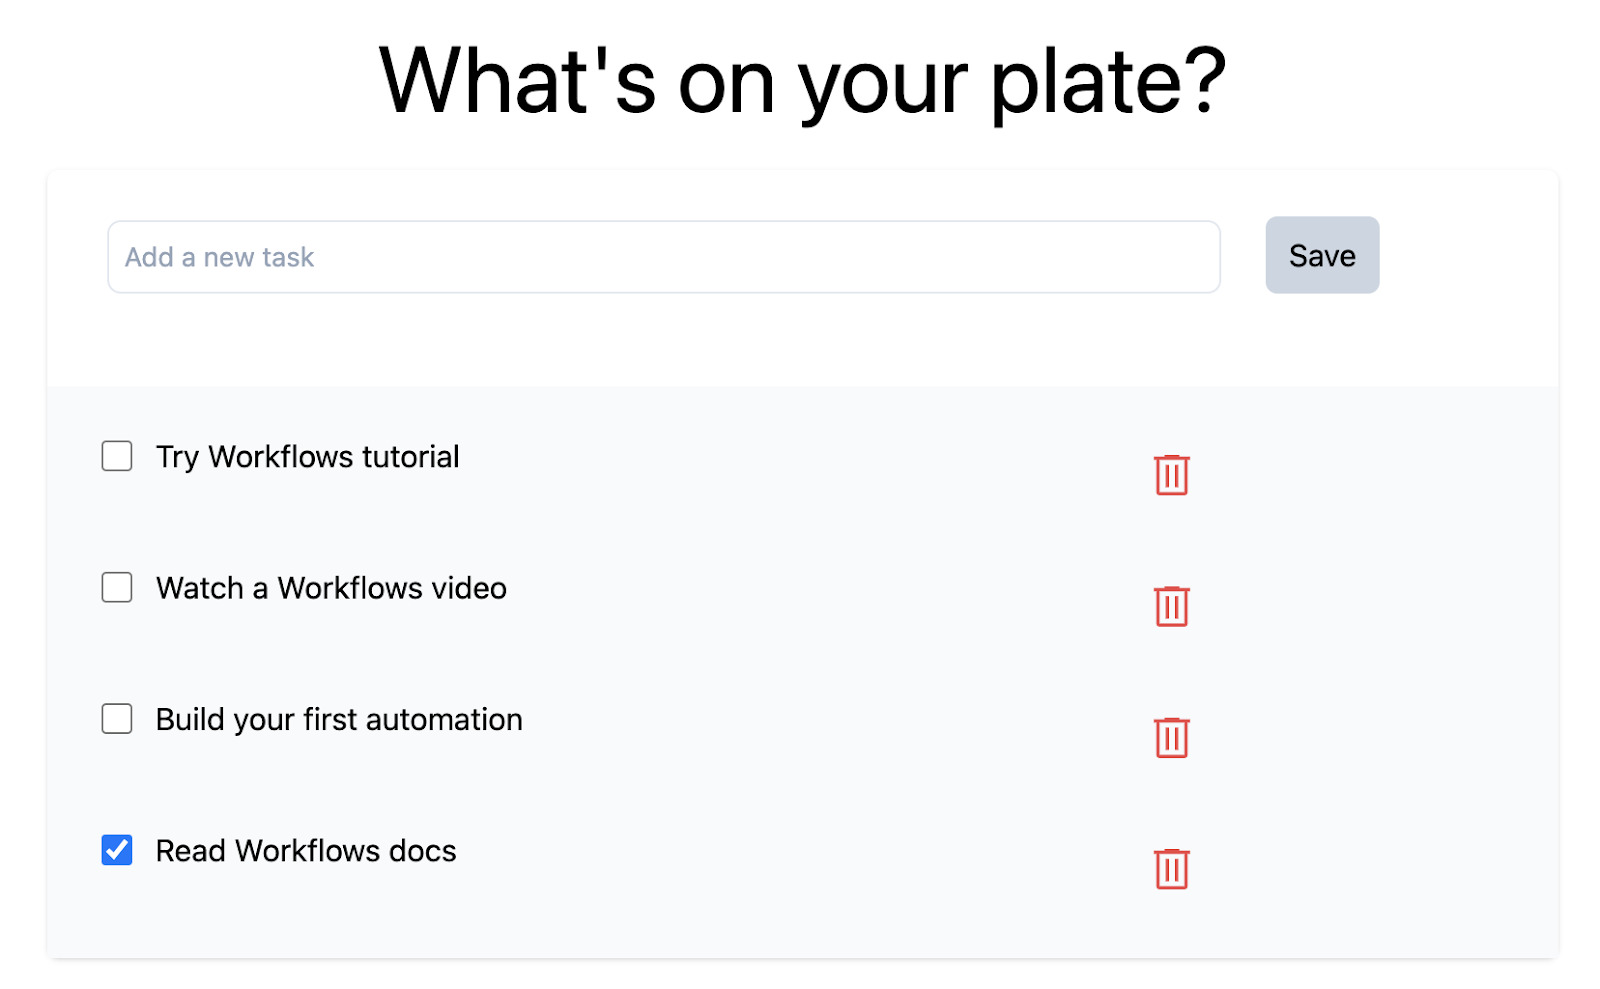
The application allows entering todo items and marking them completed when done.
But it’s missing an important enterprise capability.
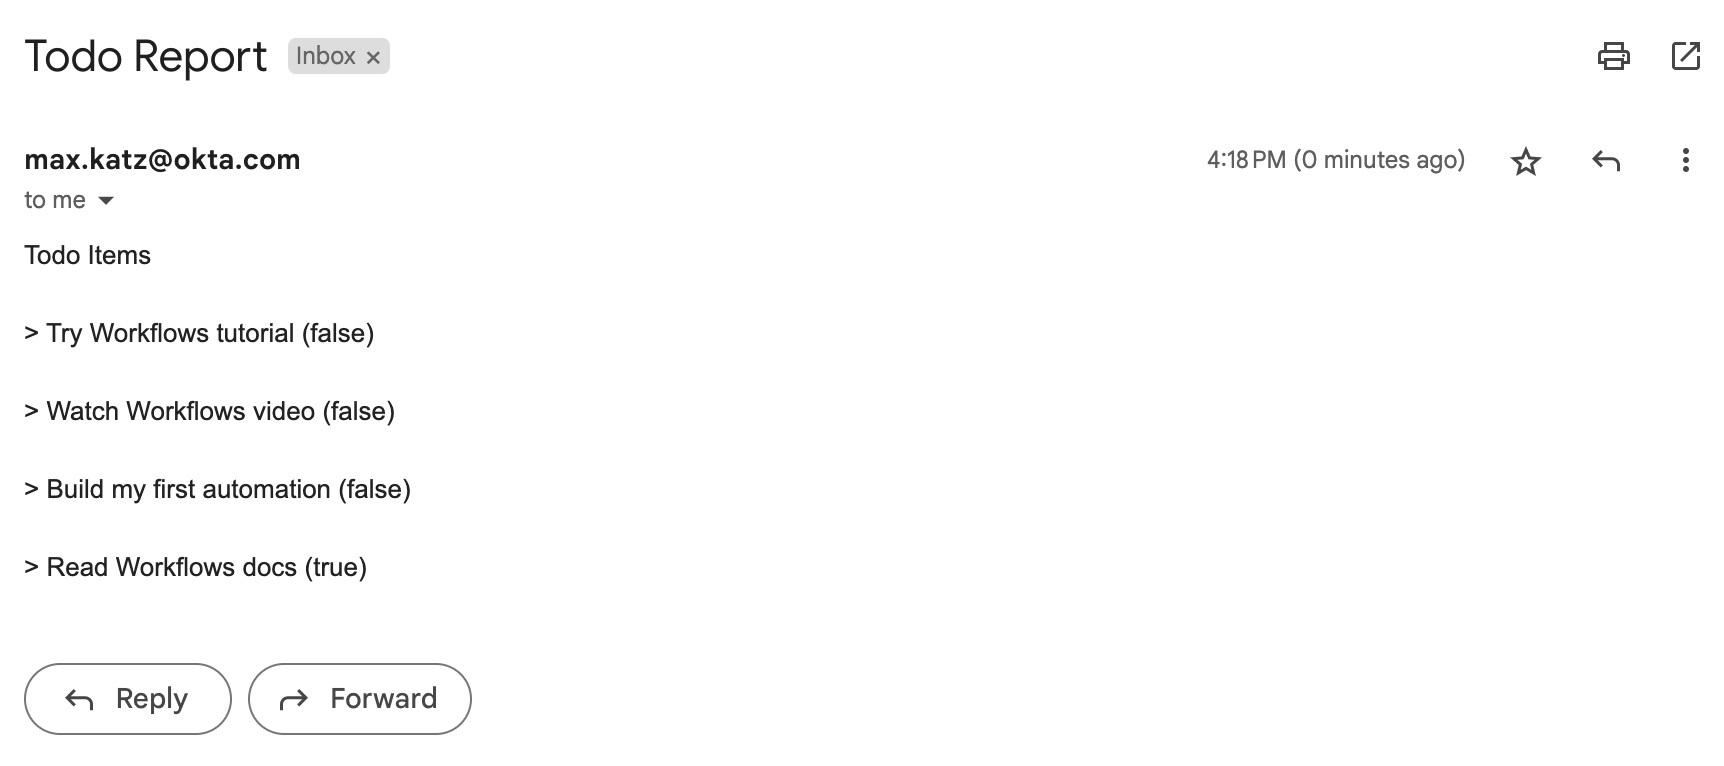
You need to add a report that summarizes all the Todo items for your organization and automatically emails the report once a week.
The email report looks like this:
In this workshop, you’ll enhance the SaaS Todo application by creating an automated report using Okta’s no-code Workflows platform.
You will complete the following steps:
- Building an Okta Workflows flow and automation
- Scheduling the flow to run periodically
- Enhancing an SaaS Todo application with a new API service
- Calling the API service to retrieve todos items from an application
- Creating a todo summary and sending the summary via email
- Testing the flow
The workshop uses a local application to make it straightforward to connect to its API without needing to deploy the application in the cloud.
The local setup is for demonstration purposes only. In the real world, the application would be deployed in the cloud.
| Posts in the enterprise-ready workshop series |
|---|
| 1. How to Get Going with the On-Demand SaaS Apps Workshops |
| 2. Enterprise-Ready Workshop: Authenticate with OpenID Connect |
| 3. Enterprise-Ready Workshop: Manage Users with SCIM |
| 4. Enterprise Maturity Workshop: Terraform |
| 5. Enterprise Maturity Workshop: Automate with no-code Okta Workflows |
| 6. How to Instantly Sign a User Out across All Your App |
What is Okta Workflows?
Okta Workflows is a no-code platform that allows building automations to help with identity processes.
The following are use cases where you can use Workflows.
Provision and deprovision app accounts
When an employee joins your company, Workflows simplifies the task of provisioning their account.
- Automatically create their identity in your apps
- Set user and group entitlements
- Assign shared folder
- Send a message to their manager or a welcome message to the team Slack channel
Similarly, when an employee leaves the company, Workflows can deactivate the user account, transfer their digital assets to a manager, and then deactivate the user account three days later.
Sequence actions with logic and timing
Workflows can create non-activated accounts in all apps one week before a new employee’s start date and then activate them on their first day.
If an employee leaves your company, Workflows can deactivate the user account, remove their access to all apps except payroll, and then delete the account after a year.
Send notifications for lifecycle events
For a lifecycle event such as an app assignment or user suspension, Workflows can notify your IT team through email or Slack.
Log and share lifecycle events
\Workflows can query Okta APIs and System Log events, run logic, and even compile data into a CSV file. Then, Workflows can email that file to your teams.
This is a short list of what is possible.
Okta Workflows flows
In Workflows, you will create flows. A flow is a sequence of steps to complete a goal. It’s similar to a script where every code line is a step to complete a goal. In Workflows, you will build the flow visually without writing any code.
You will learn about the Workflows building blocks in a few minutes. First, let’s create your first flow.
Getting access to Okta Workflows
There are two ways to access Workflows.
- You might be entitled to Workflows if you already use some Okta products
- Access to Workflows as part of WIC (Workforce Identity Cloud) trial
Workflows when using other Okta products
If you have Okta SSO or Okta UD you might be entitled to Workflows. Check if you can access Workflows by going to Okta organization > Admin > Workflows > Workflows console. If you use these products but don’t have access to Workflows, please contact your account manager.
Okta Workflows as part of WIC (Workforce Identity Cloud) trial
To sign up for a Workforce Identity Cloud trial:
- Go to the Okta Workforce trial page
- Register for a trial to access Workflows
Opening the Okta Workflows console
To access Workflows:
- Sign in to your Okta org
- If you are using a trial, your org URL can be found in an email with the Activate your Okta account subject
- It has the following format:
https://trial-<ID>.okta.com. For examplehttps://trial-6093533.okta.com
- Click Admin (upper right) to access the Admin console
- On the right-hand side menu, click Workflows > Workflows console to open Workflows
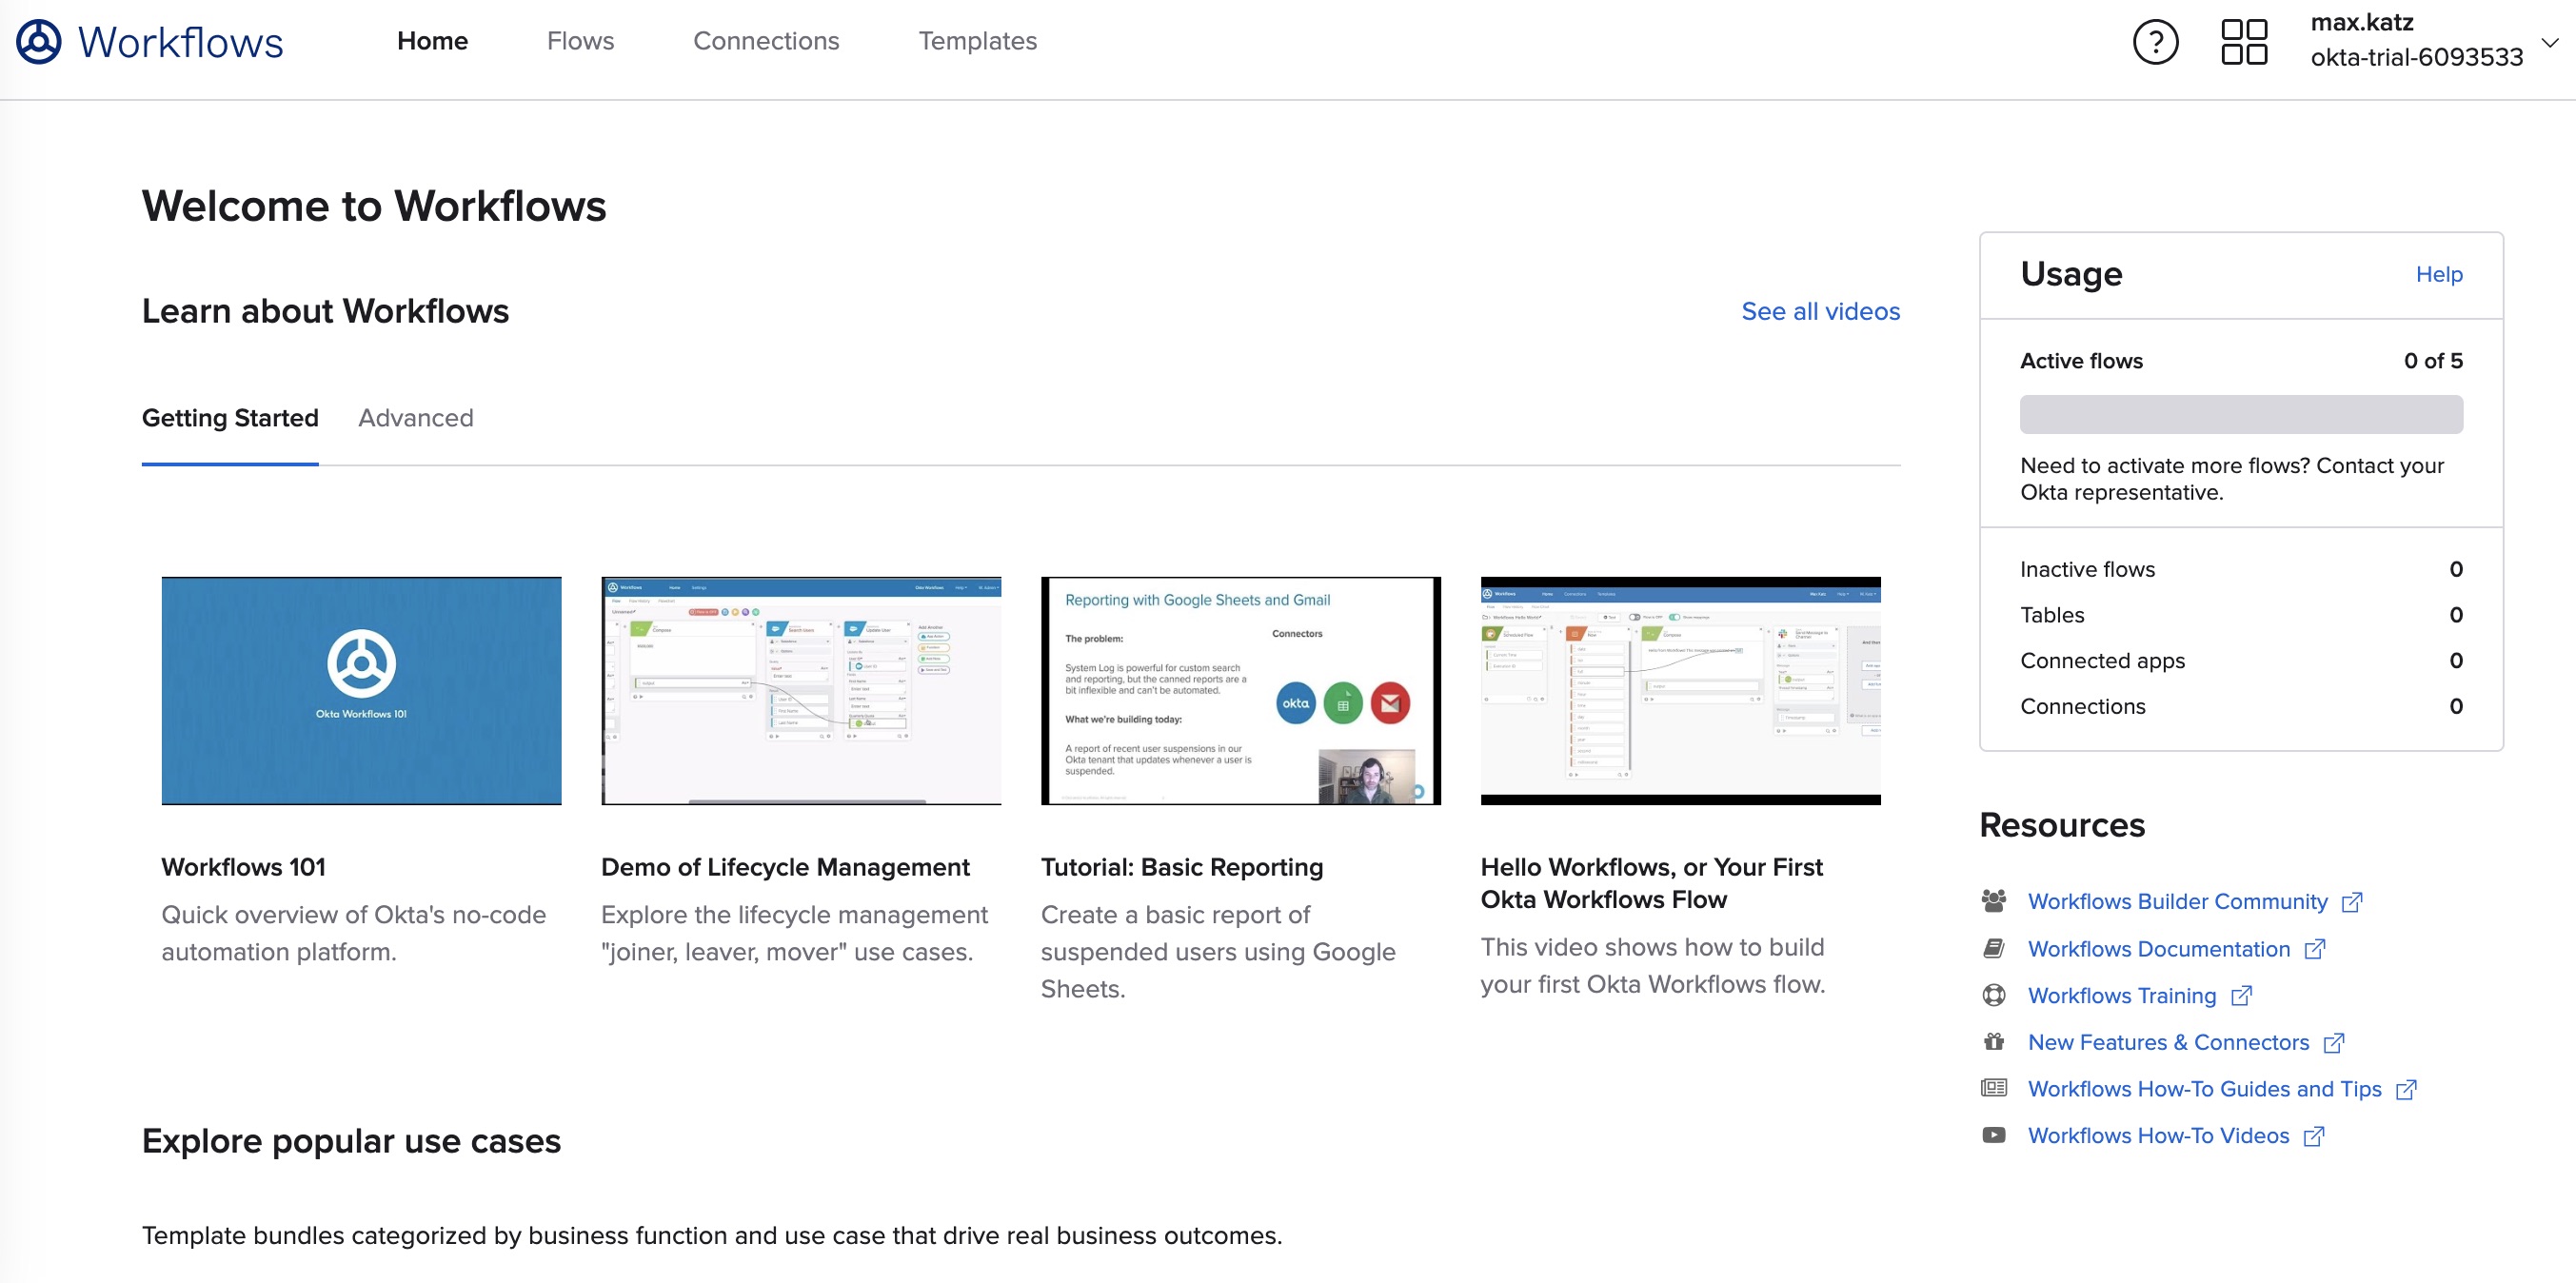
You will see the Workflows home page:
Creating a flow
To start, you will create a new flow.
- In the Workflows console, click Flows in the top navigation menu
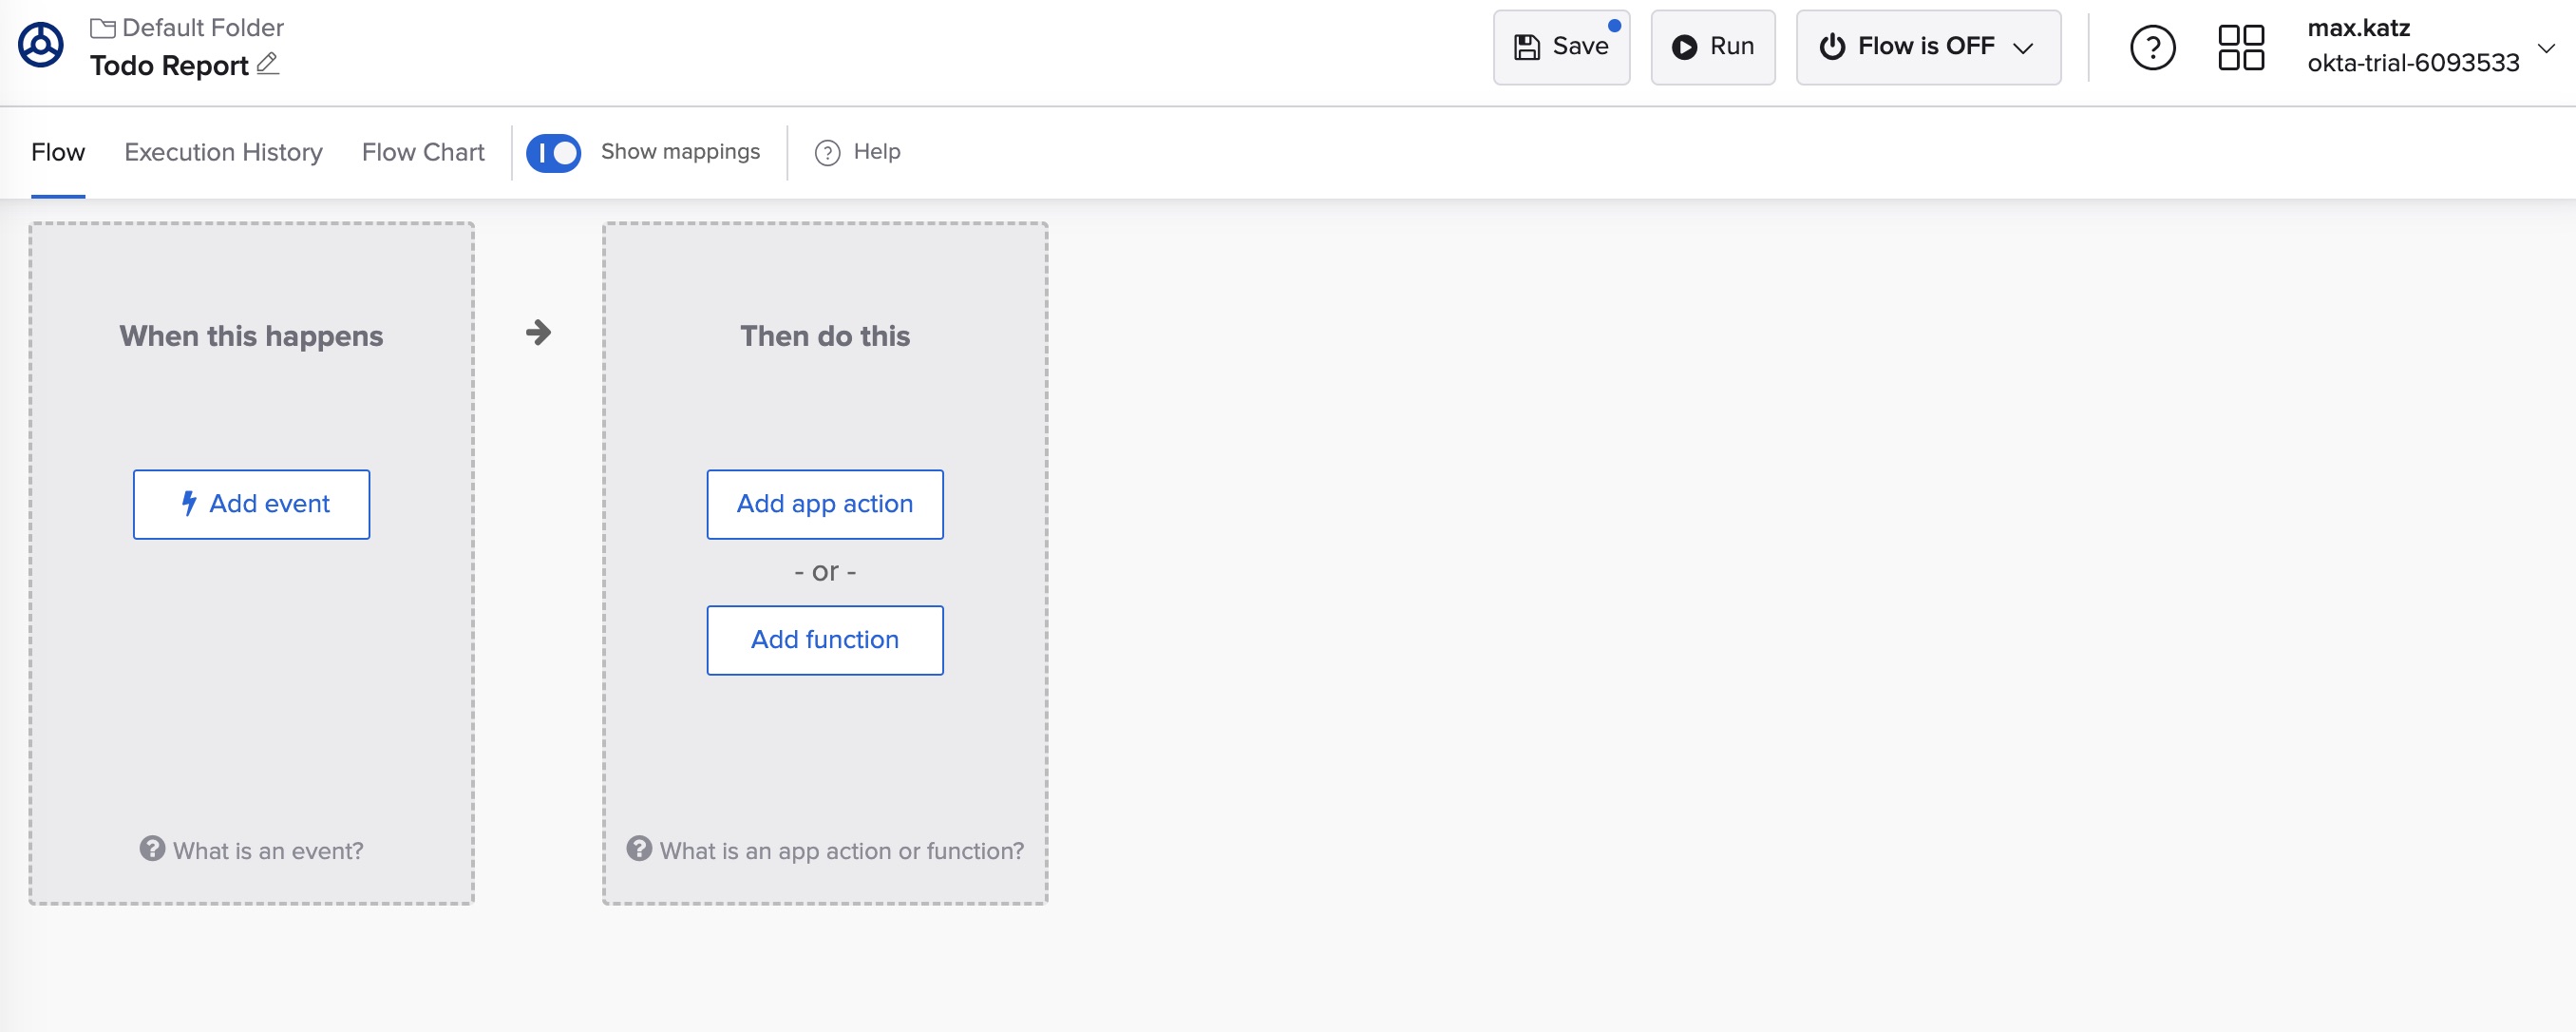
- Inside the Default Folder, click the + New Flow to create a new flow
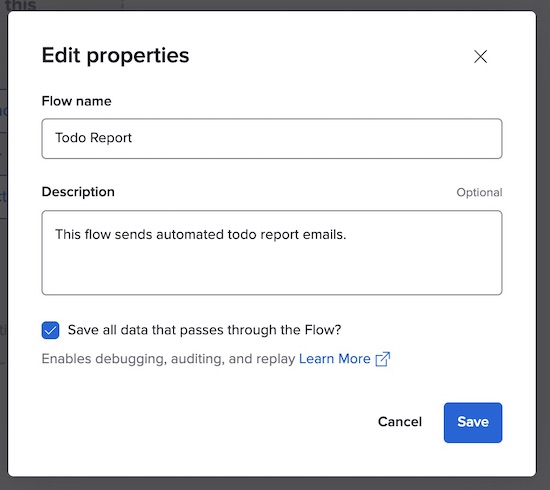
- Click Unnamed (upper left corner)
- For the name, enter Todo Report
- It is also a good idea to enter a description This flow sends automated Todo report email.
- Check the Save all data that passes through the Flow? checkbox. You will be using this capability later in this tutorial
- Click Save to save the flow name and description
Congratulations, you created a Workflows flow.
Okta Workflows building blocks
Before building the flow, you should learn about Workflows building blocks.
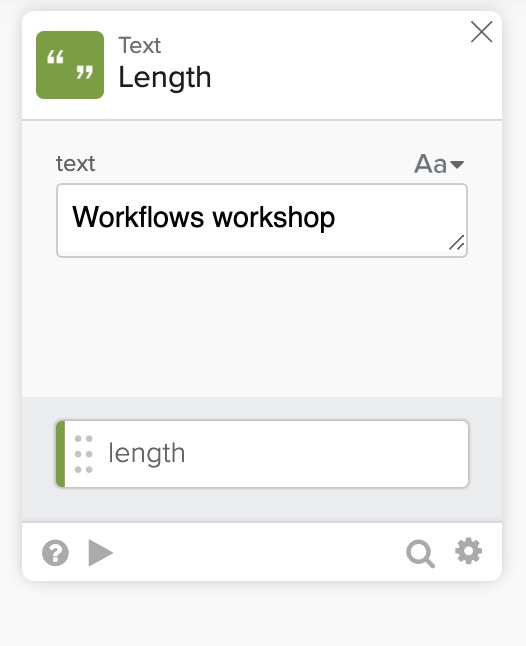
Each card represents one step in a flow.
A card has two types of fields: input and output. Input fields accept values. Output fields are values a card produces, which can be passed to subsequent cards.
This is an example of the Text - Length card. This card calculates and returns the number of characters in a text string.
- The text field is the card’s input
- The length field is the card’s output (the lower grey area)
There are two types of cards:
- App action cards are steps that control other applications or web services. For example, Gmail, Slack, and Jira
- Function cards are steps to interact with, change, or control the data in a flow. Some examples of functions cards:
- True/False: Evaluate values based on true or false conditions
- Flow Control: Manage and manipulate the structure of your flow
- Date & Time: Parse and manipulate times and dates
- List: Create and iterate over lists of items
- Number: Perform mathematical operations
- Text: Build, modify, and parse text
Here is again what you are going to build:
- Calling an API service to retrieve all the todo items
- Creating a message from all the todo items
- Emailing the message
- Set up the flow to run on schedule
Before building the flow, you need to get the Todo application.
Setting up the Todo application
In this section, you will complete the following steps:
- Getting the Todo application
- Installing application dependencies
- Creating the database
- Adding an organziation to the application
- Running the application
If you would like to skip the Setting up the Todo application and Enhancing the application with a new API steps and jump to the Workflows part, check out the fully built project on GitHub.
Getting the Todo application
In this step, you will get the Todo application.
Read about the tools required for this application in How to Get Going with the On-Demand SaaS Apps Workshops
There are two ways to get the Todo application:
Option 1: Clone the repository
- Clone the Todo application that already has OIDC support implemented.
- Run the following command
git checkout oidc-workshop-complete
Option 2: Download the application
- Go to the okta-enterprise-ready-workshops GitHub page
- Open the menu for the green <> Code button and select Download Zip
Installing application dependencies
- Navigate to the folder where you cloned or downloaded the Todo application
- If you downloaded the zip file, unzip the application file
- Run the following commands to install application dependencies:
npm ci
npm install passport-http-bearer
npm install @types/passport-http-bearer -D
Creating the database
Run the following command to generate a database and seed it with two users.
npm run init-db
The command will write the application user names and passwords to the console.
Adding an organziation to the application
In a later step, you will enhance the application with a new API service to get all the todo items. The new API retrieves all the todo items belonging to an organization.
In this step, you will set up an organization in the application database.
To launch the database viewer:
- In a new terminal tab or window, run the following command from the application folder:
npx prisma studio
You will see the following message:
Prisma Studio is up on http://localhost:5555
In a new browser window, go to http://localhost:5555 to view the database. The screenshot below shows the application database. The database has two users.
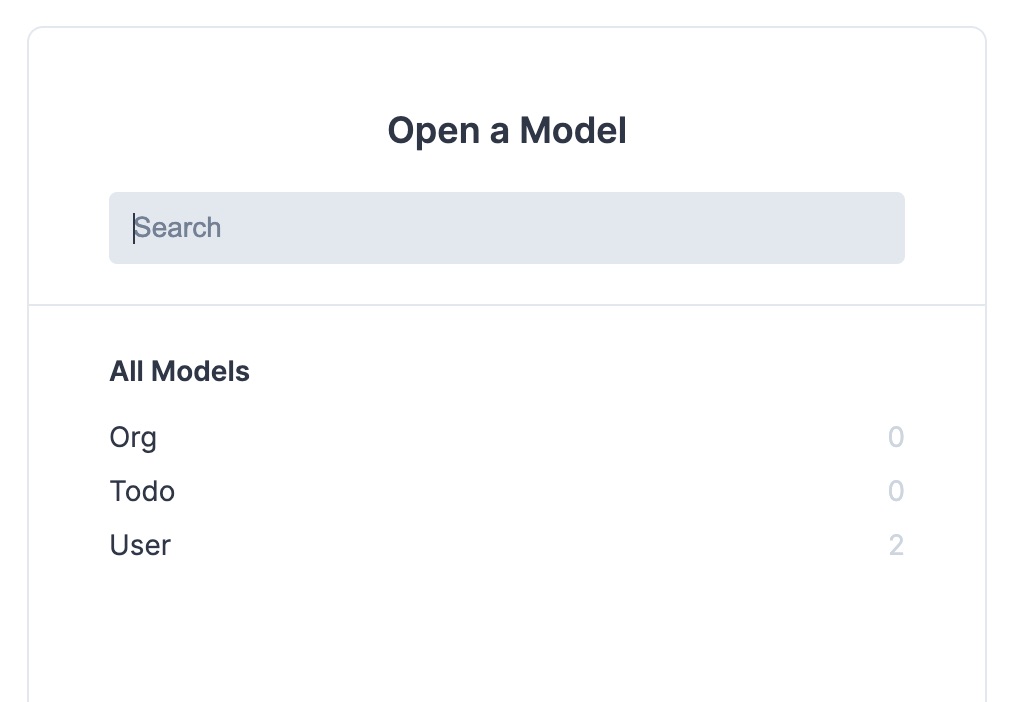
To create a new organiziation in the application database:
- Click on the Org model
- Click Add record to add a new record
- In the domain column, enter matrix.fake
- In the apikey column, enter 131313 (you might need to scroll to the right to see this column)
- In the User column, click on 0 User and select both users to add to this organziation (click outside the list to close it)
- Click Save 1 change button to save the new organization and its API key
The organziation record should look like this (some columns are filtered/hidden to show domain, API, and User columns)

You are ready to start the application and create the todo items.
Running the application
To start the Todo application, run the following command from the application folder:
npm start
The create serveral todo items:
- In a browser, go to http://localhost:3000
- Sign in to the application
- Use one of the users written to the console in step Creating the database
- Enter several todo items
You can also use Prisma Studio to view the todo items in the database.
Enhancing the Todo application with a new API
In this step, you will add an API service to get all the items belonging to an organization. You will also add authentiation to the API service.
The automation you will create later in this workshop will use this API service to retrieve the todo items and generate a report.
- In the application folder, open the file
apps/api/src/main.tsin your favorite editor or IDE
Importing the library for API authentication
- At the very top of the file, you will see several import statments. After the last statment, add the following code:
import passportBearer from 'passport-http-bearer';
This module allows authenticating HTTP requests using bearer tokens.
Setting up bearer token authentication strategy
- Go to the end of
main.tsfile and add the following code:
// Workshop code start
const BearerStrategy = passportBearer.Strategy;

passport.use(new BearerStrategy(
  async (apikey, done) => {
    const org = await prisma.org.findFirst({
      where: {
        apikey: apikey
      }
    });

    return done(null, org);
  }
));
This code sets up an authentication strategy using an HTTP bearer token.
We are using the keys to look up the associated orgs. The way this is set up, it supports scaling across customers.
Adding the API endpoint for retrieving todo items
- Right after the code above, add the following code:
app.get('/api/org/todos',
  passport.authenticate('bearer'),
  async (req, res) => {
    const todos = await prisma.todo.findMany({
      where: {
        orgId: req.user['id']
      }
    });
    res.json({todos});
});
// Workshop code end
This code retrieves all the todo items belonging to an organization.
Save the changes.
If you look in the terminal where you started the application, you will see a message that the application detected changes and restarting.
There is one last step before you start building the automation. In the next section, you will launch an API tunnel.
Launching the API in a local tunnel
Workflows runs on the cloud, and this application runs locally on your computer. For Workflows to call the API on your local machine, you need to create a tunnel.
In a new terminal window (or tab), run the following command to start the tunnel:
npx localtunnel --port 3333
The command output will be a random URL in the following format:
your url is: https://some-name.loca.lt
For example:
your url is: https://swift-waves-hammer.loca.lt
You will be using this URL later. If you restart the tunnel, a new URL will be created that you need to use in your flow.
You might see different tunnel URLs used in images in this workshop.
You are ready to build the automation!
Building the Todo Report flow
In this section, you will complete the following steps:
- Calling the API service
- Creating the message
- Sending the message via email
- Setting up the flow to run on schedule
Calling the API service
In this step, you will add a card to call the API to retrieve all the todo items.
Creating a connection to the API service
In this step, you will create a connection to the API service.
- Return to the flow you created
- Click Add function > find the API Connector (HTTP) section > select the Get card
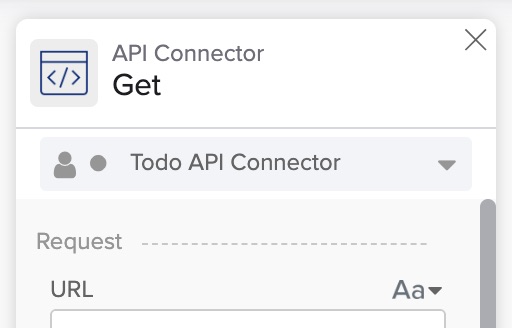
- Click + New Connection to create a connection to the API
- For Connection Nickname, enter Todo API Connector
- For Auth Type, select Custom
- For Header Name, enter Authorization
- For Header Value, enter Bearer 131313
- Click Create to create a connection
The card API connection is shown at the top:
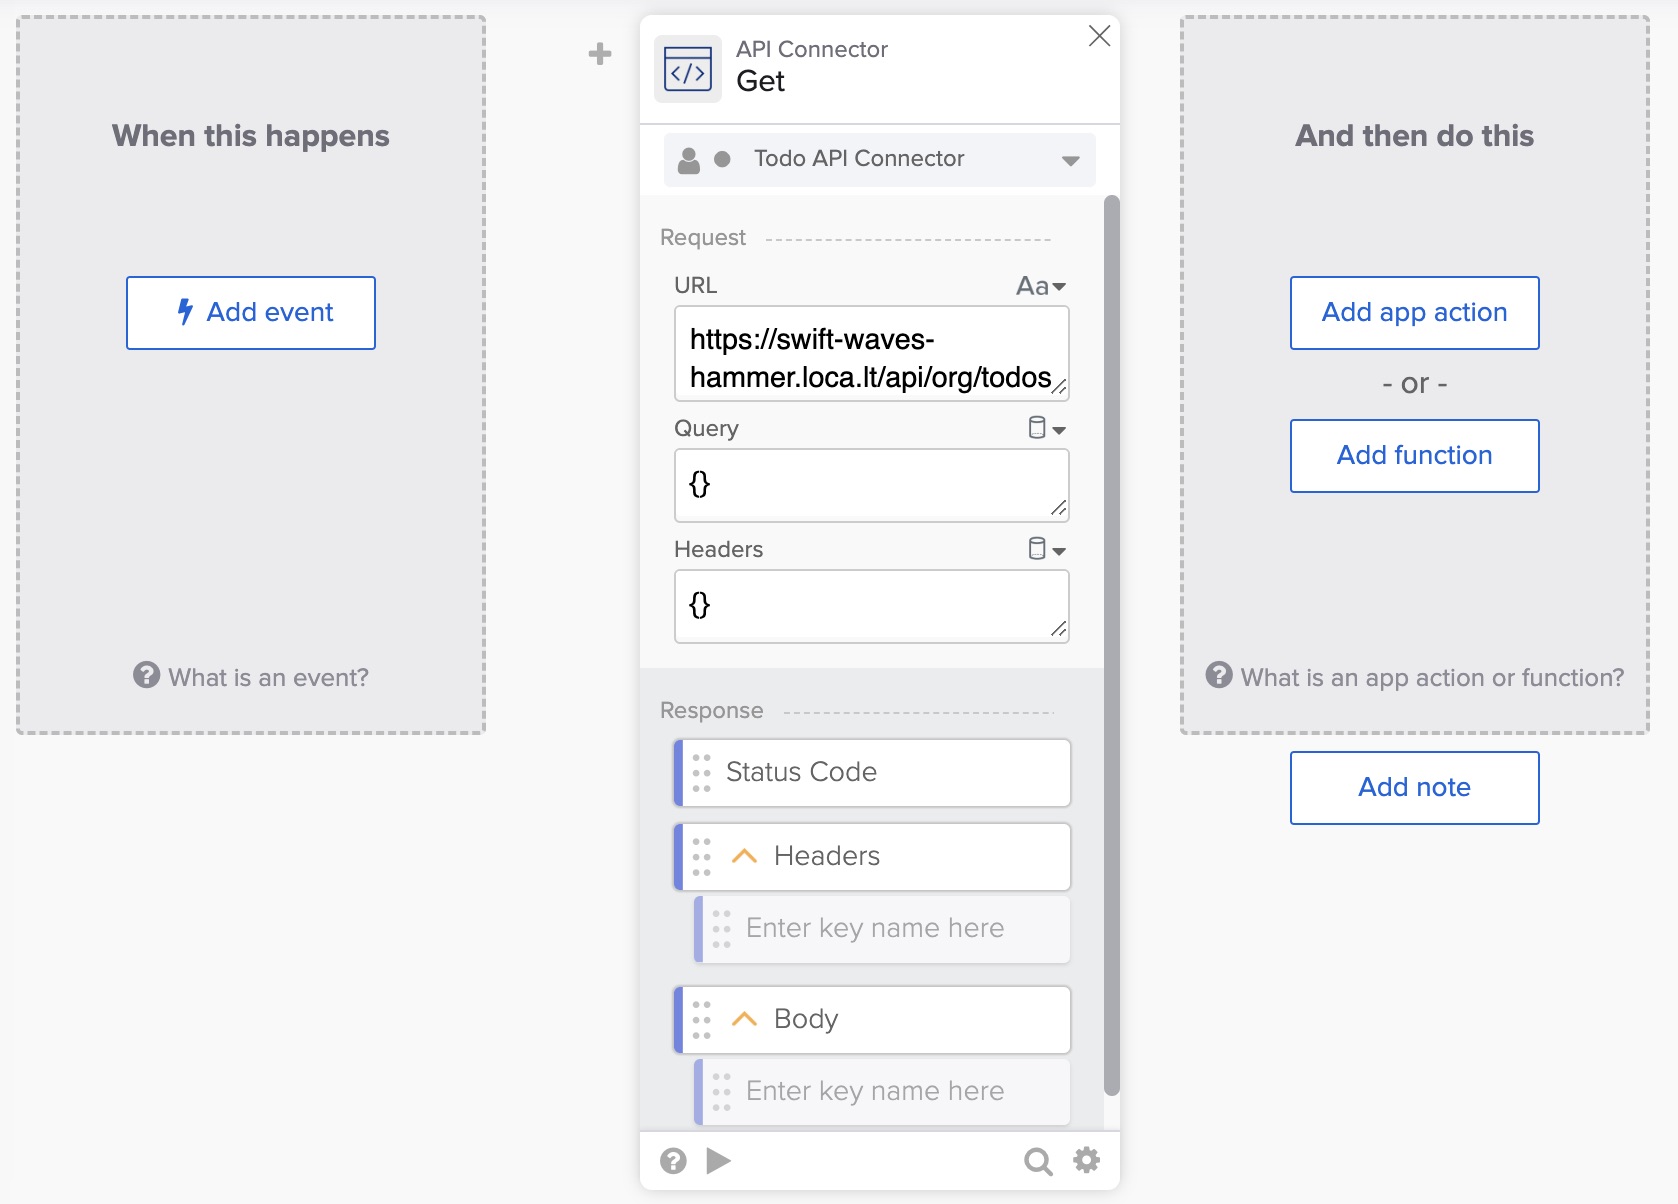
Setting the service URL
In this step, you will set the service URL.
- For the URL field, enter the tunnel URL from step Opening application API with a tunnel and append the
/api/org/todosendpoint.
For example:
https://swift-waves-hammer.loca.lt/api/org/todos
The tunnel URL will change whenever you restart the tunnel.
Click the Save button to save changes.
The API Connector - Get card looks like this:
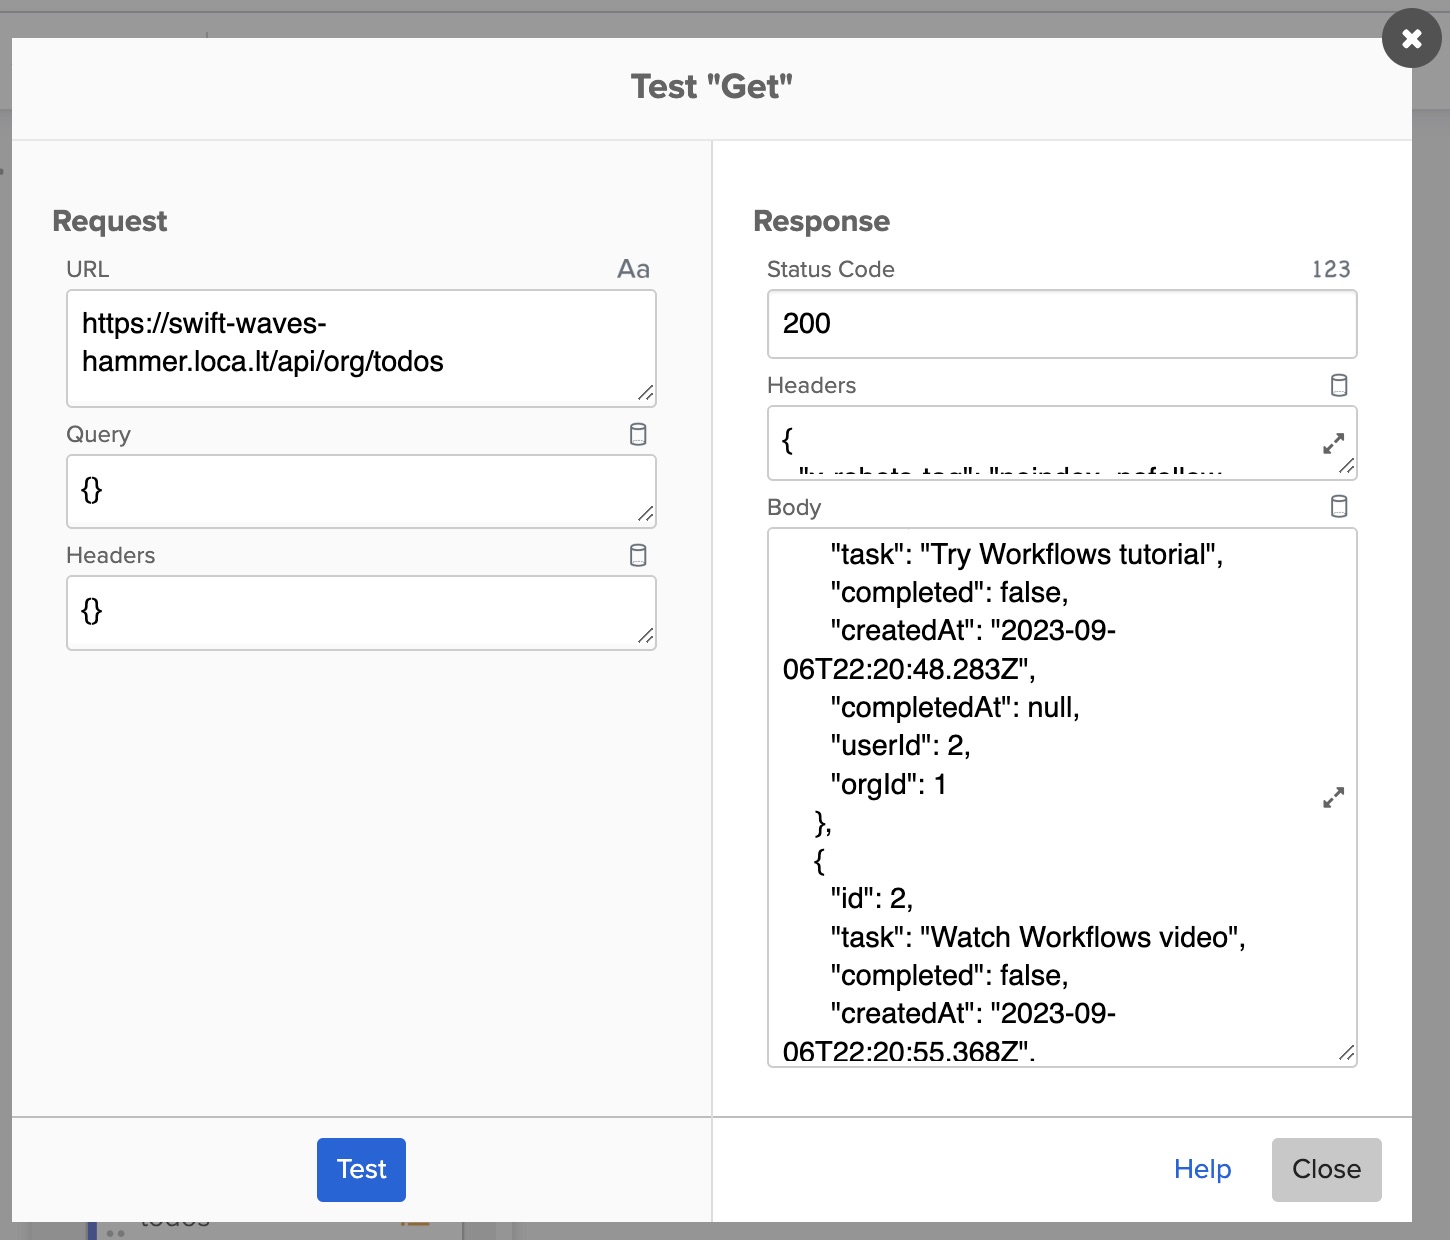
Testing the card
To test the API Connector - Get card:
- Click the ▶️ button at the bottom of the card
- Press Test to test the card and the API service
- Expand the Body field to see the tasks from the application
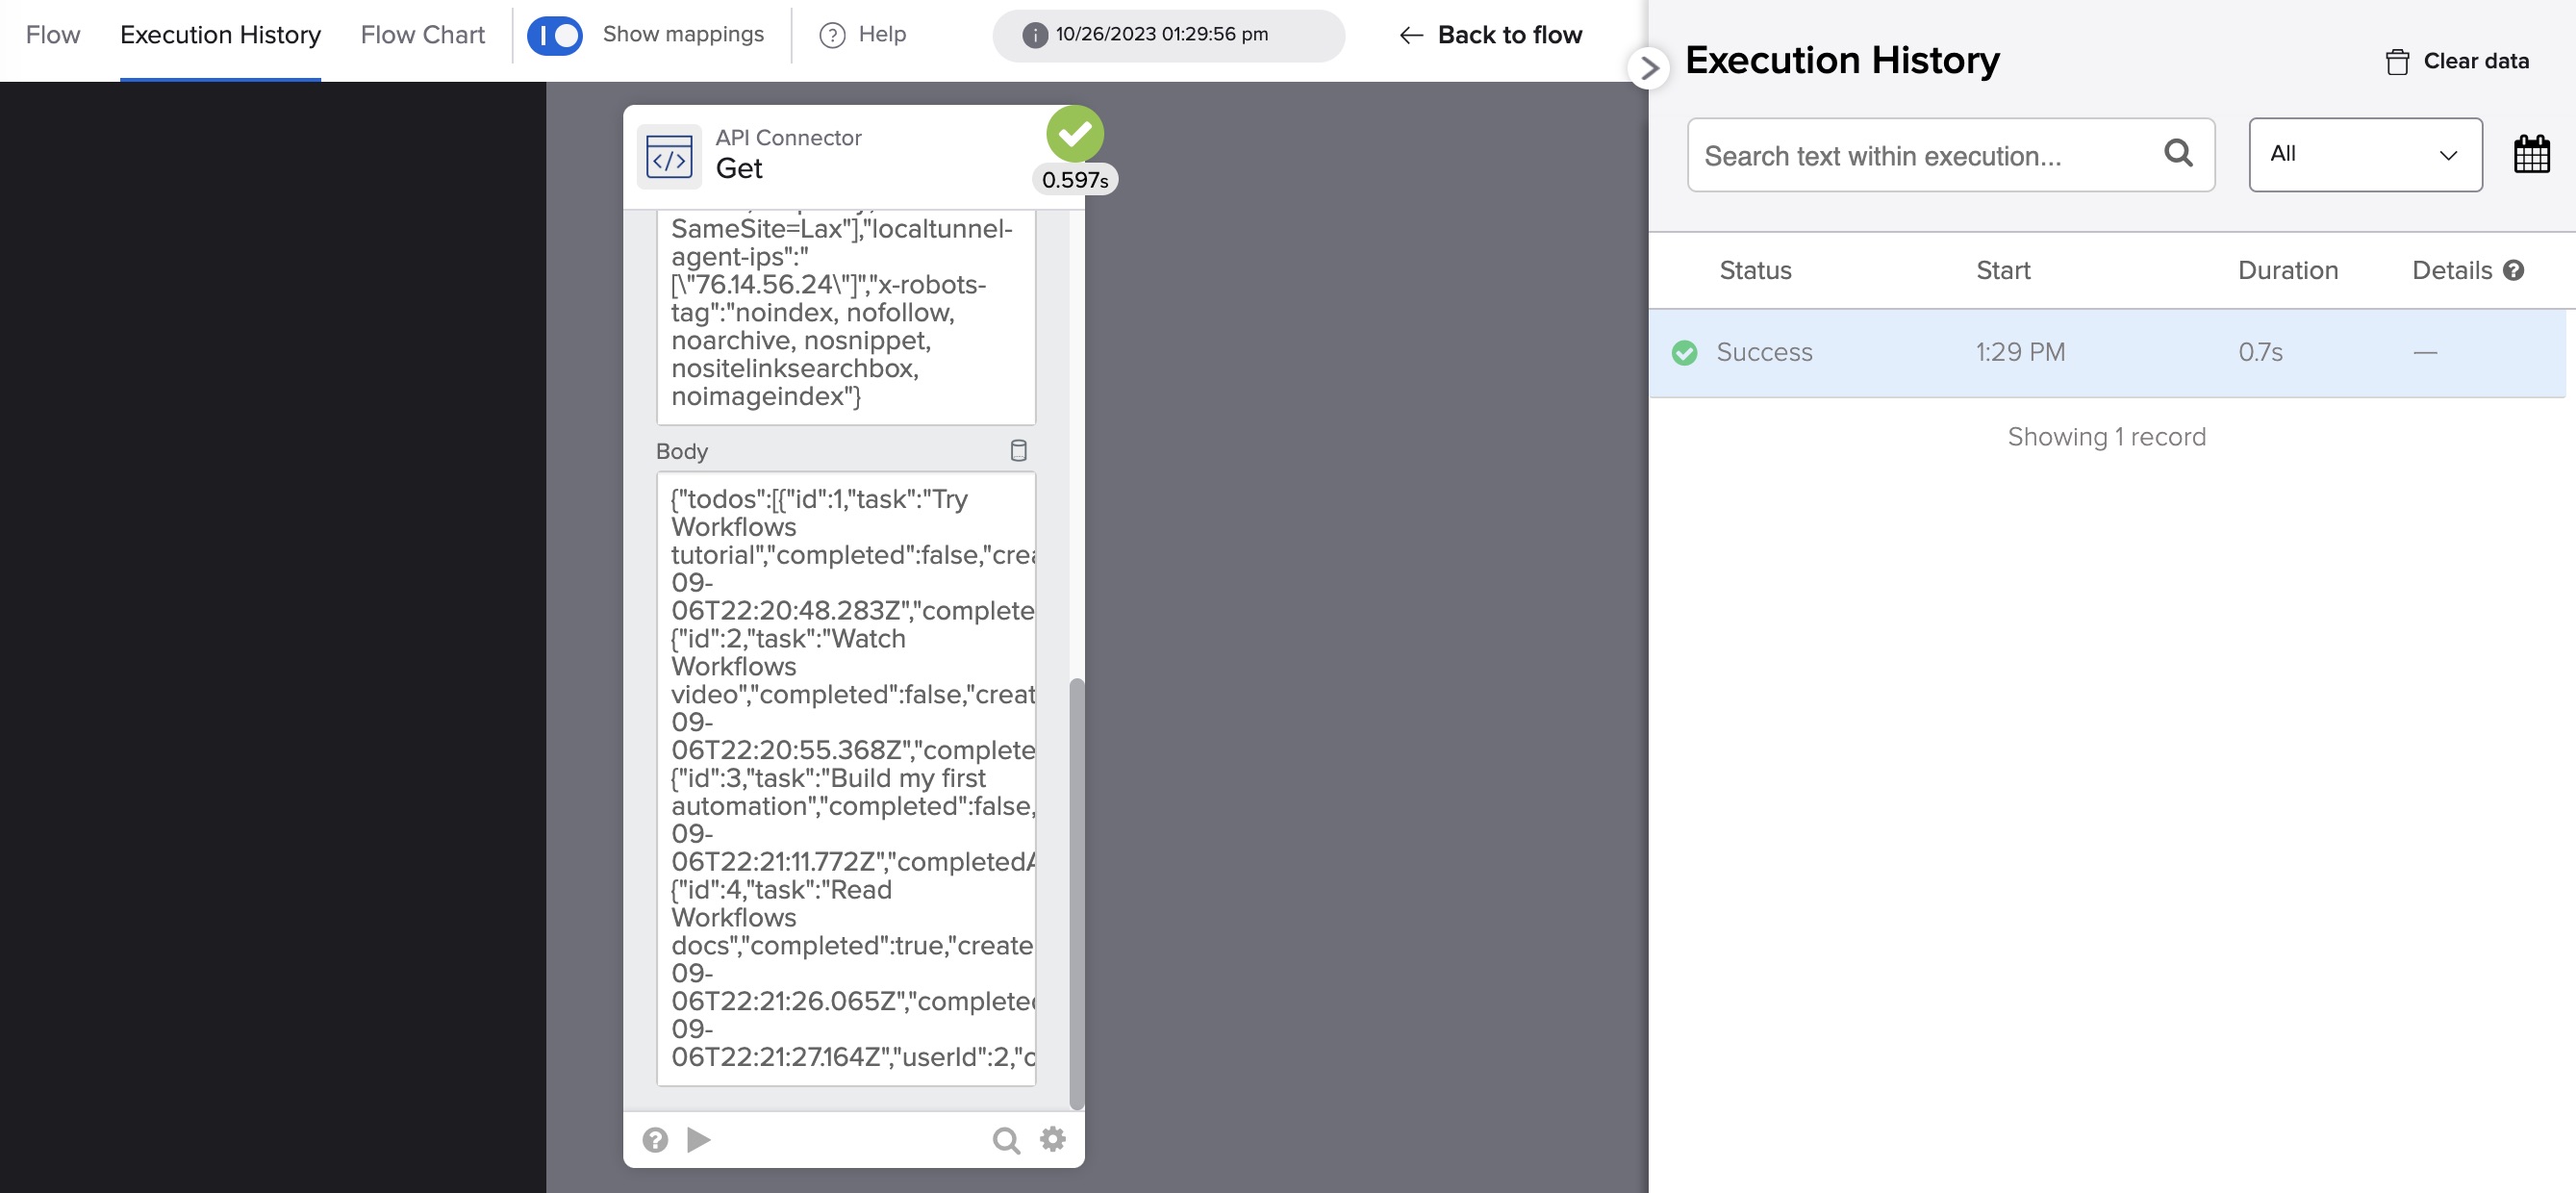
To test the flow:
- Click the Close button to go back to the
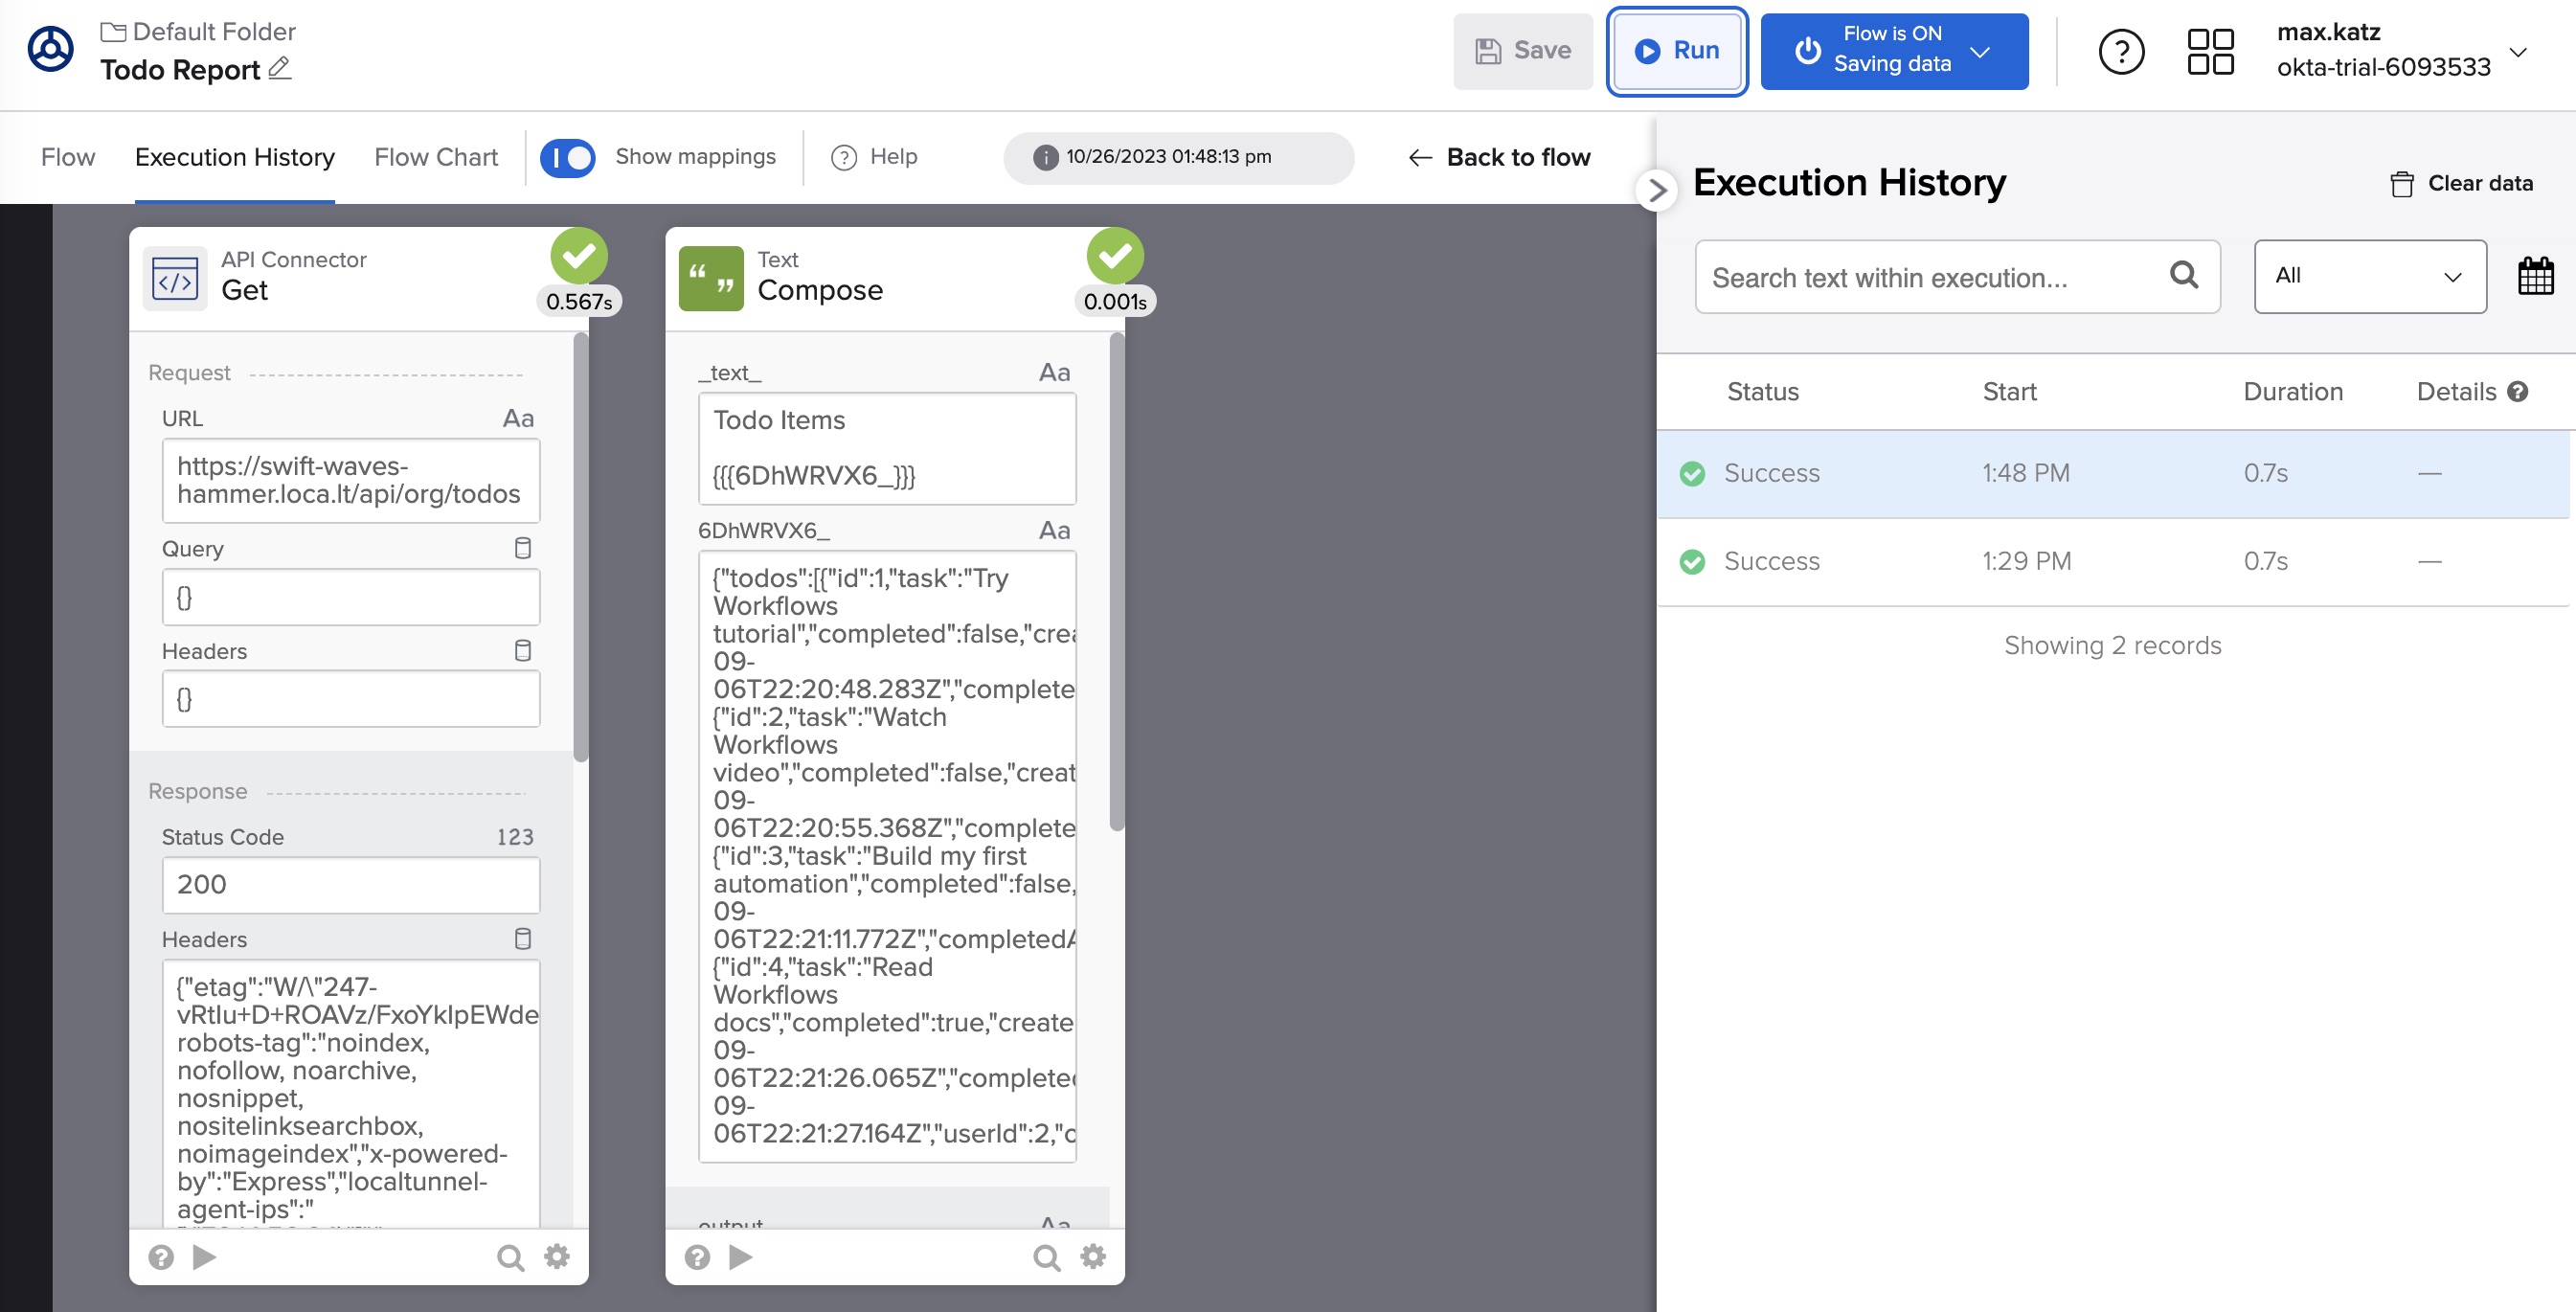
- Click the Run button in the toolbar to run and test the flow
The Execution History page shows data passed from card to card for each card flow.
In the next section, you will create the text message.
Creating the message
In this step, you will create a text message to send via email. Later, you will modify the message to include a list of all the todos.
- In the flow editor, click Add function > Most popular (category) > Compose
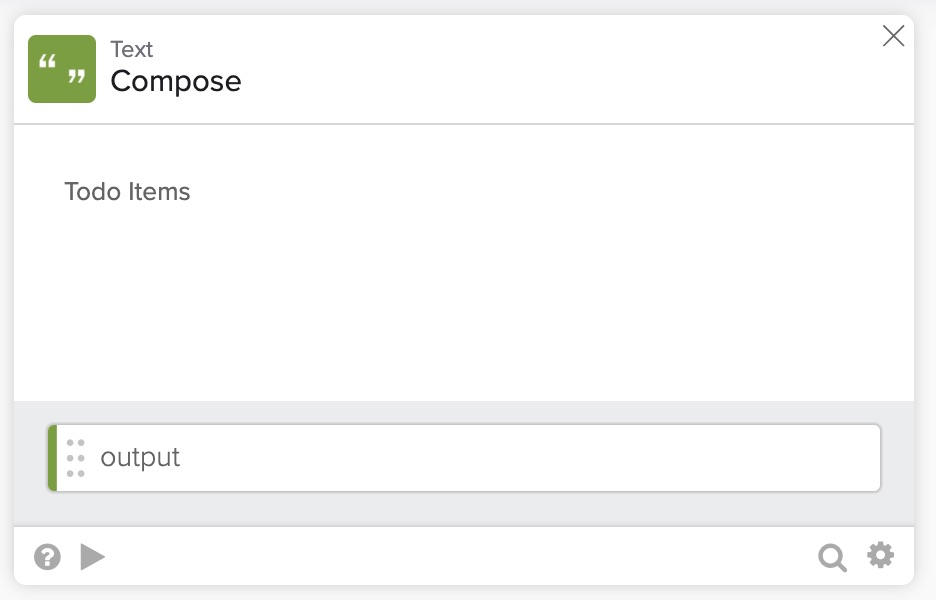
- In the Compose card, enter the following text:
Todo Items
Function cards are steps to interact with, change, or control the data in a flow
The Compose card looks like this:
You can test the Compose card. Click the ▶️ button at the bottom of the card.
Now, let’s take the output from the API Connector - Get card and pass it to the Compose card. The output is not formatted-friendly, but we will fix it later.
- Take the Body field from the Get card and pass it over to the Compose card, placing it under the current text
- Place the cursor after Todo Items and press enter to create more space between the lines if needed
Click the Test button at the top of the flow to test it.
You will see the output in the Compose card. It’s not formatted (plain JSON for now), but that’s OK. You will fix it in a later step.
Now that you have two cards on a flow, using the Flow History, you can see how data is passed from card to card.
For now, you build a flow that calls an external API service and displays the output.
Next, you are going to add a step to email the result.
Next, let’s work on emailing the message.
Sending the message via email
In this step, you will add a card to send the message you created in the previous step.
Adding the Gmail card
To email the message, you will use the Gmail card.
- Click Add app action
- Find the Gmail app
- Find and click on the Send Email action
- Click + New Connection and follow the steps to authenticate your Gmail account
- You need to have access to a Google Workspace account to use this card (not a personal Gmail account)
App action cards are steps that control other applications or web services. For example, Gmail, Slack, and Jira.
The card looks like this:

Next, you need to set fields on the Send Email card.
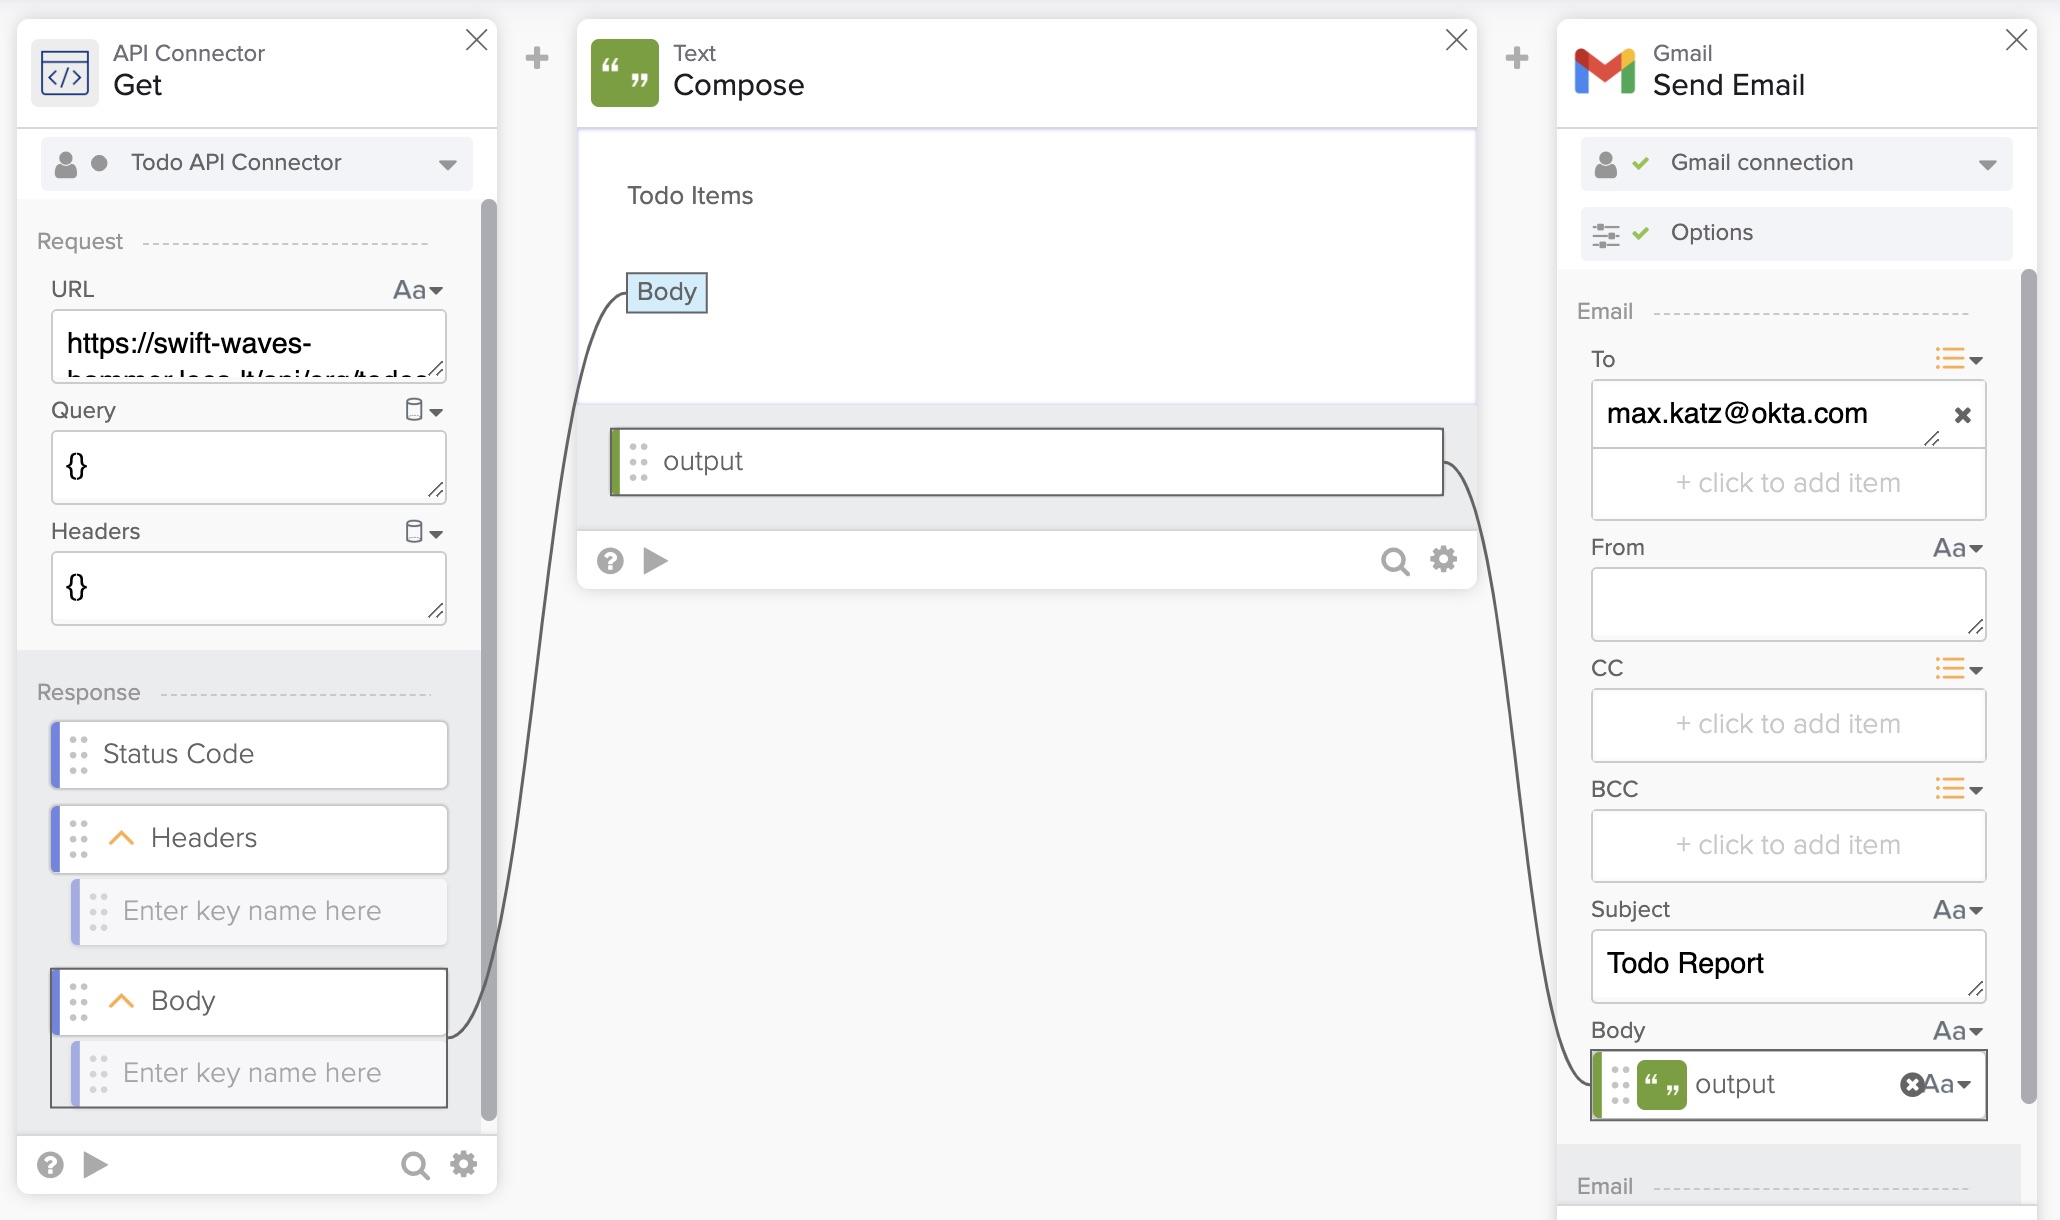
Setting up the Gmail card
- For the Email field, enter your email (or any other email you can check)
- For the Subject field, enter Todo Report
- For the Body field, connect the output field from the Compose card to the Body field in Send Email card
- All other fields are optional
Testing the Gmail card
To test the Send Email card:
- Click the ▶️ button on the card. You only need to enter the Body field
- All other fields will carry the information you entered.
- Enter any text, and click the Test button
- Check your email
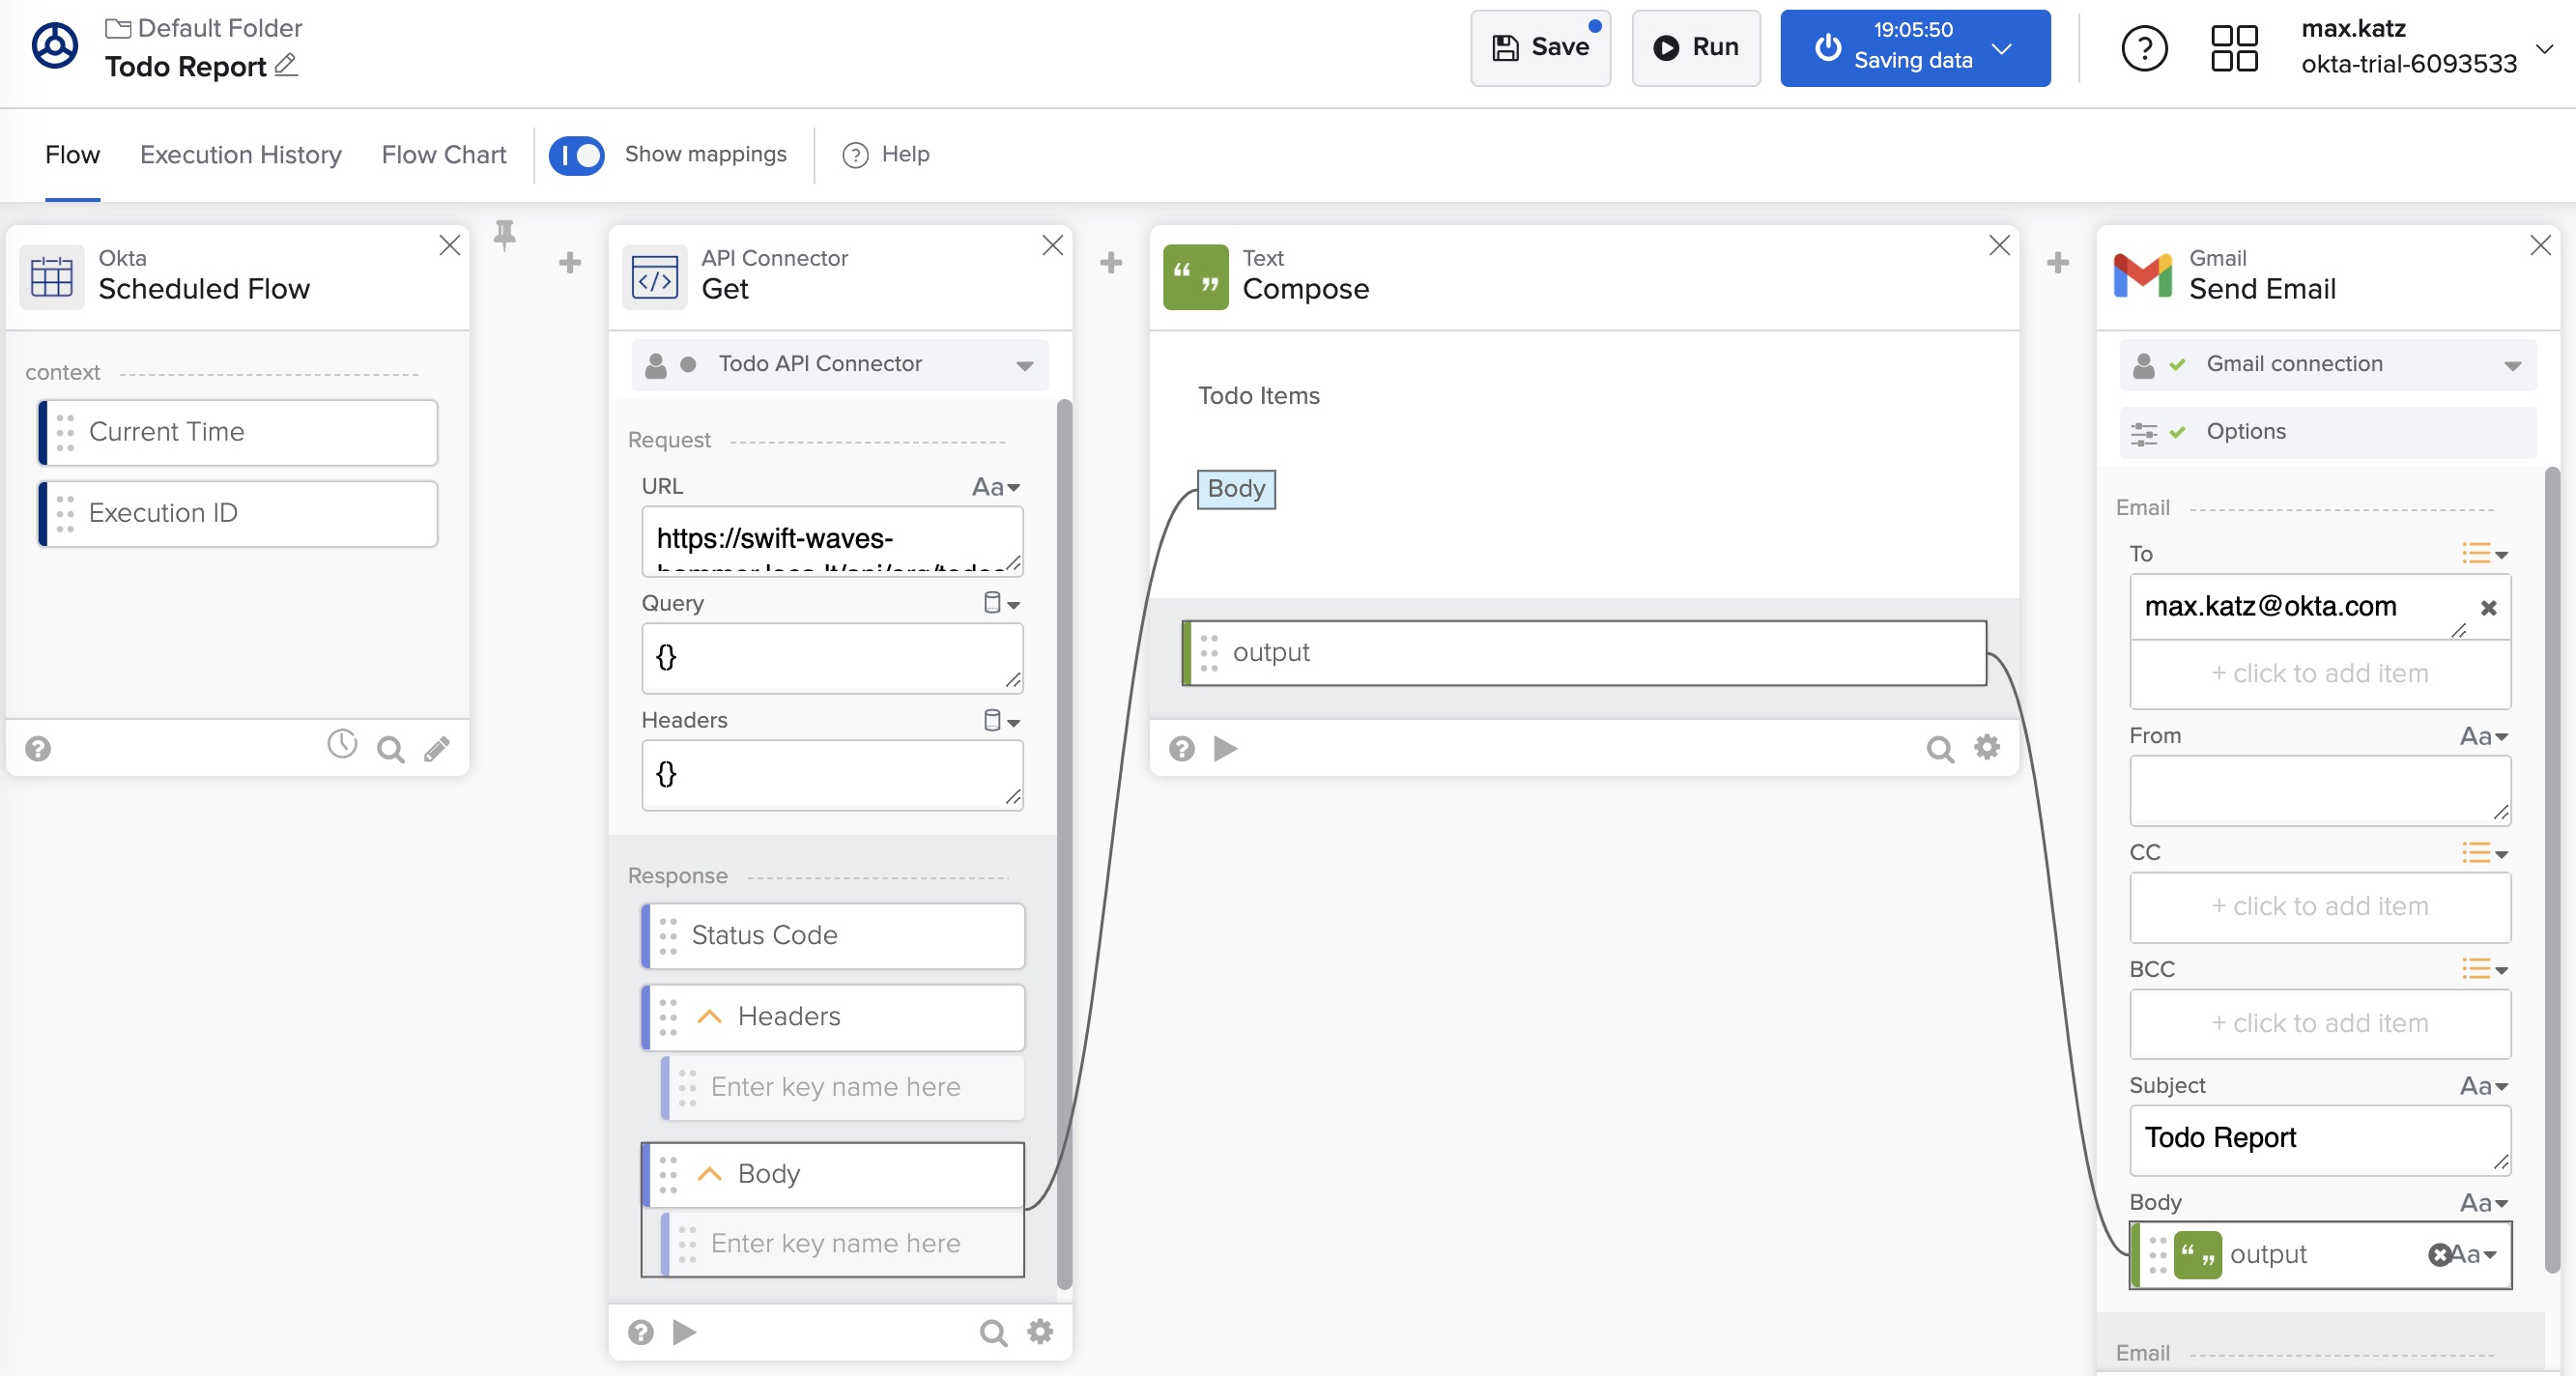
Testing the flow
The flow looks like this:
To test the flow, click the Run button and check that you received the email.
The email looks like this:
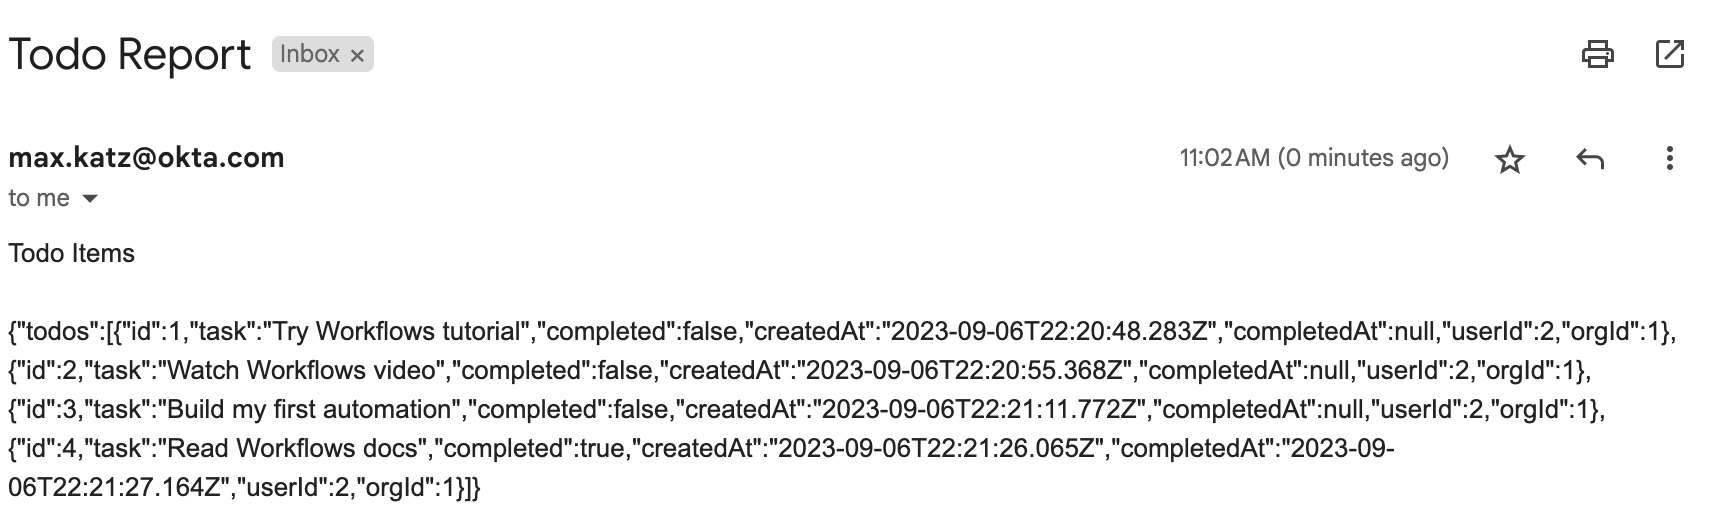
The email is not formatted yet. But it’s neat that you can call an API, create a message, and email it without writing any code.
There is one last step left before we make the message look pretty. The step is to make this flow run automatically.
Set up the flow to run on schedule
In this step, you will configure the flow to run on schedule.
- In the flow editor, move to the beginning of the flow, to the area before the API Connector - Get card
-
In the box where it says When this happens, click the Add event button
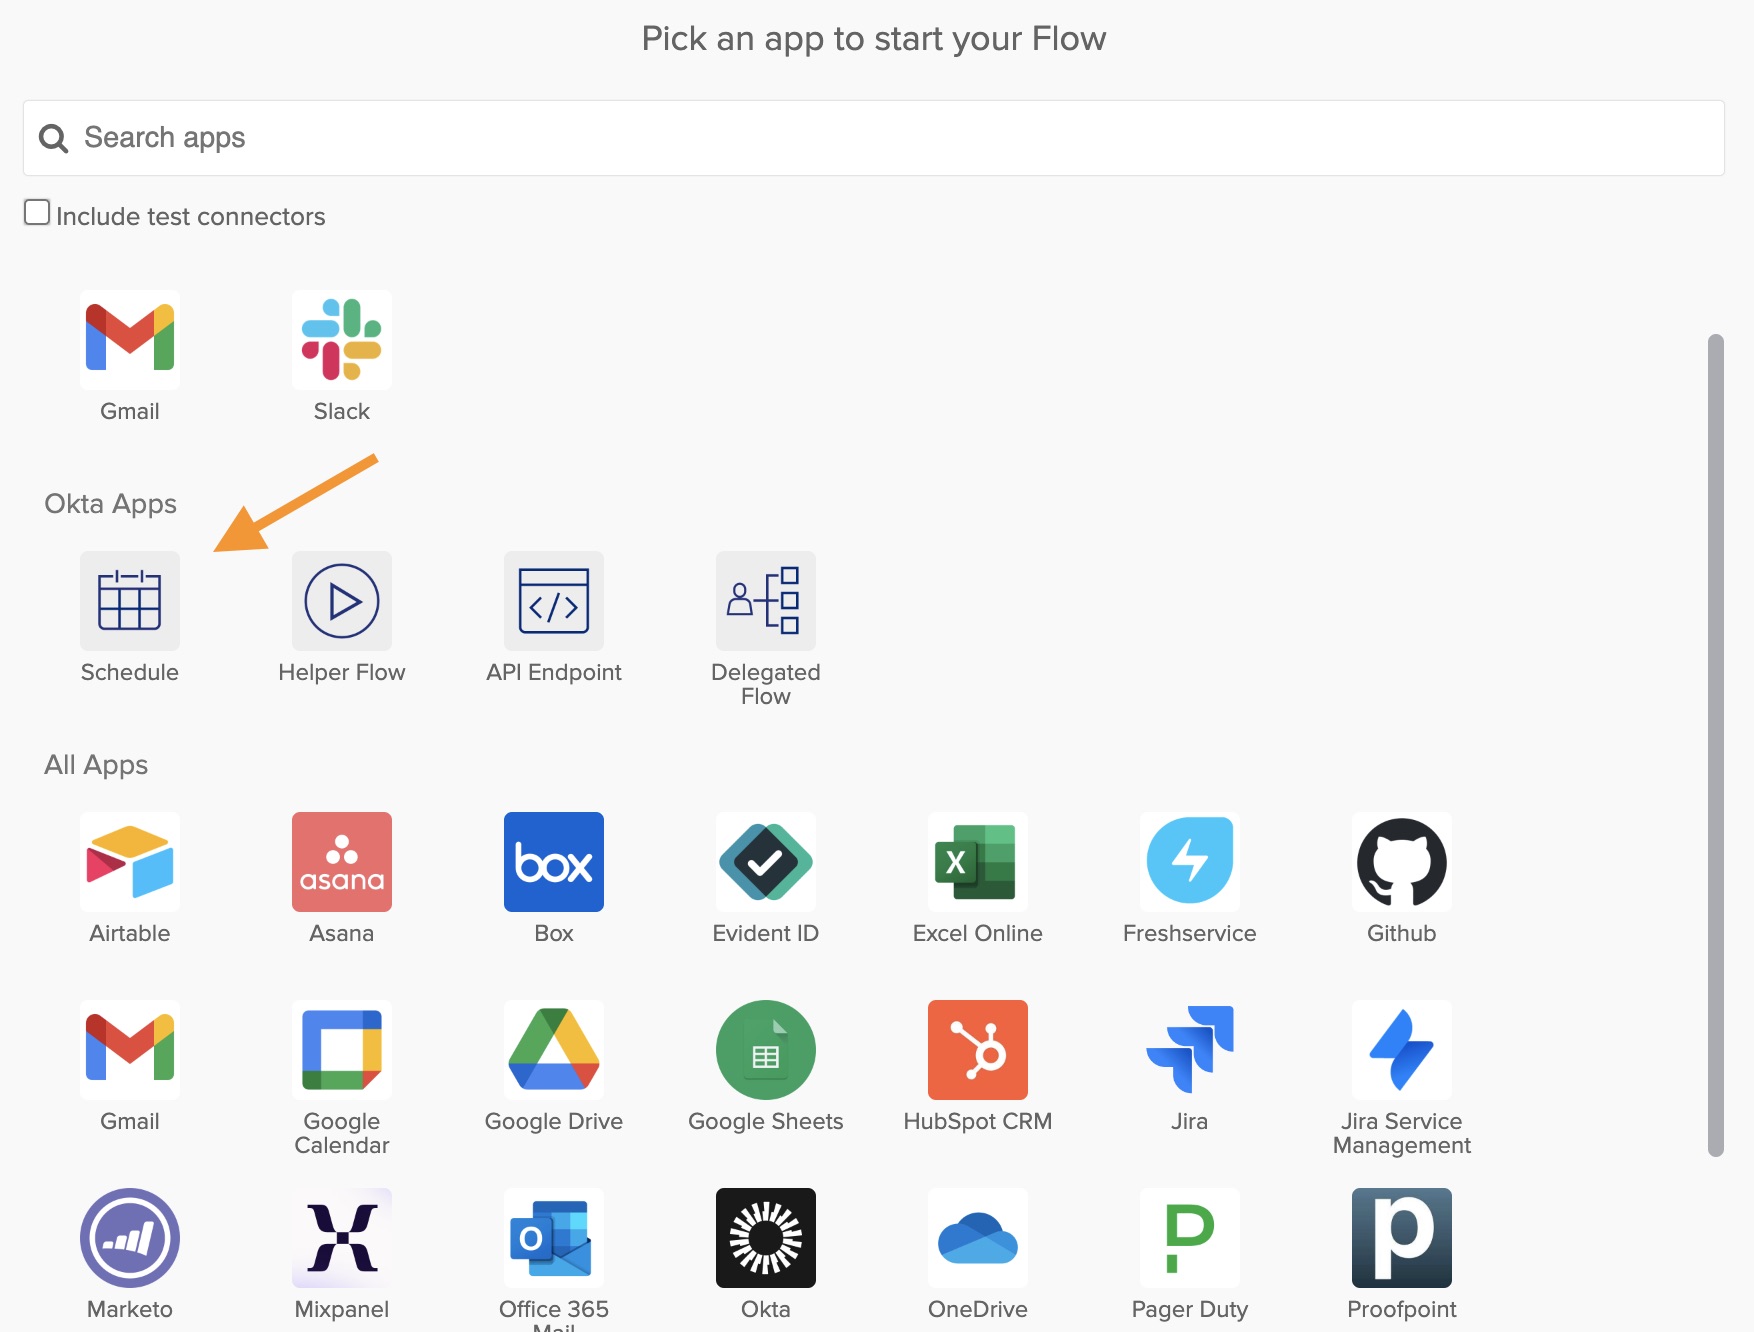
-
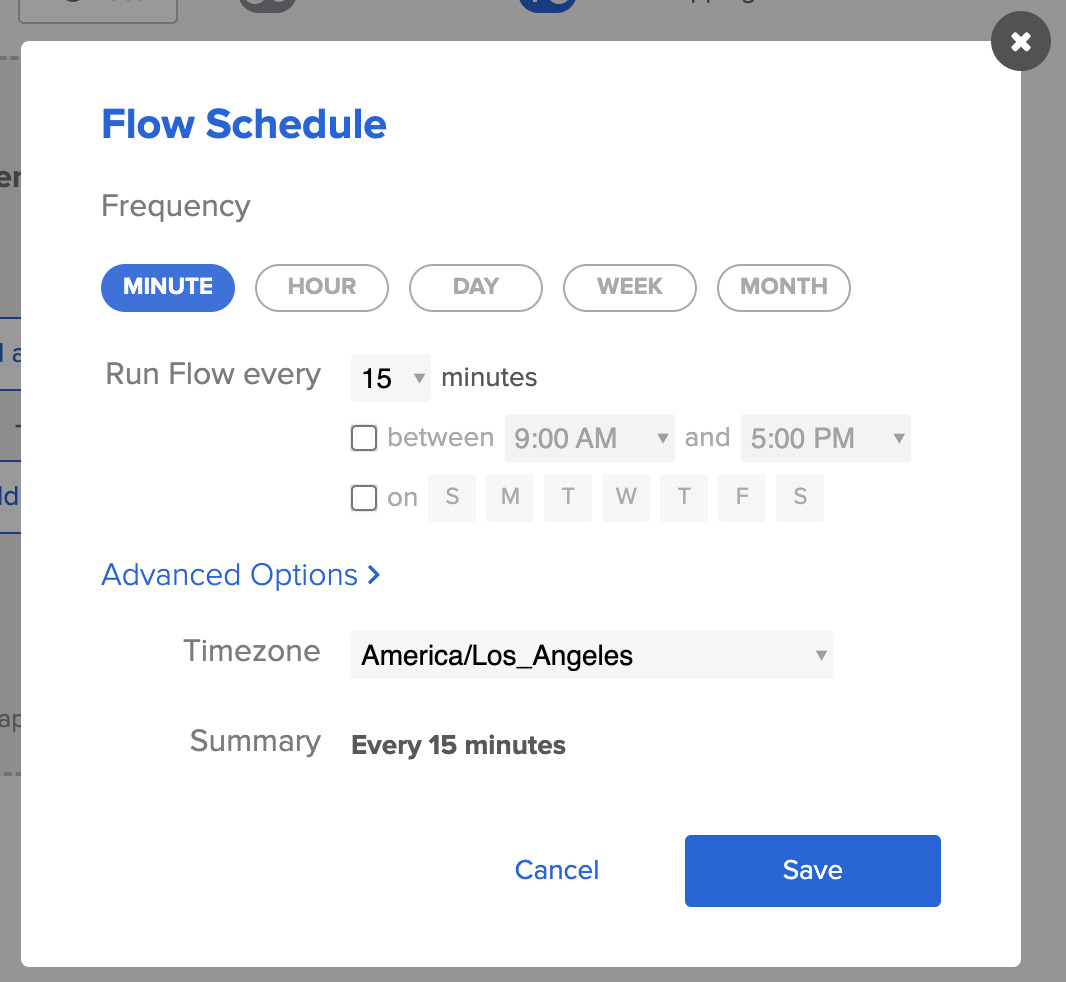
You will see the Flow Schedule dialog where you set when to run the flow
- Update the flow to run every Friday at 9 am local time
- You can set a schedule that works for you
- To test the flow, you don’t need to wait for the schedule. You can always use the Run button
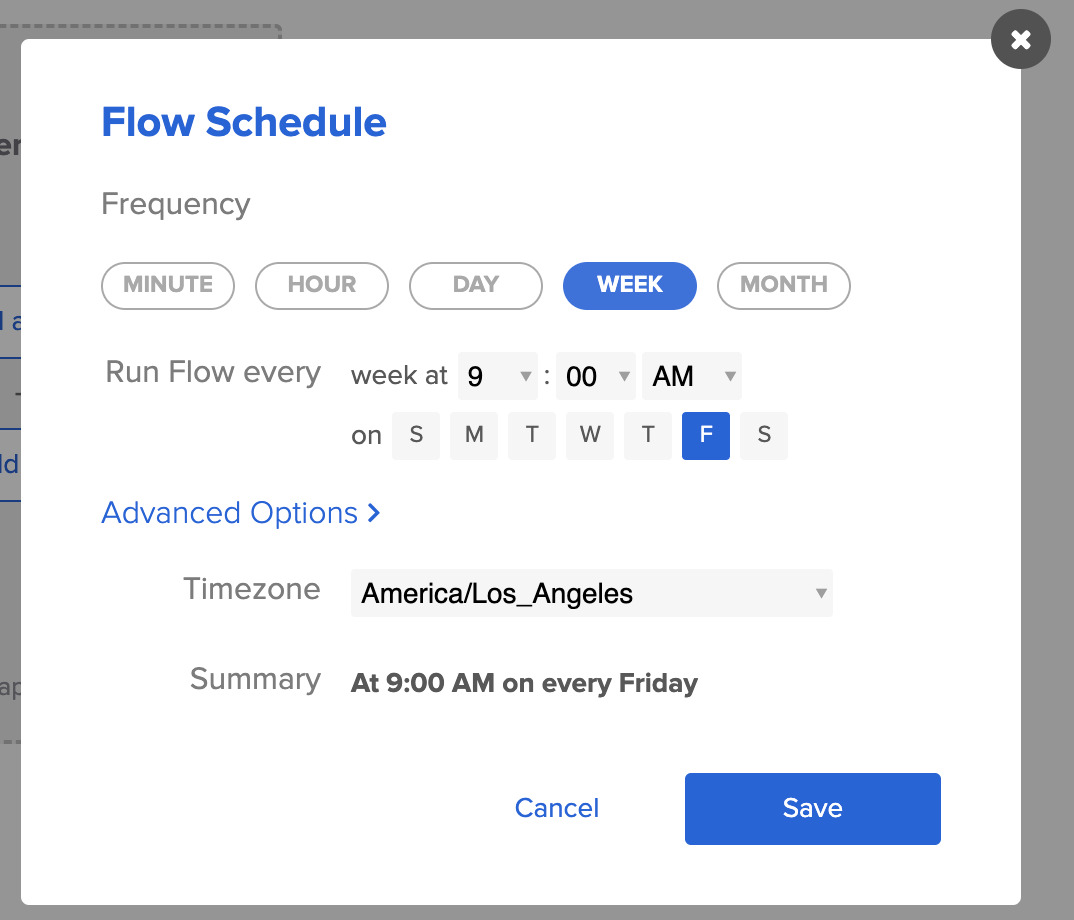
- Click the Save to save the schedule
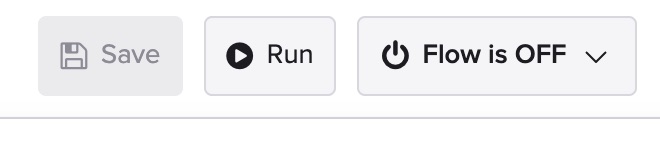
To see when the flow runs next:
- Open the Flow is OFF button menu
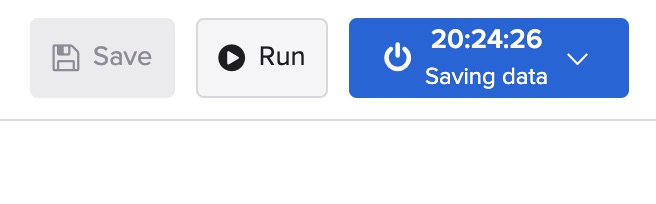
- Toggle Flow is OFF to Flow is ON
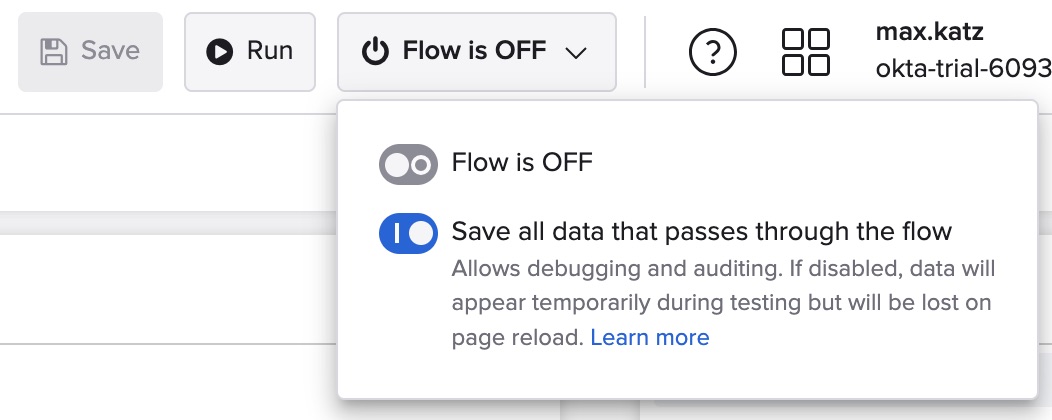
When the flow is on, you will see a time countdown until its next run:
Your flow should look like this:
You can turn off the flow while you build it. You can also remove and re-add the Flow Schedule card later.
Updating the flow to send a pretty message
In this section, you will update the flow to send a pretty message. You will complete the following:
- Understand the JSON returned from the API service
- Creating a helper flow
- Setting up helper flow inputs
- Building the message
- Returning the message to the main flow
- Adding the Reduce card to the main flow
Understanding the JSON returned from the API service
The response from the API service looks like this:
{
  "todos": [
    {
      "id": 1,
      "task": "Try Workflows tutorial",
      "completed": false,
      "userId": 2,
      "orgId": 1
    },
    {
      "id": 2,
      "task": "Watch a Workflows video",
      "completed": false,
      "userId": 2,
      "orgId": 1
    },
    {
      "id": 3,
      "task": "Build your first automation",
      "completed": false,
      "userId": 2,
      "orgId": 1
    },
    {
      "id": 4,
      "task": "Read Workflows docs",
      "completed": true,
      "userId": 2,
      "orgId": 1
    }
  ]
}
The above JSON is an array of objects. To create a pretty message, you need to process each JSON object. You will use the task and the completed paths for the new message.
You must use a helper workflow in Workflows to process a JSON array. A helper flow is a flow that another flow calls. A helper flow can also participate in a for-each-like logic.
You will also use the Reduce card in Workflows to create a message. The Reduce card works similarly to the reduce() function in JavaScript.
The reduce function takes a list of values and reduces the list to a single value. You have a list of todo items and must reduce them (and their status) into a single value (message). This message will then be sent via email.
Creating the helper flow
In this step, you will create the helper flow.
- Click on the Default Folder to go back to the folder
- Click + New Flow to create a new flow
- Click Unnamed (upper left corner)
- For the name, enter Todo Report_Helper
- Check the Save all data that passes through the Flow? checkbox
- Click the Save to save changes
You created another flow.
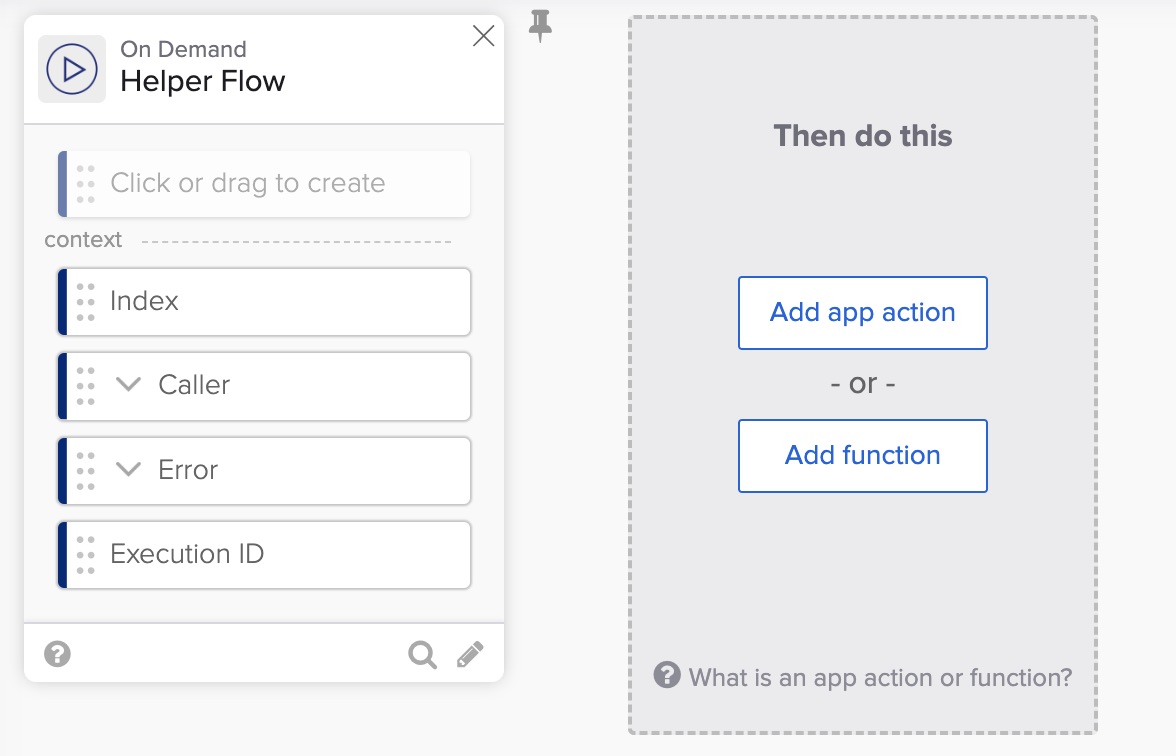
A flow becomes a helper flow when the first card (step) is the Helper Flow card.
- Click the Add event button
- Under Okta Apps, select the Helper Flow card
Your flow should look like this:
In the next step, you will set up the flow inputs.
Setting up helper flow inputs
In this step, you will define inputs the main flow will pass to the helper flow.
- To add a flow input field, click inside the Click or drag and create box and enter Item
- Move the mouse over the field type indicated by Aa, open the list, and select Object from the list
 3. Under the Item field, create two fields:
- Name: task, type: Text
- Name: completed, type: Text
The Helper Flow card should look like this:
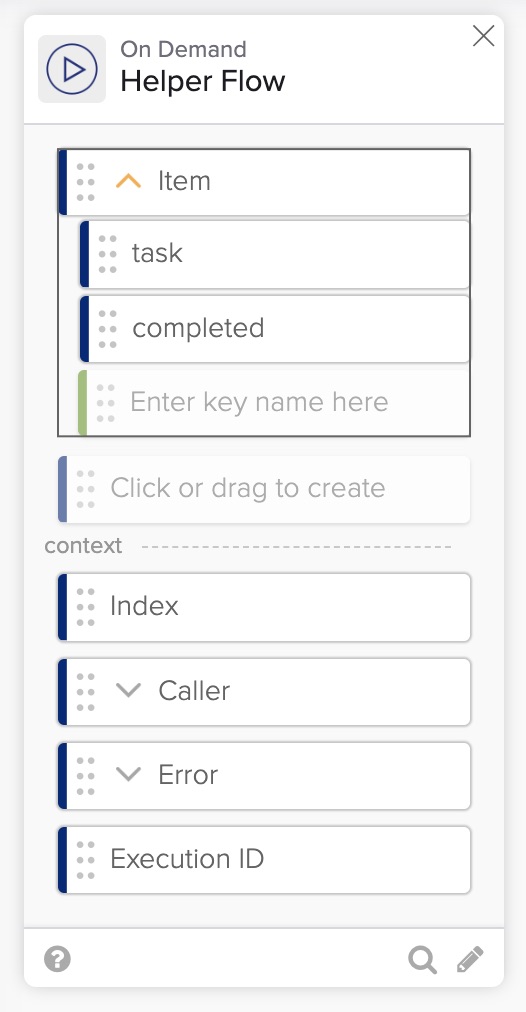
You need to create one more input field. This will be a new field, not part of the Item object.
- Click inside the Click or drag to create box and create the memo field. Set its type to Text
The final Helper Flow card looks like this:

Your helper flow is set up to accept two inputs. A JSON object with two fields: task and completed and a text field (memo).
Next, you are going to create a pretty message.
Building the message
You will use the Compose card to create the message in this step.
- To add the Compose card, click Add function > Most popular (category) > Compose
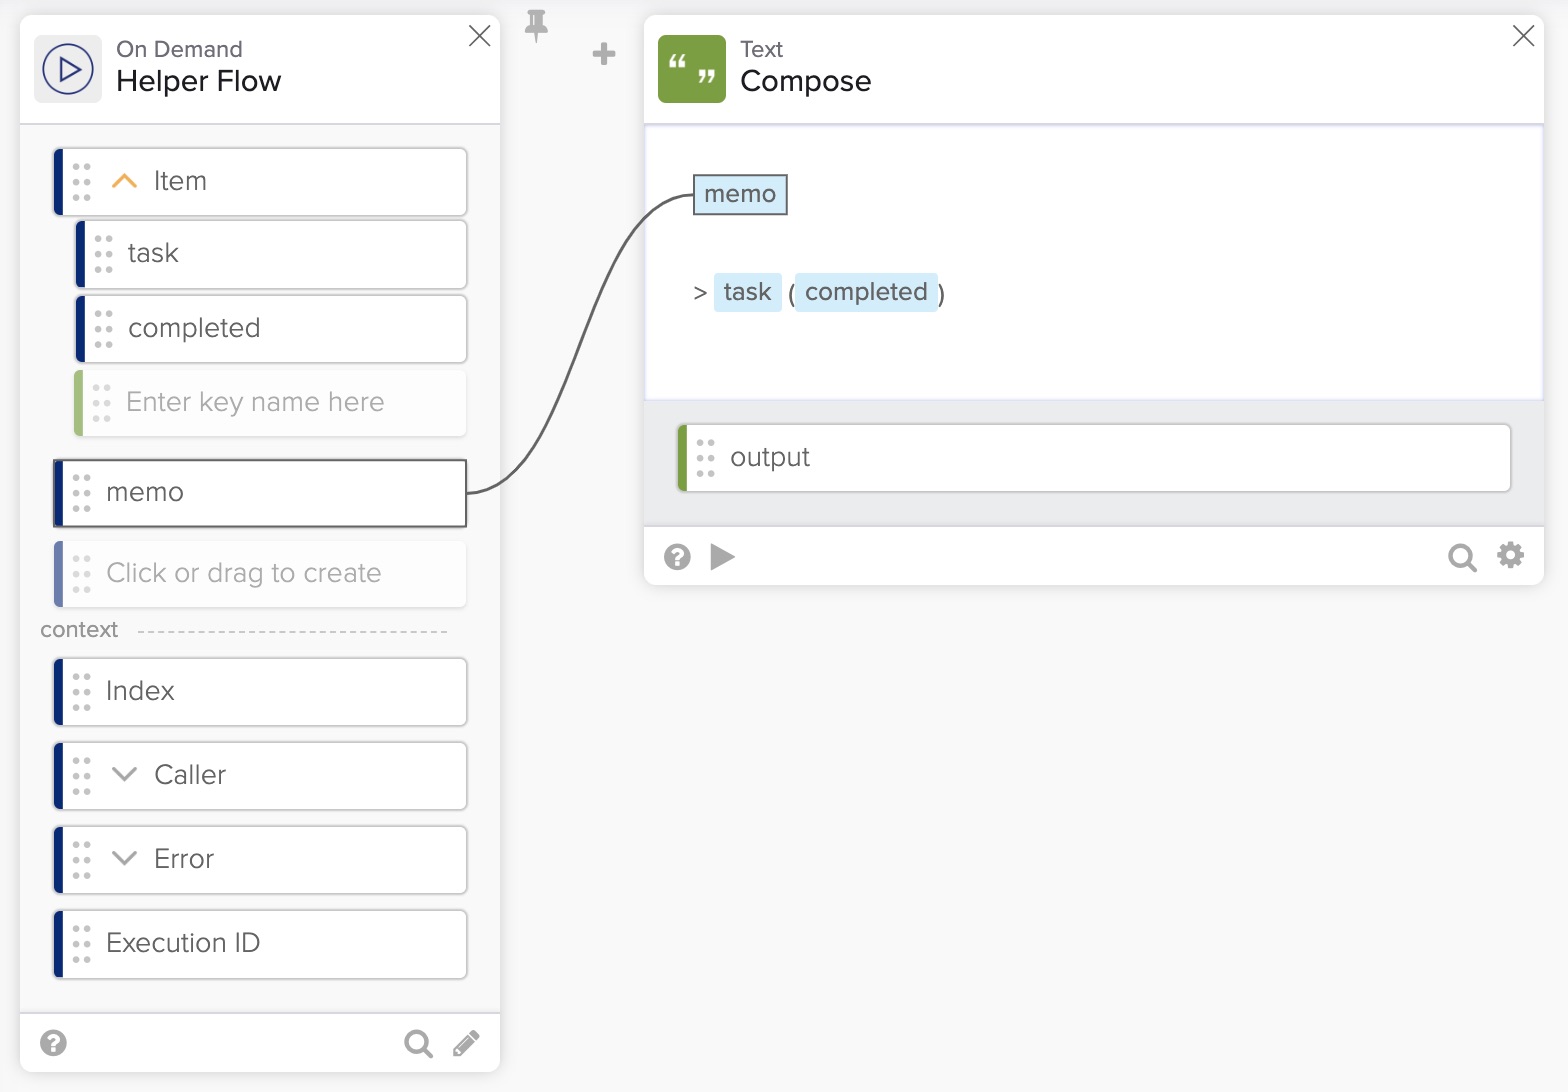
- Next, place the memo field inside the Compose card, as shown in the screenshot below
- Click Enter twice
- Type >
- Take the task field and pass it to the Compose card as shown in the screenshot
- Enter ( ) and inside place the completed field
The Compose card looks like this:
Returning the message to the main flow
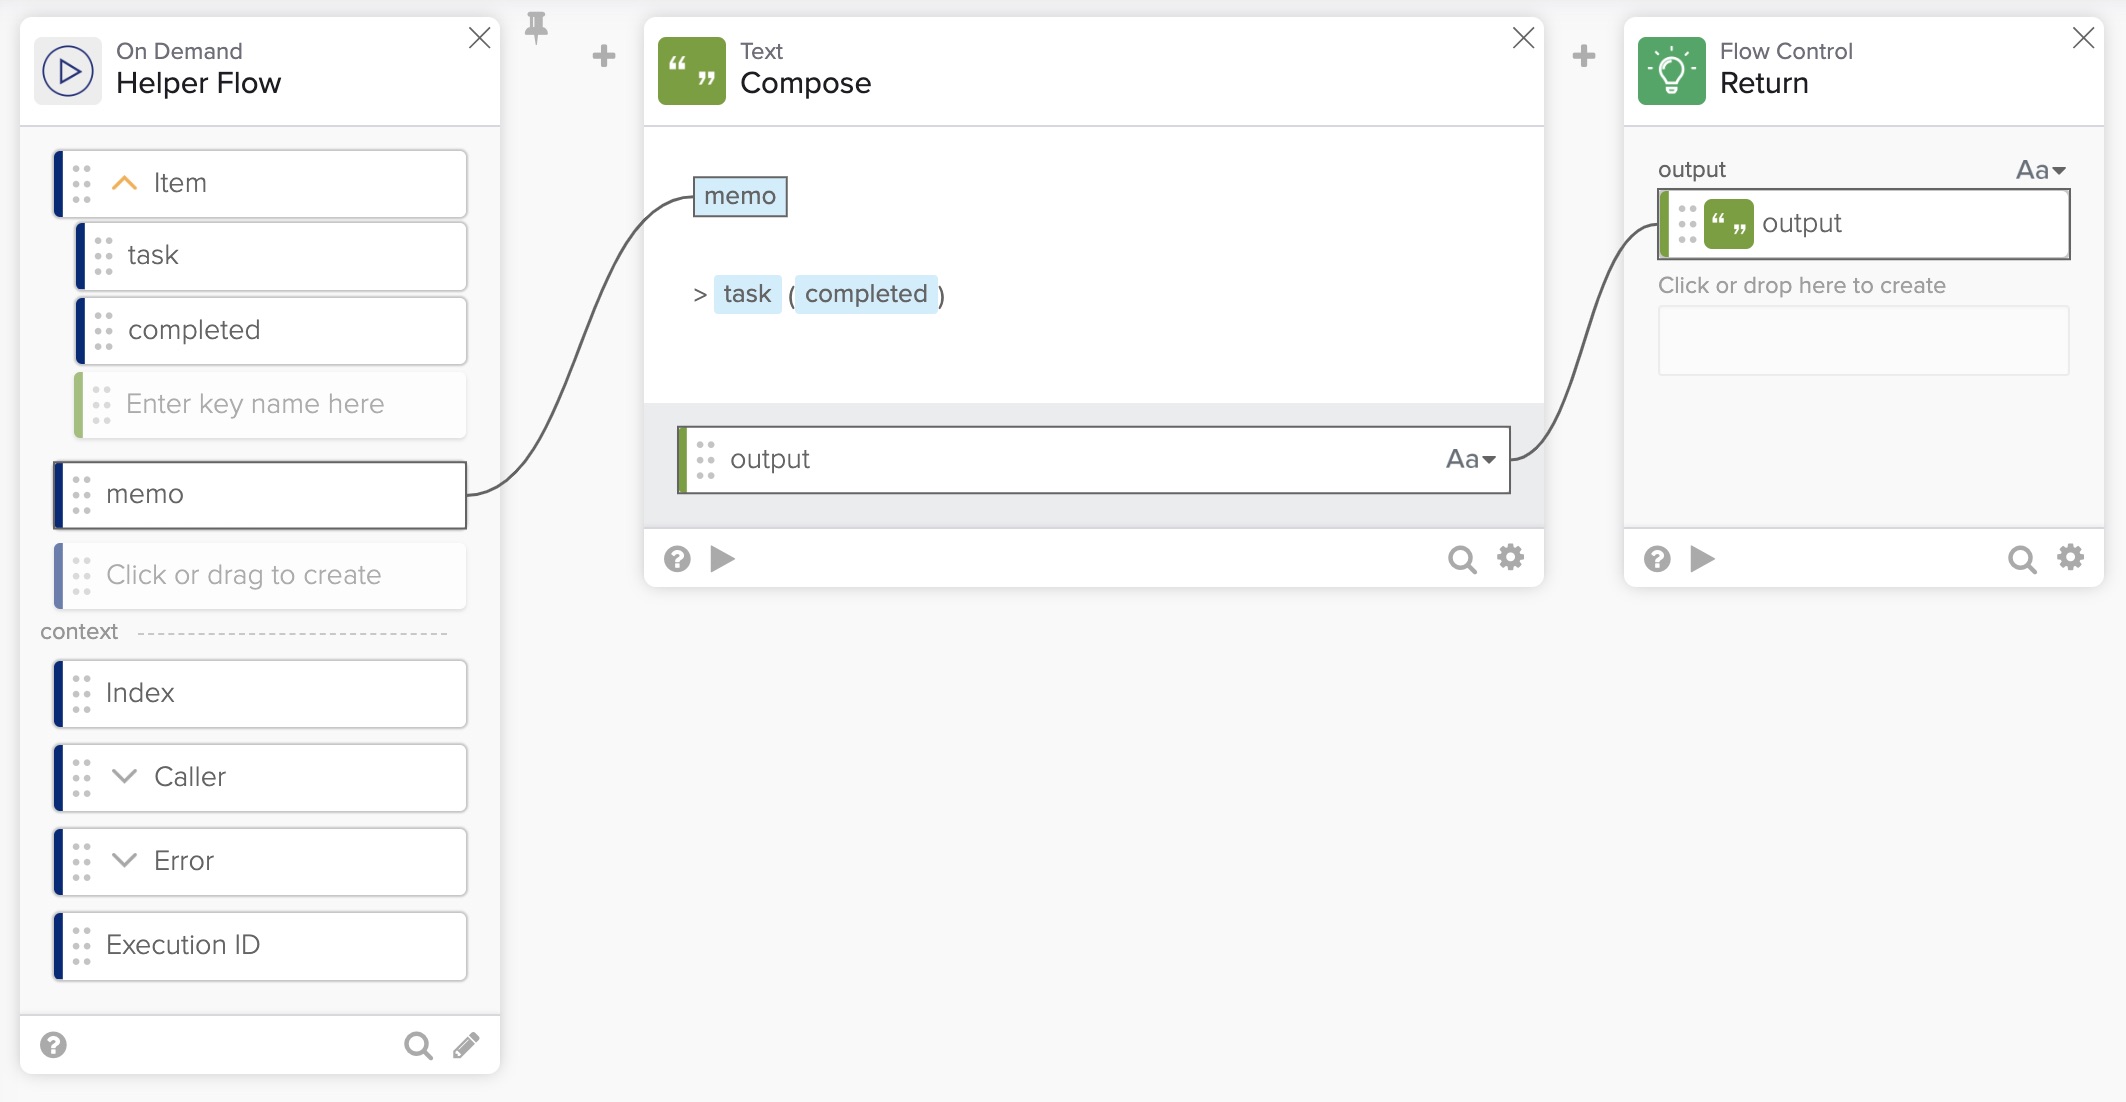
You need to return the message to the Todo Report flow using the Return card.
- Click Add function > Flow Control (category) > Return
- Take the Output from the Compose card and connect it to the Return card
The helper flow looks like this:
Next, you will update the main flow to call this helper flow.
Using the Reduce card
In this step, you will update the Todo Report flow to call the Todo Report_Helper flow.
Adding the Reduce card
- Open the Todo Report flow
- Click the + between the Get card and the Compose card
- Select the calculator icon > List (category) > Reduce card.
The flow will look like this:
Updating the Get card
The Reduce card expects a list as input. To pass a todo list from the Get card:
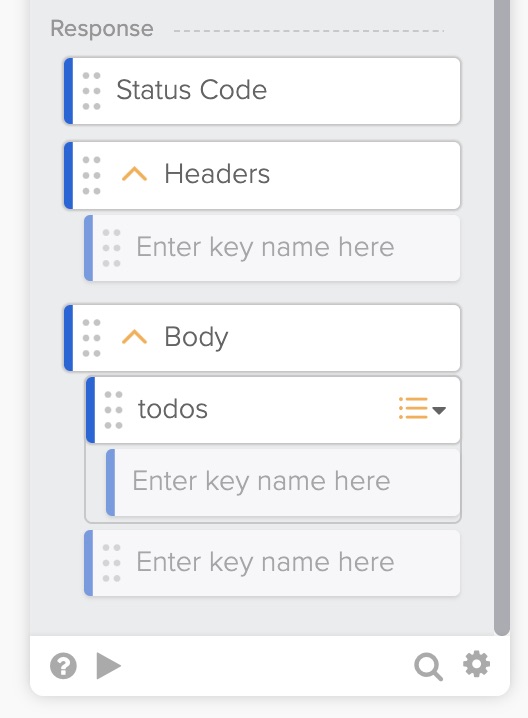
- On the API Connector - Get card, add a todos field under the Body field.
- Set the field type to Object and also check the List option
The new field looks like this:
Setting up the Reduce card
In this stept, you will pass data and configure the Reduce card.
- Take the todos field and connect it to the list field on the Reduce card
- For Helper Flow, click the Choose Flow button
- Click on the Default Folder, select the Todo Report_Helper flow and click Choose
- For the memo field, change its type to Text and enter Todo Items (delete the quotes)
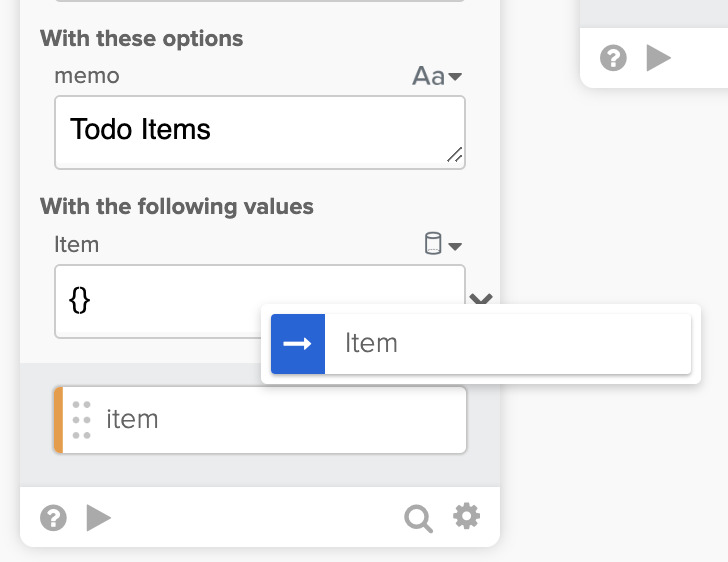
- For the Item field, click the arrow on the right side of the field and select Item from the list
- For the item in the output section of the card, set its type to Text.
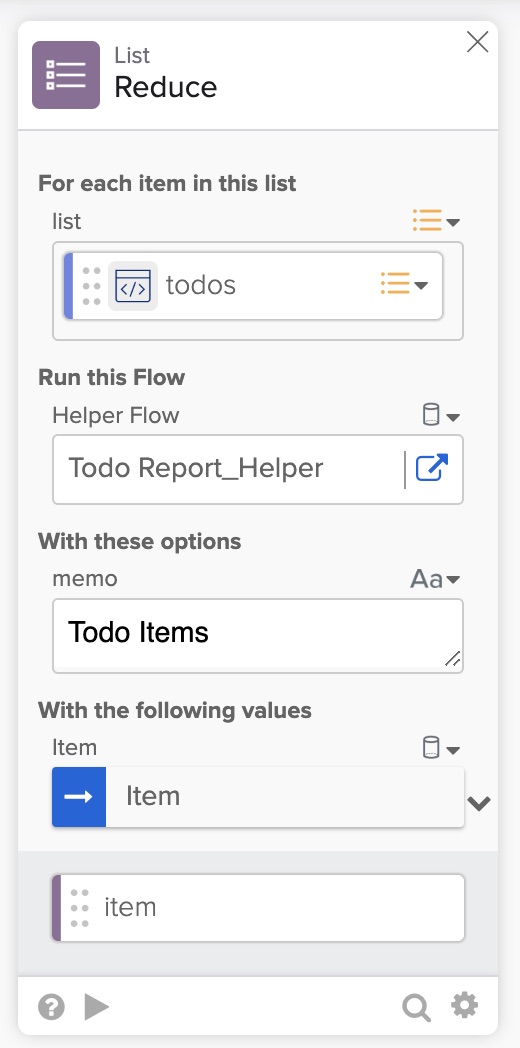
The Reduce card looks like this:
Passing data to the Gmail card card
To send the list to the Gmail card:
- Delete the Compose card
- Connect the item field from the Reduce card to the Body field on the Send Email card.
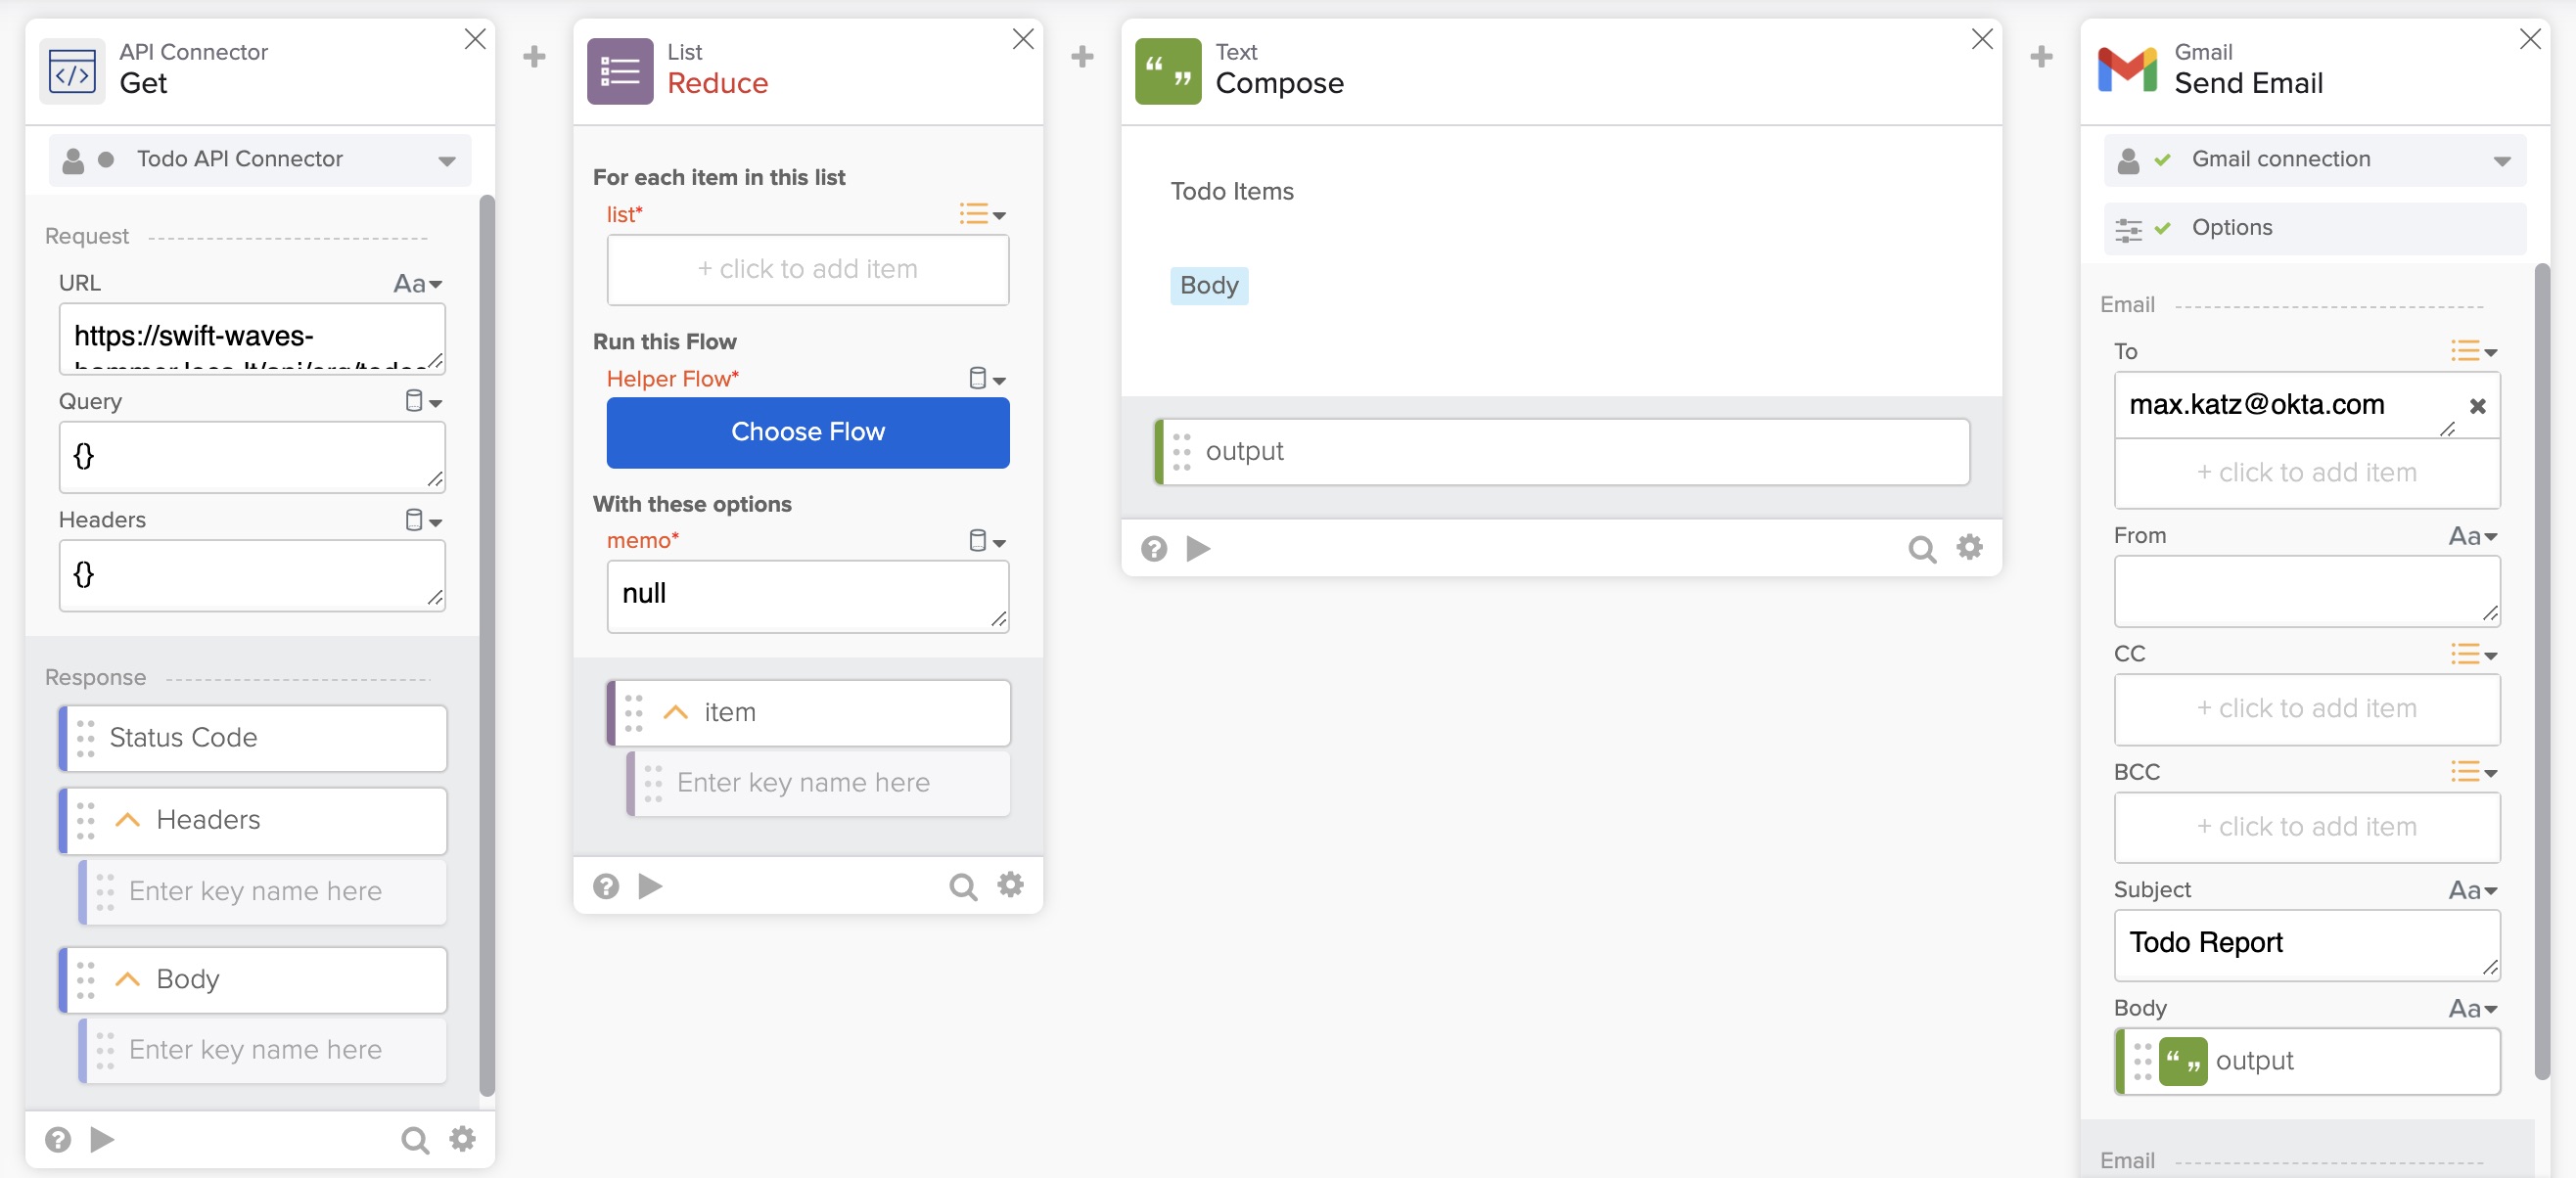
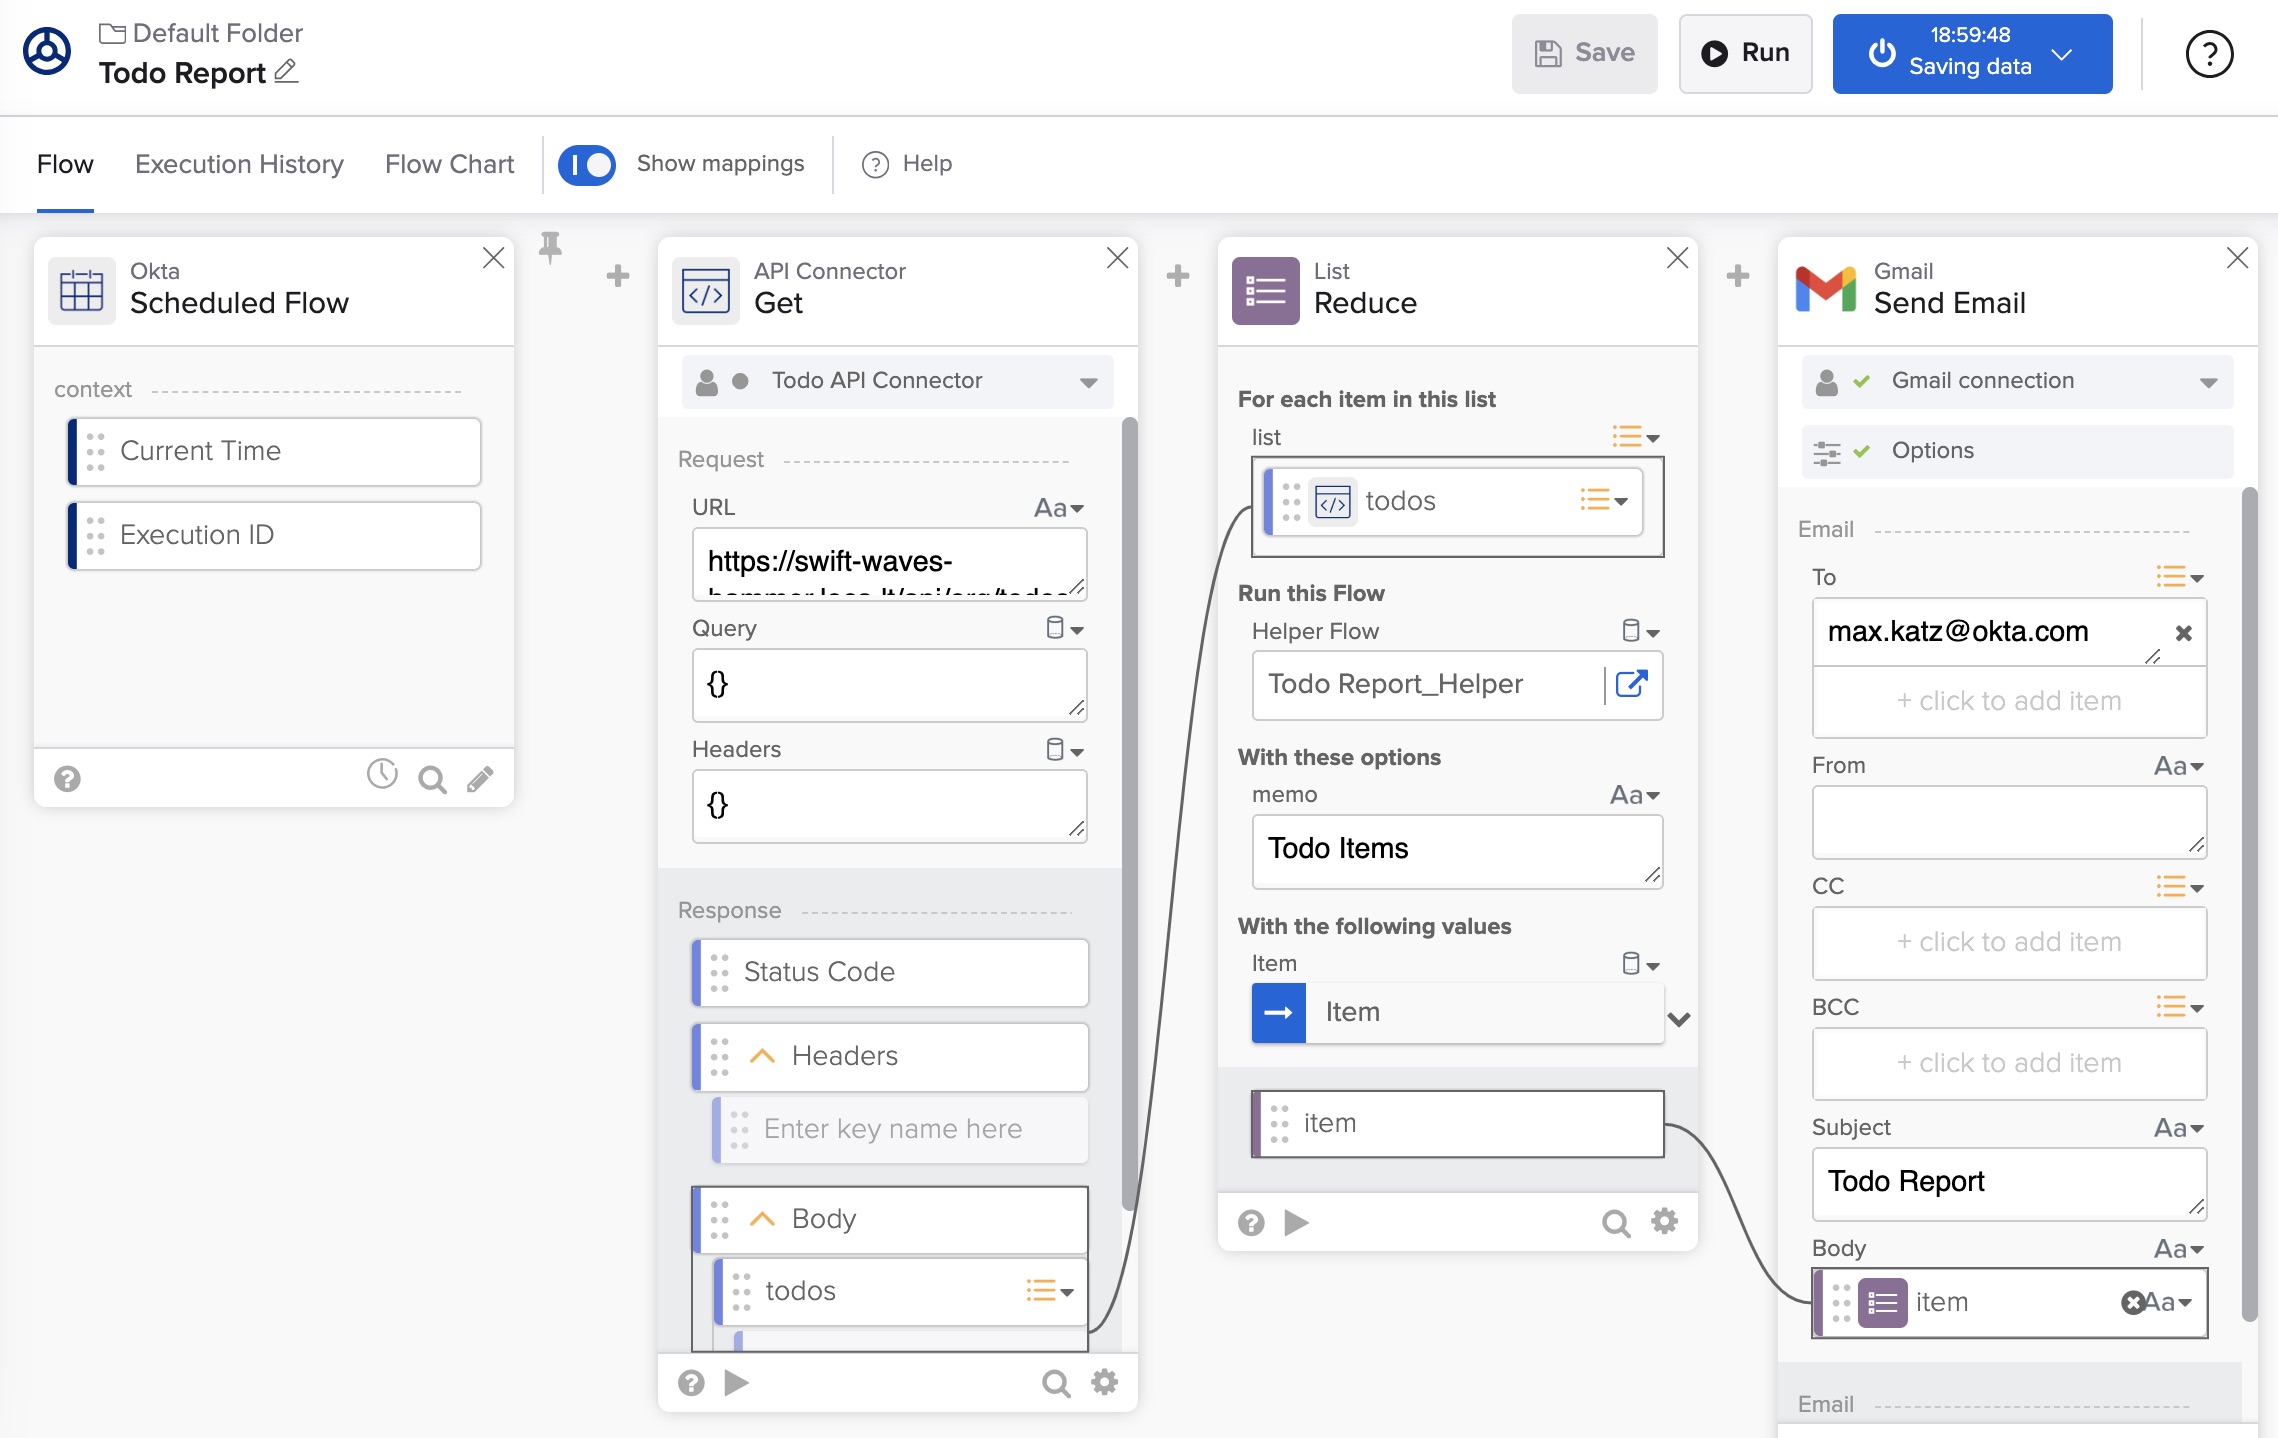
The final flow looks like this:
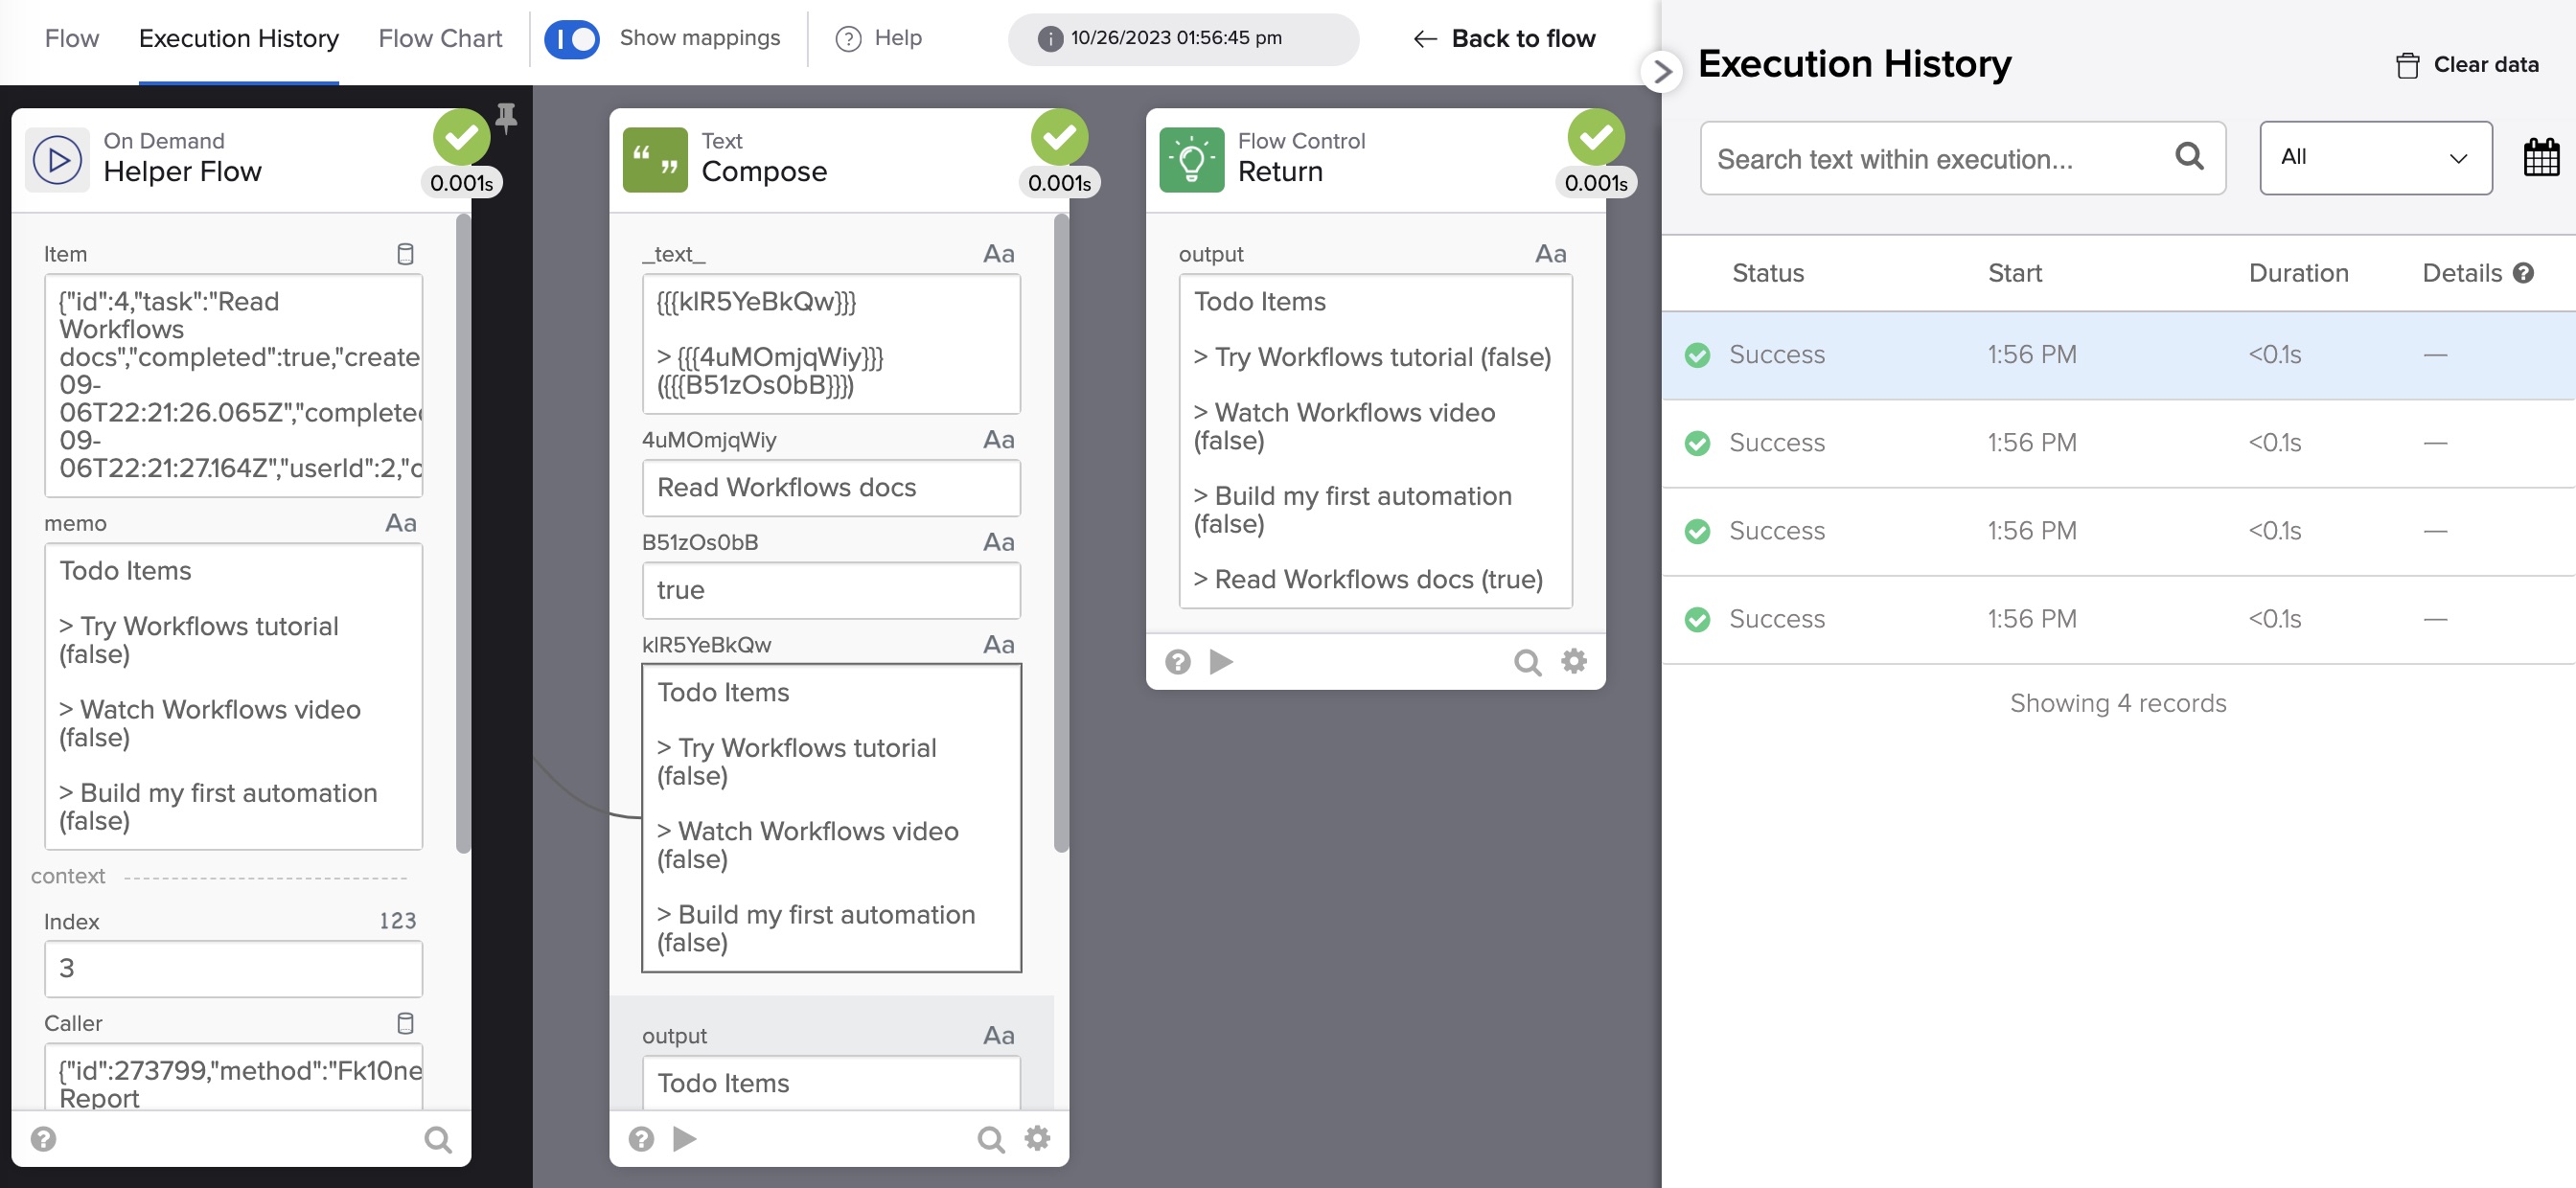
How does the Reduce card work
A good way to learn how the Reduce card works is to look at the Todo Report_Helper flow history. Reduce is a way to reduce a list to a single value. In this example, you take a list of todo items and reduce them to a single text message.
The helper flow will run four times (the number of todo items in the Todo application).
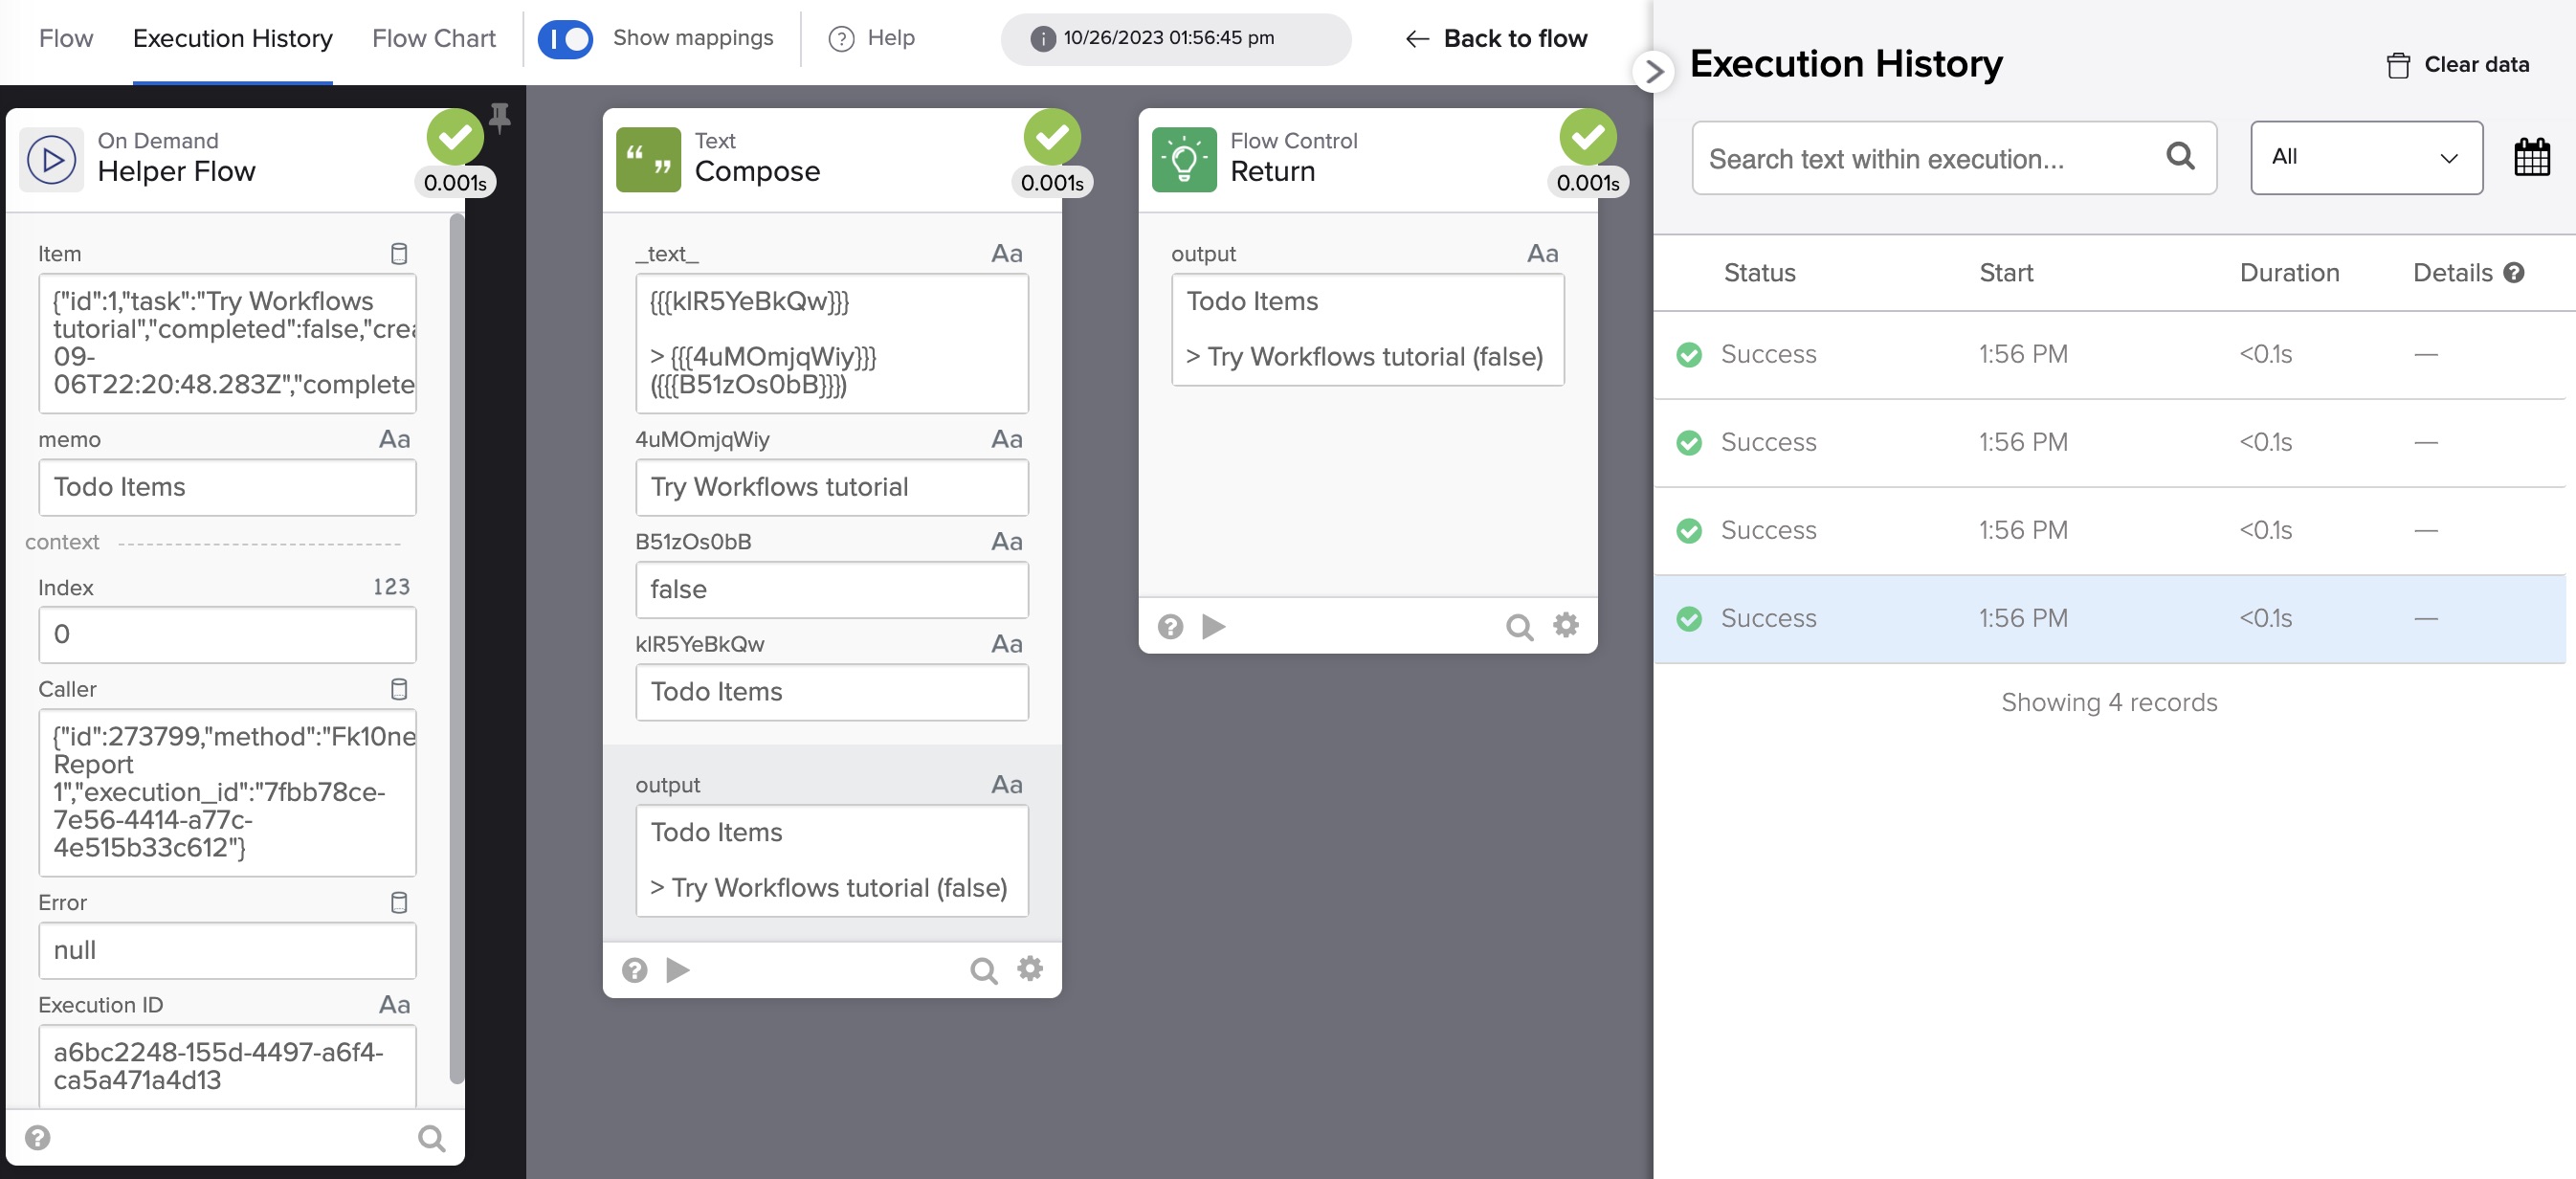
First run
On the first run, the memo field is set to:
Todo Items
The first todo item is added and returned to the main flow:
Todo Items

> Try Workflows tutorial (false)
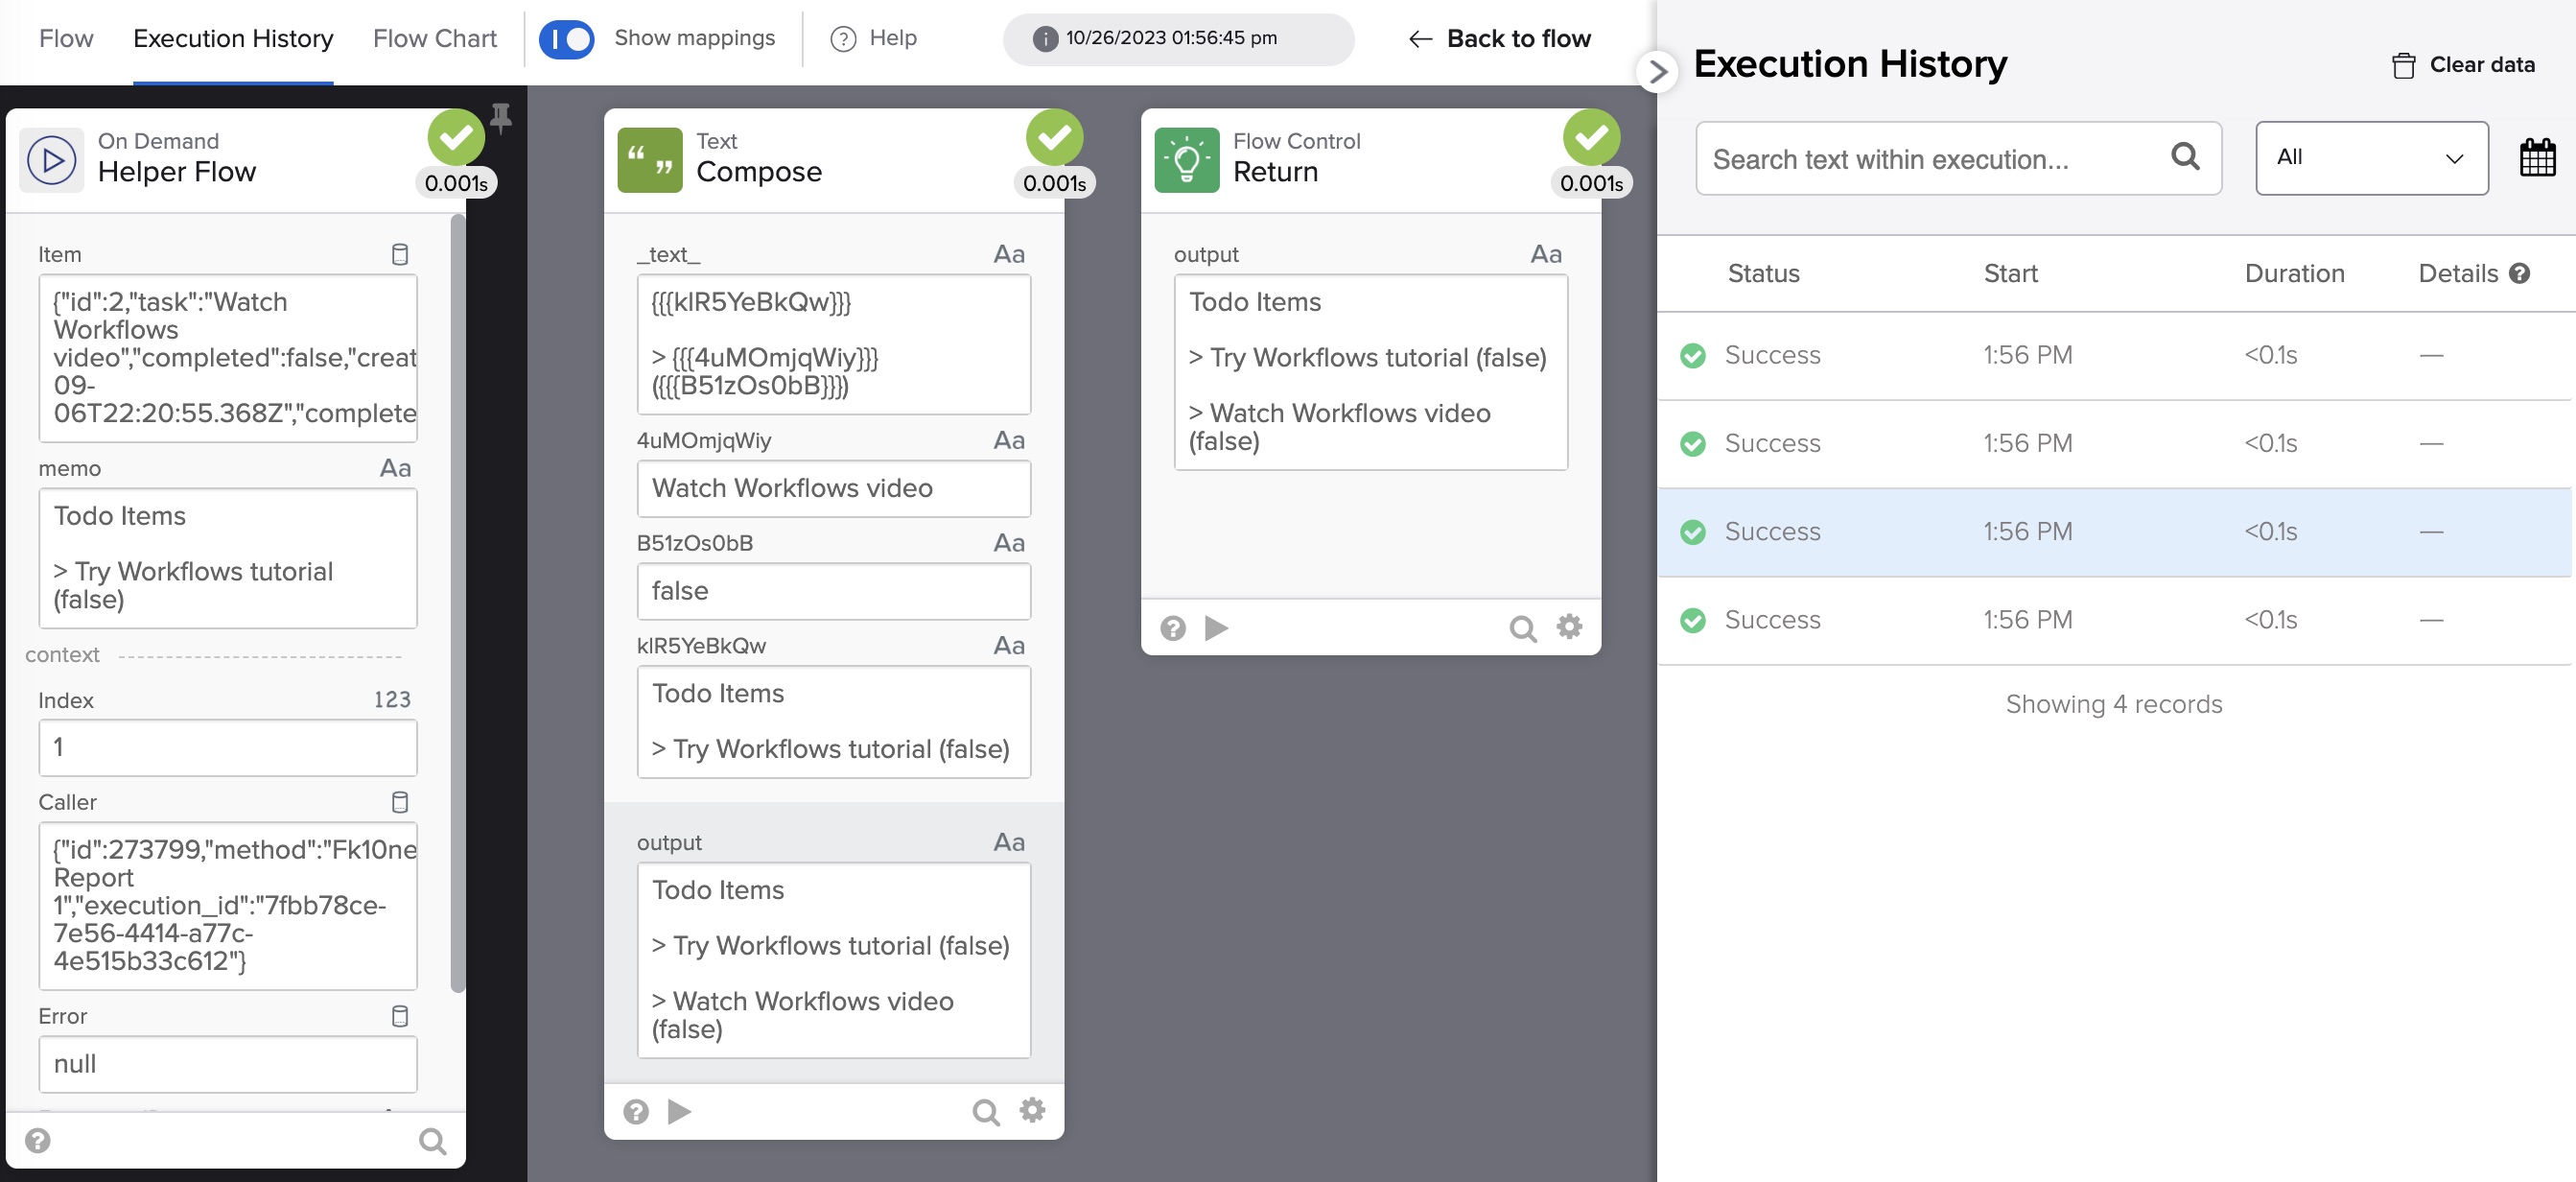
Second run
The memo field is now set to what was returned after the first run:
Todo Items

> Try Workflows tutorial (false)
The second todo item is added and returned to the main flow:
Todo Item

> Try Workflows tutorial (false)

> Watch a Workflows video (false)
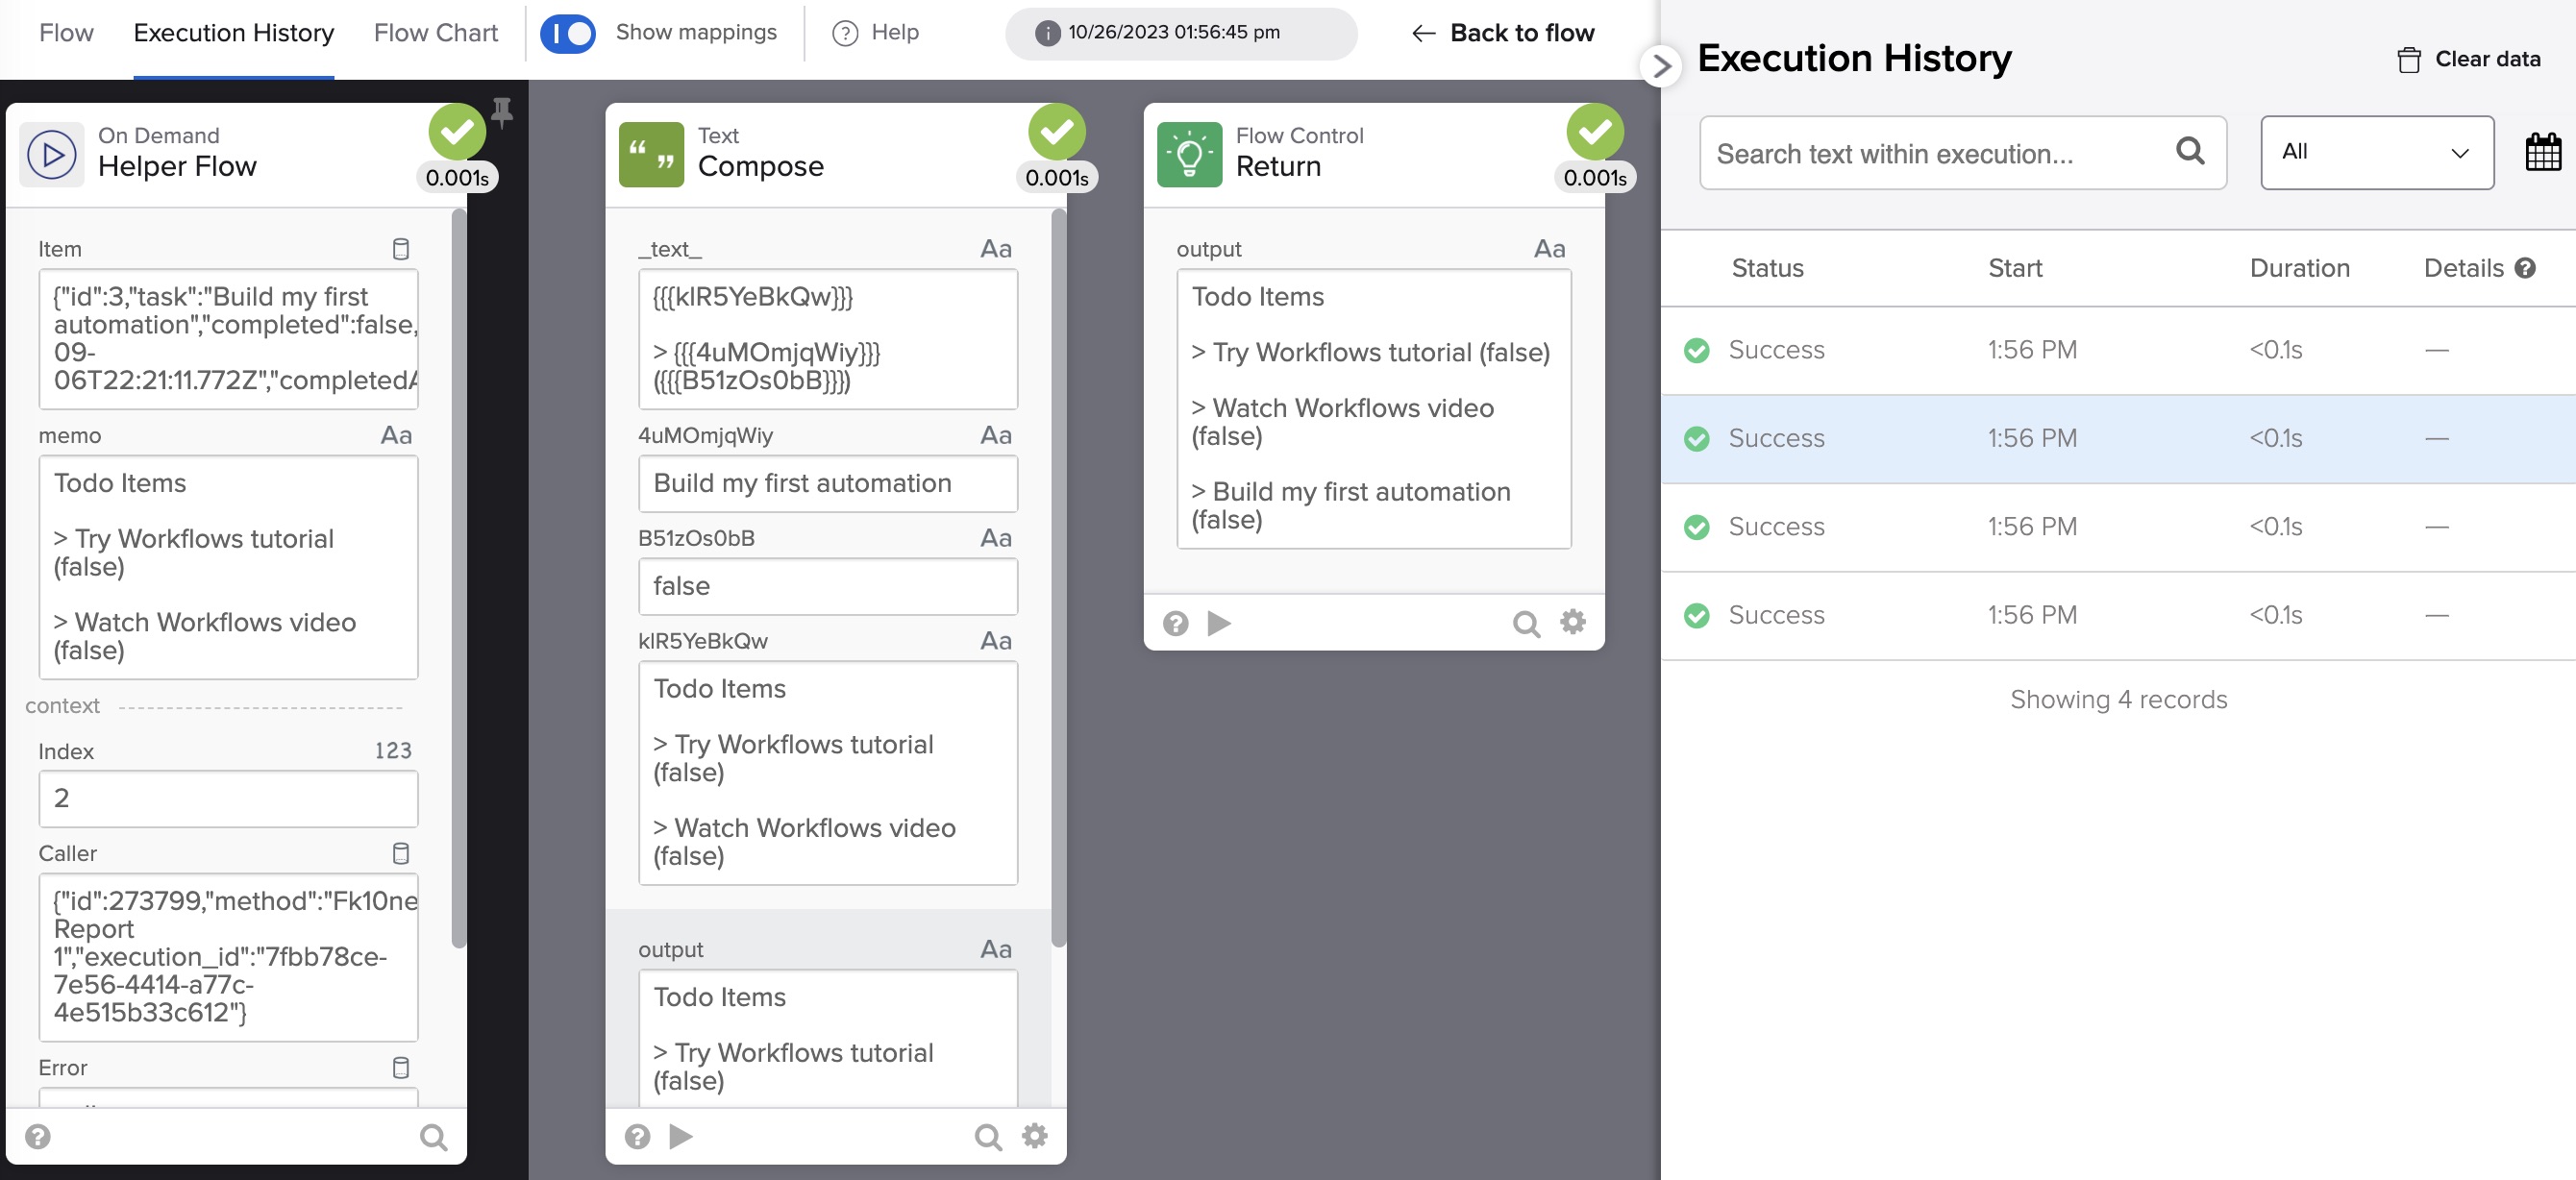
Third run
The memo field is now set to what was returned after the second run:
Todo Items

> Try Workflows tutorial (false)

> Watch a Workflows video (false)
The third item is added and returned to the main flow:
Todo Items

> Try Workflows tutorial (false)

> Watch a Workflows video (false)

> Build your first automation (false)
Fourth run
The memo field is now set to what was returned after the third run:
Todo Items

> Try Workflows tutorial (false)

> Watch a Workflows video (false)

> Build your first automation (false)
The fourth item is added and returned to the main flow:
Todo Items

> Try Workflows tutorial (false)

> Watch a Workflows video (false)

> Build your first automation (false)

> Read Workflows docs (true)
Since all the items were processed, the Reduce card is done and the flow execution moves on to the next card, the Send Email card.
The complete automation
Congratulations! You built an automation using no-code.
This is the final Todo Report flow:
This is the final Todo Report_Helper flow:
You are ready to test the automation.
Testing the automation
To test the flow:
- Check that the application’s front end, back end, and tunnel are running
- If the tunnel restarted, you need to update the tunnel URL in the Get card
- Turn both the Todo Report and the Todo Report_Helper flows on
- Click the Test button on the Todo Report flow
You will receive an email like this:
What you learned
In this workshop, you learned the following:
- Building an Okta Workflows flow and automation
- Scheduling the flow to run periodically
- Enhancing an application with a new API service
- Calling the API service to retrieve todos items from an application
- Creating a todo summary and sending the summary via email
- Testing the flow
Next steps
Now that you can run the application locally, you are ready to start on a workshop of your choice! Find the workshops you want to participate in:
| Posts in the enterprise-ready workshop series |
|---|
| 1. How to Get Going with the On-Demand SaaS Apps Workshops |
| 2. Enterprise-Ready Workshop: Authenticate with OpenID Connect |
| 3. Enterprise-Ready Workshop: Manage Users with SCIM |
| 4. Enterprise Maturity Workshop: Terraform |
| 5. Enterprise Maturity Workshop: Automate with no-code Okta Workflows |
| 6. How to Instantly Sign a User Out across All Your App |
Ready to become enterprise-ready? Follow us on Twitter and subscribe to our YouTube channel to get notified about new workshops. If you have any questions or want to share what workshops/base application tech stacks you’d like to see next, please comment below!
Okta Workflows resources
More resources to help you learn more about Okta Workflows:
- Videos
- Office Hours
- Knowledge Base articles
- Documentation
- Slack community (join the #okta-workflows channel)
- Get help from support (forum, questions)
Max Katz is Okta Workflows Developer Advocate. Max loves the no-code automation space and provides developer education with content, videos, and online meetups. Before Okta, Max led the North America Developer Advocacy team at IBM. Before IBM, Max led developer advocacy for a cloud-based mobile app platform, Appery, helping it grow from zero to over 400,000 developers. Max regularly writes on his http://maxkatz.net blog.
Okta Developer Blog Comment Policy
We welcome relevant and respectful comments. Off-topic comments may be removed.