Learn How to Build a Single-Page App with Vue and Spring Boot

In this tutorial, you are going to create a single-page application (SPA) that uses a Spring Boot resource server and a Vue front-end client. You’ll see how to configure Spring Boot to use JSON Web Tokens (JWT) for authentication and authorization, with Okta as an OAuth 2.0 and OpenID Connect (OIDC) provider. You’ll also see how to bootstrap a Vue client app with the Vue CLI and how to secure it using the Okta Sign-In Widget.
Okta is a computer security services company that provides a lot of great resources for securing web applications. The Okta Sign-In Wdiget is a great way to secure front-end applications because it allows you to easily add a secure login form that is configurable for single sign-on and social sign-on with external providers such as Google, Facebook, and LinkedIn. It provides an implementation of the authorization code OAuth 2.0 flow using PKCE (Proof Key for Code Exchange).
PKCE is a modification of the authorization code flow that does not require the application to have the client secret, making it suitable for client applications where the code is essentially public. Implementing a secure authorization code flow on a front-end application requires properly handing redirects and the token exchange, which can be a little involved. Fortunately, Okta has simplified this process greatly, handling a lot of the complexity for you.
Table of Contents
- Create the Spring Boot Resource Server
- Spring Boot and CORS
- Configure the Resource Server for Okta Auth
- Use the Vue CLI to Bootstrap the Client App
- Create a Single-Page OIDC Application on Okta
- Finish the Vue Front-End Client App
- Test the Completed Server and Client
- Learn More About Application Security
Requirements
Before you get started, you’ll need to make sure you have a few tools installed.
-
Okta CLI: The Okta CLI is an easy way to create projects that use Okta for security. Follow the installation instructions on the Okta CLI project website. You should log in to your existing account or register for a new account using the CLI before continuing with this tutorial.
-
Java 11: This project uses Java 11. OpenJDK 11 will work just as well. Instructions are found on the OpenJDK website. OpenJDK can also be installed using Homebrew. Alternatively, SDKMAN is another excellent option for installing and managing Java versions.
-
Vue CLI: You’ll use the Vue CLI to generate the starter Vue client project. Install it according to the the instructions on the Vue website.
Create the Spring Boot Resource Server
To bootstrap the Spring Boot resource server project, you will use the Spring Initializr. It’s designed to help developers quickly configure and generate Spring Boot projects. There’s a great web interface that you should take a look at. However, in this project, you’re going to use the REST interface to download a pre-configured project.
This project will have both a Vue client and a Spring Boot server project, so you may want to make a parent directory called something like Spring Boot SPA. Use the following command to download and extract the starter project in the parent directory.
curl https://start.spring.io/starter.tgz \
  -d type=maven-project \
  -d language=java \
  -d platformVersion=2.5.4 \
  -d jvmVersion=11 \
  -d artifactId=spring-boot-spa \
  -d baseDir=spring-boot-spa \
  -d packageName=com.okta.springbootspa \
  -d group=com.okta \
  -d dependencies=web,okta \
  | tar -xzvf -
The command above configures various aspects of the Spring Boot project, including the Spring Boot version and the Java version. It also configures two dependencies.
-
The first,
web, includes Spring MVC, Spring’s standard web package. -
The second,
okta, includes Okta’s Spring Boot starter.
You can check out the Okta Spring Boot Starter project on GitHub for more info, but briefly, it streamlines the use of Okta to secure Spring Boot projects. For a resource server, you would typically need to include the Spring Security OAuth Resource Server dependency, but the Okta Spring Boot Starter includes this for you.
Now that you have the basic application in place, replace DemoApplication.java with the following code.
src/main/java/com/okta/springbootspa/DemoApplication.java
package com.okta.springbootspa;

import org.springframework.boot.SpringApplication;
import org.springframework.boot.autoconfigure.SpringBootApplication;
import org.springframework.context.annotation.Configuration;
import org.springframework.security.config.annotation.web.builders.HttpSecurity;
import org.springframework.security.config.annotation.web.configuration.EnableWebSecurity;
import org.springframework.security.config.annotation.web.configuration.WebSecurityConfigurerAdapter;
import org.springframework.web.bind.annotation.CrossOrigin;
import org.springframework.web.bind.annotation.GetMapping;
import org.springframework.web.bind.annotation.RestController;

import java.security.Principal;
import java.util.Arrays;
import java.util.List;
import java.util.Random;

@SpringBootApplication
public class DemoApplication {

    public static void main(String[] args) {
        SpringApplication.run(DemoApplication.class, args);
    }

    @RestController
    @CrossOrigin
    class CaffeineLevelRestController {

        String getCaffeineLevel() {
            List<String> givenList = Arrays.asList(
                    "Head on table asleep. Needs coffee now!",
                    "Not at all. What's wrong?!",
                    "Mildly. Boring.",
                    "Making progress.",
                    "Everything is awesome. Stuff is definitely happening.",
                    "Eyeballs are rolling around in my head and I'm shouting at my coworker about JHipster.",
                    "The LD50 of caffeine is 100 cups. Your developer has had 99 and is talking to the bike rack outside while jogging in place."
            );
            Random rand = new Random();
            String caffeineLevelString = givenList.get(rand.nextInt(givenList.size()));
            return caffeineLevelString;
        }

        @GetMapping("/howcaffeinatedami")
        public String getCaffeineLevel(Principal principal) {
            String userName = principal != null ? principal.getName() : "Anonymous";
            return userName + ", your developer's caffeine level is: " + getCaffeineLevel();
        }
    }

    @Configuration
    @EnableWebSecurity
    class SecurityConfiguration extends WebSecurityConfigurerAdapter {

        @Override
        protected void configure(HttpSecurity http) throws Exception {
            http.cors().and()
                    .authorizeRequests(authorizeRequests -> authorizeRequests.anyRequest().authenticated())
                    .oauth2ResourceServer().jwt();
        }
    }
}
This example resource server defines one endpoint, /howcaffeinatedami, that returns a random (and hopefully humorous) string designating your developer’s current caffeine level.
There is also an inner class (at the bottom) that extends WebSecurityConfigurerAdapter to configure Spring Security for the application. The configuration class does three things:
-
ensures that all requests require authentication;
-
configures Spring Boot to use the standard resource server security configuration with JSON Web Tokens (JWT); and
-
enables CORS (Cross-Origin Resource Sharing).
You also need to add a line to the application.properties file. This line changes the resource server port from the default 8080 to 8082. You have to do this because the VueJS application will run on 8080.
src/main/resources/application.properties
server.port=8082
You now have the code in place for the resource server. You’ll still need to configure the OAuth 2.0 and OIDC settings to use Okta as the provider, but first, I want to explain a little about CORS (Cross-Origin Resource Sharing). It’s not just an annoying error your browsers throw at you when you’re trying to develop apps locally! If you already totally understand CORS or are impatient to keep moving, feel free to skip the next section.
Spring Boot and CORS
CORS is a protocol that allows for browsers and servers to explicitly allow cross-origin resource sharing. By default, JavaScript running in a browser is restrained by a same-origin policy. This means that a Javascript application can only make calls to a server that resides on the same domain from which it was loaded. As a starting point, this makes a lot of sense from a security perspective and prevents a lot of abuse. However, this policy would be pretty restrictive if developers were not able to allow exceptions.
CORS allows resource servers to explicitly enable cross-origin requests, to tell the browser what type of requests it allows and from what origins. It is a white-listing scheme in the sense that all cross-origin requests will be denied by the browser unless the server is explicitly configured to allow them.
Notice that this protocol is mediated between the server and the browser. The client application, the Vue app in this case, doesn’t really have to do anything about CORS. From the perspective of the client app, the HTTP request to the resource server will either succeed or fail. If it fails because of CORS, the request will return a 401 (Unauthorized).
In this example, the resource server resides on http://localhost:8082 and the Vue client will be loaded from the Vue development server at http://localhost:8080. Because the port number is part of the domain, these two URLs are considered different origins by the browser. When the Vue app tries to make a request to the Spring Boot resource server, the browser will throw an error unless CORS is properly configured.
Note that not every request will trigger a CORS check. Certain types of simple requests are allowed, particularly requests that only allow form and text content types and the GET, HEAD, and POST request types. Take a look at the Mozilla developer docs on this for more info. However, any request with the Content-Type header application-json will always trigger a CORS check if made to a cross-origin domain.
The first thing the browser will do when a suitable request is made to a resource on a different domain is to send a CORS preflight request. This is actually a totally separate request made by the browser before it sends the actual request. The CORS preflight request essentially asks the browser if it is configured for CORS, if it will allow the type of request the client wants to send (DELETE, GET, POST, etc.), and if it will allow requests from the specific origin domain. The preflight request has nothing to do with authentication or authorization in the way we normally speak about it. It’s just a quick check to see if CORS is configured and if, in theory, the server might allow the request based on the HTTP verb and the client domain.
If the preflight header is not handled correctly, CORS will return an error to the client application. If the preflight header does not allow the type of request or does not allow requests from the client origin, CORS will also return an error to the client. The actual, original request to the server will never be made. Only once the preflight request has been properly handled will the browser allow the request from the client app to the resource server proceed.
Here is a general outline of a CORS request:
- JavaScript client app makes request to resource server on different domain
- Browser intercepts request, flags it as requiring CORS verification, and sends the CORS preflight request to the resource server
- Server responds to the preflight request by saying it will allow the client domain to make the type of request
- Browser sends the origin request to the server
- Server handles original request, authenticating and authorizing it using OAuth 2.0 and OIDC before returning a reply
From a developer perspective, CORS is something that needs to be configured on the server. Spring Boot makes this easy. There are two places in the Java code where CORS is configured. CORS must generally be enabled for the Spring Boot application. This is done in the SecurityConfiguration class in the configure(HttpSecurity http) method by adding the cors() method to the http configuration chain.
The second place is the @CrossOrigin annotation on the CaffeineLevelRestController class. This tells Spring Boot to configure CORS for all endpoints in this controller. By default, this will allow cross-origin requests from any domain. To restrict requests to only our client application domain, we could have used the annotation @CrossOrigin(origins = "http://localhost:8080").
Take a look at this Spring blog post for more info on Spring Boot and CORS.
Configure the Resource Server for Okta Auth
You should already have used the Okta CLI to either register a new account or log into an existing account. If not, please do so now. From a bash shell, type okta login, you should see a message that says something like: Okta Org already configured: https://dev-133337.okta.com/. This is your Okta base domain.
The only configuration you have to do for the resource server is to add the okta.oauth2.issuer property to the application.properties file. Spring Security and the Okta Spring Boot Starter will use the issuer endpoint to discover any other configuration it needs (except for the aud claim, which defaults to api://default).
Your issuer is simply your Okta domain plus /oauth2/default, such as https://dev-133337.okta.com/oauth2/default.
Another way to find your issuer URI is to open your Okta developer dashboard. Select Security and API from the left menu. This will show you your authorization servers. Mostly likely you only have the default authorization server that was set up for you when you signed up. This page will show you the audience (again, probably api://default) and the Issuer URI.
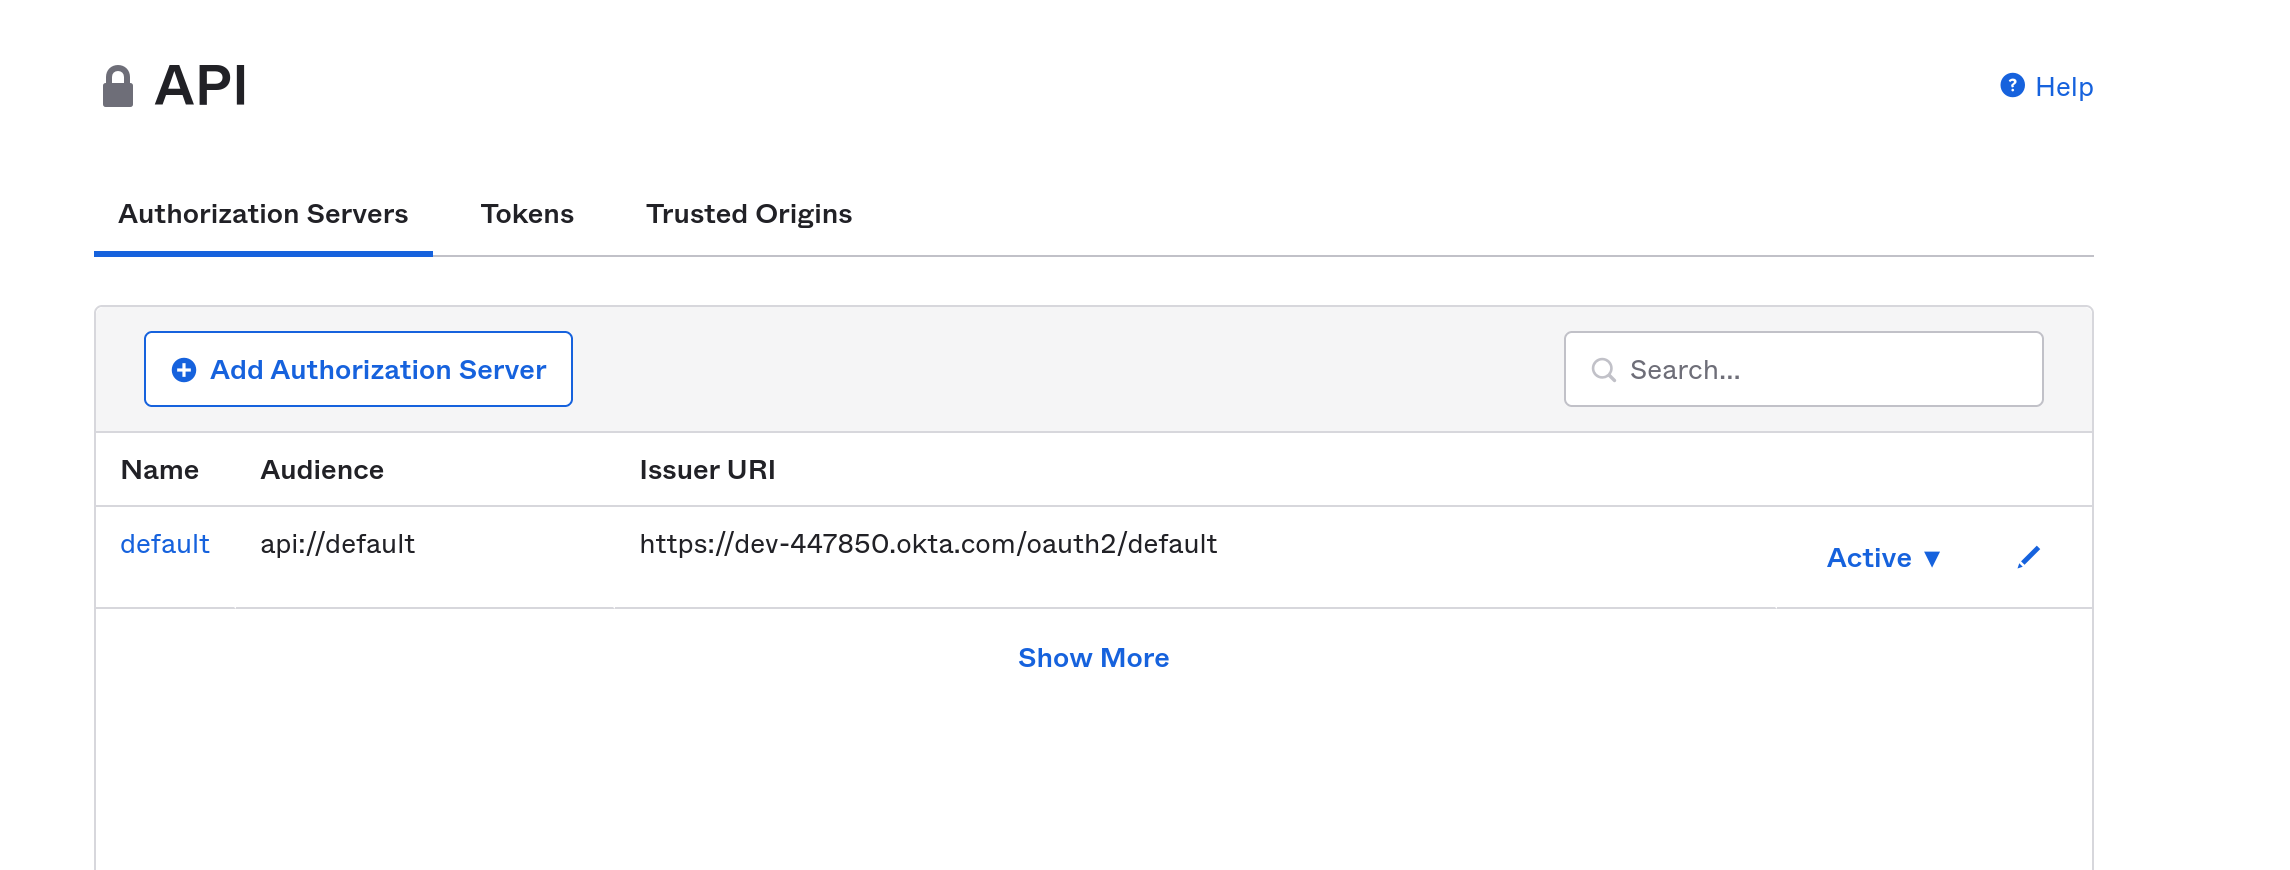
Add the issuer URI to your properties file, which should look something like below, replacing {yourOktaDomain} with your actual Okta domain.
src/main/resources/application.properties
server.port=8082
okta.oauth2.issuer=https://{yourOktaDomain}/oauth2/default
You now have a working, secure resource server. Go ahead and run the application.
./mvnw spring-boot:run
You should get a lot of console output that ends with the following.
2021-09-01 11:49:42.136  INFO 370077 --- [           main] o.s.b.w.embedded.tomcat.TomcatWebServer  : Tomcat started on port(s): 8082 (http) with context path ''
2021-09-01 11:49:42.143  INFO 370077 --- [           main] com.okta.springbootspa.DemoApplication   : Started DemoApplication in 2.021 seconds (JVM running for 2.199)
Use the Vue CLI to Bootstrap the Client App
The next step is to build the front-end, client application. The application will use Vue and the Okta Sign-In Widget to implement a secure client application. The Okta Sign-In Widget allows you to easily add Single Sign-On (SSO) and a secure login form to any application.
The instructions below for integrating the Okta Sign-In widget with Vue are largely pulled from this article on the Okta website, which is a great reference if you have any questions.
Create the app using the Vue CLI. Run the following command from the project root directory (the directory above the Spring Boot project directory). It will create a new directory, okta-app, which will contain the client application.
vue create okta-app
Select Manually select features.
Make sure Router and Choose Vue version are selected. Babel and Linter / Formatter were automatically selected for me as well, which is fine.
Select version 3.x.
Enable history mode for router (type y).
Select ESLint with error prevention only.
The defaults for the remainder of the options are fine: lint on save, saving configuration in dedicated files, and not saving this as a preset.
Navigate into the project directory.
cd okta-app
You need to install a few dependencies. The first three are required for Okta security and the sign-in widget. The last, axios, is the library you’ll use to make the HTTP request to the resource server.
npm install --save \
  @okta/okta-signin-widget@5.12.0 \
  @okta/okta-vue@5.0.1 \
  @okta/okta-auth-js@5.5.0 \
  axios@0.22.0
Create a src/okta/index.js file:
import OktaSignIn from '@okta/okta-signin-widget'
import { OktaAuth } from '@okta/okta-auth-js'

const yourOktaUri = '${yourOktaUri}';
const clientId = '${clientId}';

const oktaSignIn = new OktaSignIn({
    baseUrl: yourOktaUri,
    clientId: clientId,
    redirectUri: 'http://localhost:8080/login/callback',
    authParams: {
        pkce: true,
        issuer: `${yourOktaUri}/oauth2/default`,
        display: 'page',
        scopes: ['openid', 'profile', 'email']
    }
});

const oktaAuth = new OktaAuth({
    issuer: `${yourOktaUri}/oauth2/default`,
    clientId: clientId,
    redirectUri: window.location.origin + '/login/callback',
    scopes: ['openid', 'profile', 'email']
})

export { oktaAuth, oktaSignIn };
In the file above, you need to replace the placeholders ${...} with the appropriate values. Before you can do this, however, you need to use the CLI to create the OIDC application on the Okta servers, which you will do directly below.
Create a Single-Page OIDC Application on Okta
This time you’re going to create a single-page application for the front-end (instead of the web application type you used for the resource server). Enter the following command into a shell.
okta apps create
Press enter to accept the default Application name okta-app. (Application name here refers to the OIDC application created on the Okta servers).
For Type of Application, Select 2: Single Page App.
Change the Redirect URI to http://localhost:8080/login/callback.
Press enter to accept the default Post Logout Redirect.
You should see some output like the following.
Okta application configuration:
Issuer:    https://{yourOktaUri}/oauth2/default
Client ID: {clientId}
The values in brackets will, of course, be your actual values.
You need to go back to the src/okta/index.js file and replace the yourOktaUri and clientId variables at the top of the file with your values. The value for yourOktaUri is the Okta URI without any further path specifiers. It will look like this: https://dev-133337.okta.com
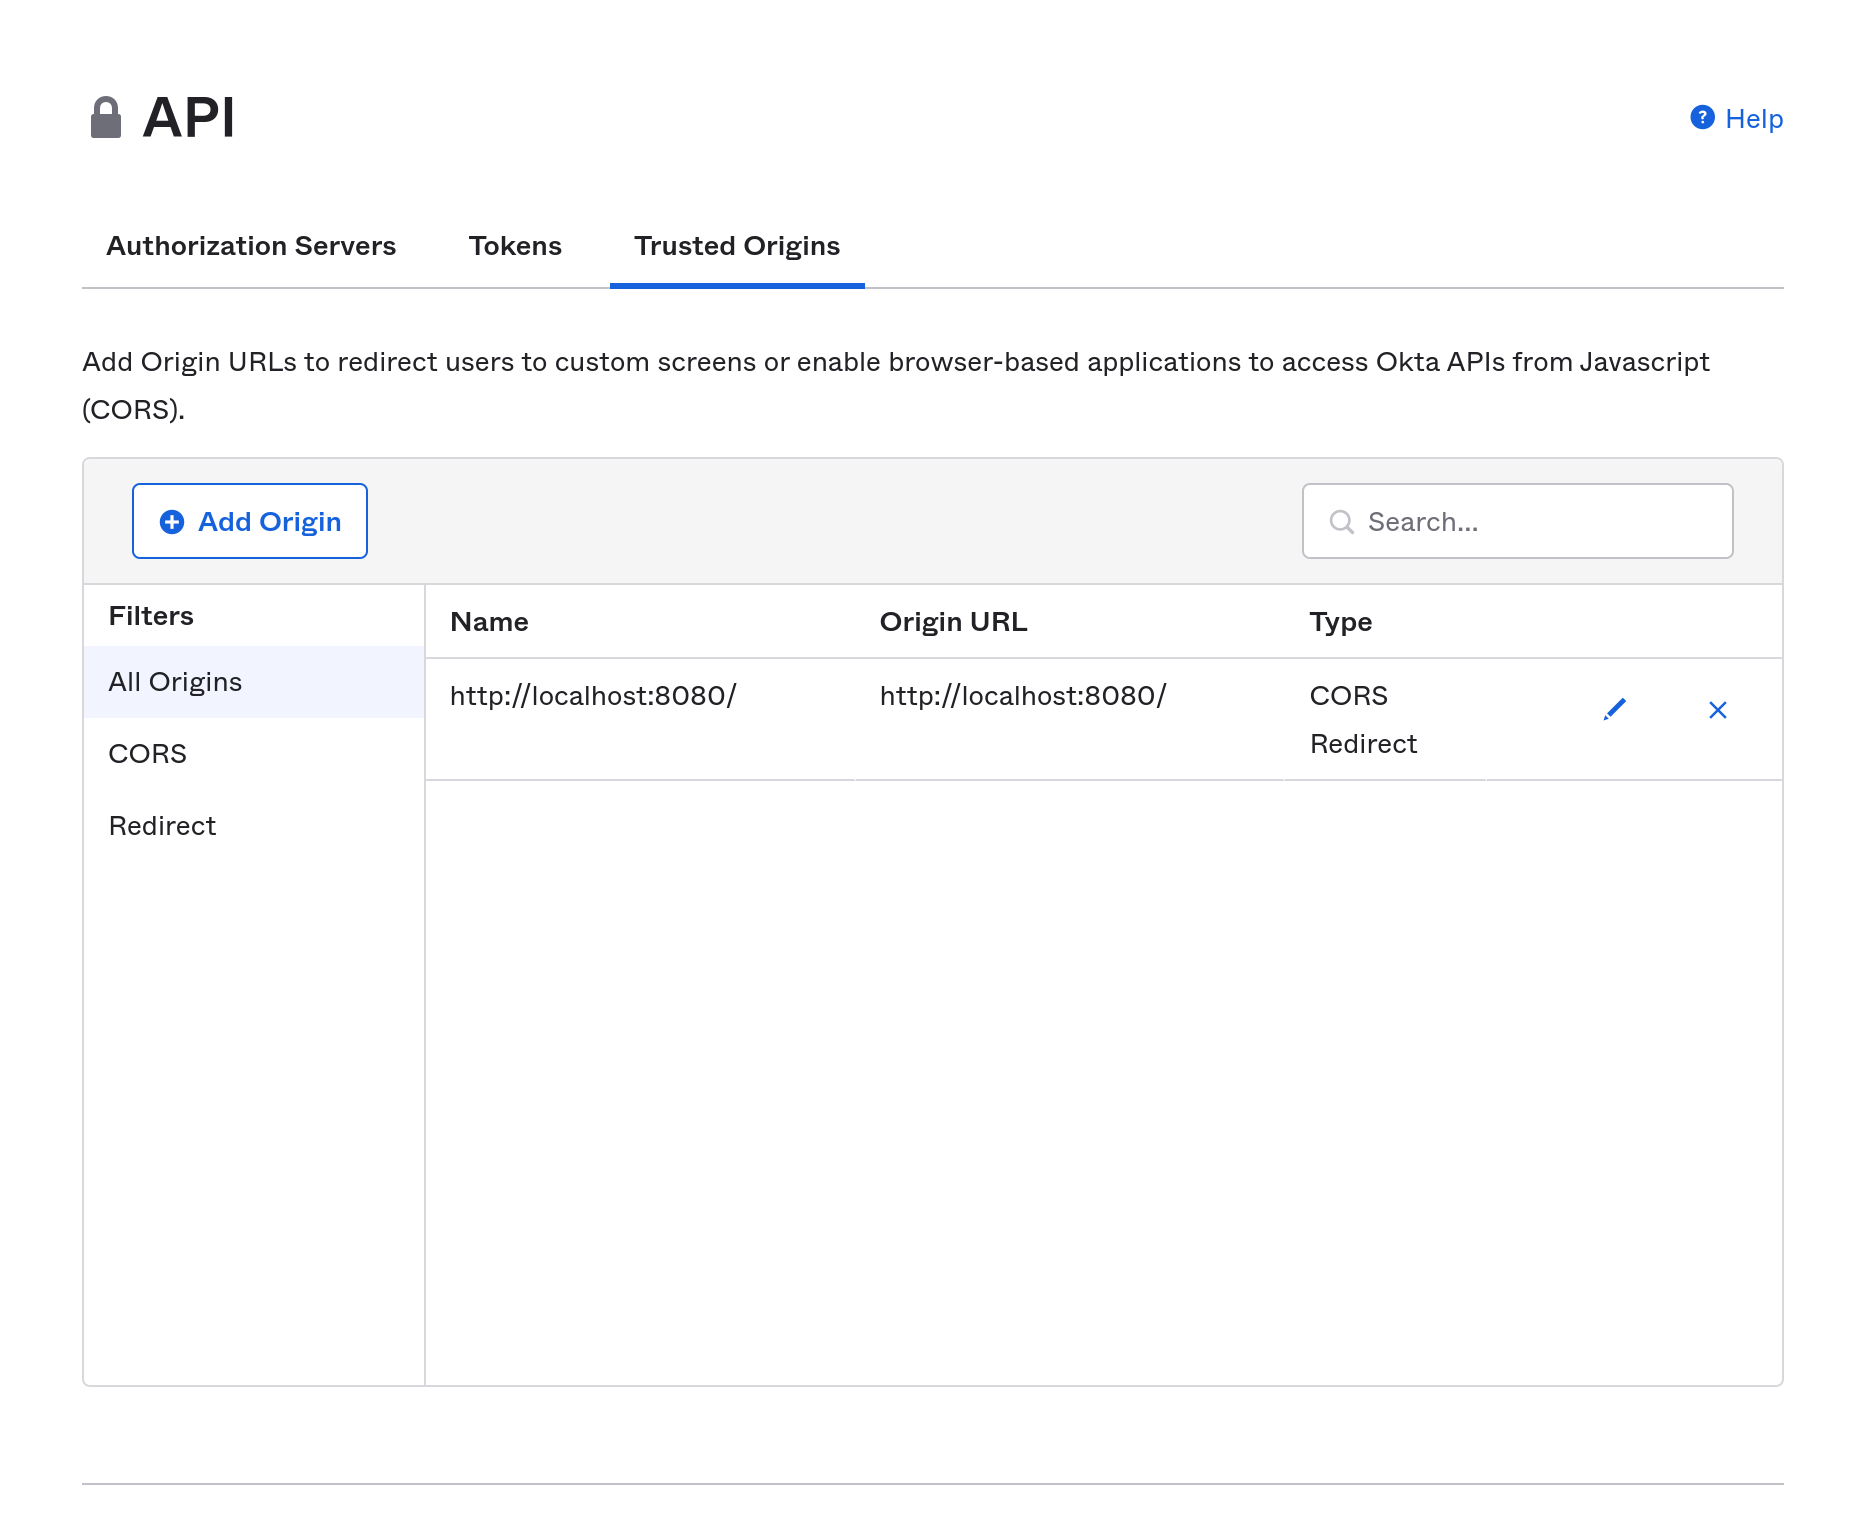
One of the things that the Okta CLI does for you is to add your application’s base URL to the CORS trusted origins for the Okta auth server. This is necessary because the the Okta Sign-In Widget will be making cross-origin requests, that, as noted above, would be blocked unless CORS is properly handled. You can see this by going to your Okta developer dashboard. with Security and API selected from the left-side menu, and Trusted Origins selected from the API tab. You’ll see that (in this case) http://localhost:8080 was added as a trusted origin of type CORS Redirect.
You can read more about CORS and Okta in the Okta documentation.
Finish the Vue Front-End Client App
The next file you need to create is a wrapper for the Okta Sign-In Widget.
Create a src/components/Login.vue file with the following content.
<template>
  <div class="login">
    <div id="okta-signin-container"></div>
  </div>
</template>

<script>
import '@okta/okta-signin-widget/dist/css/okta-sign-in.min.css'
import {oktaSignIn} from '../okta'

export default {
  name: 'Login',
  mounted: function () {
    this.$nextTick(function () {
      oktaSignIn.showSignInAndRedirect(
          { el: '#okta-signin-container' }
      )
    })
  },
  unmounted () {
    // Remove the widget from the DOM on path change
    oktaSignIn.remove()
  }
}
</script>
This file is verbatim from the Okta documentation on using the Okta Sign-In Widget with Vue. The docs are a great resource for more information.
In order for authentication to work, you need to define four routes.
/: A default page to handle basic control of the app./profile: A protected route to the current user’s profile./login: Shows the sign-in page./login/callback: A route to parse tokens after a redirect.
Update src/App.vue to provide the necessary navigation links.
<template>
  <div id="app2">
    <nav>
      <div>
        <router-link to="/">
          Home
        </router-link>
        <router-link to="/login" v-if="!authenticated">
          Login
        </router-link>
        <router-link to="/profile" v-if="authenticated" >
          Profile
        </router-link>
        <a v-if="authenticated" v-on:click="logout()">
          Logout
        </a>
      </div>
    </nav>
    <div id="content">
      <router-view/>
    </div>
  </div>
</template>

<script>
export default {
  name: 'app',
  data: function () {
    return { authenticated: false }
  },
  async created () {
    await this.isAuthenticated()
    this.$auth.authStateManager.subscribe(this.isAuthenticated)
  },
  watch: {
    // Everytime the route changes, check for auth status
    '$route': 'isAuthenticated'
  },
  methods: {
    async isAuthenticated () {
      this.authenticated = await this.$auth.isAuthenticated()
    },
    async logout () {
      await this.$auth.signOut()
    }
  }
}
</script>

<style>
nav div a { margin-right: 10px }
#app {
  width: 800px;
  margin: 0 auto;
}
a {
  text-decoration: underline;
  cursor: pointer;
}
</style>
Create src/components/Home.vue to define a home page.
<template>
  <div id="home">
    <h1>Okta Single-Page App Demo</h1>
    <div v-if="!this.$root.authenticated">
      <p>How much caffeine has your developer had today? <router-link role="button" to="/login">Log in to find out!</router-link></p>
    </div>

    <div v-if="this.$root.authenticated">
      <p>Welcome, {{claims.name}}!</p>
      <p>
        {{this.caffeineLevel}}
      </p>
    </div>
  </div>
</template>

<script>

import axios from 'axios';

export default {
  name: 'home',
  data: function () {
    return {
      claims: '',
      caffeineLevel: ''
    }
  },
  created () { this.setup() },
  methods: {
    async setup () {
      if (this.$root.authenticated) {
        this.claims = await this.$auth.getUser()
        let accessToken = this.$auth.getAccessToken();
        console.log(`Authorization: Bearer ${accessToken}`);
        try {
          let response = await axios.get('http://localhost:8082/howcaffeinatedami',
              { headers: {'Authorization': 'Bearer ' + accessToken } } );
          this.caffeineLevel = response.data;
        }
        catch (error) {
          this.caffeineLevel = `${error}`
        }
      }
    }
  }
}
</script>
The code above does a couple things worth pointing out. It demonstrates how to check if a user is authenticated, how to get the user object from the $auth object, and how to get the access token so it can be used in a request to a resource server.
Add a Profile component at src/components/Profile.vue. This route will only be visible for users with a valid access token.
<template>
  <div id="profile">
    <h1>My User Profile (ID Token Claims)</h1>
    <p>
      Below is the information from your ID token.
    </p>
    <table>
      <thead>
      <tr>
        <th>Claim</th>
        <th>Value</th>
      </tr>
      </thead>
      <tbody>
      <tr v-for="(claim, index) in claims" :key="index">
        <td>{{claim.claim}}</td>
        <td :id="'claim-' + claim.claim">{{claim.value}}</td>
      </tr>
      </tbody>
    </table>
  </div>
</template>

<script>
export default {
  name: 'Profile',
  data () {
    return {
      claims: []
    }
  },
  async created () {
    this.claims = await Object.entries(await this.$auth.getUser()).map(entry => ({ claim: entry[0], value: entry[1] }))
  }
}
</script>
The /login route is the wrapper for the Sign-In Widget and redirects if the user is already logged in. You already created the component for this route above.
The /login/callback route is part of the @okta/okta-vue package. It handles a lot of the mechanics of the OAuth 2.0 authorization code flow, as well as manages token parsing, tokens storage, and redirection after authentication.
Next you need to define the Vue router. Replace src/router/index.js with the following. You might notice that this code requires authentication for two routes: the home route and the profile route.
import { createRouter, createWebHistory } from 'vue-router'
import { LoginCallback, navigationGuard } from '@okta/okta-vue'
import HomeComponent from '@/components/Home'
import LoginComponent from '@/components/Login'
import ProfileComponent from '@/components/Profile'

const router = createRouter({
  history: createWebHistory(),
  routes: [
    {
      path: '/',
      component: HomeComponent,
      meta: {
        requiresAuth: true
      }
    },
    {
      path: '/login',
      component: LoginComponent
    },
    {
      path: '/login/callback',
      component: LoginCallback
    },
    {
      path: '/profile',
      component: ProfileComponent,
      meta: {
        requiresAuth: true
      }
    }
  ]
})

router.beforeEach(navigationGuard)

export default router
Replace the code in src/main.js with the following.
import { createApp } from 'vue'
import App from './App.vue'
import router from './router'
import OktaVue from '@okta/okta-vue'
import { oktaAuth } from './okta';

createApp(App)
    .use(router)
    .use(OktaVue, {
        oktaAuth,
        onAuthRequired: () => {
            router.push('/login')
        },
        onAuthResume: () => {
            router.push('/login')
        },
    })
    .mount('#app')
You can now run the Vue app.
npm run serve
Test the Completed Server and Client
Make sure your resource server is still running. Here are the commands in case you need to restart the server (which, of course, need to be run from the Spring Boot project’s root directory).
./mvnw spring-boot:run
Open the app in your browser at http://localhost:8080.
Because the app is set to secure the home page, you will immediately be directed to the Okta login screen. Log in using your Okta credentials.
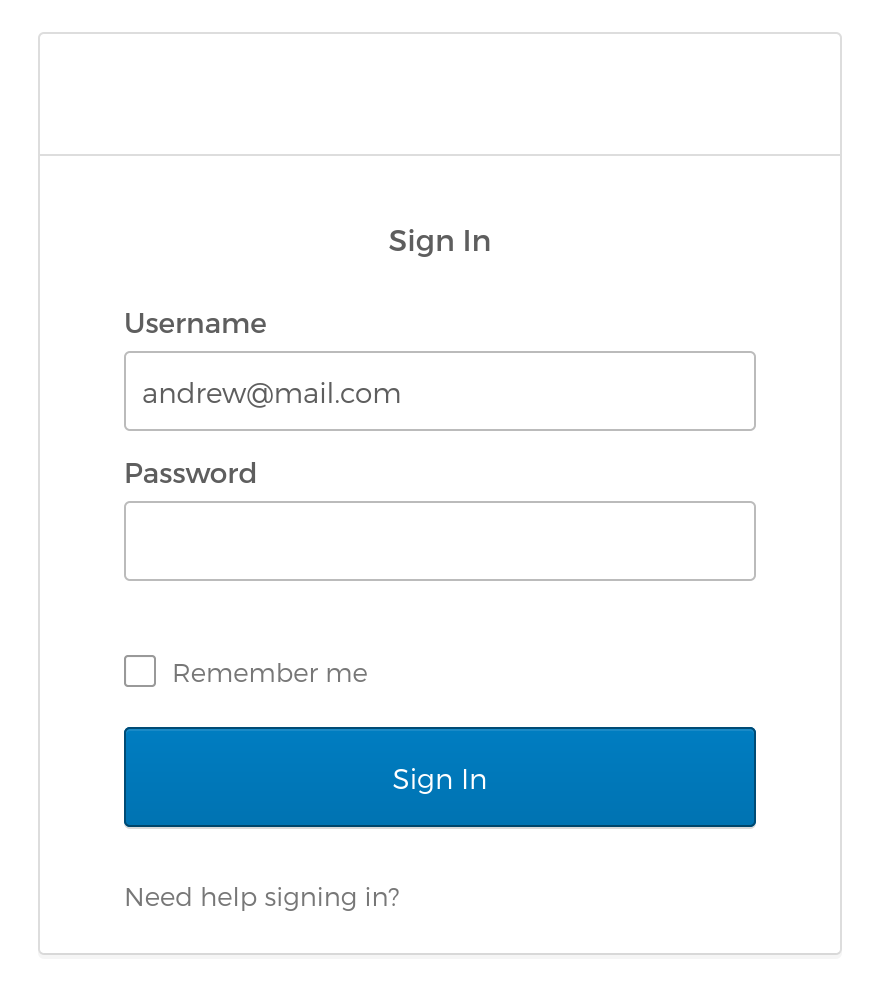
When you enter your credentials, the Okta Sign-In Widget and the Vue app will follow the OAuth 2. 0 Authorization Code flow. In this flow, the client sends the login credentials to the Okta auth server and, if authentication is successful, receives an authorization code. The client app calls the Okta token endpoint, trading this authorization code for a JWT (JSON Web Token). The standard OAuth 2.0 authorization code flow requires that the application send the client secret along with the code to the token endpoint.
However, in the context of a client-side application, putting the client secret in public browser code would be a major security violation. Instead, Okta uses PKCE (Proof Key for Code Exchange). In this modified flow, the client generates a one-time key that is sent with the request and is associated with the authorized JWT. This is used to ensure that only the client that requested the JWT can use it.
There’s a great, in-depth article on the PKCE flow by Micah Silverman on the Okta Dev Blog.
Once you’ve logged in you’ll see the simple application screen below.
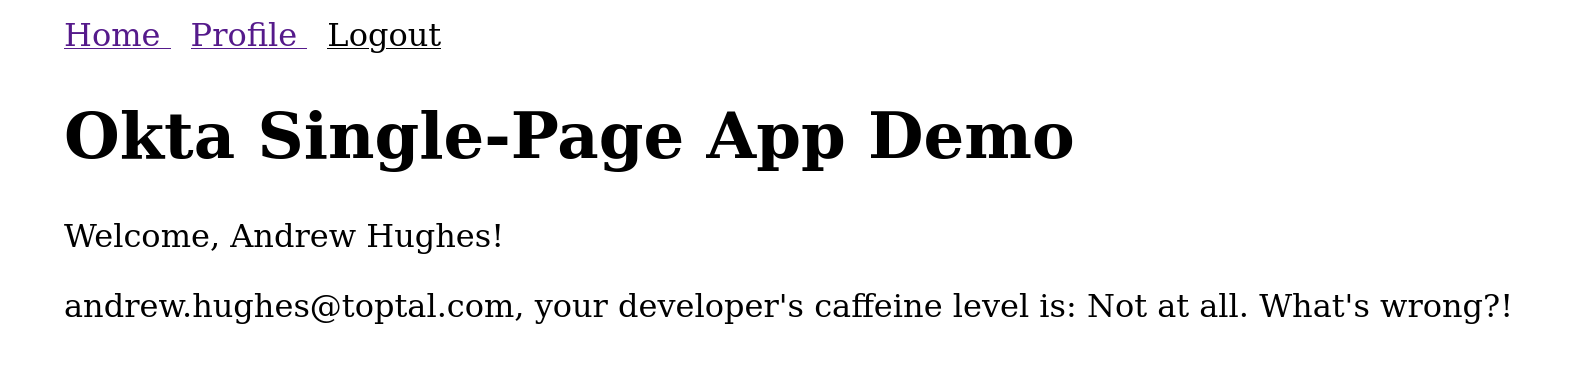
Notice that it has pulled your name and email from your authentication information. It has also made an HTTP request to the Spring Boot REST server using the JWT to determine the caffeine level of your developer (the /howcaffeinatedami endpoint). Don’t worry! Although the image above is reporting your developer’s caffeine level is “not at all,” never fear. I can promise you this is incorrect and simply a random response merely for mildly humorous effect.
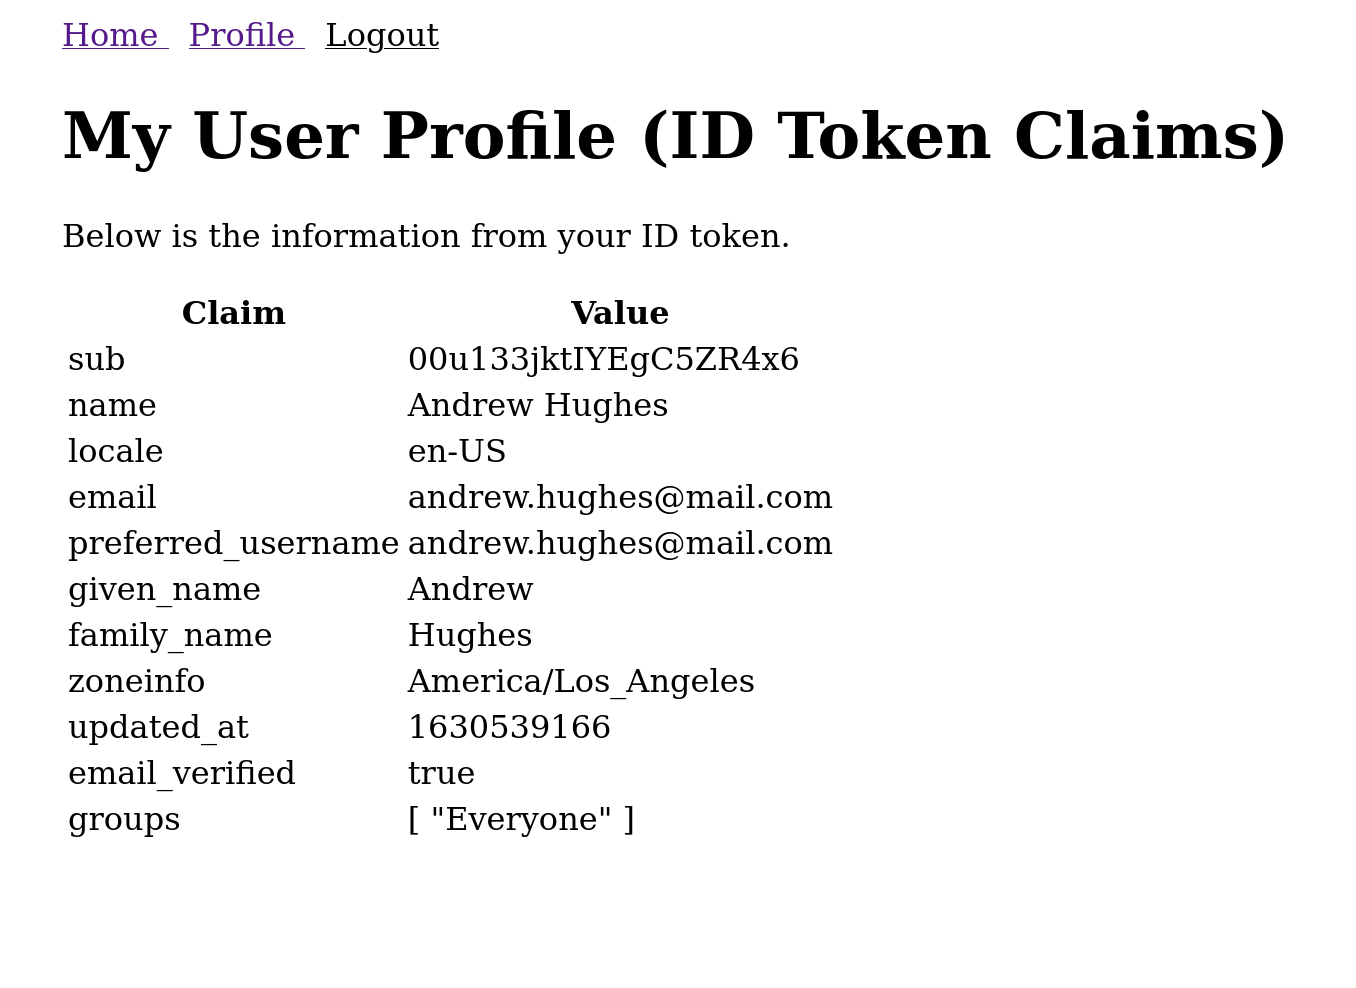
You can also go to the profile page at http://localhost:8080/profile, which will show you all of the claims in the authenticated token.
Learn More About Application Security
In this post you saw how to use Spring Boot to create a simple resource server and Vue to create a front-end client. You saw how to use Okta to implement a secure application stack. The front-end client used the Okta Sign-In Widget to implement the OAuth 2.0 authorization code flow with PKCE for a secure token exchange. The resource server was also secured using Okta by including Okta’s Spring Boot Starter, which made adding JWT auth to the project quick and easy.
Check out the source for this example project on GitHub.
To learn more about OAuth 2.0 and OIDC, check out these blog posts
- Easy Single Sign-On with Spring Boot and OAuth 2.0
- Add Social Login to Your Spring Boot 2.0 App
- Build a CRUD App with Vue.js, Spring Boot, and Kotlin
- Use PKCE with OAuth 2.0 and Spring Boot for Better Security
- Migrate Your Spring Boot App to the Latest and Greatest Spring Security and OAuth 2.0
Follow Okta Developers for more great content and updates from the team! You can find us on Twitter, Facebook, subscribe to our YouTube Channel, or start the conversation below.
Okta Developer Blog Comment Policy
We welcome relevant and respectful comments. Off-topic comments may be removed.