Session Clustering for OAuth 2.0 Applications
A common OAuth 2.0 question we get: "How do I deal with OAuth in a load-balanced application?" The short answer: There’s nothing specific about session clustering for OAuth. The longer answer is—you likely still need to worry about cluster session management. This post will discuss how an OAuth login relates to your application’s session. And we’ll build a simple, secure, load-balanced application to demonstrate.
Note: In May 2025, the Okta Integrator Free Plan replaced Okta Developer Edition Accounts, and the Okta CLI was deprecated.
We preserved this post for reference, but the instructions no longer work exactly as written. Replace the Okta CLI commands by manually configuring Okta following the instructions in our Developer Documentation.
Prerequisites
-
HTTPie, a user-friendly HTTP CLI
Sessions and OAuth 2.0 Applications
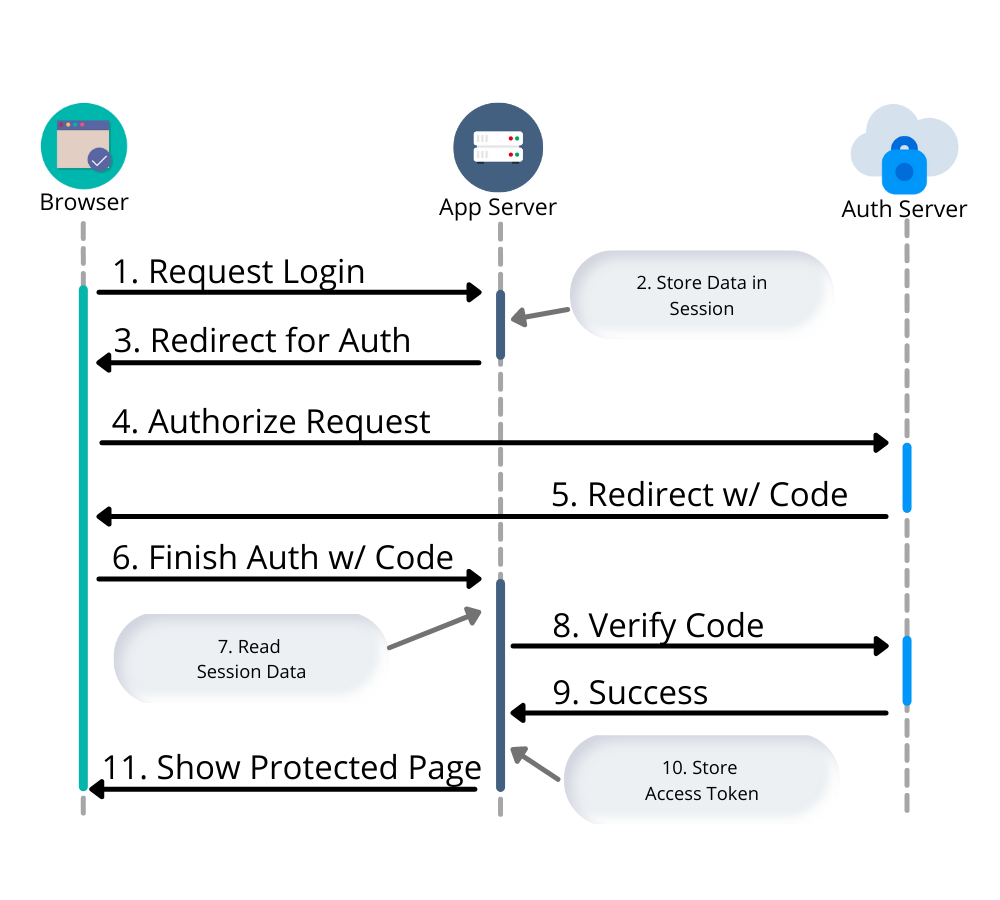
An application that uses an OAuth 2.0 redirect, an "Authorization Code Grant", typically uses a server-side session to temporarily store the state of the login process until it completes. Let’s look at a simplified OAuth login flow:
-
A user requests to log in - either by clicking on a login button or automatically when they request a protected page.
-
Web App stores information about the current session - OAuth state info and optionally a PKCE code verifier and/or a nonce for OpenId Connect (OIDC).
-
The response is a browser redirect to the authorization server.
-
User interacts with the authorization server to provide credentials and confirm consent.
-
Authorization server issues redirect with a code back to the web app.
-
User authorization is finalized on the backend.
-
The web app reads the previously stored OAuth data from the session.
-
Verification that the user has been authorized with the authorization server.
-
Auth Server response with an OAuth access token.
-
Web app stores access token in session.
-
User is logged in.
Two separate requests are made to the web application: the initial login request and a verification step. Both requests access the same session information. For your application, this means once you start scaling, you need to think about session management.
Stateless with JWTs
At this point, you might wonder if you can cram everything in a JWT (JSON Web Token) and make this process stateless; removing the need for any session clustering. You could, but you would need to use a JWE (JSON Web Encryption) to ensure the browser didn’t have access to any sensitive data. There are a whole host of reasons not to use JWTs as session tokens, but those issues are outside the scope of this post.
Load Balancer Sticky Sessions
Another option to avoid session replication or clustering is to use "sticky sessions" (or "session affinity"), but this creates a fragile environment. If a web server fails or is taken down for any reason, all users associated with that server would essentially be logged out. Sticky sessions also violate the 12-factor principles of process statelessness.
| Don’t confuse 12 Factor’s reference to "process statelessness" with what’s meant by "stateless" in the previous section. There we refer specifically to the need for an application relay on the "state" of a server between requests, for example data cached in memory or a file. Instead, a backing service should be used. In the case of session storage, the example of Redis is used, which is exactly what we’re going to do in the next section. |
Setup HAproxy and Redis
To build a load-balanced application, we need a minimum of three things—a load balancer (HAproxy), shared session storage (Redis), and multiple instances of a web application (Spring Boot).
If you want to skip right to the code, take a look at this GitHub repo.
Create a new directory for this project:
mkdir oauth-sessions
cd oauth-sessions
Configure HAproxy
HAproxy is used to distribute requests between multiple backend applications and create a configuration file, haproxy.cfg, that will serve two different web apps (one on port 8081, and another on 8082).
global
    daemon
    maxconn 2000

    # send request logs to stdout, to make debugging easier
    log stdout format raw local0

defaults
    mode http
    log global
    option httplog
    timeout connect 5000ms
    timeout client 50000ms
    timeout server 50000ms

frontend http-in
    bind *:8080
    default_backend webapps

backend webapps
    balance roundrobin

    # `host.docker.internal` refers to host that is running Docker Desktop
    # On Linux add `--add-host=host.docker.internal:host-gateway` to `docker run` to
    # mimic the functionality
    server webapp1 host.docker.internal:8081
server webapp2 host.docker.internal:8082| Make sure there is a trailing newline, or you may have trouble starting up HAproxy. |
Start HAproxy and Redis with Docker
I’ll be running the example web application directly on my laptop, but HAproxy and Redis can both run as Docker containers. Create a docker-compose.yml file:
version: '3.8'
services:

  haproxy:
    image: docker.io/haproxy:2.4-alpine
    volumes:
      - ./haproxy/haproxy.cfg:/usr/local/etc/haproxy/haproxy.cfg
    extra_hosts:
      # Docker Desktop uses `host.docker.internal` for the host,
      # mimic this for linux installs, requires Docker 20.10+
      - host.docker.internal:host-gateway
    ports:
      - 8080:8080

  redis:
    # Starts Redis without persistence
    image: docker.io/redis:6.2.5-alpine
    ports:
      - 6379:6379
Start both HAproxy and Redis by running:
docker compose up
You can stop the process by pressing Ctrl+C or running the docker compose down command from the same directory.
|
Build a Secure Spring Boot Application
Now that the system dependencies are out of the way, let’s move on to building a Spring Boot application.
Create a new Spring Boot application by visiting start.spring.io and selecting the Web and Okta dependencies or by running the following command:
https start.spring.io/starter.tgz \
  bootVersion==2.5.4 \
  dependencies==web,okta \
  groupId==com.example \
  artifactId==webapp \
  name=="Web Application" \
  description=="Demo Web Application" \
  packageName==com.example \
  javaVersion==11 \
| tar -xzvf -
To give a visual indication of which server handled the request, create a REST controller that displays the server port in src/main/java/com/example/Endpoints.java:
package com.example;

import org.springframework.beans.factory.annotation.Value;
import org.springframework.web.bind.annotation.GetMapping;
import org.springframework.web.bind.annotation.RestController;

@RestController
public class Endpoints {

    @GetMapping("/")
    String serverInfo(@Value("${server.port}") int port) {
        return "Hello, your server port is: " + port;
    }
}
Start the Spring Boot Application
In the previous section, HAproxy was bound to port 8080, which is also the default port for Spring Boot. Start the application on port 8081 using:
SERVER_PORT=8081 ./mvnw spring-boot:runAt this point, the Spring Boot application has NOT been configured to use Redis or OAuth, but you can still test out the server by grabbing the auto-generated password from the console output. It will look something like this:
Using generated security password: 4302a714-580b-4d01-91d9-5d9597ee1bb5Copy the password and make a request to the Spring Boot application:
http :8081/ --auth user:<your-password>You will see a response containing the server port:
Hello, your server port is: 8081Great, this means that the Spring Boot application is up and running! Now make sure you can access the server through the load balancer on port 8080:
http :8080/ --auth user:<your-password>You should see the same response; if you see a 503 Service Unavailable, try the request one more time.
The HAproxy configuration used in this post does NOT have health checks enabled, so it will alternate requests between port 8081 and 8082; this is intentional to simplify the configuration. Take a look at Spring Actuator if you want to add health checks and other monitoring to your application.
|
Stop the Spring Boot server using Ctrl+C. It’s time to secure the application with OAuth 2.0.
Secure Spring Boot with OAuth 2.0
Before you begin, you’ll need a free Okta developer account. Install the Okta CLI and run okta register to sign up for a new account. If you already have an account, run okta login.
Then, run okta apps create. Select the default app name, or change it as you see fit.
Choose Web and press Enter.
Select Okta Spring Boot Starter.
Accept the default Redirect URI values provided for you. That is, a Login Redirect of http://localhost:8080/login/oauth2/code/okta and a Logout Redirect of http://localhost:8080.
What does the Okta CLI do?
The Okta CLI will create an OIDC Web App in your Okta Org. It will add the redirect URIs you specified and grant access to the Everyone group. You will see output like the following when it’s finished:
Okta application configuration has been written to:
  /path/to/app/src/main/resources/application.properties
Open src/main/resources/application.properties to see the issuer and credentials for your app.
okta.oauth2.issuer=https://dev-133337.okta.com/oauth2/default
okta.oauth2.client-id=0oab8eb55Kb9jdMIr5d6
okta.oauth2.client-secret=NEVER-SHOW-SECRETS
NOTE: You can also use the Okta Admin Console to create your app. See Create a Spring Boot App for more information.
Now that the application has been configured to use OAuth 2.0, start two different instances (open two different terminal windows):
SERVER_PORT=8081 ./mvnw spring-boot:runAnd the second one on port 8082:
SERVER_PORT=8082 ./mvnw spring-boot:runAccessing the applications through the load balancer will yield odd results; open a private/incognito window to http://localhost:8080 and try to log in. You will be redirected to Okta where you can type in your account credentials. However, after pressing the Sign In, you will see an error page:
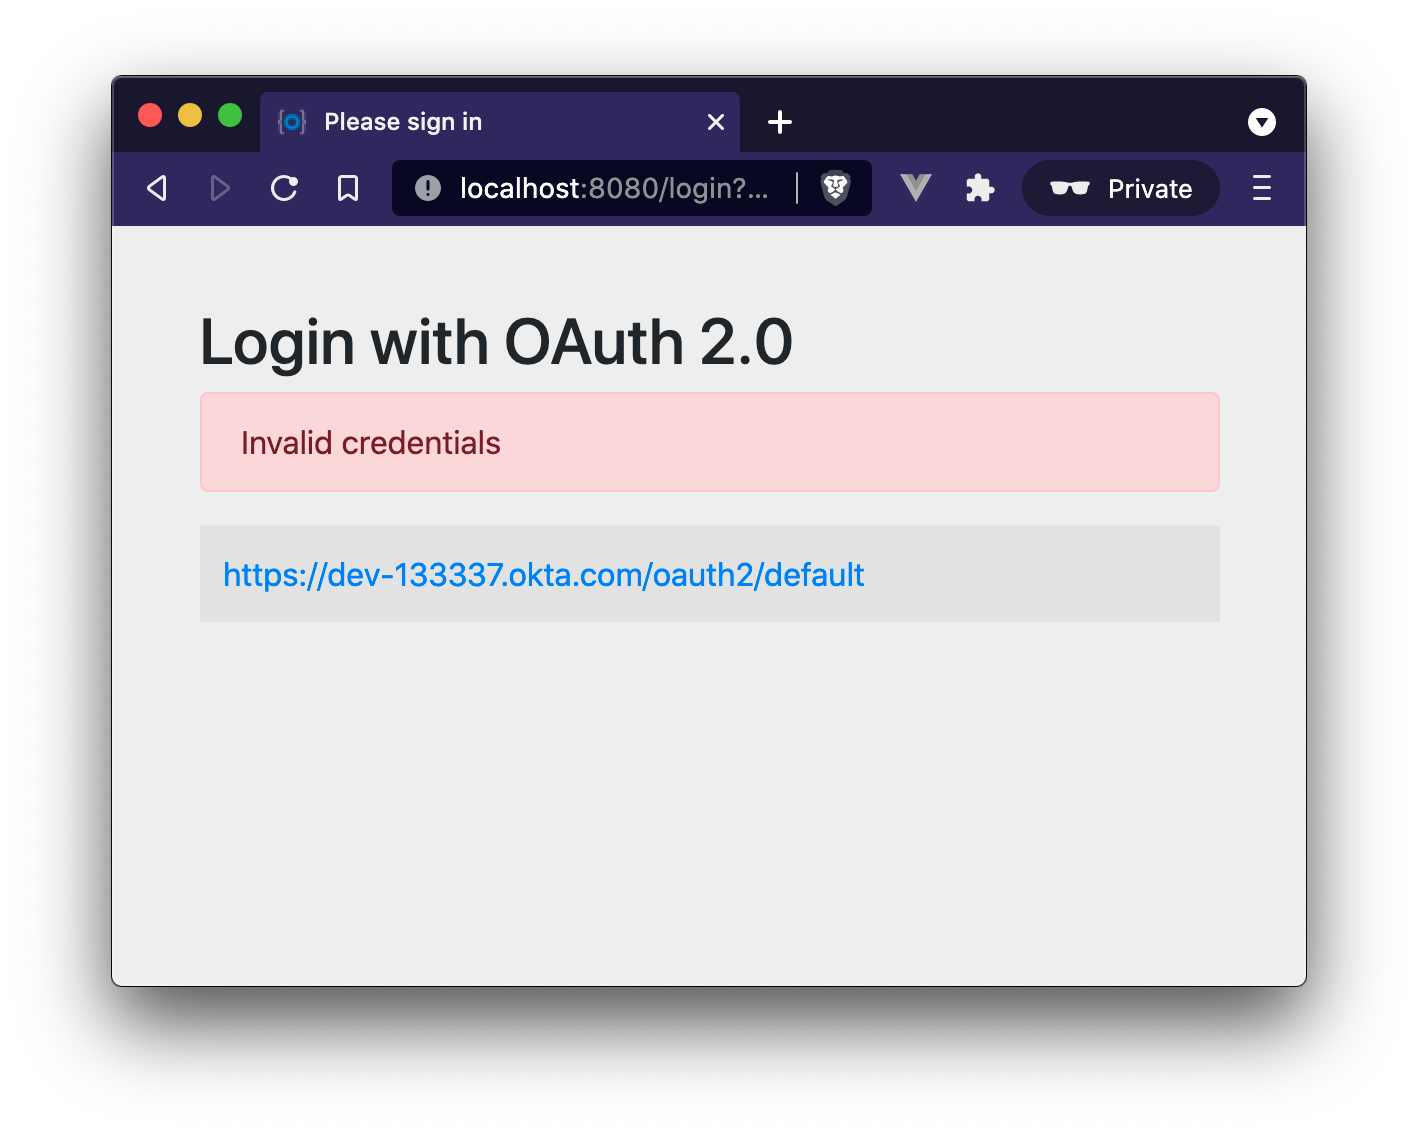
Think back to the sequence diagram at the beginning of this post, and see if you can spot the problem. The initial login request (step one) happened on one instance, and the final one occurred on another (step six). Updating the application to use shared session storage will fix the problem.
Let’s do that!
Share Sessions with Redis
If you are following along, you already have a Redis server running; now we’ll configure the Spring Boot application to make use of it. Luckily, Spring Session makes the process painless.
Open up the pom.xml and add the following inside the <dependencies> block:
<dependency>
    <groupId>org.springframework.boot</groupId>
    <artifactId>spring-boot-starter-data-redis</artifactId>
</dependency>
<dependency>
    <groupId>org.springframework.session</groupId>
    <artifactId>spring-session-data-redis</artifactId>
</dependency>
By default, Spring Session configures Redis to connect to localhost on port 6379 and NO password. Take a look at the Spring Session documentation for various configuration options.
|
Restart the Spring Boot applications. (Remember there’s one on port 8081 and another on 8082).
Open up your browser again and try to access http://localhost:8080/; this time, you will be able to log in without issue!
Refresh the browser a few times and you will see the response alternating between the ports:
Hello, your server port is: 8081And:
Hello, your server port is: 8082Easy enough, just a couple of dependencies to configure shared session storage! If Redis isn’t your jam, Spring Session also supports databases, Hazelcast, MongoDB, and Apache Geode.
Learn More OAuth 2.0 and Session Management
This post shows how to manage sessions for a simple load-balanced application that uses OAuth 2.0. Our example focused on the Spring Boot portion of the application, but it’s far from production-ready. A few other concerns would need to be addressed first:
-
A single HAproxy and Redis instance are single points of failure
-
Redis data is not persisted
-
Redis connections are not secured
-
TLS should be enabled for HAproxy and the Spring Boot application
If you want to learn more, check out this related content:
If you have questions, please leave a comment below. If you liked this tutorial, follow @oktadev on Twitter, follow us on LinkedIn, or subscribe to our YouTube channel.
Brian Demers is a Developer Advocate at Okta and a PMC member for the Apache Shiro project. He spends much of his day contributing to OSS projects in the form of writing code, tutorials, blogs, and answering questions. Along with typical software development, Brian also has a passion for fast builds and automation. Away from the keyboard, Brian is a beekeeper and can likely be found playing board games. You can find him on Twitter at @briandemers.
Okta Developer Blog Comment Policy
We welcome relevant and respectful comments. Off-topic comments may be removed.