Command Line Login with the OAuth Device Grant
Even if you’ve never heard of the OAuth 2.0 Device Authorization Grant, formerly known as the Device Flow, you’ve probably seen it in action on a smart TV or other streaming device. The Device Authorization Grant is commonly used on devices with limited keyboard input ability. The process allows you to log in to an account more easily via a separate browser on your laptop, mobile phone, or other companion rich-input device.
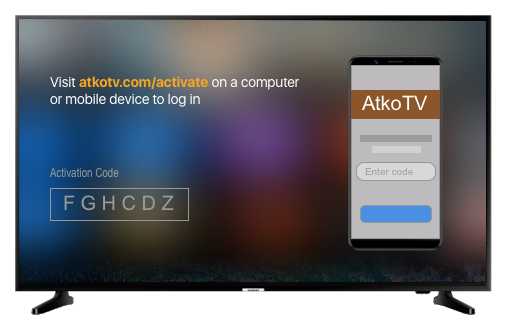
For instance, if AtkoTV is launching a streaming service, its streaming Apple TV app might present you with something like the sign-in screen below. Instead of struggling to input anything on your TV, you’d log in on your laptop or mobile phone to complete the sign-in process.
Back in 2019, Aaron Parecki showed how to support the OAuth 2.0 Device Grant, but it required you to deploy a proxy. Fast forward a couple years, and today we’re happy to let you know that the Okta platform has officially introduced native Device Authorization, and it’s available now as an early access feature. This post will show you how to enable the Device Flow process in your Okta account, and how to use it in a real application.
The OAuth 2.0 Device Grant Interaction
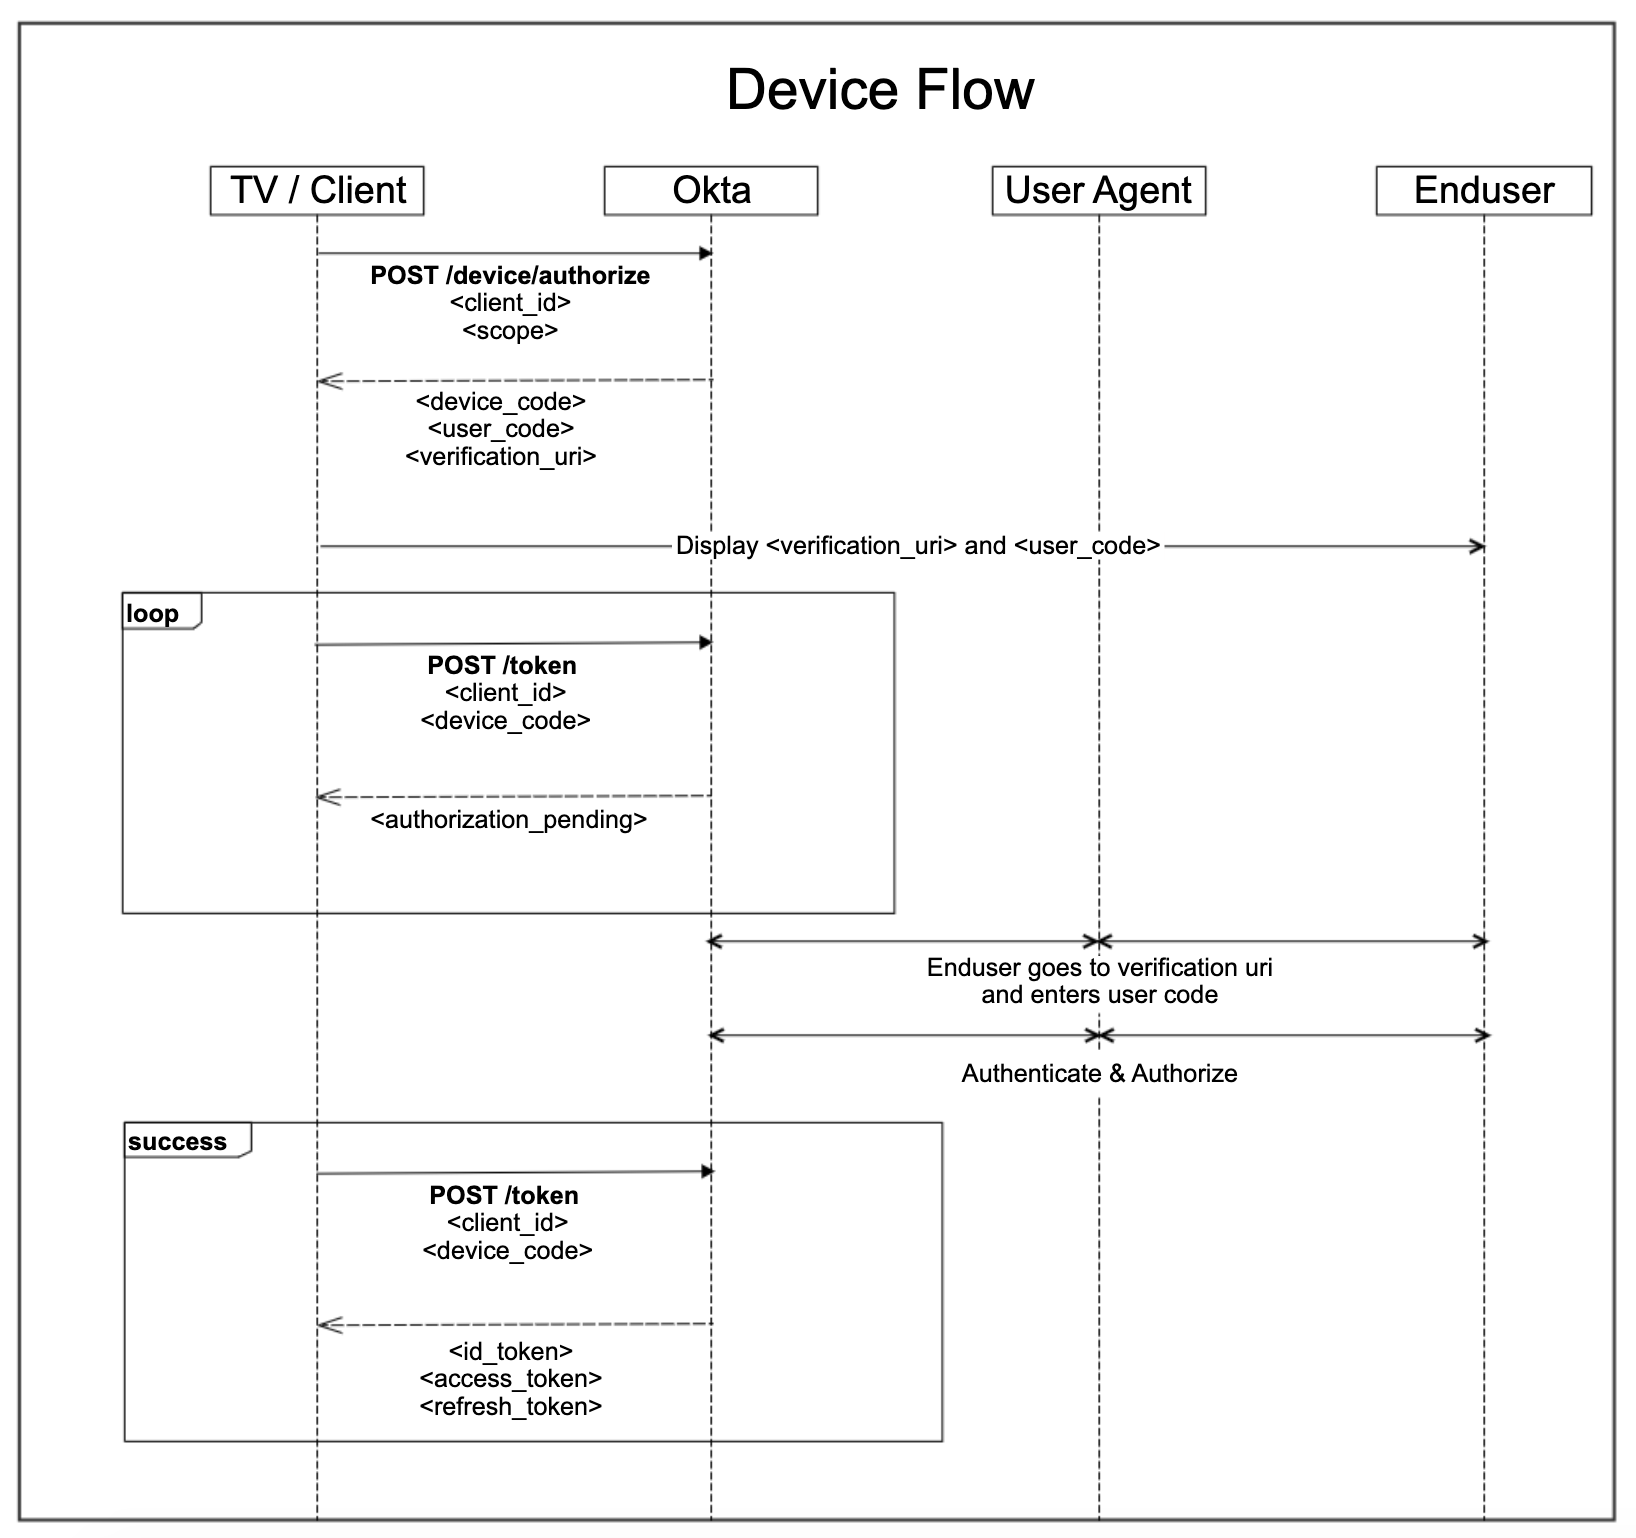
The OAuth 2.0 specification defines the Device Grant as “an OAuth 2.0 extension that enables devices with no browser or limited input capability to obtain an access token.” The official RFC describes the interaction in detail, as you can also see in the following flow diagram.
Let’s take a look at the code. In the command line, we can perform the first authorization step as follows:
curl -X POST \
  --url https://dev-133337.okta.com/oauth2/v1/device/authorize \
  --data 'client_id=0oa15wulqt5yqD9FP5d7&scope=openid profile offline_access'
We will get back a response:
{
  "device_code": "df1b060b-4e36-4bbe-98aa-5dcb11909f5f",
  "user_code": "DRTDNTJC",
  "verification_uri": "https://dev-133337.okta.com/activate",
  "verification_uri_complete": "https://dev-133337.okta.com/activate?user_code=DRTDNTJC",
  "expires_in": 600,
  "interval": 5
}
In the second step, to poll for the access token, we issue the following command:
curl -X POST \
  --url https://dev-133337.com/oauth2/v1/token \
  --data 'device_code=df1b060b-4e36-4bbe-98aa-5dcb11909f5f&grant_type=urn:ietf:params:oauth:grant-type:device_code&client_id=0oa15wulqt5yqD9FP5d7'
If the user has not logged in, the response looks like this:
{
  "error": "authorization_pending",
  "error_description": "The device authorization is pending. Please try again later."
}
Otherwise, we’ll get a response back with the access_token, refresh_token and id_token.
{
  "token_type": "Bearer",
  "expires_in": 3600,
  "access_token": "....",
  "scope": "openid profile offline_access",
  "refresh_token": "....",
  "id_token": "...."
}
How to Enable the Device Grant in Okta
Follow these steps to add a new app that supports the Device Grant.
-
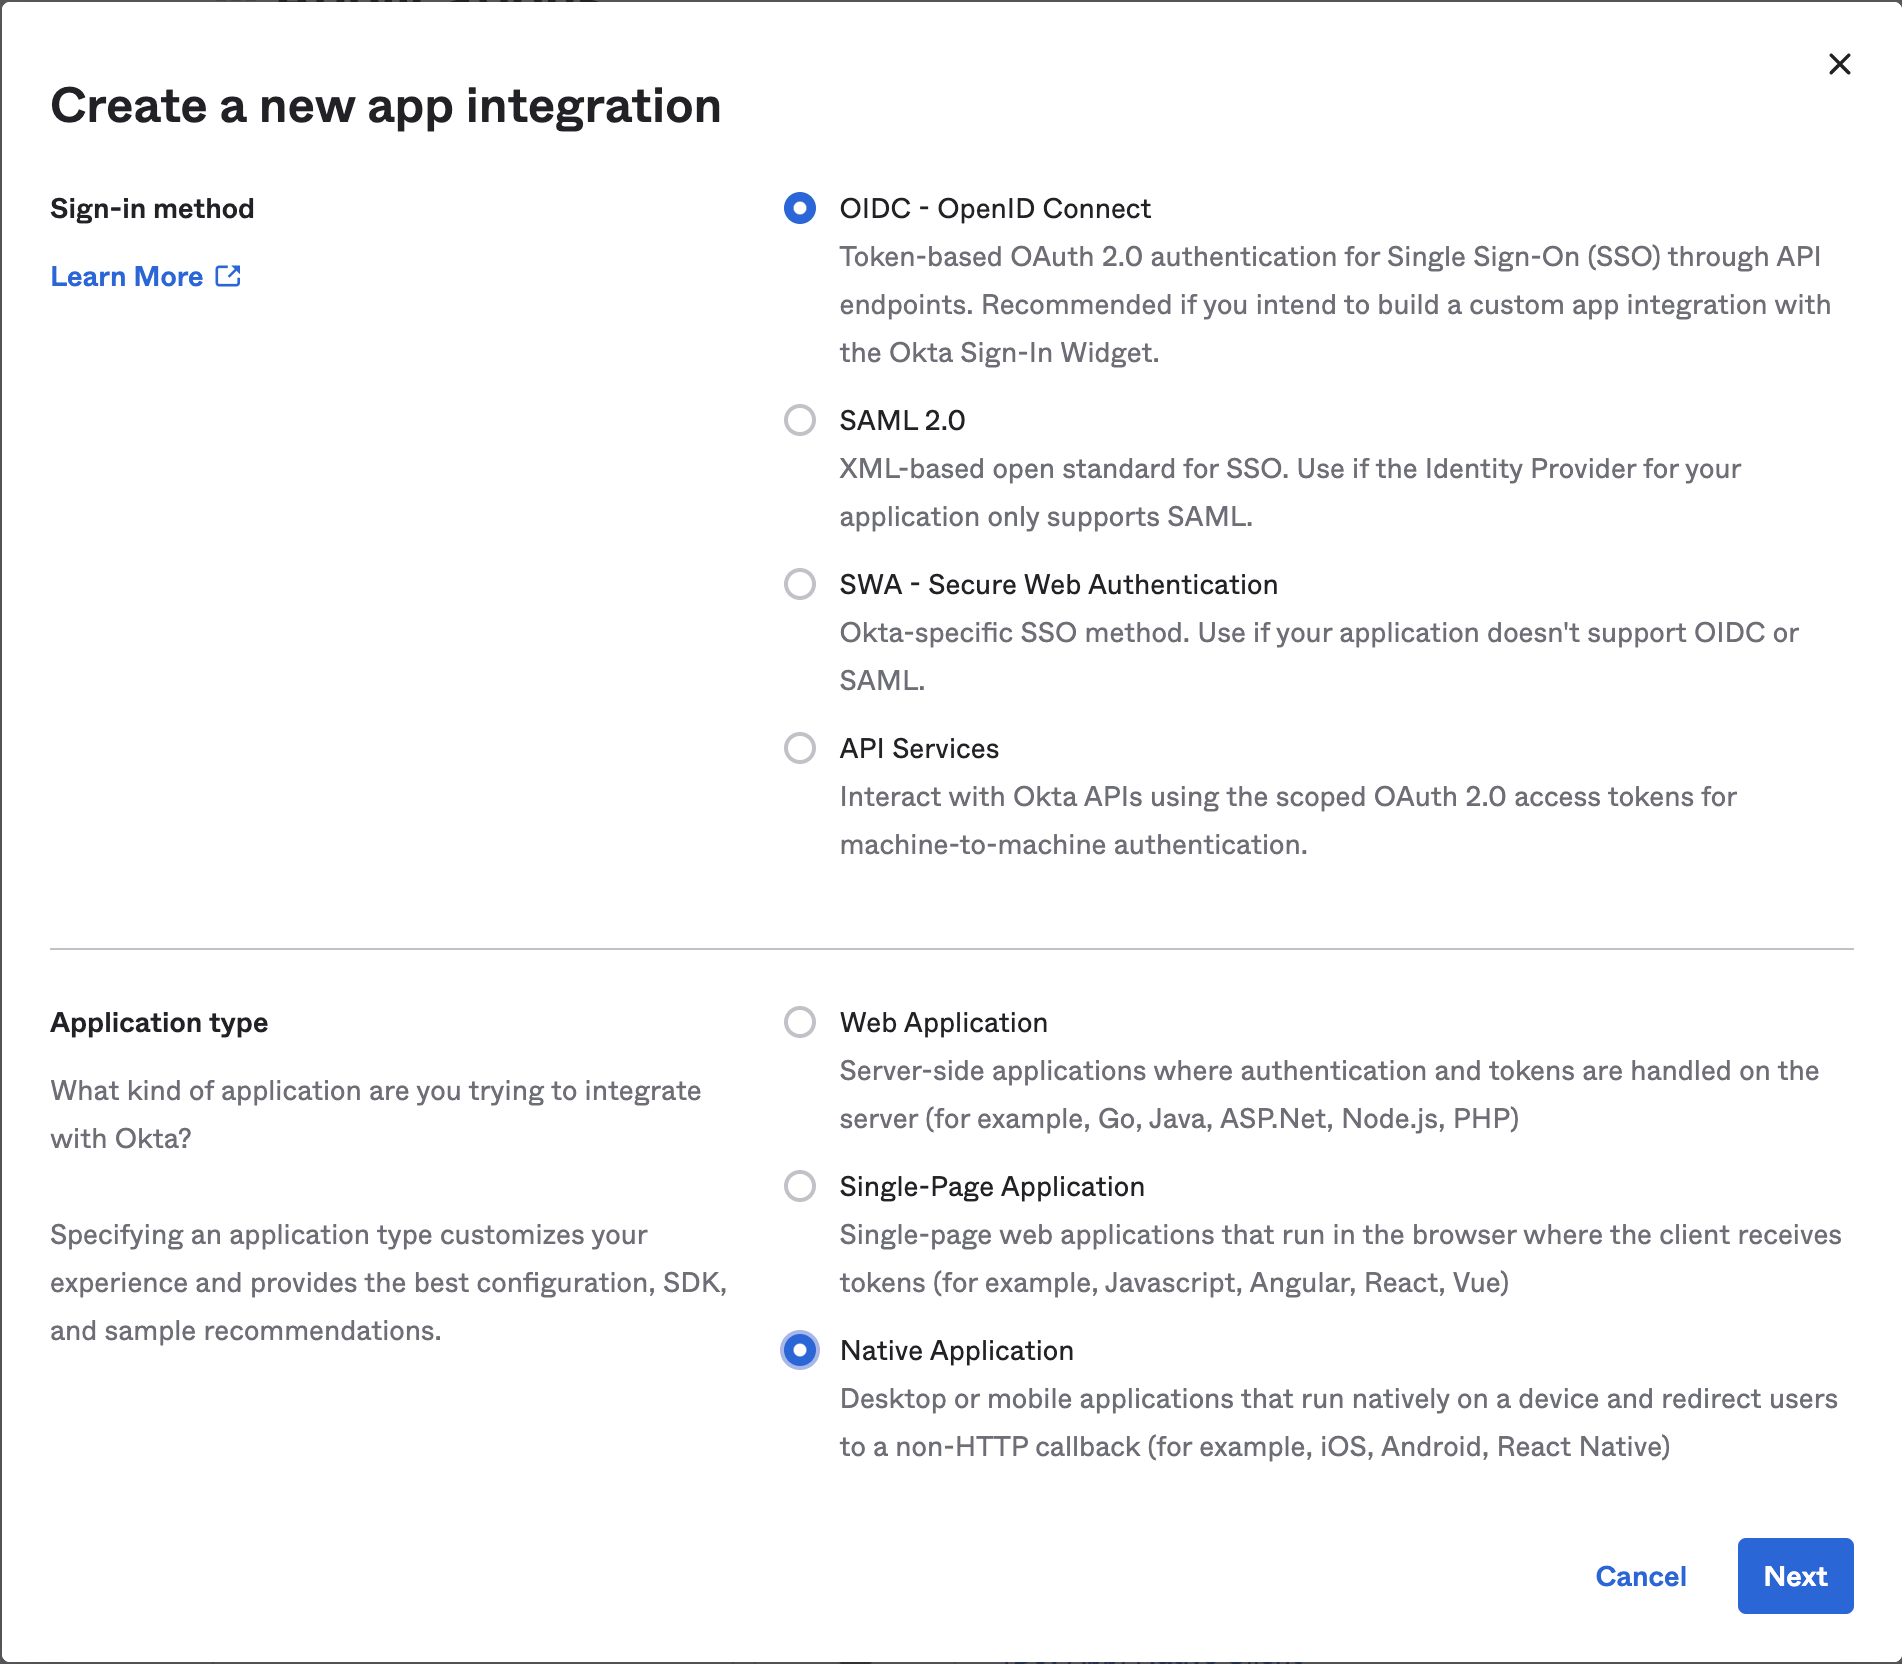
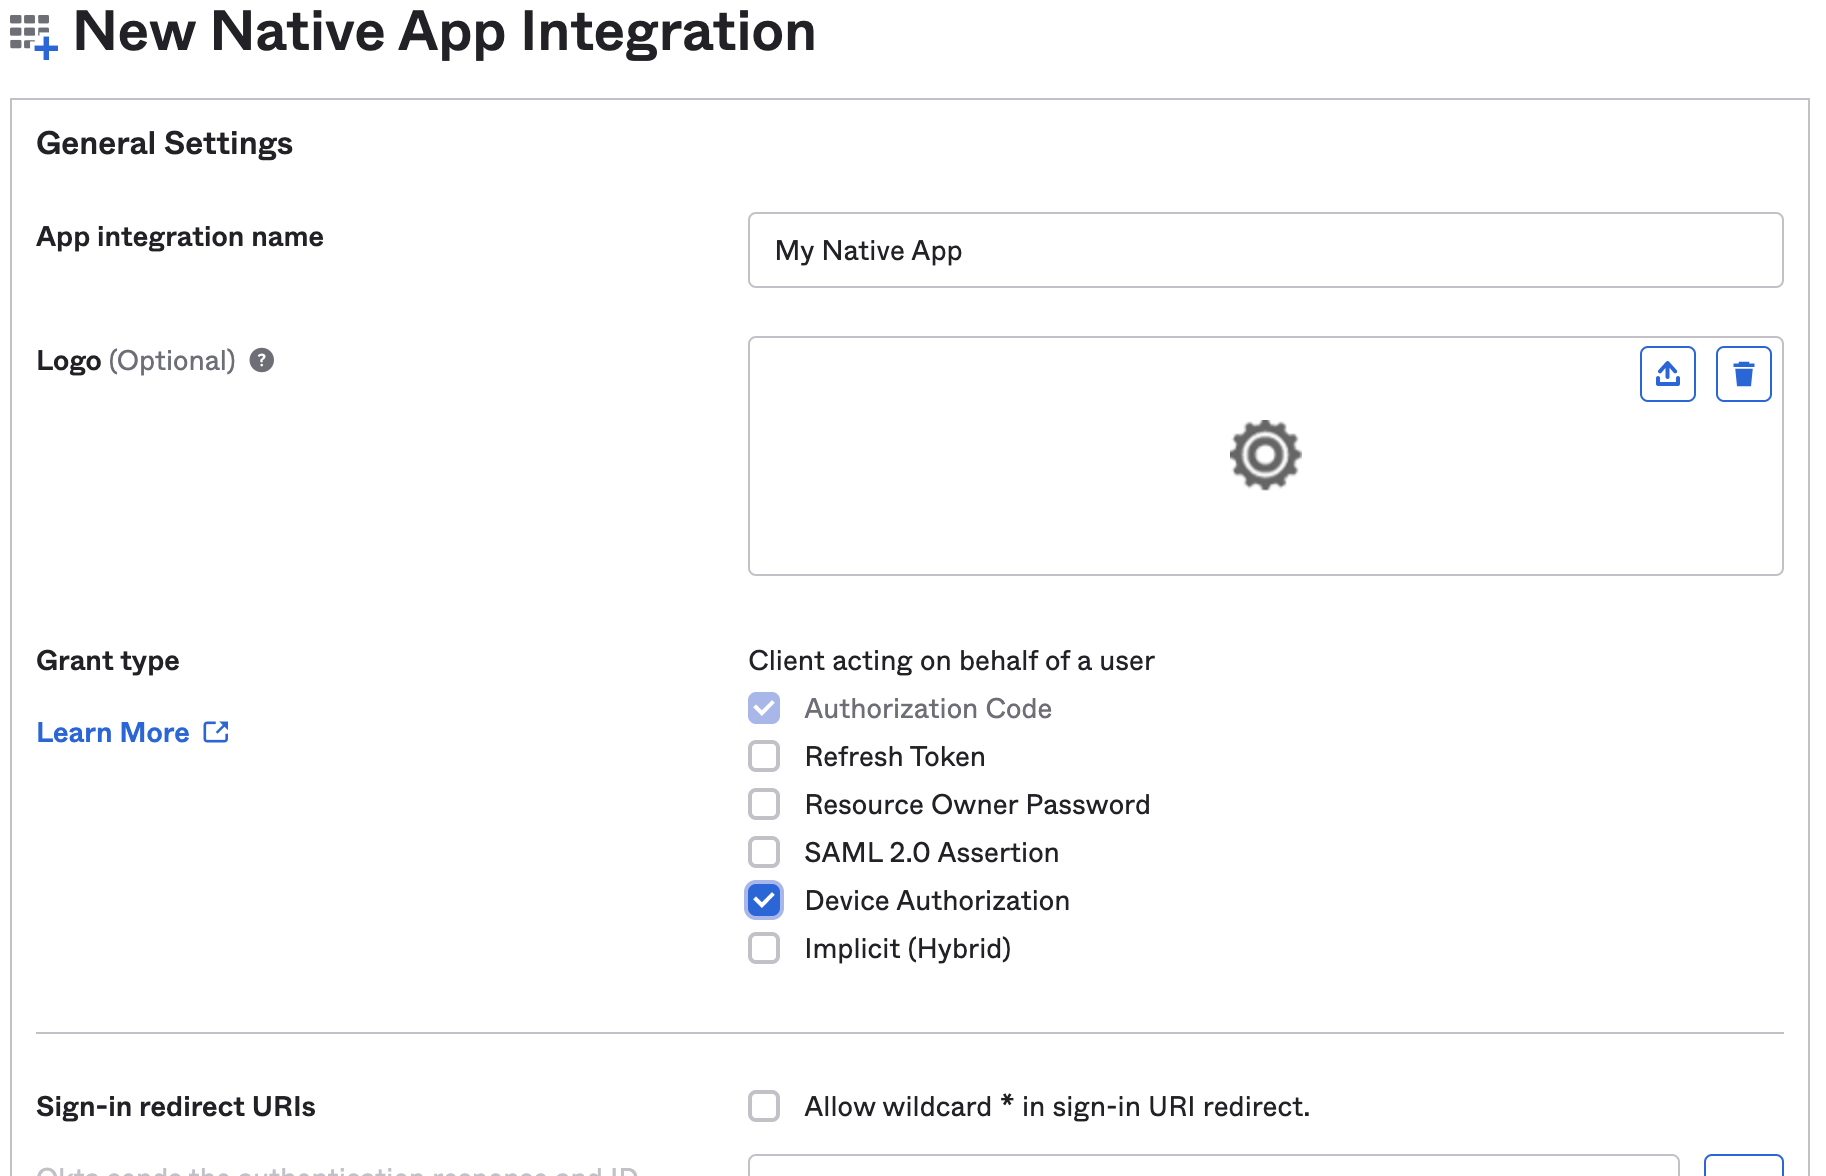
In Applications->Applications, click Create App Integration. In the pop-up, choose OIDC - OpenID Connect, then Native Application. The Device Grant is only available for Native Applications.
-
In the next step, check Device Authorization in the Grant type section.
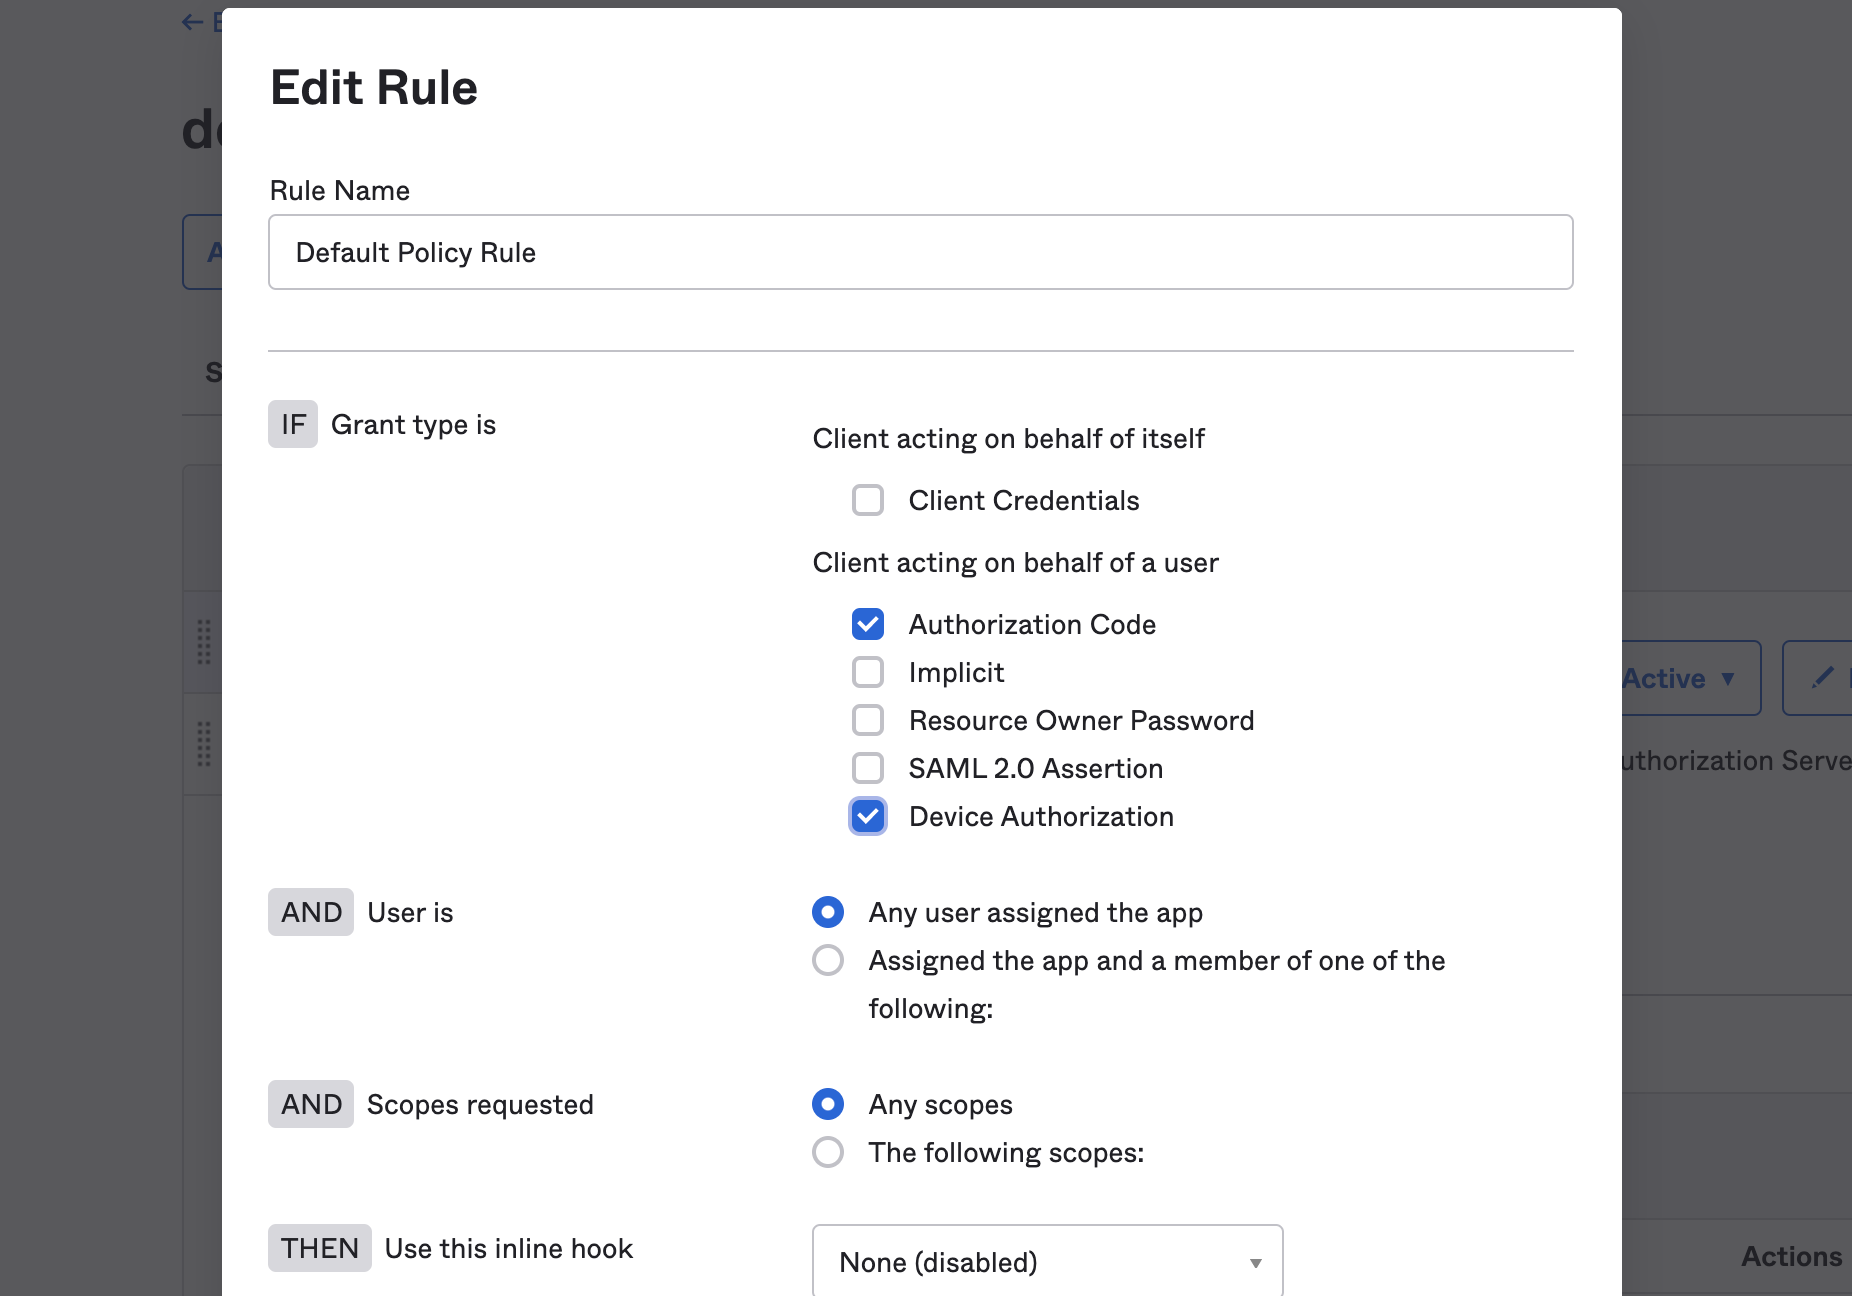
If you want to use a custom Authorization Server, you also need to accept the grant type in the authorization server’s policy interface:
- Go to Security->API
- Select the authorization server you want to use (for example, default).
- Click the Access Policies tab, and edit the rule for your policy. Make sure to select the Device Authorization checkbox.
How to Enable an SSH Server with Device Authorization
We’ve identified many use cases for the Device Authorization Grant beyond TV apps, as it can be used to authenticate a variety of devices. In this use case, we share an example of SSH login with the Device Authorization Grant on Okta.
When accessing servers, we typically use SSH. While SSH supports strong security, it has a couple of limitations:
- SSH works well for a single user, but it’s harder to manage in an enterprise where multiple users log in to the same server. SSH stores the public key for each allowed user on the server, so the server must be able to update the keys when the permissions list changes (for example, when a new user is granted access).
- Lack of two-factor authentication: SSH only supports password and private key authentication natively. Adding stronger user authentication, such as SMS verification, requires extra work.
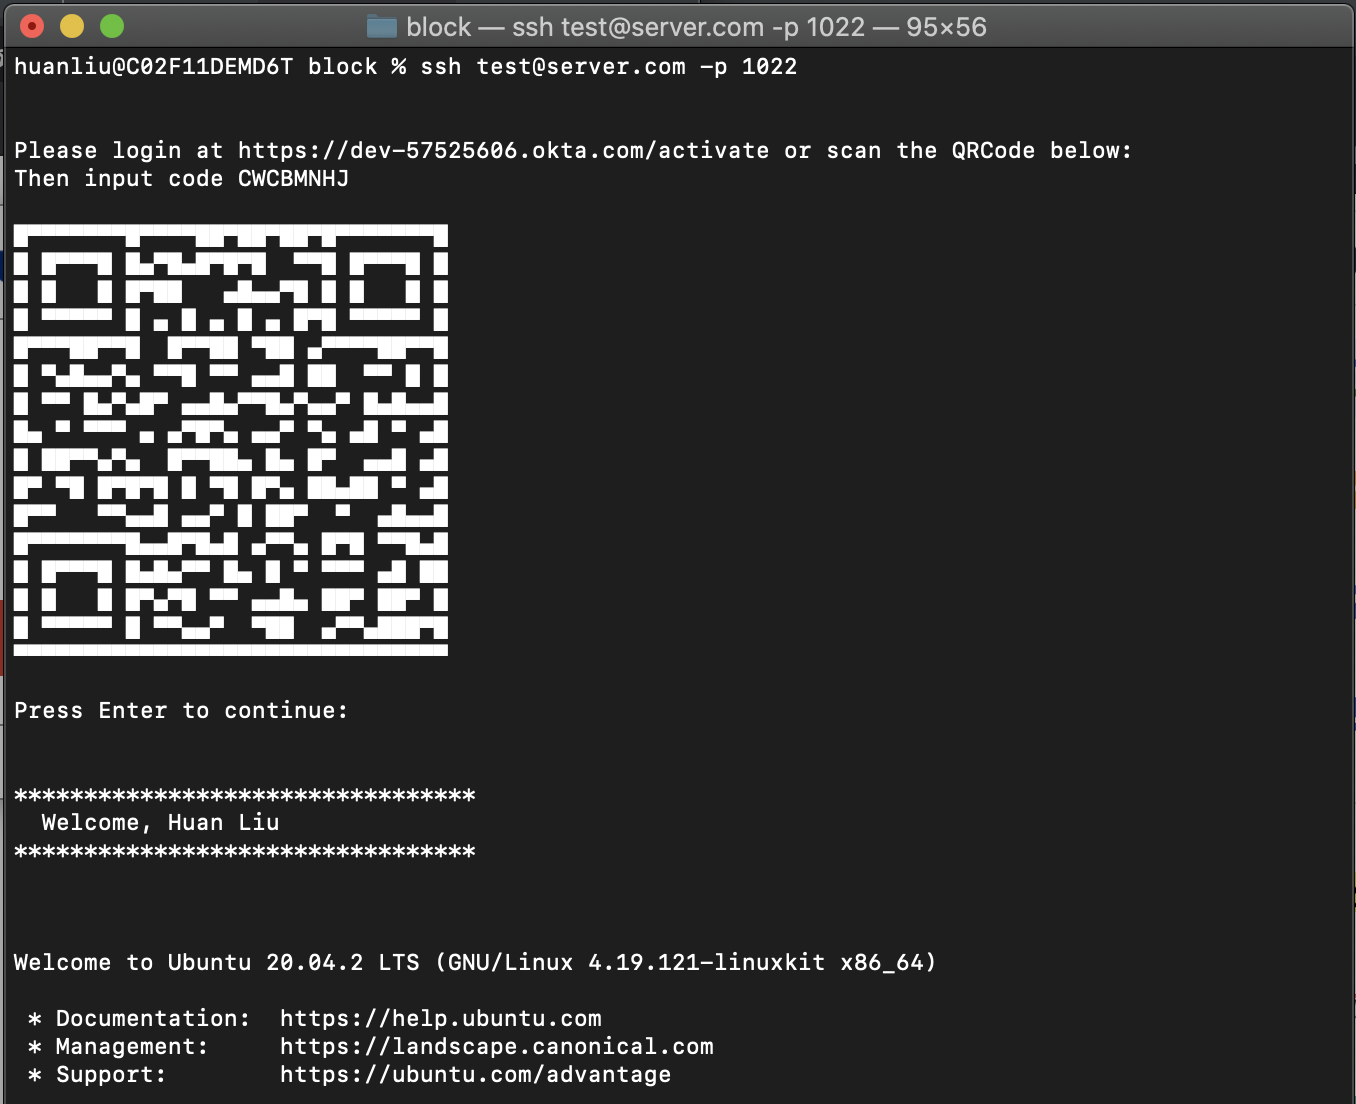
The following example enables the Device Authorization Grant on an Ubuntu 20.04.2 LTS server, but the instructions should work for any flavor of Linux server. The end-user login experience looks like this:
On a Linux server, the SSH daemon uses PAM (Pluggable Authentication Modules) to enable an authentication extension. First, let’s edit the PAM configuration. In /etc/pam.d/sshd, we look for @include common-auth. Then we’ll comment it out to disable the normal authentication method, such as password or private key check. Then we’ll add a line of code directly below to enable Device Authorization. deviceflow.so is the PAM module that follows.
# @include common-auth             # Disable password authentication
auth    required    deviceflow.so  # register custom authentication module
Next we’ll edit the /etc/ssh/sshd_config file to make sure that challenge-response authentication is enabled, using PAM. You’ll see a line starting with ChallengeResponseAuthentication. The default is no. Change this to yes:
ChallengeResponseAuthentication yes
Later on in the same file, make sure that “UsePAM” is set to yes (it is the default) as follows:
UsePAM yes
Next we’ll develop the authentication module. To make sure the necessary libraries are installed, we run the following commands:
apt-get update
apt-get install build-essential libpam0g-dev libcurl4-openssl-dev libqrencode-dev libssl-dev
The full source code for the PAM module is available on GitHub. For a PAM module, we need to define two interfaces:
PAM_EXTERN int pam_sm_setcred( pam_handle_t *pamh, int flags, int argc, const char **argv)
PAM_EXTERN int pam_sm_authenticate( pam_handle_t *pamh, int flags,int argc, const char **argv )
The second interface handles the authentication flow, which holds all our authentication logic. The code is self-explanatory, so we’ll only cover the high-level steps:
-
First, plug in your org’s URLs in
deviceflow.c. Change the URL based on your org name and whether you are using the org Authentication Server or a custom Authentication Server. Also, define the client ID for the Native App where you’ve enabled the Device Authorization grant type.#define DEVICE_AUTHORIZE_URL "https://dev-133337.okta.com/oauth2/v1/device/authorize" #define TOKEN_URL "https://dev-133337.okta.com/oauth2/v1/token" #define CLIENT_ID "0oa15wulqt5yqD9FP5d7" -
We first issue a POST call to our
authorizeendpoint on the Authorization Server. From the POST result, we can extract thedevice_codeanduser_code. The POST call is abstracted away as a call to a helper functionissuePost, which takes the URL as the first parameter and the POST data as the second parameter:sprintf(postData, "client_id=%s&scope=openid profile offline_access", CLIENT_ID); issuePost(DEVICE_AUTHORIZE_URL, postData);The helper function uses libcurl to send the POST request:
void issuePost(char * url, char * data) {
   /* send all data to this callback function  */
   curl_easy_setopt(curl, CURLOPT_WRITEFUNCTION, WriteMemoryCallback);
   /* we pass our 'chunk' struct to the callback function */
   curl_easy_setopt(curl, CURLOPT_WRITEDATA, (void *)&chunk);

   curl_easy_setopt(curl, CURLOPT_URL, url ) ;
   curl_easy_setopt(curl, CURLOPT_POST, 1);  /* this is a POST */
   curl_easy_setopt(curl, CURLOPT_POSTFIELDS, data);
   int res = curl_easy_perform( curl ) ;
}
The
WriteMemoryCallbackfunction saves the callback results in achunkbuffer. Then, we use a helper functiongetValueForKeyto extract the value fields for keysuser_code,device_code, andverification_uri_complete. -
We then prompt the user to login to the activate endpoint. For a more pleasant user experience, we incorporate the URL inside a QRCode. We use the value field for
verification_uri_complete, which includesuser_codeas part of the query parameters, so that a user does not have to type in the code manually. We leveraged the code from Y2Z/qr to generate ASCII output so that it will output properly in the command shell.char * qrc = getQR(activateUrl); sprintf(prompt_message, "\n\nPlease login at %s or scan the QRCode below:\n\n%s", activateUrl, qrc); free(qrc); sendPAMMessage(pamh, prompt_message);Since this is a PAM module, we cannot just print to screen directly. The
sendPAMMessagehelper function uses the PAM module’s interface function to send messages to the user:void sendPAMMessage(pam_handle_t *pamh, char * prompt_message) { int retval; struct pam_message msg[1],*pmsg[1]; struct pam_response *resp; struct pam_conv *conv ; pmsg[0] = &msg[0] ; msg[0].msg_style = PAM_TEXT_INFO ; msg[0].msg = prompt_message; resp = NULL ; retval = pam_get_item( pamh, PAM_CONV, (const void **) &conv ) ; if( retval==PAM_SUCCESS ) { retval = conv->conv( 1, (const struct pam_message **) pmsg, &resp, conv->appdata_ptr ) ; } if( resp ) { free( resp ); } }In the above, we set the communication type to
PAM_TEXT_INFOto indicate that we want to send a message to the user. In thepam_get_itemcall, we retrieve the PAM conversation moduleconv, and in the following line, we just invoke theconvmodule, which writes the message to the user console. -
We periodically issue a POST call to the token endpoint. If the POST result gives a token back, we return
PAM_SUCCESSto allow the user to log in, or eventually, we returnPAM_AUTH_ERRto signal authentication failure and deny user access.sprintf(postData, "device_code=%s&grant_type=urn:ietf:params:oauth:grant-type:device_code&client_id=%s", devicecode, CLIENT_ID); while (waitingForActivate) { issuePost(TOKEN_URL, postData); // ... } -
The POST return includes various JWT tokens. From the
id_token, we know exactly who logged in, and we optionally print a customized welcome message.
To compile all our code (deviceflow.c and qr.c), we run:
gcc -fPIC -c deviceflow.c qr.c
sudo ld -x --shared -o /lib/security/deviceflow.so deviceflow.o qr.o \
        -lm -lqrencode -lcurl -lssl -lcrypto
The second command installs the compiled PAM module under /lib/security, which is where PAM looks for additional plugin modules.
Then we restart SSHD daemon to make sure the new PAM module is invoked:
sudo /etc/init.d/ssh restart
In the repo, we’ve also included a Dockerfile, so you’ll have a local Ubuntu container in which to try out the new SSH sign-in flow.
SSH Login in the Cloud with Okta
Although we’ve only added a couple hundred lines of C code, this fundamental change in SSH login using the Device Grant empowers you to do more with Okta.
- Move your SSH management to the cloud, and avoid the hassle of local management. With this new feature, there’s no need to manage SSH passwords or public keys locally.
- You now have the full power of Okta at your disposal! Leverage Okta policies, enable multi-factor authentication, add sign-on policies and multiple IdPs (Identity Providers).
Other Uses for the Device Authorization Grant
In this post, we’ve demonstrated how to implement the Device Grant for SSH login. Using the information returned from the tokens—including the user’s profile information contained in the ID token—we can go even further. We can easily create a separate Linux account in the PAM module and set up the permissions correctly, so a user can sign in to their individual account. You may be trying to connect to a root account via ssh root@server.com. Instead, the PAM module can log you in as user@server.com—a less privileged account—by learning who you are from the ID token.
Token-based permissions give you finer granularity in access control. For example, it’s easy to implement time-limited access control. The access token can be set up to expire within a given time span. If the time limit for access is exceeded, the access token renewal will fail, and the server can revoke permission right away. In addition to enabling time-limited access, you can also customize scopes and claims to further fine-tune the access model.
While this app demonstrates how to enable SSH login, we believe there are many other applications for the Device Flow. We’re eager to hear from you with feature requests and new use cases. Let us know what applications are on your mind. You can share ideas and feedback by leaving a comment here. For related content, follow @oktadev on Twitter, like us on Facebook, or subscribe to our YouTube channel.
Huan Liu is a Director of Engineering and Sphere Head for CIAM (Customer Identity Access Management) Products. His team is responsible for both the end-to-end CIAM experiences and the underlying federation protocols. Prior to Okta, Huan was an Engineering Manager and Head of the Terragraph program at Facebook. He was also the co-lead of the Maveric program, which brings Facebook's ML expertise to 5G networks. Huan holds a Ph.D. degree in Electrical Engineering from Stanford University.
Lars K. Johansen is a Staff Software Engineer and the lead for the Customer Federations team in the CIAM (Customer Identity Access Management) Products sphere at Okta. He has a great passion for software that involves security, scalability, efficiency, and reliability. Lars was born and raised in Oslo, Norway, and he enjoys going on hikes, playing tennis, and loves to cook and eat delicious food. Before Okta, Lars was a graduate student at Harvard University, holds a Master's Degree from The Norwegian University of Science and Technology (NTNU), and most recently wrote his Master's Thesis on the topic of Network Coding at Massachusetts Institute of Technology (MIT).
Okta Developer Blog Comment Policy
We welcome relevant and respectful comments. Off-topic comments may be removed.