Add the OAuth 2.0 Device Flow to any OAuth Server
You may not have heard of the Device Flow before, but you’ve probably used it if you have an Apple TV, Roku or Amazon FireTV! The OAuth 2.0 Device Flow is used to log in to a device using OAuth when the device doesn’t have a browser, or also when the device has limited keyboard input ability.
The Apple TV is a great device, but it’s missing a browser, which means it can’t do a typical OAuth flow like you’d normally experience logging in to something on a computer or iPhone. What about passwords? Well, you probably wouldn’t want everyone else in the living room watching as you slowly type your password on the screen character by character.
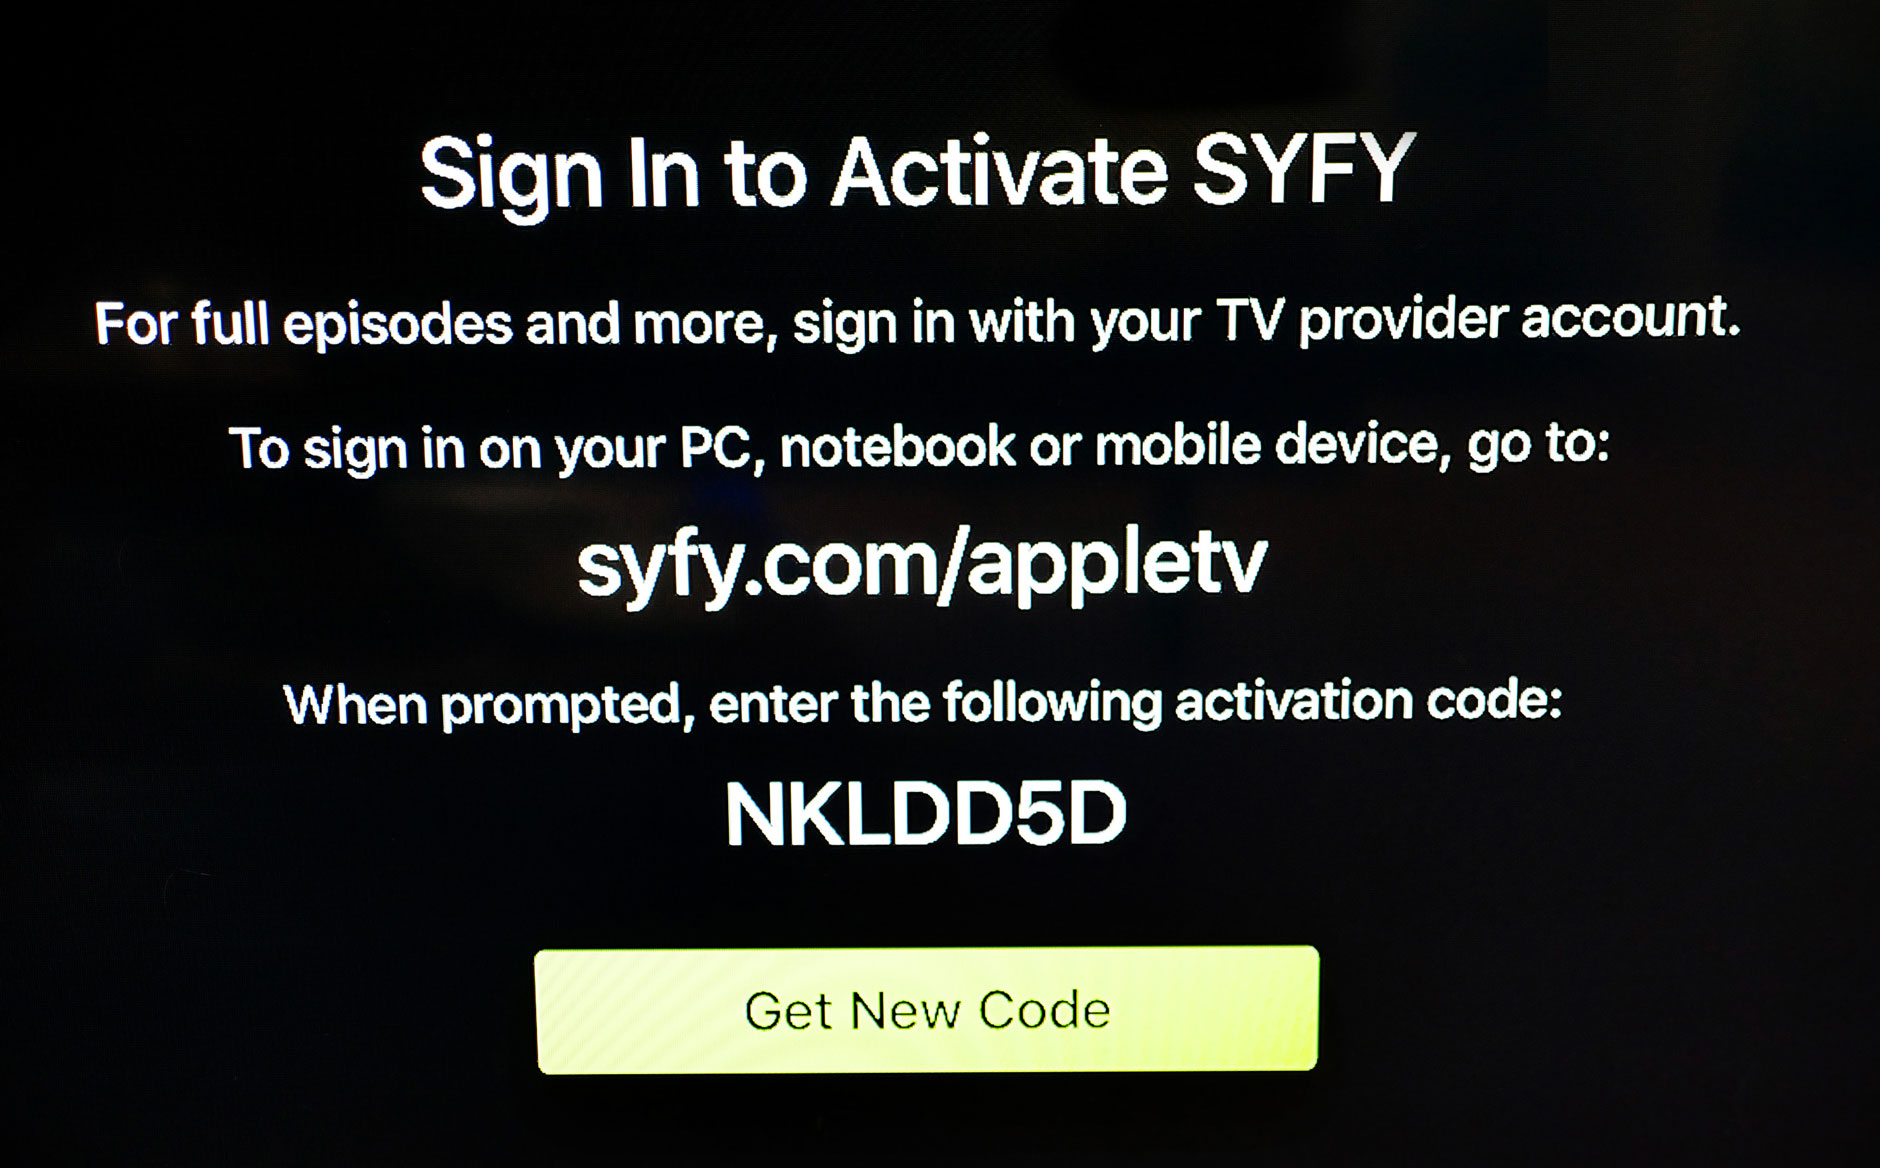
Instead, when you log in to an app on your Apple TV, you see a screen like this.
It asks you to visit a URL on some other device and enter the code shown on the screen. Then you finish logging in on that other device, usually your phone.
This has a number of benefits! It doesn’t require a browser on the device, but it also means you don’t have to deal with the awkward on-screen keyboard. Once you type this into your phone, you’re then presented with a regular login screen, and if you have your passwords saved in your phone, or are already signed in, then it’s even less typing.
This flow is also used by other kinds of devices, like the hardware video encoder below.
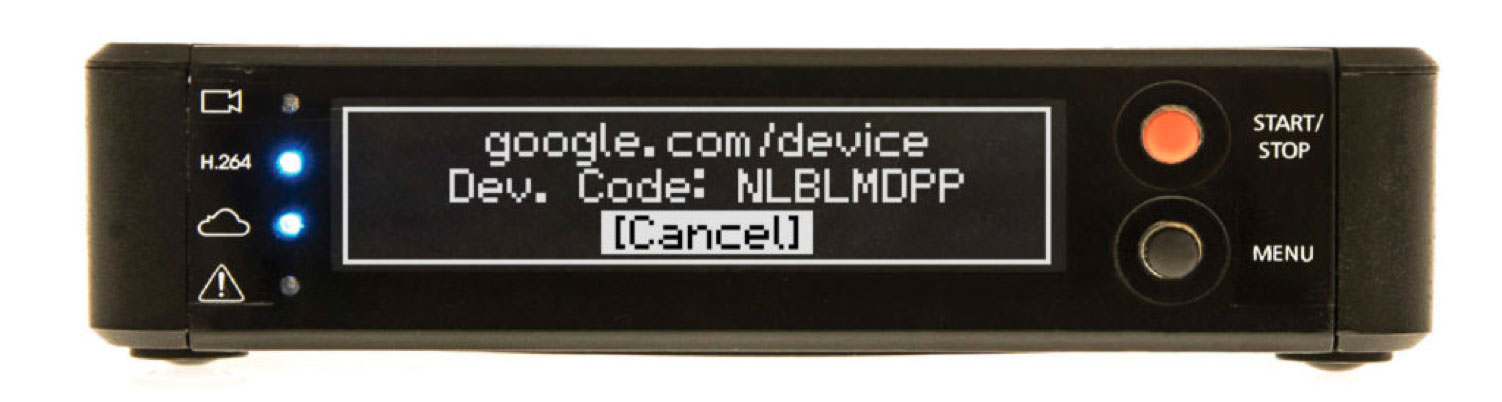
This device not only doesn’t have a browser, it barely has a screen! Text entry on this device is also super awkward, and involves wiggling the little “menu” joystick to navigate the one-line on-screen keyboard. But it’s still a very powerful device! Connect an HDMI video source like a video camera and it will push the video stream to Facebook or YouTube Live.
So now that we know what the OAuth 2.0 Device Flow is, let’s look at how it works.
Note: In May 2025, the Okta Integrator Free Plan replaced Okta Developer Edition Accounts, and the Okta CLI was deprecated.
We preserved this post for reference, but the instructions no longer work exactly as written. Replace the Okta CLI commands by manually configuring Okta following the instructions in our Developer Documentation.
How the OAuth 2.0 Device Flow Works
The OAuth 2.0 Device Flow works quite different from the other OAuth flows, since it doesn’t involve a browser redirect on the device.
When the user wants to log in, the device starts out by making a POST request to begin the process. The POST request contains only one piece of information, its client_id. (Devices like these are considered “public clients”, so no client_secret is used in them, similar to mobile apps.) This request is made to a new endpoint that is unique to the Device Flow.
POST https://authorization-server.com/device

client_id={CLIENT_ID}
The server will respond with a JSON document with a few pieces of information.
{
  "device_code": "NGU4QWFiNjQ5YmQwNG3YTdmZMEyNzQ3YzQ1YSA",
  "verification_uri": "https://example.com/device",
  "user_code": "BDSD-HQMK",
  "expires_in": 1800,
  "interval": 5
}
Here’s what the properties in the response mean:
device_code- This is a long string that the device will use to eventually exchange for an access tokenverification_uri- This is the URL the user needs to enter into their phone to start logging inuser_code- This is the text the user will enter at the URL aboveexpires_in- The number of seconds that this set of values is valid. After this amount of time, thedevice_codeanduser_codewill expire and the device will have to start overinterval- The number of seconds the device should wait between polling to see if the user has finished logging in
Now the device needs to display the URL and User Code to the user somehow. While the device waits for the user to enter the code and log in, it will make a POST request every 5 seconds as specified by the interval returned. This POST request will be made to the token endpoint, using a grant type of device_code.
POST https://authorization-server.com/token

grant_type=urn:ietf:params:oauth:grant-type:device_code
&client_id=CLIENT_ID
&device_code=NGU4QWFiNjQ5YmQwNG3YTdmZMEyNzQ3YzQ1YSA
While the user is busy logging in on their phone, the token endpoint will return the error message below:
{
  "error": "authorization_pending"
}
The authorization_pending error means the user isn’t finished logging in, but the code hasn’t yet expired either. The device should try this again after the specified number of seconds. Meanwhile the user will be logging in, choosing a YouTube account, and approving the request.
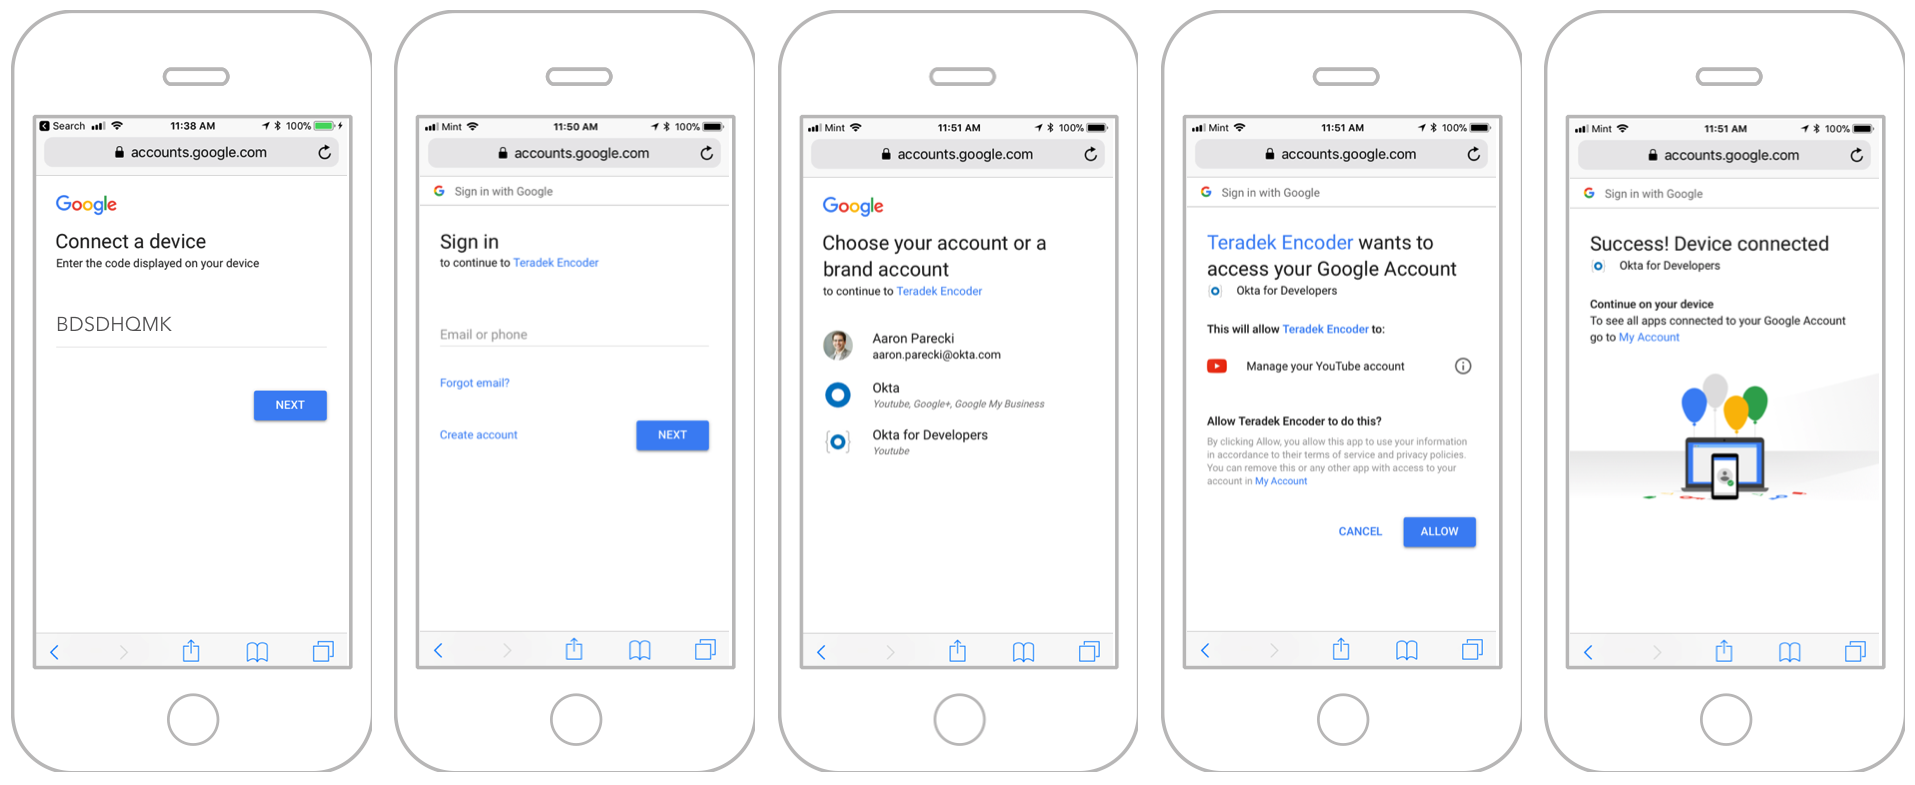
Finally, when the user finishes logging in, their phone will give them a “success” message, and there isn’t anything left to do on the phone.
The next time the device makes the POST request to the token endpoint, it will get back an access token!
{
  "access_token": "MsQ50jbzRn43NzqNLgV3Ia",
  "expires_in": 3600,
  "refresh_token": "b7aab34e37298a160e0ede5b43ed1f70a8"
}
The flow is complete, and the device can proceed to use the access token with the API!
Use the Device Flow with a Server that Doesn’t Support It
Now that you know how the Device Flow works, you see that it requires special support from the OAuth server to use it. At the moment, only a few OAuth services support this out of the box, Google being probably the largest deployment of it.
So what happens if you want to use the Device Flow with an API that doesn’t support it natively? That’s where this Device Flow Proxy Server comes into play. The Device Flow Proxy Server implements the parts specific to the Device Flow, but redirects the user out to whatever OAuth service you want. Let’s set up an example using Okta.
This project is written in PHP to make it easy to deploy, so make sure you have PHP on your computer. (It’s built-in to MacOS!)
Clone the Project from GitHub
Clone the project into a folder on your computer:
git clone https://github.com/aaronpk/Device-Flow-Proxy-Server.git
cd Device-Flow-Proxy-Server
We’re using a few libraries, so you’ll need to install them with Composer.
If you don’t already have Composer installed, you can install it on Linux or MacOS with the command belo:
curl https://gist.githubusercontent.com/aaronpk/436bbfcf57644f1c8d6a230326c546bd/raw/8eac46272051f4bc965d4021300c9b21534408a6/install-composer.sh | bash
(Or visit getcomposer.org for instructions on other platforms.)
Then you can install this project’s dependencies, using either
composer install
or
php composer.phar install
depending on whether you’ve installed Composer globally or just in this folder.
Next, you’ll need to configure the proxy server to talk to Okta’s OAuth server. If you’re following this tutorial with a different OAuth server, it should work just fine. This proxy server needs to know two things: where to send the user to authenticate with the real OAuth server (the authorization endpoint), and where to get access tokens from (the token endpoint). These are defined in the project’s config file.
Copy the config.template.php file to config.php. There are two URLs in there you’ll need to configure for your Okta account.
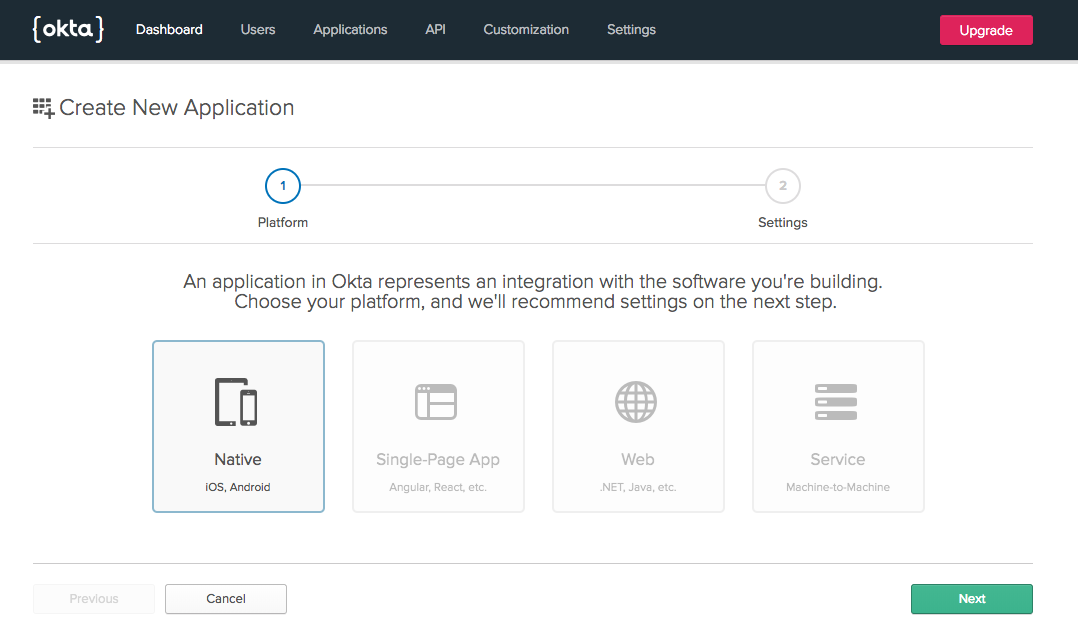
Create an Okta Developer Account
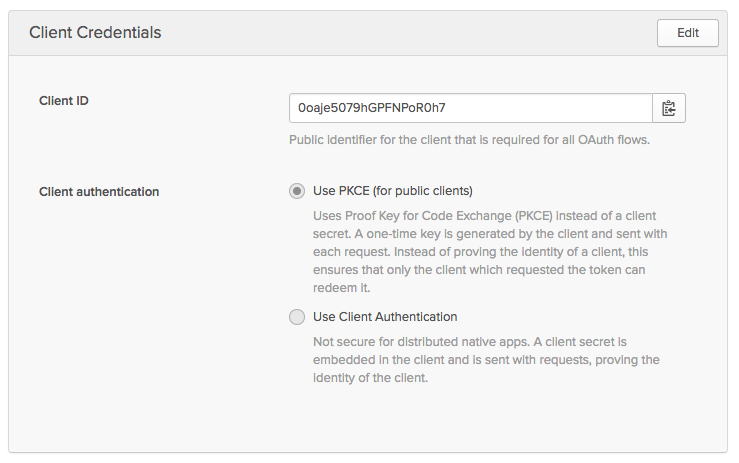
Create a free Okta Developer account at developer.okta.com/signup. From the Applications tab, click Add Application. Then choose the Native option. Remember, like iOS and Android apps, you can’t trust these devices to keep secrets, so this enables the PKCE flow for this application.
Choose a name for the app, and set the redirect URL to http://localhost:8080/auth/callback.
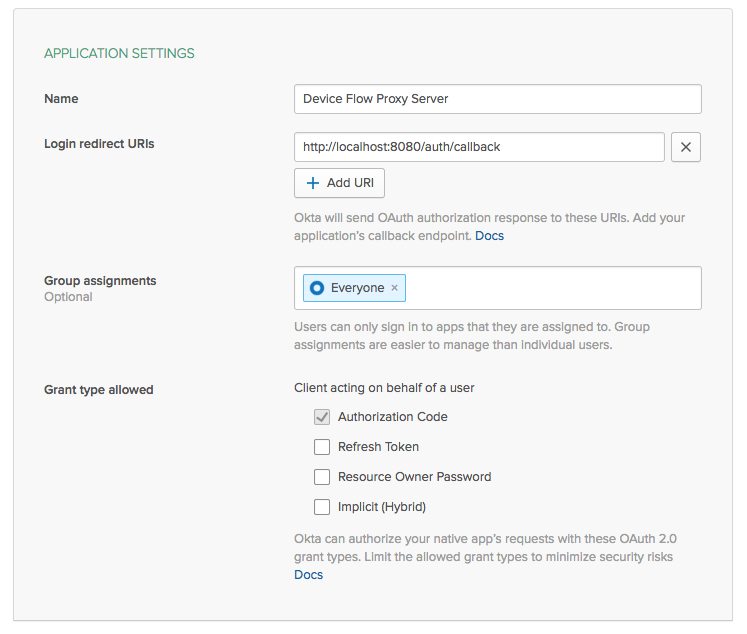
Once you create the app, you’ll get a client_id for it. Copy that somewhere as you’ll need it in a bit.
Next, navigate to the API tab and choose Authorization Servers. You’ll see an authorization server that’s been created for your account.
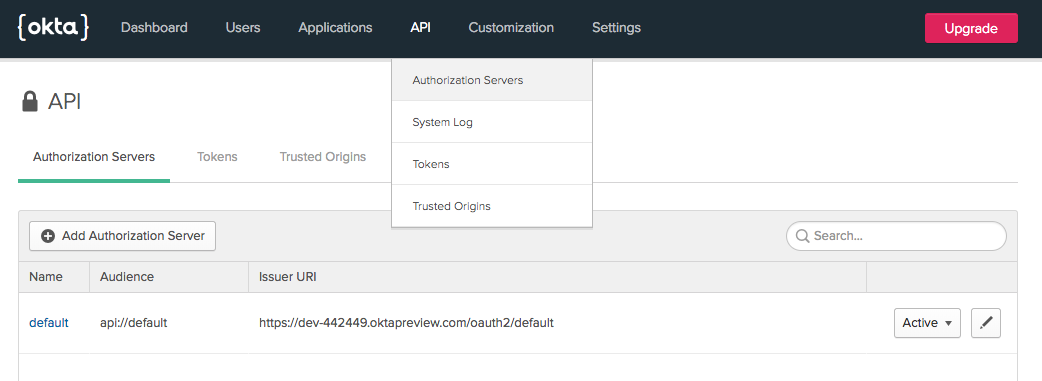
Copy the Issuer URI that you see there, and use it as the base URL for your two endpoints to configure in the config file, adding /v1/authorize and /v1/token to the end. For example, if your Issuer URI is https://{yourOktaDomain}/oauth2/default, then the two URLs in your config file would be:
public static $authEndpoint = 'https://{yourOktaDomain}/oauth2/default/v1/authorize';
public static $tokenEndpoint = 'https://{yourOktaDomain}/oauth2/default/v1/token';
Run the PHP Server and Try it Out!
At this point, you should be ready to try it out! Open up a terminal, and from the project folder, run the PHP built-in web server to start it:
php -S 127.0.0.1:8080 -t public
Now you have a server listening on port 8080! Don’t open your browser there just yet, since remember we have to have the device initiate the OAuth request.
You can simulate a browserless device by interacting with the proxy server from the command line. In another terminal, make the following curl request to begin the Device Flow. Replace {yourClientId} with the client ID you got when creating the app above.
curl http://localhost:8080/device/code -d client_id={yourClientId}
You’ll get back a JSON response from this special device endpoint, which will instruct you what to do next.
{
    "device_code": "2e4be0865137c1d695b134c3e47ab968fe2e485ed57afb0990798353b9ea3d62",
    "user_code": "TVMC-CEWX",
    "verification_uri": "http://localhost:8080/device",
    "expires_in": 300,
    "interval": 5
}
Remember the device will need to poll for the response. You can make the first poll request by running the following command to make a POST request to our proxy’s token endpoint:
curl http://localhost:8080/device/token -d client_id={yourClientId} -d device_code={yourDeviceCode} -d grant_type=urn:ietf:params:oauth:grant-type:device_code
Remember to replace {yourClientId} and {yourDeviceCode} with the values specific to your flow.
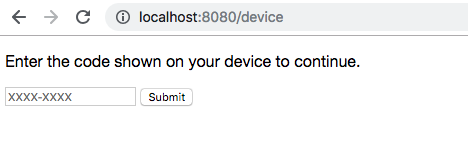
Open http://localhost:8080/device in your browser, and you’ll see a prompt asking you to enter the user_code. Go ahead and type that in now. (You can enter it with or without the hyphen, and in upper or lower case, the proxy server will normalize the input.)
If you’re already signed in to Okta, you won’t even see the OAuth prompt, and you’ll be redirected back immediately to the proxy.
Now back in the terminal, go ahead and repeat the same POST request you made before. (You can type up arrow and enter to repeat the last command.)
curl http://localhost:8080/device/token -d client_id=0oaibdcprjlBnVOd60h7 -d device_code=9069166b78f96e64b8a6e0511cad353f390e359880c9182a791436d8da5cfb2b -d grant_type=urn:ietf:params:oauth:grant-type:device_code
This time, you’ll get back a JSON response containing an access token from Okta!
{
    "access_token": "eyJraWQiOiJWNnRfLUVHNC1NV3FTTW5mdHFteTJpV0p4SkxaanN6VHBFdWp0ZG5kaGZVIiwiYWxnIjoiUlMyNTYifQ.eyJ2ZXIiOjEsImp0aSI6IkFULnZNVUhydDVsNG5SekFkUWd4UjllRUhzM2FMTHBieFBPZDFLd0tBUmwtNEEiLCJpc3MiOiJodHRwczovL2Rldi00NDI0NDkub2t0YXByZXZpZXcuY29tL29hdXRoMi9kZWZhdWx0IiwiYXVkIjoiYXBpOi8vZGVmYXVsdCIsImlhdCI6MTU1MDI3NzcxMywiZXhwIjoxNTUwMjg0OTEzLCJjaWQiOiIwb2FpYmRjcHJqbEJuVk9kNjBoNyIsInVpZCI6IjAwdWJ1NG1sNWNBWUdod2dxMGg3Iiwic2NwIjpbImluZm8iXSwic3ViIjoiYWFyb25AcGFyZWNraS5jb20ifQ.kKoks1ZhoZ0yLJkWqeAH_klyLvpK6wUbf2Zo-1n15eIf1Mwiae-DEsuHcnGXNKlRblL7O7GjZIJGDBhweirp5kmzErvDF7FSHwqs-mRAEArSDt4-JN91R9sqDnngR24lRuixC9j-u1a15y3r31Cl7Cpv04VHQ12hLfDY4H6bLdEyD9s915FI1vHGSBZEhB_FktJRILTtaLUuFDLXVnX8-Dg-u1wgYQSa8Ier89I4u-6d-hSTtv6txNUnBukI01w85sdEwE7S1Wh_LfHR1So-Z6956mmj7RXNNq36XcKW2vVS2Lk3Q3O94SLqtFWIdl8AhuAyN4S-Lab1lhWvTQev7A",
    "token_type": "Bearer",
    "expires_in": 7200
}
At this point, the Device Flow is complete and your device can use the access token to make API requests!
Try the Interactive Command Line Version
If you want to see a more realistic version of this that more closely emulates doing this on a real device, check out the client.php script in the repository. You can run this from PHP by passing your client_id to the script:
php client.php {yourClientId}
The script will show you the URL and user_code (and will even pre-fill the code in the URL so that you don’t need to type it in!)
Please visit this URL in your browser, and confirm the code in the browser matches the code shown:
http://localhost:8080/device?code=KFMM-HDHJ
KFMM-HDHJ
The script will poll the token endpoint waiting for you to finish logging in, after which it will show you the successful message and the access token!
You successfully logged in!
Here is the access token returned from the server:
eyJraWQiOiJWNnRfLUVHNC1NV3FTTW5mdHFteTJpV0p4SkxaanN6VHBFdWp0ZG5kaGZVIiwiYWxnIjoiUlMyNTYifQ.eyJ2ZXIiOjEsImp0aSI6IkFULnZNVUhydDVsNG5SekFkUWd4UjllRUhzM2FMTHBieFBPZDFLd0tBUmwtNEEiLCJpc3MiOiJodHRwczovL2Rldi00NDI0NDkub2t0YXByZXZpZXcuY29tL29hdXRoMi9kZWZhdWx0IiwiYXVkIjoiYXBpOi8vZGVmYXVsdCIsImlhdCI6MTU1MDI3NzcxMywiZXhwIjoxNTUwMjg0OTEzLCJjaWQiOiIwb2FpYmRjcHJqbEJuVk9kNjBoNyIsInVpZCI6IjAwdWJ1NG1sNWNBWUdod2dxMGg3Iiwic2NwIjpbImluZm8iXSwic3ViIjoiYWFyb25AcGFyZWNraS5jb20ifQ.kKoks1ZhoZ0yLJkWqeAH_klyLvpK6wUbf2Zo-1n15eIf1Mwiae-DEsuHcnGXNKlRblL7O7GjZIJGDBhweirp5kmzErvDF7FSHwqs-mRAEArSDt4-JN91R9sqDnngR24lRuixC9j-u1a15y3r31Cl7Cpv04VHQ12hLfDY4H6bLdEyD9s915FI1vHGSBZEhB_FktJRILTtaLUuFDLXVnX8-Dg-u1wgYQSa8Ier89I4u-6d-hSTtv6txNUnBukI01w85sdEwE7S1Wh_LfHR1So-Z6956mmj7RXNNq36XcKW2vVS2Lk3Q3O94SLqtFWIdl8AhuAyN4S-Lab1lhWvTQev7A
Learn More about OAuth, the Device Flow, and Okta
Hopefully, this gives you an idea of how to use the Device Flow with an OAuth server that doesn’t have native support. In a production environment, you’d want to do some cleanup to the UI that the user interacts with to make it look a bit nicer, but this is a good starting point!
You can find the entire source code for this project on GitHub.
If you would like to dig deeper into the topics covered in this article, the following resources are a great starting point:
- Add Authentication to your PHP App in 5 Minutes
- Get Started with PHP + Okta
- Device Code Flow on the OAuth Playground
Like what you learned today? Follow us on Twitter, and subscribe to our YouTube channel for more awesome content!
Aaron Parecki is a Senior Security Architect at Okta. He is the author of OAuth 2.0 Simplified, and maintains oauth.net. He regularly writes and gives talks about OAuth and online security. He is an editor of several internet specs, and is the co-founder of IndieWebCamp, a conference focusing on data ownership and online identity. Aaron has spoken at conferences around the world about OAuth, data ownership, quantified self, and home automation, and his work has been featured in Wired, Fast Company and more.
Okta Developer Blog Comment Policy
We welcome relevant and respectful comments. Off-topic comments may be removed.