How to Use Client Credentials Flow with Spring Security

The client credentials grant is used when two servers need to communicate with each other outside the context of a user. This is a very common scenario—and yet, it’s often overlooked by tutorials and documentation online. In contrast, the authorization code grant type is more common, for when an application needs to authenticate a user and retrieve an authorization token, typically a JWT, that represents the user’s identity within the application and defines the resources the user can access, and the actions the user can perform.
The OAuth 2.0 docs describe the client credentials grant in this way:
The Client Credentials grant type is used by clients to obtain an access token outside of the context of a user. This is typically used by clients to access resources about themselves rather than to access a user’s resources.
Table of Contents
- What Is the Client Credentials Grant Flow?
- Intro to Spring Security 5 Core Classes
- Build a Secure OAuth 2.0 Resource Server with Spring Security
- Create an OIDC Application
- Test Your Secure Server
- Add a Custom Scope to Your Authorization Server
- Create a RestTemplate Command-Line Application
- Create a WebClient-Based Application
- Learn More About Spring Boot and Spring Security
In this tutorial, you will learn about how to allow services to securely interoperate even when there is not an authenticated user, using the client credentials grant.
Fortunately, this grant type is more straightforward than the other user-focused grant types. It is often used for processes such as CRON jobs, scheduled tasks, and other types of heavy background data processing.
You will create a simple resource server that will be secured using Okta as an OAuth 2.0 and OpenID Connect (OIDC) provider. After that, you will create a Spring Boot-based command-line client that uses Spring’s RestTemplate to make authenticated requests to the secure server. You will see how to authenticate the client with Okta using the client credentials grant and how to exchange the client credentials for a JSON Web Token (JWT), which will be used in the requests to the secure server.
RestTemplate is deprecated, and while still widely used, should probably not be used for new code. Instead, the WebFlux-based class, WebClient should be used. In the next part of the tutorial, you will implement the same OAuth 2.0 client credentials grant using Spring WebClient.
If you would rather follow along by watching a video, check out the screencast below from our YouTube channel.
Note: In May 2025, the Okta Integrator Free Plan replaced Okta Developer Edition Accounts, and the Okta CLI was deprecated.
We preserved this post for reference, but the instructions no longer work exactly as written. Replace the Okta CLI commands by manually configuring Okta following the instructions in our Developer Documentation.
What Is the Client Credentials Grant Flow?
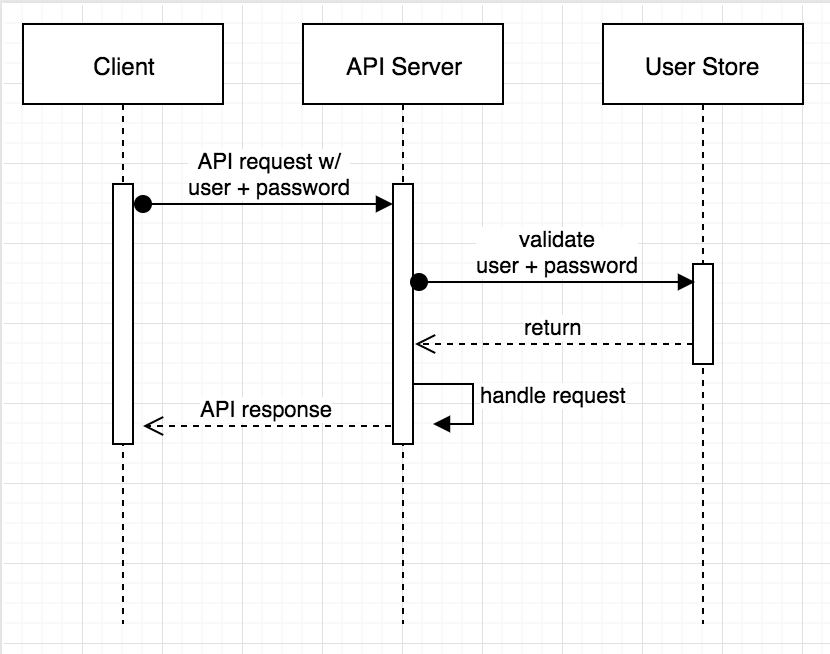
The goal of the OAuth 2.0 client credentials grant is to allow two automated services to interact securely. It does this primarily by replacing the old scheme, HTTP Basic, with a token-based authentication scheme that greatly reduces the number of requests that expose sensitive access credentials.
The primary problem with HTTP Basic is that it sends the username and password with every request. This means that each and every request between each and every service is a major potential security risk. Did the headers get leaked in a log file? Did somebody forget to force HTTPS? One mistake and credentials are compromised. Further, because usernames and passwords often don’t have expiration dates, and because many people will (sadly) reuse these credentials across services, such a leak can expose a hole the size of a barn in a system’s security barrier.
OAuth 2.0, in contrast, mitigates this risk by having the client (the service initiating the request) request an access token from an authorization server. This access token is then used in the request to the other service for authentication and authorization. The primary benefit here is that the service credentials are only exposed when a new token must be requested or refreshed.
Further, this request is performed in a far more controlled manner, since it happens between the client and the authorization server.With HTTP Basic, in essence, every server has to act as an authorization server, with the increased security risk this poses. (Ideally a single authorization server can be hardened far more effectively than an entire network of services.)
The same is true when the service that receives the request validates the token. It makes a request to the authorization server, sending only the token, not exposing the username and password of the client.
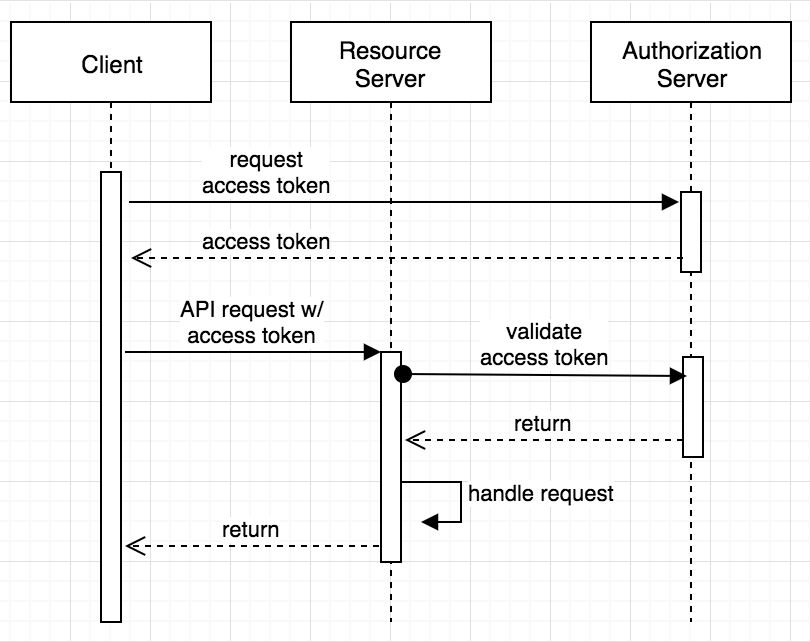
Another major benefit is that the tokens should expire and can be scoped. Passwords only expire when they are changed. Tokens have an expiration built into them. Further, the scope of the token and the authenticated identity of the token holder can be used to restrict the actions that the token holder is allowed to perform.
Prerequisites:
- Java 11: This project uses Java 11. OpenJDK 11 will work just as well. Instructions are found on the OpenJDK website. OpenJDK can also be installed using Homebrew. Alternatively, SDKMAN is another excellent option for installing and managing Java versions.
- HTTPie: This is a powerful command-line HTTP request utility that you’ll use to test the WebFlux server. Install it according to the docs on their site.
- Okta CLI: The Okta CLI is a simple way to use Okta as an OAuth 2.0 and OpenID Connect provider. You can sign up for a free Okta developer account, log in to an existing account, and create OIDC applications. You’ll use it in this tutorial to configure Okta as your OAuth 2.0 and OIDC provider.
Intro to Spring Security 5 Core Classes
Spring Security 5 changed how a lot of the OAuth flow is handled. The client credentials grant was no exception—the old method used Spring’s RestTemplate and OAuth2RestTemplate. While you can still use RestTemplate, OAuth2RestTemplate is gone and does not work with Spring Security 5. The preferred method in Spring Security 5 is to use the WebClient, which is part of the WebFlux package.
I’m going to take a moment to introduce some of the main OAuth Spring Security classes. If you already feel comfortable with OAuth 2.0 and Spring Security 5, or just want to see the code, feel free to skip ahead to the next section.
In the examples below, you’ll see that to configure client credentials need to configure Spring by overriding some of these classes through Bean definitions. If you want to get a more detailed look at these classes, take a look at the Spring docs on the subject.
ClientRegistration: represents a client registered with OAuth 2.0 or OpenID Connect (OIDC). It holds all of the basic information about the client, such as client id, client secret, grant type, and the various URIs. Client registrations are typically loaded automatically from an application.properties file. Spring auto-configuration looks for properties with the schema spring.security.oauth2.client.registration.[registrationId] and creates a ClientRegistration instance within a ClientRegistrationRepository. As you will see, in the command line runner version of this, we have to re-create some of this logic manually because it is not being auto-configured for us outside of the scope of a web service environment.
ClientRegistrationRepository: this is a container class that holds ClientRegistrations.
OAuth2AuthorizedClient: Represents an authorized client. This is a composed class that contains a client registration but adds authentication information. Take a look at the code excerpt below. You’ll see that the OAuth2AuthorizedClient adds three properties composed on top of the client registration: a principal name, an access token, and a refresh token.
public class OAuth2AuthorizedClient implements Serializable {
    ...
    private final ClientRegistration clientRegistration;
    private final String principalName;
    private final OAuth2AccessToken accessToken;
    private final OAuth2RefreshToken refreshToken;
    ...
}
OAuth2AuthorizedClientRepository: is a container class that holds and persists authorized clients between requests. The default implementation, InMemoryOAuth2AuthorizedClientService, simply stores the clients in memory.
OAuth2AuthorizedClientManager: is the manager class that contains the logic to handle the authorization flow. Most importantly, it authorizes and re-authorizes OAuth 2.0 clients using an OAuth2AuthorizedClientProvider. It also delegates persistence of the authorized clients and calls success or failure handlers when client authorization succeeds or fails.
OAuth2AuthorizedClientProvider: represents an OAuth 2.0 provider and handles the actual request logic for different grant types and OAuth 2.0 providers. They can be auto-configured based on property values (spring.security.oauth2.client.provider.[provider name]). In the case of this tutorial, you will be using Okta as your provider, so you’ll see properties with the prefix spring.security.oauth2.client.provider.okta. that are auto-configuring an associated OAuth2AuthorizedClientProvider.
Now for the code!
Build a Secure OAuth 2.0 Resource Server with Spring Security
In this section, you’re going to make a simple resource server for the clients to call. To bootstrap the project, you’re going to use the Spring Initializr. It’s a great way to create a preconfigured Spring Boot project. Here you’re going to access it via the REST API, but it also has a pretty slick web interface.
Make a root project directory for the three different applications:
- the resource server,
- the
RestTemplateclient, and - the
WebClientclient.
Open a BASH shell and navigate to the base project directory. Run the command below to retrieve the pre-configured starter project for the server using the Spring Initializr REST API.
curl https://start.spring.io/starter.tgz \
  -d bootVersion=2.5.6 \
  -d artifactId=secure-server \
  -d dependencies=oauth2-resource-server,web,security,okta \
  -d baseDir=secure-server \
| tar -xzvf - && cd secure-server
You can also use HTTPie:
https start.spring.io/starter.zip \
  bootVersion==2.5.6 \
  artifactId==secure-server \
  dependencies==oauth2-resource-server,web,security,okta \
  baseDir==secure-server \
| tar -xzvf - && cd secure-server
This defines four dependencies:
- Spring Boot OAuth 2.0 resource server
- Spring Boot web starter
- Spring security
- The Okta Spring Boot starter
The Okta Spring Boot starter is a project that simplifies OAuth 2.0 and OpenID Connect (OIDC) configuration with Spring Boot and Okta. Take a look at the Okta Spring Boot Starter on GitHub for more information.
From within the secure-server project, open the DemoApplication class file and replace it with the following contents.
java/com/example/secureserver/DemoApplication.java
package com.example.secureserver;

import org.springframework.boot.SpringApplication;
import org.springframework.boot.autoconfigure.SpringBootApplication;
import org.springframework.security.access.prepost.PreAuthorize;
import org.springframework.security.config.annotation.method.configuration.EnableGlobalMethodSecurity;
import org.springframework.security.config.annotation.web.builders.HttpSecurity;
import org.springframework.security.config.annotation.web.configuration.WebSecurityConfigurerAdapter;
import org.springframework.web.bind.annotation.GetMapping;
import org.springframework.web.bind.annotation.RestController;
import com.okta.spring.boot.oauth.Okta;

import java.security.Principal;

@SpringBootApplication
public class DemoApplication {

    public static void main(String[] args) {
        SpringApplication.run(DemoApplication.class, args);
    }

    @EnableGlobalMethodSecurity(prePostEnabled = true)
    public static class SecurityConfig extends WebSecurityConfigurerAdapter {
        protected void configure(final HttpSecurity http) throws Exception {
            http.authorizeRequests()
                    .anyRequest().authenticated()
                    .and()
                    .oauth2ResourceServer().jwt();
        }
    }

    @RestController
    public class RequestController {
        @PreAuthorize("hasAuthority('SCOPE_mod_custom')")
        @GetMapping("/")
        public String getMessage(Principal principal) {
            return "Welcome, " + principal.getName();
        }
    }

}
This class does a few important things. In the SecurityConfig inner class, it configures Spring Boot as an OAuth 2.0 resource server using JWTs and requires that all requests are authenticated. It also enables using the @PreAuthorize annotation by including the @EnableGlobalMethodSecurity(prePostEnabled = true) annotation.
The second inner class, RequestController, defines a REST endpoint at the context root and secures this endpoint using the @PreAuthorize annotation. The security requires that the authorized JWT has the custom scope “mod_custom.”
Notice that to specify a required scope using the PreAuthorize annotation, you use a Spring Expression Language snippet (SpEL): hasAuthority('SCOPE_mod_custom'). Spring automatically prepends “SCOPE_” in front of the required scope name, such that the actual required scope is “mod_custom” not “SCOPE_mod_custom.”
The application code is in place. However, you still need to configure the Spring Boot application to use Okta as the OAuth 2.0 and OIDC provider. You also need to create an OIDC application on Okta.
Create an OIDC Application
Before you begin, you’ll need a free Okta developer account. Install the Okta CLI and run okta register to sign up for a new account. If you already have an account, run okta login.
Then, run okta apps create service. Select the default app name, or change it as you see fit.
What does the Okta CLI do?
The Okta CLI will create an OAuth 2.0 Service App in your Okta Org. You will see output like the following when it’s finished:
Okta application configuration has been written to: /path/to/app/.okta.env
Run cat .okta.env (or type .okta.env on Windows) to see the issuer and credentials for your app.
export OKTA_OAUTH2_ISSUER="https://dev-133337.okta.com/oauth2/default"
export OKTA_OAUTH2_CLIENT_ID="0oab8eb55Kb9jdMIr5d6"
export OKTA_OAUTH2_CLIENT_SECRET="NEVER-SHOW-SECRETS"
Your Okta domain is the first part of your issuer, before /oauth2/default.
NOTE: You can also use the Okta Admin Console to create your app. See Create a Service App for more information.
Copy the values from the generated .okta.env file into src/main/resources/application.properties. It should look like the following (with your own values for the issuer, client ID, and client secret) when you’re finished.
okta.oauth2.issuer=https://dev-123456.okta.com/oauth2/default
okta.oauth2.client-secret=292yu98y2983e28ue928u39e82ue982ue982
okta.oauth2.client-id=0oa7km6o1AEDdbuUq4x7
Add a line to the applications.properties file. This changes the server port to 8081.
server.port=8081
Test Your Secure Server
You now have a fully functioning server application. You can run it with the following command.
./mvnw spring-boot:run
Once that finishes starting, you can run a request using HTTPie.
http :8081/secure
However, the server requires a valid JSON Web Token (JWT).
HTTP/1.1 401
...

401 Unauthorized
Add a Custom Scope to Your Authorization Server
Because we are using the custom scope mod_custom in the @PreAuthorize annotation, you need to add this custom scope to your Okta authorization server. Run okta login and open the resulting URL in your browser. Sign in to the Okta Admin Console. You may need to click the Admin button to get to your dashboard.
Go to Security > API. Select the Default authorization server by clicking on default in the table.
Select the Scopes tab. Click Add Scope.
Give the scope the following Name: mod_custom.
Give the scope whatever Display Name and Description you would like, or leave it blank. Click Create to continue.
Create a RestTemplate Command-Line Application
Next, you will create a command-line application that makes an authorized request to the secure server using RestTemplate. Use the Spring Initializr to download a bootstrapped application with the following command, run from the root directory for the project as a whole.
curl https://start.spring.io/starter.tgz \
  -d bootVersion=2.5.6 \
  -d artifactId=client \
  -d dependencies=oauth2-client,web \
  -d baseDir=client-resttemplate \
| tar -xzvf - && cd client-resttemplate
Open this project in your IDE and create a new class to hold the OAuth configuration.
src/main/java/com/example/client/OAuthClientConfiguration.java
package com.example.client;

import org.springframework.beans.factory.annotation.Value;
import org.springframework.context.annotation.Bean;
import org.springframework.context.annotation.Configuration;
import org.springframework.security.oauth2.client.*;
import org.springframework.security.oauth2.client.registration.ClientRegistration;
import org.springframework.security.oauth2.client.registration.ClientRegistrationRepository;
import org.springframework.security.oauth2.client.registration.InMemoryClientRegistrationRepository;
import org.springframework.security.oauth2.core.AuthorizationGrantType;

@Configuration
public class OAuthClientConfiguration {

    // Create the Okta client registration
    @Bean
    ClientRegistration oktaClientRegistration(
            @Value("${spring.security.oauth2.client.provider.okta.token-uri}") String token_uri,
            @Value("${spring.security.oauth2.client.registration.okta.client-id}") String client_id,
            @Value("${spring.security.oauth2.client.registration.okta.client-secret}") String client_secret,
            @Value("${spring.security.oauth2.client.registration.okta.scope}") String scope,
            @Value("${spring.security.oauth2.client.registration.okta.authorization-grant-type}") String authorizationGrantType
    ) {
        return ClientRegistration
                .withRegistrationId("okta")
                .tokenUri(token_uri)
                .clientId(client_id)
                .clientSecret(client_secret)
                .scope(scope)
                .authorizationGrantType(new AuthorizationGrantType(authorizationGrantType))
                .build();
    }

    // Create the client registration repository
    @Bean
    public ClientRegistrationRepository clientRegistrationRepository(ClientRegistration oktaClientRegistration) {
        return new InMemoryClientRegistrationRepository(oktaClientRegistration);
    }

    // Create the authorized client service
    @Bean
    public OAuth2AuthorizedClientService auth2AuthorizedClientService(ClientRegistrationRepository clientRegistrationRepository) {
        return new InMemoryOAuth2AuthorizedClientService(clientRegistrationRepository);
    }

    // Create the authorized client manager and service manager using the
    // beans created and configured above
    @Bean
    public AuthorizedClientServiceOAuth2AuthorizedClientManager authorizedClientServiceAndManager (
            ClientRegistrationRepository clientRegistrationRepository,
            OAuth2AuthorizedClientService authorizedClientService) {

        OAuth2AuthorizedClientProvider authorizedClientProvider =
                OAuth2AuthorizedClientProviderBuilder.builder()
                        .clientCredentials()
                        .build();

        AuthorizedClientServiceOAuth2AuthorizedClientManager authorizedClientManager =
                new AuthorizedClientServiceOAuth2AuthorizedClientManager(
                        clientRegistrationRepository, authorizedClientService);
        authorizedClientManager.setAuthorizedClientProvider(authorizedClientProvider);

        return authorizedClientManager;
    }

}
In the context of a servlet, much of what this file does would be accomplished automatically by Spring auto-configuration. However, since this is a command-line utility and no servlet is going to be created, you have to recreate some of the OAuth configuration. This is what the file above accomplishes.
The oktaClientRegistration() method loads the properties for the client and provider from the application.properties file and creates an Okta client registration using those properties.
The other methods create an InMemoryOAuth2AuthorizedClientService that contains this client registration and creates an InMemoryOAuth2AuthorizedClientService, both of which are injected into a AuthorizedClientServiceOAuth2AuthorizedClientManager. This is the high-level controller class that orchestrates the OAuth 2.0 client credentials grant request. A lot is going on in this, and we won’t unpack it all here. I will point out that AuthorizedClientServiceOAuth2AuthorizedClientManager is a class specifically designed to be used outside of the context of a HttpServletRequest.
From the Spring Docs:
The DefaultOAuth2AuthorizedClientManager is designed to be used within the context of a HttpServletRequest. When operating outside of a HttpServletRequest context, use AuthorizedClientServiceOAuth2AuthorizedClientManager instead.
Next, update the DemoApplication file.
src/main/java/com/example/client/DemoApplication.java
package com.example.client;

import org.slf4j.Logger;
import org.slf4j.LoggerFactory;
import org.springframework.beans.factory.annotation.Autowired;
import org.springframework.boot.CommandLineRunner;
import org.springframework.boot.SpringApplication;
import org.springframework.boot.autoconfigure.SpringBootApplication;
import org.springframework.context.annotation.Configuration;
import org.springframework.http.HttpEntity;
import org.springframework.http.HttpHeaders;
import org.springframework.http.HttpMethod;
import org.springframework.http.ResponseEntity;
import org.springframework.security.oauth2.client.AuthorizedClientServiceOAuth2AuthorizedClientManager;
import org.springframework.security.oauth2.client.OAuth2AuthorizeRequest;
import org.springframework.security.oauth2.client.OAuth2AuthorizedClient;
import org.springframework.security.oauth2.core.OAuth2AccessToken;
import org.springframework.web.client.RestTemplate;

@Configuration
@SpringBootApplication
public class DemoApplication implements CommandLineRunner {

	Logger logger = LoggerFactory.getLogger(CommandLineRunner.class);

	public static void main(String[] args) {
		SpringApplication.run(DemoApplication.class, args);
	}

	// Inject the OAuth authorized client service and authorized client manager
	// from the OAuthClientConfiguration class
	@Autowired
	private AuthorizedClientServiceOAuth2AuthorizedClientManager authorizedClientServiceAndManager;

	// The command line runner method, runs once application is fully started
	@Override
	public void run(String... args) throws Exception {

		////////////////////////////////////////////////////
		//  STEP 1: Retrieve the authorized JWT
		////////////////////////////////////////////////////

		// Build an OAuth2 request for the Okta provider
		OAuth2AuthorizeRequest authorizeRequest = OAuth2AuthorizeRequest.withClientRegistrationId("okta")
				.principal("Demo Service")
				.build();

		// Perform the actual authorization request using the authorized client service and authorized client
		// manager. This is where the JWT is retrieved from the Okta servers.
		OAuth2AuthorizedClient authorizedClient = this.authorizedClientServiceAndManager.authorize(authorizeRequest);

		// Get the token from the authorized client object
		OAuth2AccessToken accessToken = Objects.requireNonNull(authorizedClient).getAccessToken();

		logger.info("Issued: " + accessToken.getIssuedAt().toString() + ", Expires:" + accessToken.getExpiresAt().toString());
		logger.info("Scopes: " + accessToken.getScopes().toString());
		logger.info("Token: " + accessToken.getTokenValue());

		////////////////////////////////////////////////////
		//  STEP 2: Use the JWT and call the service
		////////////////////////////////////////////////////

		// Add the JWT to the RestTemplate headers
		HttpHeaders headers = new HttpHeaders();
		headers.add("Authorization", "Bearer " + accessToken.getTokenValue());
        HttpEntity request = new HttpEntity(headers);

		// Make the actual HTTP GET request
		RestTemplate restTemplate = new RestTemplate();
		ResponseEntity<String> response = restTemplate.exchange(
				"http://localhost:8081",
				HttpMethod.GET,
				request,
				String.class
		);

		String result = response.getBody();
		logger.info("Reply = " + result);
	}
}
This file is the standard Spring Boot application file that starts the framework. It uses an inner class that extends WebSecurityConfigurerAdapter to configure Spring Boot for OAuth 2.0 client. The bulk of the code is in the run() method, which is what is defined by the CommandLineRunner interface and is what is executed once Spring Boot is fully loaded.
The run() method does two main things:
- It uses the client ID and client secret to retrieve a JWT
- It uses that JWT to make an authorized HTTP request using
RestTemplate
OAuth2AuthorizeRequest and AuthorizedClientServiceOAuth2AuthorizedClientManager are the classes used to configure the request for authentication with Okta’s servers and to make the actual request.
Before you can test the code, add some properties to the application.properties file. You need to fill in three values below:
- the client ID for your OIDC application
- the client secret for your OIDC application
- your own Okta URI in the
token-uri
All of these values can be taken from the application.properties file for the secure server project above.
src/main/resources/application.properties
spring.security.oauth2.client.registration.okta.client-id={yourClientId}
spring.security.oauth2.client.registration.okta.client-secret={yourClientSecret}
spring.security.oauth2.client.registration.okta.authorization-grant-type=client_credentials
spring.security.oauth2.client.registration.okta.scope=mod_custom
spring.security.oauth2.client.provider.okta.token-uri=https://{yourOktaDomain}/oauth2/default/v1/token
spring.main.web-application-type=none
The last property, spring.main.web-application-type=none, tells Spring Boot not to launch any kind of web service. Since this is a command-line app, there’s no reason to launch the default Tomcat container.
With that all in place, you can now try it out. Make sure your server is running (./mvnw spring-boot:run) and then run the client in a separate shell.
./mvnw spring-boot:run
If all went well, the client will show you some output that looks like the following (I’ve omitted most of the token, but you’ll see it as a bit block of characters in your console).
...
2021-03-23 15:22:06.871  INFO 181148 --- [           main] com.example.client.DemoApplication       : Started DemoApplication in 1.374 seconds (JVM running for 1.531)
2021-03-23 15:22:07.527  INFO 181148 --- [           main] o.s.boot.CommandLineRunner               : Issued: 2021-03-23T22:22:07.517358Z, Expires:2021-03-23T23:22:07.517358Z
2021-03-23 15:22:07.530  INFO 181148 --- [           main] o.s.boot.CommandLineRunner               : Scopes: [mod_custom]
2021-03-23 15:22:07.531  INFO 181148 --- [           main] o.s.boot.CommandLineRunner               : Token: eyJraWQiOiJJdXVaRG00RTg5WUg5U1JoeC1tbWlZU0Q3RmRNTzM4THYycnpl...
2021-03-23 15:22:07.562  INFO 181148 --- [           main] o.s.boot.CommandLineRunner               : Reply = Welcome, 0oa2km6o18E6dbuUq4x7
[INFO] ------------------------------------------------------------------------
[INFO] BUILD SUCCESS
[INFO] ------------------------------------------------------------------------
[INFO] Total time:  3.759 s
[INFO] Finished at: 2021-03-23T15:22:07-07:00
[INFO] ------------------------------------------------------------------------
One thing I want to point out is that this client is going to request a new token on every request. This is less than ideal because the token request sequence is the most vulnerable from a security perspective. A way around this would be to persist the token between requests. You could persist the token yourself and handle the refresh logic within the run() method, or you could implement an OAuth2AuthorizedClientService that persists the token instead of using the default in-memory implementation.
Create a WebClient-Based Application
In this section, you’re going to implement a command-line client using the newer, currently recommended WebClient API. WebClient is part of Spring’s WebFlux package. This is Spring’s reactive, non-blocking API, which you can read more about in their documentation. If you’re reading this and you don’t already have some idea of what non-blocking, asynchronous, or reactive coding is about, please tell me what rock you’ve been hiding under because it’s probably nice and quiet and peaceful.
It’s important to realize when using WebFlux within the Java servlet framework that you are mixing two different threading paradigms. Spring does a good job of handling this gracefully, but there are places (as you’ll see below) where you need to be aware of WebClient’s non-blocking nature and deliberately block it to wait for a response.
In this client, you will use two different methods to run tasks. First, you will use the CommandLineRunner interface, just as you did above. This will demonstrate using WebClient in a blocking context. Second, you will use WebClient to make requests using the @Scheduled annotation. This annotation allows for a variety of scheduling options, including CRON-style scheduling. It also allows the use of WebClient in all its non-blocking glory.
Here is the command to download the starter for the WebClient-based client from the Spring Initializr. The only difference between this bootstrapped project, and the previous one, is the addition of a new dependency. The dependency webflux is necessary to add support for the WebClient class.
Run this command from a Bash shell from the project root directory.
curl https://start.spring.io/starter.tgz \
  -d bootVersion=2.5.6 \
  -d artifactId=client \
  -d dependencies=oauth2-client,web,webflux \
  -d baseDir=client-webclient \
| tar -xzvf - && cd client-webclient
Open the project in your favorite IDE and create a new class to hold the OAuth configuration.
src/main/java/com/example/client/OAuthClientConfiguration.java
package com.example.client;

import org.springframework.beans.factory.annotation.Value;
import org.springframework.context.annotation.Bean;
import org.springframework.context.annotation.Configuration;
import org.springframework.security.oauth2.client.*;
import org.springframework.security.oauth2.client.registration.*;
import org.springframework.security.oauth2.client.web.reactive.function.client.ServerOAuth2AuthorizedClientExchangeFilterFunction;
import org.springframework.security.oauth2.core.AuthorizationGrantType;
import org.springframework.web.reactive.function.client.WebClient;

@Configuration
public class OAuthClientConfiguration {

    @Bean
    ReactiveClientRegistrationRepository clientRegistrations(
            @Value("${spring.security.oauth2.client.provider.okta.token-uri}") String token_uri,
            @Value("${spring.security.oauth2.client.registration.okta.client-id}") String client_id,
            @Value("${spring.security.oauth2.client.registration.okta.client-secret}") String client_secret,
            @Value("${spring.security.oauth2.client.registration.okta.scope}") String scope,
            @Value("${spring.security.oauth2.client.registration.okta.authorization-grant-type}") String authorizationGrantType

    ) {
        ClientRegistration registration = ClientRegistration
                .withRegistrationId("okta")
                .tokenUri(token_uri)
                .clientId(client_id)
                .clientSecret(client_secret)
                .scope(scope)
                .authorizationGrantType(new AuthorizationGrantType(authorizationGrantType))
                .build();
        return new InMemoryReactiveClientRegistrationRepository(registration);
    }

    @Bean
    WebClient webClient(ReactiveClientRegistrationRepository clientRegistrations) {
        InMemoryReactiveOAuth2AuthorizedClientService clientService = new InMemoryReactiveOAuth2AuthorizedClientService(clientRegistrations);
        AuthorizedClientServiceReactiveOAuth2AuthorizedClientManager authorizedClientManager = new AuthorizedClientServiceReactiveOAuth2AuthorizedClientManager(clientRegistrations, clientService);
        ServerOAuth2AuthorizedClientExchangeFilterFunction oauth = new ServerOAuth2AuthorizedClientExchangeFilterFunction(authorizedClientManager);
        oauth.setDefaultClientRegistrationId("okta");
        return WebClient.builder()
                .filter(oauth)
                .build();
    }

}
Like the corresponding file in the previous client, this file loads the Okta client registration and packages it in an in-memory client registration repository (InMemoryReactiveClientRegistrationRepository). This repository is specifically a reactive repository suitable for use with the WebClient class. This is used to build a reactive authorized client manager, which is packaged in an OAuth 2.0 filter that handles the client credentials grant exchange. Here the WebClient is packaged as a bean with the filter in place, and every request that uses this bean will have this filter. In the previous example, the client credentials exchange was performed explicitly in the command line runner method.
Update the DemoApplication class to match the following.
package com.example.client;

import org.slf4j.Logger;
import org.slf4j.LoggerFactory;
import org.springframework.beans.factory.annotation.Autowired;
import org.springframework.boot.CommandLineRunner;
import org.springframework.boot.SpringApplication;
import org.springframework.boot.autoconfigure.SpringBootApplication;
import org.springframework.context.annotation.Configuration;
import org.springframework.scheduling.annotation.EnableScheduling;
import org.springframework.scheduling.annotation.Scheduled;
import org.springframework.web.reactive.function.client.WebClient;

@Configuration
@SpringBootApplication
@EnableScheduling
public class DemoApplication implements CommandLineRunner {

    Logger logger = LoggerFactory.getLogger(CommandLineRunner.class);

    public static void main(String[] args) {
        SpringApplication.run(DemoApplication.class, args);
    }

    @Autowired
    private WebClient webClient;

    @Scheduled(fixedRate = 5000)
    public void scheduledRequest() {
        webClient.get()
                .uri("http://localhost:8081")
                .retrieve()
                .bodyToMono(String.class)
                .map(string
                        -> "Schedule request response: " + string)
                .subscribe(logger::info);
    }

    @Override
    public void run(String... args) throws Exception {
        String body = webClient.get()
                .uri("http://localhost:8081")
                .retrieve()
                .bodyToMono(String.class)
                .block();
        logger.info(body);
    }
}
This class uses two different methods to trigger requests, both of which use the WebClient bean defined in the previous class. The scheduledRequest() method uses the @Scheduled annotation to trigger a request every five seconds. This annotation allows WebClient to be used in a non-blocking manner.
The run() method, by contrast, uses WebClient in a blocking manner. Notice the block() method in the chain of commands, and notice that it is returning a String value that is logged instead of using the more reactive methodology to log results: subscribe(logger::info).
That’s it for this client. You can tell by the relative simplicity of this implementation over the RestTemplate implementation that Spring is moving in this direction. RestTemplate, while still widely used, is now deprecated.
Before you run it, copy the values from the application.properties file from the previous project to this project.
src/main/resources/application.properties
spring.security.oauth2.client.registration.okta.client-id={yourClientId}
spring.security.oauth2.client.registration.okta.client-secret={yourClientSecret}
spring.security.oauth2.client.registration.okta.authorization-grant-type=client_credentials
spring.security.oauth2.client.registration.okta.scope=mod_custom
spring.security.oauth2.client.provider.okta.token-uri=https://{yourOktaUri}/oauth2/default/v1/token
spring.main.web-application-type=none
You can start the WebClient-based client using the following command.
./mvnw spring-boot:run
You should see output like this:
2021-04-08 19:22:09.658  INFO 346556 --- [           main] com.example.client.DemoApplication       : Started DemoApplication in 0.613 seconds (JVM running for 0.782)
2021-04-08 19:22:11.848  INFO 346556 --- [           main] o.s.boot.CommandLineRunner               : Welcome, 0oa2kpqtzoRHDcgZG4x7
2021-04-08 19:22:11.849  INFO 346556 --- [or-http-epoll-7] o.s.boot.CommandLineRunner               : Schedule request response: Welcome, 0oa2kpqtzoRHDcgZG4x7
2021-04-08 19:22:14.670  INFO 346556 --- [or-http-epoll-7] o.s.boot.CommandLineRunner               : Schedule request response: Welcome, 0oa2kpqtzoRHDcgZG4x7
Learn More About Spring Boot and Spring Security
In this tutorial, you saw two different ways to implement the OAuth 2.0 client credentials flow. You created a simple server application. You created a client using RestTemplate, a deprecated but still widely used Spring technology. Finally, you created a client using the newer, asynchronous WebClient, built on Spring’s WebFlux package.
You can find the source code for this example in our okta-spring-boot-client-credentials-example repository.
If you liked this post, there’s a good chance you might like some of our other ones.
- Build a Secure Spring Data JPA Resource Server
- Spring Boot and Okta in 2 Minutes
- How to Docker with Spring Boot
- Scaling Secure Applications with Spring Session and Redis
- Spring Cloud Config for Shared Microservice Configuration
If you have any questions about this post, please add a comment below. For more awesome content, follow @oktadev on Twitter, like us on Facebook, or subscribe to our YouTube channel.
Changelog:
- Oct 26, 2021: Updated to use Spring Boot 2.5.6. You can view this post’s changes in okta-blog#936; example app changes are in okta-spring-boot-client-credentials-example#4.
Okta Developer Blog Comment Policy
We welcome relevant and respectful comments. Off-topic comments may be removed.