R2DBC and Spring for Non-Blocking Database Access
Reactive APIs are a powerful way to handle and serve large amounts of data and large numbers of requests in a web application. They rely on a “server-side event” model in which the client (e.g. your browser) subscribes to “events” on the server, and the server “pushes” events to the client as they become available.
For simple CRUD applications this is not very useful. However, in situations with millions of “subscribers” it can offer improved performance versus the standard “request-response” paradigm.
Spring Boot 2.0 provided reactive web technology by integrating with WebFlux, a framework built on top of Project Reactor. Using WebFlux you can create reactive APIs easily in Spring Boot. However, because most Spring Boot applications are CRUD-ish and are backed by relational databases, reactive APIs may not provide much benefit because the underlying database transactions (querying, updating, etc) are synchronous/blocking.
Table of Contents
- What is R2DBC?
- Create a Spring Boot Project with R2DBC
- Create an OpenID Connect Application
- Configure and Secure Your Reactive Spring Boot Application
- Stream Data to a Webpage Using R2DBC
- Learn More About R2DBC and Reactive Web Technologies
Note: In May 2025, the Okta Integrator Free Plan replaced Okta Developer Edition Accounts, and the Okta CLI was deprecated.
We preserved this post for reference, but the instructions no longer work exactly as written. Replace the Okta CLI commands by manually configuring Okta following the instructions in our Developer Documentation.
What is R2DBC?
R2DBC is an API which provides reactive, non-blocking APIs for relational databases. Using this, you can have your reactive APIs in Spring Boot read and write information to the database in a reactive/asynchronous way.
In this tutorial you will develop a Spring Boot application that:
- Communicates with an H2 database using R2DBC
- Integrates with Okta for security using OAuth 2.0
- Serves reactive streams of data to a secured web page
Let’s get started!
Prerequisites: Java 11
If you would rather follow along by watching a video, check out the screencast below from our YouTube channel.
Create a Spring Boot Project with R2DBC
Click this link or go to start.spring.io and select the following options in your browser:
- Project:
Maven Project - Language:
Java - Spring Boot:
2.5.6
Under Project Metadata, set the values to the following:
- Group:
com.okta.dev - Artifact:
okta-r2dbc - Name:
okta-r2dbc - Description: Spring Boot App for Okta + R2DBC
- Package:
com.okta.dev.oktar2dbc - Packaging:
Jar - Java:
11
Select the following dependencies:
- Spring Data JPA
- Spring Data R2DBC
- Spring Reactive Web
- Okta
- H2 Database
- Lombok
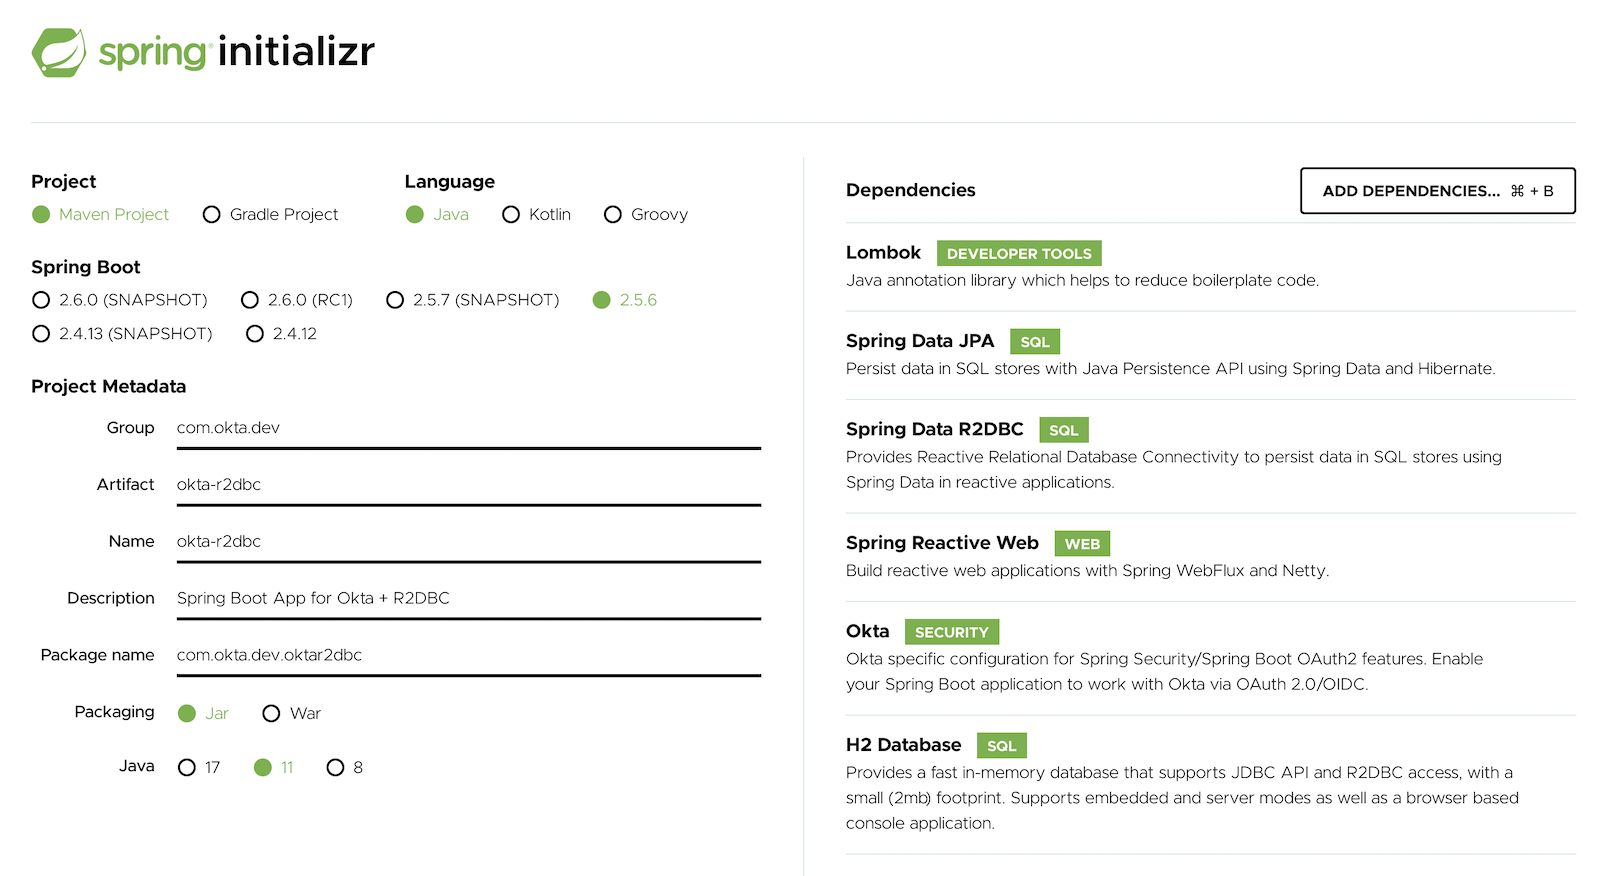
Click Generate to download the project files. Unzip the file and import the project files into your favorite IDE.
Create an OpenID Connect Application
Before you begin, you’ll need a free Okta developer account. Install the Okta CLI and run okta register to sign up for a new account. If you already have an account, run okta login.
Then, run okta apps create. Select the default app name, or change it as you see fit.
Choose Web and press Enter.
Select Okta Spring Boot Starter.
Accept the default Redirect URI values provided for you. That is, a Login Redirect of http://localhost:8080/login/oauth2/code/okta and a Logout Redirect of http://localhost:8080.
What does the Okta CLI do?
The Okta CLI will create an OIDC Web App in your Okta Org. It will add the redirect URIs you specified and grant access to the Everyone group. You will see output like the following when it’s finished:
Okta application configuration has been written to:
  /path/to/app/src/main/resources/application.properties
Open src/main/resources/application.properties to see the issuer and credentials for your app.
okta.oauth2.issuer=https://dev-133337.okta.com/oauth2/default
okta.oauth2.client-id=0oab8eb55Kb9jdMIr5d6
okta.oauth2.client-secret=NEVER-SHOW-SECRETS
NOTE: You can also use the Okta Admin Console to create your app. See Create a Spring Boot App for more information.
Configure and Secure Your Reactive Spring Boot Application
Open your IDE and edit your application’s configuration file at src/main/resources/application.properties:
okta.oauth2.issuer=https://MY_OKTA_DOMAIN.okta.com/oauth2/default
okta.oauth2.clientId=CLIENT_ID
okta.oauth2.clientSecret=CLIENT_SECRET

spring.data.r2dbc.repositories.enabled=true
spring.r2dbc.url=r2dbc:h2:mem://./testdb
Make sure MY_OKTA_DOMAIN, CLIENT_ID, and CLIENT_SECRET are replaced with values from the Okta CLI.
Open the Java class at com.okta.dev.oktar2dbc.OktaR2dbcApplication and add the @EnableWebFlux and @EnableR2dbcRepositories annotations to the main class:
@EnableWebFlux
@EnableR2dbcRepositories
@SpringBootApplication
public class OktaR2dbcApplication {
    public static void main(String[] args) {
        SpringApplication.run(OktaR2dbcApplication.class, args);
    }
}
@EnableWebFlux enables the reactive API, and @EnableR2dbcRepositories configures the application to use reactive database repositories via R2DBC.
Create the persistent entity representing an application user:
package com.okta.dev.oktar2dbc.database;

import lombok.Data;
import org.springframework.data.annotation.Id;
import javax.persistence.GeneratedValue;
import javax.persistence.GenerationType;

@Data
public class UserEntity {
    @Id
    @GeneratedValue(strategy = GenerationType.SEQUENCE)
    private Long id;
    private String email;
    private String name;
}
Define a reactive R2dbcRepository to manage this user entity:
package com.okta.dev.oktar2dbc.database;

import org.springframework.data.r2dbc.repository.R2dbcRepository;
import org.springframework.stereotype.Repository;
import reactor.core.publisher.Flux;

@Repository
public interface UserRepository extends R2dbcRepository<UserEntity, Long> {
    Flux<UserEntity> findByEmail(String email);
}
The R2dbcRepository interface abstracts away much of the complexity of managing reactive database connections, but some major differences between this and the non-reactive JpaRepository should be noted:
- Methods like
findById()which return one entity will instead return aMono<>object. - Methods like
findAll()which return lists of entities will instead return aFlux<>object.
A thorough explanation of these reactive types is outside the scope of this tutorial. For a more thorough introduction you can check out the official documentation here. For now it is enough to know that these reactive types represent data that is changing or not-yet-whole, and it is the responsibility of the caller to “react” to the results as they become available.
Next you will create an OAuth-enabled UserDetailsService which will manage our user authentication and security with OAuth 2.0. Create a file at com.okta.dev.oktar2dbc.domain.UserDetails:
package com.okta.dev.oktar2dbc.domain;

// imports omitted

public class UserDetails implements OidcUser {

    private final String email;
    private final OidcIdToken oidcIdToken;
    private final Map<String, Object> claims = new HashMap<>();
    private final Map<String, Object> attributes = new HashMap<>();

    public UserDetails(String email, OidcUserRequest oidcUserRequest) {
        this.email = email;
        this.claims.putAll(oidcUserRequest.getIdToken().getClaims());
        this.attributes.putAll(oidcUserRequest.getClientRegistration().getProviderDetails().getConfigurationMetadata());
        this.oidcIdToken = oidcUserRequest.getIdToken();
    }

    @Override
    public Map<String, Object> getClaims() {
        return new HashMap<>(claims);
    }

    @Override
    public OidcUserInfo getUserInfo() {
        return new OidcUserInfo(getClaims());
    }

    @Override
    public OidcIdToken getIdToken() {
        return oidcIdToken;
    }

    @Override
    public Map<String, Object> getAttributes() {
        return new HashMap<>(attributes);
    }

    @Override
    public Collection<? extends GrantedAuthority> getAuthorities() {
        return Collections.singletonList(new SimpleGrantedAuthority("USER"));
    }

    @Override
    public String getName() {
        return email;
    }
}
This OidcUser object represents the authenticated user and loads user information from the various claims provided by the OAuth identity provider.
Create the user service at com.okta.dev.oktar2dbc.domain.DbUserService:
package com.okta.dev.oktar2dbc.domain;

// imports omitted

import java.util.Map;

public class DbUserService implements OAuth2UserService<OidcUserRequest, OidcUser>, ReactiveUserDetailsService {
    private static final String CLAIM_NAME = "name";
    private static final String CLAIM_EMAIL = "email";

    private final UserRepository userRepository;

    public DbUserService(UserRepository userRepository) {
        this.userRepository = userRepository;
    }

    @Override
    public OidcUser loadUser(OidcUserRequest oidcUserRequest) throws OAuth2AuthenticationException {
        Map<String, Object> metadata = oidcUserRequest.getIdToken().getClaims();
        String email = (String) metadata.get(CLAIM_EMAIL);
        String name = (String) metadata.get(CLAIM_NAME);

        Flux<UserEntity> userLookup = userRepository.findByEmail(email);
        UserEntity userEntity = userLookup.blockFirst();

        if (userEntity == null) {
            userEntity = new UserEntity();
            userEntity.setEmail(email);
        }

        userEntity.setName(name);
        userEntity = userRepository.save(userEntity).block();

        return new UserDetails(userEntity.getEmail(), oidcUserRequest);
    }

    @Override
    public Mono<org.springframework.security.core.userdetails.UserDetails> findByUsername(String username) {
        return null; // not used
    }
}
The DbUserService handles requests from OAuth 2.0 to automatically load users into the database. The user’s information will be created or updated on each login via the reactive connections provided by UserRepository.
Secure the application by creating a configuration file at com.okta.dev.oktar2dbc.config.SecurityConfig:
package com.okta.dev.oktar2dbc.config;

// imports omitted

@EnableWebFluxSecurity
@Configuration
public class SecurityConfig {
    @Bean
    public ReactiveUserDetailsService userDetailsService(UserRepository userRepository) {
        return new DbUserService(userRepository);
    }

    @Bean
    public SecurityWebFilterChain configure(ServerHttpSecurity http) throws Exception {
        return http
            .csrf().disable()
            .authorizeExchange()
            .pathMatchers("/", "/index").permitAll()
            .anyExchange().authenticated()
            .and()
            .oauth2Login()
            .authenticationSuccessHandler(new RedirectServerAuthenticationSuccessHandler("/protected"))
            .and().build();
    }
}
The @EnableWebFluxSecurity annotation secures the application according to the settings defined in configure(). There are some small differences between this and the normal security configuration classes usually seen in non-reactive Spring Boot apps, but it should appear familiar. To note:
- The home page (
/and/index) is exposed and not protected by authentication. - All other requests/pages are protected
- OAuth 2.0 login behavior is enabled by
.oauth2Login() - After a successful OAuth 2.0 login, the user is redirected to a protected page:
/protected.
Now to create the web pages. Create a file at src/main/resources/pages/index.html with the following content:
<!DOCTYPE html>
<html lang="en">
<head>
    <meta charset="UTF-8">
    <title>R2DBC Example - Home</title>
</head>
<body>
Hello!
</body>
</html>
This is the main page for the application and does not require authentication to access. Next create a file at src/main/resources/pages/protected.html:
<!DOCTYPE html>
<html lang="en">
<head>
    <meta charset="UTF-8">
    <title>R2DBC Example - Protected</title>
</head>
<body>
Okta login successful!
</body>
</html>
For serving these pages with WebFlux you will create an application router that maps HTTP requests to resources in the codebase.
Create a Java class at com.okta.dev.oktar2dbc.ApplicationRouter with the following content:
package com.okta.dev.oktar2dbc;

// imports omitted

@Configuration
public class ApplicationRouter {

    // (1)
    @Value("classpath:pages/index.html")
    private Resource indexHtml;

    // (2)
    @Value("classpath:pages/protected.html")
    private Resource protectedHtml;

    @Bean
    public RouterFunction<ServerResponse> route() {
        return RouterFunctions
            // (3)
            .route(RequestPredicates.GET("/index"), request -> pageResponse(indexHtml))
            .andRoute(RequestPredicates.GET("/"), request -> pageResponse(indexHtml))

            // (4)
            .andRoute(RequestPredicates.GET("/protected"), request -> pageResponse(protectedHtml));
    }

    private static Mono<ServerResponse> pageResponse(Resource page) {
        return ServerResponse
            .ok()
            .contentType(MediaType.TEXT_HTML) // (5)
            .body(DataBufferUtils.read(page, new DefaultDataBufferFactory(), 4096), DataBuffer.class);
    }
}
In this class you can see the following:
- The page resources created above are injected as
Resourceobjects at (1) and (2). - A mapping to the unprotected
index.htmlpage is defined in (3). - A mapping to the protected
protected.htmlpage is defined in (4). - (5) When creating the server response (which is a reactive
Mono), theTEXT_HTMLcontent type is specified. This makes sure your browser renders the content as an HTML page and not plain text.
One more step is necessary to get the application running. R2DBC does not automatically generate the database schema, so you must do it yourself.
Create a file at src/main/resources/schema.sql with the following content:
CREATE TABLE USER_ENTITY
(
    id BIGINT PRIMARY KEY AUTO_INCREMENT,
    email VARCHAR2,
    name VARCHAR2
);
Spring Boot will automatically detect the schema.sql file and execute it to create the user_entity table on startup.
Open your command line tool and run the application:
cd /path/to/okta-r2dbc-app
./mvnw spring-boot:run
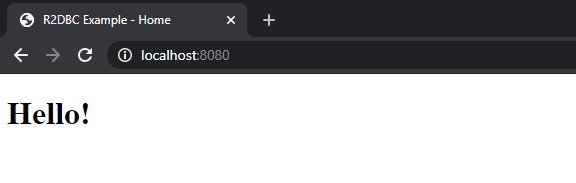
Open your browser and navigate to http://localhost:8080 and you should see the unprotected index page:
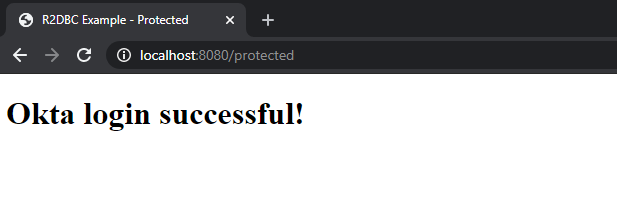
Next navigate to http://localhost:8080/protected. You should be prompted to log in with Okta, and after successfully authenticating, returned to the protected page:
Stream Data to a Webpage Using R2DBC
You’ve successfully implemented R2DBC in your Spring Boot application, but the behavior is still non-reactive: querying and saving users during authentication is still a synchronous, blocking process. Now you will implement a non-blocking API endpoint which reads from the database using reactive techniques.
Create a persistence entity at com.okta.dev.oktar2dbc.database.HeartbeatEntity:
package com.okta.dev.oktar2dbc.database;

// imports omitted

@Data
public class HeartbeatEntity {
    @Id
    @GeneratedValue(strategy = GenerationType.SEQUENCE)
    private Long id;

    private Long timestamp;
    private String username;
    private String text;

    // getters and setters omitted
}
Create a @Repository for this entity at com.okta.dev.oktar2dbc.database.HeartbeatRepository:
package com.okta.dev.oktar2dbc.database;

@Repository
public interface HeartbeatRepository extends R2dbcRepository<HeartbeatEntity, Long> {
}
Open the initialization SQL file at src/main/resources/schema.sql and add the table definition for HEARTBEAT_ENTITY so it looks like this:
CREATE TABLE USER_ENTITY
(
    id BIGINT PRIMARY KEY AUTO_INCREMENT,
    email VARCHAR2,
    name VARCHAR2
);

CREATE TABLE HEARTBEAT_ENTITY
(
    id BIGINT PRIMARY KEY AUTO_INCREMENT,
    timestamp BIGINT NOT NULL,
    username VARCHAR2 NOT NULL,
    text VARCHAR2
);
The database model for Heartbeats is complete, now you’ll create:
- A service to generate and save heartbeats to the database
- An HTTP endpoint routing to serve a reactive stream of heartbeats
- Simple JavaScript to display the stream on a web page
Create the heartbeat service at com.okta.dev.oktar2dbc.service.HeartbeatService:
package com.okta.dev.oktar2dbc.service;

// imports omitted

@Service
public class HeartbeatService {
    private final HeartbeatRepository heartbeatRepository;

    @Autowired
    public HeartbeatService(HeartbeatRepository heartbeatRepository) {
        this.heartbeatRepository = heartbeatRepository;
    }

    @Scheduled(fixedRate = 1000) // 1 second
    public void create() {
        HeartbeatEntity heartbeatEntity = new HeartbeatEntity();
        heartbeatEntity.setTimestamp(System.currentTimeMillis());
        heartbeatEntity.setText(randomString());
        heartbeatEntity.setUsername("system");
        heartbeatRepository.save(heartbeatEntity)
                .log()
                .then()
                .subscribe();
    }

    private static String randomString() {
        int lower = 'A';
        int upper = 'Z';

        return IntStream.range(0, 10)
                .mapToObj(i -> {
                    double range = upper-lower;
                    char charIdx = ((char)(lower + (range * Math.random())));
                    return String.valueOf(charIdx);
                })
                .collect(Collectors.joining());
    }
}
The create() method is marked with Spring Boot’s @Scheduled annotation, which will cause the method to be called asynchronously on a schedule you define. Specifying fixedRate = 1000 means the method will execute every 1000 milliseconds (i.e. one second).
To enable scheduling, you must also add the @EnableScheduling annotation to a configuration class. Open the main application class at com.okta.dev.oktar2dbc.OktaR2dbcApplication and add it:
@EnableScheduling // <-- added
@EnableWebFlux
@EnableR2dbcRepositories
@SpringBootApplication
public class OktaR2dbcApplication { ... }
Open your application router at com.okta.dev.oktar2dbc.ApplicationRouter and modify the route() method to add a routing for /heartbeats:
package com.okta.dev.oktar2dbc;

// imports omitted

@Configuration
public class ApplicationRouter {

    // other code omitted

    @Bean
    public RouterFunction<ServerResponse> route() {
        return RouterFunctions
            .route(RequestPredicates.GET("/index"), request -> pageResponse(indexHtml))
            .andRoute(RequestPredicates.GET("/"), request -> pageResponse(indexHtml))
            .andRoute(RequestPredicates.GET("/protected"), request -> pageResponse(protectedHtml))
            .andRoute(RequestPredicates.GET("/heartbeats"), request -> {
                Flux<Long> interval = Flux.interval(Duration.ofSeconds(1));
                Flux<HeartbeatEntity> heartbeatEntityFlux = heartbeatRepository.findAll();
                Flux<HeartbeatEntity> zipped = Flux.zip(heartbeatEntityFlux, interval, (key, value) -> key);

                return ServerResponse
                    .ok()
                    .contentType(MediaType.TEXT_EVENT_STREAM)
                    .body(zipped, HeartbeatEntity.class);
            });
    }
}
Within the /heartbeats routing you are:
- Defining a
Fluxnamedintervalwhich will publish aLongobject every second (the value of theLongis not important here, just that it publishes every second) - Defining
heartbeatEntityFluxwhich is aFluxof allHeartbeatEntitiesin the database - Creating a “zipped”
Fluxwhich interpolates items from the twoFlux. An item will be published frominterval, and then one fromheartbeatEntityFlux, and then one frominterval, etc. - Returning this stream with a
Content-Typeoftext/event-stream
Open the protected HTML page at src/main/resources/pages/protected.html and modify it:
<!DOCTYPE html>
<html lang="en">
<head>
    <meta charset="UTF-8">
    <title>R2DBC Example - Protected</title>
    <script src="https://ajax.googleapis.com/ajax/libs/jquery/3.6.0/jquery.min.js"></script>
    <script type="text/javascript">
        $(function() {
            var cnx = new EventSource('http://localhost:8080/heartbeats');
            cnx.onmessage = function (e) {
                var data = JSON.parse(e.data);
                var htmlText = '<tr><td>'+data.id+'</td><td>'+data.timestamp+'</td><td>'+data.text+'</td></tr>';
                $( "#heartbeatTable > tbody" ).append(htmlText);
            };
        });
    </script>
</head>
<body>
<h1>Okta login successful!</h1>
<h3>Heartbeats</h3>
<table id="heartbeatTable">
    <thead>
    <tr>
        <th>ID</th>
        <th>Timestamp</th>
        <th>Text</th>
    </tr>
    </thead>
    <tbody>
    </tbody>
</table>
</body>
</html>
The JavaScript function:
- Opens a streaming connection with the
/heartbeatsendpoint defined above - Creates an HTML table row whenever new data is received from the stream
- Appends that table row to the body of
heartbeatTable
Start the application again:
cd /path/to/okta-r2dbc-app
./mvnw spring-boot:run
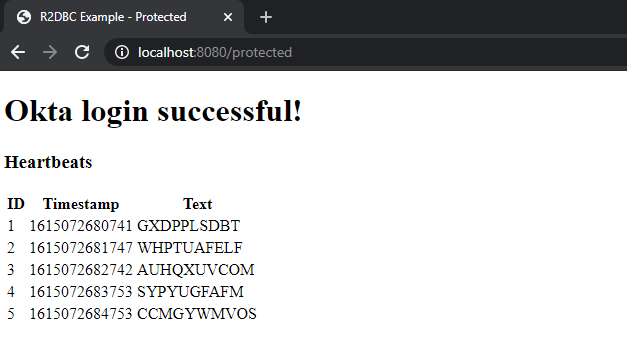
Open your browser and navigate to http://localhost:8080/protected. When the page loads you should see a streaming, constantly updating list of heartbeats.
Congratulations! You’ve created a Spring Boot application using R2DBC and written a reactive API to serve content!
Learn More About R2DBC and Reactive Web Technologies
This tutorial provided a very basic setup for how to use reactive frameworks and techniques with Spring Boot. For in-depth examples and use cases not covered in this tutorial, see Spring’s official documentation for R2DBC.
The source code for this example is on GitHub in the oktadev/okta-spring-boot-r2dbc-example repository.
Check out these other articles on using reactive web with Spring Boot:
- Build Reactive APIs with Spring WebFlux
- Reactive Java Microservices with Spring Boot and JHipster
- Secure Reactive Microservices with Spring Cloud Gateway
- Full Stack Reactive with Spring WebFlux, WebSockets, and React
Please provide comments, questions, and any feedback in the comments section below.
Follow us on social media (Twitter, Facebook, LinkedIn) to know when we’ve posted more articles like this, and please subscribe to our YouTube channel for tutorials and screencasts!
We’re also streaming on Twitch, follow us to be notified when we’re live.
Changelog:
- Oct 26, 2021: Updated to use Spring Boot 2.5.6. You can view the changes in this post in okta-blog#935; example app changes are in okta-spring-boot-r2dbc-example#3.
Okta Developer Blog Comment Policy
We welcome relevant and respectful comments. Off-topic comments may be removed.