Introducing the Okta CLI
Okta is an Identity Management Platform that takes all the hassle out of authentication and authorization. It’s feature-packed with everything from workforce integrations for G-Suite to the latest version of OAuth 2.0 as-a-service for developers writing their own APIs.
It can sometimes be a daunting task for developers to get started with Okta because of how feature-rich it is.
Introducing the Okta CLI - made by developers for developers. Using the CLI tool, you can go from zero to running an application complete with auth (in the language and framework of your choice) in about five minutes. And, you don’t have to wade through any web-based admin consoles to do it.
Set Up the Okta CLI
The Okta CLI is a native command-line application that runs on macOS, Linux, and Windows. Installation on any of these OS’s is a snap, but there are some prerequisites:
| OS | Prerequisites |
|---|---|
| macOS | Homebrew |
| Linux | Flatpack |
| Windows | Chocolatey |
There are simple install directions at https://cli.okta.com for your platform.
Here, I show you the command to install on macOS:
brew install --cask oktadeveloper/tap/okta
Pretty easy, right?
Get Started in Under 5 Minutes
As a developer, in order to make use of Okta, you need an Okta Organization (fondly referred to as an org).
In order to integrate your application with Okta so that your users can authenticate, you need to register your application within Okta.
For your application to work with the registered Okta application, you need to drop in a library for the language (and framework) you’re using.
Finally, you need to configure the library to work with Okta.
In the past, that’s meant bouncing back and forth between the Okta Admin Console and your application as well as finding the right library and configuring it.
Now, it looks like this:
okta start
I want to make this a little more challenging for myself, so I am going to use a .NET sample application since I am a Java developer. Here’s the output of the above command:
Registering for a new Okta account, if you would like to use an existing account, use 'okta login' instead.
First name: Micah
Last name: Silverman
Email address: micah@afitnerd.com
Company: Okta
Creating new Okta Organization, this may take a minute:
OrgUrl: https://dev-159750.okta.com
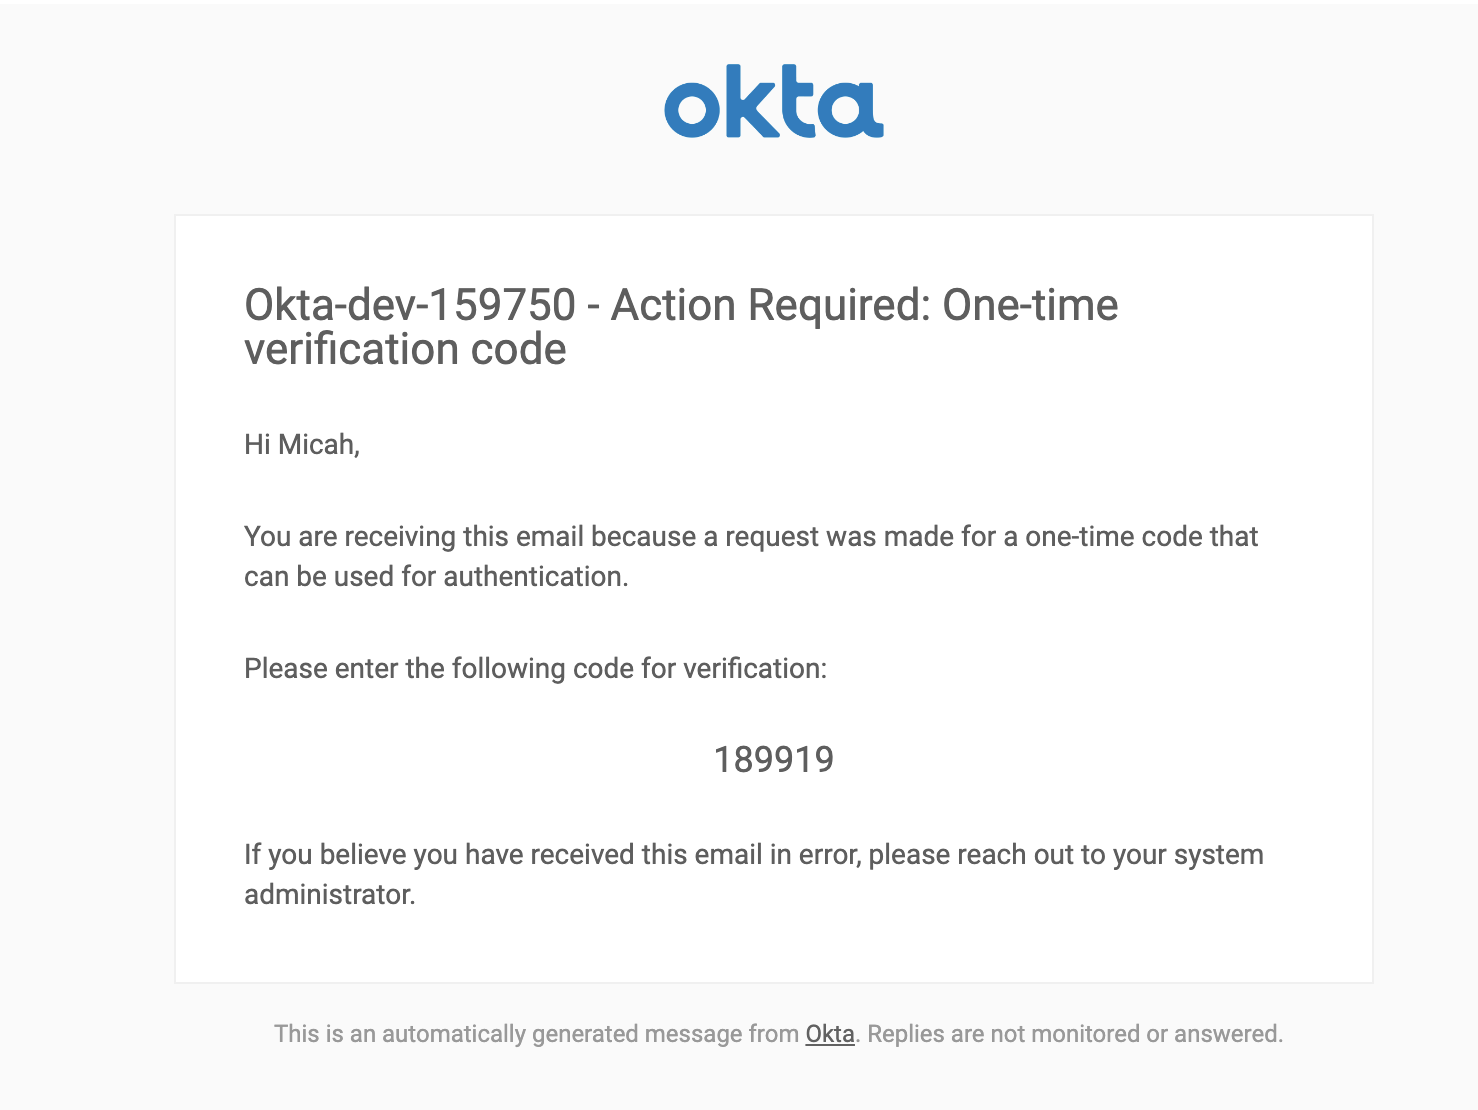
An email has been sent to you with a verification code.
Check your email
Verification code: 189919
New Okta Account created!
Your Okta Domain: https://dev-159750.okta.com
To set your password open this link:
https://dev-159750.okta.com/welcome/drp7UBGB_GVjeHp_5Jbs
Select a sample
> 1: Spring Boot + Okta
> 2: Vue + Okta
> 3: ASP.NET Core MVC + Okta
> 4: Angular + Okta
Enter your choice [Spring Boot + Okta]: 3
Configuring a new OIDC Application, almost done:
Created OIDC application, client-id: 0oa6kobyoZO41crqQ5d5
Change the directory:
cd okta-aspnet-core3-sample
Okta configuration written to: okta-aspnetcore-mvc-example/appsettings.json
Don't EVER commit okta-aspnetcore-mvc-example/appsettings.json into source control
Run this application with:
dotnet run --project okta-aspnetcore-mvc-example
There’s a lot going on here from the humble okta start command, so let’s break it down.
First I see a one-time requirement in order to provision the Okta org.
I put in some minimal information: name, email, and company. In about 20 seconds, a shiny new Okta org is allocated for me and the Okta CLI shows me my Org URL (https://dev-159750.okta.com).
Next, I need to prove that I own the email address I entered. A One-Time Passcode (OTP) is sent to my email address and the Okta CLI waits for me to paste that in.
Once my email address is verified, the Okta CLI displays a unique link to set my password.
NOTE: The order-of-operations here is not important. You can set your password before you choose a sample or afterward. But, you should set your password in a timely fashion as that unique URL expires after 24 hours.
Next, I see a list of available samples. As of this writing, there are four samples, but we are expanding that list. And, the Okta CLI automatically makes any new samples available in the list. You can register as many samples as you like with your Okta Org.
I chose option 3: ASP.NET Core MVC + Okta.
Finally, I see information about the OIDC Application that was registered in my Okta Org along with instructions to run the downloaded app.
I’m going to follow those instructions and run this sample:
cd okta-aspnet-core3-sample
dotnet run --project okta-aspnetcore-mvc-example
Here’s the output (abbreviated):
dotnet run --project okta-aspnetcore-mvc-example

Welcome to .NET Core 3.1!
---------------------
SDK Version: 3.1.402

...

info: Microsoft.Hosting.Lifetime[0]
      Now listening on: https://localhost:5001
info: Microsoft.Hosting.Lifetime[0]
      Application started. Press Ctrl+C to shut down.
...
Did you know you could run .NET on macOS? What a world! Simply run:
brew cask install dotnet-sdk.
You can browse over to: https://localhost:5001 to see this basic app in action.
NOTE: You may want to use an incognito or private window to authenticate in a separate context. Also, you’ll see a certificate warning from the browser as it’s likely you don’t have a TLS cert installed for
localhost. You can bypass this warning to view the app.
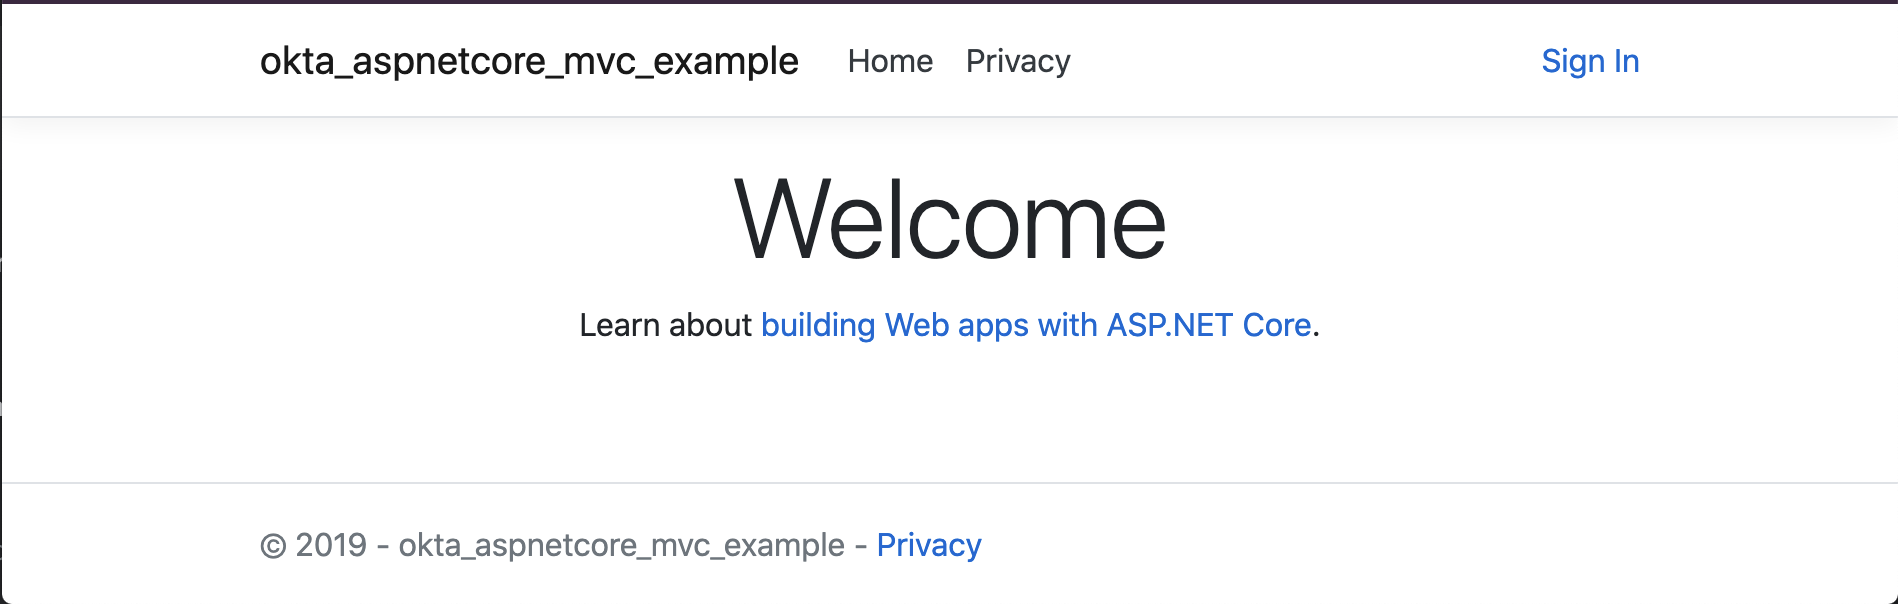
Click Sign In and you’re redirected over to Okta to authenticate. After authenticating, you’re redirected back to the app and it knows who you are!

NOTE: If you didn’t set your password earlier, you’ll need to now. Follow the unique link shown in the Okta CLI output. In my case, it was:
https://dev-159750.okta.com/welcome/drp7UBGB_GVjeHp_5Jbs
Looking Under the Hood of the Okta CLI
I don’t know much at all about .NET programming. I couldn’t tell you the difference between .NET Core and ASP.NET or the differences between 3 and 4 (was .NET 5 just released?). However, in less than five minutes, I had a running app that I could authenticate to using Okta!
The samples’ architecture is the secret sauce behind this capability. If you check out where the .NET sample lives, you can see the appsettings.json template file:
{
  ...
  "Okta": {
    "OktaDomain": "${CLI_OKTA_ORG_URL}",
    "ClientId": "${CLI_OKTA_CLIENT_ID}",
    "ClientSecret": "${CLI_OKTA_CLIENT_SECRET}"
  }
}
Part of the work that the Okta CLI does is to replace these values with the actual settings from your Okta org when the sample is set up and the Okta application is provisioned.
We wanted to keep the Okta CLI as flexible as possible, so it grabs the sample you choose from GitHub and walks all of the plain text files in the project looking for replacement parameters. The Okta CLI has no specific knowledge of a particular language or framework, which makes it easy to work with any language and framework.
Each sample also has some meta-information contained in .okta/sample-config.yaml:
oauthClient:
  redirectUris:
    - https://localhost:5001/authorization-code/callback
    - http://localhost:8080/authorization-code/callback
  applicationType: web

directions: |+2
  Okta configuration written to: okta-aspnetcore-mvc-example/appsettings.json
  Don't EVER commit okta-aspnetcore-mvc-example/appsettings.json into source control
  Run this application with:
      dotnet run --project okta-aspnetcore-mvc-example
For the .NET Core app, it describes the type of Okta Client needed, which in this case is an OAuth 2.0 Web application. It also lists the redirectUris Okta needs in order to integrate with the application.
The directions section is what’s output to the command-line once the application is provisioned in Okta and configured locally.
Ordinarily, you won’t have to deal with the sample code on GitHub directly, but it’s useful to understand what’s happening under the hood.
New to OAuth 2.0? Check out this post to get started: An Illustrated Guide to OAuth and OpenID Connect
NOTE: When you run okta start, your Okta Org URL and API Token are stored in: ~/.okta/okta.yaml. It’s the information in this file that the Okta CLI uses to perform operations on your Okta Org, like provisioning new OAuth 2.0 Clients.
More Stuff You Can Do with the Okta CLI
So far, this post has shown you how to get started with the Okta CLI. What if you already have an Okta Org? What if you already have code you’re working on and want to integrate it with Okta?
Running with an Existing Org
Want to hook up the Okta CLI to your existing Okta Org? No problem! Run:
okta login
You’re asked to enter your Org URL and an API token. This information is then stored in ~/.okta/okta.yaml and is used with other okta commands.
You can create an API Token by following these instructions.
Configure Your Existing Application
Let’s say you have a Spring Boot Project you’ve been working on. You could easily integrate Okta into your project by doing the following:
- Add the Okta Spring Boot integration to your project’s
pom.xmlfile:
<dependency>
    <groupId>com.okta.spring</groupId>
    <artifactId>okta-spring-boot-starter</artifactId>
    <version>1.5.1</version>
</dependency>
- Put some placeholders in
src/main/resources/application.properties:
okta.oauth2.issuer=${CLI_OKTA_ISSUER}
okta.oauth2.client-id=${CLI_OKTA_CLIENT_ID}
okta.oauth2.client-secret=${CLI_OKTA_CLIENT_SECRET}
- Create a metadata file in your project at:
.okta/sample-config.yaml:
oauthClient:
  redirectUris:
    - http://localhost:8080/login/oauth2/code/okta
  applicationType: web
- Run
okta start:
Configuring a new OIDC Application, almost done:
Created OIDC application, client-id: 0oa6mv2tHQ1IPbG2r5d5
You can see that the placeholders in your src/main/resources/application.properties file have been replaced:
$ cat src/main/resources/application.properties

okta.oauth2.issuer=https://dev-159750.okta.com/oauth2/default
okta.oauth2.client-id=0oa6mv2tHQ1IPbG2r5d5
okta.oauth2.client-secret=tgIdHYX4EvRUlt0HnuRV-y_9qlr9C1IM4C9Z-g17
At this point, you could fire up your app as normal and have it fully integrated with Okta for authentication:
./mvnw spring-boot:run
The important bits to set up a project for use with the Okta CLI are:
- Add the
OKTA_CLI_*placeholder values to the configuration files that make sense for your language and framework - Add the
.okta/sample-config.yamlfile with the right application type for your language and framework - Run
okta startto provision and Okta app and update all the placeholders in your config file(s)
The easiest way to see what configuration you need for your language and framework is to visit the samples found in the okta-samples GitHub org.
Currently, the available placeholder values are:
| Placeholder | Description |
|---|---|
| CLI_OKTA_ORG_URL | The base URL to your Okta Org |
| CLI_OKTA_ISSUER | The URL to your Okta OAuth 2.0 Authorization Server |
| CLI_OKTA_CLIENT_ID | The client ID set by Okta for web, native, browser and service type apps |
| CLI_OKTA_CLIENT_SECRET | The client secret set by Okta for web and service type apps |
| CLI_OKTA_REVERSE_DOMAIN | The reversed domain name, commonly used for mobile application redirect schemes |
Adding Samples for Okta CLI
We’d love your contributions! If you want to set up a new sample, create a new repo that has the naming convention: okta-<language and or framework name>-sample. Ideally, it’d be a language and framework that we don’t already have. But, if you want to submit a variation on an existing sample, we’d accept that too - just give it a unique name.
Watch the Okta CLI in Action
We’ve created a few screencasts to show the Okta CLI in action. The videos below show how to use okta start with Spring Boot, Angular, React Native, and JHipster!
We’ll publish more videos in the future. Check out our Okta CLI playlist to see the latest.
Learn More About Okta, OAuth 2.0, and OpenID Connect
I hope you enjoyed this little tour of the Okta CLI. Watch for new developer blog posts that make use of it. We welcome issues and PRs in the okta-cli GitHub repo.
If you want to learn more about Okta, OAuth 2.0 and/or OpenID Connect, check out these posts:
- API Access Management with Okta
- What the Heck is OAuth?
- Nobody Cares About OAuth or OpenID Connect
- Implement the OAuth 2.0 Authorization Code with PKCE Flow
- What is the OAuth 2.0 Grant Type?
- OAuth 2.0 From the Command Line
- Build a Secure Node.js App with SQL Server
Follow us on Twitter and subscribe to our YouTube Channel so you never miss any of our awesome content!
Micah Silverman is a Senior Security H@X0R. With 25 years of Java Experience (yup, that's from the beginning), he's authored numerous articles, co-authored a Java EE book and spoken at many conferences. He's a maker, who's built full size MAME arcade cabinets and repaired old electronic games. He brings his love of all things Java and Developer Advocacy to you!
Okta Developer Blog Comment Policy
We welcome relevant and respectful comments. Off-topic comments may be removed.