Migrate User Passwords with Okta's Password Hook

Okta is an identity platform focused on making authentication easy to build with minimal code. Our goal at Okta is to build a solution so flexible and easy to use, that you’ll never have to build authentication again.
And while Okta can provide a lot of new functionality to your application, including multi-factor authentication (MFA) based on contextual policies, self-service password resets, and federation to enterprise identity providers and social media accounts, we’ve found that the biggest hesitation for many customers is password migration.
If your passwords are hashed and salted, you can do a bulk import with Okta Users API. Hashing functions supported include SHA-1, SHA-256, SHA-512, BCRYPT, and MD5. However, if your passwords are not salted, or if you do not have the option for a bulk export, you can still migrate a user’s password with a just-in-time migration. This guide will show you how to do that.
For the just-in-time migration, you will leverage the Password Import Inline Hook. Using the Password Hook, migration is done the first time the user authenticates to Okta by first verifying the password against the current user store. If the password matches the current user store, Okta will allow the user to log in and simultaneously hash, salt and store the password in Okta’s Universal Directory. If the password does not match the user is blocked from signing in and the password is not stored. This will continue until the user is verified successfully, or the user’s password is reset in Okta.
The following guide will show you how to use Okta’s Password Hook to verify a user’s password against a SQLite Database. The database will be initiated for you with credentials for two users, one with a plain text password and the other with a hashed (not salted) password to demonstrate your options. This guide will test against both requirements, so that you can test both or whichever is most relevant for you.
But first I’ll address a few key questions you may be wondering about.
What Are Inline Hooks?
If you’re familiar with webhooks, then you’ll recognize the similarities with inline hooks, but with a tie to a specific Okta process, allowing you to add custom functionality. For example, the Password Import Inline Hook is tied to the Okta authentication process, allowing us to verify the user’s password against a database before determining whether to grant access and migrate the password.
Inline Hooks do require a web service with an internet-accessible endpoint. In this example you’ll be using Glitch, a simple-to-use app-hosting platform, to both host and run the custom process flow. However, generally users host the Inline Hook service within a web server they already have in place.
The call is synchronous, so that Okta pauses the process that triggered the flow (in this example, authentication) until a response from the service or endpoint is received. Every inline hook takes the form of HTTPS REST, and includes a JSON object, but the specifics of the data.context object within will vary by inline hook. The response from the service back to Okta will also typically include a JSON payload with a commands object to specify actions and communicate back to Okta.
For example, with the Import Password Inline Hook, the JSON data.context object includes credentials typed in by the user. The service is expected to evaluate if the credentials match the original user store and send a response. The response is expected to include the command com.okta.action.update, specifying if the credentials are VERIFIED or UNVERIFIED.
For more information, visit our (Inline Hooks documentation)[https://developer.okta.com/docs/concepts/inline-hooks/] and specifically Password Import Inline Hooks.
All the code is already written for you, all you have to do is copy the application I created, create an Inline Hook within your Okta tenant and you’re ready for testing. I’m using Node.js, but you can convert the steps I’m using to the language of your choice.
Use Import Password Inline Hook
Remix This Glitch App: https://okta-inlinehook-passwordimport.glitch.me/
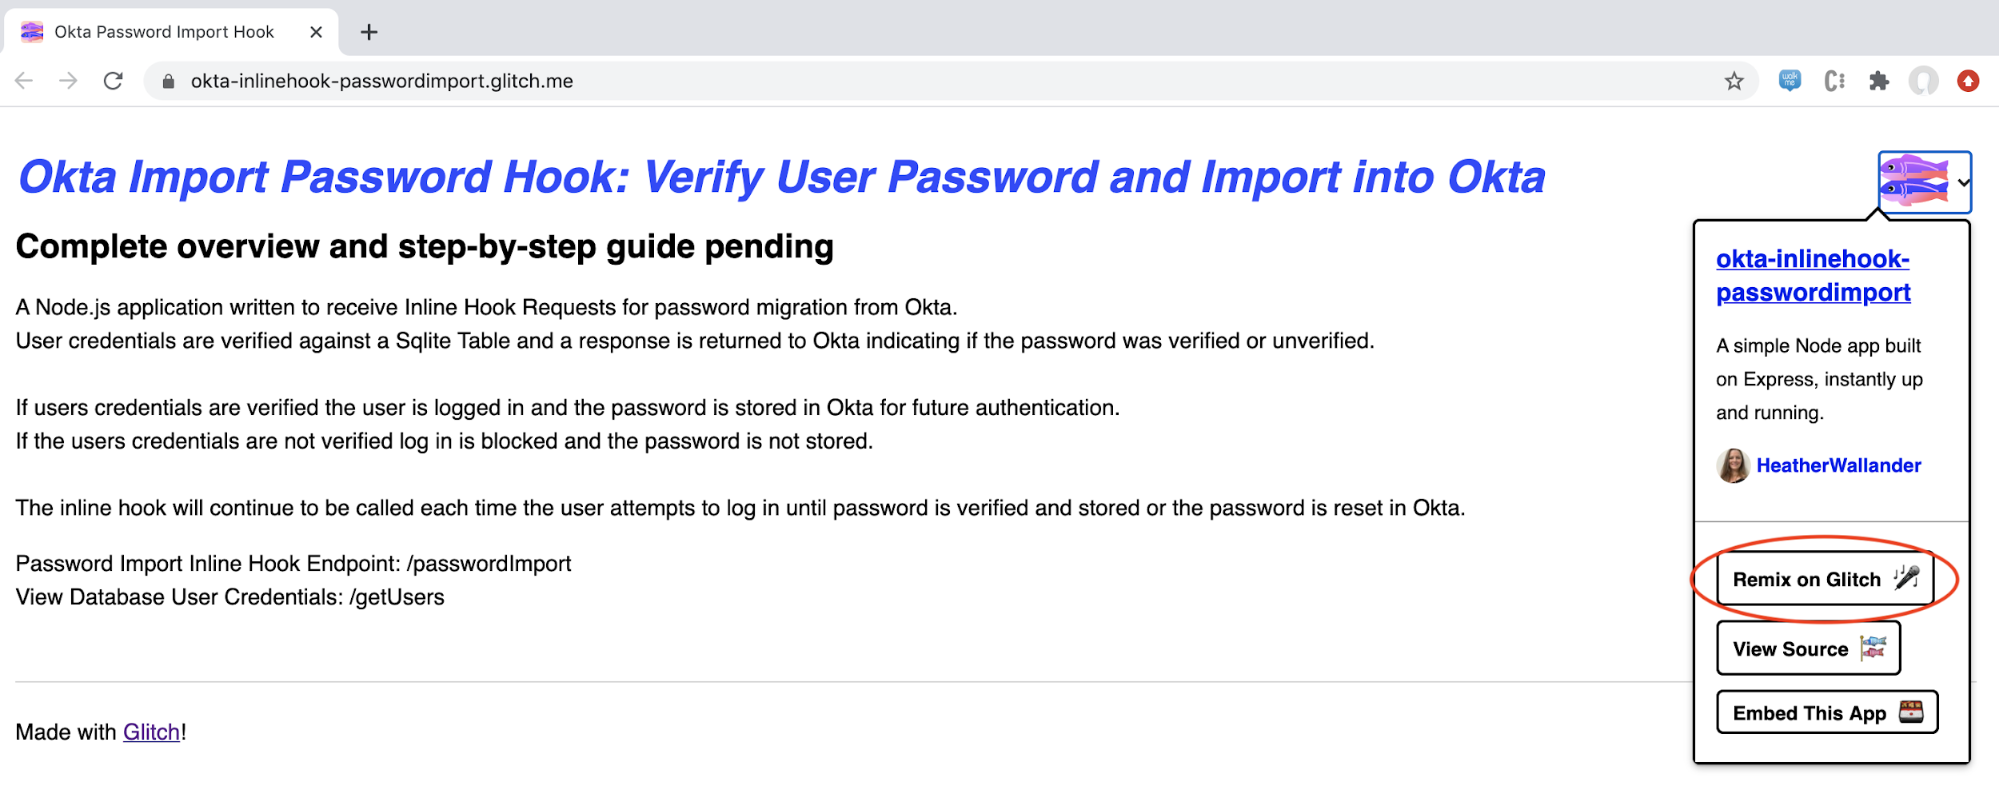
Remixing will create a name and URL that you’ll be able to use for testing. For example:
- Glitch app name: snapdragon-foremost-flat
- Glitch app URL: https://snapdragon-foremost-flat.glitch.me/
The code is written to automatically initialize a SQLite database and insert the first two rows of data. To confirm this, click Show (next to Glitch App Name) and select In a New Window.
Add /getUsers to your URL and you should see the following JSON output with user credentials for two users.
The first user is stored with a plain text password and the second is stored with a hashed password so that you can test both use cases.
Create an Inline Hook in Okta
You will point the inline hook to the /passwordImport endpoint, as I’ve created a POST Request to receive the credentials from Okta and send a response of VERIFIED or UNVERIFIED dependent on if the password was validated against the original user store.
The code below is already in the Glitch app you remixed, but is also provided here for visibility.
// Attempt to verify user password and return result to Okta
app.post("/passwordImport", async (request, response) => {
  console.log(" "); // for separation of logs during testing
  var verify = await comparePassword(request.body.data.context.credential);
  console.log('Password for ' + request.body.data.context.credential['username'] + ": " + verify);
  var returnValue = { "commands":[
                          { "type":"com.okta.action.update",
                            "value":{ "credential": verify } }
                    ]}
  response.send(JSON.stringify(returnValue));
})

// If database password stored as hash, call hashpassword() to convert typed in password
// Compare typed in password to database password and return result
async function comparePassword(creds) {
  var pwd = "";
  if (Boolean(hashed)) {
    pwd = await hashPassword(creds['password']);
    console.log('Text Password: ' + creds['password']);
    console.log('Hashed Password: ' + pwd);
  } else {
    pwd = creds['password'];
    console.log('Text Password: ' + creds['password']);
  }
  var db_password = await getDbPwd(creds['username'].toLowerCase());
  console.log('Database Password: ' + db_password);
  if (pwd === db_password) {
    return('VERIFIED');
  } else {
    return('UNVERIFIED');
  }
}
In your Okta tenant, navigate to Workflow > Inline Hooks > Add Inline Hook in the Admin Portal and select Password Import.
Give the hook a name and enter your Glitch base url + /passwordImport as the URL. Select Save.
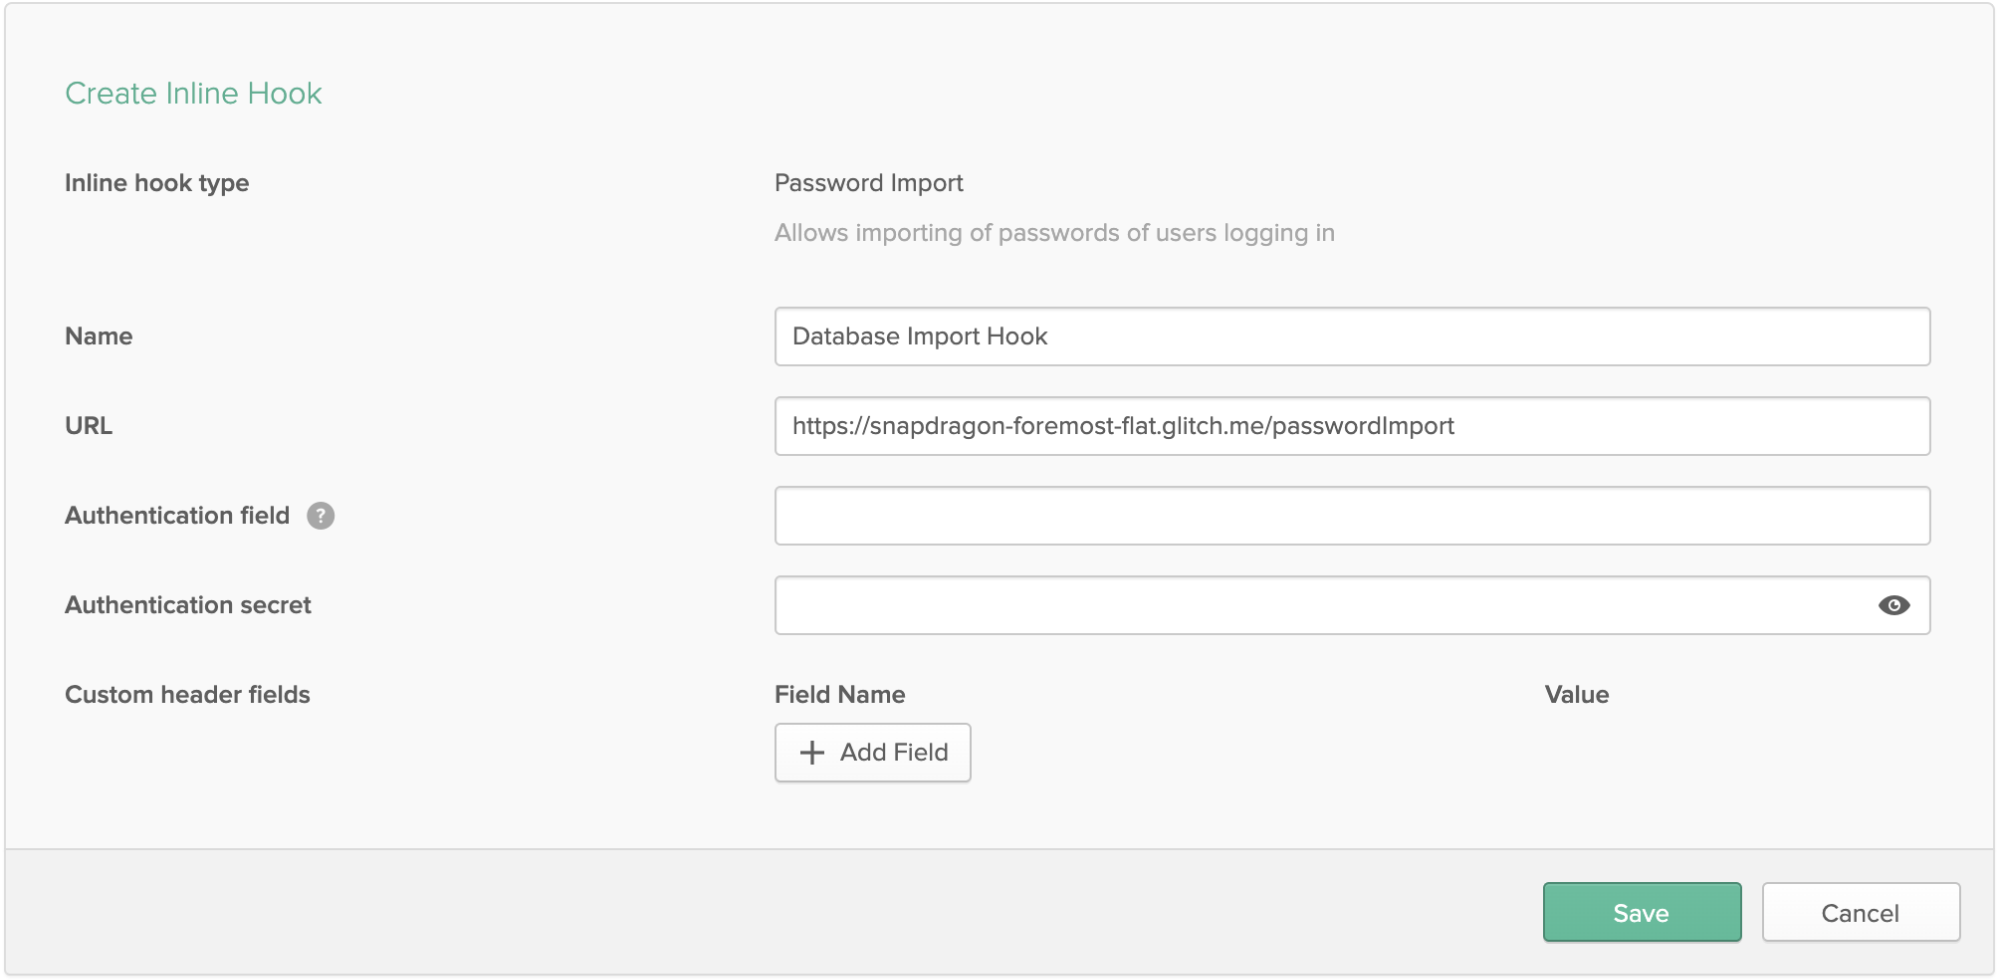
Note: For this test, authentication verification has not been added but would be recommended in a production environment.
Test Your Password Import Hook
That’s it, since all the code has already been written in your remixed Glitch application, you just need to test.
You will need to use Okta’s [Create User with Password Import Inline Hook API Request]](https://developer.okta.com/docs/reference/api/users/#create-user-with-password-import-inline-hook). This will indicate to Okta that the Import Password Inline Hook we created should be called the next time the user authenticates. The hook will continue to be called until the user’s password is verified successfully or until the password is reset in Okta.
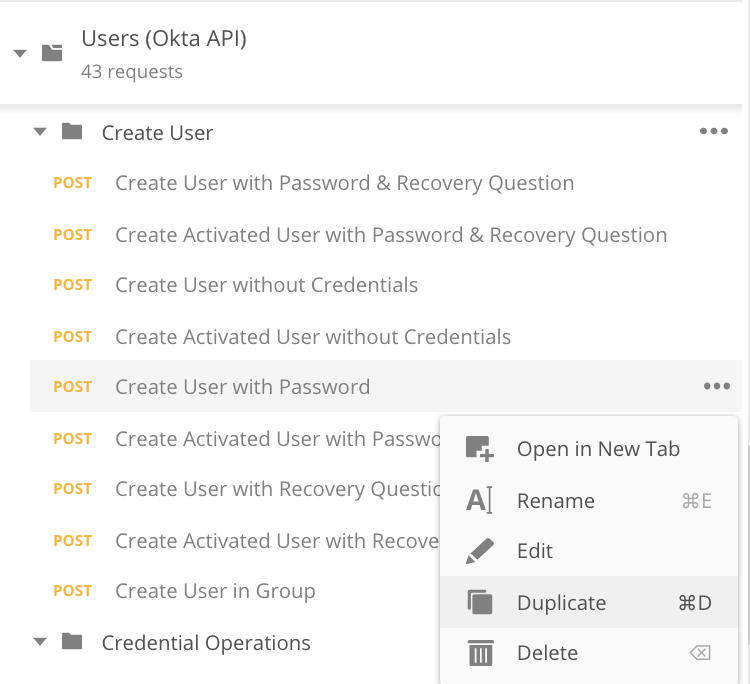
The easiest way to use the API is to create and use an Okta Postman Environment. We will be working off the Users Collection, but will need to duplicate an existing request to create one for the Password Import Hook. For this example, I copied Create User with Password by selecting the three ellipsis to the right of the request and selecting Duplicate.
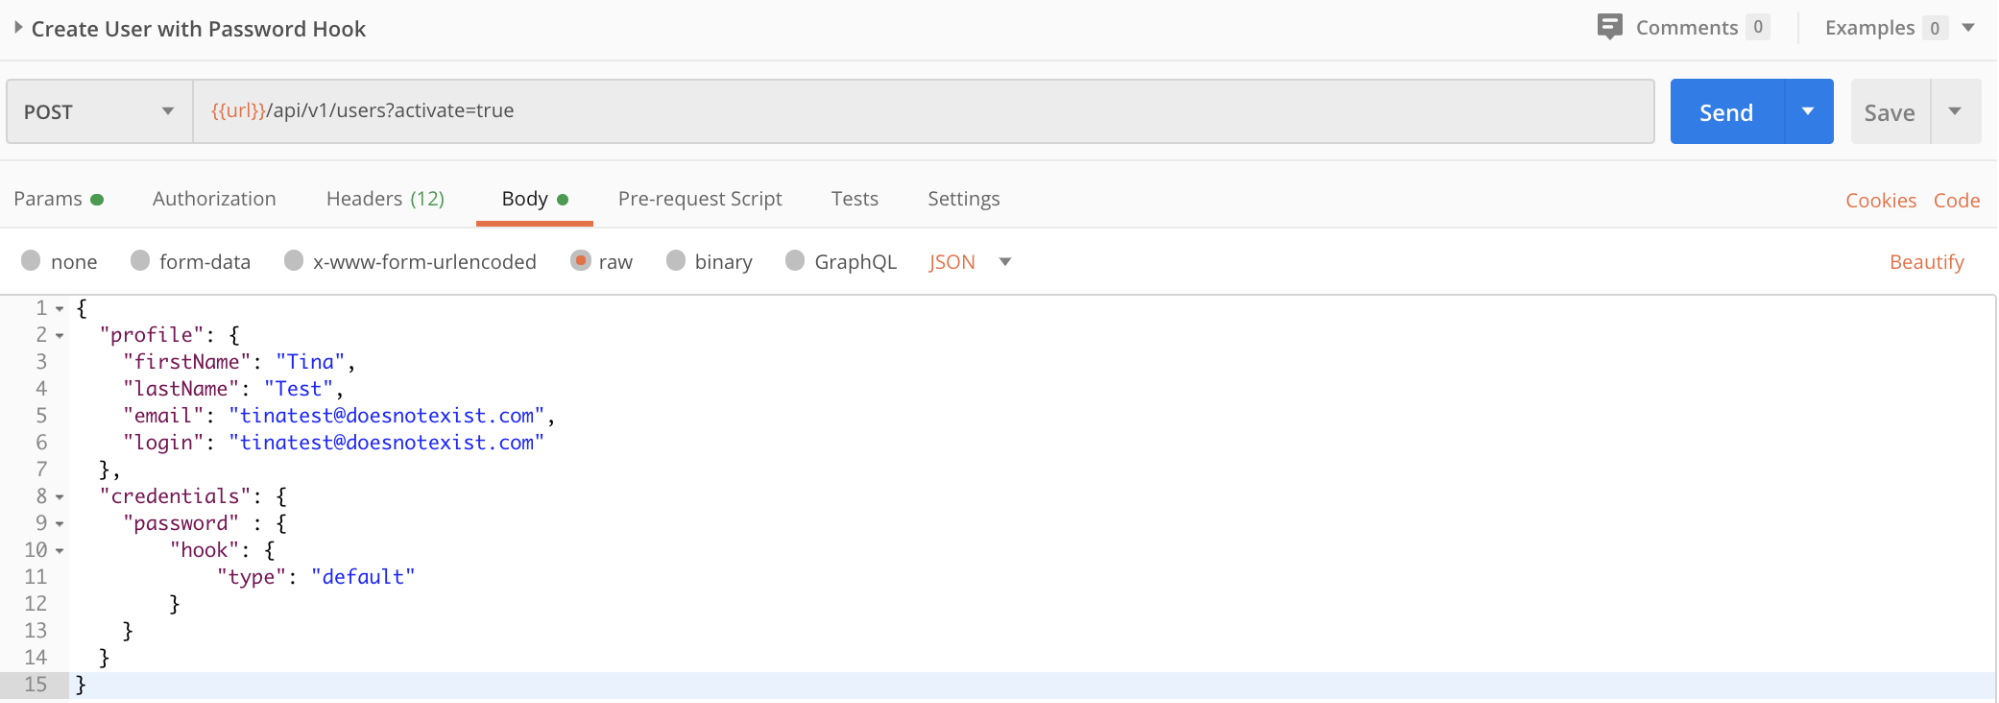
Once duplicated, I renamed the request to Create User with Password Hook and set activate to true. The body of the request should be modified so that the password value is a hook with a default type. If you want to test with the data already inserted into the database you’ll want to create two users tinatest@doesnotexist.com and timtest@doesnotexist.com.
The screenshot below shows the request body format in Postman with the data set to match the first user in the database. You’ll need to send the request twice, once for the Tina Test user and a second time for the Tim Test user.
Once the user is added to your Okta tenant, you can attempt to log in. I’ve included message outputs via the console of the Glitch application. If you’d like to confirm the service receives the request and the data retrieved, select **Tools > Logs **. For the initial tests with tinatest@doesnotexist.com, first type in an incorrect password to confirm the user is blocked from signing in and the password is not stored, requiring the inline hook to be called again during the next user login attempt. Once sign-in is blocked, you can attempt to log in with the correct password: textPassword.
The user should be signed in, landed on the Okta dashboard. If checking the console, your output should look similar to this:

Optionally, you can sign out and log in again to confirm the inline hook is no longer called for this user now that the password has been successfully stored in Okta.
##Test Your Password Import Hook with Hashed Password
For the second user, timtest@doesnotexist.com, you’ll be using a hashed password, so you’ll need to make a slight modification to the code of the glitch application.
On line 44, there is a line of code setting the variable hashed to false. Change the value to true.
// Determines if password needs to be hashed prior to comparing
// This example uses SHA-512 (already imported), but can be modified to include more or alternate hashes
// If true, the password typed in by the user will be hashed before comparison
// If false, the plain text password will be used for comparison
var hashed = true;
This will result in a function being called to convert the password typed in by the user to a hashed value for comparison to the value in the database.
// Function to convert password to hashed password for comparison
// Can be modified for alternate hash functions or to add salt if needed
function hashPassword(pwd) {
  return sha512(pwd);
}
The code above is separate from the rest of the application logic, to allow for easy modification to an alternative hashing function depending on what is used to store passwords in your database or user store.
Optionally, clear the log for the app, so that only messages for this new user will be visible.
The user timtest@doesnotexist.com should already be in your Okta tenant from the previous step, but if not, add the user following the steps and formatting described above.
Once the user is created in your Okta tenant, attempt to log in first with an incorrect password and then with the correct password: hashedPassword.
Similar to the first user, the incorrect password should result in the user being blocked from signing in and the password not being stored. The second attempt, with the correct password, should allow the user access to the Okta dashboard and the password should be stored. Console Log output should look similar to this:

As before, you can sign the user out and log back in to confirm the inline hook is not called again now that the password is stored.
It’s as easy as that! You now have a working inline hook that can migrate your user’s password at the time of first login.
Continue Developing with Okta and Event Hooks
This post walked through using the Import Password Inline Hook, but there are additional inline hooks to expand functionality for user import, registration, or customizing SAML Assertions and OIDC tokens. If you’re interested in learning more about these, visit our Inline Hooks documentation for resources on how to build and use them.
As mentioned earlier in this post, Inline Hooks are synchronous, pausing the process that triggered the flow until a response is received. However, if you would like an asynchronous option that will allow the process to continue running without disruption, we have options for this as well with Event Hooks. View our Event Hook Eligible documentation to see options for triggering asynchronous hooks.
If you’d like to learn more about Okta Hooks or if you’re interested in learning how you can add Okta authentication to your Node.js application, you may find these posts helpful:
- Use Okta Token Hooks to Supercharge OpenID Connect
- Build Easy User Sync Webhooks with Okta
- Node.js Login with Express and OIDC
If you like this content, be sure to follow us on Twitter and subscribe to our YouTube Channel for updates on new posts and videos.
Heather Wallander is a Solution Engineer at Okta, specializing in Customer Identity Use Cases. After beginning her career in sales and marketing, she moved into software development, before finding the best of both worlds in Solutions Engineering. Heather has a bachelor's in Marketing and master's in Information Systems. She joined Okta in February 2019.
Okta Developer Blog Comment Policy
We welcome relevant and respectful comments. Off-topic comments may be removed.