Ionic + Sign in with Apple and Google
Apple announced a Sign in with Apple service at its WWDC developer conference in June 2019. If you’re familiar with social login with Google or Facebook, it’s very similar. Most of these identity services use OAuth and OpenID Connect (OIDC), and Apple’s implementation is similar.
Today I’d like to show you how to develop a mobile application with Ionic, add OIDC authentication, retrieve the user’s information, and add social login (aka federated identity) with Apple and Google. I’ll even show you how to test it in a phone simulator, as well as on your device.
Prerequisites:
- Node 12+
- A sense of adventure
Table of Contents
- Create an Ionic App
- Add Authentication with OpenID Connect
- Configure Sign in with Apple
- What about Okta’s Angular SDK and Sign-In Widget?
- Create a Custom Domain and TLS Certificate with Cloudflare
- Add Social Login with Google
- Run Your Ionic App in iOS Simulator
- Deploy Ionic App to iOS Phone
- Learn More about Ionic and Social Login
Note: In May 2025, the Okta Integrator Free Plan replaced Okta Developer Edition Accounts, and the Okta CLI was deprecated.
We preserved this post for reference, but the instructions no longer work exactly as written. Replace the Okta CLI commands by manually configuring Okta following the instructions in our Developer Documentation.
Create an Ionic App
To begin, you’ll need to install the Ionic CLI.
npm i -g @ionic/cli@6.11.0
Then, use ionic start to create a new Angular app with tabs. You might notice this command also specifies Capacitor. Using Capacitor is the recommended way to run Ionic apps on mobile devices from 2020 onward.
ionic start ionic-social tabs --type angular --capacitor
cd ionic-social
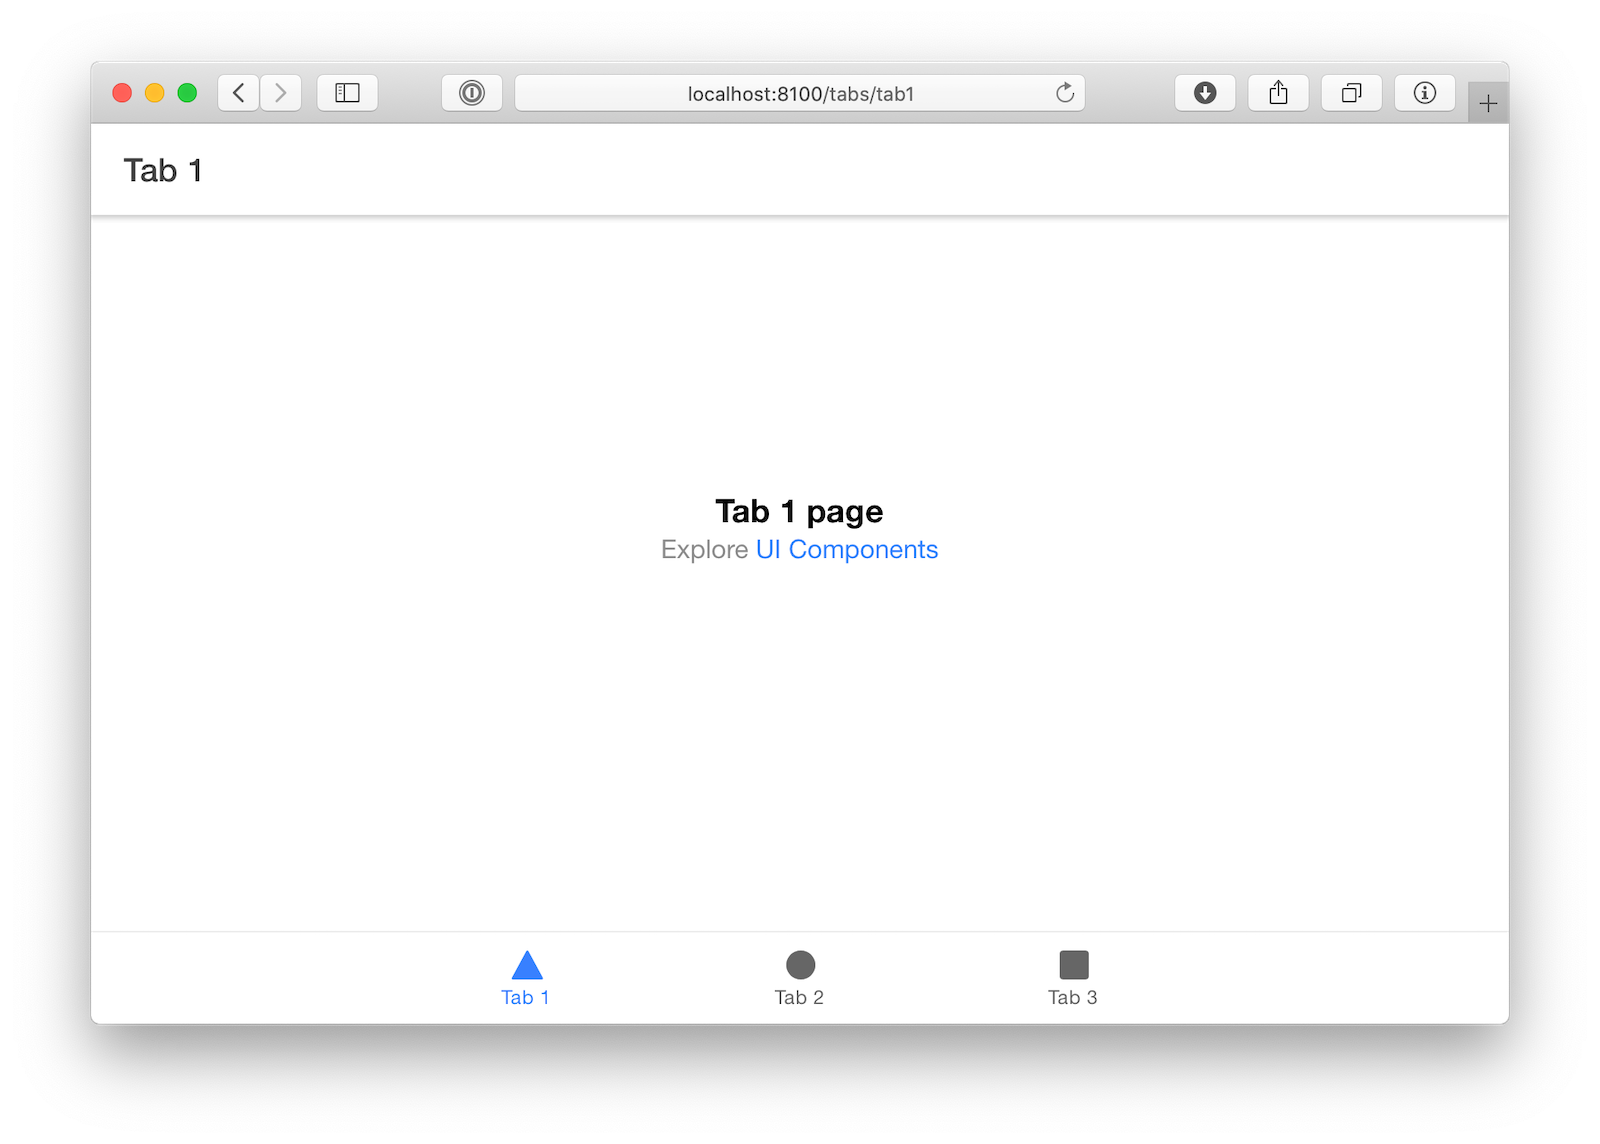
Run ionic serve and make sure you can see the app in your browser.
Add Authentication with OpenID Connect
The easiest way to add OIDC authentication to an Ionic app is with OktaDev Schematics.
Before you begin, you’ll need a free Okta developer account. Install the Okta CLI and run okta register to sign up for a new account. If you already have an account, run okta login.
Then, run okta apps create. Select the default app name, or change it as you see fit.
Choose Native and press Enter.
Use [http://localhost:8100/callback,com.okta.dev-133337:/callback] for the Redirect URI and set the Logout Redirect URI to [http://localhost:8100/logout,com.okta.dev-133337:/logout]
(where dev-133337.okta.com is your Okta domain name). Your domain name is reversed to provide a unique scheme to open your app on a device.
What does the Okta CLI do?
The Okta CLI will create an OIDC Native App in your Okta Org. It will add the redirect URIs you specified and grant access to the Everyone group. You will see output like the following when it’s finished:
Okta application configuration:
Issuer:    https://dev-133337.okta.com/oauth2/default
Client ID: 0oab8eb55Kb9jdMIr5d6
NOTE: You can also use the Okta Admin Console to create your app. See Create a Native App for more information.
Run the following command to add a sign-in feature to your Ionic + Capacitor app.
ng add @oktadev/schematics@2.2.0 --platform=capacitor
When prompted for your issuer and client ID, use the values in your terminal. If you closed your terminal window, you can run okta apps to see your apps and okta apps config --app=<clientId> to get your app’s info.
This process will install several dependencies and a plethora of files to handle OIDC authentication.
✅️ Added 'ionic-appauth' into dependencies
✅️ Added '@ionic-native/secure-storage' into dependencies
✅️ Added 'cordova-plugin-secure-storage-echo' into dependencies
✅️ Added 'cordova-plugin-advanced-http' into dependencies
✅️ Added 'cordova-plugin-safariviewcontroller' into dependencies
✅️ Added '@ionic-native/http' into dependencies
🔍 Installing packages...
CREATE src/app/auth/auth-guard.service.ts (988 bytes)
CREATE src/app/auth/auth-http.service.ts (826 bytes)
CREATE src/app/auth/auth.module.ts (760 bytes)
CREATE src/app/auth/auth.service.ts (2316 bytes)
CREATE src/app/auth/ng-http.service.ts (1347 bytes)
CREATE src/app/auth/user-info.model.ts (188 bytes)
CREATE src/app/auth/auth-callback/auth-callback.module.ts (574 bytes)
CREATE src/app/auth/auth-callback/auth-callback.page.ts (1018 bytes)
CREATE src/app/auth/end-session/end-session.module.ts (564 bytes)
CREATE src/app/auth/end-session/end-session.page.ts (479 bytes)
CREATE src/app/auth/factories/browser.factory.ts (290 bytes)
CREATE src/app/auth/factories/http.factory.ts (379 bytes)
CREATE src/app/auth/factories/index.ts (102 bytes)
CREATE src/app/auth/factories/storage.factory.ts (318 bytes)
CREATE src/app/login/login.module.ts (538 bytes)
CREATE src/app/login/login.page.html (187 bytes)
CREATE src/app/login/login.page.scss (0 bytes)
CREATE src/app/login/login.page.spec.ts (936 bytes)
CREATE src/app/login/login.page.ts (750 bytes)
UPDATE src/app/app.module.ts (899 bytes)
UPDATE package.json (1929 bytes)
UPDATE src/app/app-routing.module.ts (660 bytes)
UPDATE src/app/app.component.spec.ts (1308 bytes)
UPDATE src/app/app.component.ts (674 bytes)
UPDATE src/app/tab1/tab1.page.html (2237 bytes)
UPDATE src/app/tab1/tab1.page.spec.ts (928 bytes)
UPDATE src/app/tab1/tab1.page.ts (1216 bytes)
✔ Packages installed successfully.
You can see all the files that OktaDev Schematic adds in its GitHub project.
NOTE: OIDC Login for Ionic is made possible thanks to the excellent Ionic AppAuth project and its examples. This integration is not Okta-specific and should work with any identity provider that supports PKCE for browser and mobile apps.
Run ionic serve and open http://localhost:8100 in a new incognito window.
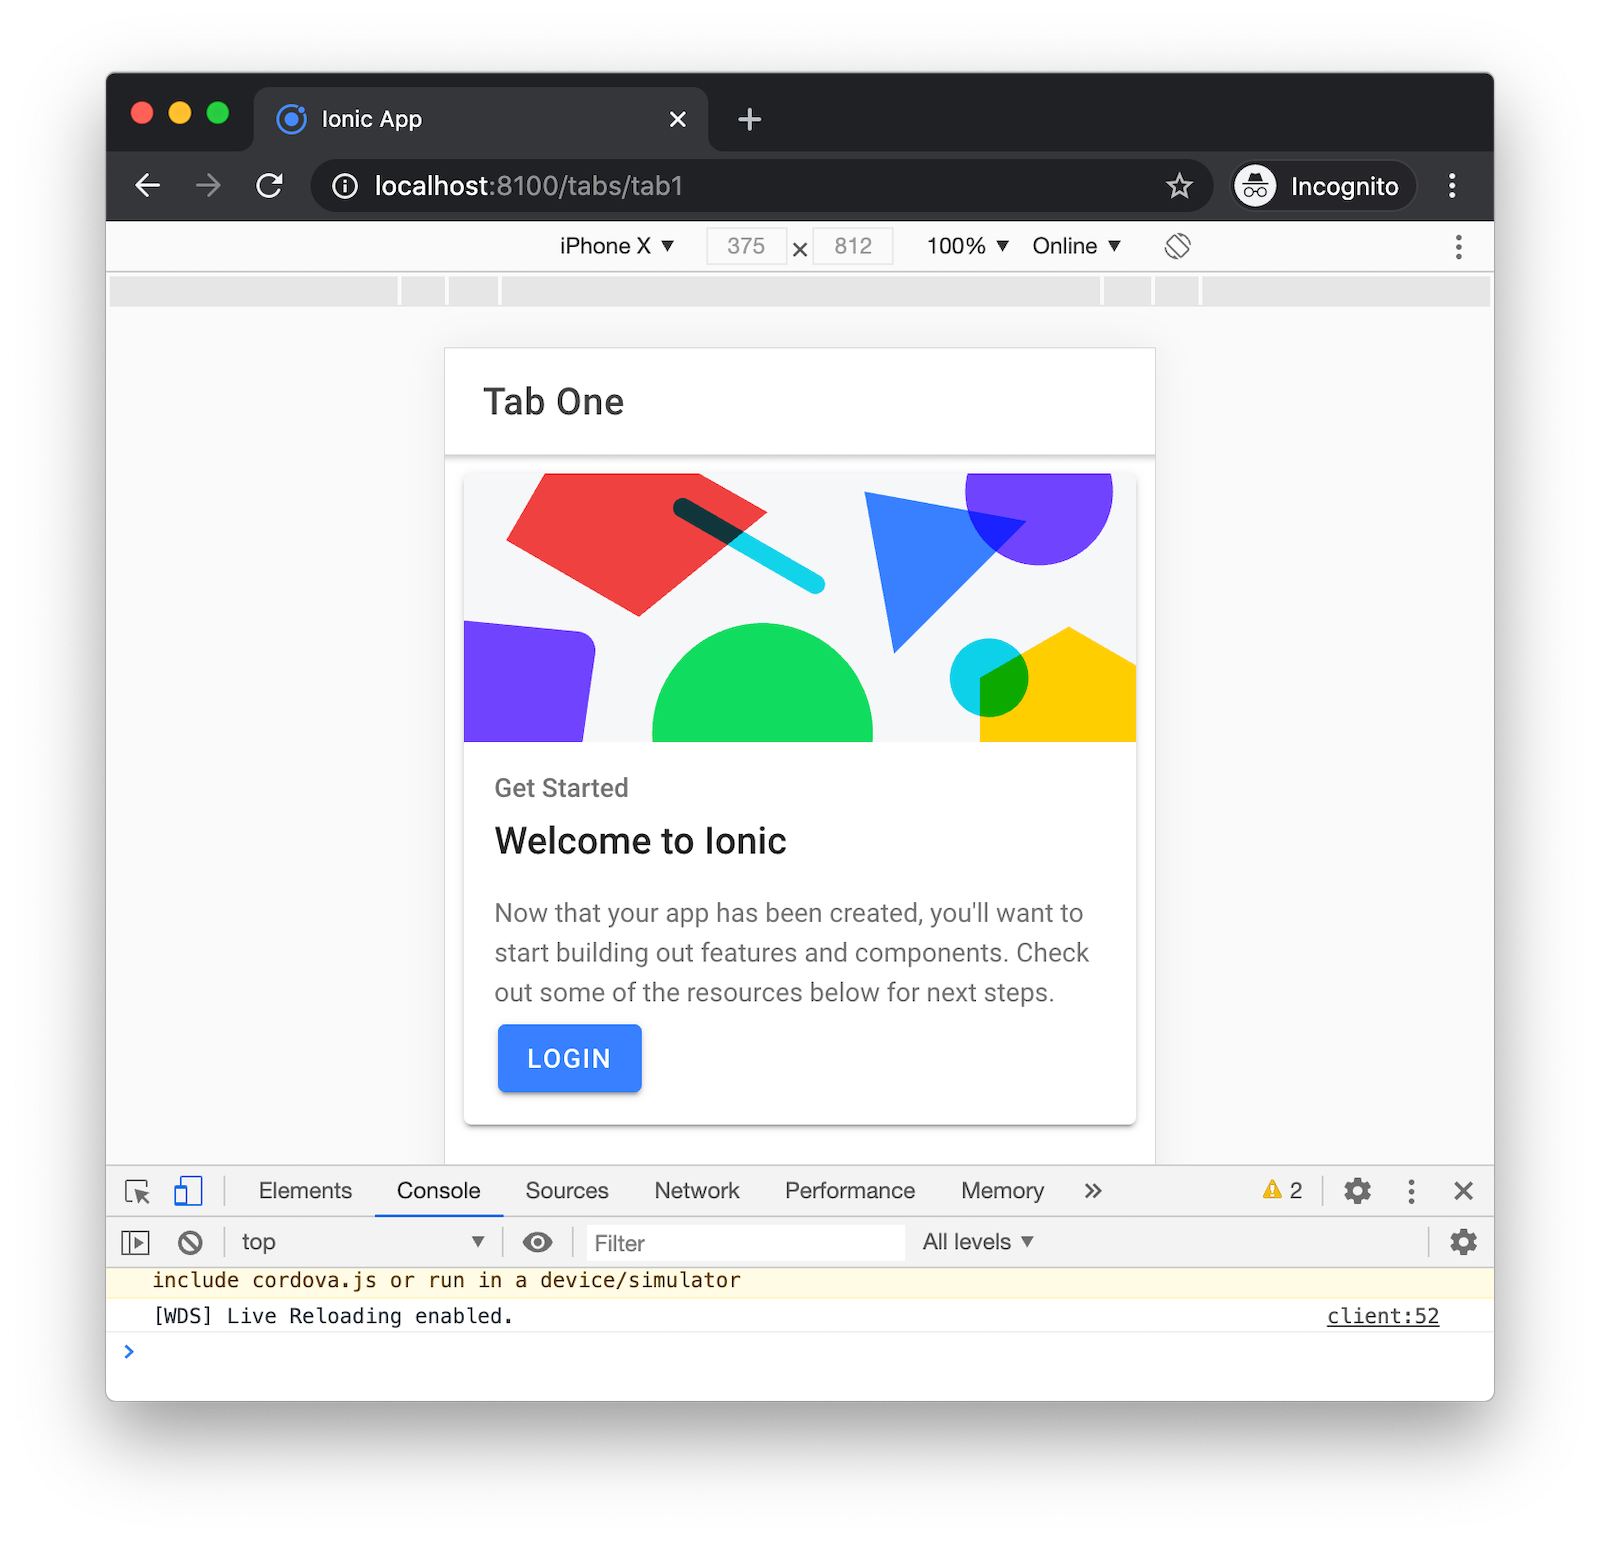
Click Login to sign in to your Okta developer account.
You’ll be redirected back to your app.
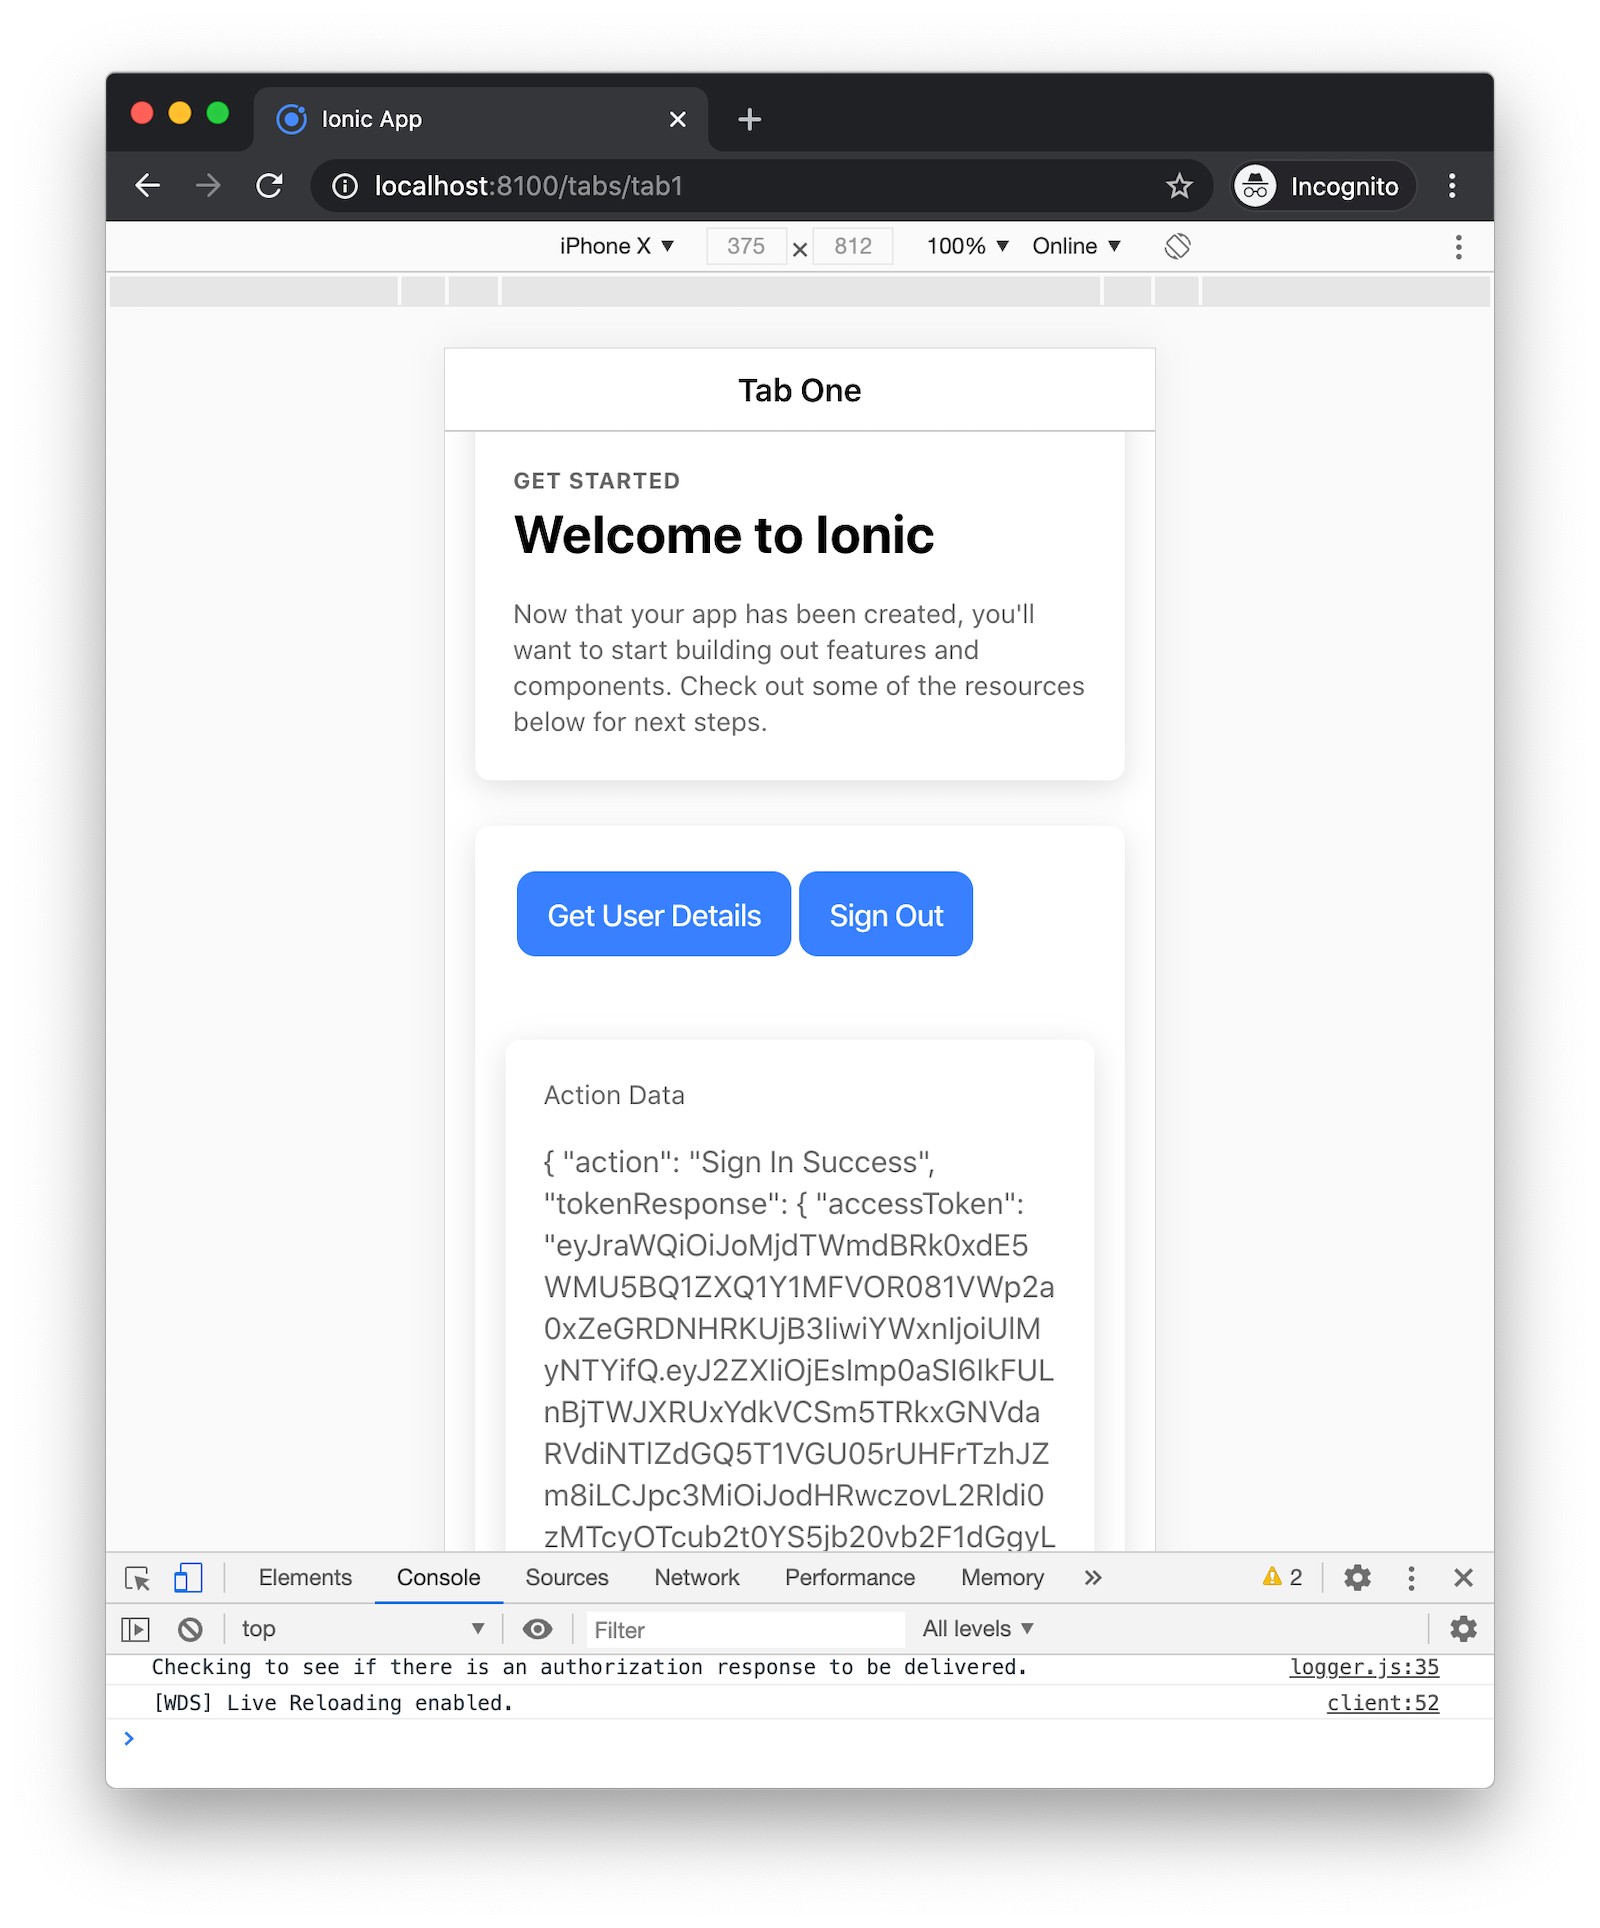
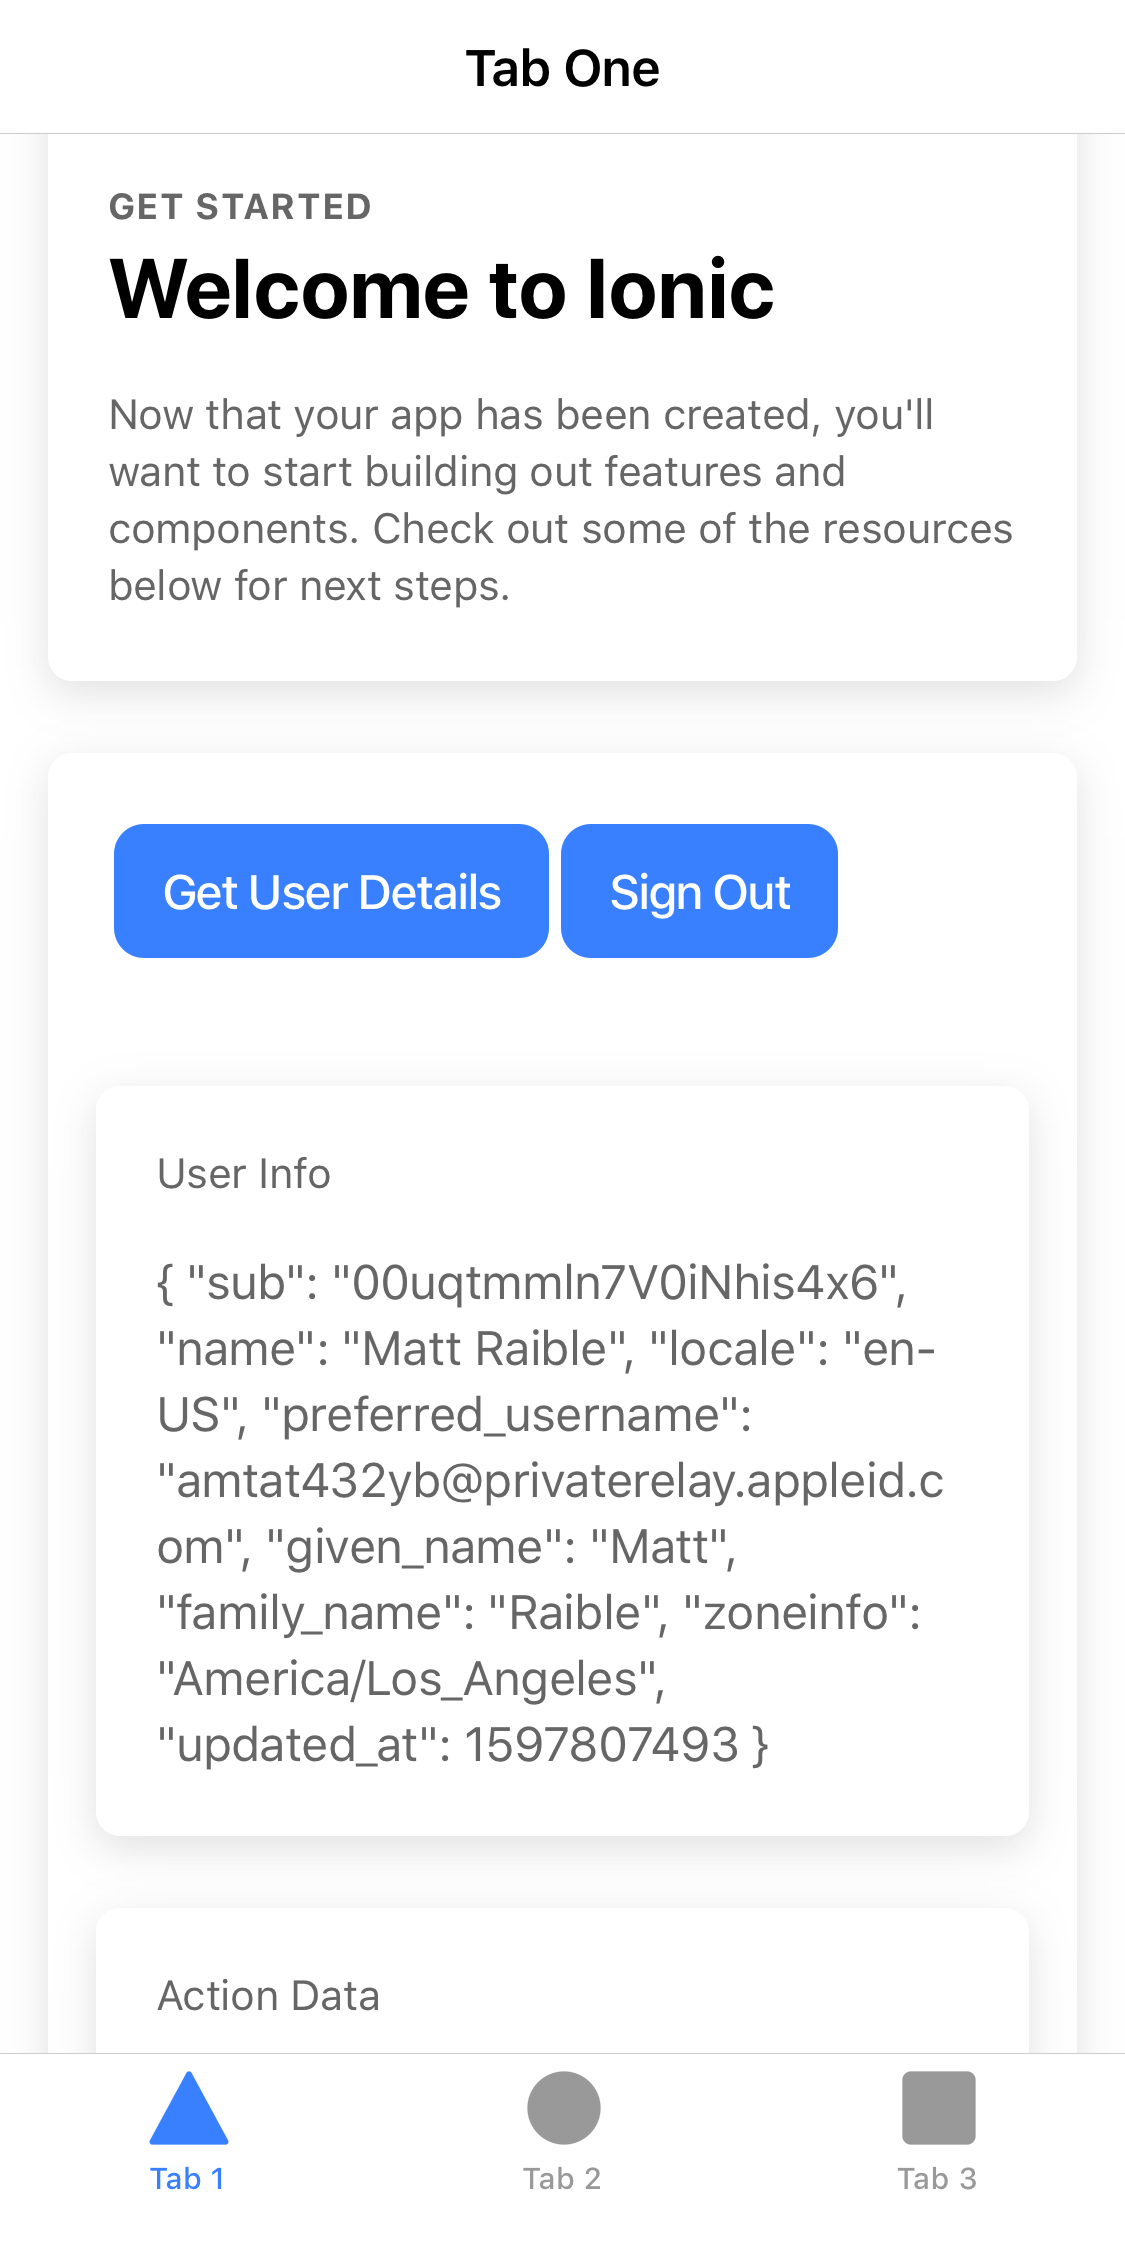
Click Get User Details to fetch the user’s information using the following code in src/app/tab1/tab1.page.ts.
public async getUserInfo(): Promise<void> {
  this.userInfo = await this.authService.getUserInfo<IUserInfo>();
}
Your user information will be rendered in src/app/tab1/tab1.page.html:
<ion-card *ngIf="userInfo">
  <ion-card-header>
    User Info
  </ion-card-header>
  <ion-card-content>
    {{userInfo | json}}
  </ion-card-content>
</ion-card>
One of the neat things you can do with your Okta developer account is add additional identity providers. This means you can add Apple as an identity source and easily add Sign in with Apple to your Ionic app!
Configure Sign in with Apple
To begin, you must have an Apple developer account. You’ll need to create an App ID, a Services ID, and a private key.
Create an App ID on Apple
Log in to developer.apple.com and go to Certificates, Identifiers & Profiles. Select Identifiers on the left and click the blue + icon. Select App IDs and Continue. Select App and Continue. Enter a description and bundle ID. I used Ionic Social and com.okta.developer.ionic-social.
Scroll down and select Sign in with Apple, click Continue, and then Register.
Create a Services ID on Apple
To create a Services ID (with allowed redirect URIs), go to Identifiers > blue + icon Services IDs > Continue. I used Okta for the description and com.okta.developer.ionic for the identifier. Click Continue, then Register.
Select the identifier that you just created.
Select the Sign in with Apple checkbox, and then click Configure to define the domain your app is running on and the redirect URLs used during the OAuth flow.
Enter the domain name where your app runs in the Domains and Subdomains box (e.g., dev-133337.okta.com). In the Return URLs box, enter your Okta tenant’s /authorize/callback URL, for example https://dev-133337.okta.com/oauth2/v1/authorize/callback.
Click Next, Done, Continue, and then Save.
Create a Private Key for Client Authentication
On the Certificates, Identifiers, & Profiles page, select Keys, and then Create a key.
Give your key a name (e.g., AppleLoginKey), select Sign in with Apple, and click Configure.
Select your App ID from the Primary App ID drop-down box and click Save. Apple will generate a new private key.
Click Continue, Register, and then Download.
Click Done, and then on the Keys page, click the key that you just created and make a note of the Key ID. You need it in the next section.
Make a note of your Team ID in the upper-right corner of your Apple developer dashboard (just below your account name).
TIP: See Okta’s developer docs for Sign in with Apple if these steps don’t work.
Add Apple as an Identity Provider in Okta
Open your Okta developer console in a new tab and navigate to Security > Identity Providers > Add Identity Provider > Add Apple.
- Name:
Apple - Client ID:
com.okta.developer.ionic(your Services ID from Apple) - Client Secret Signing Key: upload the
.p8file you downloaded - Key ID and Team ID: available in your last tab
- Scopes: defaults (
name,email,openid) are fine
Click Add Identity Provider. Click the arrow next to your new IdP, and you’ll see its ID.
Copy this ID and open src/app/auth/auth.service.ts in a text editor. Add auth_extras as a property to authConfig and add your Apple IdP’s ID as an idp property.
const authConfig: any = {
  ...
  usePkce: true,
  auth_extras: {
    idp: '<your-apple-idp-id>'
  }
};
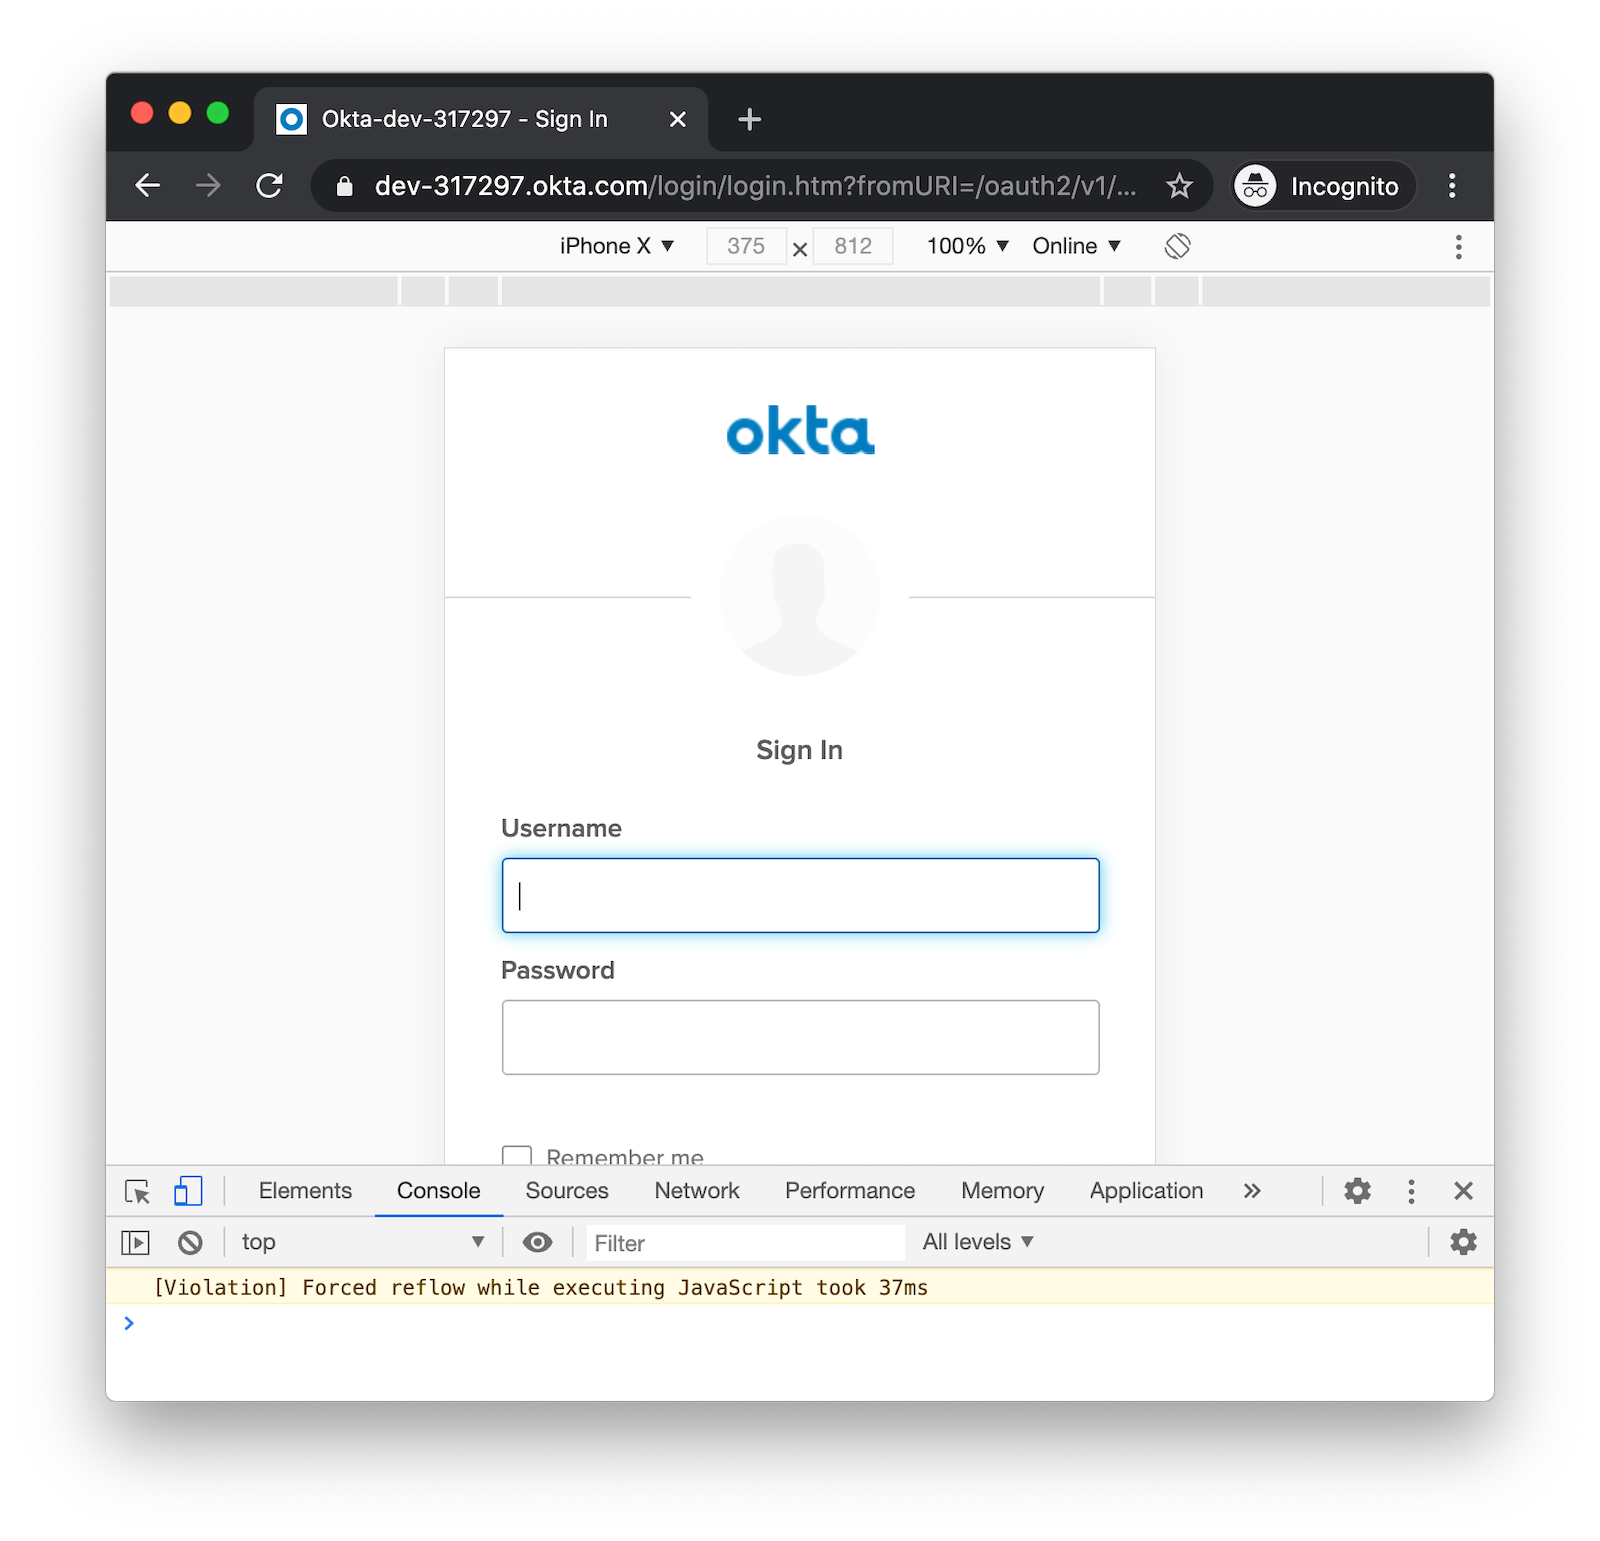
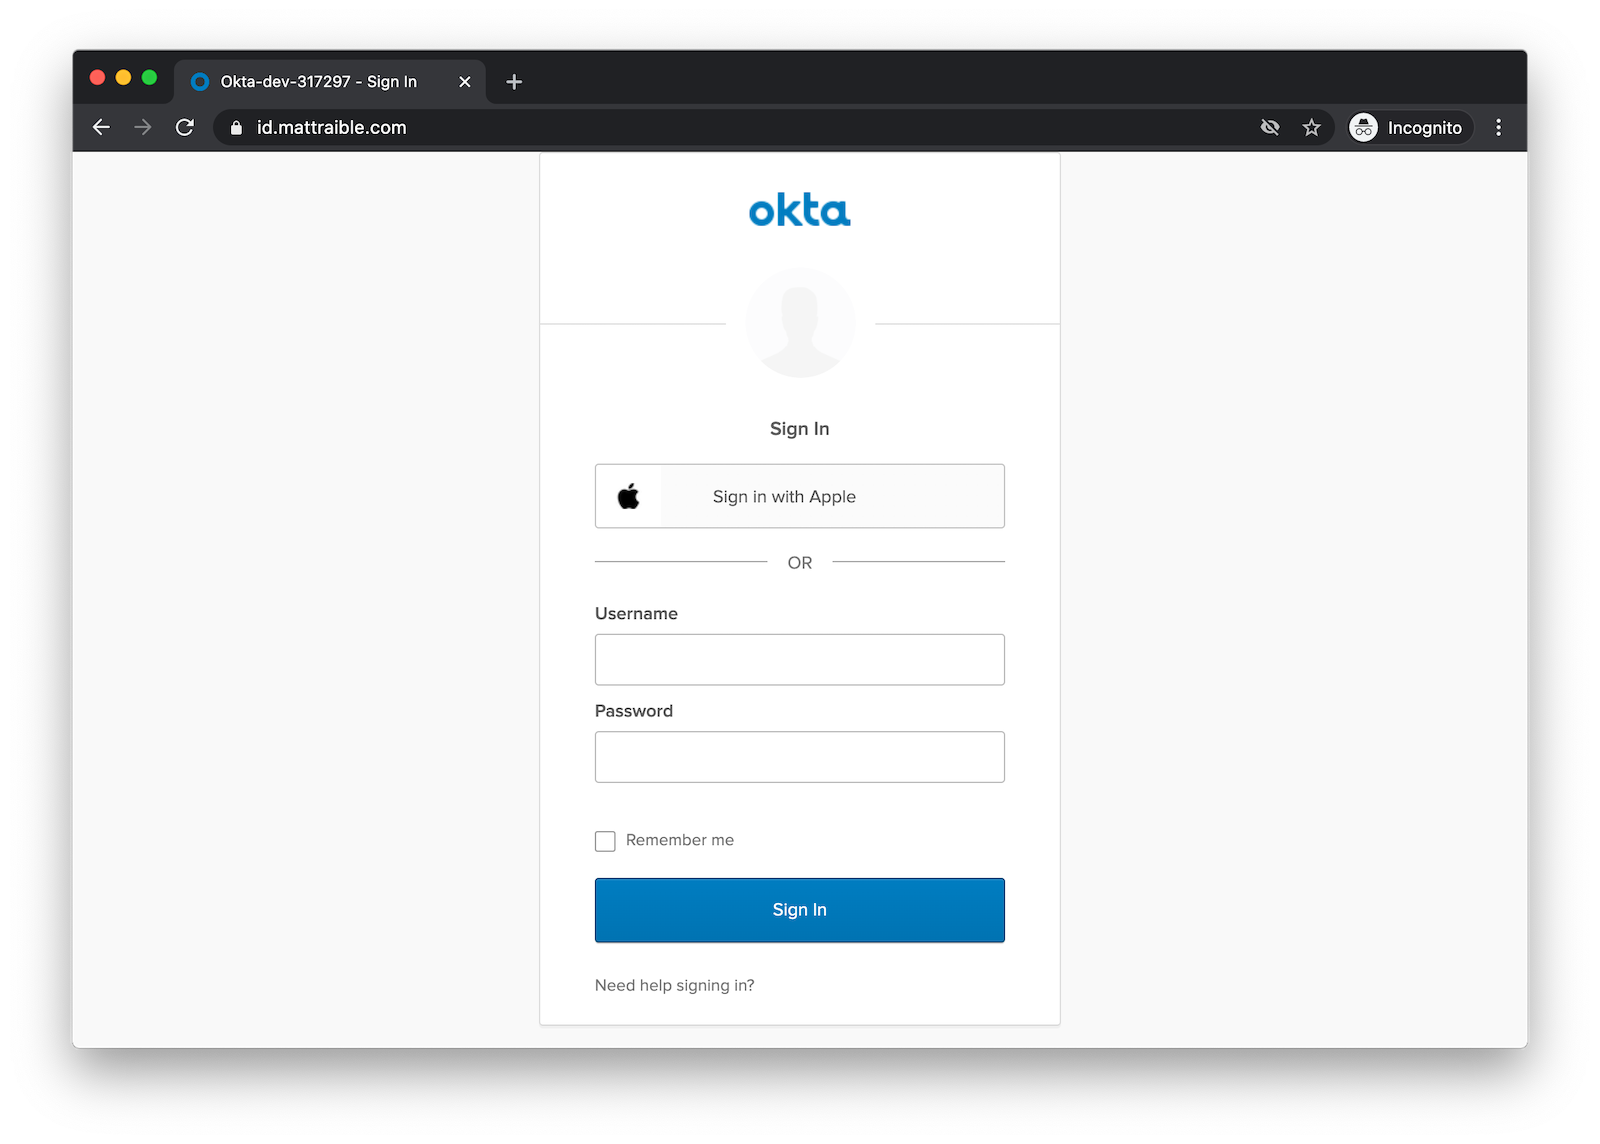
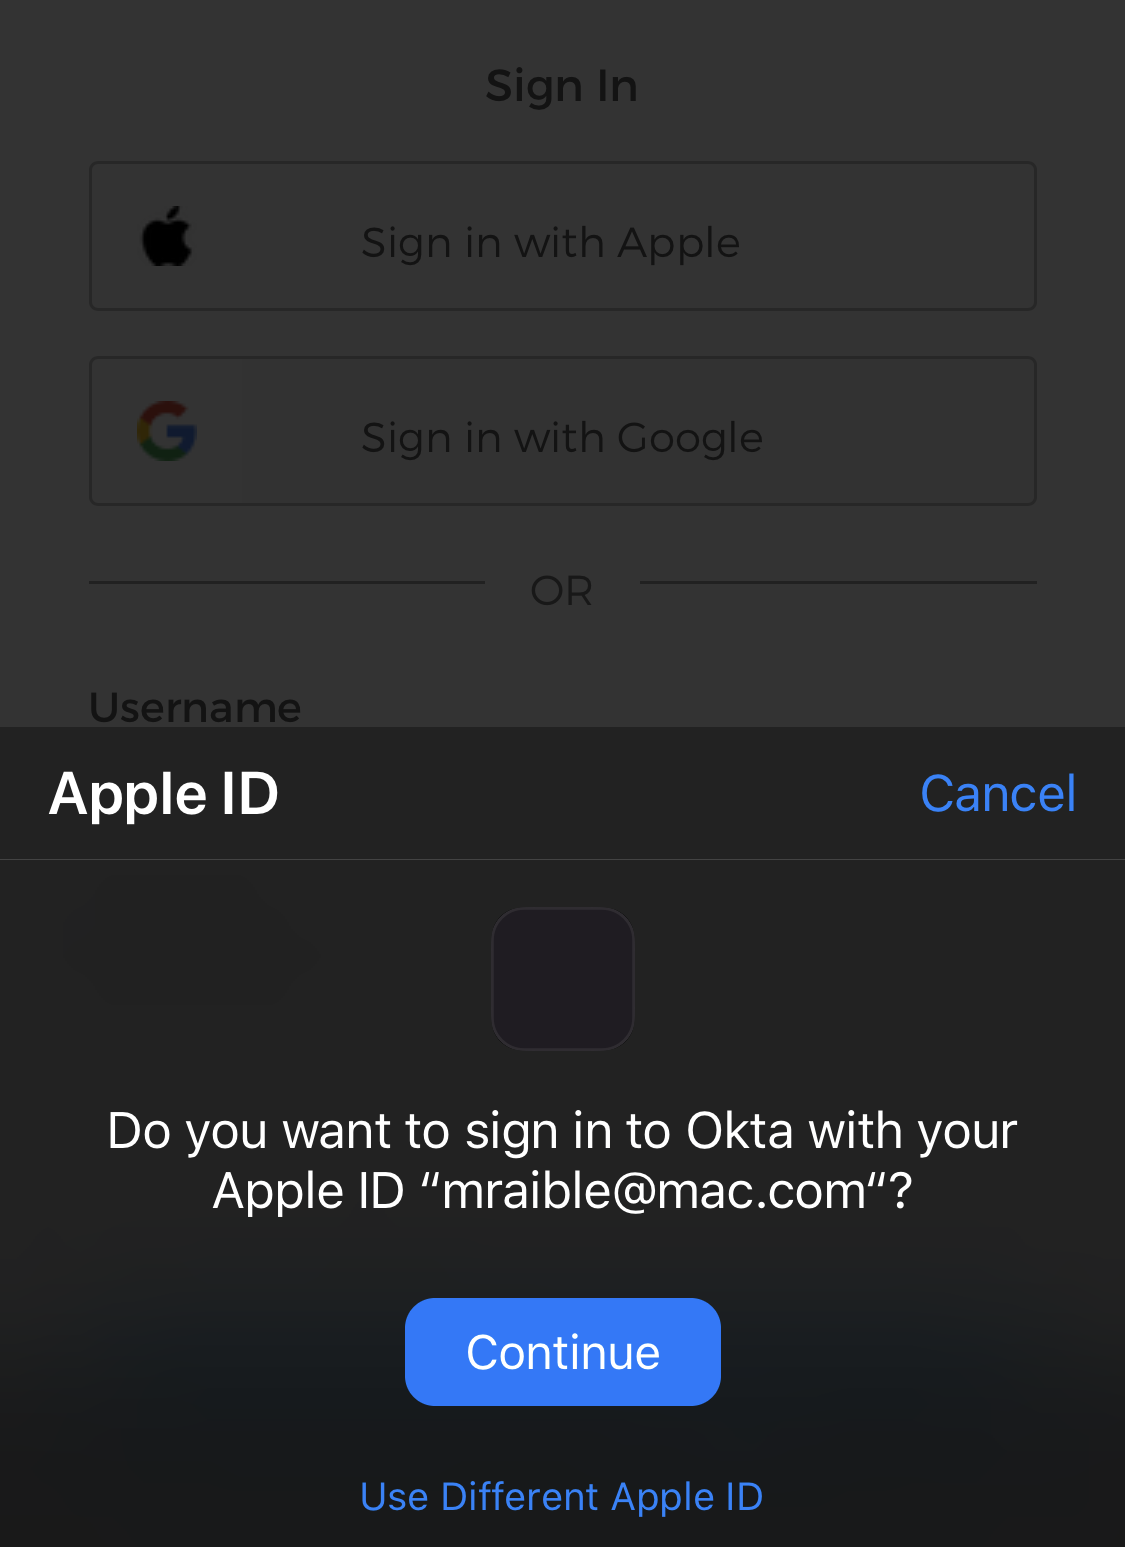
Restart your Ionic app and open http://localhost:8100 in a private window. Click Login
and you’ll be redirected to Apple to sign in.

Log in, and you should be redirected back to your app.
NOTE: If you receive an error about Missing fields: 'firstName','lastName', you’ll need to remove the app from your Apple ID. On a Mac, go to System Preferences > Apple ID > Password & Security > Apps Using Your Apple ID > Edit. Go to Ionic Social and click Stop Using Apple ID. This error happens because Apple sends the name only the very first time you log in.
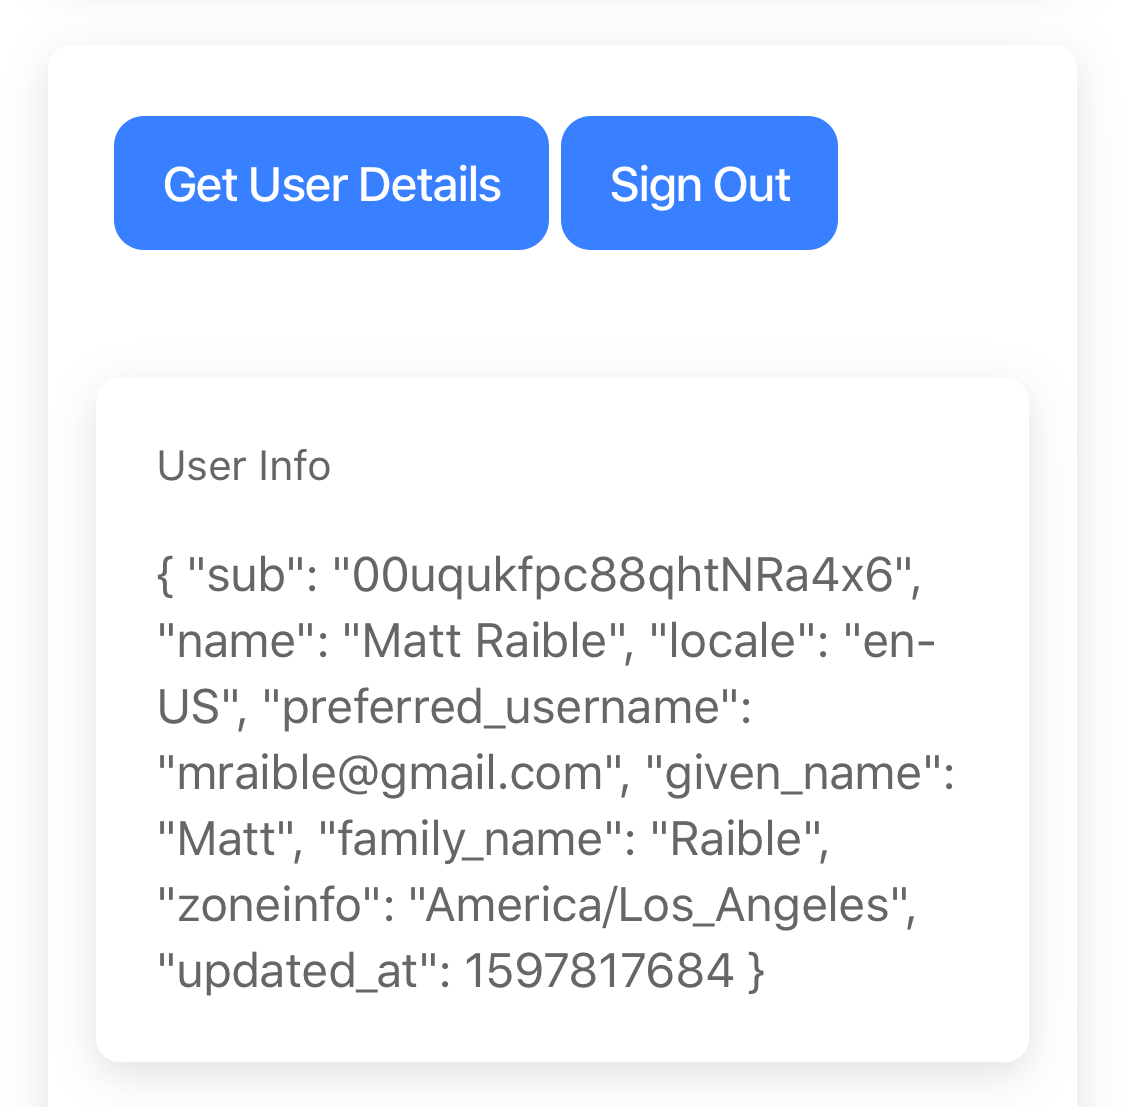
Click Get User Details, and your info will be fetched from Apple via Okta.
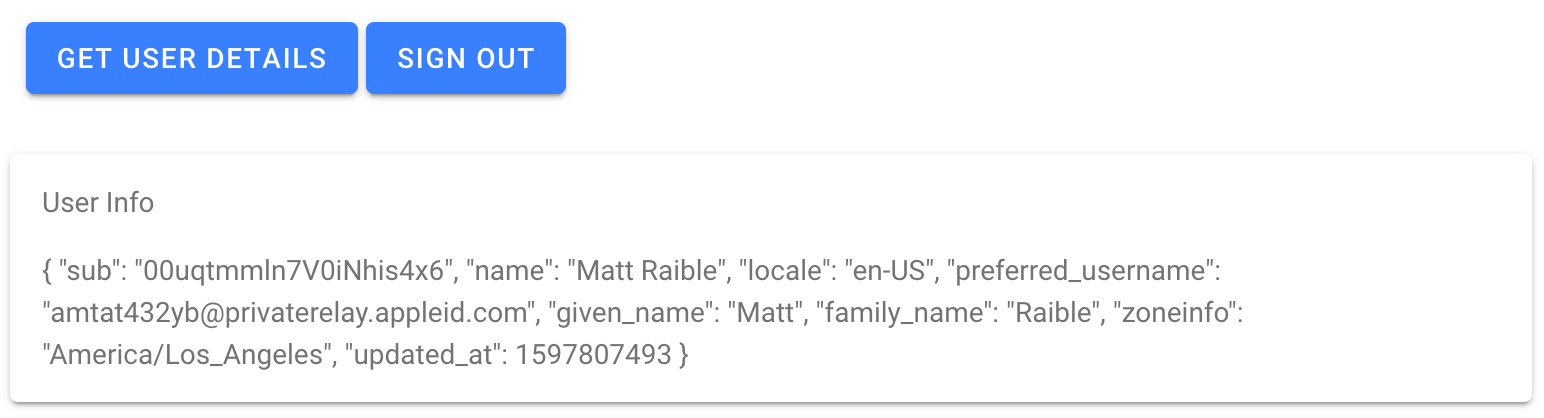
It’s pretty cool that you can add Sign in with Apple via Okta, don’t you think?! 😀
But what if you want to allow people to sign up for an account and you want to manage your users? The good news is you can configure Okta as your main login screen with buttons to sign in with Apple, Google, and many other identity providers.
TIP: To see how to enable user registration, see Tutorial: User Login and Registration in Ionic > Add User Registration.
What about Okta’s Angular SDK and Sign-In Widget?
Okta provides an Angular SDK as well as the Sign-In Widget. I’ve encountered quite a few developers that want to have an in-app login screen without popping a browser.
The Sign-In Widget seems like a good solution for this. However, in a Capacitor app, capacitor://localhost is sent as an origin header, and Okta only allows http and https as schemas. This means the CORS request for the ./well-known/openid-configuration metadata fails.
I thought the Capacitor Community’s HTTP module would fix this, but it does not. I’m currently trying to convince Okta to allow capacitor:// as a schema for trusted origins.
In the meantime, you can customize the Okta-hosted version of the Sign-In Widget. To do this, you need to create a custom domain.
Create a Custom Domain and TLS Certificate with Cloudflare
To use a custom domain with Okta, you need to have access to its DNS settings and create a TLS certificate.
Cloudflare makes this easy. Sign up for Cloudflare if you don’t have an account.
Log in to Cloudflare and select +Add Site. It’s best if you point a whole domain at Cloudflare. For example, I used mattraible.com. The free plan is good enough for this tutorial.
After transferring your domain, you’ll need to create an origin CA certificate.
- Click the SSL/TLS app
- Click the Origin Server tab
- Click Create Certificate to open the Origin Certificate Installation window
- Select Let Cloudflare generate a private key and a CSR
- Change Certificate Validity to 1 year (Okta will reject the certificates with a 15-year expiration)
- Click Next
Copy the Origin Certificate to a tls.cert file on your hard drive. Copy the Private key to private.key.
In Okta, go to Settings > Customization > Custom URL Domain > Edit > Get Started. Enter a subdomain name (e.g., id.mattraible.com) and click Next. You’ll be prompted to verify domain ownership. Add the specified TXT record on Cloudflare via the DNS > + Add record option.
Click Verify > Next on Okta.
For the Certificate field, copy/paste the contents of tls.cert.
On a Mac, you can use
cat tls.cert | pbcopyin a terminal to copy the file to your clipboard.
Put the contents of private.key in the Private key box. Click Next.
You’ll be prompted to add a CNAME record. Add this to your Cloudflare DNS. Click Finish.
NOTE: When I first tried this, I found that my home network caches DNS entries, and I was unable to get to id.mattraible.com for days. However, if I connected with my phone, I was able to load it. I grabbed the IP address when I was connected to my phone and added an entry to my hosts file as a workaround.
Wait until https://<id.domain.name> resolves in your browser before continuing.
Configure a Custom Domain for Your Authorization Server
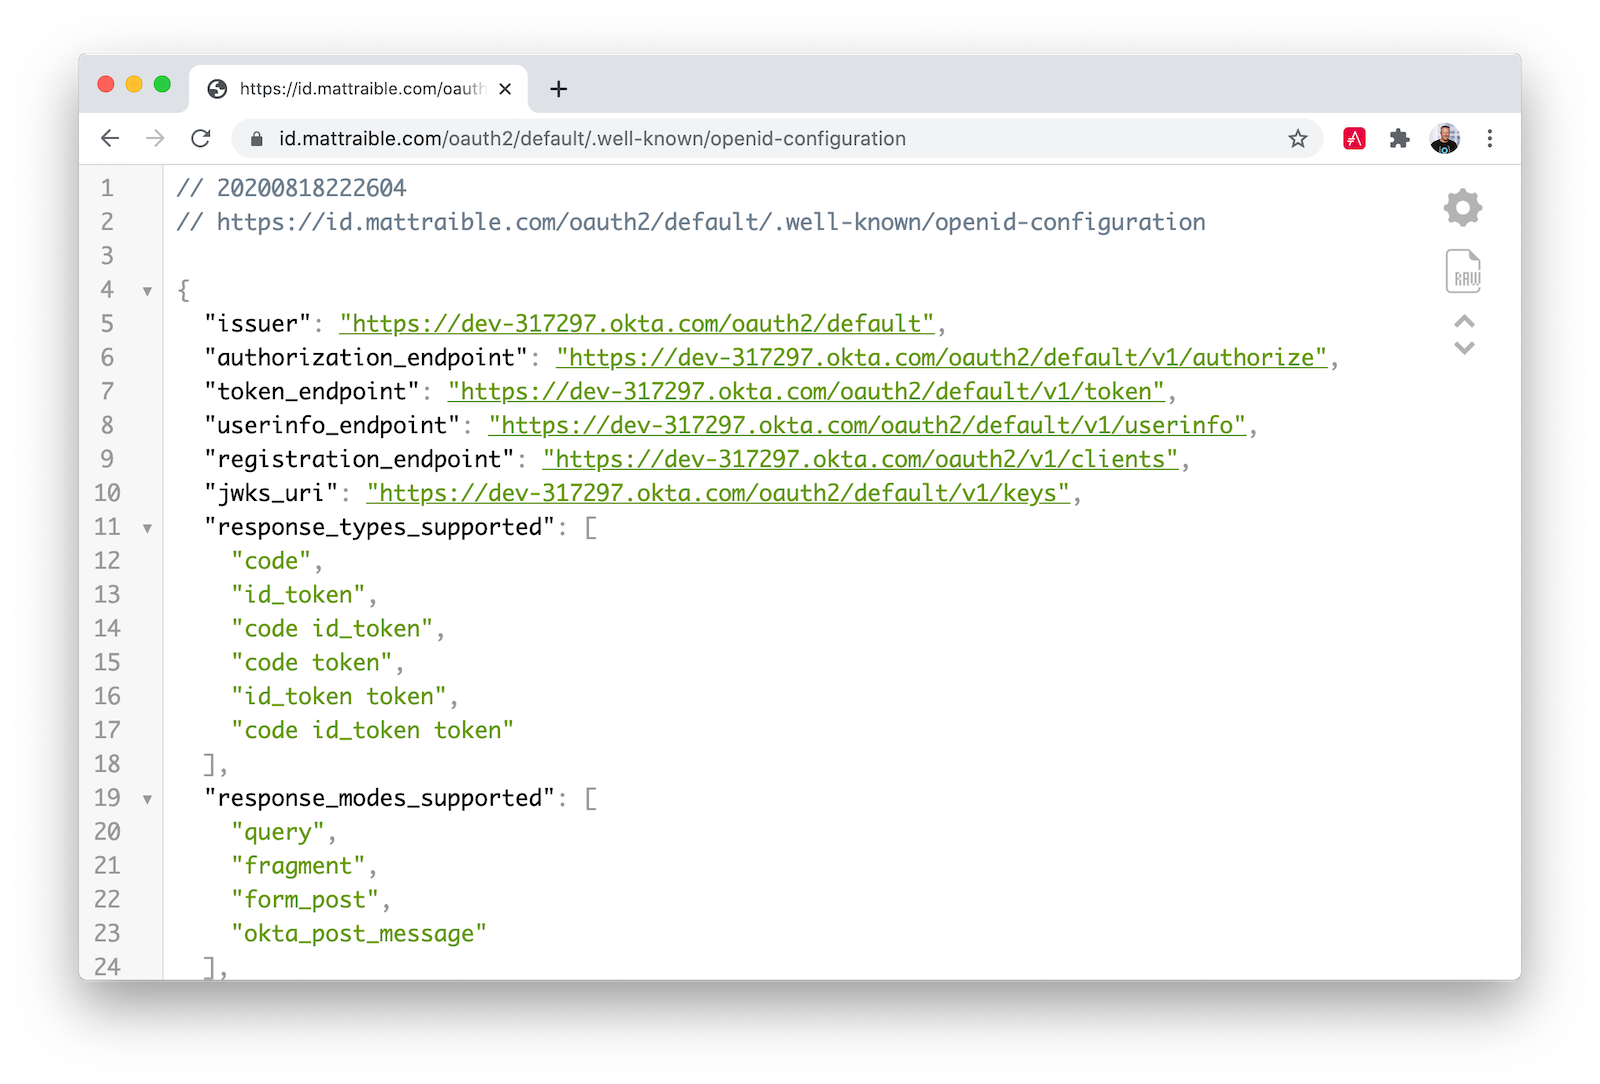
The OpenID Connect specification requires a ./well-known/openid-configuration endpoint with metadata about your app’s endpoints. You should be able to see yours at:
https://<id.domain.name>/oauth2/default/.well-known/openid-configuration
You might notice that it has your Okta dev-* domain, rather than your custom domain name.
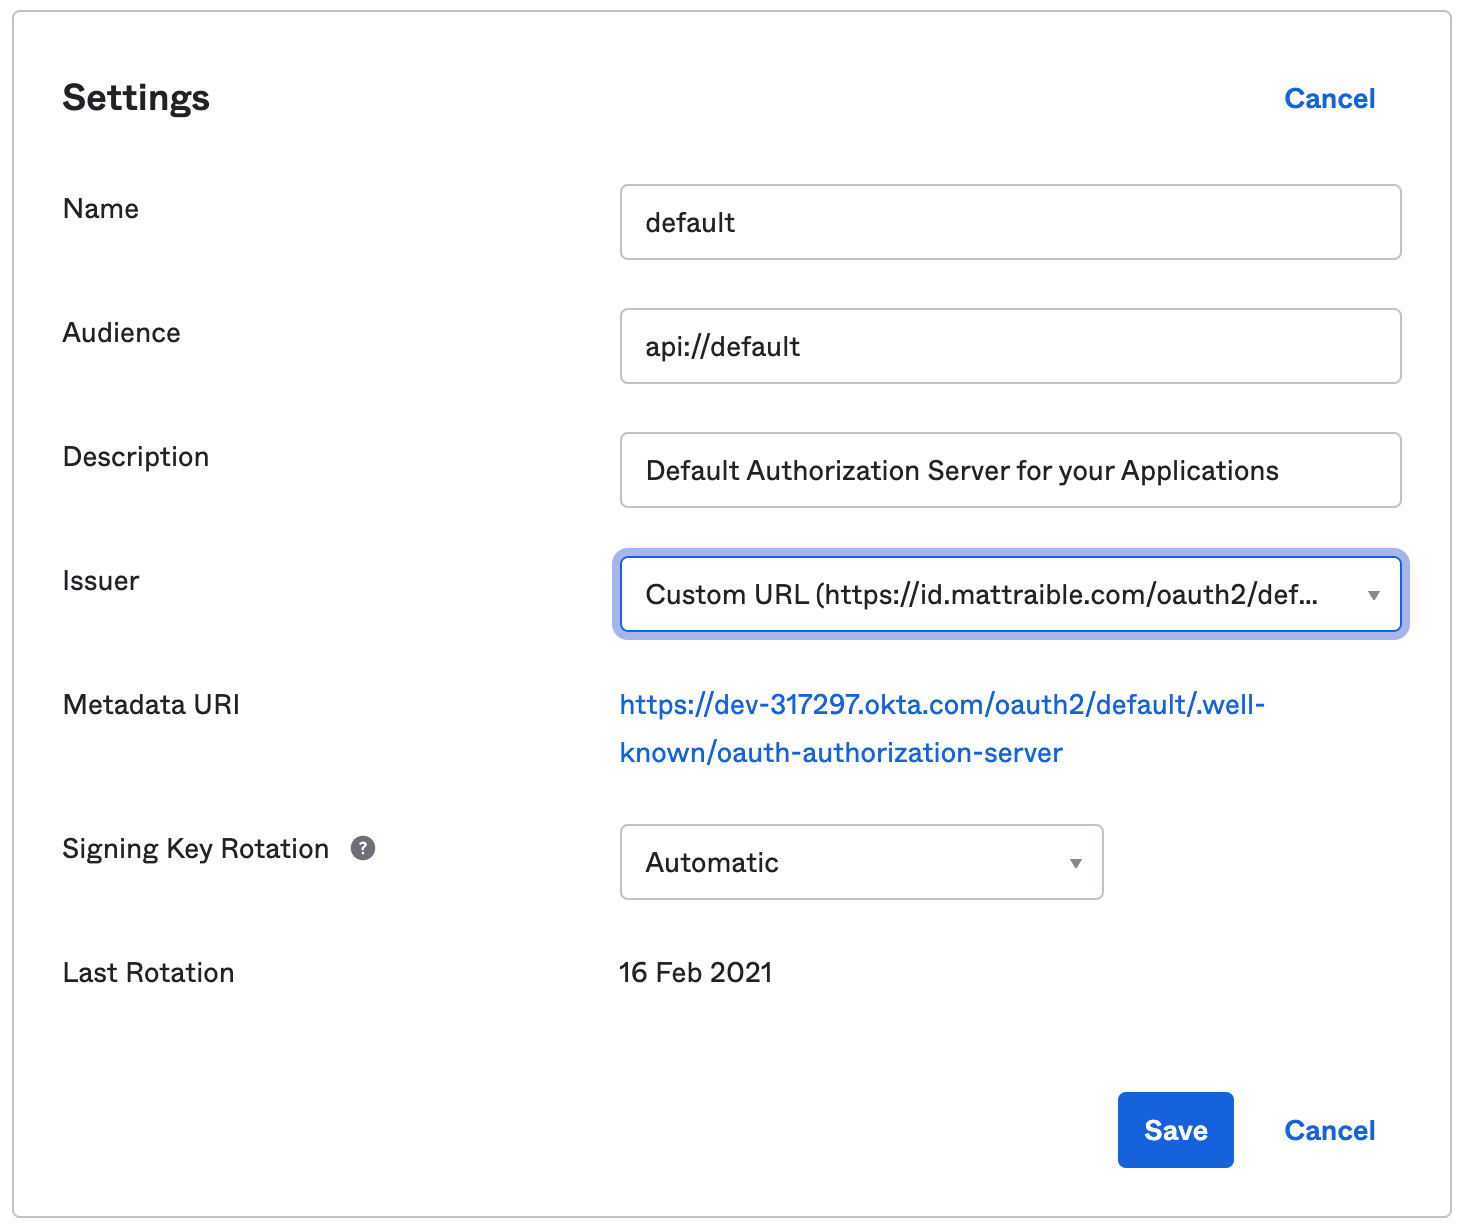
You need to update your authorization server to use your custom domain to fix this. Log in to your Okta account and go to Security > API > Authorization Servers > default > Edit. Change the Issuer to use Custom URL.
Try ./well-known/openid-configuration again; it should have your custom domain now.
Configure Apple to Allow Your Custom Domain
Since you’ve added a new domain, you’ve created another possible redirect URL. Log in to your Apple developer account and go to the Service ID you created. Edit your service and configure Sign in with Apple. Add a new Website URL with your domain and authorize callback.
- Domains:
<id.domain.name> - Return URLs:
https://<id.domain.name>/oauth2/v1/authorize/callback
You can see the values I used below.
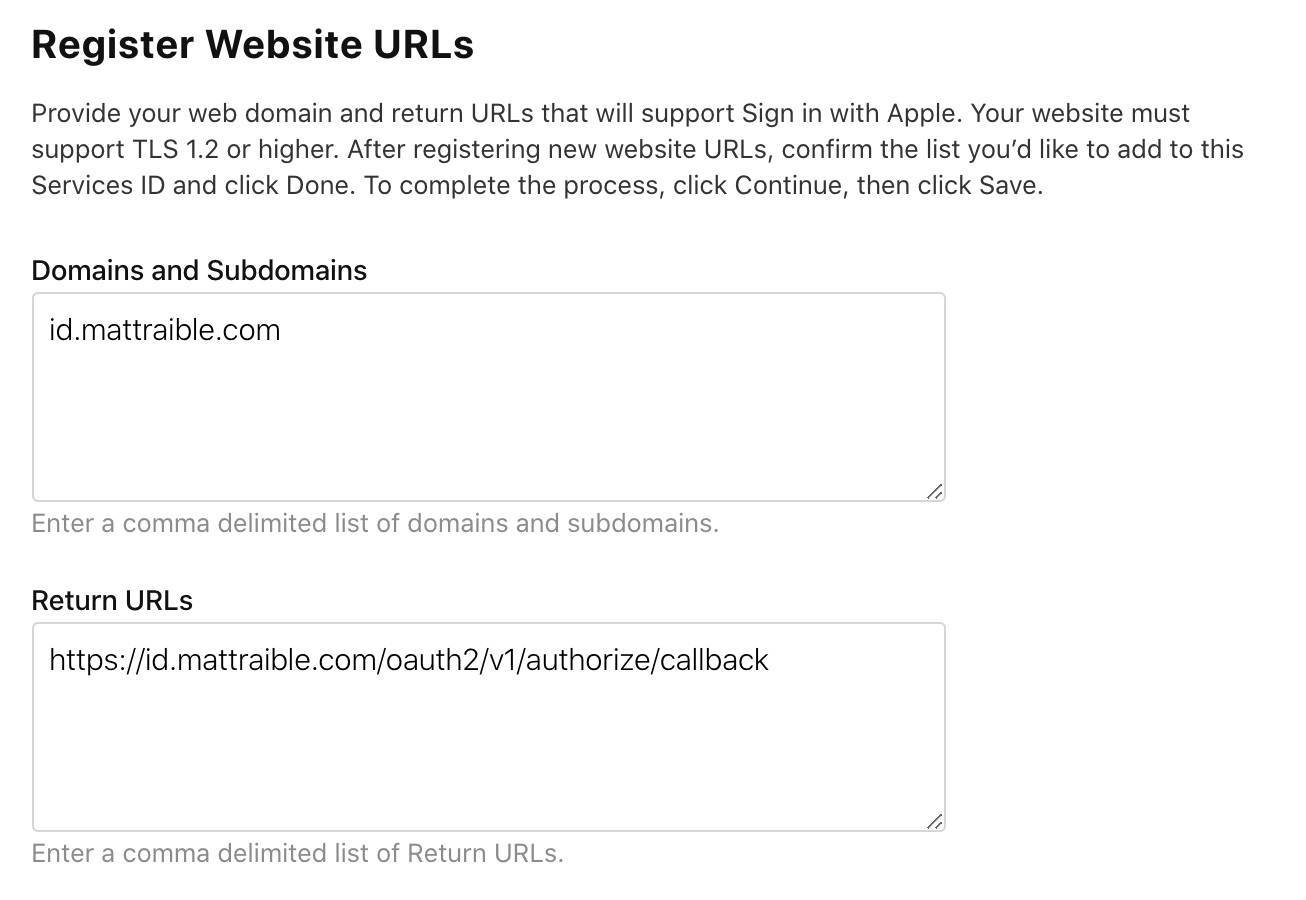
Click Done, Continue, and Save.
Configure Ionic to use Your Custom Domain
Open src/app/auth/auth.service.ts in your Ionic app and change the configuration to use your custom domain. Remove auth_extras too.
const issuer = 'https://<id.domain.name>/oauth2/default';
const authConfig: any = {
  identity_client: clientId,
  identity_server: issuer,
  redirect_url: redirectUri,
  end_session_redirect_url: logoutRedirectUri,
  scopes,
  usePkce: true
};
Now you can customize the Okta-hosted Sign-In Widget.
Add Sign in with Apple to the Hosted Sign-In Widget
In Okta, go to Customization > Sign-in Page. Make sure you’re using the latest version, then modify the HTML on the right. Find the line with var config and add the following after it, where <apple-idp-id> can be found at Users > Social & Identity Providers > (>) before Apple.
config.idps = [
  {type: 'APPLE', id: '<apple-idp-id>'}
];
config.idpDisplay = "PRIMARY";
Scroll up and click Save and Publish.
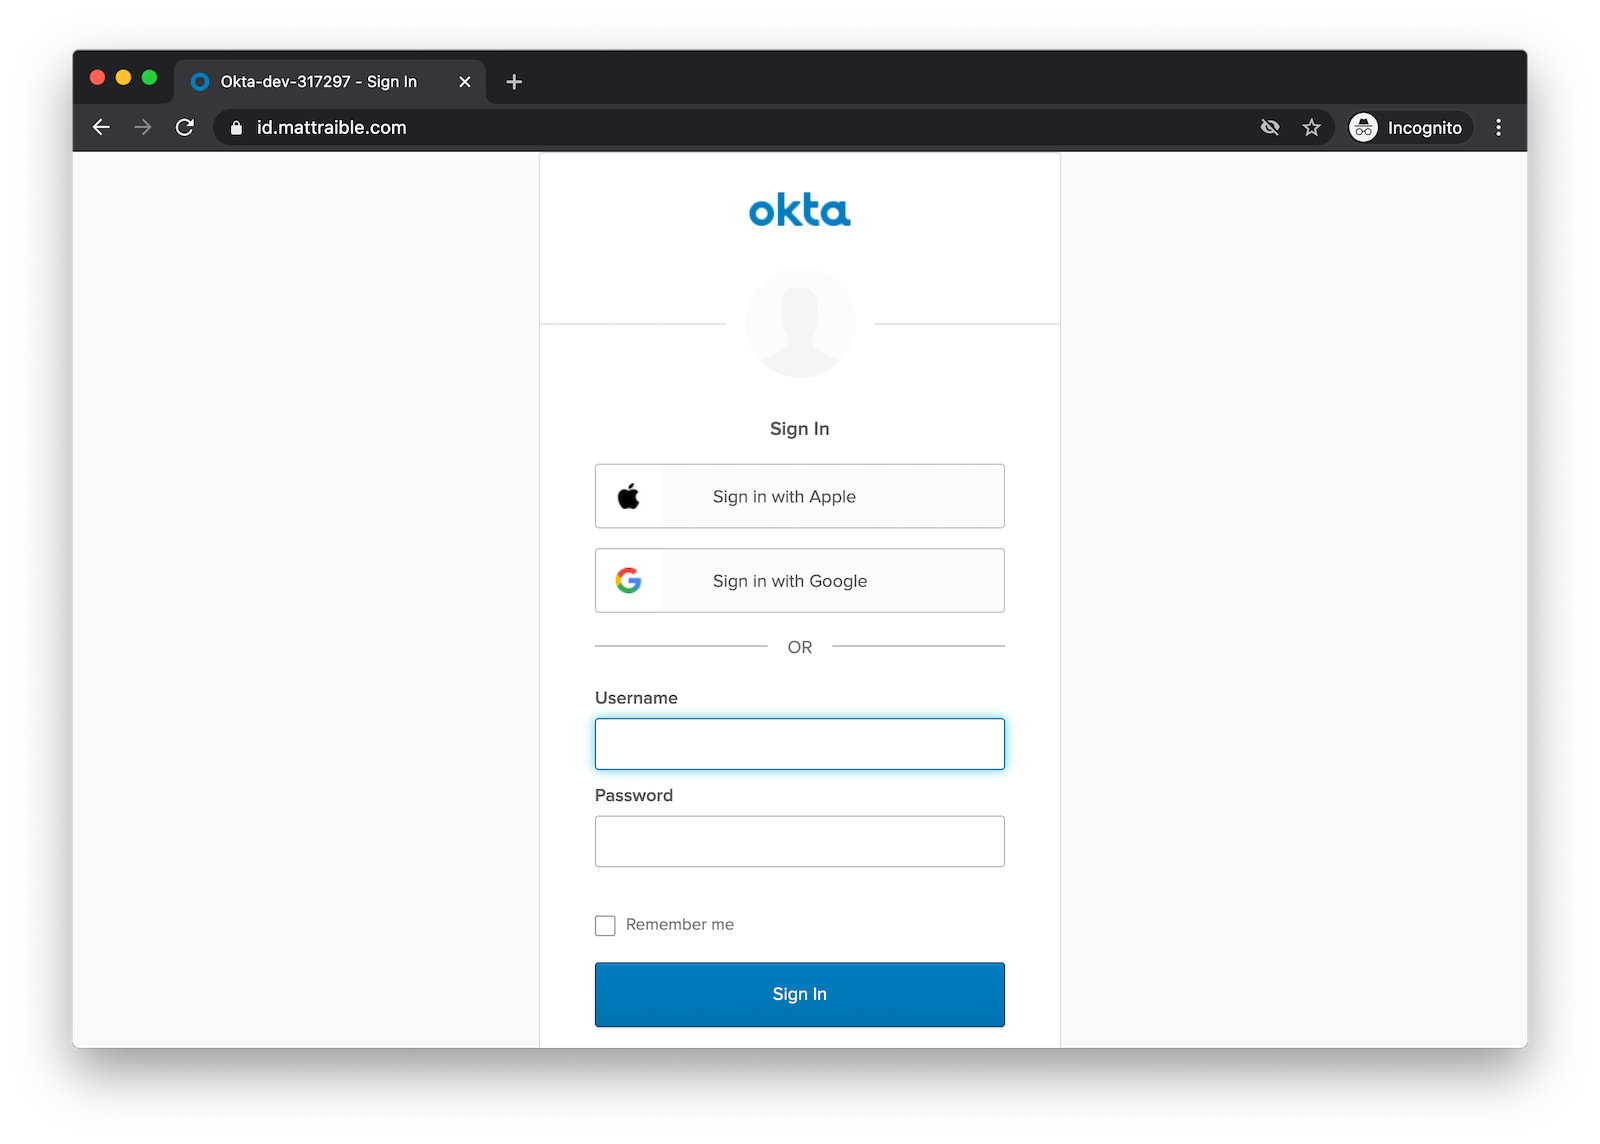
Navigate to your custom id.domain.name, and you should see a Sign in with Apple button.
Add Social Login with Google
If you want to add Sign in with Google, you can do it with very similar steps. Rather than repeat all the steps verbatim here, I invite you to check out Okta’s Google Social Login Guide.
Tip: You’ll need to add http://localhost:8100 as a JavaScript origin to sign in with Google via your browser in development.
After you’ve registered Google as an identity provider, update your sign-in page’s code.
config.idps = [
  {type: 'APPLE', id: '<apple-idp-id>'},
  {type: 'GOOGLE', id: '<google-idp-id>'},
];
Click Save and Publish. Now you should be able to sign in with Apple or Google. How cool is that?! 😎
Run Your Ionic App in iOS Simulator
To build your app and run it on iOS Simulator, run the following commands:
ionic build --prod
npx cap add ios
npx cap open ios
Add your custom scheme to ios/App/App/Info.plist:
<key>CFBundleURLTypes</key>
<array>
  <dict>
    <key>CFBundleURLName</key>
    <string>com.getcapacitor.capacitor</string>
    <key>CFBundleURLSchemes</key>
    <array>
      <string>capacitor</string>
      <string>com.okta.$dev-subdomain</string>
    </array>
  </dict>
</array>
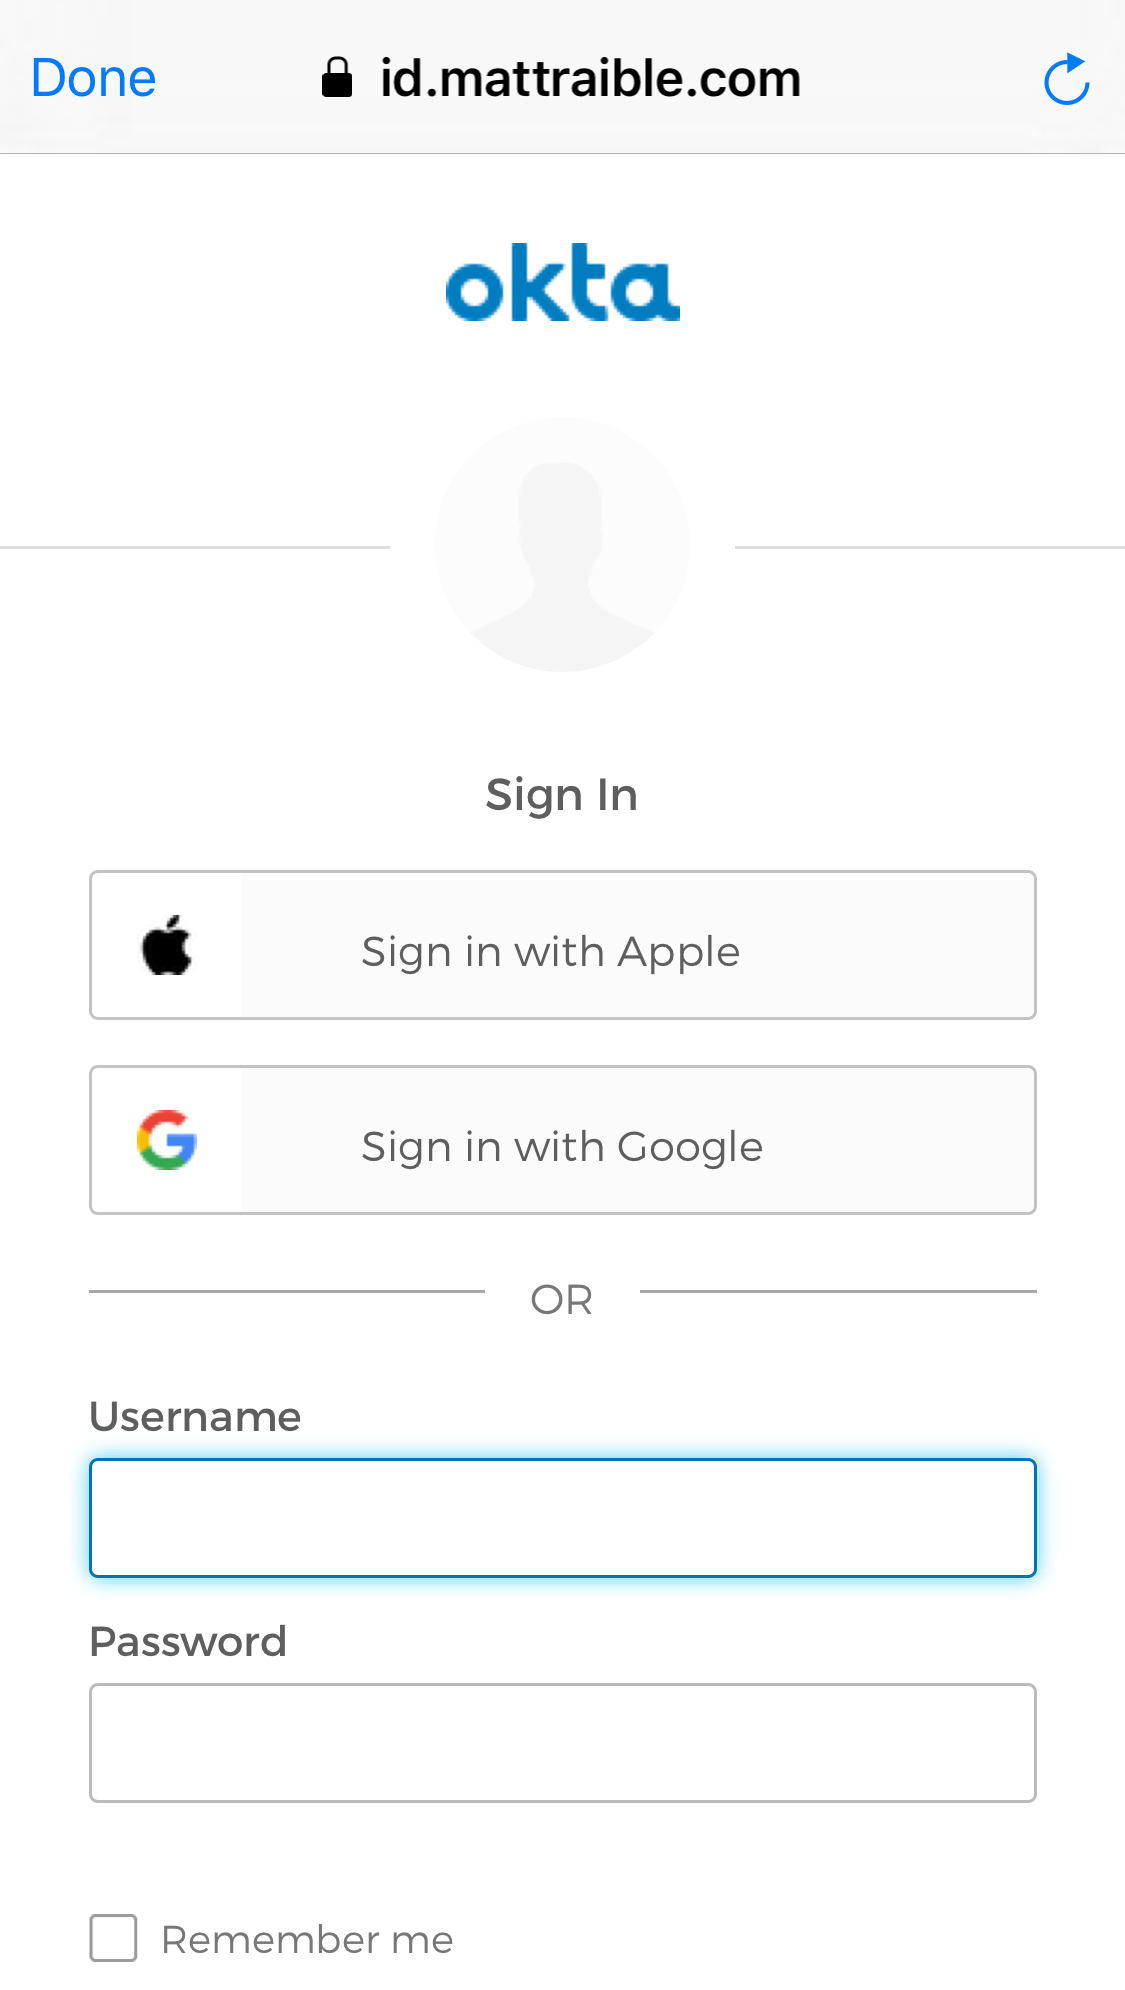
In Xcode, go to App > Signing & Capabilities and select your team. Then, click the ▶ button in the top left and deploy to an iPhone X. Click the Login button, and you should see options to sign in with Apple, Google, or your Okta credentials.
NOTE: If you want to debug your Ionic app in Simulator, you can use Safari to debug Simulator in its Develop menu.
Sign in with Apple and then click the button to get your user details. You should see everything working.
Google should work too!
Deploy Ionic App to iOS Phone
If you have an iPhone, you should be able to deploy your Ionic app to it. Plug your iPhone in via USB, and it should show up as a target in Xcode. You should see an App > Your Phone Name at the top. Click ▶ to deploy to your (unlocked) phone.
I dig the Sign in with Apple experience on my iPhone 11! iOS takes over without a redirect and makes it seamless.
For me, Face ID is even part of the flow! 😃
Learn More about Ionic and Social Login
I hope you enjoyed this tutorial on how to add Sign in with Apple (and Google) to your Ionic apps. The thing I dig about Okta’s setup is that I can use the same identity provider for all my apps that use my authorization server. That means I only have to configure external IdPs once, and all my apps can take advantage of it.
You can find all the code for this example on GitHub in the @oktadeveloper/okta-ionic-social-login-example repository.
If things didn’t work in this tutorial for some reason, please consult Okta’s official documentation for adding Apple and Google.
In addition to Apple and Google, we also support signing in with Azure AD, Facebook, LinkedIn, and Microsoft. There’s even support for Okta-to-Okta.
Some other resources you might like:
- Apple’s Sign in with Apple Guidelines
- Thanks to Capacitor, I’ve fallen in love with mobile development again
- What the Heck is Sign In with Apple?
- Build Mobile Apps with Angular, Ionic 4, and Spring Boot
- Mobile Development with Ionic, React Native, and JHipster
- The Hitchhiker’s Guide to Testing Spring Boot APIs and Angular Components with WireMock, Jest, Protractor, and Travis CI
If you liked this post, follow @oktadev on Twitter to see when we publish in-depth tutorials on Java, JavaScript, .NET, Python, PHP, and many others. We also have a YouTube channel. You should subscribe! 😊
Changelog:
- Mar 25, 2021: Updated to use the Okta CLI and the new Okta Admin Console. Changes to this post can be viewed in okta-blog#615.
Matt Raible is a well-known figure in the Java community and has been building web applications for most of his adult life. For over 20 years, he has helped developers learn and adopt open source frameworks and use them effectively. He's a web developer, Java Champion, and Developer Advocate at Okta. Matt has been a speaker at many conferences worldwide, including Devnexus, Devoxx Belgium, Devoxx France, Jfokus, and JavaOne. He is the author of The Angular Mini-Book, The JHipster Mini-Book, Spring Live, and contributed to Pro JSP. He is a frequent contributor to open source and a member of the JHipster development team. You can find him online @mraible and raibledesigns.com.
Okta Developer Blog Comment Policy
We welcome relevant and respectful comments. Off-topic comments may be removed.