Build Awesome APIs with Entity Framework Core

.NET Core version 3.1 just came out as of writing this article. It includes a new version of Entity Framework (EF) Core, the next generation of Microsoft’s tried and tested Object Relational Mapper (ORM). Entity Framework has been used alongside ASP.NET for years and has developed a reputation for being an essential tool in any developer’s toolbox for .NET Framework, and now .NET Core. .NET Core now also includes a built-in dependency injection system and class templating for controllers. These features make developing REST APIs remarkably easy.
Coupling the new .NET Core features with Okta provides a secure REST API in no time at all. Okta can be used as an authentication server that issues a JSON Web Token (JWT). Microsoft’s ASP.NET Core provides middleware for validating the token.
In this tutorial, you will create a simple REST API to serve a client application for a lending library. The client application will need to add library patrons, provide lists of available books, and let the server know when a book is checked out or checked in. You’ll use SQL Server for your database connected to your application with EF Core. You will learn how to build a REST API with ASP.NET Core, build a database with Code First principles, and secure it using Okta.
Secure Your Entity Framework Core Application
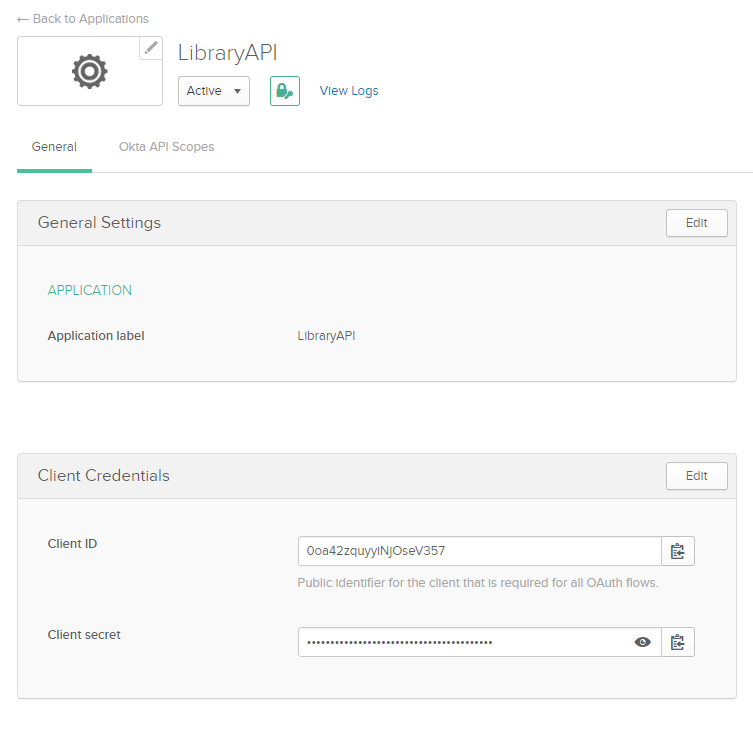
The first thing you need to do is set up Okta for use as an authorization server. In your Okta Developer Console, create a new application. Click Add Application and select the Service option. Give your application a meaningful name (I named mine LibraryAPI) and click Done. The next screen will show your Client Id and Client Secret. Make sure to note these—you’ll need them in your application.
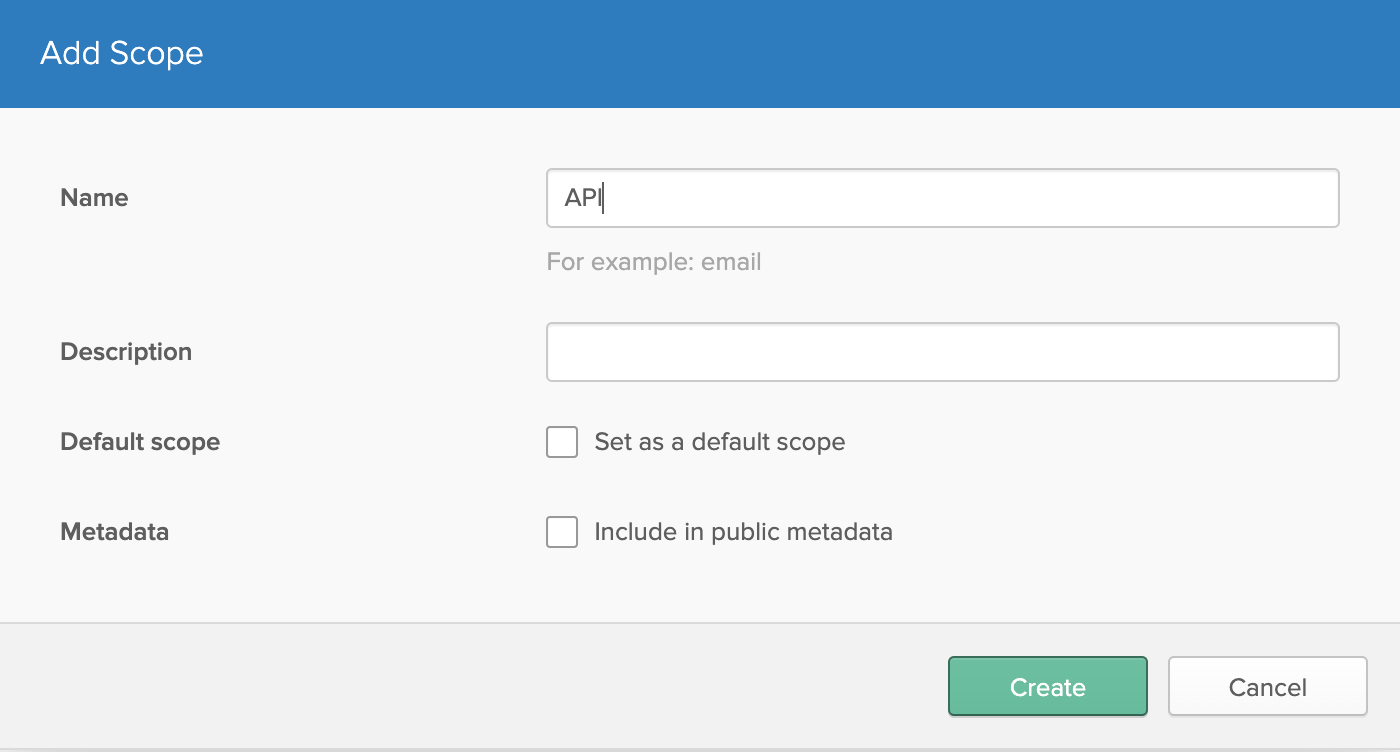
Next, click on API > Authorization Servers in the Developer Console and note your authorization server. By default, you should have one set up named “default”. The default one is fine for development purposes, but in a production environment, you will likely want to create a new one. Note the Issuer URI and Audience on this page as you’ll need those as well. Finally, click on the server and navigate to the Scopes tab. Click Add Scope and add a new scope called API. You will need to send this scope as a parameter when obtaining a token.
Scaffold Your Entity Framework Core API
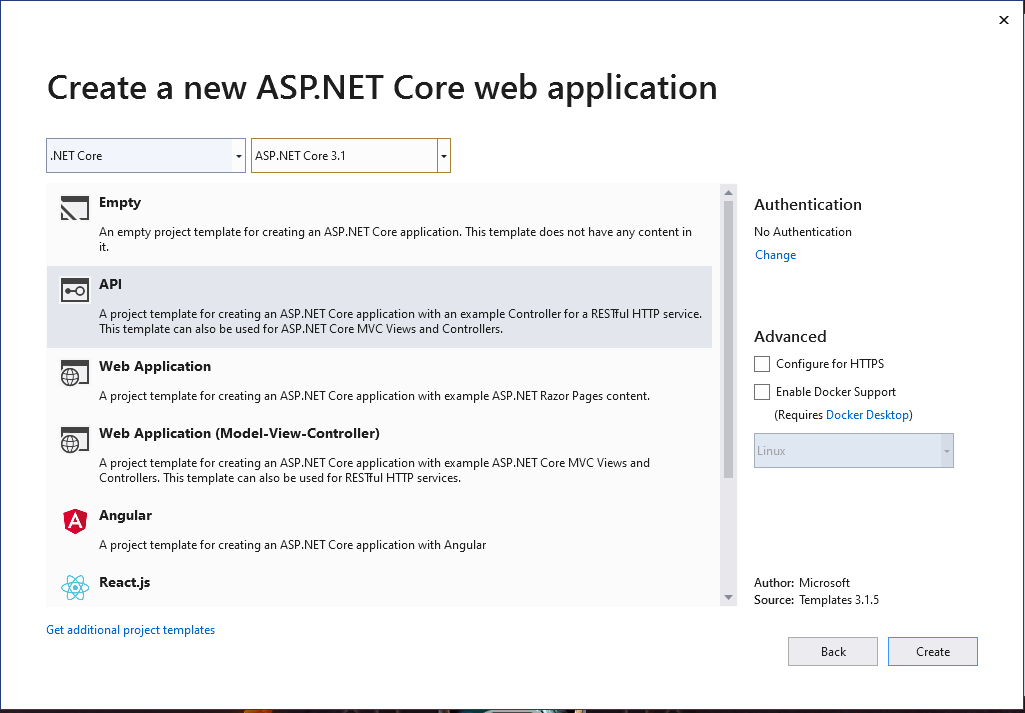
Open up Visual Studio 2019 and click Create a new Project. Under templates, select ASP.NET Core Web Application and click Next. Give it a meaningful name (mine is named LibraryAPI) and click Create. Finally, select API on the Create a new ASP.NET Core web application page and click Create. It will take a minute to scaffold the project for you.
Get the Necessary NuGet Packages
The first package you’ll need is Entity Framework Core. As discussed before, Entity Framework is your ORM that will connect your web application to your database.
Install-Package Microsoft.EntityFrameworkCore -Version 3.1.4
Next, you’ll want to use Microsoft’s JWT validation library to check the token issued by Okta.
Install-Package Microsoft.AspNetCore.Authentication.JwtBearer -Version 3.1.4
Configure Your Entity Framework Core API’s Startup
Next, you’ll need to configure your application so that it can properly validate the JWT that will be sent on each request. While you’re here, you can work on setting up your database as well. First, open the file named appsettings.Development.json. Add the following configuration to it.
{
  "Logging": {
    "LogLevel": {
      "Default": "Information",
      "Microsoft": "Warning",
      "Microsoft.Hosting.Lifetime": "Information"
    }
  },
  "ConnectionStrings": {
    "LibraryConnectionString": "{yourConnectionString}"
  },
  "Okta": {
    "Audience": "api://default",
    "Authority": "{yourOktaDomain}/oauth2/default"
  }
}
Next, create a new class in your root folder called Okta.cs. This class will be a strongly typed object to contain the Okta settings you just placed in your appsettings file. You will need this class in your Startup.cs class shortly.
namespace LibraryAPI
{
    public class Okta
    {
        public string Authority { get; set; }
        public string Audience { get; set; }
    }
}
Finally, open Startup.cs (this was created by the Visual Studio Template) and change the code to the below:
using Microsoft.AspNetCore.Builder;
using Microsoft.AspNetCore.Hosting;
using Microsoft.Extensions.Configuration;
using Microsoft.Extensions.DependencyInjection;
using Microsoft.Extensions.Hosting;
using Microsoft.EntityFrameworkCore;
using Microsoft.AspNetCore.Authentication.JwtBearer;

namespace LibraryAPI
{
    public class Startup
    {
        public Startup(IConfiguration configuration)
        {
            Configuration = configuration;
        }

        public IConfiguration Configuration { get; }

        // This method gets called by the runtime. Use this method to add services to the container.
        public void ConfigureServices(IServiceCollection services)
        {
            services.AddControllers();

            services.AddDbContext<Data.LibraryContext>(options =>
                options.UseSqlServer(Configuration.GetConnectionString("LibraryConnectionString")));

            var okta = Configuration.GetSection("Okta").Get<Okta>();

            services.AddAuthentication(JwtBearerDefaults.AuthenticationScheme)
                    .AddJwtBearer(options =>
                    {
                        options.Authority = okta.Authority;
                        options.Audience = okta.Audience;
                    });
        }

        // This method gets called by the runtime. Use this method to configure the HTTP request pipeline.
        public void Configure(IApplicationBuilder app, IWebHostEnvironment env)
        {
            if (env.IsDevelopment())
            {
                app.UseDeveloperExceptionPage();
            }

            app.UseRouting();

            app.UseAuthentication();
            app.UseAuthorization();

            app.UseEndpoints(endpoints =>
            {
                endpoints.MapControllers();
            });
        }
    }
}
A lot of this code was automatically generated by Visual Studio when you created the project. But you have added a few new pieces.
First, you added a DbContext to the services of the application. For now, this should result in a compiler error until you add the LibraryContext class to your application (which you’ll do shortly).
Next, you’re getting the Okta settings from the appsettings file you just amended. Having a strongly typed object to bind the Okta configuration section makes it a little easier to set up your JWT validation. To set that up, you just need to add authentication to your services then call AddJwtBearer() from the Microsoft.AspNetCore.Authentication.JwtBearer package you added earlier. Provide this method with your Authority and Audience so that it can properly validate the token.
You also need to configure your HTTP Request pipeline to use authentication and authorization. This can be added to the Configure() method as shown above.
Create Your Database with Entity Framework Core Code First
Next, you can work on designing and coding your database. Here you are using a Code First approach to creating your database. This means you’ll write C# code which EF Core will use to create or update your database using the connection string provided in your Startup class.
First, create your entities. For this project you’ll need three entities: User, Book, and Checkout. Create a new folder in your root directory and name it Data. In there, add three new files for User.cs, Book.cs, and Checkout.cs.
Start with the User entity. This entity consists of a Username and an Id which will be used as a primary key. All the entities you create will have a property named Id that is decorated with the attribute [Key] to mark it as a primary key.
using System.ComponentModel.DataAnnotations;

namespace LibraryAPI.Data
{
    public class User
    {
        [Key]
        public int Id { get; set; }

        public string Username { get; set; }
    }
}
Next is a similar entity called Book. Along with the Id property, you’re also holding some information about the title, author, and description of the book.
using System.ComponentModel.DataAnnotations;

namespace LibraryAPI.Data
{
    public class Book
    {
        [Key]
        public int Id { get; set; }

        public string Title { get; set; }
        public string Author { get; set; }
        public string Description { get; set; }
    }
}
Finally, edit your Checkout class with the following code. The Checkout entity is a little more complicated than the other two because it will include foreign key references to Book and User. This should make sense as a user checks out a book. To tell EF Core that this is a foreign key, you can add the ForeignKey attribute to a virtual property. The argument it needs, such as BookId on Book, tells EF Core that Checkout.BookId should reference the primary key on the Book class.
There is another way to manage the keys in your database called Fluent API. Fluent API is a more powerful way of setting up keys, cascading rules, mapping entities to tables, and a whole range of other functions. Most of the time Fluent API is overkill, especially when you are working in a Code First setup. However, a Fluent API is necessary if you are working in a database-first environment where the database structure may not interact well with EF Core or doesn’t have strict naming conventions.
The virtual properties on the Checkout entity serve a very important function. These objects are navigation properties that can be loaded when you retrieve a Checkout object or they can be ignored. By default, EF Core won’t load these objects. However, you can enable *lazy loading, eager loading, or use “Include” to tell EF Core to load these properties. More on that in a little bit. What’s important to know here is that these properties can be populated with the referenced entity Id specified in the attribute.
using System;

using System.ComponentModel.DataAnnotations;
using System.ComponentModel.DataAnnotations.Schema;


namespace LibraryAPI.Data
{
    public class Checkout
    {
        [Key]
        public int Id { get; set; }
        public int UserId { get; set; }
        public int BookId { get; set; }
        public bool Active { get; set; }
        public DateTime CheckoutDate { get; set; }
        public DateTime DueDate { get; set; }

        public DateTime? CheckinDate { get; set; }

        [ForeignKey("BookId")]
        public virtual Book Book { get; set; }

        [ForeignKey("UserId")]
        public virtual User User { get; set; }
    }
}
To tie this all together you will need a DbContext that has these entities in it. Create a new file in the Data folder named LibraryContext and add the following code:
using Microsoft.EntityFrameworkCore;

namespace LibraryAPI.Data
{
    public class LibraryContext : DbContext
    {
        public LibraryContext(DbContextOptions<LibraryContext> options)
        : base(options)
        {
        }

        public DbSet<User> User { get; set; }

        public DbSet<Checkout> Checkout { get; set; }

        public DbSet<Book> Books { get; set; }

        protected override void OnModelCreating(ModelBuilder modelBuild
        {
            base.OnModelCreating(modelBuilder);

            modelBuilder.Entity<Book>().HasData(new Book { Id = 1, Author = "J. R. R. Tolkien", Description= "The Fellowship of the Ring, the first volume in the trilogy, tells of the fateful power of the One Ring. It begins a magnificent tale of adventure that will plunge the members of the Fellowship of the Ring into a perilous quest and set the stage for the ultimate clash between the powers of good and evil.", Title = "The Fellowship of the Ring"});
            modelBuilder.Entity<Book>().HasData(new Book { Id = 2, Author = "J. R. R. Tolkien", Description = "The Fellowship has been forced to split up. Frodo and Sam must continue alone towards Mount Doom, where the One Ring must be destroyed. Meanwhile, at Helm's Deep and Isengard, the first great battles of the War of the Ring take shape.", Title = "The Two Towers" });

            modelBuilder.Entity<Book>().HasData(new Book { Id = 3, Author = "J. R. R. Tolkien", Description = "The Return of the King is the towering climax to J. R. R. Tolkien's trilogy that tells the saga of the hobbits of Middle-earth and the great War of the Rings. In this concluding volume, Frodo and Sam make a terrible journey to the heart of the Land of the Shadow in a final reckoning with the power of Sauron.", Title = "The Return of the King" });
            modelBuilder.Entity<Book>().HasData(new Book { Id = 4, Author = "J. R. R. Tolkien", Description = "Like every other hobbit, Bilbo Baggins likes nothing better than a quiet evening in his snug hole in the ground, dining on a sumptuous dinner in front of a fire. But when a wandering wizard captivates him with tales of the unknown, Bilbo becomes restless. Soon he joins the wizard's band of homeless dwarves in search of giant spiders, savage wolves, and other dangers. Bilbo quickly tires of the quest for adventure and longs for the security of his familiar home. But before he can return to his life of comfort, he must face the greatest threat of all - a treasure-troving dragon named Smaug.", Title = "The Hobbit" });

            modelBuilder.Entity<Book>().HasData(new Book { Id = 5, Author = "Philip K Dick", Description = "It's America in 1962. Slavery is legal once again. The few Jews who still survive hide under assumed names. In San Francisco, the I Ching is as common as the Yellow Pages. All because some twenty years earlier the United States lost a war - and is now occupied by Nazi Germany and Japan.", Title = "The Man In The High Castle" });
            modelBuilder.Entity<Book>().HasData(new Book { Id = 6, Author = "Jim Butcher", Description = "With rent past due and a decent meal becoming an issue of some importance, Harry needs work, and soon. A call from a distraught wife, and another from Lt. Murphy of the Chicago PD Special Investigation Unit makes Harry believe things are looking up, but they are about to get worse, much worse. Someone is harnessing immense supernatural forces to commit a series of grisly murders. Someone has violated the first law of magic: Thou Shalt Not Kill. Tracking that someone takes Harry into the dangerous underbelly of Chicago, from mobsters to vampires, while he himself is under suspicion of the crimes.", Title = "Storm Front" });

        }

    }
}
If you’ve used Entity Framework before this should look familiar, but with some notable changes. The constructor here takes a DbContextOptions argument that will contain information about the database itself. This includes the connection string and the type of database used. You are using SQL Server in this application but EF Core is capable of connecting to a range of databases including MySql and Postgres.
You also need to include your entity sets as properties on the context.
And finally, there is the overridden method OnModelCreating where you will see what looks like some seed data for books. This is EF Core’s new way of seeding data. When you add a migration, EF Core will look in this method for any changes and add them to the migration. Here you have added a few sample books for testing your API.
If you’re not familiar with migrations, they are classes that EF Core uses to update (or downgrade) your database. You can use the command Add-Migration Initial-Migration in the Package Manager Console to add your first migration. This should include the entities you added and a section for the books’ sample data. Once the migration has been created, you can use the command Update-Database to create or update your target database with any outstanding migrations. Update-Database can also take a specific migration name to update or downgrade to that migration.
Add Your Controllers
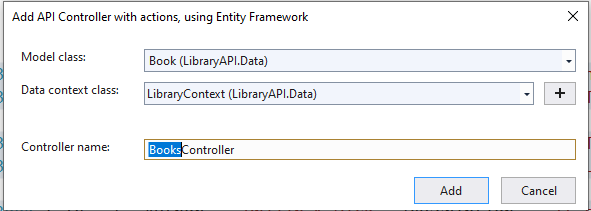
By default, Visual Studio may have added a controller for WeatherForecast. You can delete this. With your Controllers folder empty, you are about to add three new controllers. But here you want to leverage Visual Studio to help you. Right-click on Controllers and hover over Add and click Controller. Click on the option for API Controller with actions, using Entity Framework. Click Add then follow the wizard for your Book entity. You’ll repeat these steps each time you add a controller.
Visual Studio will set up the routing, dependency injection for EF Core, and give you a list of RESTful methods to implement. You will need to do some work to trim methods that you will not support in this application. For example, users cannot add new books. They can only get a list of available books. See below for the final product.
One note about setting up your controllers this way: There is intense debate about whether you should inject a DbContext into your controllers. Many people believe you should abstract the data layer away from the controllers and use models and service classes here rather than entities and contexts. I tend to agree with that philosophy, however there is always a “but.” For this tutorial, it would be okay to inject the context into the controller, however this strategy may fail you one day and you have to write models anyway.
This controller, and all your other controllers, will need to be decorated with an Authorize attribute to let the application know to use the authorization and authentication middleware you configured in the Startup.cs file.
The BooksController only provides two methods, GetBooks and GetBook. These names are internal and the exposed name can be seen in the comments over the methods. The exposed names fit a more RESTful pattern and are controlled by the Route attribute and the HttpGet attribute.
using System;
using System.Collections.Generic;
using System.Threading.Tasks;
using Microsoft.AspNetCore.Mvc;
using Microsoft.EntityFrameworkCore;
using LibraryAPI.Data;
using Microsoft.AspNetCore.Authorization;

namespace LibraryAPI.Controllers
{
    [Route("api/[controller]")]
    [ApiController]
    [Authorize]
    public class BooksController : ControllerBase
    {
        private readonly LibraryContext _context;

        public BooksController(LibraryContext context)
        {
            _context = context;
        }

        // GET: api/Books
        [HttpGet]
        public async Task<ActionResult<IEnumerable<Book>>> GetBooks()
        {
            return await _context.Books.ToListAsync();
        }

        // GET: api/Books/5
        [HttpGet("{id}")]
        public async Task<ActionResult<Book>> GetBook(int id)
        {
            var book = await _context.Books.FindAsync(id);

            if (book == null)
            {
                return NotFound();
            }

            return book;
        }
    }
}
Follow the above method to add a controller for UsersController. The UsersController will only allow Get and Post operations. Another aside here—there is also some debate about the role of Post and Put methods in a REST API. While many online sources will suggest that Put is for adding a resource and Post is for amending one, the Visual Studio template has these roles reversed. In this project, you’ll follow the convention set up by Microsoft, although that may not always be the case.
Aside from trimming the unused methods, you’ll also need to amend the Post method to do a check before adding a user to the database. The default template will simply allow the API to always add a new user, relying on the client to do the check before adding the user.
using System.Linq;
using System.Threading.Tasks;
using Microsoft.AspNetCore.Mvc;
using LibraryAPI.Data;
using Microsoft.AspNetCore.Authorization;

namespace LibraryAPI.Controllers
{
    [Route("api/[controller]")]
    [ApiController]
    [Authorize]
    public class UsersController : ControllerBase
    {
        private readonly LibraryContext _context;

        public UsersController(LibraryContext context)
        {
            _context = context;
        }

        // GET: api/Users/5
        [HttpGet("{id}")]
        public async Task<ActionResult<User>> GetUser(int id)
        {
            var user = await _context.User.FindAsync(id);

            if (user == null)
            {
                return NotFound();
            }

            return user;
        }

        // POST: api/Users
        // To protect from overposting attacks, enable the specific properties you want to bind to, for
        // more details, see https://go.microsoft.com/fwlink/?linkid=2123754.
        [HttpPost]
        public async Task<ActionResult<User>> PostUser(User user)
        {
            if (!UserExists(user.Id))
            {
                _context.User.Add(user);
                await _context.SaveChangesAsync();

                return CreatedAtAction("GetUser", new { id = user.Id }, user);
            }
            else
            {
                return UnprocessableEntity();
            }
        }

        private bool UserExists(int id)
        {
            return _context.User.Any(e => e.Id == id);
        }
    }
}
Finally, you’ll need to add the CheckoutsController. For this controller you will include methods for Get, Post, and Put. Put is used for when a user returns a book to mark the checkout as returned by deactivating it and setting a time stamp on the checkout object for CheckinDate.
There’s a small change in the Get method here. You’ll notice there’s a call for Include when querying your database. Lazy loading isn’t enabled by default in EF Core so if you didn’t use Include, the navigation properties wouldn’t be populated. To explicitly tell EF Core to load this object, Include is used to identify which property to populate. You could also do this by enabling eager loading or lazy loading. The trouble with those is they can often load more data than you want. There’s always a tradeoff for whatever approach you use.
using System;
using System.Collections.Generic;
using System.Linq;
using System.Threading.Tasks;
using Microsoft.AspNetCore.Http;
using Microsoft.AspNetCore.Mvc;
using Microsoft.EntityFrameworkCore;
using LibraryAPI.Data;
using Microsoft.Extensions.Logging;
using Microsoft.AspNetCore.Authorization;

namespace LibraryAPI.Controllers
{
    [Route("api/[controller]")]
    [ApiController]
    [Authorize]
    public class CheckoutsController : ControllerBase
    {
        private readonly LibraryContext _context;

        public CheckoutsController(LibraryContext context)
        {
            _context = context;
        }

        // GET: api/Checkouts
        [HttpGet]
        public async Task<ActionResult<IEnumerable<Checkout>>> GetCheckout()
        {
            return await _context.Checkout.ToListAsync();
        }

        // GET: api/Checkouts/5
        [HttpGet("{id}")]
        public async Task<ActionResult<Checkout>> GetCheckout(int id)
        {
            var checkout = await _context.Checkout.Include(checkout => checkout.Book).SingleOrDefaultAsync(r => r.Id.Equals(id));

            if (checkout == null)
            {
                return NotFound();
            }

            return checkout;
        }

        // PUT: api/Checkouts/5
        // To protect from overposting attacks, enable the specific properties you want to bind to, for
        // more details, see https://go.microsoft.com/fwlink/?linkid=2123754.
        [HttpPut("{id}")]
        public async Task<IActionResult> PutCheckout(int id, Checkout checkout)
        {
            if (id != checkout.Id)
            {
                return BadRequest();
            }

            _context.Entry(checkout).State = EntityState.Modified;

            try
            {
                await _context.SaveChangesAsync();
            }
            catch (DbUpdateConcurrencyException)
            {
                if (!CheckoutExists(id))
                {
                    return NotFound();
                }
                else
                {
                    throw;
                }
            }

            return NoContent();
        }

        // POST: api/Checkouts
        // To protect from overposting attacks, enable the specific properties you want to bind to, for
        // more details, see https://go.microsoft.com/fwlink/?linkid=2123754.
        [HttpPost]
        public async Task<ActionResult<Checkout>> PostCheckout(Checkout checkout)
        {
            _context.Checkout.Add(checkout);
            await _context.SaveChangesAsync();

            return CreatedAtAction("GetCheckout", new { id = checkout.Id }, checkout);
        }

        private bool CheckoutExists(int id)
        {
            return _context.Checkout.Any(e => e.Id == id);
        }
    }
}
Test Your Entity Framework Core API
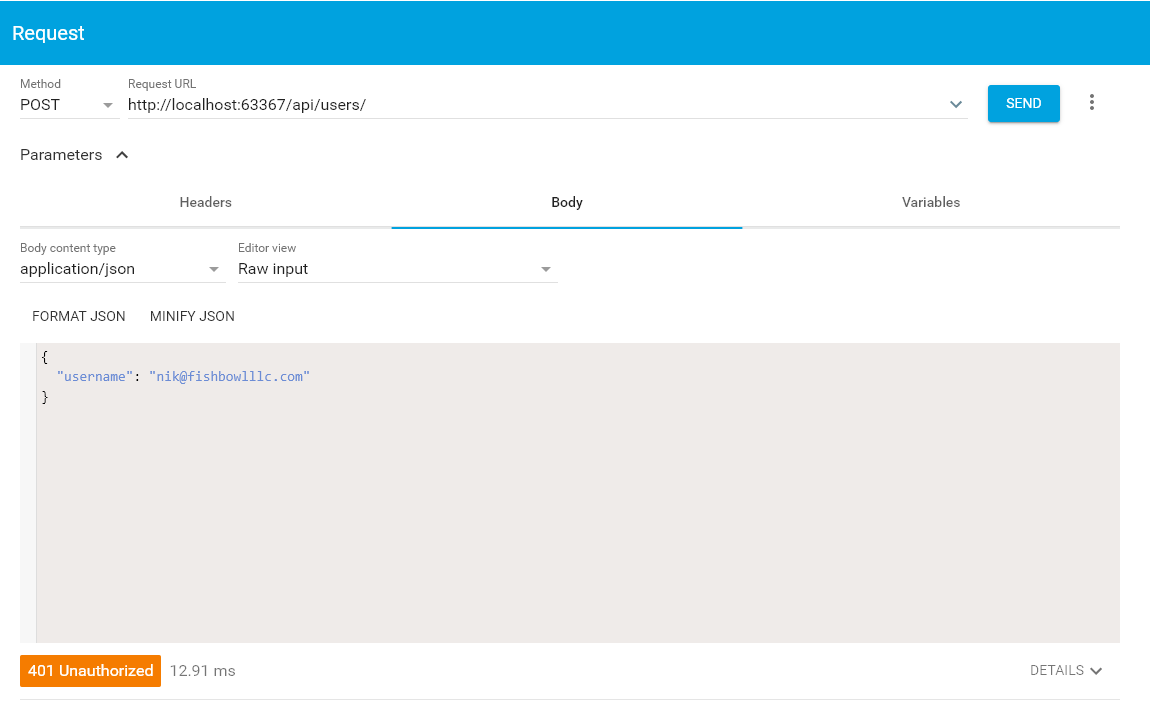
With the application complete you can start debugging it with Postman or another REST client of your choice. You will want to test the actions. First, try to add a user without adding any headers. The result should be a 401 indicating you did not include the bearer token with the request.
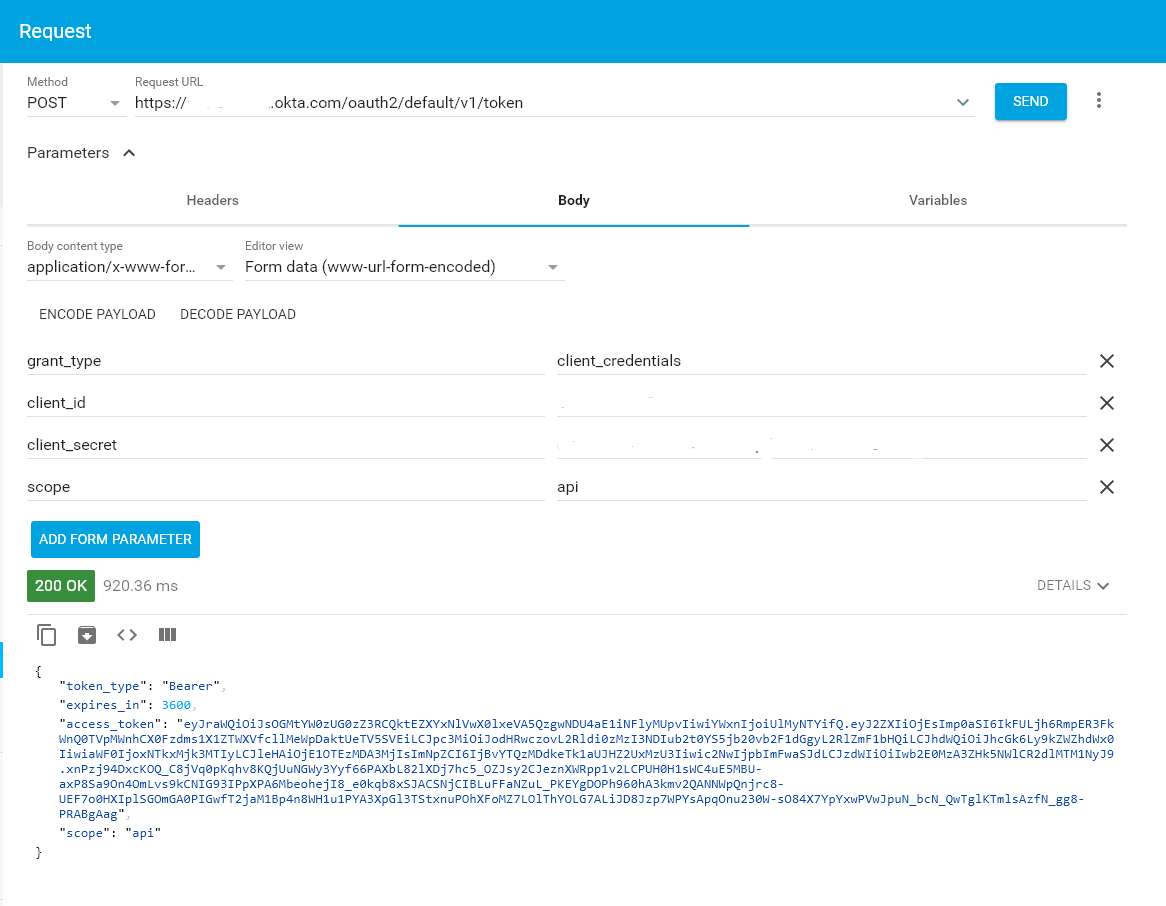
To correct this, make a call to your authentication server to receive a token. Note,, here the content-type must be application/x-www-form-urlencoded. In the image below I have removed my client_id, client_secret, and Okta domain. You will need to populate these with your own.
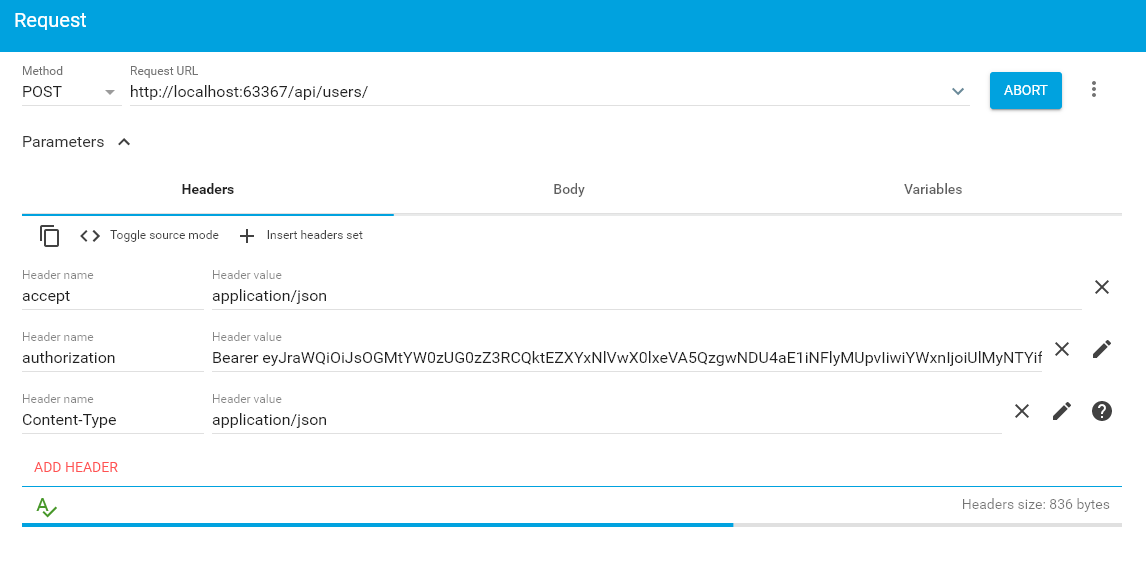
Now, you can add this token to the header of your Add User call. This should return the user entity to you successfully.
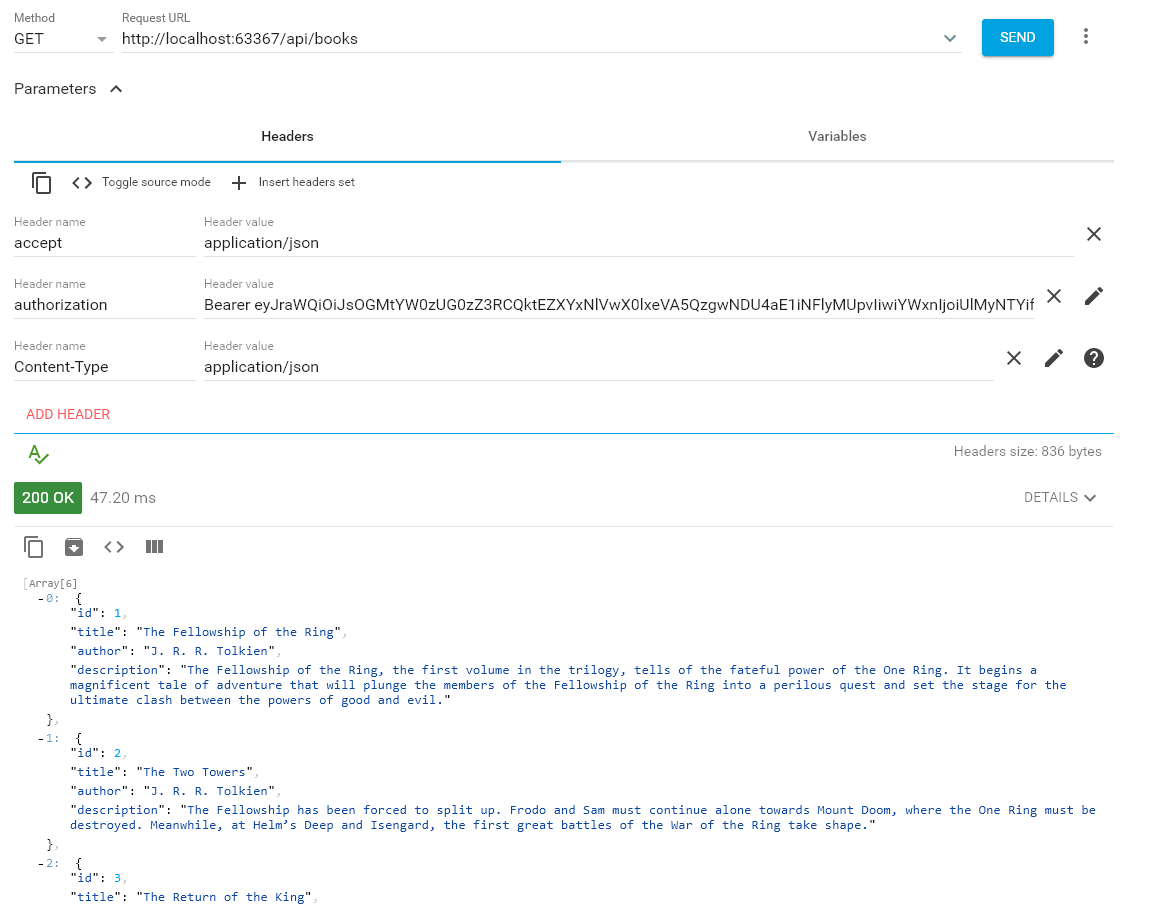
With a user added, get a list of the available books. Remember to include your JWT Bearer Token.
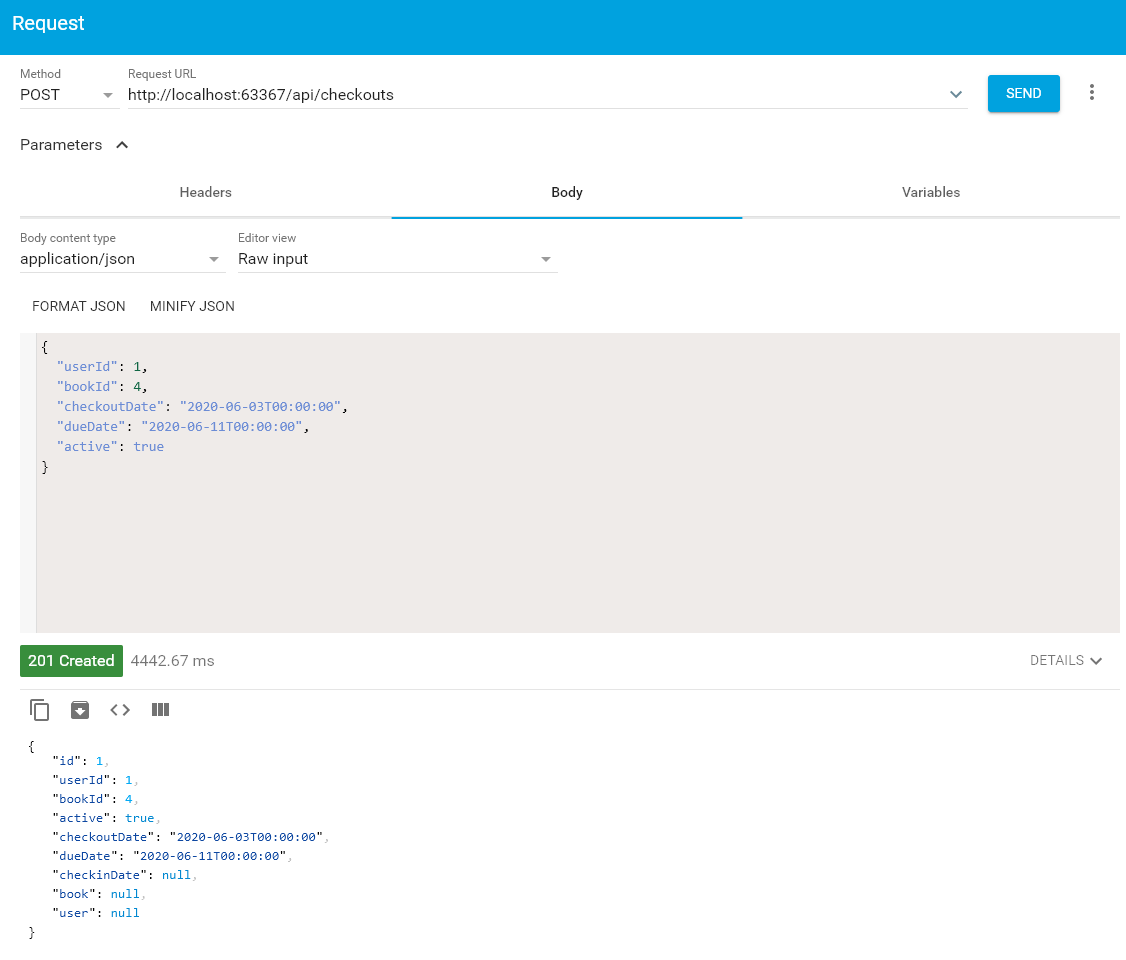
Finally, pick a book you like and send a call to CheckoutsController/Post to add the new Checkout.
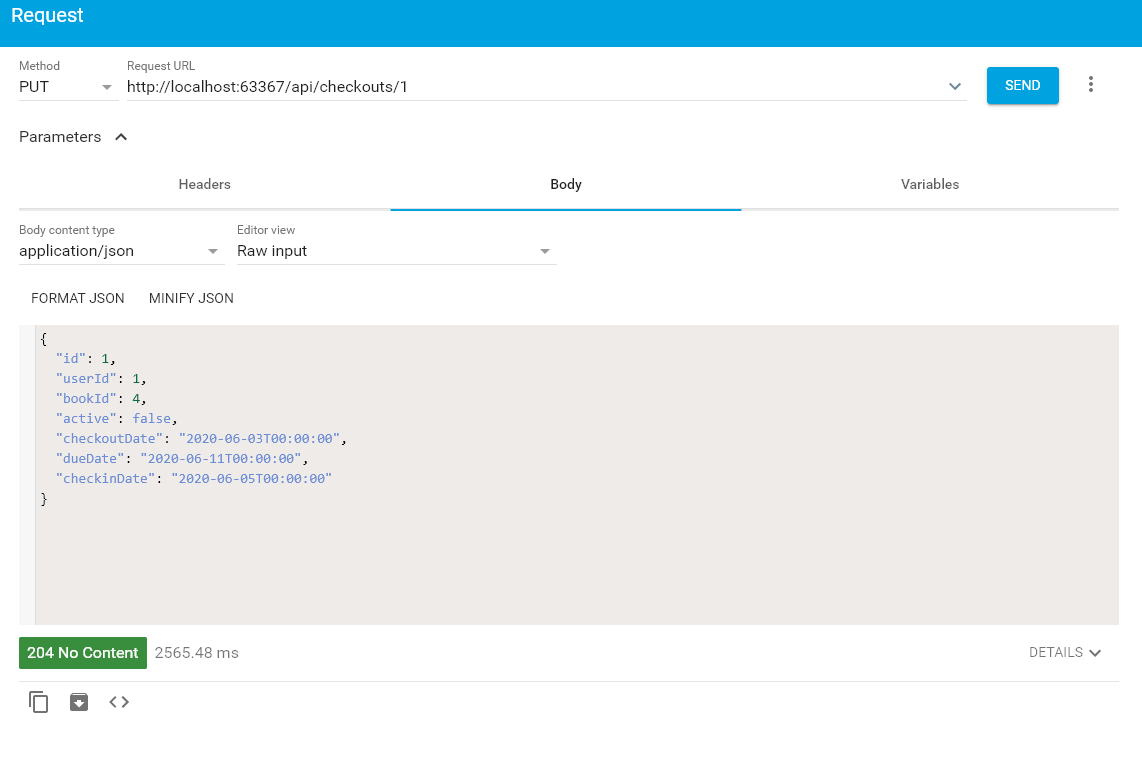
If you want to check the book back in, you can make a call to CheckoutsController/Put to do so.
Read More about Entity Framework Core and ASP.NET Core
ASP.NET Core and Entity Framework Core continue the solid foundation of web application infrastructure that made the legacy ASP.NET so popular. The ecosystem has pushed into modern times while maintaining familiarity for veteran ASP.NET developers. The toolsets and methodologies make it really easy to build a new ASP.NET Core application with EF Core, and using Okta to secure your web API is fast and developer friendly.
To learn more about EF Core and ASP.NET Core, check out some of our other fantastic content!
- Build a Basic CRUD App with ASP.NET Core 3.0 and MongoDB
- Deploy a .NET Container with AWS Fargate
- How to Make a CRUD App with Entity Framework Core
If you have any questions about the content in this post, feel free to leave a comment below. To see even more great content, follow us on Twitter and subscribe to our YouTube Channel!
Okta Developer Blog Comment Policy
We welcome relevant and respectful comments. Off-topic comments may be removed.