How to Make a CRUD App with Entity Framework Core

ASP.NET Core is Microsoft’s latest iteration of its web framework, which boasts many upgrades over the .Net Framework versions of ASP.NET. ASP.NET Core is cross-platform—meaning you can finally deploy your ASP.NET apps on Linux. It’s open-source which is a massive departure from Microsoft’s previous line of thinking. Most of the new framework should be familiar to veteran ASP.NET developers however there are some new tweaks to get used to.
One of the most popular tools on ASP.NET was the powerful ORM Entity Framework. With the release of ASP.NET Core, Entity Framework has released its next-gen version Entity Framework Core to work with .Net Core. EF Core supports LINQ, change tracking, and schema migrations. EF Core also works with many different databases, not just SQL Server. You can use it with SQLite, MySQL, PostgreSQL, and Azure Cosmos DB.
In this article, you will build a small app that allows users to vote on movies. To compile the list of movies the app will allow users to add, update, or delete movies from the database. You will use Visual Studio 2019, ASP.NET Core, Entity Framework Core, Microsoft SQL Server, and Okta for Authentication.
Note: In May 2025, the Okta Integrator Free Plan replaced Okta Developer Edition Accounts, and the Okta CLI was deprecated.
We preserved this post for reference, but the instructions no longer work exactly as written. Replace the Okta CLI commands by manually configuring Okta following the instructions in our Developer Documentation.
Scaffold Your ASP.NET Core and Entity Framework Core Application
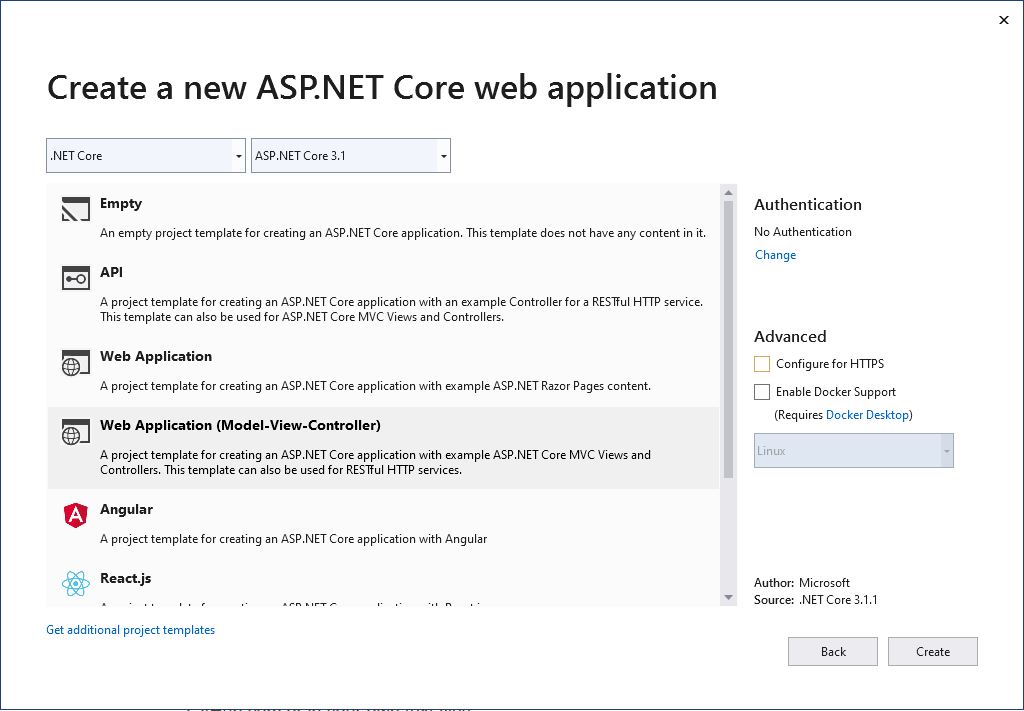
To start, open Visual Studio and click Create a new Project. From the next menu, search for ASP.NET Core Web Application and click Next. You can name your project whatever you want (I named mine V_Okta), then press Create. This will bring you to the next menu where you’ll select Web Application (Model-View-Controller). For this application, you are using the MVC Application type rather than the new Razor Pages Application. Uncheck Configure for HTTPS and leave Authentication as No Authentication since you will manually add it with Okta. Press Create and let Visual Studio scaffold your project.
The Visual Studio Web App template comes with Bootstrap and Jquery in the wwwroot folder and a default _Layout.cshtml page that makes use of both of these libraries. This is very helpful since bootstrap is one of the easiest CSS frameworks to use. The template also comes with Index.cshtml and Privacy.cshtml pages under the Home controller. You won’t use the Privacy page so you can delete it, or hold onto it for now.
Install the Entity Framework Core Nuget Packages
First, you’ll need to bring in any required Nuget packages for running the application. For this project, you only need to add the required EF Core libraries as well as the Okta Library.
Install-Package Microsoft.EntityFrameworkCore -Version 3.1.1
Install-Package Microsoft.EntityFrameworkCore.SqlServer -Version 3.1.1
Install-Package Microsoft.EntityFrameworkCore.Tools -Version 3.1.1
For EF Core, you’ll need the core EntityFrameworkCore package. You will also want the EntityFrameworkCore.SqlServer package as it contains some SqlServer functionality that may come in handy as your project grows. EntityFrameworkCore.Tools contains tools for building and deploying migrations to your database.
If you’ve never used migrations before,now is a good time to say a few words about them. EF Core supports two main paradigms for integrating a database into your web application: Code First and Database First. They are effectively what they sound like. In Code First, you will write the C# code that describes your database. You can decorate properties with attributes for expanded functionality—like keys—or you can use the Fluent API to define those relationships. In Database First, you write your database and then import the structure into your project. Each time you update your database, you need to update the model in your web app.
For this project, you will use Code First. Each time you update the model in your web app, you need to apply those changes to your database. To do so you will use Migrations. Migrations are simply a set of instructions for updating your database based on your code. Migrations can be applied and reverted, making database versioning simple. They can also contain logic for seeding data if necessary. At the end of the article, your project will only have one Migration, InitialMigration. However, if you choose to expand this app later and need to add more complex database logic, you will need to add more migrations and apply them to your database. You’ll see how to do that once you set up your model.
For consistency’s sake, you’ll want to make sure you specify the version across each of these tools. You will be using Version 3.1.1 for this application.
Next, you will need to install the tools needed to connect to Okta.
Install-Package Okta.AspNetCore -Version 3.1.1
The Okta.AspNetCore package makes connecting to Okta for authentication as easy as possible. You simply configure your application to use the authentication service and decorate protected routes with an Authorize attribute and Okta will take care of enforcing the authorization policy as well as logging the user in.
Set up an Okta Application
To authenticate the user, you will need to set up an Okta application in your developer’s console. If you haven’t signed up for an Okta Developer account you can do that here. Once you are signed up, you will receive a URL to navigate to for setting up the application. Click on Applications on the Okta Developer Console. Then click Add Application. On the next screen select Web and Next. Then you can set up your application. Give it a meaningful name and change the URIs to match your local URI. By default, Okta will assume your base URI is localhost:8080, however, IIS will automatically assign a port to your application. For example, my base URI in Visual Studio is localhost:54057. You can find this information by right-clicking on your project in Visual Studio and selecting properties. Under the Debug tab, you’ll see Web Server Settings and App URL.
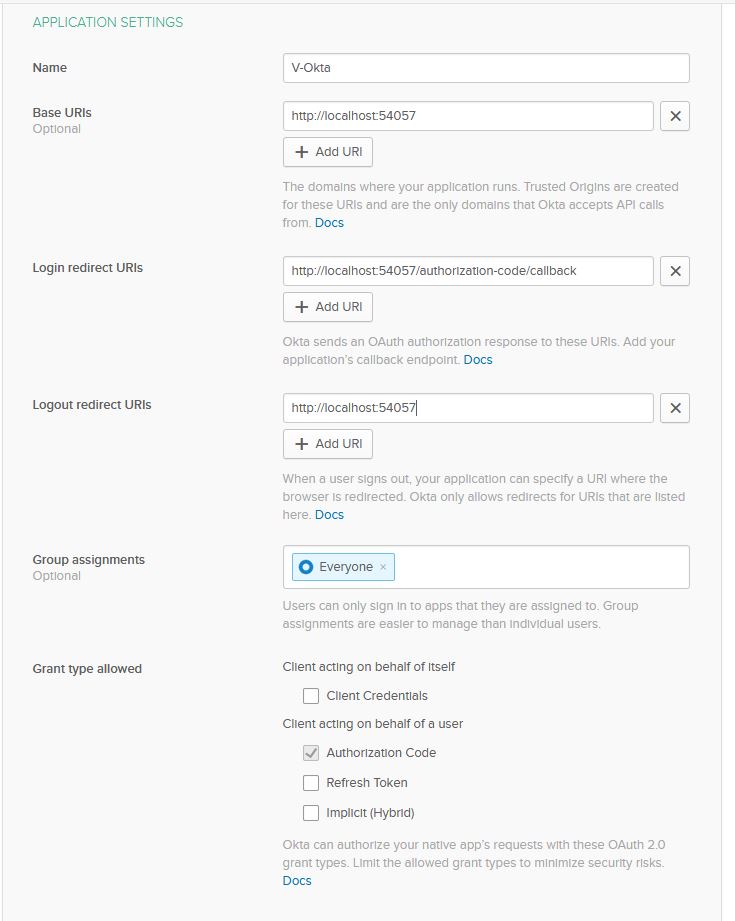
Once you are set up, press Done and Okta will set up your new application. At the bottom of General, you will find Client ID and Client secret. You will need both of these for your application so make note of them for use later.
Build your Entity Framework Core Application
With your application set up complete and ready for development, you can start to build your application. First, take a look at appsettings.json. In Visual Studio, you’ll notice that you can unfold this file and reveal a second file called appsettings.Development.json. If you return to the Properties -> Debug area in Visual Studio you’ll see a section called Environment Variables. Under this section, you should see a pair with the name ASPNETCORE_ENVIRONMENT and the value Development. This means that Visual Studio will try to use appsettings.Development.json when loading your settings. If you want a separate profile, say for your release, you can add a new file under appsettings.json called appsettings.Release.json and set ASPNETCORE_ENVIRONMENT to release to easily switch your app settings. For this article, you will only need development. If you are using Git for source control you can add the line appsettings.*.json to your .gitignore file to ensure you don’t push sensitive settings to your repository.
In your appsettings.Development.json file you will need to add settings for your application.
{
  "Logging": {
    "LogLevel": {
      "Default": "Information",
      "Microsoft": "Warning",
      "Microsoft.Hosting.Lifetime": "Information"
    }
  },
  "AllowedHosts": "*",
  "ConnectionStrings": {
    "VoktaDatabase": "{your connection string}"
  },
  "OktaSettings": {
    "OktaDomain": "{yourOktaDomain}",
    "ClientId": "{yourOktaClientID}",
    "ClientSecret": "{yourOktaClientSecret}"
  }
}
The two major things you will need for this application are AppSettings.VoktaDatabase and the OktaSettings section. Your OktaDomain can be found on your Okta development dashboard where you created the application. Your ClientId and ClientSecret were made note of earlier after creating your application. AppSettings.VoktaDatabase is just the connection string to your database. Since you are using code first, the database does not need to be created in advance but the server must be running. If you do not have a copy of SQL Server you can download one from Microsoft.
In this application, you are not using Logging in this project, but that section is boilerplate from Microsoft. The same is true for AllowedHosts which is used when setting up CORS.
Add Your Entity Framework Core Data Layer
You’ll next add your Data Layer, using EF Core. Start by adding a new folder to your project called Data. Within that folder, add another folder called Entities.
In Data.Entities you will add three classes; User.cs, Movie.cs, Vote.cs. The workflow here is that you will check the User table when a user logs in. If that user doesn’t exist you will add them to the table. Users can add a Movie to the Movie table. These two together will be referenced by the Vote table so you know who voted for what movie. The Vote table also stores a value for the vote value. The value can be -1, 0, 1.
Replace the content in User.cs with the following:
using System.Collections.Generic;
using System.ComponentModel.DataAnnotations;

namespace V_Okta.Data.Entities
{
    public class User
    {
        [Key]
        public int Id { get; set; }
        public string Username { get; set; }

        public List<Vote> Votes { get; set; }
    }
}
First is the User table. All entities will have a primary key named Id. The only other field on this table is the Username which will be the preferred_username that Okta provides. The Votes property is a navigation property that makes use of the foreign key on the Vote table.
Now, replace the contents of the Movie.cs file with:
using System.Collections.Generic;
using System.ComponentModel.DataAnnotations;

namespace V_Okta.Data.Entities
{
    public class Movie
    {
        [Key]
        public int Id { get; set; }
        public string Title { get; set; }
        public string Description { get; set; }
        public int CurrentVotes { get; set; }

        public List<Vote> Votes { get; set; }

    }
}
Next is the Movie table. Here, you are storing the Title of the movie and a Description along with the current number of votes. Again, the Votes property is simply a navigation property that uses the key on the Vote table.
Finally, you can implement the Vote table. Replace the contents of the Vote.cs file with:
using System.ComponentModel.DataAnnotations;

namespace V_Okta.Data.Entities
{
    public class Vote
    {
        [Key]
        public int Id { get; set; }
        public int UserId { get; set; }
        public int MovieId { get; set; }
        public int Value { get; set; }

        public Movie Movie { get; set; }
        public User User { get; set; }
    }
}
In this space, you are storing the UserId and MovieId to tell who voted for what movie along with the Value of that vote. If the user likes the movie Value will be 1. If they don’t it will be -1. 0 means the User neither likes or dislikes the movie. This occurs when the user previously voted the movie up or down then retracted the vote.
To tie it all together you need to add a database context. In your Data folder add a class called VoktaContext.cs.
using Microsoft.EntityFrameworkCore;
using V_Okta.Data.Entities;

namespace V_Okta.Data
{
    public class VoktaContext : DbContext
    {
        public DbSet<Movie> Movies { get; set; }
        public DbSet<Vote> Votes { get; set; }
        public DbSet<User> Users { get; set; }

        public VoktaContext(DbContextOptions options) : base(options)
        {
        }
    }
}
This very simple class defines your database structure. There will be three tables. Some tutorials online will have you put the connection string in the OnConfiguring method of the DbContext base class. However, this will make switching between your appsettings configurations a bit more difficult. For this example, you will be using the constructor to inject the DbContextOptions into the VoktaContext. You will set that up in your Startup.cs file.
Configure the Startup File
Since you will need to have Startup.cs ready to go before you can deploy migrations to your database, now is a good time to set that up. In your Startup.cs file, you will edit it from the boilerplate code to handle the database setup as well as the Okta Authentication.
Before we dig in, add a folder to your project called Settings. In this folder add a class called OktaSettings.cs. You will use this class in your Startup class.
namespace V_Okta.Settings
{
    public class OktaSettings
    {
        public string OktaDomain { get; set; }
        public string ClientId { get; set; }
        public string ClientSecret { get; set; }
    }
}
Next, you can edit your Startup.cs with the following code.
using System;
using System.Collections.Generic;
using System.Linq;
using System.Threading.Tasks;
using Microsoft.AspNetCore.Builder;
using Microsoft.AspNetCore.Hosting;
using Microsoft.Extensions.Configuration;
using Microsoft.Extensions.DependencyInjection;
using Microsoft.Extensions.Hosting;
using Microsoft.EntityFrameworkCore;
using Microsoft.AspNetCore.Authentication.Cookies;
using Okta.AspNetCore;


namespace V_Okta
{
    public class Startup
    {
        public Startup(IConfiguration configuration)
        {
            Configuration = configuration;
        }

        public IConfiguration Configuration { get; }

        // This method gets called by the runtime. Use this method to add services to the container.
        public void ConfigureServices(IServiceCollection services)
        {
            services.AddControllersWithViews();

            var oktaSettings = Configuration.GetSection("OktaSettings").Get<Settings.OktaSettings>();

            services.AddAuthentication(options =>
            {
                options.DefaultAuthenticateScheme = CookieAuthenticationDefaults.AuthenticationScheme;
                options.DefaultSignInScheme = CookieAuthenticationDefaults.AuthenticationScheme;
                options.DefaultChallengeScheme = OktaDefaults.MvcAuthenticationScheme;
            })
            .AddCookie()
            .AddOktaMvc(new OktaMvcOptions
            {
                OktaDomain = oktaSettings.OktaDomain,
                ClientId = oktaSettings.ClientId,
                ClientSecret = oktaSettings.ClientSecret,
                OnUserInformationReceived = context =>
               {
                   string username = context.User.RootElement.GetString("preferred_username");
                   if (!String.IsNullOrEmpty(username))
                   {
                       var dbContext = context.HttpContext.RequestServices.GetService<Data.VoktaContext>();
                       var user = dbContext.Users.Where(r => r.Username.Equals(username)).FirstOrDefault();

                       if (user == null)
                       {
                           dbContext.Users.Add(new Data.Entities.User()
                           {
                               Username = username
                           });

                           dbContext.SaveChanges();
                       }
                   }

                   return Task.CompletedTask;
               }
            });

            services.AddDbContext<Data.VoktaContext>(options =>
                 options.UseSqlServer(Configuration.GetConnectionString("VoktaDatabase")));

            services.AddMvc();
        }

        // This method gets called by the runtime. Use this method to configure the HTTP request pipeline.
        public void Configure(IApplicationBuilder app, IWebHostEnvironment env)
        {
            if (env.IsDevelopment())
            {
                app.UseDeveloperExceptionPage();
            }
            else
            {
                app.UseExceptionHandler("/Home/Error");
                // The default HSTS value is 30 days. You may want to change this for production scenarios, see https://aka.ms/aspnetcore-hsts.
                app.UseHsts();
            }
            app.UseHttpsRedirection();
            app.UseStaticFiles();

            app.UseRouting();

            app.UseAuthentication();
            app.UseAuthorization();

            app.UseEndpoints(endpoints =>
            {
                endpoints.MapControllerRoute(
                    name: "default",
                    pattern: "{controller=Home}/{action=Index}/{id?}");
            });
        }
    }
}
The first thing to do is get the Okta Settings from your appsettings file and deserialize it into the OktaSettings class you created earlier. Then you can configure your services to use Authentication by making use of the Okta ASP.Net Core library you imported earlier. One catch here is the usage of OnUserInformationReceived, which is called when the user first logs on and Okta returns the details requested about the user. When this happens, the application will check the database to see if you have captured this user before. If the user doesn’t exist, the application will add the user.
The second thing this code does is set up your VoktaContext. It does this by getting the connection string from the configuration and passing the connection string to the DbContextOptionsBuilder that is injected into the VoktaContext.
Add an Entity Framework Core Migration and Update the Database
Now that your database is set up, it’s time to deploy it. Once again, you will need to make sure your server is accessible—however, EF Core will create the database for you as long as your user has permissions to do so. The command to do this is very simple:
Add-Migration InitialMigration
Update-Database
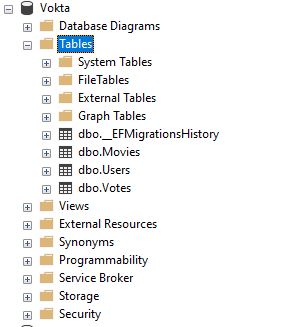
Add-Migration will create a class called InitialMigration that you can review in your Migrations folder. EF Core will have created the Migrations folder for you. You don’t need to do anything with this file, but sometimes it can be helpful to review.
Update-Database will apply that Migration to the database you have selected in your appsettings file. To verify this, you can open the database in Sql Server Management Studio and see the results.
Add Models and Controllers
Because you selected the MVC web app, Visual Studio will automatically add three folders: Models, Views, and Controllers. You will see there are already some classes prepopulated. In Models there is the ErrorViewmodel.cs which you will not be using at this point.
First, add Movie.cs to your Models folder. This class will be referenced in your other models so it makes sense to add it first.
using System.Linq;

namespace V_Okta.Models
{
    public class Movie
    {
        public int Id { get; set; }
        public string Title { get; set; }
        public string Description { get; set; }
        public int CurrentVotes { get; set; }

        public int UserVote { get; set; }

        public Movie(Data.Entities.Movie movie, int userId)
        {
            Id = movie.Id;
            Title = movie.Title;
            Description = movie.Description;
            CurrentVotes = movie.CurrentVotes;

            if (movie.Votes == null)
                return;

            var userVote = movie.Votes.Where(r => r.UserId.Equals(userId)).FirstOrDefault();

            if (userVote != null)
            {
                UserVote = userVote.Value;
            }
        }

        public Movie()
        {

        }
    }
}
This class looks very similar to the Movie entity. And it is. You may ask why not use the Movie entity instead of creating a new model. There are a few reasons. One of the biggest is the concept of circular references when serializing your models to JSON. Because the navigation properties in your entities reference each other, your JSON serializer will attempt to serialize forever since Vote is a property of Movie, which is a property of Vote. Of course, there are ways to handle this in JSON serializers, but you will then encounter more problems that could take an entire article to go over. In general, it’s best practice to separate your models from your data layer altogether.
To populate the information, you are injecting the entity into the Movie model. There are other ways of handling this like Automapper, but for the sake of simplicity populating the model here should be fine.
Other than populating the base Movie details, you are also checking the movie’s Votes to see if the user has voted on the movie. If they have, you assign the value of the vote to the UserVote property—otherwise you leave it as zero. The purpose of this will be clear later.
Next you can add the VoteMovieResponse.cs. This model is the response returned when the user votes on the movie. It carries some information that tells the View how to represent what happened on the server.
namespace V_Okta.Models
{
    public class VoteMovieResponse
    {
        public bool Success { get; set; }
        public int CurrentVotes { get; set; }
        public int UserVote { get; set; }
    }
}
Add a file for MoviesHomeModel.cs. This class will provide a model for the main movie display where the user can vote.
using System.Collections.Generic;

namespace V_Okta.Models
{
    public class MoviesHomeModel
    {
        public List<Movie> Movies { get; set; }

        public MoviesHomeModel(List<Data.Entities.Movie> movies, int userId)
        {
            Movies = new List<Movie>();

            foreach(var movie in movies)
            {
                Movies.Add(new Movie(movie, userId));
            }
        }
    }
}
This class will contain a list of movies using your new Movie model.
Finally, you can add the ManageMovieModel.cs. This model facilitates adding, updating, or deleting the movie from the Manage page.
namespace V_Okta.Models
{
    public class ManageMovieModel
    {
        public int RequestedId { get; set; }
        public bool NewMovie { get; set; }
        public bool MovieFound { get { return Movie != null || NewMovie; } }
        public Movie Movie { get; set; }
    }
}
Right-click on the Controllers folder and hover over Add and then Controller. By adding your controller this way, Visual Studio does a lot of the scaffolding for you. Next, select MVC Controller - Empty and name it Movies. Visual Studio will automatically suffix it with Controller meaning your new class is called MoviesController.cs.
using System;
using System.Linq;
using Microsoft.AspNetCore.Mvc;
using Microsoft.AspNetCore.Authorization;
using System.Security.Claims;
using Microsoft.EntityFrameworkCore;

namespace V_Okta.Controllers
{
    [Authorize]
    public class MoviesController : Controller
    {
        Data.VoktaContext _context;

        public MoviesController(Data.VoktaContext context)
        {
            _context = context;
        }

        public IActionResult Index()
        {
            var model = new Models.MoviesHomeModel(_context.Movies.Include("Votes").ToList(), getUserId());
            return View(model);
        }

        [Route("/Movies/Manage/{id?}")]
        public IActionResult Manage(int id = 0)
        {
            var model = new Models.ManageMovieModel();
            model.RequestedId = id;

            if (id.Equals(0))
                model.NewMovie = true;

            else
            {
                var movie = _context.Movies.Where(r => r.Id.Equals(id)).FirstOrDefault();

                if (movie != null)
                {
                    model.Movie = new Models.Movie(movie, getUserId());
                }
            }

            return View(model);
        }

        [HttpPost]
        public IActionResult SaveMovie(Models.Movie movie)
        {
            if (movie.Id > 0)
            {
                var data = _context.Movies.Where(r => r.Id.Equals(movie.Id)).FirstOrDefault();

                if (data == null)
                {
                    throw new Exception("movie not found");
                }

                data.Description = movie.Description;
            }
            else
            {
                _context.Movies.Add(new Data.Entities.Movie()
                {
                    Description = movie.Description,
                    Title = movie.Title
                });
            }

            _context.SaveChanges();

            return RedirectToAction("Index", "Movies", null);
        }

        [HttpPost]
        public IActionResult RemoveMovie(int id)
        {
            try
            {
                var movie = _context.Movies.Where(r => r.Id.Equals(id)).FirstOrDefault();

                if (movie == null)
                    throw new Exception("no movie found");

                _context.Movies.Remove(movie);
                _context.SaveChanges();

                return new JsonResult(true);
            }
            catch (Exception e)
            {
                return new JsonResult(false);
            }
        }

        [HttpPost]
        public IActionResult UpvoteMovie(int id)
        {
            try
            {
                var movie = _context.Movies.Where(r => r.Id.Equals(id)).FirstOrDefault();

                if (movie == null)
                    throw new Exception("no movie found");

                var vote = _context.Votes.Where(r => r.UserId.Equals(getUserId()) && r.MovieId.Equals(id)).FirstOrDefault();

                if (vote == null)
                {
                    _context.Votes.Add(new Data.Entities.Vote()
                    {
                        MovieId = id,
                        UserId = getUserId(),
                        Value = 1
                    });

                    movie.CurrentVotes += 1;
                }
                else
                {
                    movie.CurrentVotes -= vote.Value;

                    if (vote.Value == 1)
                    {
                        vote.Value = 0;
                    }
                    else
                    {
                        vote.Value = 1;
                        movie.CurrentVotes += 1;
                    }
                }

                _context.SaveChanges();

                return new JsonResult(new Models.VoteMovieResponse()
                {
                    CurrentVotes = movie.CurrentVotes,
                    UserVote = vote.Value,
                    Success = true
                });
            }
            catch (Exception e)
            {
                return new JsonResult(new Models.VoteMovieResponse()
                {
                    Success = false
                });
            }
        }

        [HttpPost]
        public IActionResult DownvoteMovie(int id)
        {
            try
            {
                var movie = _context.Movies.Where(r => r.Id.Equals(id)).FirstOrDefault();

                if (movie == null)
                    throw new Exception("no movie found");

                var vote = _context.Votes.Where(r => r.UserId.Equals(getUserId()) && r.MovieId.Equals(id)).FirstOrDefault();

                if (vote == null)
                {
                    _context.Votes.Add(new Data.Entities.Vote()
                    {
                        MovieId = id,
                        UserId = getUserId(),
                        Value = -11
                    });

                    movie.CurrentVotes -= 1;
                }
                else
                {
                    movie.CurrentVotes -= vote.Value;

                    if (vote.Value == -1)
                    {
                        vote.Value = 0;
                    }
                    else
                    {
                        vote.Value = -1;
                        movie.CurrentVotes -= 1;
                    }
                }

                _context.SaveChanges();

                return new JsonResult(new Models.VoteMovieResponse()
                {
                    CurrentVotes = movie.CurrentVotes,
                    UserVote = vote.Value,
                    Success = true
                });
            }
            catch (Exception e)
            {
                return new JsonResult(new Models.VoteMovieResponse()
                {
                    Success = false
                });
            }
        }

        protected int getUserId()
        {
            var username = (User.Identity as ClaimsIdentity).Claims.Where(r => r.Type.Equals("preferred_username")).First().Value;
            return _context.Users.Where(r => r.Username.Equals(username)).First().Id;
        }
    }
}
A lot is going on in this class, but it’s not as intimidating as it looks. Starting from the top, you’ll see you have decorated the class declaration with the Authorize attribute. This will put the entire controller under authorization, meaning every action here will be authorized and authenticated unless the AllowAnonymous attribute is used on a specific action.
Next, you are injecting the Data.VoktaContext into the controller as assigning it to the private variable _context which will be used throughout your controller.
Two actions here return Views: Index and Manage. Index will return the view for voting on the movies. Here, you have populated a new MoviesHomeModel with the movies from your database and bound the model to your Index view. You will want to right-click on View and select Add View.

For Manage, you are performing logic to populate a property about if the movie is new or existing. If the movie doesn’t exist, you want to inform the user that they attempted to reach a movie that doesn’t exist. If the user was attempting to add a new movie, you want to present the user with a movie creation form. You will notice the usage of the Route attribute. All the attribute does is ensure the URL used is in the form “Movies/Manage/{id?}” rather than “Movies/Manage?id=*”.
Finally, you have four separate post actions—each decorated with HttpPost. These are: SaveMovie, RemoveMovie, UpvoteMovie, and DownvoteMovie.
UpvoteMovie and DownvoteMovie work very similarly. The client posts the movie to the action and the server looks for the vote for the movie and the user. If it doesn’t find one it will add one. If it does, it checks to see what the vote is, then changes it. If the movie has a vote already, then you remove the vote by setting its value to 0. If the vote exists in the database but its value is 0, then you set the value to 1(or -1 in the case of a downvote).
SaveMovie acts as a “create” or “update” method. If the movie exists in the database, you treat it as an update. However, only the description can be edited. If the movie doesn’t exist, then you will create it in the database and save it.The RemoveMovie action removes the movie from the database.
For the HomeController, you will edit the Index view for branding and workflow purposes but there is no need to change the controller from the default MVC template.
Set Up the Views
Your last task is to set up the Views. ASP.NET Core comes with a _Layout file ready to go. It does a pretty good job for your purposes in this application but you will want to change your headers and links on the page.
<!DOCTYPE html>
<html lang="en">
<head>
<meta charset="utf-8" />
<meta name="viewport" content="width=device-width, initial-scale=1.0" />
<title>@ViewData["Title"] - V_Okta</title>
<link rel="stylesheet" href="~/lib/bootstrap/dist/css/bootstrap.min.css" />
<link rel="stylesheet" href="~/css/site.css" />
<link rel="stylesheet" href=" https://stackpath.bootstrapcdn.com/font-awesome/4.7.0/css/font-awesome.min.css" />
</head>
<body>
<header>
<nav class="navbar navbar-expand-sm navbar-toggleable-sm navbar-light bg-white border-bottom box-shadow mb-3">
<div class="container">
<a class="navbar-brand" asp-area="" asp-controller="Home" asp-action="Index">V_Okta</a>
<button class="navbar-toggler" type="button" data-toggle="collapse" data-target=".navbar-collapse" aria-controls="navbarSupportedContent"
aria-expanded="false" aria-label="Toggle navigation">
<span class="navbar-toggler-icon"></span>
</button>
<div class="navbar-collapse collapse d-sm-inline-flex flex-sm-row-reverse">
<ul class="navbar-nav flex-grow-1">
<li class="nav-item">
<a class="nav-link text-dark" asp-area="" asp-controller="Movies" asp-action="Index">Movies</a>
</li>
<li class="nav-item">
<a class="nav-link text-dark" href="~/Movies/Manage">Add A Movie</a>
</li>
</ul>
</div>
</div>
</nav>
</header>
<div class="container">
<main role="main" class="pb-3">
@RenderBody()
</main>
</div>
<footer class="border-top footer text-muted">
<div class="container">
© 2020 - V_Okta - <a asp-area="" asp-controller="Home" asp-action="Privacy">Privacy</a>
</div>
</footer>
<script src="~/lib/jquery/dist/jquery.min.js"></script>
<script src="~/lib/bootstrap/dist/js/bootstrap.bundle.min.js"></script>
<script src="~/js/site.js" asp-append-version="true"></script>
@RenderSection("Scripts", required: false)
</body>
</html>
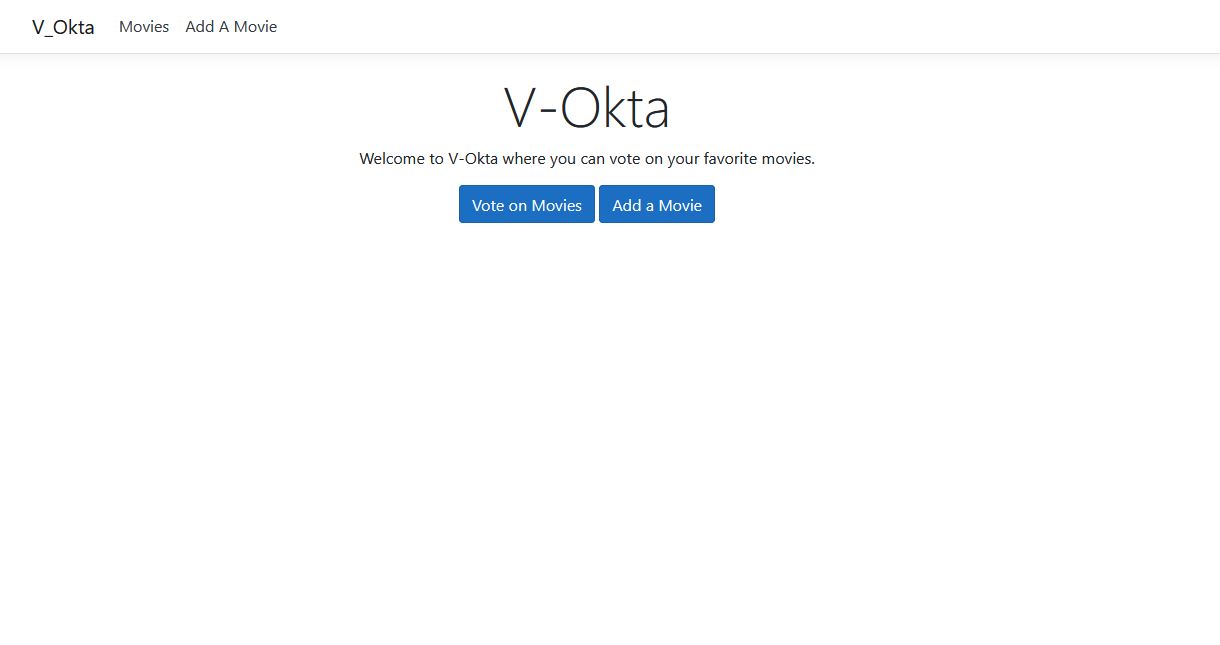
You will also want to change the Home/Index.cshtml page to reflect your application better.
@{
    ViewData["Title"] = "Home Page";
}

<div class="text-center">
    <h1 class="display-4">V-Okta</h1>
    <p>Welcome to V-Okta where you can vote on your favorite movies.</p>
</div>

<div class="text-center">
    <a href="~/Movies/Index" class="btn btn-primary">Vote on Movies</a>
    <a href="~/Movies/Manage" class="btn btn-primary">Add a Movie</a>
</div>
As you can see, this provides a couple of links for the functionality of your site. Since the MoviesController is under authorization from your controller setup, both of these links will require the user to log in first using Okta.
Next, you can set up the Movies/Index.cshtml page. This page will handle displaying the list of movies, allowing for voting, and providing a link for the user to edit the movie.
@{
    ViewData["Title"] = "Index";
}

@model V_Okta.Models.MoviesHomeModel

<div class="row">
<div class="col-lg-12">

    <table class="table table-striped">
        <thead>
            <tr>
                <th>Vote</th>
                <th>Movie</th>
                <th>Description</th>
                <th>Current Votes</th>
                <th>Edit Movie</th>

            </tr>
        </thead>
        <tbody>
            @foreach (var movie in Model.Movies.OrderByDescending(r => r.CurrentVotes))
            {
                <tr>
                    <td>
                        @if (movie.UserVote == 1)
                        {
                            <i id="@movie.Id-upvote" class="fa fa-chevron-up text-success" onclick="upvoteMovie(@movie.Id)"></i>
                        }
                        else
                        {
                            <i id="@movie.Id-upvote" class="fa fa-chevron-up" onclick="upvoteMovie(@movie.Id)"></i>
                        }

                        @if (movie.UserVote == -1)
                        {
                            <i id="@movie.Id-downvote" class="fa fa-chevron-down text-danger" onclick="downvoteMovie(@movie.Id)"></i> }
                        else
                        {
                            <i id="@movie.Id-downvote" class="fa fa-chevron-down" onclick="downvoteMovie(@movie.Id)"></i>
                        }

                    </td>
                    <td>@movie.Title</td>
                    <td>@movie.Description</td>
                    <td id="@movie.Id-CurrentVotes">@movie.CurrentVotes</td>
                    <td>
                        <a href="~/Movies/Manage/@movie.Id" class="btn btn-sm btn-primary">Edit</a>
                    </td>

                </tr>
            }
        </tbody>
    </table>
</div>
</div>

<script>

function upvoteMovie(id) {
    var xhr = $.post("/Movies/UpvoteMovie", { id: id })
        .done(function (data) {
            console.log(data);

            if (data.success) {
                $('#' + id + '-CurrentVotes').text(data.currentVotes);

                if (data.userVote == 0) {
                    $('#' + id + '-upvote').removeClass('text-success');
                    $('#' + id + '-downvote').removeClass('text-danger');
                }
                else {
                    $('#' + id + '-upvote').addClass('text-success');
                    $('#' + id + '-downvote').removeClass('text-danger');
                }
            }
        });
}


function downvoteMovie(id) {
    var xhr = $.post("/Movies/DownvoteMovie", { id: id })
        .done(function (data) {
            if (data.success) {
                $('#' + id + '-CurrentVotes').text(data.currentVotes);

                if (data.userVote == 0) {
                    $('#' + id + '-downvote').removeClass('text-danger');
                    $('#' + id + '-upvote').removeClass('text-success');
                }
                else {
                    $('#' + id + '-downvote').addClass('text-danger');
                    $('#' + id + '-upvote').removeClass('text-success');
                }
            }
        });
}
</script>
Here, you are presenting the movies in a table. If the user has voted on the movie, you will display the filled caret to represent the value of the vote. Otherwise, display the hollow caret. The carets are also bound to two javascript functions upvoteMovie and downvoteMovie, which post to the corresponding method on the server then handle the response. As long as the call succeeds you will set the appropriate image for the button and update the CurrentVotes to reflect the new vote count. Finally, you also provided a link to the Movies/Manage page for each movie so that the user can edit them. Copy the code below and replace the content of the file.
@{
    ViewData["Title"] = "Manage";
}

@model V_Okta.Models.ManageMovieModel

<div class="row">
    <div class="col-lg-12">

        @if (!Model.MovieFound)
        {
            <div class="alert alert-danger">
                We're sorry but that movie wasn't found.  If you would like to add a movie <a href="~/Movies/Manage">Click here.</a>  Otherwise return to the <a href="~/Movies/Index">Movies List.</a>
            </div>
        }
        else
        {
            using (Html.BeginForm("SaveMovie", "Movies", FormMethod.Post))
            {
                <div class="card">
                    <div class="card-header">

                        @Html.HiddenFor(r => r.Movie.Id)
                        @if (!Model.NewMovie)
                        {
                            <h4> @Model.Movie.Title </h4>
                        }
                        else
                        {
                            @Html.TextBoxFor(r => r.Movie.Title, null, new { @class = "form-control", @placeholder = "Enter a Title" })
                        }
                    </div>
                    <div class="card-body">
                        @Html.TextAreaFor(r => r.Movie.Description, 10, 1, new { @class = "form-control", @placeholder = "Enter a Description" })
                    </div>
                    <div class="card-footer">
                        <input type="submit" value="Save" class="btn btn-primary" />
                    </div>
                </div>
            }
        }
    </div>
</div>
The first thing this view does is check if the movie was found. If the user requested a movie that wasn’t found, you display a message offering the user a chance to create a movie or return to the Movies/Index page.
Otherwise, the user will be presented with a form that allows them to update or create a movie. If the user is in update mode then the title isn’t editable, but the description is. After saving the movie, the user will be redirected to the Movies/Index page.
You can check out the completed code on GitHub.
Run Your Entity Framework Core Application
With all your code set up, it’s time to see the final product. Press F5 to start running your application. You should be presented with the home page.
Learn More About ASP.NET Core and Entity Framework Core
- Build a CRUD App with ASP.NET Core 2.2 and Entity Framework Core
- ASP.NET Core 3.0 MVC Secure Authentication
- Okta ASP.NET Core 3.0 OIDC Example
Make sure to follow us on Twitter and subscribe to our YouTube Channel so that you never miss any awesome content!
Okta Developer Blog Comment Policy
We welcome relevant and respectful comments. Off-topic comments may be removed.