Build a Spring Boot Application Using Java Modules

Java is one of the most mature and persistent development languages that exists. Recently, it shifted to a 6-month release schedule, enabling it to deliver more frequent updates to the language. One of the changes introduced in Java 9 was the modular system.
The Java Platform Module System (JPMS) adds two fundamental capabilities when building Java apps:
- Reliable configuration - replacing the brittle, error-prone class-path mechanism with a means for program components to declare explicit dependencies upon one another.
- Strong encapsulation - allowing a component to declare which of its public types are accessible to other components and which are not.
Packages may be grouped into modules that serve as building blocks in the construction of very large programs. The declaration of a module specifies which other modules (packages, classes, and interfaces) are required to compile and run code.
While we have the visibility modifiers—public, private, protected, and default—they are not enough to provide external visibility. A common example used to illustrate the problem is a “Util” class, this class may be used throughout a library from various packages within a JAR file but is NOT meant to be used outside of the library. JPMS can help with this type of situation.
Table of Contents
- Introduction
- Install a Java 9+ JDK
- Project Structure
- Build an Application Without Java Modules
- Secure Your Web Application
- Using Java Modules
- Running the Application
- Learning More About Java Modular System
Note: In May 2025, the Okta Integrator Free Plan replaced Okta Developer Edition Accounts, and the Okta CLI was deprecated.
We preserved this post for reference, but the instructions no longer work exactly as written. Replace the Okta CLI commands by manually configuring Okta following the instructions in our Developer Documentation.
Introduction
When Java 9 was created, the JDK went under a major refactoring to modularize its content. It created various modules to organize the contents. Some examples include: java.base, java.sql, and java.xml(along with many others). To date, there are a total of 60 modules in Java 14 JDK.
java.base has fundamental classes like Object, String, Integer, Double, etc. While java.sql has classes related to accessing the JDBC API like ResultSet, Connection and others. Additionally, java.xml has classes related to XML manipulation like XMLStreamReader, XMLStreamWriter and similar classes in that vein.
The modularization enabled the possibility of reducing the Java runtime to include just the java.base if your application only depends on this module. By using the jlink tool that is bundled with the JDK, you can create a micro runtime with only the JDK modules you need. This post won’t cover how to use jlink—as it is not the focus—but you can see an example on this Baeldung article.
For the rest of this article, you should have at least some basic understanding of Spring Boot, Maven, and REST web services principles as well as Docker installed on your machine.
Install a Java 9+ JDK
First, you’ll need a Java 9+ JDK in order to use modules. If you have been using Java 8, you’ll likely have to download a separate JDK with a version of 9 or later to be used for this tutorial. This project is set up to use JDK 11 in this tutorial. You can download the JDKs from AdoptOpenJDK. Just make sure your JAVA_HOME environment variable is pointing to that JDK.
Project Structure
In this article, we’ll be covering how to develop a simple application with two modules: the application module (that contains the web-facing classes) and the persistence module (that contains the data access layer). We’ll also be using a couple of dependencies (spring-boot-starter-data-mongodb and okta-spring-boot-starter) to illustrate how they are configured when building a modular application.
The project source code can be found at GitHub
How to Structure a Modular Project with Maven
We’re going to create this project folder structure manually to better understand it. Each module will live inside a separate directory and have its own pom.xml file. There will also be a pom.xml on the project root that will serve as the parent pom for the modules. Create the following folder structure:
.
├── application
│   ├── pom.xml
│   └── src
│       └── main
│           ├── java
│           └── resources
├── persistence
│   └── src
│       └── main
│           └── java
└── pom.xml
First, let’s define the root pom.xml. It contains the common <parent> indication to spring-boot-started-parent and two entries in the <module> section. These entries are the names of the directories for the modules we are developing. Please note that they are specific to Maven and denote sub-projects, having nothing to do with the Java modules that we’ll be working on later.
<?xml version="1.0" encoding="UTF-8"?>
<project xmlns="http://maven.apache.org/POM/4.0.0" xmlns:xsi="http://www.w3.org/2001/XMLSchema-instance"
         xsi:schemaLocation="http://maven.apache.org/POM/4.0.0 https://maven.apache.org/xsd/maven-4.0.0.xsd">
    <modelVersion>4.0.0</modelVersion>
    <parent>
        <groupId>org.springframework.boot</groupId>
        <artifactId>spring-boot-starter-parent</artifactId>
        <version>2.3.1.RELEASE</version>
        <relativePath/> <!-- lookup parent from repository -->
    </parent>
    <groupId>com.okta.developer</groupId>
    <artifactId>spring-boot-with-modules</artifactId>
    <version>0.0.1-SNAPSHOT</version>
    <packaging>pom</packaging>

    <properties>
    	<java.version>11</java.version>
    </properties>

    <modules>
        <module>application</module>
        <module>persistence</module>
    </modules>
</project>
The persistence module will have a pom.xml like the one below and point to the parent pom.xml that we defined earlier. This will have a dependency on spring-data-mongo since we’ll be saving our data to a Mongo DB.
<?xml version="1.0" encoding="UTF-8"?>
<project xmlns="http://maven.apache.org/POM/4.0.0" xmlns:xsi="http://www.w3.org/2001/XMLSchema-instance"
         xsi:schemaLocation="http://maven.apache.org/POM/4.0.0 https://maven.apache.org/xsd/maven-4.0.0.xsd">
    <modelVersion>4.0.0</modelVersion>
    <parent>
        <groupId>com.okta.developer</groupId>
        <artifactId>spring-boot-with-modules</artifactId>
        <version>0.0.1-SNAPSHOT</version>
    </parent>
    <artifactId>spring-boot-with-modules-persistence</artifactId>

    <dependencies>
        <dependency>
            <groupId>org.springframework.boot</groupId>
            <artifactId>spring-boot-starter-data-mongodb</artifactId>
        </dependency>
    </dependencies>
</project>
Finally, the application module will have a pom.xml (below), pointing to the parent pom.xml (above). It will also have a dependency on spring-boot-starter-web— as we’ll be creating REST endpoints on it—and a dependency on our persistence module:
<?xml version="1.0" encoding="UTF-8"?>
<project xmlns="http://maven.apache.org/POM/4.0.0" xmlns:xsi="http://www.w3.org/2001/XMLSchema-instance"
         xsi:schemaLocation="http://maven.apache.org/POM/4.0.0 https://maven.apache.org/xsd/maven-4.0.0.xsd">
    <modelVersion>4.0.0</modelVersion>
    <parent>
        <groupId>com.okta.developer</groupId>
        <artifactId>spring-boot-with-modules</artifactId>
        <version>0.0.1-SNAPSHOT</version>
    </parent>
    <artifactId>spring-boot-with-modules-app</artifactId>

    <dependencies>
        <dependency>
            <groupId>org.springframework.boot</groupId>
            <artifactId>spring-boot-starter-web</artifactId>
        </dependency>
        <dependency>
            <groupId>com.okta.developer</groupId>
            <artifactId>spring-boot-with-modules-persistence</artifactId>
            <version>${project.version}</version>
        </dependency>
    </dependencies>

    <build>
        <plugins>
            <plugin>
                <groupId>org.springframework.boot</groupId>
                <artifactId>spring-boot-maven-plugin</artifactId>
            </plugin>
        </plugins>
    </build>

</project>
To compile the project, run mvn compile from the project root.
NOTE: Don’t confuse Maven modules with Java Modules.
-
Maven modules are used to separate a project into multiple sub-projects. The main project will have a
pom.xmlreferencing sub-projects in the<modules>section. Each sub-project will have its ownpom.xml. When building the main project, it will automatically build the sub-projects too. -
Java modules is another name for JPMS (Java Platform Module System), it was added in JDK 9 under the name Project Jigsaw. It allows applications (packaged as JAR or WAR) to define a
module-info.java. This special module-info file contains a set of directives which define its dependencies and which classes are exported for use by other libraries.
Build an Application Without Java Modules
The presence of module-info.java in an application’s source root defines that it is using Java modules. You will first build the application without JPMS and enable it in a later step.
Create the Persistence Module
Create a class Bird in the persistence module in persistence/src/main/java/com/okta/developer/animals/bird/Bird.java. This will represent the entity that we’ll be saving to DB.
package com.okta.developer.animals.bird;

import org.springframework.data.annotation.Id;

public class Bird {

    @Id
    private String id;

    private String specie;
    private String size;

    public String getId() {
        return id;
    }

    public void setId(String id) {
        this.id = id;
    }

    public String getSpecie() {
        return specie;
    }

    public void setSpecie(String specie) {
        this.specie = specie;
    }

    public String getSize() {
        return size;
    }

    public void setSize(String size) {
        this.size = size;
    }
}
Now we’re going to create a repository to save this entity to DB. Spring Data MongoDB does this for us automatically, creating the CRUD operations so all we have to create is an interface extending MongoRepository.
Create this class in persistence/src/main/java/com/okta/developer/animals/bird/BirdRepository.java:
package com.okta.developer.animals.bird;

import org.springframework.data.mongodb.repository.MongoRepository;

public interface BirdRepository extends MongoRepository<Bird, String> {
}
Finally, for the persistence module. We’ll be creating a service class to expose the persistence operations in persistence/src/main/java/com/okta/developer/animals/bird/BirdPersistence.java:
package com.okta.developer.animals.bird;

import org.springframework.beans.factory.annotation.Autowired;
import org.springframework.stereotype.Component;

import javax.annotation.PostConstruct;
import java.util.List;

@Component
public class BirdPersistence {

    private BirdRepository birdRepository;

    @Autowired
    public BirdPersistence(BirdRepository birdRepository) {
        this.birdRepository = birdRepository;
    }

    @PostConstruct
    void postConstruct(){
        Bird sampleBird = new Bird();
        sampleBird.setSpecie("Hummingbird");
        sampleBird.setSize("small");
        save(sampleBird);
    }

    public void save(Bird bird) {
        birdRepository.save(bird);
    }

    public List<Bird> get() {
        return birdRepository.findAll();
    }
}
Create the Web Application Module
In the application module, create the main application class application/src/main/java/com/okta/developer/SpringBootModulesApplication.java annotated with @SpringBootApplication:
package com.okta.developer;

import org.springframework.boot.SpringApplication;
import org.springframework.boot.autoconfigure.SpringBootApplication;

@SpringBootApplication
public class SpringBootModulesApplication {

    public static void main(String[] args) {
        SpringApplication.run(SpringBootModulesApplication.class, args);
    }
}
Add a controller to expose REST operations on the Bird classes
This class will be stored on application/src/main/java/com/okta/developer/BirdController.java
package com.okta.developer;

import com.okta.developer.animals.bird.Bird;
import com.okta.developer.animals.bird.BirdPersistence;
import org.springframework.web.bind.annotation.GetMapping;
import org.springframework.web.bind.annotation.PostMapping;
import org.springframework.web.bind.annotation.RequestBody;
import org.springframework.web.bind.annotation.RestController;

import java.util.List;

@RestController
public class BirdController {

    private BirdPersistence birdPersistence;

    public BirdController(BirdPersistence birdPersistence) {
        this.birdPersistence = birdPersistence;
    }

    @GetMapping("bird")
    public List<Bird> getBird() {
        return birdPersistence.get();
    }

    @PostMapping("bird")
    public void saveBird(@RequestBody Bird bird) {
        birdPersistence.save(bird);
    }
}
At this point, the application is functional and can be run. Start a MongoDB instance using the following docker command:
docker run -p 27017:27017 mongo:3.6-xenial
Then, go to the project root and run:
mvn install && mvn spring-boot:run -pl application
If everything goes correctly, you’ll be able to navigate to http://localhost:8080/bird and see a JSON output like this:
[{"id":"5f03ff7277a08a55ae73c8b9","specie":"Hummingbird","size":"small"}]
Secure Your Web Application
Before we move on to using Java modules, it’s time to tune our app and make it secure by adding a single dependency and a couple configuration properties.
Add the following dependency to your application/pom.xml file:
<dependency>
    <groupId>com.okta.spring</groupId>
    <artifactId>okta-spring-boot-starter</artifactId>
    <version>1.3.0</version>
</dependency>
Register an Application on Okta
To begin, sign up for a forever-free Okta developer account.
Once you’re signed into Okta, register your client application.
- In the top menu, click on Applications
- Select Add Application
- Click Web and then Next
- Enter
Spring Boot with Java Modulesas the Name (this value doesn’t matter, so feel free to change it) - Change the Login redirect URI to
http://localhost:8080/login/oauth2/code/okta - Click Done
Configure the App with Okta Information
Create a file application/src/main/resources/application.properties with the following content:
okta.oauth2.issuer=https://{yourOktaDomain}/oauth2/default
okta.oauth2.clientId={clientId}
okta.oauth2.clientSecret={clientSecret}
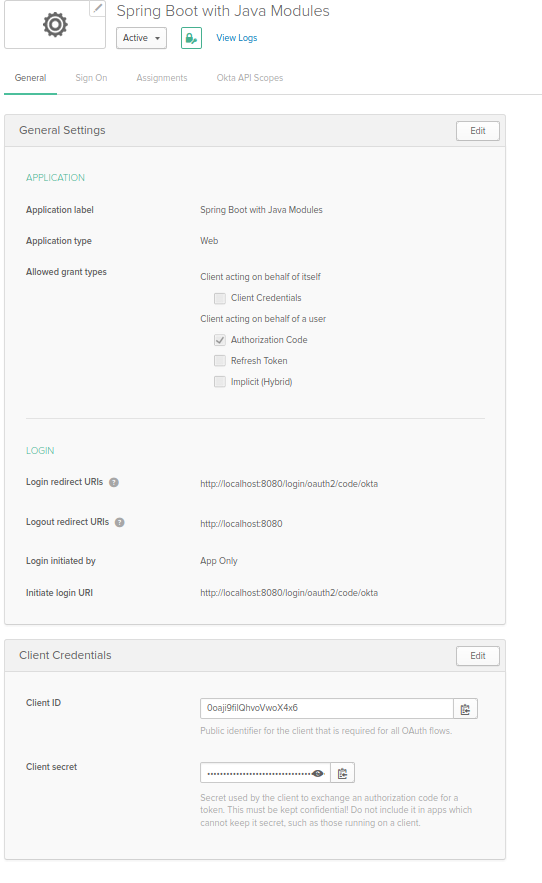
You can find {clientId} and {clientSecret} on the General tab of the Okta application you just crated:
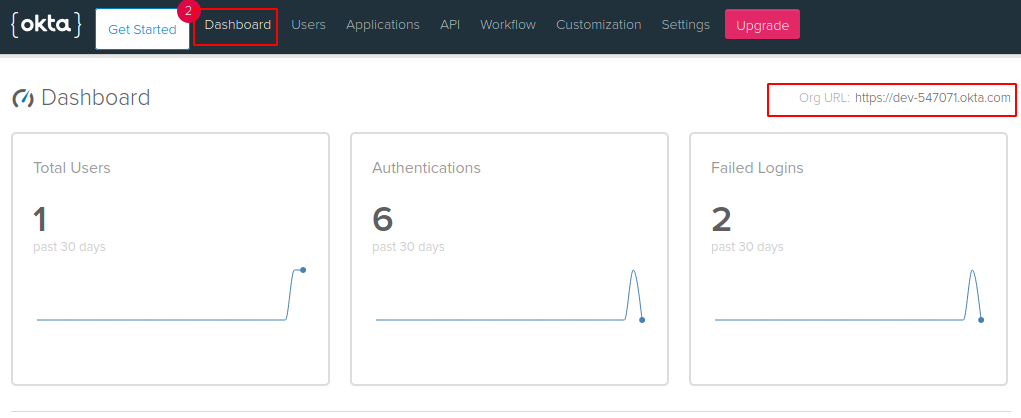
You can find {yourOktaDomain} on your Okta dashboard:
If you restart the app and navigate to http://localhost:8080/bird in an incognito/private browser window, you’ll see a login page.
Using Java Modules
Now it is time to modularize the app. This is achieved by placing a file module-info.java in each project’s source root (src/main/java). We’ll be doing this for both our modules: application and persistence. There are two ways to modularize a Java app—top-down and bottom-up. In this tutorial we’ll be showing the bottom-up approach; modularizing the libraries before the app. This approach is preferable as we’ll have persistence already modularized when writing the application and module-info.java. If application was modularized first then persistence would be treated as an automatic module and you would have to use the JAR file name for the module name.
Modularize the persistence Library
Create a module declaration file persistence/src/main/java/module-info.java with the following content:
module com.okta.developer.modules.persistence {

    requires java.annotation;
    requires spring.beans;
    requires spring.context;
    requires spring.data.commons;
    requires spring.data.mongodb;

    exports com.okta.developer.animals.bird;
}
Each requires keyword signalizes that this module will be depending on some other module.
Spring (version 5) is not modularized yet, its JAR files don’t have the module-info.java.
When you have a dependency on the modulepath (formerly the classpath for non-modular applications) like this they will be available as automatic modules.
An automatic module derives its name using a two-step process:
- If the JAR defines the
Automatic-Module-Nameheader in its `MANIFEST.MF, then that property defines the module’s name. - Alternately, the JAR file name is used to determine the name. The second approach is intrinsically unstable, so no modules with a dependency on such an automatic module should be published in public Maven repositories.
In Spring 5, the Automatic-Module-Name metadata was added to all Spring libraries, if/when Spring defines module-info, the metadata in your application does NOT need to change.
The exports keyword exports all classes in that package. When another module uses a requires clause referencing that package, it will have access to the package classes.
In this example, the module is exporting all classes under the com.okta.developer.animals.bird package.
Modularize the application Project
Create a module declaration file application/src/main/java/module-info.java with the following content:
module com.okta.developer.modules.app {

    requires com.okta.developer.modules.persistence;

    requires spring.web;
    requires spring.boot;
    requires spring.boot.autoconfigure;
}
This one is similar to the first but, along with the Spring dependencies, we also have the com.okta.developer.modules.persistence dependency.
By adding the requires com.okta.developer.modules.persistence this module will have access to the package that was exported: com.okta.developer.animals.bird.
Running the Application
Go to the project root and run
mvn install && mvn spring-boot:run -pl application
If everything is operating correctly you’ll be able to login and navigate to http://localhost:8080/bird where you’ll see JSON output.
Learning More About Java Modular System
The Java Modular System is an excellent addition to the Java ecosystem. It helps organize and isolate classes that were otherwise needlessly exposed. By looking at the application module-info.java, you can see a blueprint of the application dependencies.
This topic is broad and, if you want to learn more, this talk by Alex Buckley is an excellent start.
If you have an existing Spring Boot application that you’d like to have use the modular system, this other talk by Jaap Coomans will help you out.
You can learn more about securing Spring applications in these posts:
- A Quick Guide to OAuth 2.0 with Spring Security
- OpenID Connect Logout Options with Spring Boot
- Build a CRUD App with Angular 9 and Spring Boot 2.2
If you have any questions about this post, please add a comment below. For more awesome content, follow @oktadev on Twitter, like us on Facebook, or subscribe to our YouTube channel.
Okta Developer Blog Comment Policy
We welcome relevant and respectful comments. Off-topic comments may be removed.