Painless Node.js Authentication
User authentication is a critical component of just about every web application. Unfortunately, while authentication is a core part of all websites, it can still be difficult to get right. Despite the Node.js community being around for a while, there still aren’t a lot of simple, foolproof ways to authenticate users in Node.js applications.
In this article I’m going to explain how to build a Node.js application that authenticates users in a best practices way. I’ll also explain what authentication options exist, and why you may (or may not) want to use them.
Note: In May 2025, the Okta Integrator Free Plan replaced Okta Developer Edition Accounts, and the Okta CLI was deprecated.
We preserved this post for reference, but the instructions no longer work exactly as written. Replace the Okta CLI commands by manually configuring Okta following the instructions in our Developer Documentation.
Authentication Options in Node.js
There are three main ways to authenticate users in Node.js apps:
- Roll your own authentication
- Use Passport.js
- Delegate to a third party service
Build Node.js Authentication Yourself
Rolling your own authentication seems to be the most popular choice for Node.js developers today. It’s also the most dangerous choice you have as a developer.
To successfully build user authentication into your application, you need to build your own user database, handle sessions, user permissions (authorization), sensitive credentials, and sensitive data storage.
While those things may sound simple, they can be incredibly complicated and dramatically increase the surface area for attack. Rolling your own authentication is something every security professional strongly discourages.
On the positive side, building authentication into your web application from the ground up can be a great learning experience, so if you’re trying to learn more about how user authentication works, give it a go! Just don’t use any of that in production. =)
Use Passport.js Authentication
Passport.js is an authentication middleware for Node.js. Passport describes itself as being a simple, unobtrusive authentication solution for Node.js. Passport is a small framework that implements many different “providers”. There are tons of open source providers you can use with Passport to help authenticate users in a variety of ways.
Due to Passport’s flexibility, however, it can be confusing and complex to use and requires a lot of developer effort to implement into a production app. Passport.js exclusively handles user authentication, meaning that things like user authorization, password reset workflows, etc., all require custom development to function.
Delegate Node.js Authentication to a Third Party Service
Unlike rolling your own authentication or using Passport.js, delegating user authentication to a third party service requires far less custom development and almost always reduces risk and complexity.
By outsourcing user authentication to a provider, you’re essentially shifting the risk of handling authentication yourself to a third party while gaining simplicity, robustness, and time savings. In exchange, however, you’ll typically incur some cost. Third party services can be very affordable but aren’t free.
Through the rest of this article, I’m going to walk you through building an application using two of the three strategies we’ve discussed: roll your own authentication as well as third-party provider.
My goal is to show you how to implement user authentication in both ways so that you have a more informed understanding of how to build authentication into your Node.js applications as well as what some of the tradeoffs are.
By the end of this article, you should have a good grasp on how to build secure Node.js websites with user authentication.
Build a Simple Node.js App with Authentication
The sample application we’re going to build today is a simple web-based chat application. This application will be built using Express.js (a popular Node.js web framework).
For the roll your own authentication example, I’ll walk you through implementing token-based authentication using JSON Web Tokens (JWTs). For the third-party provider implementation, I’ll walk you through using the OpenID Connect protocol to handle authentication and authorization via Okta.
Okta is one of the largest and most popular authentication services out there, but the implementation practices covered in this guide will be generally applicable for all third-party authentication providers.
OpenID Connect (often referred to as OIDC) is the recommended way to handle user authentication and authorization in modern web applications. In the third-party provider example below, Okta will act as the OIDC authorization server that stores your user credentials.
With that out of the way, let’s build something! =)
Initialize the Node.js Project
To get started, we need to create a project folder and bootstrap the Node.js application. To do this, run the commands below after installing Node.js:
$ mkdir chat-backend
$ cd chat-backend
$ npm init
The npm init utility walks you through creating a package.json file (which is the basis for all Node-based applications). Hit enter at the prompts to select all the default options.
You will see the following output.
Press `^C` at any time to quit.
package name: (chat-backend)
version: (1.0.0)
description: A Node.js chat backend
entry point: (index.js)
test command:
git repository:
keywords:
author:
license: (ISC)
About to write to /Users/ivo/dev/chat-backend/package.json:

{
  "name": "chat-backend",
  "version": "1.0.0",
  "description": "A Node.js chat backend",
  "main": "index.js",
  "scripts": {
    "test": "echo \"Error: no test specified\" && exit 1"
  },
  "author": "",
  "license": "ISC"
}

Is this OK? (yes)
Next, define a start script in your package.json file which will let you easily start the chat app by running npm start in the future. Open your package.json file and modify the scripts key to look like the following.
  "scripts": {
  "test": "echo \"Error: no test specified\" && exit 1",
             "start": "node index.js"
  },
Install Node.js Dependencies
To build our app, we’re going to need several dependencies.
- @okta/oidc-middleware - A library for implementing the OpenID Connect protocol
- body-parser - A library which will allow us to parse incoming HTTP data
- dotenv - A library that will make managing secret environment variables simpler
- express - The web framework we’ll be using
- njwt - The JWT library we’ll use to work with tokens
- nnode - A transpilation tool to make it easier for us to work with the latest JavaScript features
- cors - A library for working with CORS headers
- express-session - A session management library to makes storing session details simple
To install the necessary dependencies, run the following command.
$ npm install @okta/oidc-middleware@2.0.0 body-parser@1.19.0 dotenv@8.0.0 express@4.17.1 njwt@1.0.0 nnode@0.3.3 cors@2.8.5 express-session@1.16.2 --save
Now that you’ve got the dependencies installed, create a simple index.js file. index.js will be the web server’s entry point (the first code to be run), which will initialize the nnode library which transpiles JavaScript without the need for any extra tooling.
Once nnode is setup, you’ll simply import the web server code from the server.js file.
To get this working, copy the code below into a new index.js file.
require('nnode');
require('./server');
Define Node.js Controllers
Logic that exposes server resources should always be tucked away safely in a controller. In this case, we need to create a messages.controller.js file to handle the logic to send and read messages for our chat application.
Create a new messages.controller.js file and copy in the code below.
const messages = [];

function getUserIdFromAuthenticatedRequest(req) {
  return '1'; // hardcoding for now, pending authentication implementation
}

export async function getAll(req, res) {
  const userId = getUserIdFromAuthenticatedRequest(req);
  const response = messages.filter(message => message.fromUserId === userId || message.toUserId === userId);
  res.json(response);
}

export async function post(req, res) {
  const userId = getUserIdFromAuthenticatedRequest(req);
  const { text, toUserId } = req.body;
  const id = messages.length + 1;

  if (!text || !toUserId) {
    res.status(400);
    return res.json({ error: 'Message requires both `text` and `toUserId` fields.' });
  }

  const newMessage = {
    id, text, fromUserId: userId, toUserId
  };

  messages.push(newMessage);
  res.json(newMessage);
}
Create a Simple Web Server in Node
Now that you’ve got some message-handling code defined, you need to create a web server to power the actual chat functionality. To do this, you’ll use Express.js.
Create a server.js file and copy the code below into it.
import 'dotenv/config';
import express from 'express';
import bodyParser from 'body-parser';
import cors from 'cors';

import * as messagesController from './messages.controller';

const app = express();

app.use(cors());
app.use(bodyParser.json());

app.get('/messages', messagesController.getAll);
app.post('/messages', messagesController.post);

const { PORT = 3000 } = process.env;
app.listen(PORT, () => console.log(`Authentication example app listening on port ${PORT}!`));
You can now run the server using the npm start command below.
$ npm start
Test the Application Using Curl or Postman
Through the rest of this article I’ll be showing you how to test out the web server backend using curl, a popular command line tool for testing APIs.
If you aren’t familiar with curl, and don’t want to follow along on the command line, you may want to try Postman. It’s more of an IDE for APIs. You can copy+paste any curl command examples below into Postman using Postman’s import functionality. This may be easier for you if you aren’t comfortable using the CLI.
To start, try to compose a message from one user to another using your newly created API:
curl -X POST http://localhost:3000/messages \
  -H "Content-Type: application/json" \
  -d '{"text": "Something!", "toUserId": "2"}'
Your request should execute successfully and your message should have been “sent”.
You can also use the API to view stored messages. Do this by running the curl command below.
curl -X GET http://localhost:3000/messages
This API call will respond with an array containing any previously created messages.
Implement Token-Based Authentication in Your Node.js Application Using JWTs
By now, you’ve built a very simple chat application using Express.js and tested it out. But one critical piece is still missing: user authentication!
So far you haven’t messed around at all with user accounts, sessions, API tokens, etc. But, in order for our chat application to function properly, it needs to know who is sending messages to whom. For this, we need to implement some form of user authentication.
In this section I’m going to walk you through implementing a simple token-based authentication scheme using JSON Web Tokens (JWTs).
DISCLAIMER: This is purely for education purposes (don’t run this in production). In general, we always recommend NOT taking this approach in production apps because there are a lot of implementation risks of rolling your own authentication solution.
With that disclaimer out of the way, let’s implement some JWT-based authentication!
PS: If you’re not interested in handling authentication manually using JWTs (JSON Web Tokens), jump directly to the section titled Use Okta’s Identity Cloud and OpenID Connect”.
Implement JWT Authentication in Node.js
To get started with token-based authentication, create a jwt-authentication.js file and copy in the code below. This file will contain all your custom authentication logic.
import njwt from 'njwt';

export const users = [{
  id: '1',
  email: 'first.user@gmail.com',
  password: 'password', // please note that it's NEVER a good idea to store passwords directly nor have passwords `password`
}, {
  id: '2',
  email: 'second.user@gmail.com',
  password: 'password',
}];

const {
  APP_SECRET = 'something really random',
  APP_BASE_URL = 'http://localhost:3000'
} = process.env;

export function encodeToken(tokenData) {
  return njwt.create(tokenData, APP_SECRET).compact();
}

export function decodeToken(token) {
  return njwt.verify(token, APP_SECRET).body;
}

// This express middleware attaches `userId` to the `req` object if a user is
// authenticated. This middleware expects a JWT token to be stored in the
// `Access-Token` header.
export const jwtAuthenticationMiddleware = (req, res, next) => {
  const token = req.header('Access-Token');
  if (!token) {
    return next();
  }

  try {
    const decoded = decodeToken(token);
    const { userId } = decoded;

    console.log('decoded', decoded);
    console.log('userId', userId);

    if (users.find(user => user.id === userId)) {
      console.log('found user!');
      req.userId = userId;
    }
  } catch (e) {
    return next();
  }

  next();
};

// This middleware stops the request if a user is not authenticated.
export async function isAuthenticatedMiddleware(req, res, next) {
  if (req.userId) {
    return next();
  }

  res.status(401);
  res.json({ error: 'User not authenticated' });
}

// This endpoints generates and returns a JWT access token given authentication
// data.
export async function jwtLogin(req, res) {
  const { email, password } = req.body;
  const user = users.find(user => user.email === email && user.password === password);

  if (!user) {
    res.status(401);
    return res.json({ error: 'Invalid email or password' });
  }

  const accessToken = encodeToken({ userId: user.id });
  return res.json({ accessToken });
}
The code above uses the open source nJwt library to generate and validate JWTs. This library helps remove complexities around JWTs and allows you to securely make and use JWTs in your applications without needing to read rfc7519.
Next, let’s integrate JWT authentication into the web server. Open up the server.js file and replace your previous code with the new code below.
import 'dotenv/config';
import express from 'express';
import bodyParser from 'body-parser';
import * as messagesController from './messages.controller';
import { isAuthenticatedMiddleware, jwtAuthenticationMiddleware, jwtLogin } from './jwt-authentication';

const app = express();

app.use(bodyParser.json());
app.use(jwtAuthenticationMiddleware);

app.post('/jwt-login', jwtLogin);
app.get('/messages', isAuthenticatedMiddleware, messagesController.getAll);
app.post('/messages', isAuthenticatedMiddleware, messagesController.post);

const port = 3000;
app.listen(port, () => console.log(`Authentication example app listening on port ${port}!`));
Also, let’s update the getUserIdFromAuthenticatedRequest function in the messages.controller.js to utilize the new token-based authentication approach:
function getUserIdFromAuthenticatedRequest(req) {
  return req.userId;
}
Test Token Authentication in Your Node.js Application
Now you’ve set up the entire JWT authentication layer of the server, let’s test it out by trying to authenticate to the server and get a token.
curl -X POST http://localhost:3000/jwt-login \
  -H "Content-Type: application/json" \
  -d '{"email": "first.user@gmail.com", "password": "password"}'
If everything is working properly, you should now have an access token (a JWT). The /jwt-login endpoint you passed your credentials to validated the credentials and generated a short-lived access token for you to use to access other parts of the API/website.
You’ll use this token later to authenticate when making requests.
For purposes of testing the API, copy the access token value and insert it into the cURL examples below. Replace ACCESS_TOKEN with the access token value.
To test sending a message after a user has authenticated, run this cURL example:
curl -X POST http://localhost:3000/messages \
  -H "Content-Type: application/json" \
  -H "Access-Token: ACCESS_TOKEN" \
  -d '{"text": "hello again!", "toUserId": "2"}'
You can also, of course, view all messages while authenticated.
curl -X GET http://localhost:3000/messages \
  -H 'Access-Token: ACCESS_TOKEN'
Implement Node.js Authentication Using OpenID Connect and Okta
Now that you’ve seen how to implement rudimentary token-based authentication using JSON Web Tokens and a bit of elbow grease, let’s take a look at how you might use a third-party authentication provider instead.
What we’ll do here is use OpenID Connect (the recommended way to handle user authentication and authorization in modern applications) as well as Okta (a popular third party authentication provider) to secure the same chat application as before.
Okta is an API service that allows you to create users, handle user authentication and authorization, etc. By using Okta, you avoid writing most of the authentication/authorization/user management logic. To continue below and implement Okta, you’ll need to create a forever-free developer account.
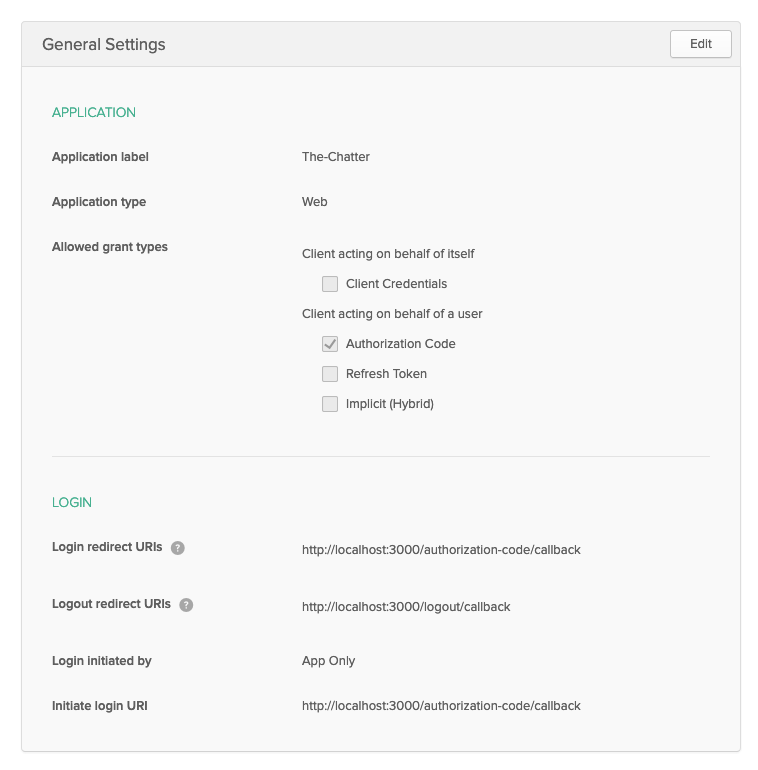
Once you’ve created your Okta account and are logged into your Okta dashboard, click on the Applications menu item then Add Application. From the app creation wizard, select Web then click Next.
On the Application Settings screen, give your application a name (I’ve named mine “The-Chatter”) and copy in the following app settings:
- Base URIs:
http://localhost:3000 - Login redirect URIs:
http://localhost:3000/authorization-code/callback
Once that’s done, create the application. Then, click the Edit button and add in the following additional application settings:
- Logout redirect URIs:
http://localhost:3000/logout/callback
Now save your changes and confirm your settings match those below.
Now that your app has been fully created, scroll down and take a look at the Client Credentials listed below. You’re going to need this information shortly to integrate your web app with Okta. These settings (your Client ID and Client secret) are your application’s OpenID Connect credentials.
Create a file named .env in the root directory of your project and copy in the following (be sure to substitute in the proper values where appropriate).
OKTA_DOMAIN={{ OKTA_DOMAIN }} # this can be found on your dashboard at the top right of the screen
CLIENT_ID={{ CLIENT_ID }}
CLIENT_SECRET={{ CLIENT_SECRET }}
APP_BASE_URL=http://localhost:3000
APP_SECRET=alongrandomstring
Next, modify your server.js file to make use of the @okta/oidc-middleware package. This will handle all OpenID Connect logic and simplify user authentication and authorization.
Paste the code below into your server.js file, overwriting whatever was there before.
import 'dotenv/config';
import express from 'express';
import bodyParser from 'body-parser';
import { ExpressOIDC } from '@okta/oidc-middleware';
import session from 'express-session';

import * as messagesController from './messages.controller';
import { isAuthenticatedMiddleware, jwtAuthenticationMiddleware, jwtLogin } from './jwt-authentication';

const app = express();

const { OKTA_DOMAIN, CLIENT_ID, CLIENT_SECRET, APP_BASE_URL, APP_SECRET } = process.env;

const oidc = new ExpressOIDC({
  issuer: `${OKTA_DOMAIN}/oauth2/default`,
  client_id: CLIENT_ID,
  client_secret: CLIENT_SECRET,
  appBaseUrl: APP_BASE_URL,
  scope: 'openid profile',
  post_logout_redirect_uri: 'http://localhost:3000/logout/callback',
});

app.use(session({
  secret: APP_SECRET,
  resave: true,
  saveUninitialized: false,
}));

app.use(oidc.router);
app.use(bodyParser.json());
app.use(jwtAuthenticationMiddleware);

app.post('/jwt-login', jwtLogin);
app.get('/messages', oidc.ensureAuthenticated(), messagesController.getAll);
app.post('/messages', oidc.ensureAuthenticated(), messagesController.post);

// Or attach endpoints like this to use your custom-made JWT middleware instead
// app.get('/messages', isAuthenticatedMiddleware, messagesController.getAll);
// app.post('/messages', isAuthenticatedMiddleware, messagesController.post);

app.get('/logout', oidc.forceLogoutAndRevoke(), (req, res) => {
  // This is never called because forceLogoutAndRevoke always redirects.
});

const { PORT = 3000 } = process.env;
app.listen(PORT, () => console.log(`Authentication example app listening on port ${PORT}!`));
The next step is to update the getUserIdFromAuthenticatedRequest function in the messages.controller.js file to utilize Okta. Update the messages.controller.js file and overwrite it with the code below.
function getUserIdFromAuthenticatedRequest(req) {
  if (req.userId) {
    return req.userId;
  }
  return req.userContext && req.userContext.userinfo && req.userContext.userinfo.sub;
}
And with that, your app should be good to go!
Test Okta + OIDC Authentication in Your Node.js App
At this point, your app has working authentication via Okta using OpenID Connect. Because of the way we configured Okta, you’ll need to use a browser to log into your website. But before you can log in, you must first create a user account in Okta.
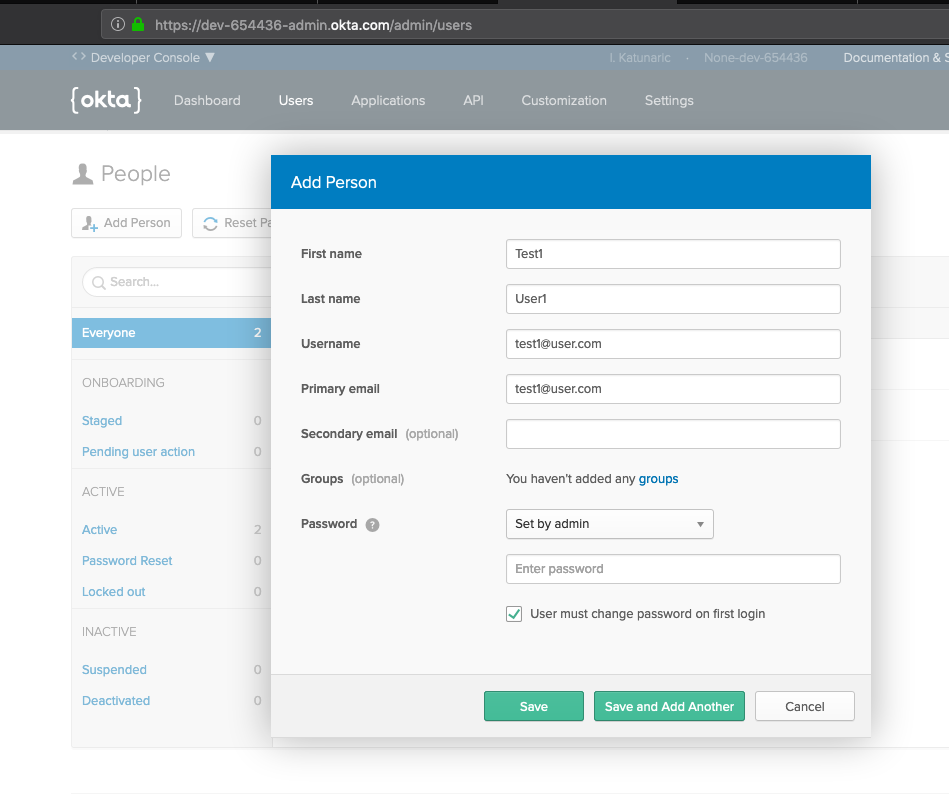
To keep things simple, let’s create a user account to test with manually using the Okta UI. From within the Okta dashboard click the Users tab followed by the Add Person button. Then create a user like I did below.
And whatever you do, make sure you remember the password you set! We’ll need this later.
Once the user has been created, click on their account in the user list and copy the last part of the URL from your browser. For example, when you click on the user account after it’s created, the page you’re on may look like this: https://dev-761395-admin.okta.com/admin/user/profile/view/00u1hnybir4Qon1ap357. In that case, you’d want to copy the 00u1hnybir4Qon1ap357 component out of the URL as this is the newly-created user’s ID, and you’ll need this later for testing.
Finally, now that your user has been created, try to log into your new site by visiting http://localhost:3000/login. You will be redirected to an Okta login page to log in using the account you created in Okta dashboard.
After a successful login, navigate to http://localhost:3000/messages to see a list of all messages. This should look like an empty array for now, because you have no messages yet.
Open Chrome’s Network tab while on the http://localhost:3000/messages page. Under the Request Headers tab you will see a cookie definition that looks like connect.sid=. Copy this cookie’s value and use it in the request below instead of COOKIE_GOES_HERE:
curl -X POST http://localhost:3000/messages \
  -H 'Content-Type: application/json' \
  -H 'Cookie: connect.sid=COOKIE_GOES_HERE' \
  -d '{"text": "hello again!", "toUserId": "USER_ID_COPIED_FROM_OKTA_DASHBOARD_URL"}'
After executing this request, refresh your browser on the http://localhost:3000/messages page to see the newly created message.
If you want to view the same message as another user, you can visit http://localhost:3000/logout to log out and then http://localhost:3000/login to login using a different account. After doing this, visit http://localhost:3000/messages to view all the messages received by the currently logged in user.
Learn More about Node.js and Authentication
That’s all for now! I hope you’ve learned a bit about Node authentication.
You created a small chat-focused web app to provide simple messaging functionality and you learned how to setup token-based authentication yourself (as a proof of concept), as well as full-blown OpenID Connect authentication using Okta.
To learn more about Node and authentication, check out some of our other interesting blog posts:
- What the Heck is OAuth?
- Build a REST API with Node and Postgres
- Build a Simple REST API with Node and OAuth 2.0
As always, if you have questions or comments about this post, leave them in the comments below and don’t forget to follow us on Twitter and Facebook!
Okta Developer Blog Comment Policy
We welcome relevant and respectful comments. Off-topic comments may be removed.