JWTs in React for Secure Authentication

Although authentication is a common requirement for web apps, it can be difficult to get it right, especially if you’re by yourself or part of a small team. That’s why many sites choose to use OAuth 2.0 to let a third-party handle authentication for them. They just need to know how to decode a JSON Web Token (JWT), rather than how to store a bunch of user information and pray they aren’t the next company with leaked passwords.
Today I’ll shed some light on what exactly a JWT is, and how to use one in practice. If you follow along, you’ll learn how to create an app in React with Okta as a third-party to authenticate users. You’ll learn how to decode the JWT and use it to make decisions about what to display on the screen.
Note: In May 2025, the Okta Integrator Free Plan replaced Okta Developer Edition Accounts, and the Okta CLI was deprecated.
We preserved this post for reference, but the instructions no longer work exactly as written. Replace the Okta CLI commands by manually configuring Okta following the instructions in our Developer Documentation.
Understand JWTs
If you’re wondering, “I don’t know what a JWT is, or even how to pronounce it.” The official RFC specification says to just pronounce it like the word “jot.” As far as what a JWT is? Put simply, it’s a way to make a set of easily readable and verifiable claims that cannot be easily recreated without a secret key.
A good analogy would be a driver’s license. The government does the work to verify your identity and your ability to drive, then issues you a card with some information on it and an expiration date. You can use your license to verify your name, birthday, address, etc. to anyone who asks. You could put that information on any piece of paper, but a driver’s license has additional security. It may have some watermarks, an electronic chip, a barcode, something only seen under ultraviolet light; plenty of ways for someone to verify its validity, but very difficult for you to recreate at home.
A JWT is pretty much the same thing. As a user, you sign in to some trusted third-party the old fashioned way (with a username and password, for example). You’re then issued a string with a JSON payload with things like your username, some user permissions, and an expiration date. The string also contains an encrypted portion (the signature) and another JSON payload with information about which encryption algorithm was used. You can verify the two JSON payloads could be used to make that signature with a public key, but you can’t recreate the signature without a secret key stored securely on the issuer’s server. Some algorithms will just use a single secret key, which is simpler, and good enough for when you only need to verify on a server where the secret won’t be shared anywhere.
When your app receives a JWT, you can run some basic checks against it:
- Is it a valid signature?
- Has it expired?
- Is the issuer who I expected it to be?
If everything checks out, you can use the rest of the payload in the app, for example, to determine what a user’s name is or if they’re an admin or not.
Structure of a JWT
Here is an example JWT:
eyJhbGciOiJIUzI1NiIsInR5cCI6IkpXVCJ9.eyJ1c2VybmFtZSI6InRoZW9ybml0aG9sb2dpc3QiLCJzdXJuYW1lIjoiQm9uZCIsIm5hbWUiOiJKYW1lcyBCb25kIiwiaWF0Ijo5NDY2ODQ4MDB9.uOP6fIf8dhgb7As5D0a4z6EjaXsudQgrKWj8PmoWFd0
Two periods split the JWT into three parts - the first two are the header and payload, which are just base64 encoded. You can decode them without the secret to get this payload:
{
 "username": "theornithologist",
 "surname": "Bond",
 "name": "James Bond",
 "iat": 946684800
}
You can also verify the JWT with the (not-so-)secret, Birds of the West Indies.
How to Build a Simple React App
Today, you’ll build a simple search bar to search through a set of users. Before you get to the code, you’ll need to install a couple dependencies. Then, you can bootstrap a React app and be up and running in no time.
First, to check if you have Node installed, type node --version in the terminal. If you get an error, it’s not installed yet. If you have an old version (let’s say under 8, since it gives you async/await), you might want to consider an upgrade. A great way to install Node, while making it easy to upgrade later or manage different versions simultaneously, is the Node Version Manager (NVM). You can use this command to install it:
curl -o- https://raw.githubusercontent.com/nvm-sh/nvm/v0.34.0/install.sh | bash
Note: If you run into issues, make sure to check out NVM’s installation guide as they cover a lot of edge cases.
Next, you’ll need to set up the project. If you don’t already have them installed, install yarn and create-react-app:
npm i -g yarn@1.16.0 create-react-app@3.0.1
Now use create-react-app to bootstrap a new React project, then start the app:
create-react-app react-jwts
cd react-jwts
yarn start
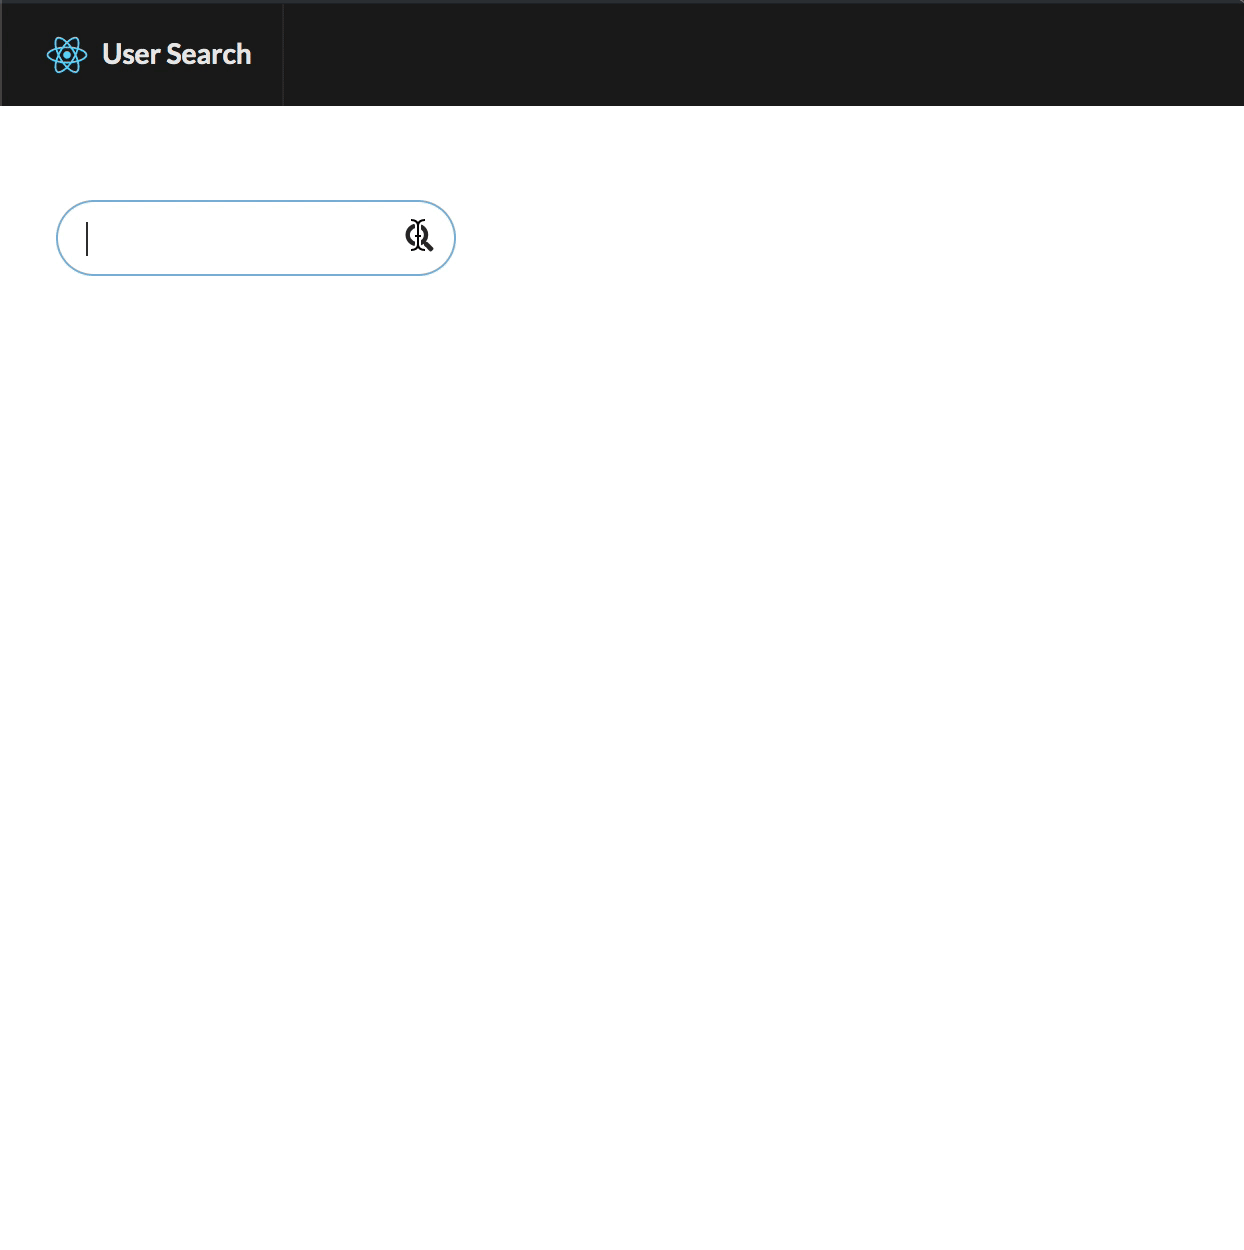
The yarn start command starts the server, which will watch for any changes you make to any files and automatically reload the page. You should now see the default app up at http://localhost:3000.
Add a Search UI and API With Semantic UI, Fuse.js, and the Hooks API
With the basic app up and running, you need to install a few dependencies. For the frontend you can use faker.js to generate fake data (for now, rather than pulling data via an API). The app will also look much nicer without a lot of extra code if you use a UI framework such as Semantic UI. For client-side search, I like Fuse.js. Add them as dependencies:
yarn add faker@4.1.0 semantic-ui-react@0.87.2 semantic-ui-css@2.4.1 fuse.js@3.4.5
To start, create an “API” to fetch your set of users. If you make it an async function, it will simulate connecting to a real backend, so you can simply replace this function and the rest of your app would still work the same. Make a new file api.js:
src/api.js
import faker from 'faker';

const users = [...new Array(1000)].map(() => ({
  id: faker.random.uuid(),
  avatar: faker.image.avatar(),
  username: faker.internet.userName(),
  name: `${faker.name.firstName()} ${faker.name.lastName()}`,
}));

export const fetchUsers = async () => users;
Next, create three new components:
- A header for the page
- An autocomplete search input
- A card to display the selected user
First, add the header:
src/Header.js
import React from 'react';
import { Container, Menu, Image } from 'semantic-ui-react';

import logo from './logo.svg';

export default ({ selectedUser }) => {
  const pageName = selectedUser ? selectedUser.name : '';

  return (
    <Menu fixed="top" inverted>
      <Container>
        <Menu.Item header>
          <Image size="mini" src={logo} />
          User Search
        </Menu.Item>
        <Menu.Item style={{ flex: 1 }}>{pageName}</Menu.Item>
      </Container>
    </Menu>
  );
};
This takes a selectedUser prop, which you’ll need to pass in from the App component. Next, create the search component:
src/Search.js
import React from 'react';
import { Container, Search } from 'semantic-ui-react';
import Fuse from 'fuse.js';

export default ({ users, selectUser }) => {
  const [term, setTerm] = React.useState('');
  const filteredUsers = React.useMemo(() => {
    if (!term || !users) return users || [];
    const fuse = new Fuse(users, {
      shouldSort: true,
      keys: ['name', 'username'],
    });

    return fuse.search(term);
  }, [users, term]);

  return (
    <Container>
      <Search
        loading={!users}
        onResultSelect={(e, { result }) => {
          setTerm('');
          selectUser(result.user);
        }}
        onSearchChange={e => setTerm(e.currentTarget.value)}
        results={filteredUsers.slice(0, 5).map(user => ({
          childKey: user.id,
          title: user.name,
          description: user.username,
          image: user.avatar,
          user,
        }))}
        value={term}
      />
    </Container>
  );
};
This component uses React’s relatively new Hooks API. This component will store the search term locally, rather than in some global state, since other components don’t need to know it. The useState hook can be used in a functional component and takes a little less code when you only have one piece of state like in this component.
The useMemo hook ensures that if there are multiple renders of the component, the search will only be done once. Search can be a relatively expensive operation, especially as the dataset grows in size.
Again, you haven’t defined the required props yet. You’ll need to pass in the set of users and a function to select a user from the main App component. Next, create a component to display the selected user:
src/SelectedUser.js
import React from 'react';
import { Message, Card, Image } from 'semantic-ui-react';

export default ({ selected, selectUser }) => {
  if (!selected) return null;

  return (
    <Card style={{ marginTop: '2em' }}>
      <Message
        attached
        header={selected.name}
        onDismiss={() => selectUser(null)}
      />
      <Image src={selected.avatar} wrapped ui={false} />
      <Card.Content>
        <Card.Header>{selected.username}</Card.Header>
      </Card.Content>
    </Card>
  );
};
If no user is selected, this simply won’t render anything. Otherwise, you’ll get a card with the user. You’ll also get a button to deselect the user, so you’ll also need the parent component to pass in a selectUser function here.
In your src/index.js file, replace the ./index.css import with the Semantic UI CSS.
import 'semantic-ui-css/semantic.min.css';
Your App.js file now needs to reference the new components you just made. Your App.js file should end up looking like this:
import * as React from 'react';
import { Container } from 'semantic-ui-react';

import { fetchUsers } from './api';

import Header from './Header';
import Search from './Search';
import SelectedUser from './SelectedUser';

const App = () => {
  const [users, setUsers] = React.useState(null);
  const [selectedUser, selectUser] = React.useState(null);

  React.useEffect(() => {
    fetchUsers().then(setUsers);
  }, []);

  return (
    <div>
      <Header selectedUser={selectedUser} />
      <Container style={{ paddingTop: '7em' }}>
        <Search users={users} selectUser={selectUser} />
        <SelectedUser selected={selectedUser} selectUser={selectUser} />
      </Container>
    </div>
  );
};

export default App;
The useEffect hook fetches the list of users. When you pass in the empty array ([]), you tell React you only want to run this effect on the very first call. If you left the array out, it would run every time this component renders. If you were to add some variables into the array, it would run any time any of those variables changed.
Go ahead and give it a whirl! You should be able to search through a set of (fake) users, select one, choose another, etc.
Create an Okta Application
One simple way to add authentication to your project is with Okta. Okta is a cloud service that allows developers to create, edit, and securely store user accounts and user account data, and connect them with one or multiple applications. The API enables you to:
- Authenticate and authorize your users
- Store data about your users
- Perform password-based and social login
- Secure your application with multi-factor authentication
- And much more! Check out our product documentation
If you don’t already have one, sign up for a forever-free developer account. Log in to your developer console, navigate to Applications, then click Add Application. Select Single-Page App, then click Next.
Since Create React App runs on port 3000 by default, add it as a Base URI and Login Redirect URI. Your settings should look like this:
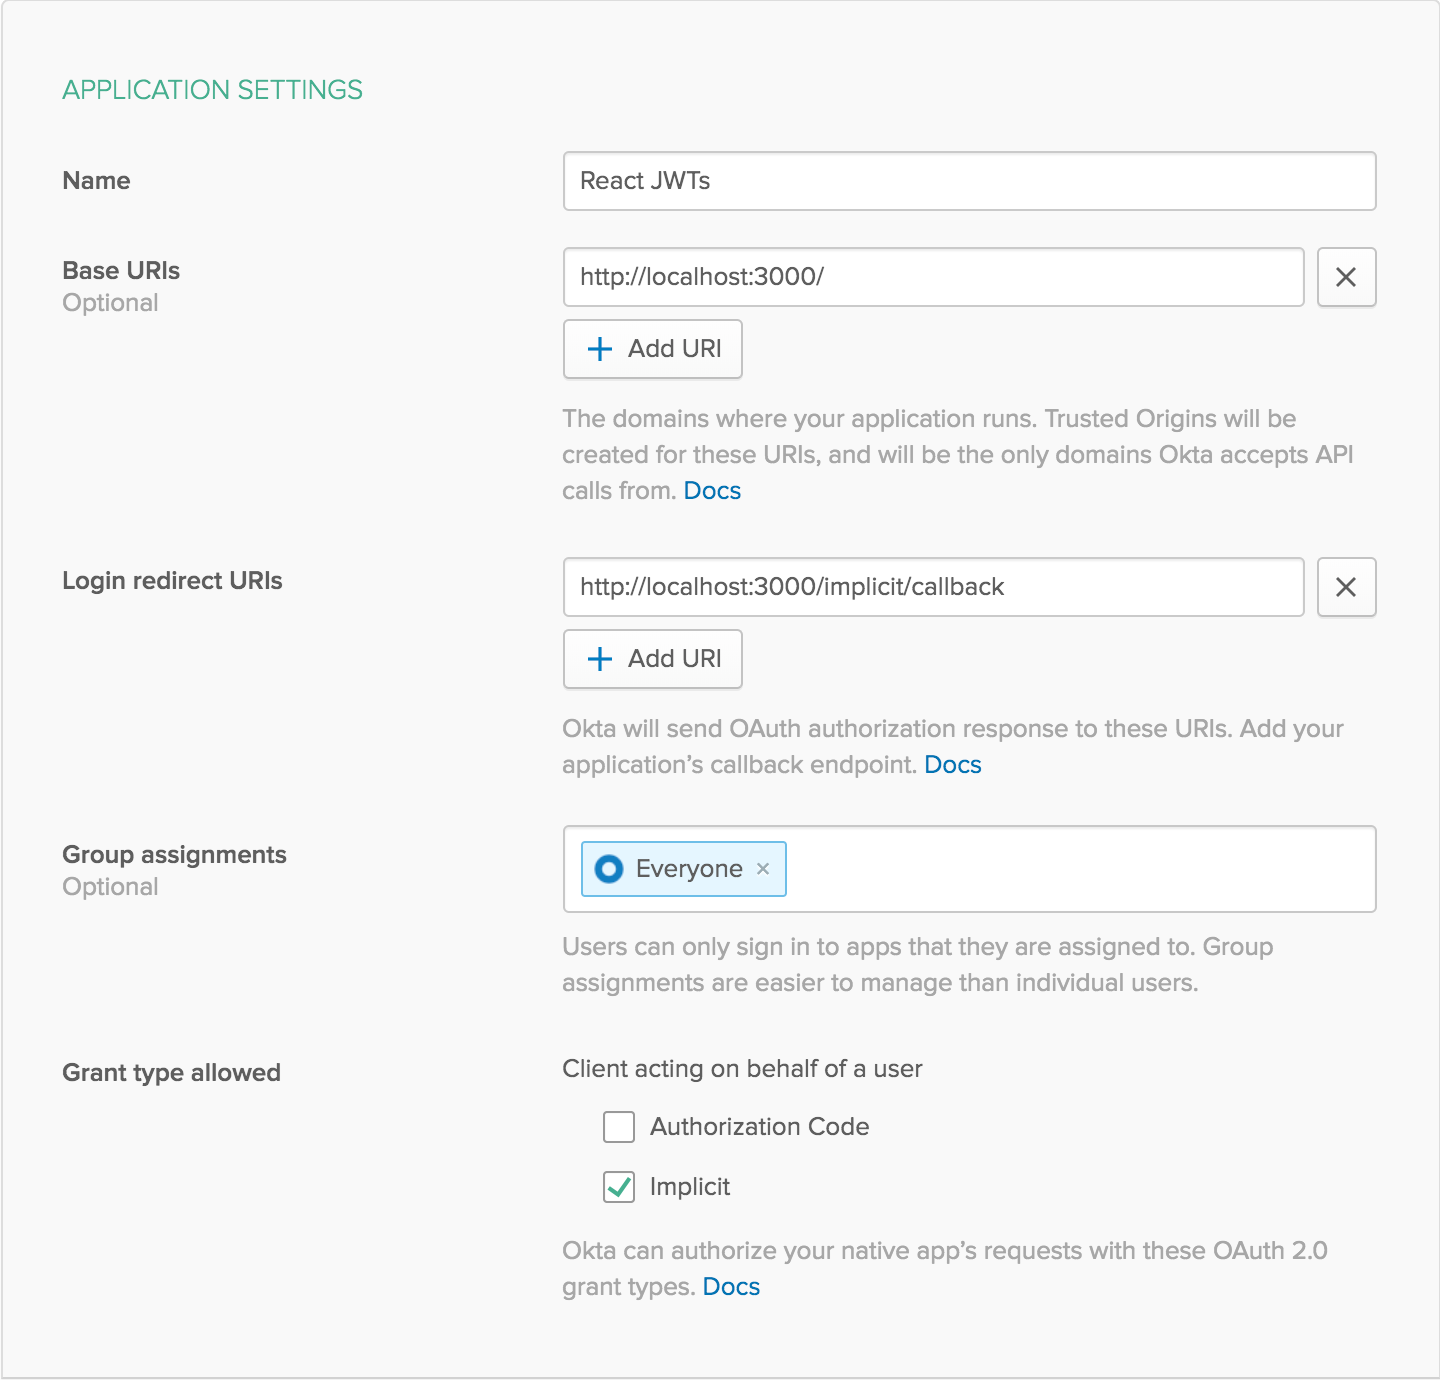
Click Done to save your app, then copy your Client ID and paste it into the .env.local file as a variable. This will allow you to access the file in your code without storing your credentials in source control. You’ll need to add your organization URL (without the -admin suffix) to that file as well. Environment variables (other than NODE_ENV) need to start with REACT_APP_ in order for Create React App to read them, so the file should end up like this:
.env.local
REACT_APP_OKTA_CLIENT_ID={yourClientId}
REACT_APP_OKTA_ORG_URL=https://{yourOktaOrgUrl}
Add User Claims
Okta allows you to add users to groups, for example, an Admins or Managers group. By default, each user is already in the Everyone group. For this tutorial, I’ll show you how to determine which groups your user is in. This does require a little extra configuration for your Okta application.
While you’re still signed in to your Okta account:
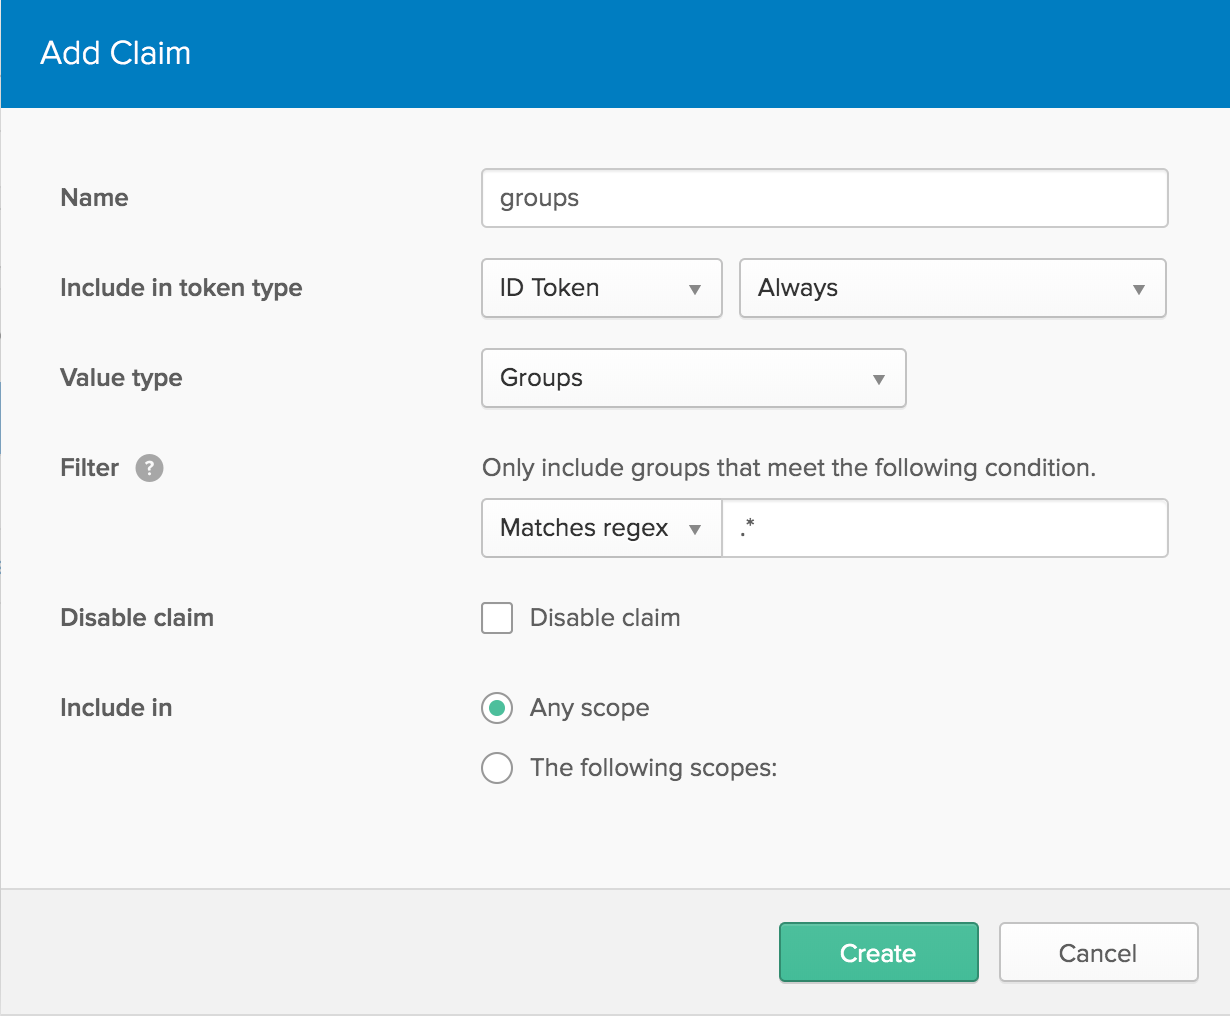
- Navigate to API -> Authorization Servers
- Click on the
defaultserver, then the Claims tab - Click Add Claim and give it a name of
groups - Change
Include in token typetoID Token - For
Value type, selectGroups - Under
Filter, change theStarts withdropdown toMatches regexand enter.*in the text field next to it - Click Create to save it.
Next, navigate to Users -> Groups. Click the Add Group button and create a new group called Admins, and give it a friendly description, then click Add Group.

Click on the new group you just created, then click Add Members.Type your name into the search bar, then click the Add button next to your user. An additional account not in the Admins group will make testing easier
Connect Okta to Your React App
Now your Okta application is ready to go, you’ll need two more dependencies to connect it to your React app.
yarn add @okta/okta-react@1.2.0 react-router-dom@5.0.1
Restart your server in order to pick up the new environment variables from .env.local. You can close the terminal hosting it or kill the process with ctrl-C, then use yarn start to start it back up again.
Okta’s React tools make it easy to authenticate users. The service will do all the heavy lifting and simply give you a JWT you can use as you please. Okta also provides a Higher-Order Component (HoC) to pass in an auth prop to a component.
Whenever some piece of auth changes (such as the user or token), the component wrapped in the HoC will be re-rendered, and then you can query the auth prop for changes. In order to make sure the entire app has access to pieces of that data, you can allow components to subscribe to React’s Context API.
Create a new file Auth.js to store the Auth Context and a component to watch for updates.
src/Auth.js
import * as React from 'react';
import { withRouter } from 'react-router-dom';
import { withAuth } from '@okta/okta-react';

export const AuthContext = React.createContext();

const getUserFromToken = token => {
  if (token) {
    try {
      return JSON.parse(atob(token.split('.')[1]));
    } catch (error) {
      // ignore
    }
  }

  return null;
};

export const AuthProvider = ({ children }) => {
  const [state, setState] = React.useReducer((oldState, newState) => newState, {
    loading: true,
    token: undefined,
    user: null,
  });

  const updateAuth = async auth => {
    const token = (await auth.getIdToken()) || null;
    if (token !== state.token) {
      setState({
        token,
        loading: false,
        user: getUserFromToken(token),
      });
    }
  };

  return (
    <AuthContext.Provider value={{ ...state, updateAuth }}>
      {children}
    </AuthContext.Provider>
  );
};

export const AuthHandler = withAuth(
  withRouter(({ auth, location }) => {
    const { updateAuth } = React.useContext(AuthContext);

    React.useEffect(() => {
      updateAuth(auth);
    });

    React.useEffect(() => {
      if (location.pathname === '/login') auth.login('/');
      if (location.pathname === '/logout') auth.logout('/');
    }, [auth, location.pathname]);

    return null;
  }),
);
React.createContext() creates the context. Once exported, other components can subscribe to the consumer with AuthContext.Consumer or with the useContext hook.
Decode A JWT and Manage User States and Changes
Remember when I talked earlier about how to decode a JWT? This helper function will parse the JWT to get the user for you. The browser’s built-in atob Javascript function can be used to convert a base64-encoded string to plain text (in this case a JSON string). Then JSON.parse converts it to an actual javascript object. We only care about the payload, which is the second part of the .-separated token.
const getUserFromToken = token => {
  if (token) {
    try {
      return JSON.parse(atob(token.split('.')[1]));
    } catch (error) {
      // ignore
    }
  }

  return null;
};
Wrap your App component with the AuthProvider to listen for updates from the AuthHandler, and provide any pieces of auth state to any subscribers. This uses the useReducer hook in order to set multiple pieces of state at once and avoid unnecessary re-renders.
export const AuthProvider = ({ children }) => {
  const [state, setState] = React.useReducer((oldState, newState) => newState, {
    loading: true,
    token: undefined,
    user: null,
  });

  const updateAuth = async auth => {
    const token = (await auth.getIdToken()) || null;
    if (token !== state.token) {
      setState({
        token,
        loading: false,
        user: getUserFromToken(token),
      });
    }
  };

  return (
    <AuthContext.Provider value={{ ...state, updateAuth }}>
      {children}
    </AuthContext.Provider>
  );
};
The AuthHandler connects to both Okta’s withAuth HoC to access auth, as well as React Router’s withRouter HoC to access the current location. You could use window.location, but React Router allows you to easily listen to changes and guarantees this component will render when the route changes. Combined with a useEffect, you’ll be able to log the user in or out when they visit the /login or /logout routes.
export const AuthHandler = withAuth(
  withRouter(({ auth, location }) => {
    const { updateAuth } = React.useContext(AuthContext);

    React.useEffect(() => {
      updateAuth(auth);
    });

    React.useEffect(() => {
      if (location.pathname === '/login') auth.login('/');
      if (location.pathname === '/logout') auth.logout('/');
    }, [auth, location.pathname]);

    return null;
  }),
);
Wrap your app with the provider and add in the AuthHandler. To set up your app to listen to Okta, you’ll also need to add some more context wrappers to App:
src/App.js
// Add this to the top of the file
import { Switch, Route, BrowserRouter as Router } from 'react-router-dom';
import { Security, ImplicitCallback } from '@okta/okta-react';
import { AuthHandler, AuthProvider, AuthContext } from './Auth';

// Replace your `export default` at the bottom of the file with this:
export default () => (
  <AuthProvider>
    <Router>
      <Security
        issuer={`${process.env.REACT_APP_OKTA_ORG_URL}/oauth2/default`}
        client_id={process.env.REACT_APP_OKTA_CLIENT_ID}
        redirect_uri={`${window.location.origin}/implicit/callback`}
      >
        <Switch>
          <Route path="/implicit/callback" component={ImplicitCallback} />
          <Route path="/" component={App} />
        </Switch>
      </Security>
    </Router>
  </AuthProvider>
);
If you update your API’s fetchUsers function to accept a user, you can check whether your user is in the Admins group or not, and add some more information if they are.
src/api.js
export const fetchUsers = async authUser =>
  authUser && authUser.groups.includes('Admins')
    ? users.map(user => ({
        ...faker.helpers.userCard(),
        ...user,
      }))
    : users;
Pass the user into the call to fetchUsers in your app and change the useEffect in your App component to depend on the user. This updates a logged in user with changes. After you select a user as an admin, hide sensitive information when you log out. This verifies that only admins can see sensitive information. Replace your useEffect call in App.js to this:
src/App.js
const auth = React.useContext(AuthContext);

React.useEffect(() => {
  fetchUsers(auth.user).then(nextUsers => {
    setUsers(nextUsers);
    selectUser(
      selected => selected && nextUsers.find(({ id }) => id === selected.id),
    );
  });
}, [auth.user]);
While you’re in App.js, add the AuthHandler to listen for changes. You don’t need to pass any props to this, and it doesn’t render anything, so add it anywhere. You can add <AuthHandler /> after </Container> for example. Your final App.js should look like this:
src/App.js
import * as React from 'react';
import { Container } from 'semantic-ui-react';
import { Switch, Route, BrowserRouter as Router } from 'react-router-dom';
import { Security, ImplicitCallback } from '@okta/okta-react';

import { fetchUsers } from './api';

import Header from './Header';
import Search from './Search';
import SelectedUser from './SelectedUser';
import { AuthHandler, AuthProvider, AuthContext } from './Auth';

const App = () => {
  const [users, setUsers] = React.useState(null);
  const [selectedUser, selectUser] = React.useState(null);
  const auth = React.useContext(AuthContext);

  React.useEffect(() => {
    fetchUsers(auth.user).then(nextUsers => {
      setUsers(nextUsers);
      selectUser(
        selected => selected && nextUsers.find(({ id }) => id === selected.id),
      );
    });
  }, [auth.user]);

  return (
    <div>
      <Header selectedUser={selectedUser} />
      <Container style={{ paddingTop: '7em' }}>
        <Search users={users} selectUser={selectUser} />
        <SelectedUser selected={selectedUser} selectUser={selectUser} />
      </Container>
      <AuthHandler />
    </div>
  );
};

export default () => (
  <AuthProvider>
    <Router>
      <Security
        issuer={`${process.env.REACT_APP_OKTA_ORG_URL}/oauth2/default`}
        client_id={process.env.REACT_APP_OKTA_CLIENT_ID}
        redirect_uri={`${window.location.origin}/implicit/callback`}
      >
        <Switch>
          <Route path="/implicit/callback" component={ImplicitCallback} />
          <Route path="/" component={App} />
        </Switch>
      </Security>
    </Router>
  </AuthProvider>
);
Update Your UI to Reflect Auth Changes
You’ve already modified the API to provide more information, but you don’t display it anywhere. To update the UI, add a few Card.Meta items to the SelectedUser component, just after the Card.Header, so the existing Card.Content now looks like this:
src/SelectedUser.js
<Card.Content>
  <Card.Header>{selected.username}</Card.Header>
  {selected.email && <Card.Meta>{selected.email}</Card.Meta>}
  {selected.phone && <Card.Meta>{selected.phone}</Card.Meta>}
  {selected.address && <Card.Meta>{selected.address.city}</Card.Meta>}
</Card.Content>
To ensure users can navigate without typing in the URL themselves, add some code to Header to display some info the current user.
src/Header.js
import React from 'react';
import { Container, Menu, Image, Dropdown, Loader } from 'semantic-ui-react';
import { Link } from 'react-router-dom';

import logo from './logo.svg';
import { AuthContext } from './Auth';

export default ({ selectedUser }) => {
  const pageName = selectedUser ? selectedUser.name : '';
  const auth = React.useContext(AuthContext);

  return (
    <Menu fixed="top" inverted>
      <Container>
        <Menu.Item header>
          <Image size="mini" src={logo} />
          User Search
        </Menu.Item>
        <Menu.Item style={{ flex: 1 }}>{pageName}</Menu.Item>
      </Container>

      {auth.loading || !auth.user ? (
        <Menu.Item>
          {auth.loading ? (
            <Loader active inline />
          ) : (
            <Link to="/login">Sign In</Link>
          )}
        </Menu.Item>
      ) : (
        <Dropdown
          item
          simple
          text={
            auth.user.groups.includes('Admins')
              ? `${auth.user.name} (Admin)`
              : auth.user.name
          }
        >
          <Dropdown.Menu>
            <Dropdown.Item as={Link} to="/logout">
              Sign out
            </Dropdown.Item>
          </Dropdown.Menu>
        </Dropdown>
      )}
    </Menu>
  );
};
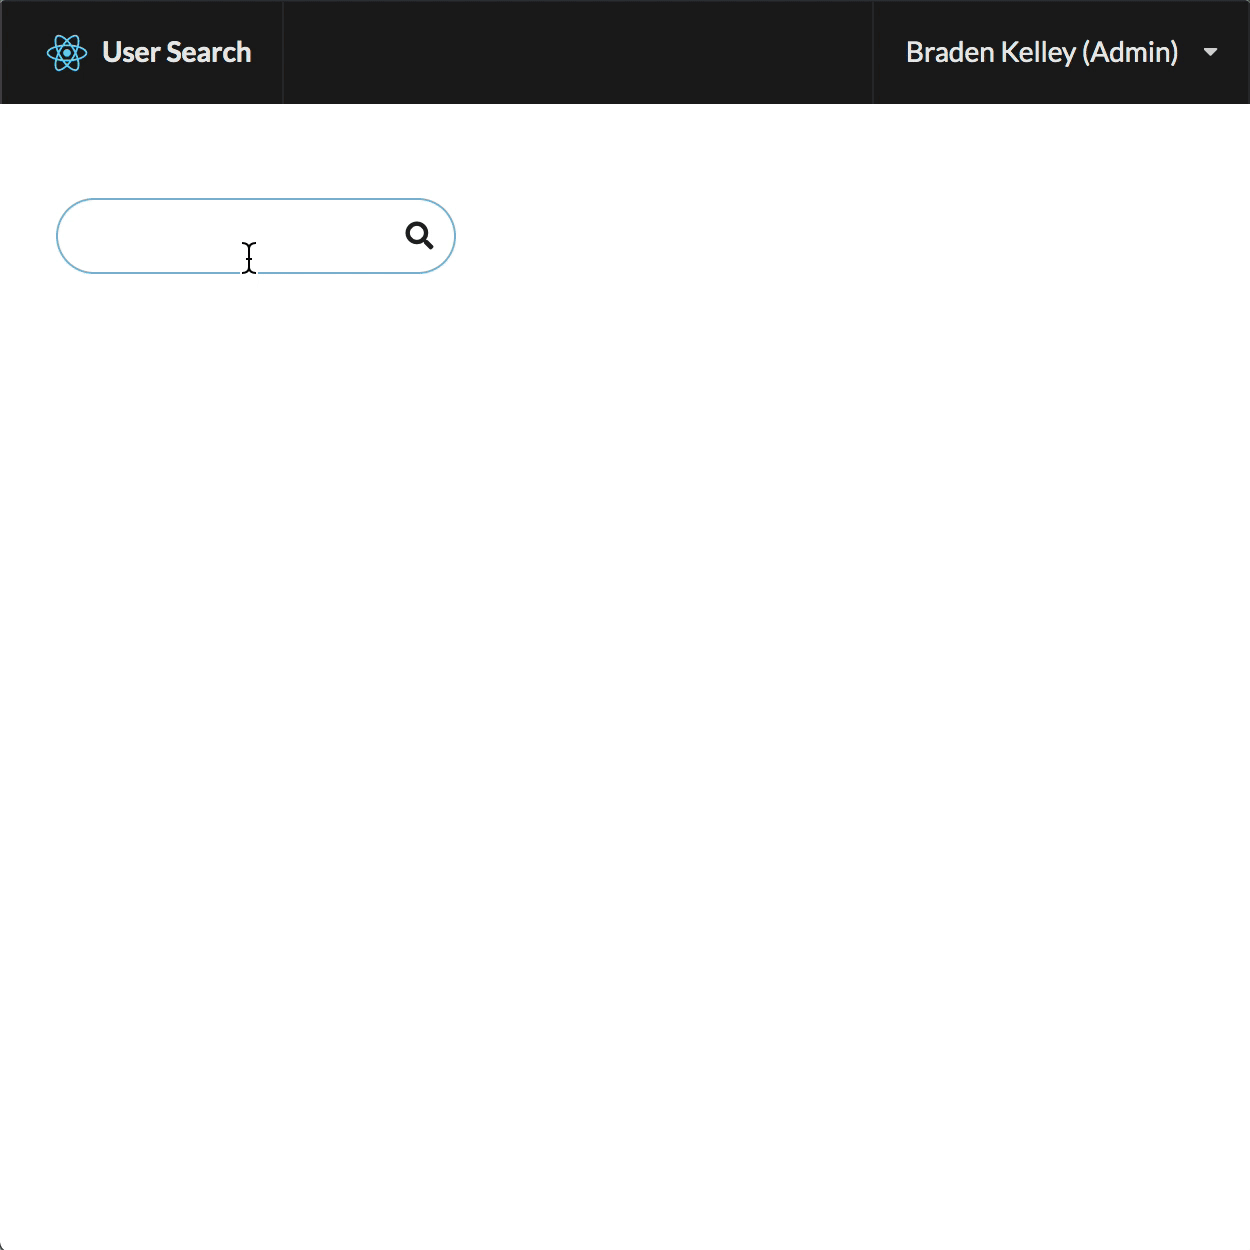
When the app first loads, the user state starts out as null and Okta needs to get you a token. In the meantime, you display a spinner with <Loader active inline />. If you’re logged out, you get a link to sign in. If you’re already logged in, it displays your name with a dropdown option to log back out. If you’re logged in as an Admin it’ll tell you right in the header.
Use Okta’s React Library to Decode the JWT
You can leverage Okta’s React library to decode the JWT instead of doing it yourself. Simply call auth.getUser() to return a promise that contains the user (or null):
In Auth.js, your updateAuth function should now look like this:
src/Auth.js
const updateAuth = async auth => {
  const token = (await auth.getIdToken()) || null;
  if (token !== state.token) {
    setState({
      token,
      loading: false,
      user: await auth.getUser(),
    });
  }
};
Note: You might not need token here, but I left it for a couple of reasons. Mainly, API requests in other parts of the app might need the token. Your backend can decode this token to ensure you’re authenticated. Also, since a token is just a string, you can just use a strict equals comparison (===) to monitor changes.
Learn More About React and JWTs
My goal was to show you how to use JWTs and how simple it can be to create a secure React app without any backend except to host a few static files. Hopefully, I succeeded. If you want to see the final sample code, you can find it on GitHub. If you’d like to learn more about React or JWTs, check out some of these other articles on the Okta developer blog:
- Build a Secure React Application with JWTs and Redux
- Why JWTs Suck as Session Tokens
- Simple User Authentication in React
- Build User Registration with Node, React, and Okta
- Angular Authentication with JWT
If you have any questions about this post, please add a comment below. For more awesome content, follow @oktadev on Twitter, like us on Facebook, or subscribe to our YouTube channel.
Okta Developer Blog Comment Policy
We welcome relevant and respectful comments. Off-topic comments may be removed.