Build a Secure React Application with JWTs and Redux

If you’ve worked with React at all, chances are you’ve at least heard of Redux. But you may not know what it is, how it fits in with React, or how to use it in your app. It can sometimes be complicated to set up but can be a very useful addition to a React app depending on your use cases.
And if you’ve done much work with web apps, you also probably know how hard it can be to deal with user authentication - storing usernames and passwords safely and securely is tough to do right. Using a third party you trust for authentication means you can rely on their backbone to make sure your app is secure. When a user authenticates with someone else, your app receives a JSON Web Token (JWT) that makes it really easy to know who someone is and verify their claims without any of the hassles that normally come with storing user information.
In this tutorial, I’ll show you how to create a React app that uses Redux for state management, how to secure your application using Okta, and how to decode the JWT in the client to make authorization decisions without relying on another call to the server. You’ll be able to use the token’s payload in order to determine what type of access to permit to a user. For this app, I’ll just have you build a search bar for a set of users.
Note: In May 2025, the Okta Integrator Free Plan replaced Okta Developer Edition Accounts, and the Okta CLI was deprecated.
We preserved this post for reference, but the instructions no longer work exactly as written. Replace the Okta CLI commands by manually configuring Okta following the instructions in our Developer Documentation.
What is Redux?
Redux is a state management tool that helps keep your app organized. While it can be used on its own or with another view library, it’s quite commonly used with React. You might not need it in your app, and there are some downsides to using it, but it also has many advantages. It would be worth weighing the pros and cons before deciding on using it for your app.
Some advantages to using Redux include:
- Components can access the state without needing to pass props through many levels of children
- A central store makes it easy to separate view layers from business logic
- Time travel debugging provides an easy way to rewind the state and can help track down bugs
- State is preserved during development when using Hot Module Replacement
- Myriad of add-ons available for things like using asynchronous actions or persisting state to local storage
Some disadvantages include:
- The state must contain plain objects and arrays so that it can be serialized
- There tends to be a lot of boilerplate, which can make the initial setup take a while
- Other tools like Hooks and Context can help solve some of the same problems with less complexity
How to Build a Simple React App with Redux
On to the coding! If you don’t already have Node installed, I highly recommend installing it via a tool called NVM, which makes it easy to upgrade and switch between different version of Node. The simplest way to install it is with the following command, but if you run into issues you can check out the installation guide. If you already have Node installed, don’t worry about this step.
curl -o- https://raw.githubusercontent.com/nvm-sh/nvm/v0.34.0/install.sh | bash
Next, you’ll need to set up the project. If you don’t already have them installed, install yarn and create-react-app:
npm i -g yarn@1.16.0 create-react-app@3.0.1
Now use create-react-app to bootstrap a new React project, then install a few dependencies. Redux is pretty un-opinionated and flexible, but to keep things simple they have a more opinionated set of tools called redux-starter-kit. Instead of connecting to a backend, you’ll just be using fake data for now - faker is great for that:
create-react-app react-redux-jwts
cd react-redux-jwts
yarn add redux@4.0.1 react-redux@7.1.0 redux-starter-kit@0.5.1 faker@4.1.0
You can start the app now with yarn start, which will watch for any changes you make to any files and automatically reload the page. You should now see the default app up at http://localhost:3000.
One popular redux methodology is known as Ducks, where instead of having all your reducers in one place, actions in another place, etc, you organize them by modules. In this app, you’ll have a users module and an auth module.
Create a folder to store your redux modules in:
mkdir src/redux
Using the redux-starter-kit, create a slice, which is essentially one piece of the global state that will manage the state reducers, and actions for one module. In a new file, add the following:
src/redux/users.js
import { createSlice } from 'redux-starter-kit';
import faker from 'faker';

const users = [...new Array(1000)].map(() => ({
  id: faker.random.uuid(),
  avatar: faker.image.avatar(),
  username: faker.internet.userName(),
  name: `${faker.name.firstName()} ${faker.name.lastName()}`,
}));

const { actions, reducer } = createSlice({
  initialState: {
    users,
    selected: null,
  },
  reducers: {
    selectUser(state, { payload: user }) {
      state.selected = user || null;
    },
  },
});

export const { selectUser } = actions;

export default reducer;
You’ll also need to create a store to manage the state for each piece.
src/redux/index.js
import { configureStore } from 'redux-starter-kit';
import users from './users';

export default configureStore({
  reducer: {
    users,
  },
});
Now in your main App.js file, you’ll need to set up the React Redux provider so that components anywhere in the tree can connect to the store.
src/App.js
// Add these lines to the top of the file
import { Provider } from 'react-redux';
import store from './redux';


// At the bottom of the file, replace `export default App` with the following:

export default () => (
  <Provider store={store}>
    <App />
  </Provider>
);
Add a UI to Your React App with Semantic UI
OK, now Redux is hooked up, but nothing is actually subscribing to the store yet. One UI framework that’s easy to work with is Semantic UI. For searching through users, a nice, local JavaScript search engine is Fuse.js. Add them as dependencies:
yarn add semantic-ui-react@0.87.2 semantic-ui-css@2.4.1 fuse.js@3.4.5
Here you’ll create three new components:
- A header for the page
- An autocomplete search input
- A card to display the selected user
To start, add the header:
src/Header.js
import React from 'react';
import { connect } from 'react-redux';

import logo from './logo.svg';
import { Container, Menu, Image } from 'semantic-ui-react';

const Header = ({ pageName }) => (
  <Menu fixed="top" inverted>
    <Container>
      <Menu.Item header>
        <Image size="mini" src={logo} />
        User Search
      </Menu.Item>
      <Menu.Item style={{ flex: 1 }}>{pageName}</Menu.Item>
    </Container>
  </Menu>
);

const mapStateToProps = state => ({
  pageName: state.users.selected ? state.users.selected.name : '',
});

export default connect(mapStateToProps)(Header);
The mapStateToProps function allows you to take the state from the redux store and convert it to props to be passed into the component. The connect function wraps the component and does the work necessary to actually connect to the store and pass in those props.
Next create the search component:
src/Search.js
import React from 'react';
import { connect } from 'react-redux';
import { Container, Search } from 'semantic-ui-react';
import Fuse from 'fuse.js';

import { selectUser } from './users';

const SearchPage = ({ users, selectUser }) => {
  const [term, setTerm] = React.useState('');
  const filteredUsers = React.useMemo(() => {
    if (!term) return users;
    const fuse = new Fuse(users, {
      shouldSort: true,
      keys: ['name', 'username'],
    });

    return fuse.search(term);
  }, [users, term]);

  return (
    <Container>
      <Search
        onResultSelect={(e, { result }) => {
          setTerm('');
          selectUser(result.user);
        }}
        onSearchChange={e => setTerm(e.currentTarget.value)}
        results={filteredUsers.slice(0, 5).map(user => ({
          childKey: user.id,
          title: user.name,
          description: user.username,
          image: user.avatar,
          user,
        }))}
        value={term}
      />
    </Container>
  );
};

const mapStateToProps = state => ({
  users: state.users.users,
});

const mapDispatchToProps = { selectUser };

export default connect(
  mapStateToProps,
  mapDispatchToProps,
)(SearchPage);
This component makes use of React’s relatively new Hooks API. The search term will be kept local to this component rather than storing it globally in Redux, since other components don’t need to know what the search term is, just whether something’s selected or not.
The useMemo hook makes it so that if there are multiple renders of the component, the search will only be done once. Searching can be a relatively expensive operation, especially as the dataset grows in size.
This uses mapStateToProps again to get the list of users and the selected user. What’s new here is mapDispatchToProps. This is how you connect to an action creator to dispatch an action to the Redux store. Rather than setting the state manually, you send an action to Redux, which then sends the action to the reducer to modify the state. Here you’re using the selectUser action creator to select a user.
Next, create a component to display the selected user:
src/SelectedUser.js
import React from 'react';
import { connect } from 'react-redux';
import { Message, Card, Image } from 'semantic-ui-react';

import { selectUser } from './users';

const SelectedUser = ({ selected, selectUser }) => {
  if (!selected) return null;

  return (
    <Card style={{ marginTop: '2em' }}>
      <Message
        attached
        header={selected.name}
        onDismiss={() => selectUser(null)}
      />
      <Image src={selected.avatar} wrapped ui={false} />
      <Card.Content>
        <Card.Header>{selected.username}</Card.Header>
      </Card.Content>
    </Card>
  );
};

const mapStateToProps = state => ({
  selected: state.users.selected,
});

const mapDispatchToProps = { selectUser };

export default connect(
  mapStateToProps,
  mapDispatchToProps,
)(SelectedUser);
This connects to the same pieces of state to know which user is selected. If none is selected, this simply won’t render anything. Otherwise, you’ll get a card showing the user. You’ll also get a button to deselect the user, so you’ll also need to subscribe to the selectUser action creator here.
In your src/index.js file, replace the ./index.css import with the Semantic UI css.
import 'semantic-ui-css/semantic.min.css';
Your App.js file now needs to reference the new components you just made. Your App.js file should end up looking like this:
src/App.js
import React from 'react';
import { Provider } from 'react-redux';
import { Container } from 'semantic-ui-react';

import store from './redux';

import Header from './Header';
import Search from './Search';
import SelectedUser from './SelectedUser';

const App = () => (
  <div>
    <Header />
    <Container style={{ paddingTop: '7em' }}>
      <Search />
      <SelectedUser />
    </Container>
  </div>
);

export default () => (
  <Provider store={store}>
    <App />
  </Provider>
);
Go ahead and give it a whirl! You should be able to search through a set of (fake) users, select one, choose another, etc.
Add Authentication to React with okta
One simple way to add authentication to your project is with Okta. Okta is a cloud service that allows developers to create, edit, and securely store user accounts and user account data, and connect them with one or multiple applications. Our API enables you to:
- Authenticate and authorize your users
- Store data about your users
- Perform password-based and social login
- Secure your application with multi-factor authentication
- And much more! Check out our product documentation
If you don’t already have one, sign up for a forever-free developer account. Log in to your developer console, navigate to Applications, then click Add Application. Select Single-Page App, then click Next.
Since Create React App runs on port 3000 by default, you should add that as a Base URI and Login Redirect URI. Your settings should look like the following:
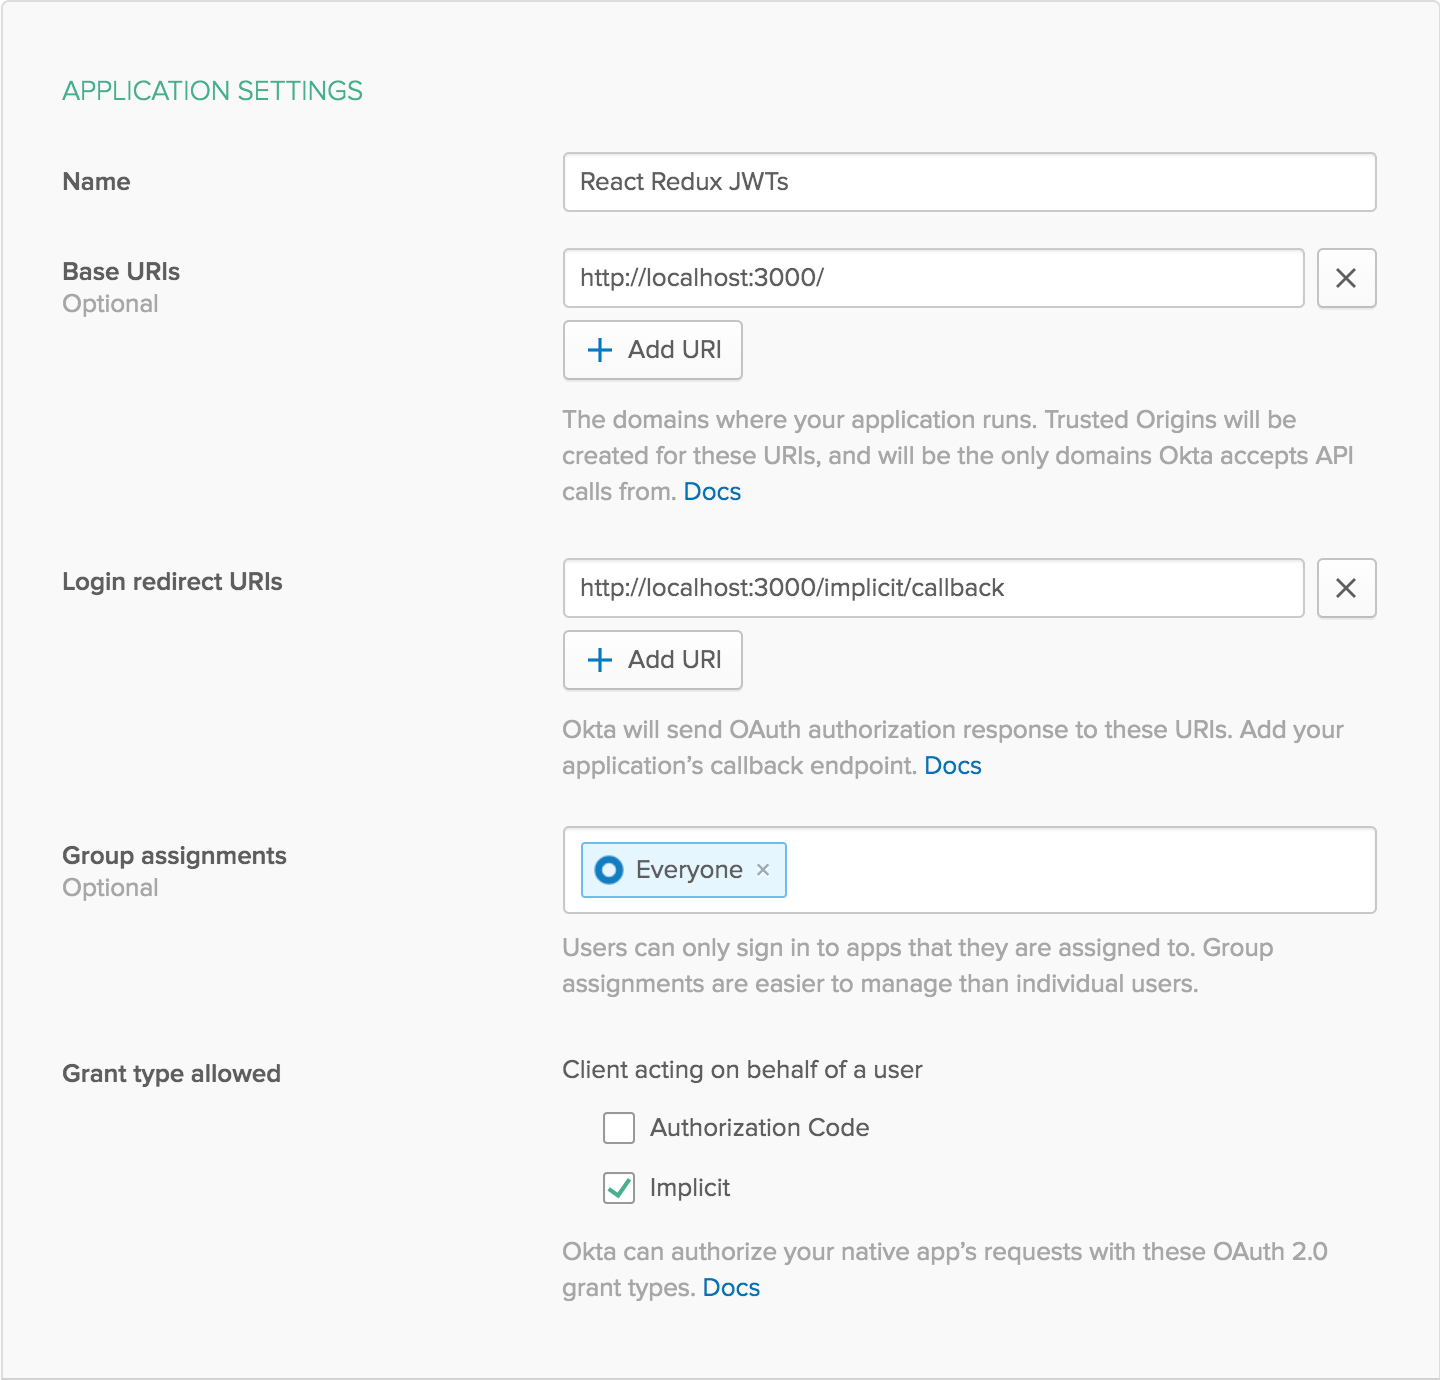
Click Done to save your app, then copy your Client ID and paste it as a variable into a file called .env.local in the root of your project. This will allow you to access the file in your code without needing to store credentials in source control. You’ll also need to add your organization URL (without the -admin suffix). Environment variables (other than NODE_ENV) need to start with REACT_APP_ in order for Create React App to read them, so the file should end up looking like this:
.env.local
REACT_APP_OKTA_CLIENT_ID={yourClientId}
REACT_APP_OKTA_ORG_URL=https://{yourOktaOrgUrl}
Okta allows you to add users to groups. For example, you can have an Admins or Managers group. By default, each user is already in the Everyone group. For this tutorial, I’ll be showing you how to determine which groups your user is in. This does require a little extra configuration for your Okta application.
While you’re still signed in to your Okta account:
- Navigate to API -> Authorization Servers
- Click on the
defaultserver, then go to the Claims tab - Click Add Claim and give it a name of
groups - Change
Include in token typetoID Token - For
Value type, selectGroups - Under
Filter, change theStarts withdropdown toMatches regexand enter.*in the text field next to it - Click Create to save it.

Next, navigate to Users -> Groups. Click the Add Group button and create a new group called Admins, and give it a friendly description, then click Add Group.
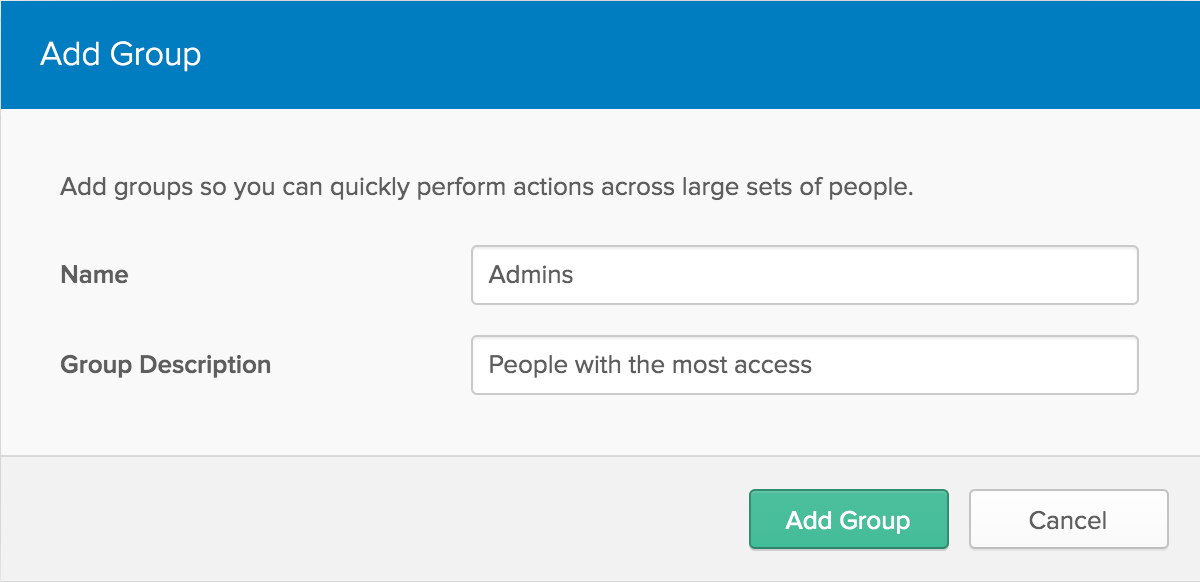
Click on the new group you just created, then click Add Members and type your name into the search bar, then click the Add button next to your user. It will help for testing if you have another account that’s not in the Admins group.
Connect Okta to Your React App
Now that your Okta application is ready to go, you’ll need to install a couple more dependencies to connect Okta to your React app.
yarn add @okta/okta-react@1.2.0 react-router-dom@5.0.1
Restart your server in order to pick up the new environment variables from .env.local. You can do this by closing the terminal hosting it or with ctrl-C, then using yarn start again to start it back up. To set up your app for listening to Okta, you’ll need to add some more context wrappers to App, as you did with React Redux’s Provider component:
src/App.js
// Add this to the top of the file
import { Switch, Route, BrowserRouter as Router } from 'react-router-dom';
import { Security, ImplicitCallback } from '@okta/okta-react';

// Replace your `export default` at the bottom of the file with the following:
export default () => (
  <Provider store={store}>
    <Router>
      <Security
        issuer={`${process.env.REACT_APP_OKTA_ORG_URL}/oauth2/default`}
        client_id={process.env.REACT_APP_OKTA_CLIENT_ID}
        redirect_uri={`${window.location.origin}/implicit/callback`}
      >
        <Switch>
          <Route path="/implicit/callback" component={ImplicitCallback} />
          <Route path="/" component={App} />
        </Switch>
      </Security>
    </Router>
  </Provider>
);
Okta’s React tools make it easy to authenticate users with their system. Okta will do all the heavy lifting and simply give you a JWT you can use to do with as you please.
What are JWTs?
A JWT is a JSON (JavaScript Object Notation) Web Token, which is most commonly used as a response to a successful authentication with a third party provider using OAuth 2.0. There are three parts to a JWT:
- The header, which contains information about the hashing algorithm to use
- The payload, or claims, which can be any JSON object but typically represents information about the user
- The signature, which isn’t feasible to recreate without the secret key, but can be easily verified without it
The header and payload are JSON strings converted to Base64, which means they can be easily read by anyone. JWT claims will typically have information about the user, such as their name and ID, but nothing sensitive like their password because it’s easy for anyone to decode the packet. It’s still always a good idea to encrypt the JWT using a secure connection such as HTTPS or WSS because even though they tend to have a short lifespan, they could still be used by someone else until a new token is issued if they were intercepted.
In general, JWTs are much safer than simply using a username and password because you can set a short expiration date, and with some extra setup, you could also revoke a JWT if you have reason to believe it’s compromised. This can all be done without the user needing to understand what’s going on, and they won’t need to change their password. This also allows you to use a third-party provider, like Okta, to authenticate the user without needing to worry about the nitty gritty of password management within your app.
Decoding a JWT is simple. A JWT is just a string, and the three parts are joined together using a dot (.), which means you can split it apart by those dots. The claims are in the second part and are Base64 encoded, which can be easily decoded with the browser’s built-in atob JavaScript function. Then just parse it as JSON:
JSON.parse(atob(token.split('.')[1]))
Use JWTs for React User Management and Authentication
You can incorporate this into your logic using Redux. Create a new slice to handle authentication:
src/redux/auth.js
import { createSlice } from 'redux-starter-kit';

const { actions, reducer } = createSlice({
  initialState: {
    loading: true,
    user: null,
    token: undefined,
  },
  reducers: {
    setAuth(state, { payload }) {
      state.loading = false;
      state.token = payload.token;

      if (payload.token) {
        try {
          state.user = JSON.parse(atob(payload.token.split('.')[1]));
        } catch (error) {
          state.user = null;
        }
      } else {
        state.user = null;
      }
    },
  },
});

export const { setAuth } = actions;

export default reducer;
You’ll then need to hook this slice into the redux store:
src/redux/index.js
import { configureStore } from 'redux-starter-kit';
import users from './users';
import auth from './auth';

export default configureStore({
  reducer: {
    users,
    auth,
  },
});
Next, you’ll need a new component to call the setAuth action creator, which will hook up to Okta’s React library. This doesn’t need to render anything but is just used to listen for updates from Okta and React Router, then call some actions depending on the current state.
src/AuthHandler.js
import * as React from 'react';
import { withRouter } from 'react-router-dom';
import { compose } from 'redux';
import { connect } from 'react-redux';
import { withAuth } from '@okta/okta-react';

import { setAuth } from './auth';
import { updateUsers } from './users';

const AuthHandler = ({
  auth,
  location,
  token,
  authUser,
  setAuth,
  updateUsers,
}) => {
  React.useEffect(() => {
    auth.getIdToken().then((nextToken = null) => {
      if (nextToken !== token) {
        setAuth({ token: nextToken });
      }
    });
  });

  React.useEffect(() => {
    if (location.pathname === '/login') auth.login('/');
    if (location.pathname === '/logout') auth.logout('/');
  }, [auth, location.pathname]);

  React.useEffect(() => {
    updateUsers(authUser);
  }, [authUser, updateUsers]);

  return null;
};

const mapStateToProps = state => ({
  token: state.auth.token,
  authUser: state.auth.user,
});

const mapDispatchToProps = { setAuth, updateUsers };

export default compose(
  withAuth,
  withRouter,
  connect(
    mapStateToProps,
    mapDispatchToProps,
  ),
)(AuthHandler);
If you’re not familiar with compose, it simply allows you to chain Higher-Order Components (HoCs) in a cleaner way. If you use a lot of HoCs (for example with a library like recompose), this could get messy quickly without using the compose function. Without compose, your export would look more like this:
export default withAuth(
  withRouter(
    connect(
      mapStateToProps,
      mapDispatchToProps
    )(AuthHandler)
  )
);
When listening to auth changes from Okta using withAuth, you’ll get an auth prop with some helpful functions. Whenever the token changes, the component will re-render. You can use React’s useEffect hook to check the ID token and update it if it’s changed.
React.useEffect(() => {
  auth.getIdToken().then((nextToken = null) => {
    setAuth({ token: nextToken });
  });
});
This component also connects to React Router with the withRouter HoC. Depending on the path, it will log the user in or out:
React.useEffect(() => {
  if (location.pathname === '/login') auth.login('/');
  if (location.pathname === '/logout') auth.logout('/');
}, [auth, location.pathname]);
For this tutorial, you’ll be showing something different to the user based on whether or not they are an admin. Imagine you have a set of users that anybody can view, but you want to hide things like their email address for anyone but admins. This effect will update the list of users whenever it detects that the currently signed in user has changed.
React.useEffect(() => {
  updateUsers(authUser);
}, [authUser, updateUsers]);
You may have noticed it’s calling updateUsers from the users Redux slice, but that hasn’t been implemented yet. Let’s go ahead and do that now. Faker has a helper function (userCard) that will generate some more information like an address, phone number, and email. In src/redux/users.js, create a new reducer that checks for the Admins group:
updateUsers(state, { payload: authUser }) {
  if (authUser && authUser.groups.includes('Admins')) {
    state.users = users.map(user => ({
      ...faker.helpers.userCard(),
      ...user,
    }));
  } else {
    state.users = users;
  }

  if (state.selected) {
    state.selected = state.users.find(
      user => user.id === state.selected.id,
    );
  }
}
Also make sure to add it to the exports:
export const { selectUser, updateUsers } = actions;
Your final file should look like this:
src/redux/users.js
import { createSlice } from 'redux-starter-kit';
import faker from 'faker';

const users = [...new Array(1000)].map(() => ({
  id: faker.random.uuid(),
  avatar: faker.image.avatar(),
  username: faker.internet.userName(),
  name: `${faker.name.firstName()} ${faker.name.lastName()}`,
}));

const { actions, reducer } = createSlice({
  initialState: {
    users,
    selected: null,
  },
  reducers: {
    selectUser(state, { payload: user }) {
      state.selected = user || null;
    },
    updateUsers(state, { payload: authUser }) {
      if (authUser && authUser.groups.includes('Admins')) {
        state.users = users.map(user => ({
          ...faker.helpers.userCard(),
          ...user,
        }));
      } else {
        state.users = users;
      }

      if (state.selected) {
        state.selected = state.users.find(
          user => user.id === state.selected.id,
        );
      }
    },
  },
});

export const { selectUser, updateUsers } = actions;

export default reducer;
Now that you have your AuthHandler component ready and hooked up to Redux, you just need to render it somewhere. Add it to App.js just after the Container wrapper.
// somewhere at the top of the file
import AuthHandler from './AuthHandler';

// Just after </Container>
<AuthHandler />
Your final App.js file should now look like the following:
src/App.js
import React from 'react';
import { Provider } from 'react-redux';
import { Container } from 'semantic-ui-react';
import { Switch, Route, BrowserRouter as Router } from 'react-router-dom';
import { Security, ImplicitCallback } from '@okta/okta-react';

import Header from './Header';
import Search from './Search';
import SelectedUser from './SelectedUser';
import AuthHandler from './AuthHandler';

import store from './redux;

const App = () => (
  <div>
    <Header />
    <Container style={{ paddingTop: '7em' }}>
      <Search />
      <SelectedUser />
    </Container>
    <AuthHandler />
  </div>
);

export default () => (
  <Provider store={store}>
    <Router>
      <Security
        issuer={`${process.env.REACT_APP_OKTA_ORG_URL}/oauth2/default`}
        client_id={process.env.REACT_APP_OKTA_CLIENT_ID}
        redirect_uri={`${window.location.origin}/implicit/callback`}
      >
        <Switch>
          <Route path="/implicit/callback" component={ImplicitCallback} />
          <Route path="/" component={App} />
        </Switch>
      </Security>
    </Router>
  </Provider>
);
Now to take advantage of the extra content available for admins, add a few Card.Meta items to the SelectedUser component, just after the Card.Header, so that the existing Card.Content now looks like this:
src/SelectedUser.js
<Card.Content>
  <Card.Header>{selected.username}</Card.Header>
  {selected.email && <Card.Meta>{selected.email}</Card.Meta>}
  {selected.phone && <Card.Meta>{selected.phone}</Card.Meta>}
  {selected.address && <Card.Meta>{selected.address.city}</Card.Meta>}
</Card.Content>
The last missing piece is to add some controls so that the user can log in and out without URL hacking. Add some code to your Header to display the currently logged in user.
src/Header.js
import React from 'react';
import { connect } from 'react-redux';
import { Link } from 'react-router-dom';
import { Container, Menu, Image, Loader, Dropdown } from 'semantic-ui-react';

import logo from './logo.svg';

const Header = ({ pageName, user, userLoading }) => (
  <Menu fixed="top" inverted>
    <Container>
      <Menu.Item header>
        <Image size="mini" src={logo} />
        User Search
      </Menu.Item>
      <Menu.Item style={{ flex: 1 }}>{pageName}</Menu.Item>

      {userLoading || !user ? (
        <Menu.Item>
          {userLoading ? (
            <Loader active inline />
          ) : (
            <Link to="/login">Sign In</Link>
          )}
        </Menu.Item>
      ) : (
        <Dropdown
          item
          simple
          text={[user.name, user.groups.includes('Admins') || '(Admin)']
            .filter(Boolean)
            .join(' ')}
        >
          <Dropdown.Menu>
            <Dropdown.Item as={Link} to="/logout">
              Sign out
            </Dropdown.Item>
          </Dropdown.Menu>
        </Dropdown>
      )}
    </Container>
  </Menu>
);

const mapStateToProps = state => ({
  pageName: state.users.selected ? state.users.selected.name : '',
  user: state.auth.user,
  userLoading: state.auth.loading,
});

export default connect(mapStateToProps)(Header);
When the app first loads, the user state starts out as null and Okta needs to do some work in the background to get you a token. In the meantime, you display a spinner with <Loader active inline />. If you’re logged out, you get a link to sign in. If you’re already logged in, it displays your name with a dropdown option to log back out. To help you out, if you’re logged in as an Admin it’ll tell you right in the header.
Bonus Tip
When working with Okta’s React library, you don’t actually need to manually decode the JWT - Okta will do it for you. Instead, you can use auth.getUser(). You would be able to cut out a good chunk of code in the reducer by using that instead:
// src/AuthHandler.js

React.useEffect(() => {
  auth.getIdToken().then((nextToken = null) => {
    if (nextToken !== token) {
      auth.getUser().then(user => {
        setAuth({ token: nextToken, user });
      });
    }
  });
});

// src/redux/auth.js
setAuth(state, { payload }) {
  state.loading = false;
  state.token = payload.token;
  state.user = payload.user;
},
Note: The token is left there for a couple of reasons. The main reason is so that you can access the token in other parts of the app in order to send off for an API request. Your backend can decode the same token to ensure that you’re authenticated. Another reason is that it’s less computational effort to compare the previous and next tokens since they’re just strings.
Learn More About React, Redux, and JWTs
Hopefully, I’ve shown you how easy it can be to set up Redux and add authentication to a React app using JWTs. If you want to see the final sample code, you can find it on GitHub. If you’d like to learn more about AWS React, Redux, or JWTs, check out some of these other articles on the Okta developer blog:
- Tutorial: Create and Verify JWTs in Java
- Why JWTs Suck as Session Tokens
- Simple User Authentication in React
- Build User Registration with Node, React, and Okta
- A Beginner’s Guide to Redux
If you have any questions about this post, please add a comment below. For more awesome content, follow @oktadev on Twitter, like us on Facebook, or subscribe to our YouTube channel.
Okta Developer Blog Comment Policy
We welcome relevant and respectful comments. Off-topic comments may be removed.