Secure and Scalable: An Introduction to JAMStack
If you’re a web developer, chances are you have heard the term “JAMstack.” Curiously, JAMstack isn’t a solution to prevent clogged printers, something to eat on toast, or a way to make music. However, by the time you finish reading this tutorial, you’ll understand JAMstack and its benefits, and learn one approach to implementing JAMstack for yourself. Let’s get ready to JAM.
The “JAM” in JAMstack stands for JavaScript, APIs, and Markup. JAMstack’s pattern of architecture makes web applications less expensive to build and more secure, with better performance and scalability.
JAMstack does not dictate you switch to any particular technology. You can use any JavaScript library or technology that compiles to JavaScript (e.g. TypeScript, Elm, Clojure, or WebAssembly). JavaScript can fetch data or send updates to third-party APIs, your own API, Serverless functions, or any combination of APIs. For managing content, you can choose from a variety of static site generators, such as Hugo, GatsbyJS, Jekyll, Next.js, Nuxt.js, or VuePress, and write content using Markdown or any other markup system that renders as HTML.
Note: In May 2025, the Okta Integrator Free Plan replaced Okta Developer Edition Accounts, and the Okta CLI was deprecated.
We preserved this post for reference, but the instructions no longer work exactly as written. Replace the Okta CLI commands by manually configuring Okta following the instructions in our Developer Documentation.
JAMstack is Fast, Scalable, and Less Expensive
Traditional web applications and Content Management Systems (CMS) rely on server-side code to render and return HTML on every request. Often times, these systems include a database or other type of dynamic storage, adding another layer of latency. Scaling a traditional system with more servers and ensuring high availability is no trivial task. Add to this the complexity of caching, such as invalidating the cache when content or code changes, and it’s a recipe for heartburn.
With the JAMstack approach, every page is compiled (or built) ahead of time when the application is deployed. All the HTML, JavaScript, CSS, and images required for the application are fully “baked” ahead of time.The goal is to avoid as much server executed code as possible because serving static files is faster and far simpler than executing server-side code.
These static files can additionally be globally cached across a Content Delivery Network (CDN). Most of the traffic falls on the CDN at dramatic cost savings over maintaining your own server infrastructure. In addition, visitors receive content from servers that are located closest to them, which can have a big impact on responsiveness, satisfaction, and conversions!

JAMstack is More Secure
Traditional server-side and CMS applications expose lots of APIs and services to allow administrators to manage data and content. All of these are at risk of attack and require continuous effort to patch and maintain.
On the other hand, static files are read-only and not susceptible to the same types of attacks. There is no code to run, so no vulnerabilities to exploit!
Even “A” in JAMstack (APIs) exposes a minimal attack surface area because there’s less code to secure and maintain and yourapplication can use APIs provided by a third-party. Presumably, any third-party service will diligently monitor and maintain the security and availability of their services.
Build Your First JAMstack with Hugo
Most JAMstack applications start with a decision on how to manage content and generate static resources. There are lots of options available in almost every programming language. StaticGen is a curated list of static site generators and a great starting place for research.
In this tutorial, we are going to use Hugo. It’s extremely fast and flexible. It’s written in Go, but it’s not likely you’ll need to learn the Go language to customize it for your needs.
Prerequisites
To complete this tutorial, there are a few things you will need.
- Depending on your operating system:
- Windows: Chocolatey
- macOS: Homebrew
- Linux: Linuxbrew
- Git
- If you don’t already have a favorite code editor, install Visual Studio Code
- A forever free Okta Developer Account
Install Hugo
The first step is to install Hugo. Hugo is a command-line interface (CLI) application that you will run in a command prompt, terminal, or PowerShell.
Chocolatey (Windows)
choco install hugo -confirm
Homebrew (macOS) or Linuxbrew (Linux)
brew install hugo
Create a New Hugo Application
In your terminal, change to a folder where you want to store your new application. Then, use the Hugo CLI to create the application.
hugo new site jamstack-demo
The previous command will create a new folder named jamstack-demo.
Add a Theme to Hugo using Git
There are a lot of great themes available for Hugo (see themes.gohugo.io for more examples). In this tutorial, you will use the Tranquilpeak theme.
cd jamstack-demo
git init
git submodule add https://github.com/kakawait/hugo-tranquilpeak-theme.git themes/hugo-tranquilpeak-theme
Update Hugo Configuration
Open the jamstack-demo project in your favorite code editor. Under the folder /themes/hugo-tranquilpeak-theme/exampleSite, you should see a file named config.toml. Open this file, select/highlight all the content, and copy the content.
Next, open the site’s /config.toml file, delete the current configuration, and paste in the configuration from the theme’s example site. Feel free to update the title or the author information.
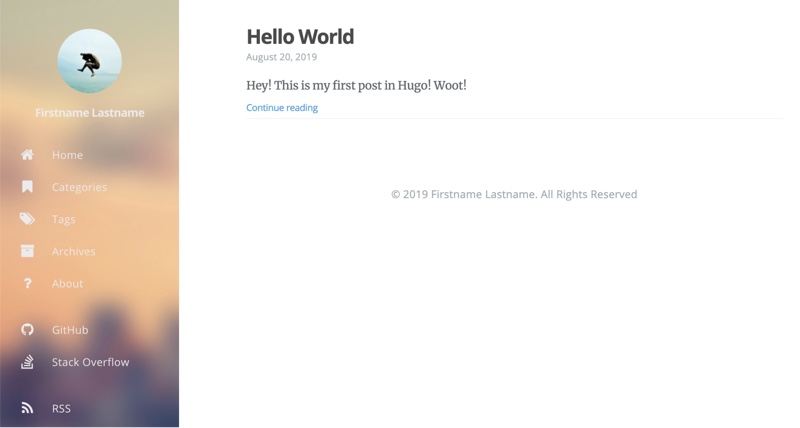
Create a New Post
In your terminal, use the Hugo CLI app to create a new post.
hugo new post/hello-world.md
In your editor, you will find the new post under /content/post/hello-world.md. Hugo uses Markdown for managing content. At the top of the Markdown file is the “front matter” or metadata about the post - add some content to the file below the front matter and save the file.
---
title: "Hello World"
date: 2019-08-20T12:55:13-04:00
draft: true
---

Hey! This is my first post in Hugo!
Launch the Hugo Server
Go back to your terminal and launch the Hugo web server with the following command. Hugo will build the site and start a local web server you can use for testing.
hugo server -D
By default, the local web site should be available at http://localhost:1313. Open your browser and navigate to the URL output at the terminal. By default, this should be http://localhost:1313. Switch back to your editor, make a change to the post, and save the file. Hugo should detect the change and automatically refresh the web site!
JavaScript and APIs
We now have a good foundation for the [M]arkup in JAM. Now let’s talk about [J]avaScript and [A]PIs. The files may be static, but once it is delivered to the client, the experience can be as dynamic as you like. The sky’s the limit!
Or, perhaps the cloud is the limit? Heh heh… get it? [cough] Right, let’s move on.
One fundamental concern for most web applications is how to manage user accounts and control access to protected data. Features such as user registration, login, password reset, and profile management are not trivial to implement on your own. Thankfully, there are great third-party solutions you can plug into your application to take all those worries away.
Add Okta Authentication and Identity to Hugo
With Okta, you can “…add authentication, authorization, and user management to your web app within minutes.” The first step is to sign up for a free developer account.
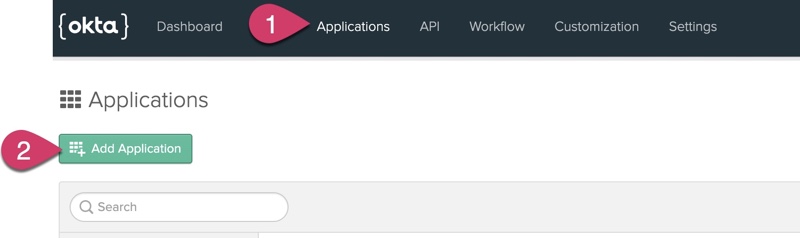
Create an Okta Application
Once you’ve registered and logged into your Okta developer dashboard, click on the Applications menu, and click Add Application.
Click on the Native application platform. The reason for choosing Native is this option supports the latest Proof Key for Code Exchange (PKCE) standard, which is more secure. Then, click Next.

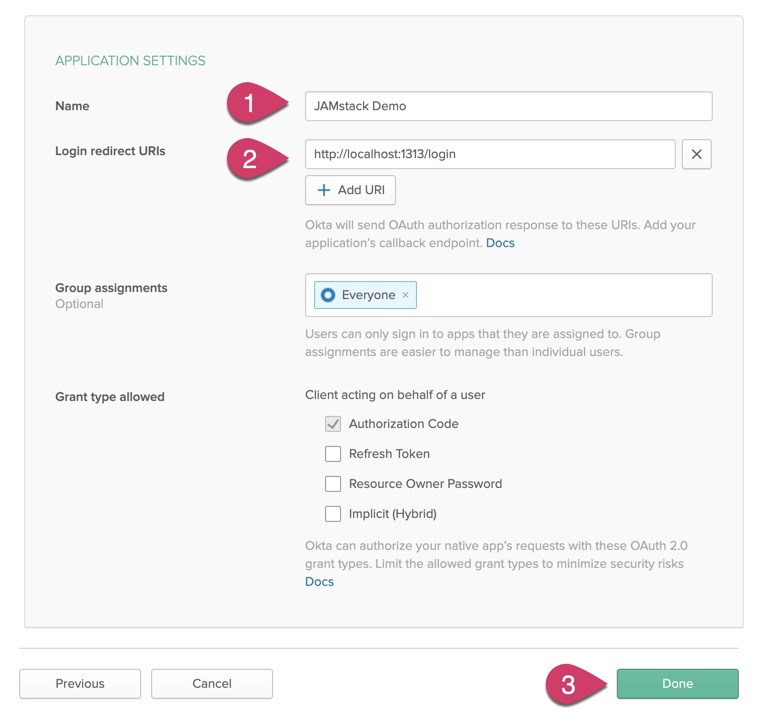
Change the application Name to whatever you desire. Update the Login redirect URIs to http://localhost:1313/login/. Click Done.
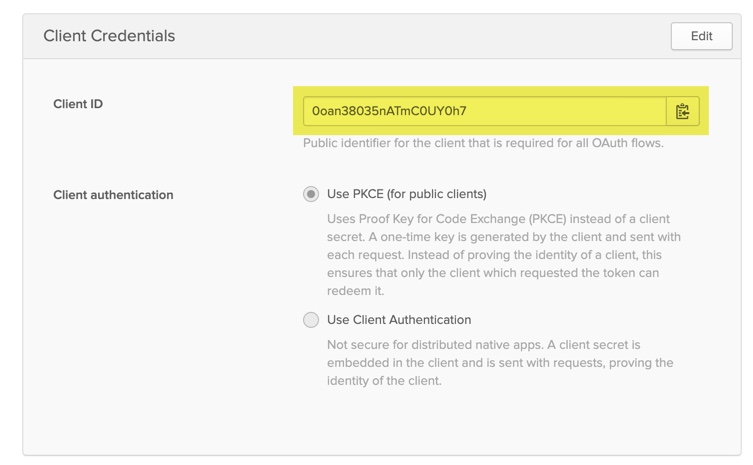
Copy the Client ID
You should now find yourself on the application settings page for the application you just created. Near the bottom, you should see a section labeled Client Credentials. Copy the Client ID and save it somewhere handy. You’ll need this value later.
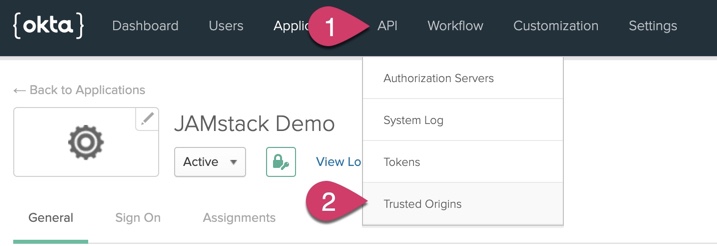
Add A Trusted Origin
To enable the Hugo application to exchange information with Okta, you need to configure Okta to permit the application’s URL. First, click on the API menu and click Trusted Origins.
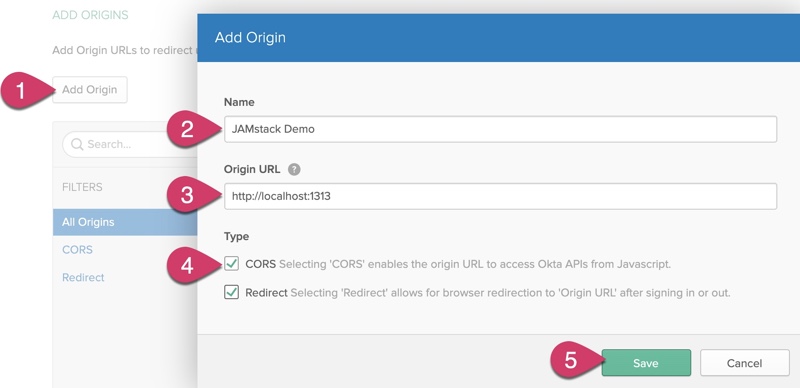
Next, click Add Origin and name the Origin JAMstack Demo. Change the Origin URL to http://localhost:1313. Click to enable both CORS and Redirect. Last, click Save.
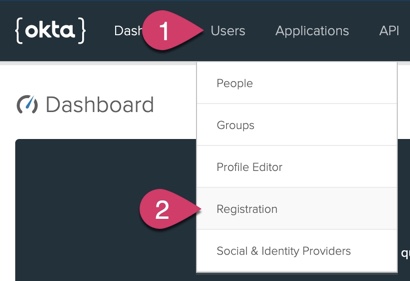
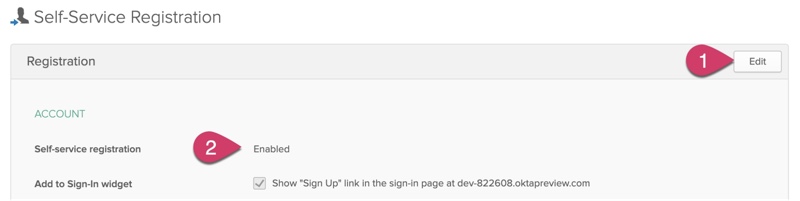
Enable Self-Service Registration
To allow new users to create their own accounts, you’ll need to enable self-service registration. To do this, click on the Users menu and click Registration.
Click on the Edit button, change the Self-service registration to Enabled, and then click the Save button at the bottom.
Copy the Organization URL
The last bit of information you need from your Okta account is your Org URL. Click on the Dashboard menu. On the right side of the page, you should see your account’s Org URL. Copy this URL and save it somewhere handy. You’ll need this value later, too.

Customize Hugo to Add Okta Login
Now that the Okta application is set up and ready, you can add Okta registration and login to your Hugo site. This will involve customizing the theme templates, creating a new Login page, and adding the Okta Sign-In Widget.
Add Okta Application Settings to Hugo Configuration
Open the /config.toml file and find the section under the comment # Menu Configuration. After the About menu item, add the following configuration.
[[menu.main]]
 weight = 6
 identifier = "login"
 name = "Login"
 pre = "<i class=\"sidebar-button-icon fa fa-lg fa-lock\"></i>"
 url = "/login"
At the very end of the config.toml file, add a new [params.okta] section with the following information. Update {yourOktaClientId} and {yourOktaOrgUrl} with the values you saved earlier.
 [params.okta]
   clientId = "{yourOktaClientId}"
   baseUrl = "{yourOktaOrgUrl}"
   redirectUri = "http://localhost:1313/login/"
Add JavaScript Files
Under the /static folder, create a new folder named js. In this folder, create a new file named okta-login.js and add the following JavaScript to this file. This JavaScript file will only be used with the login page itself.
// using jQuery, wait for the document to finish loading
$(document).ready(function () {
 // grab the Okta config injected by /layouts/partials/script.html
 var config = window.okta.config;

 // create an instance of the Okta Sign-In widget
 var signIn = new OktaSignIn({
   clientId: config.clientId,          // required okta config
   baseUrl: config.baseUrl,            // required okta config
   redirectUri: config.redirectUri,    // required okta config
   authParams: {
     display: 'page',
     responseType: 'code',             // authParams set to use PKCE
     grantType: 'authorization_code'
   },
   features: {
     registration: true                // allow user self-registration
   }
 });

 // test to see if the current request is a redirect back from Okta login
 function isRedirect() {
   return /((code|state)=)/.test(window.location.hash);
 }
  // get the active login session
 function getSession() {
   return signIn.authClient.session.get()
     .then(function (session) {
       if (session.status === "ACTIVE") {
         return session.user().then(function (user) {
           return {
             session,
             user
           }
         });
       }
       return { session, user: {} };
     })
     .catch(function (err) {
       console.error("session error", err);
     });
 }

 function showWelcomeMessage(profile) {
   $('#okta-login-firstname').html(profile.firstName)
   $('#okta-login-success').show();
 }

 // assign a click function to the sign out button
 $('#okta-sign-out').click(function() {
   signIn.authClient.session.close().then(function() {
     location.reload();
   });
 });

 if (isRedirect()) {
   // parse the token passed back from Okta
   signIn.authClient.token.parseFromUrl()
     .then(function (res) {
       var accessToken = res[0];
       var idToken = res[1];
       // set tokens for the active session
       signIn.authClient.tokenManager.add('accessToken', accessToken);
       signIn.authClient.tokenManager.add('idToken', idToken);

       // use the Okta API to get the current user
       return getSession()
         .then(function(res) {
           // show welcome message
           showWelcomeMessage(res.user.profile);
         })
         .catch(function (err) {
           console.error("getSession error", err);
         });
     })
     .catch(function (err) {
       console.error("parseFromUrl error", err);
     });
 } else {
   // try getting the active session
   getSession()
     .then(function(res) {
       if (res.session.status === 'ACTIVE') {
         // session is active, so show the welcome message
         showWelcomeMessage(res.user.profile);
         return;
       }
       // session is not active, so show the login widget
       signIn.renderEl({ el: '#okta-login-container' });
     })
     .catch(function(err){
       console.error(err);
     });
 }
});
Add a new file named okta.js to the /static/js folder with the following JavaScript. This code will be used everywhere on the site except on the login page.
// wait for the page to load
$(document).ready(function () {
 // create an instance of the Okta Sign-In widget
 var config = window.okta.config;
 var signIn = new OktaSignIn({
   clientId: config.clientId,
   baseUrl: config.baseUrl,
   redirectUri: config.redirectUri
 });

 // function to get the active login session, if exists
 function getSession() {
   return signIn.authClient.session.get()
     .then(function (session) {
       if (session.status === "ACTIVE") {
         return session.user().then(function (user) {
           return {
             session,
             user
           }
         });
       }
       return { session, user: {} };
     })
     .catch(function (err) {
       console.error("session error", err);
     });
 }

 function showWelcomeMessage(profile) {
   $('#okta-info .firstName').html(profile.firstName);
   $('#okta-info').show();
 }

 // if there's an active login session, show the welcome message
 getSession()
   .then(function(res) {
     if (res.session.status === 'ACTIVE') {
       showWelcomeMessage(res.user.profile);
     }
   })
   .catch(function(err){
       console.error(err);
   });
});
Customize Theme Templates
Under the /layouts folder, create a new folder named partials. Inside the partials folder, create a new file named okta-login.html. Add the following HTML to this file.
<div id="okta-login-container"></div>
<div id="okta-login-success" style="display:none;">
 <h2>Welcome, <span id="okta-login-firstname"></span>!</h2>
 <p>You are currently logged in.</p>
 <p><button id="okta-sign-out">Sign Out</button></p>
</div>
Under the /layouts folder, create a new folder named login. Under /layouts/login, add a new file named login.html and add the following HTML to this file.
{{ partial "head.html" . }}
<body>
 <div id="blog">
   {{ partial "header.html" . }}
   {{ partial "sidebar.html" . }}
   {{ partial "post/header-cover.html" . }}
   <div id="main" data-behavior="{{ .Scratch.Get "sidebarBehavior" }}"
     class="{{ with .Params.coverimage }}hasCover{{ end }}
            {{ if eq .Params.covermeta "out" }}hasCoverMetaOut{{ else }}hasCoverMetaIn{{ end }}
            {{ with .Params.coverCaption }}hasCoverCaption{{ end }}">
     <article class="post">
       <div class="post-header main-content-wrap {{ if $.Params.metaalignment }}text-{{ $.Params.metaalignment }}{{ else }}text-left{{ end }}">
         <h1 class="post-title" itemprop="headline">
           {{ $.Title }}
         </h1>
         {{ partial "okta-login.html" . }}
       </div>
       {{ partial "footer.html" . }}
     </article>
   </div>
 </div>
{{ partial "foot.html" . }}
Note: This is essentially the same template file as
/themes/hugo-tranquilpeak-theme/layouts/_default/single.html, but with the guts of the<article></article>changed to only include the{{ $.Title }}and new{{ partial "okta-login.html . }}.
Override Theme Templates
The next three template files will be modified copies of their respective originals. When Hugo renders a site, it first looks for template files in the site’s /layouts folder. Any file found in the /layouts folder overrides the same relative named file under the theme’s layouts folder (/themes/hugo-tranquilpeak-theme/layouts/).
Add a new file to /layouts/partials named script.html. Open the original script.html file located at /themes/hugo-tranquilpeak-theme/layouts/partials/script.html and copy the contents of the original file into /layouts/partials/script.html. Then, at the very bottom of the new script.html file, add the following markup.
{{ if ( isset .Site.Params "okta" ) }}
 <script src="https://global.oktacdn.com/okta-signin-widget/3.1.0/js/okta-sign-in.min.js" type="text/javascript"></script>
 <script>
   window.okta = {
     config: {
       clientId: '{{ .Site.Params.okta.clientId }}',
       baseUrl: '{{ .Site.Params.okta.baseUrl }}',
       redirectUri: '{{ .Site.Params.okta.redirectUri }}'
     }
   }
 </script>
 {{ if eq ( replace ( .Permalink | relURL ) "/" "" ) "login" }}
   <script src="/js/okta-login.js"></script>
 {{ else }}
   <script src="/js/okta.js"></script>
 {{ end }}
{{ end }}
Add a new file to /layouts/partials named head.html. Similar to the previous step, copy the original HTML located at /themes/hugo-tranquilpeak-theme/layouts/partials/head.html into the new head.html file. At the end of the file, add the following HTML before the {{ partial "head_end.html" . }} tag.
   {{ if .Site.Params.okta }}
     <link href="https://global.oktacdn.com/okta-signin-widget/3.1.0/css/okta-sign-in.min.css" type="text/css" rel="stylesheet"/>
   {{ end }}
Create a new file under /layouts/partials named footer.html. Add the following HTML to the file.
<footer id="footer" class="main-content-wrap">
<div id="okta-info" style="display: none; text-align: center;">
Hi, <span class="firstName"></span>!
</div>
<span class="copyrights">
© {{ now.Format "2006" }} {{ with .Site.Params.footer.copyright }}{{ . | safeHTML }}{{ else }}{{ with .Site.Author.name }}{{ . }}{{ else }}{{ with .Site.Title }}{{ . }}{{ end }}{{ end }}{{ end }}. {{ i18n "footer.all_rights_reserved" }}
</span>
</footer>
Add a Placeholder for the Login Page
Under the /content folder, add a file named login.html. Add the following markup to this file.
---
title: Login
type: login
layout: login
---
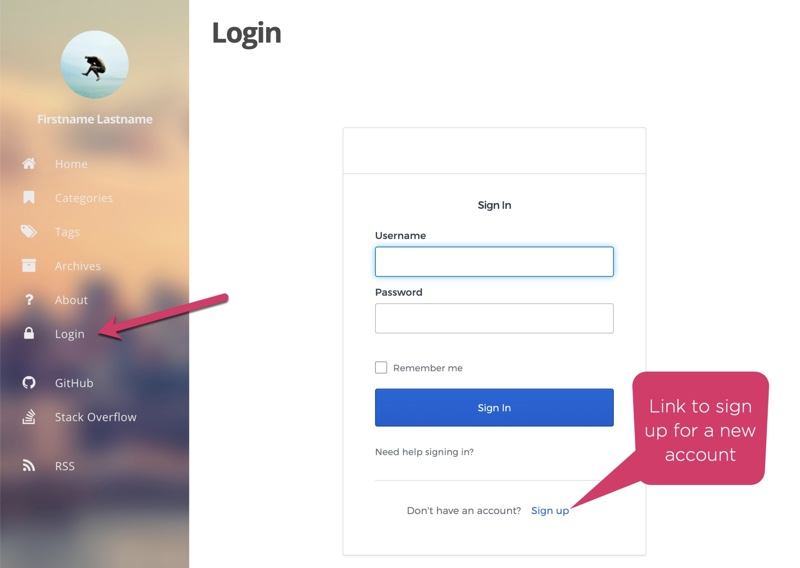
Test the New Login Page
Now you’re ready to test! Start the Hugo server if it’s not still running and browse to http://localhost:1313. You should see a new menu item on the left labeled Login. Click on this menu, and you should see the login form. Try logging in with the same Okta account you registered with, or try adding a new account using a different email address.
After you login to your Okta account, you should see the welcome message on the /login page. Click on the Home menu, and you should see a personalized message displayed in the footer area.
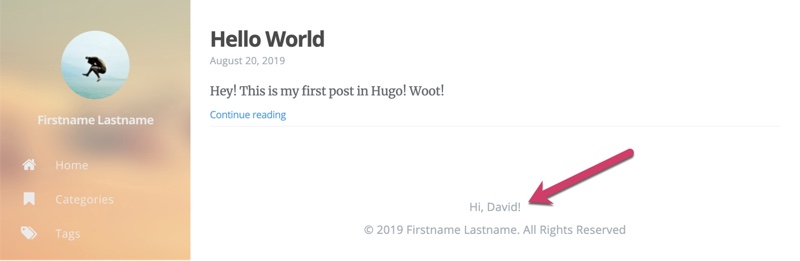
This demonstrates we can use JavaScript with the active login session to call additional Okta APIs. In this case, we’re retrieving profile information that includes the user’s first name.
Of course, there is so much more you can do! For example, from here you could integrate additional APIs and make requests to those using the same Okta authentication token. You could create a mashup of public and secure services.
Learn More About Static Sites and Security
In this post we’ve covered the basics of the JAMstack architecture, the benefits, and how to get started. However, we’ve only scratched the surface of everything you can do! Here are some resources to help you explore further!
- Add Authentication and Personalization to VuePress
- Static Sites vs CMS
- Tutorial: Build Universal Applications with Nuxt.js
- How to Configure Better Web Site Security with Cloudflare and Netlify
- Okta Sign-In Widget
- Okta Auth JavaScript SDK
For one example of deploying Hugo to a CDN, here is an excellent tutorial on how to host Hugo on Netlify.
You can find the complete source code for this post and demo on GitHub.
Okta Developer Blog Comment Policy
We welcome relevant and respectful comments. Off-topic comments may be removed.