Use Vue.js Data Binding Options for Reactive Applications

Vue.js is known as a “progressive framework for building user interfaces”. There’s a lot to unpack in this simple statement. It’s easy to get started with Vue.js, with a minimal feature set, and then layer in more of the framework as you need it.
Unike React, it has full support for the MVC (Model View Controller) pattern out-of-the-box.
It’s easier to use and grow with than Angular.
And, if you couldn’t tell, I’m a little biased.
Vue.js has full support for ECMA 6 (sometimes referred to as ES6 or ES2015). This means it’s now very easy to make your applications modular as well as being able to support modern syntax, like: import.
Vue.js has a lot of options for managing reactive data-binding in your application. This is the ability for views to automatically update when models (data) change.
In this post, you’ll look at three different approaches, each with their own pros and cons. For each of the three approaches, you’ll work with the same application: a progress bar that you can control with buttons. Then, you’ll dig deeper into the last option with a more complex code example.
The application also uses the BootstrapVue project which gives us a set of easy tags and components to work with for demonstration. You’ll make extensive use of the progress bar component.
Later, you’ll make use of the Vuex library for formal management of data stores. You’ll see how we can use these data stores to manage login and logout with Okta. First, let’s look at: Why use Okta?
Note: In May 2025, the Okta Integrator Free Plan replaced Okta Developer Edition Accounts, and the Okta CLI was deprecated.
We preserved this post for reference, but the instructions no longer work exactly as written. Replace the Okta CLI commands by manually configuring Okta following the instructions in our Developer Documentation.
Why Use Okta for Authentication?
While the example app in this post is focused on data binding, you’re going to be building a real-world application. The application includes authentication using the OpenID Connect standard in conjunction with Okta and stores the results of the authentication in the advanced data store for Vue.js. Okta makes identity management easier, more secure, and more scalable than what you’re used to. Okta is an API service that allows you to create, edit, and securely store user accounts and user account data, and connect them with one or more applications. As a developer, I know that I need authentication. But, I’ve seen enough horror stories from breaches over the years that I am happy to not handle credentials directly. Our API enables you to:
- Authenticate and authorize your users
- Store data about your users
- Perform password-based and social login
- Secure your application with multi-factor authentication
- And much more! Check out our product documentation for more information
To get started on this tutorial, register for a forever-free developer account, or sign in if you already have one. When you’re done, come back to learn more about building a secure SPA app with Vue.js and Vuex.
Use a Global Data Object for Simple Requirements
Using a global data object is straightforward and functional. It’s very accessible and the easiest of the approaches you’ll look at. It’s also the most fragile approach and requires duplicated code.
Let’s start by building and running the application. Clone the vue-data-binding-approaches GitHub project.
Note: The Vue CLI project was used to create each of the projects found in the repo.
Switch to the project folder, and run:
cd basic
npm install
npm run serve
This runs a local instance of the application. Launch your browser and navigate to: http://localhost:8080.
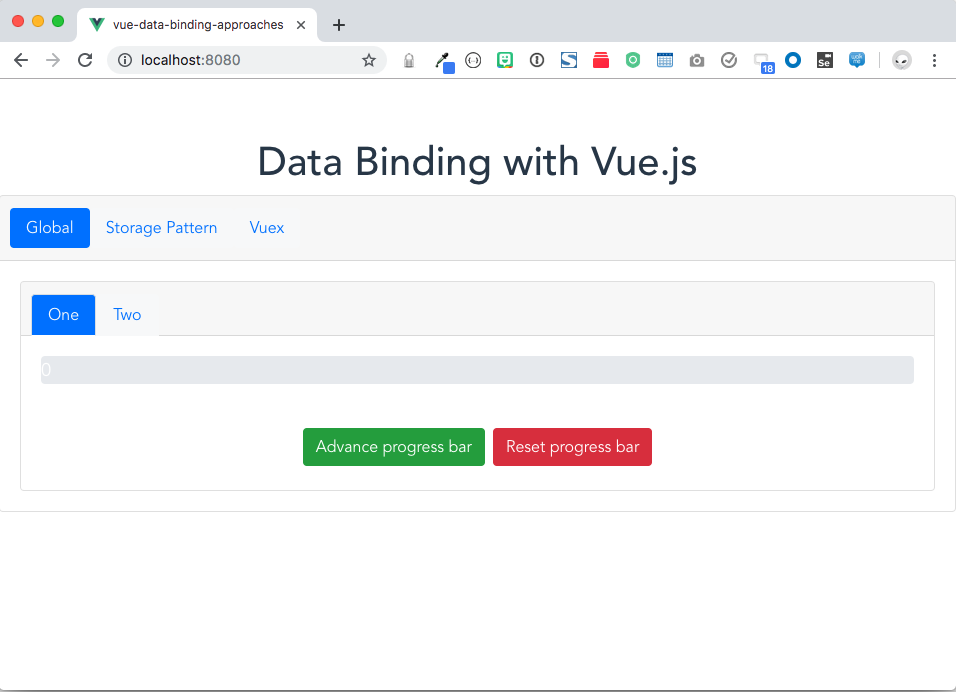
For this section of the post, you’ll be using the Global tab. Click Advance progress bar and you’ll see the progress bar move. Click the Two tab, and you should see the progress bar at the same point. The progress bars on tabs One and Two are kept in sync automatically through a global data object.
Let’s look at the code that backs the Global tab:
In the main.js file, I define the global data object:
export const globalData = {
  state: {
    max: 50,
    score: 0
  }
}
Notice that within the globalData object, there’s a state object. Within state are the actual properties we want to make sure are reactive. Due to the limitations of modern JavaScript, Vue.js cannot detect property addition or deletion. As long as we preserve globalData.state, Vue.js will be able to keep variables inside it reactive.
Let’s take a look at the parts of the basic/src/components/data-binding-global/One.vue template which manipulates the progress bar and keeps the data in sync.
Starting with the <script> section first, you can see that the globalData object defined in main.js is imported into this template.
import { globalData } from '../../main'
The data function binds the globalData object to a local variable in this template:
data() {
    return {
        scoreState: globalData.state
    }
}
The advance and reset functions manipulate the values in the globalData object. This is done by using the local template reference, which “points” to the object within our data structure. This is what preserves the reactive nature of the data in the template and why we need to nest the data properties in globalData.
advance: function () {
    if (this.scoreState.score < this.scoreState.max) {
        this.scoreState.score += 10
    }
},
reset: function () {
    this.scoreState.score = 0
}
Tying it all together is the template section. Here’s the progress bar:
<b-progress :max="scoreState.max" class="big-progress" show-progress>
    <b-progress-bar :value="scoreState.score"/>
</b-progress>
In the <b-progress> tag, the value for max is bound to the local template data object: scoreState.max. In the <b-progress-bar> tag, the value for value is bound to the local template data object: scoreState.score.
Finally, the template has buttons that when clicked call the advance and reset functions respectively to allow you to manipulate the progress bar.
basic/src/components/data-binding-global/Two.vue is almost an exact replica of One.vue. And, herein lies the issue with this approach: lots of repeated code.
Try out the Global tab on the app and you should see that however far you advance the One tab within it, when you click the Two tab, the progress bar will be at the same location. This is proof that our global reactive data binding is working.
If you look at One.vue and Two.vue in basic/src/components/data-binding-global, you can see that there’s a lot of repeated code. We can improve on this code using the Storage Pattern to centralize initialization and logic.
Use the Storage Pattern to Centralize Data Update Logic
Click on the Storage Pattern tab of the app. You can use the inside tabs to switch between the One and Two tabs. It looks just the same as the previous example. You’ll see the difference as we dig into the code.
In this version of the code, you use a centralized data store which includes not only the data object and initial states but also all the business logic.
Take a look at the basic/src/model/scoreStore.js:
export default {
    state: {
        max: 50,
        score: 0
    },
    reset: function () {
        this.state.score = 0
    },
    score: function (score) {
        if (this.state.score < this.state.max) {
            this.state.score += score
        }
    },
    bumpScore: function () {
        this.score(10)
    }
}
There’s still a state object that contains the internals of the data we want to be reactive in the application. There’s also reset, score, and bumpScore functions containing the business logic that was repeated across components in the previous example.
Now, take a look at the script section of basic/src/components/data-binding-storage/One.vue:
import scoreStore from '../../model/scoreStore'

export default {
    name: 'One',
    data() {
        return {
            scoreState: scoreStore.state
        }
    },
    methods: {
        advance: () => scoreStore.bumpScore(),
        reset: () => scoreStore.reset()
    }
}
the data() function is very similar to what we saw before. You bind the data state from the central model store.
The local functions in the methods section simply refer to functions from the central store.
There’s a great reduction in the repeated code in the components and any additional logic can be added to the central store.
This approach is robust and functional for simple projects. There are some shortcomings, however. The central store has no record of which component changed its state. Further, we want to evolve the approach where components can’t directly change state, but rather trigger events that notify the store to make changes in an orderly manner. For more complex projects, it’s useful to have a more formal data binding paradigm.
This is where Vuex comes in.
Use Vuex for Modern Data Binding
Vuex is inspired by other modern state management frameworks, like flux. It accomplishes two primary goals:
- A centralized, reactive data store
- Components cannot directly change state
Look at basic/src/model/scoreStoreVuex.js:
import Vue from 'vue'
import Vuex from 'vuex'

Vue.use(Vuex)

export default
 new Vuex.Store({
    state: {
        max: 50,
        score: 0
    },
    mutations: {
        bumpScore (state) {
            if (state.score < 50) {
                state.score += 10
            }
        },
        reset (state) {
            state.score = 0
        }
    }
  })
This time, you’re instantiating a Vuex object. Similar to the storage pattern from earlier, we define a state object in the Vuex.Store. What’s different here, is that there’s a mutations section. Each function in this section receives state as a parameter. These functions are not called directly.
You can see how changes to the datastore state are made by looking at basic/src/components/data-binding-vuex/One.vue. Take a look at the script section:
import scoreStoreVuex from '../../model/scoreStoreVuex'

export default {
    name: 'One',
    data() {
        return {
            scoreState: scoreStoreVuex.state
        }
    },
    methods: {
        advance: () => scoreStoreVuex.commit('bumpScore'),
        reset: () => scoreStoreVuex.commit('reset')
    }
}
Notice that the advance and reset functions call the commit function on scoreStoreVuex. The commit function takes a text parameter which is the name of one of the mutations we defined in the Vuex store.
Once again, you can see that our progress meter is kept in sync across the One and Two views.
The progress meter is a very simple example. In the next section, we’ll examine more complex uses of Vuex.
Advanced Data Binding with Vuex
Aside from ensuring that data elements cannot be directly changed, Vuex has a number of other features that adds to its usefulness. In this section, you’ll examine store injection, a helper for computed fields and managing more complex data objects, like arrays and javascript objects.
Everything in this section can be found in the vuex-advanced folder of the source code.
Vuex Store Injection
In this section, you use the vuex-advanced folder in the okta-vuejs-data-binding-example project.
At the top level of your app, you can inject the Vuex store. This will make it available to all components in the project without needing to explicitly import it.
It looks like this:
const store = new Vuex.Store({
...
})

new Vue({
  store,
  render: h => h(App),
}).$mount('#app')
Now, in any component, you need only refer to: this.$store to work with the Vuex data store.
Vuex Computed Fields
Computed fields are a key feature of Vue.js in general. Vuex provides advanced functionality to hook into the store to capture changes and make it easy to update the view automatically.
The mapState is a helper wrapper that can be used for computed fields. It looks like this:
import { mapState } from 'vuex';

computed: mapState([
    'ary', 'obj'
])
This is a shorthand for referencing state.ary and state.obj from the Vuex store. With this setup, you can then reference the computed value in your template:
<h1>{{ary}}</h1>
Managing Arrays and Objects with Vuex
In the basic section of this post, you were working with very simple values, like an integer for the progress meter.
Let’s take a look at how to manage arrays and objects with Vue.js and Vuex.
Because of the reactive nature of the data in the Vuex store, it’s important that you don’t delete or replace more complex objects and arrays. Doing so would break reactivity and updates would no longer be shown in views.
In the vuex-advanced application, you can add and delete elements from both arrays and objects.
Take a look at the add and del functions in the Vuex store:
const store = new Vuex.Store({
  state: {
    ary: [],
    obj: {}
  },
  mutations: {
    addAry: function (state, elem) {
      state.ary.push(elem)
    },
    delAry: function (state) {
      state.ary.splice(-1, 1)
    },
    addObj: function (state, elem) {
      Vue.set(state.obj, elem.key, elem.value)
    },
    delObj: function (state, name) {
      Vue.delete(state.obj, name);
    }
  }
})
For arrays, use the push function to add elements and the splice function to remove elements.
For objects, use the Vue.set to add elements and Vue.delete to remove elements.
In either case, the original object is never destroyed, preserving reactivity.
Use Okta and Vuex for Easy Login with OpenID Connect
Now that you’ve seen various approaches for data binding with Vue.js, let’s take a look at a practical application of Vuex.
In this section, you’ll develop a small, Single Page App (SPA) that integrates with Okta for authentication.
The app makes use of OpenID Connect, so let’s start with a quick overview of this standard for authentication and identity management.
Everything in this section can be found in the vuex-okta folder of the source code.
A Five-Minute Overview of OpenID Connect
OpenID Connect is an identity and authentication layer that rides on top of OAuth 2.0. In addition to “knowing” who you are, you can use OIDC for Single Sign-On.
OIDC is built for web applications as well as native and mobile apps. It’s a modern approach to authentication that was developed by Microsoft, Google and others. It supports delegated authentication. This means that I can provide my credentials to my authentication provider of choice (like Okta) and then my custom application (like a Vue.js app) gets an assertion in the form of an ID Token to prove that I successfully authenticated. OpenID Connect uses “flows” to accomplish delegated authentication. This is simply the steps taken to get from an unauthenticated state in the application to an authenticated state. For the SPA app, you’ll use the implicit flow for obtaining an ID Token. Here’s what the interaction looks like:
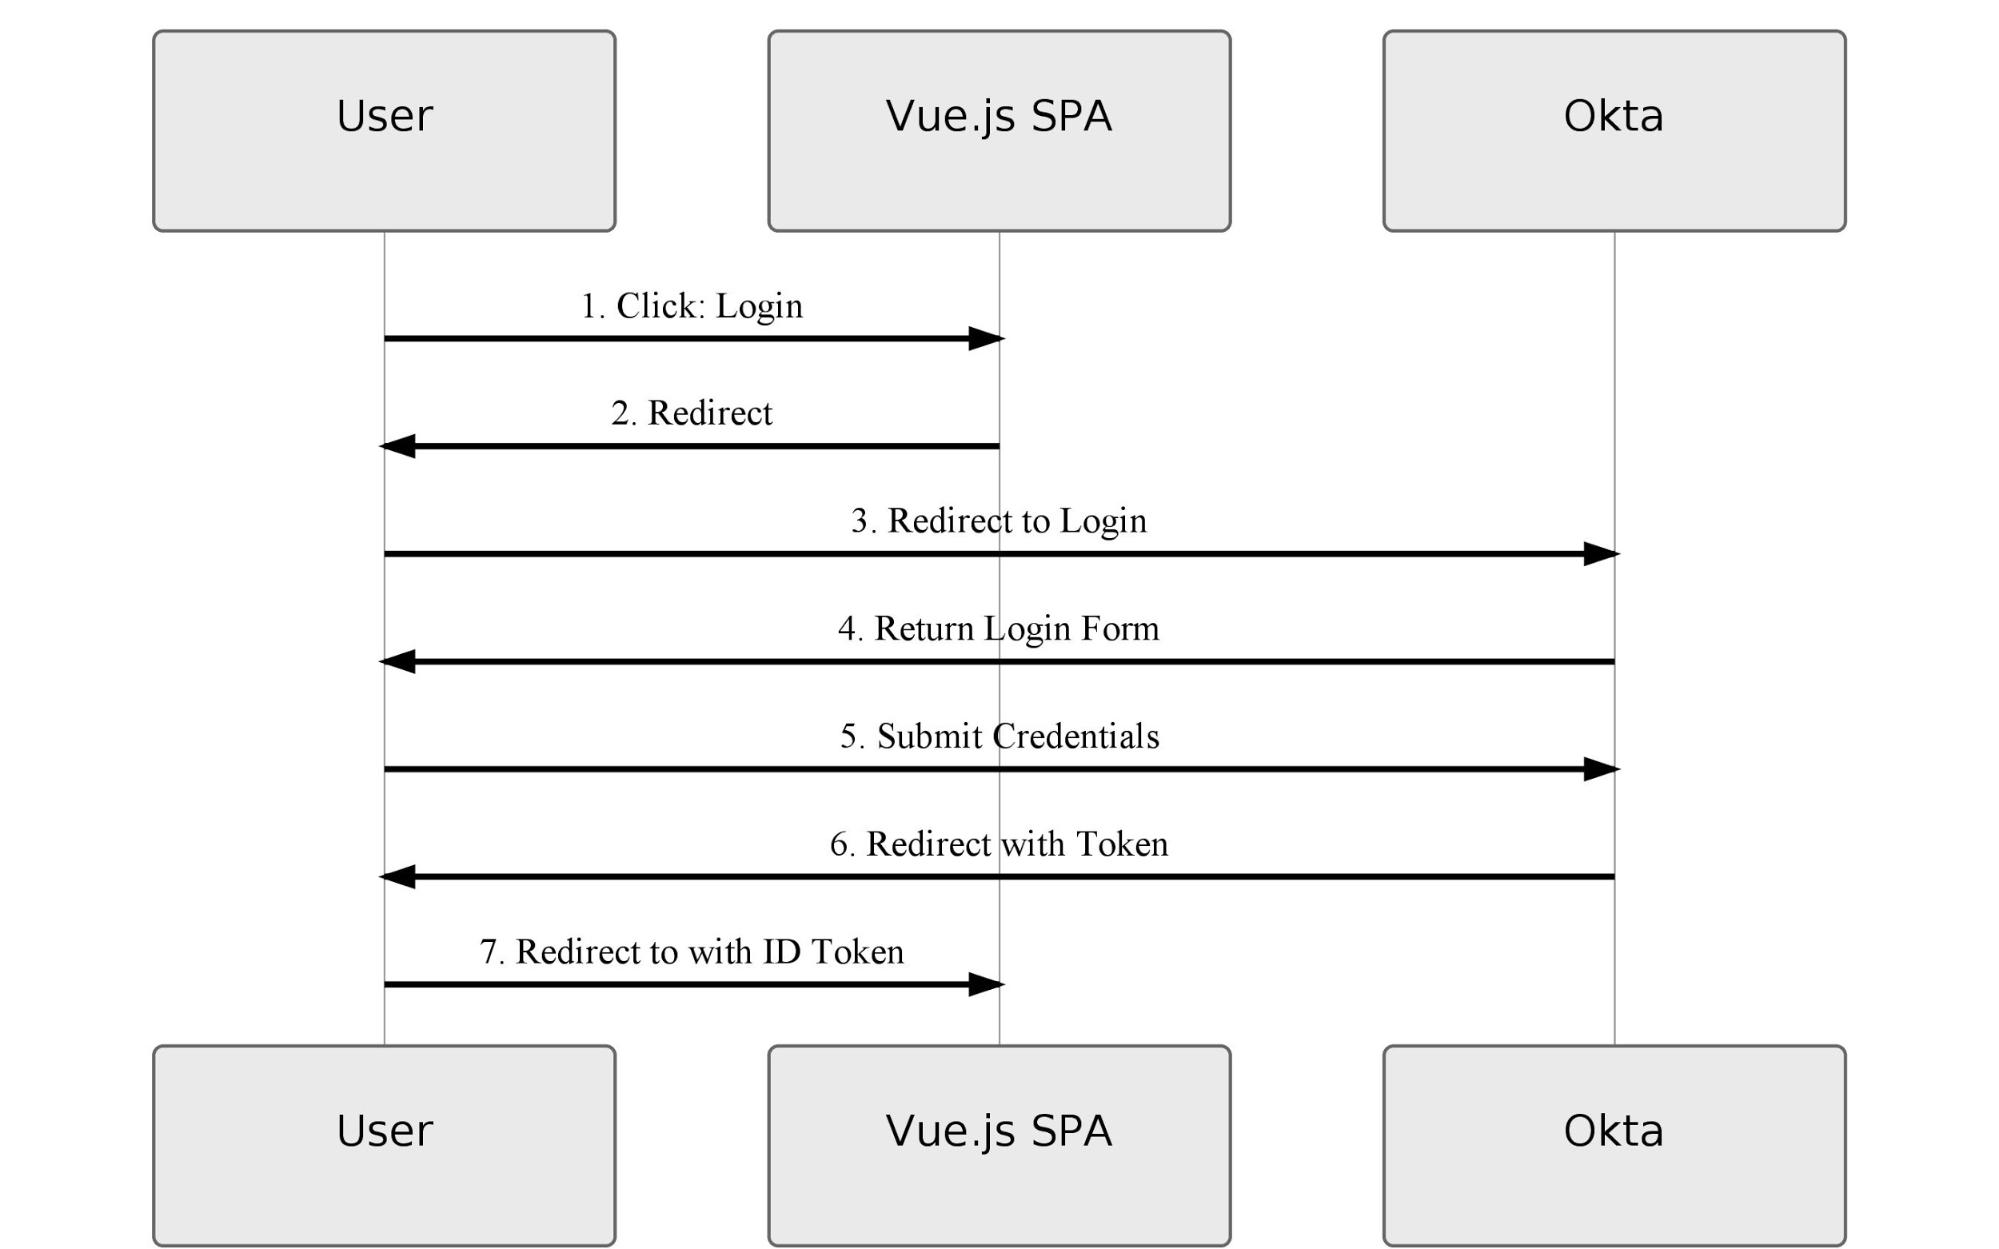
When you click the Login button in the app, you’re redirected to Okta to authenticate. This has the advantage of your app not being responsible for handling credentials. Once you’ve authenticated at Okta, you’re redirected back to the app with an ID Token. The ID Token is a cryptographically signed JSON Web Token (JWT) that carries identity information in its payload. The app can then extract user information from the token. Additionally, the app uses Vuex to store the ID Token, which can be used later to log out. To learn more about OAuth 2.0 and OIDC, check out these blog posts:
- An OpenID Connect Primer
- 7 Ways an OAuth Access Token is like a Hotel Key Card
- Is the OAuth 2.0 Implicit Flow Dead?
Note: In cases where you are using OpenID Connect to interact with an API, you’d also want to get back an access token. For these use cases, you would not want to use the implicit flow, but rather the authorization code wtih PKCE flow.
Set Up Okta for the SPA App
Head on over to https://developer.okta.com to create an Okta org.
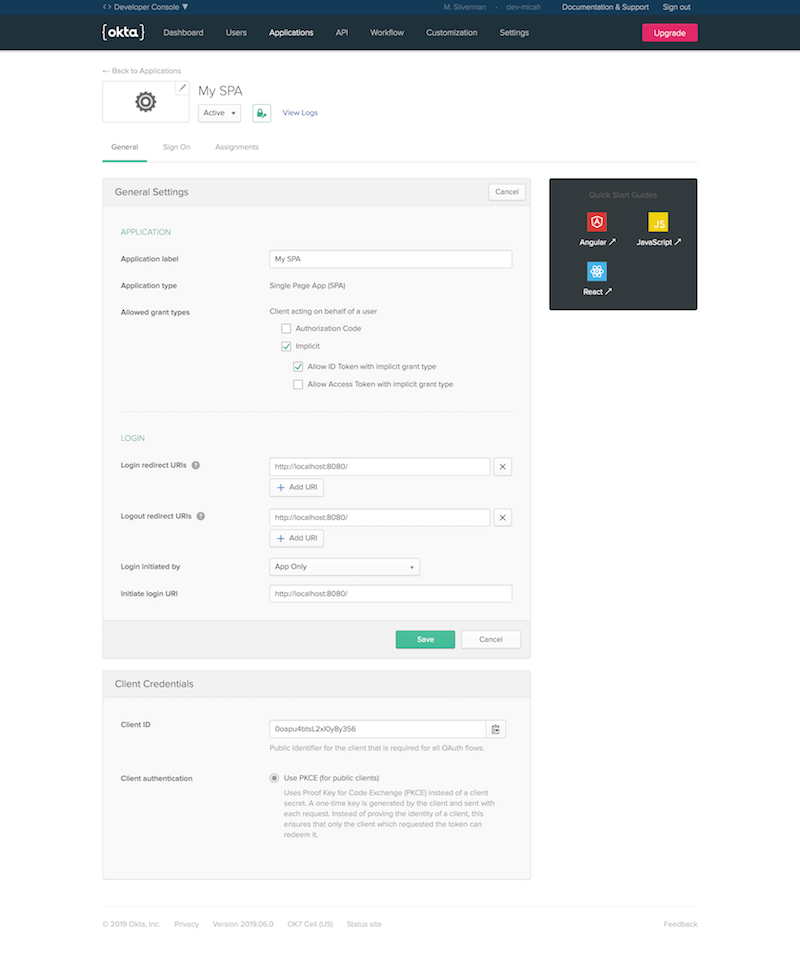
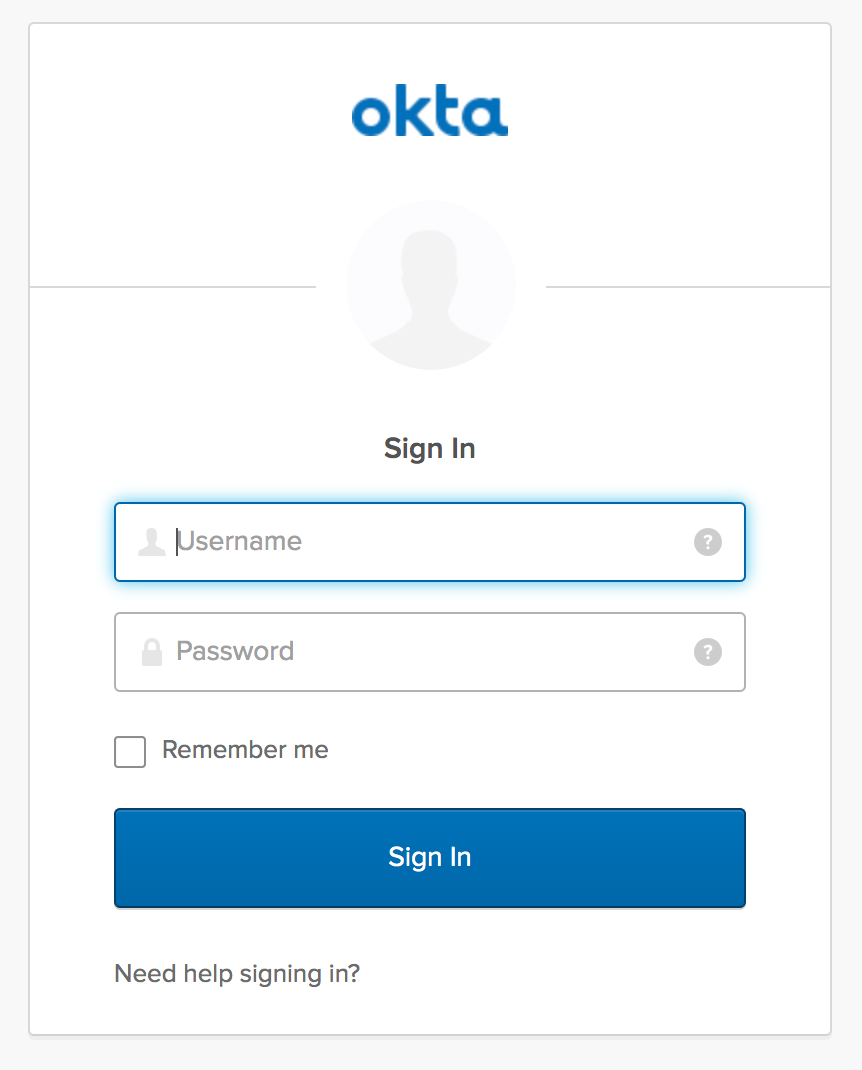
Login to your Okta org. Click Applications on the top menu. Click Add Application. Click Single-Page App and click Next.
Give your app a name. Change the Login redirect URIs field to http://localhost:8080. Click Done.
There’s one more thing we need to configure in order to support logout.
Click Edit. Uncheck Allow Access Token with implicit grant type (we will only be using the ID Token in this example). Click Add URI next to Logout redirect URIs. Enter: http://localhost:8080/.
Use Vuex and the Okta Auth Javascript Library
The okta-auth-js library includes support for OpenID Connect.
You can add it to your Vue.js project like so:
npm install @okta/okta-auth-js --save
Just like before, you configure Vuex in main.js
const store = new Vuex.Store({
  state: {
    user: {},
    idToken: ''
  },
  mutations: {
    setUser: function (state, elem) {
      Vue.set(state.user, elem.key, elem.value);
    },
    setIdToken: function (state, value) {
      state.idToken = value;
    }
  }
});
In this case, the data store keeps information about the user and the raw JWT in idToken.
The Home.vue file is the only component in this app. Okta will redirect back to this component both when you log in and when you log out.
Here’s the code to import the okta-auth-js library and set up some constants:
import OktaAuth from '@okta/okta-auth-js';

const ISSUER = 'https://{yourOktaDomain}/oauth2/default';
const CLIENT_ID = '{yourClientId}';
const REDIRECT_URI = 'http://localhost:8080';
var authClient;
The created function is run when the component is first created. In this function, the authClient is setup:
created() {
  authClient = new OktaAuth({
    issuer: ISSUER,
    clientId: CLIENT_ID,
    redirectUri: REDIRECT_URI
  });
}
The template is very simple. It shows the user information (which will be empty if you’re not logged in). It shows a Login button if you’re not currently authenticated and a Logout button if you are already authenticated.
<template>
  <div>
    <h1>Data Binding with Vue.js</h1>
    <h3>User Info:</h3>
    <div class="div-centered">
      <codemirror :value="userStr" :options="cmOptions"></codemirror>
    </div>
    <b-button v-if="!user.claims" @click="login" variant="primary" class="m-1">
        Login</b-button>
    <b-button v-if="user.claims" @click="logout" variant="danger" class="m-1">
        Logout</b-button>
  </div>
</template>
The app uses CodeMirror to display the JSON representing the user information formatted, indented and with line numbers.
Notice :value="userStr" in the <codemirror> tag. If you examine the computed section of the script, you can see how userStr is computed:
userStr() {
  return JSON.stringify(this.$store.state.user, null, '\t')
}
JSON.stringify is used so that codemirror can display the information properly. The important bit is: this.$store.state.user. This retrieves the bound value from the Vuex store.
When you first browse over to the app at http://localhost:8080, the view is pretty sparse:

When you click Login, you’re redirected over to Okta:
Here’s the login function in the methods section:
login() {
  authClient.token.getWithRedirect({
    responseType: 'id_token',
    scopes: ['openid', 'email', 'profile']
  })
}
The options passed into getWithRedirect ensure that you get back an id_token as well as specifying some default scopes in the request.
After you authenticate, Okta redirects back to http://localhost:8080. The mounted function is executed once the component is completely loaded and ready for action.
async mounted() {
  // check for tokens from redirect
  if (location.hash) {
    var tokenInfo = await authClient.token.parseFromUrl();
    this.$store.commit(
        'setUser', {key: 'claims', value: tokenInfo.claims}
    );
    this.$store.commit('setIdToken', tokenInfo.idToken);
  }
}
The redirect from Okta includes the id_token value in the URL in the fragment section. It looks something like this:
http://localhost:8080/#id_token=eyJraWQiOiI3bFV0aGJyR2hWVmxVT2RzVldwWFQwaWdyUEVGOEl6ZUtvdW53ckZocWxzIiwiYWxnIjoiUlMyNTYifQ...
The mounted function first checks to see if there’s a hash (#) in the location URL. Note: When you first browse to the app, there is no hash in the URL, so the if statement is not entered.
authClient.token.parseFromUrl() grabs the id_token from the url fragment, validates the cryptographic signature and extracts the json payload (the claims) from it.
The next two lines save the parsed claims as well as the raw JWT in the Vuex store. As we saw before, the code is using this.$store.commit to take advantage of the mutations defined in the store.
Because of the data binding and computed values we setup earlier, the user info is now displayed in the component.
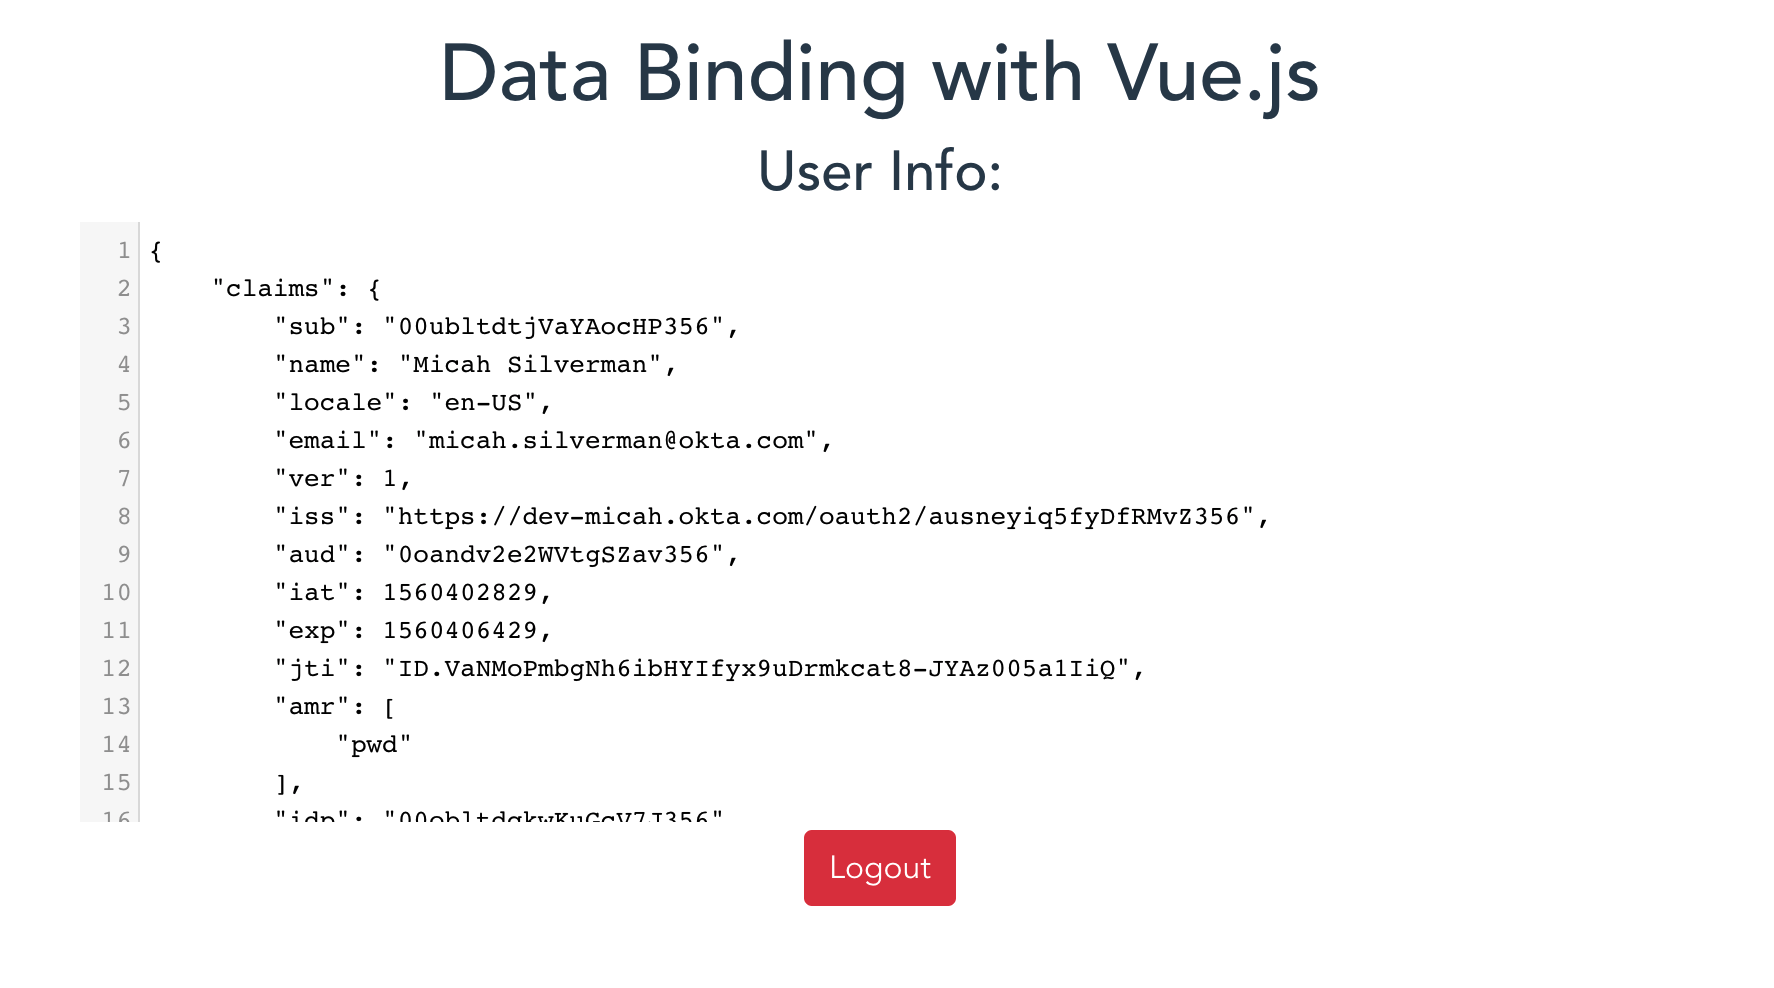
Now when you click Logout, the app uses the information in the Vuex store to properly execute the logout and destroy your session with Okta.
To log out with OIDC, you make a GET request of a /logout endpoint. You pass along the ID Token (as the raw JWT), as well as a redirect URI so that Okta can redirect back to the app after logout is complete. This is all set up in the logout function in the SPA app:
logout() {
  window.location.href =
    ISSUER + '/v1/logout?id_token_hint=' + this.$store.state.idToken +
    '&post_logout_redirect_uri=' + REDIRECT_URI
}
This closes the loop on our SPA app, its use of the okta-auth-js library in conjunction with Vuex to manage data stores and how that data is bound to the component.
Pick the Optimal Vue.js Data Binding Approach
All the code for this post can be found on GitHub.
In the simplest cases, a global data store may suit your needs. Even for more complex applications, the storage pattern may suffice. I’ve written a number of Vue.js applications that are in production that use the storage pattern. This includes the online version of the Zork game that teaches you a little about OAuth 2.0.
Vuex offers a tradeoff between slightly more complex code and a high degree of stability and testability. Vuex makes it easy to inject the data store into your components using this.$store and ensures that data cannot be directly updated by components.
As is almost always the case, you’ll need to pick the approach that makes the most sense for your use-case.
Learn More About Vue.js and Secure User Management
Okta’s written a Vue.js integration that makes integrating with Okta for secure auth a snap. It’s part of our open-source javascript OpenID Connect library. You can go directly to the Vue.js integration as well.
At Okta, we say: friends don’t let friends build auth! If you’re working on a project that requires secure, reliable authentication and authorization, get a free developer account from Okta.
Here are some more Vue.js posts that might interest you:
- Build Your First PWA with Vue and TypeScript
- Use Schematics with Vue and Add Authentication in 5 Minutes
- Build a Single-Page App with Go and Vue Check out the Okta Developer YouTube channel.
You can follow us on social @oktadev
Micah Silverman is a Senior Security H@X0R. With 25 years of Java Experience (yup, that's from the beginning), he's authored numerous articles, co-authored a Java EE book and spoken at many conferences. He's a maker, who's built full size MAME arcade cabinets and repaired old electronic games. He brings his love of all things Java and Developer Advocacy to you!
Okta Developer Blog Comment Policy
We welcome relevant and respectful comments. Off-topic comments may be removed.