Simple Authentication with Rails and OmniAuth
Today I’m going to show you how to authenticate users into your Rails applications using the latest best-practices and a hosted authentication/authorization provider which makes managing users simple. Specifically, you’ll learn how to integrate Rails and Okta to create, manage, and secure users with OpenID Connect.
To make this all work, you’ll be using one of the most popular gems in the Rails world: OmniAuth. Additionally, you’ll be using the fabulous devise gem to make plugging user authentication into our app simple.
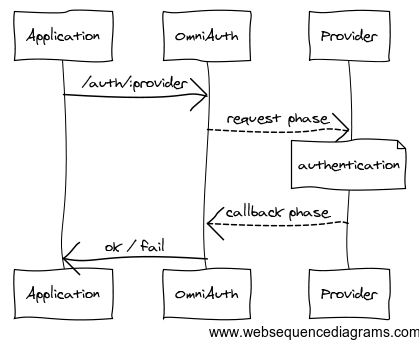
The core of what you’re building is powered by OmniAuth Gem, which will help our Rails app handle OAuth and OpenID Connect flows. What OmniAuth does is ask an identity provider (Okta, in this case) for access to user information in the form JSON Web Tokens. OmniAuth then provides a very simple hash in the form of request.env['omniauth.auth'] which contains all the logged-in user’s information which you can then easily pass to Active Record to store in a database. Cool, right?!
Build Authentication in Rails
git clone https://github.com/andrewvanbeek-okta/oktaOmniAuthDeviseSample.git
cd oktaOmniAuthDeviseSample
Now install all of the project’s dependencies using Bundler.
bundle install
Next, create a database using the rake command. This will create a local
database using SQLite3.
rake db:create
Next, create a config/application.yaml file to populate all necessary environment variables.
bundle exec figaro install
If you don’t already have an Okta account, go create one now: https://developer.okta.com/signup. Okta is a free-to-use API service that stores user accounts and handles user authentication and authorization. Okta makes identity management a lot easier, more secure, and more scalable than what you’re used to. Okta is a cloud service that allows developers to create, edit, and securely store user accounts and user account data, and connect them with one or multiple applications. Our API enables you to:
- Authenticate and authorize your users
- Store data about your users
- Perform password-based and social login
- Secure your application with multi-factor authentication
- And much more! Check out our product documentation
Once your Okta account has been created, you’ll need to copy some Okta values into environment variables for Rails to use. Edit the newly generated config/application.yml and add the following values from your Okta tenant.
OKTA_CLIENT_ID: "YOUR-CLIENT-ID"
OKTA_CLIENT_SECRET: "YOUR-CLIENT-SECRET"
OKTA_ORG: "YOUR-OKTA-ORG"
OKTA_DOMAIN: "oktapreview"
OKTA_URL: "YOUR-OKTA-ORG-URL"
OKTA_ISSUER: "YOUR-OKTA-ISSUER-URL"
OKTA_AUTH_SERVER_ID: "YOUR-AUTH-SERVER-ID"
OKTA_REDIRECT_URI: "http://localhost:5000/users/auth/oktaoauth/callback"
Now you might be wondering: where do these values come from? These values can all be retrieved from the Okta dashboard. Go to Okta and log in, then follow the steps below to retrieve these values. These values are standard OAuth configs which OmniAuth uses to communicate with Okta – the setup will be similar for other OAuth providers.
Create an App with Okta and Add Authentication for Rails
From the dashboard, click the Applications menu item, then click the Add Application button. From there, select the Web option and click Next.
Next, fill in the following values for your new Okta application.
- Name:
Rails App - Base URIs:
http://localhost:5000 - Login Redirect URIs:
http://localhost:5000/users/auth/oktaoauth/callback
Then click Done. You can now copy the Client ID and Client secret values into your environment variable file as mentioned above.
Get Your Okta Configuration Information
To get your OKTA_URL value, visit the Okta dashboard main page and copy the Org URL value from the top-right of the screen.
To get the OKTA_ISSUER value, use OKTA_ISSUER/oauth2/default, substituting your issuer URL in.
Finally, for OKTA_AUTH_SERVER_ID, use the value default.
Test Out Authentication in Your Rails App
Now that you’ve configured the necessary environment variables, let’s test it out!
Run the following commands to start a local web server to test against.
rake db:migrate
rails s
Be sure to click around, sign up, sign in, and see how OmniAuth + Okta make the authentication process painless.
Learn More
As you can see, getting your Rails app setup to handle user authentication with OpenID Connect doesn’t have to be hard. By using OmniAuth and Okta, you’re able to quickly spin up user management.
If you’d like to see how this app works in more detail, check out the screencast below. It walks through the process of adding Okta and OmniAuth to an existing Rails application.
If you’re interested in learning more about web security, please follow us on Twitter – we publish lots of interested articles on the topic. And if you have any questions, please leave a comment below and I’ll do my best to get back to you.
Okta Developer Blog Comment Policy
We welcome relevant and respectful comments. Off-topic comments may be removed.