Build a Photo Gallery PWA with React, Spring Boot, and JHipster

At its core, React is just a UI toolkit, ala GWT, but it has a very healthy ecosystem around it that provides everything you need to build a kick-ass progressive web app (PWA). PWAs are cool because if they’re done right, they can offer a native-like experience for your users, allowing them to install your app, and use it when it’s offline.
But, “why React?” is what you’re probably asking yourself right now, right? Well, you might’ve heard that Angular can be a gateway drug for Java developers wanting to learn JavaScript. If you’re an experienced Java developer that knows Angular, chances are you started with AngularJS. AngularJS has similar concepts to Java MVC frameworks, like controllers, services, and directives (which I believe are similar to JSP tags IMHO). If you’re still doing Angular development, you probably learned TypeScript along the way. You like TypeScript because it has types like Java, and it’s a pretty nice language too!
I’m betting that if you already know Angular, you might want to learn about React, its main competitor. There’s always going to be several ways to write web apps, and React provides an entirely different way to do it, and you can use TypeScript with it too!
In this post, I’ll show you how to build a secure PWA that uploads and processes images, displays them in a Flickr-like grid, and uses Spring Boot for its backend.
Note: In May 2025, the Okta Integrator Free Plan replaced Okta Developer Edition Accounts, and the Okta CLI was deprecated.
We preserved this post for reference, but the instructions no longer work exactly as written. Replace the Okta CLI commands by manually configuring Okta following the instructions in our Developer Documentation.
Get Started with React and Spring Boot
One of the easiest ways to get started with React is by using Create React App (CRA). You install it locally, then run create-react-app $projectName to generate a skeleton React application with minimal dependencies. It uses webpack under-the-covers to build the project, launch a web server, and run its tests.
Spring Boot has a similar tool, called Spring Initializr. Spring Initializer is a bit different than CRA because its a website (and API) that you use to create applications with.
Both tools are worth looking into, and you can learn how to create a basic app with them by reading my Bootiful Development with Spring Boot and React tutorial.
Today, I’ll show you how to build a CRUD app for photos with React and Spring Boot. However, I’m going to cheat. Rather than building everything from scratch, I’m going to use JHipster. JHipster is an application generator that initially only supported Angular and Spring Boot. In its version 5.0 release, it added support for React, webpack 4, and Spring Boot 2.
JHipster v5.0.0 released, the day before @jhipsterconf :-)
— JHipster (@java_hipster) June 20, 2018
Features Angular 6, React, Webpack 4, Spring Boot 2 and just too many things to list in a single tweet!https://t.co/DB9yPGHk2K
JHipster ships with a number of features that every application needs, including authentication/authorization, unit and end-to-end testing support, and tools to make it easy to deploy to the cloud.
Get Started with JHipster 5
To get started with JHipster, you’ll need to have an internet connection and Node.js installed. The project recommends you use the latest LTS (Long Term Support) version, which is 8.3.11 at the time of this writing. You can use npm, but JHipster will use Yarn if you have it installed. To run the app, you’ll need to have Java 8 installed. If you have Git installed, JHipster will auto-commit your project after creating it and will allow you to upgrade between versions.
Run the following command to install JHipster:
npm i -g generator-jhipster@5.0.1
To create a photo gallery app with JHipster, create a directory, and run jhipster in it.
mkdir gallery
cd gallery
jhipster
JHipster asks many questions about the type of application you want to create and what technologies you’d like to include. The table below shows the choices you’ll want to make:
| Question | Answer |
|---|---|
| Type of application? | Monolithic application |
| Name? | gallery |
| Java package name? | com.okta.developer |
| Use the JHipster Registry? | No |
| Type of authentication? | OAuth 2.0 / OIDC |
| Type of database? | SQL |
| Production database? | PostgreSQL |
| Development database? | H2 with disk-based persistence |
| Use Spring cache? | Yes, with Ehcache |
| Use Hibernate 2nd level cache? | Yes |
| Maven or Gradle? | Maven |
| Other technologies? | <blank> |
| Client framework? | React |
| Enable SASS support? | No |
| Enable i18n? | Yes |
| Native language of application? | English |
| Additional languages? | French |
| Additional testing frameworks? | Protractor |
| Install other generators? | No |
After you’ve answered all these questions, JHipster will create a plethora of files in your current directory and run yarn (or npm install) to install all the dependencies specified in package.json.
Verify Everything Works with Protractor and Keycloak
When you choose OAuth 2.0 and OIDC for authentication, the users are stored outside of the application, rather than in it. This means you need to have an identity provider (IdP) that stores your users and allows your app to retrieve information about them. By default, JHipster ships with a Keycloak file for Docker Compose. A default set of users and groups is imported at startup, and it has a client registered for your JHipster app.
Here’s what the keycloak.yml looks like in your app’s src/main/docker directory:
version: '2'
services:
  keycloak:
    image: jboss/keycloak:4.0.0.Final
    command: ["-b", "0.0.0.0", "-Dkeycloak.migration.action=import", "-Dkeycloak.migration.provider=dir", "-Dkeycloak.migration.dir=/opt/jboss/keycloak/realm-config", "-Dkeycloak.migration.strategy=OVERWRITE_EXISTING", "-Djboss.socket.binding.port-offset=1000"]
    volumes:
      - ./realm-config:/opt/jboss/keycloak/realm-config
    environment:
      - KEYCLOAK_USER=admin
      - KEYCLOAK_PASSWORD=admin
    ports:
      - 9080:9080
      - 9443:9443
      - 10990:10990
To start Keycloak, you’ll need to install Docker Compose. Then run the following command in a terminal window:
docker-compose -f src/main/docker/keycloak.yml up
You can verify everything works from the get-go by starting the app in one terminal with Maven:
./mvnw
Then run all the Protractor tests in another terminal:
yarn e2e
If your environment is setup correctly, you’ll see output like the following:
yarn run v1.7.0
$ protractor src/test/javascript/protractor.conf.js
(node:97048) [DEP0022] DeprecationWarning: os.tmpDir() is deprecated. Use os.tmpdir() instead.
[15:36:33] W/configParser - pattern ./e2e/entities/**/*.spec.ts did not match any files.
[15:36:33] I/launcher - Running 1 instances of WebDriver
[15:36:33] I/direct - Using ChromeDriver directly...

  Account
    ✓ should fail to login with bad password
    ✓ should login with admin account (2720ms)

  Administration
    ✓ should load metrics
    ✓ should load health
    ✓ should load configuration
    ✓ should load audits
    ✓ should load logs

  7 passing (10s)

[15:36:45] I/launcher - 0 instance(s) of WebDriver still running
[15:36:45] I/launcher - chrome #01 passed
✨  Done in 13.67s.
Enable User Registration for Your React + Spring Boot App in Keycloak
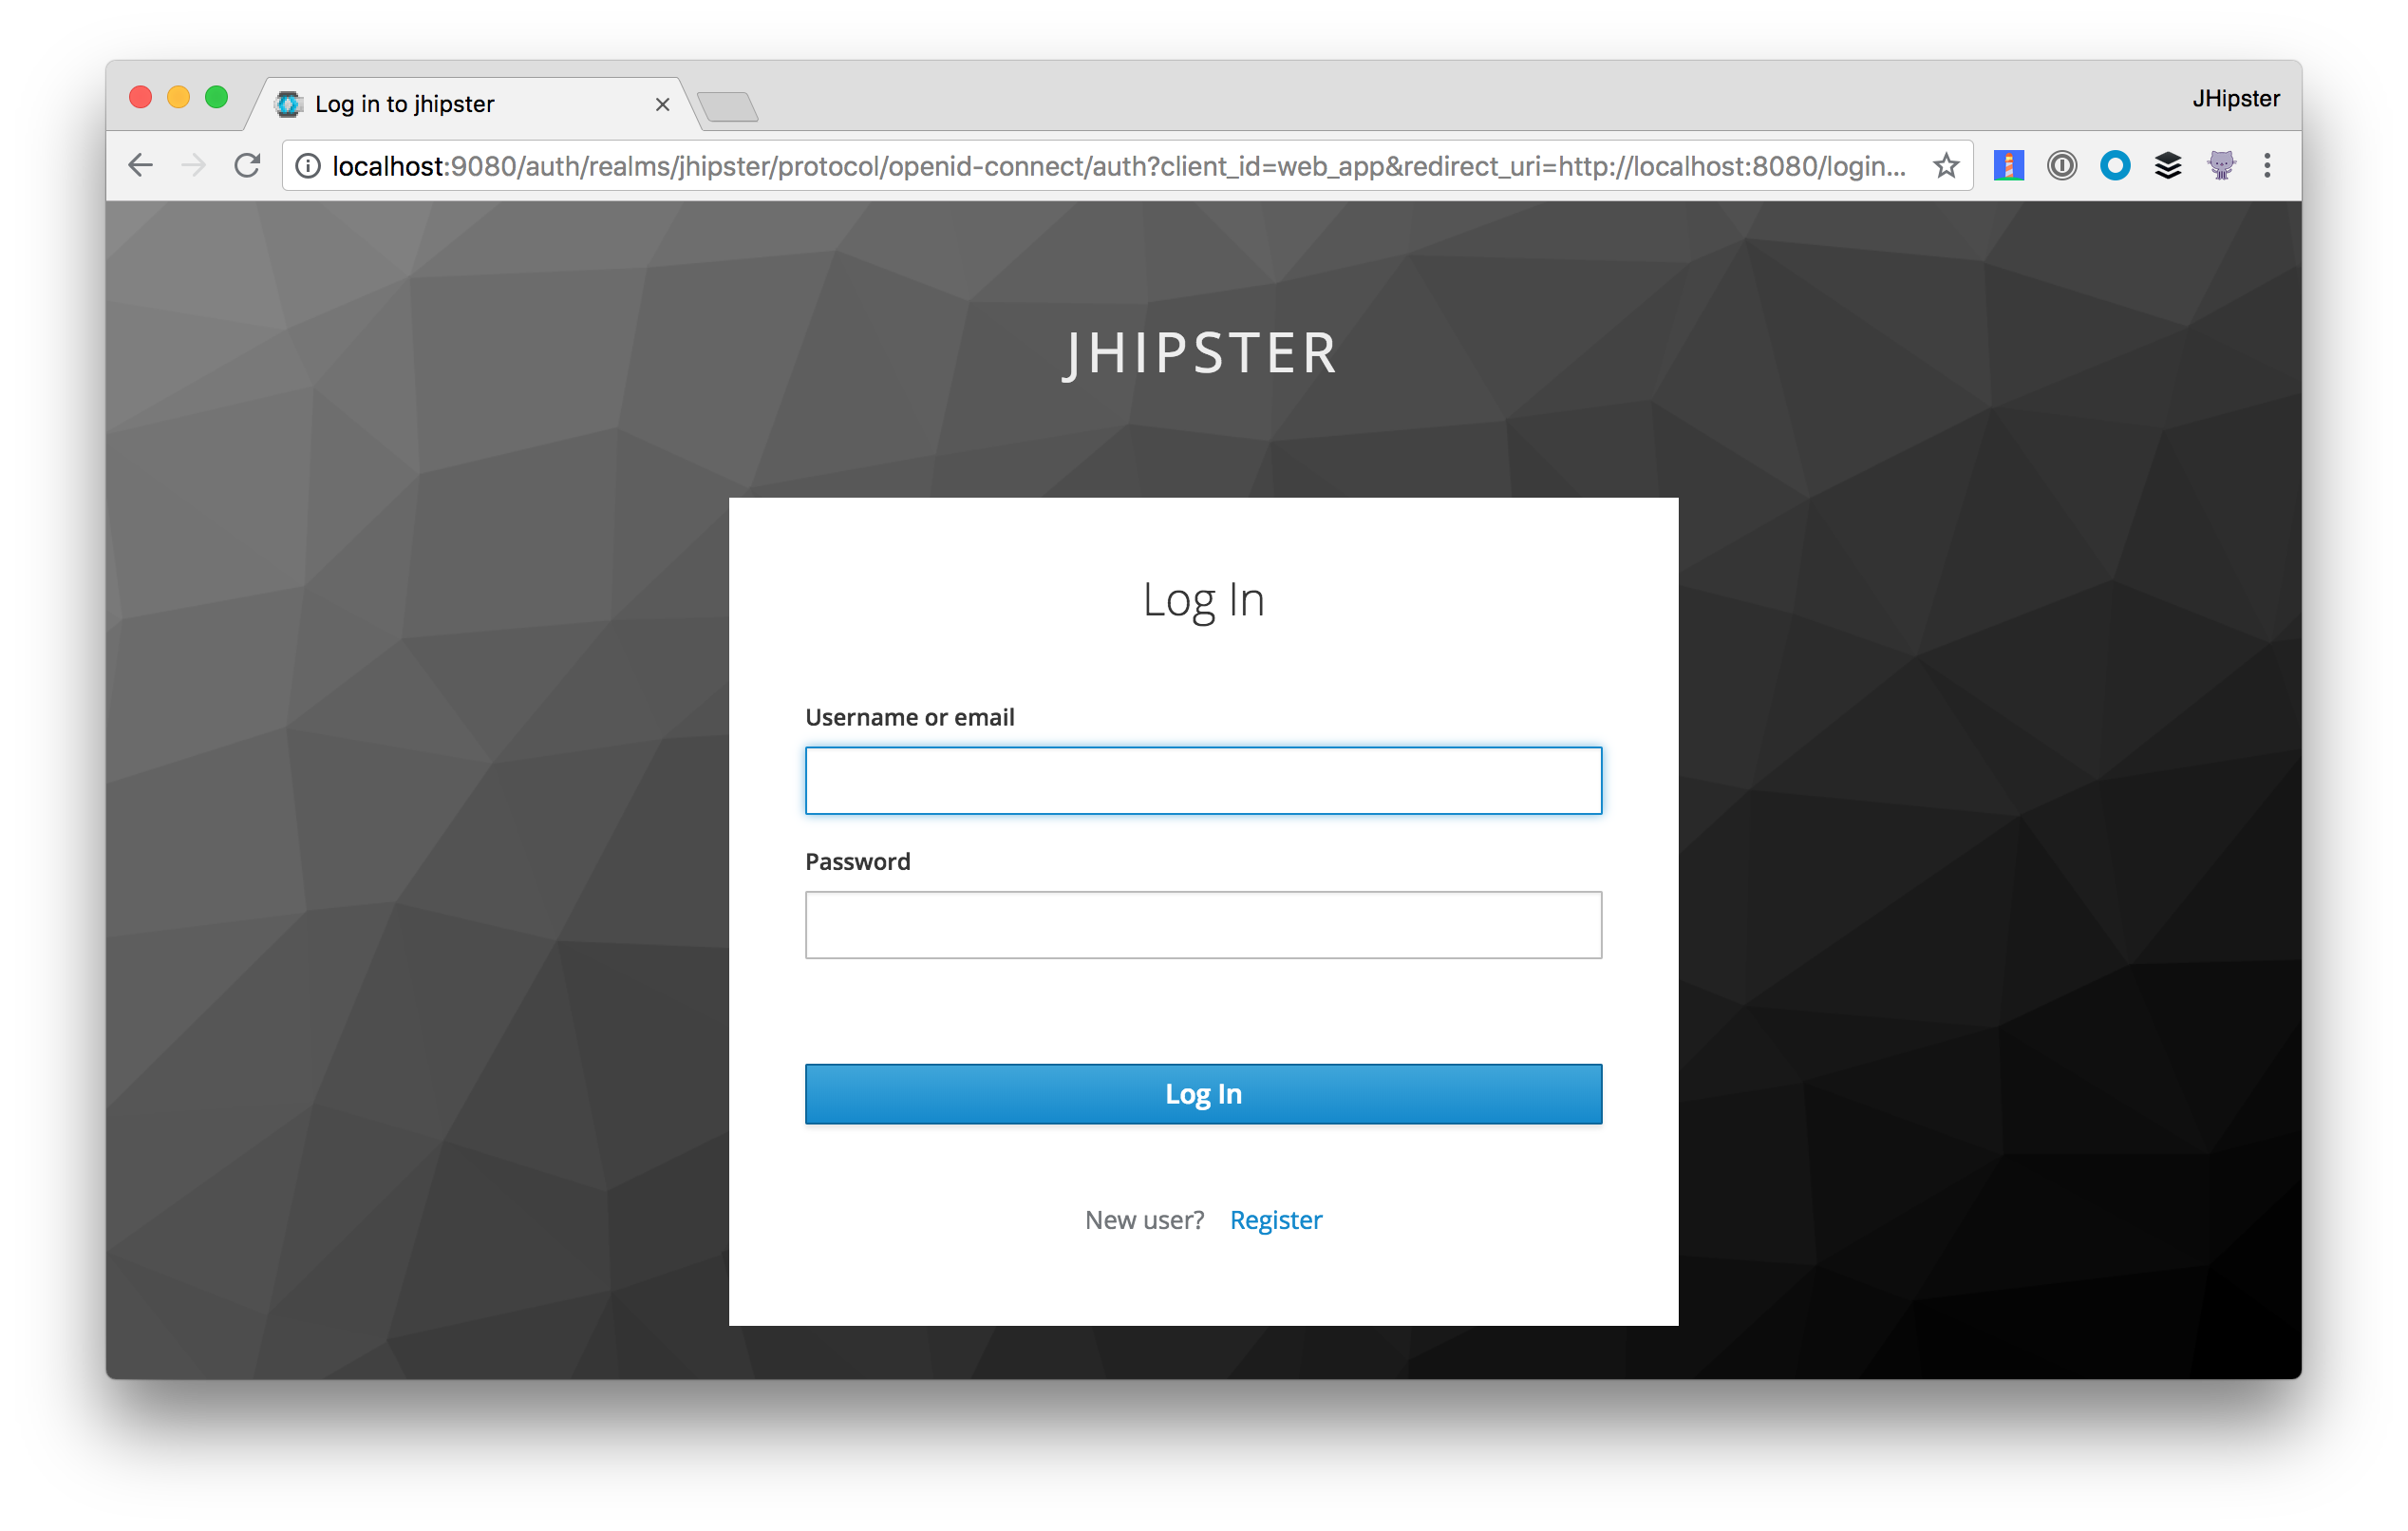
One of the features that seems to be missing when you use OIDC authentication with JHipster is user registration. If you use session or JWT authentication, there’s a link on the homepage to signup. With OIDC, you need to enable it in your IdP. For Keycloak, you can do this by navigating to http://localhost:9080 and click on Administration Console. Login with admin/admin and click on the Login tab. This screen allows you to enable forgot password, remember me, and verify by email as well.

After enabling this setting, you’ll see a Register link on Keycloak’s login form.
You’ll need to configure a default role for new users in Keycloak. Navigate to Roles and click on the Default Roles tab. Select ROLE_USER and click Add selected. To configure a default group, go to Groups > Default Groups. Click Users and Add. Adding a default group is necessary because JHipster expects users to have a ROLE_USER or ROLE_ADMIN group (or role) as part of their ID token claims.
Saving User Data for JPA Relationships
One of the features I added to JHipster is what I like to call save user snapshot. When working with JPA, it’s nice to be able to create relationships with JHipster’s User entity. This allows you to say things like “this user owns this photo album” and limit access based on that information.
This feature is on by default and works as follows:
- After logging in, a request is made to
/api/account. - The
getAccount()method inAccountResource.javais mapped to this endpoint, and it hands off toUserService#getUserFromAuthentication()to extract the user’s details. - The
getUserFromAuthentication()method extracts the user’s details from Spring Security, maps the groups/roles in the ID token to authorities, and adds/updates the user in the database.
This feature allows you to create relationships with the User entity. The only downside is when you have entities with a user relationship, the users dropdown will only contain the users that have logged into your app.
Change your Identity Provider to Okta
JHipster leverages Spring Security’s OAuth 2.0 support for configuring which IdP it should get user information from. When using Spring Security with Spring Boot, you can configure most configuration settings in a properties files. You can even override properties with environment variables.
To switch from Keycloak to Okta (or any other IdP), you can override the default properties (for Spring Security OAuth).
Why Okta instead of Keycloak?
Keycloak works great in development, and Okta has free multi-factor authentication, email support, and excellent performance for production. You can see other free features and our transparent pricing at developer.okta.com/pricing.
To see how it works, create a ~/.okta.env file with the following properties:
export SECURITY_OAUTH2_CLIENT_ACCESS_TOKEN_URI="https://{yourOktaDomain}/oauth2/default/v1/token"
export SECURITY_OAUTH2_CLIENT_USER_AUTHORIZATION_URI="https://{yourOktaDomain}/oauth2/default/v1/authorize"
export SECURITY_OAUTH2_RESOURCE_USER_INFO_URI="https://{yourOktaDomain}/oauth2/default/v1/userinfo"
export SECURITY_OAUTH2_CLIENT_CLIENT_ID="{clientId}"
export SECURITY_OAUTH2_CLIENT_CLIENT_SECRET="{clientSecret}"
You’ll need to create a new OIDC client in Okta and fill in the variables before this works. Once you’ve done that, you can run the following command to set these environment variables.
source ~/.okta.env
Restart your app and voila - you’re now using Okta!
In case you don’t know how to set up an OIDC app on Okta, here’s a quick summary.
Set Up an OIDC App on Okta
Log in to your Okta Developer account (or sign up if you don’t have an account) and navigate to Applications > Add Application. Click Web and click Next. Give the app a name you’ll remember, and specify http://localhost:8080/login as a Login Redirect URI. Click Done and note the client ID and secret. You’ll need to copy/paste them into a file in a minute.
Create a ROLE_ADMIN and ROLE_USER group (Users > Groups > Add Group) and add users to them. I recommend adding the account you signed up with to ROLE_ADMIN and creating a new user (Users > Add Person) to add to ROLE_USER.
Navigate to API > Authorization Servers and click the one named default to edit it. Click the Claims tab and Add Claim. Name it “roles”, and include it in the ID Token. Set the value type to “Groups” and set the filter to be a Regex of .*. Click Create to complete the process.
What is Okta?
In short, we make identity management a lot easier, more secure, and more scalable than what you’re probably used to. Okta is a cloud service that allows developers to create, edit, and securely store user accounts and user account data, and connect them with one or multiple applications. Our API enables you to:
- Authenticate and authorize your users
- Store data about your users
- Perform password-based and social login
- Secure your application with multi-factor authentication
- And much more! Check out our product documentation
Want a thousand users a month for free? Register for a free developer account, and when you’re done, come on back so you can learn more about building a React PWA with Spring Boot 2.0 and JHipster!
Enable Self-Service Registration in Okta
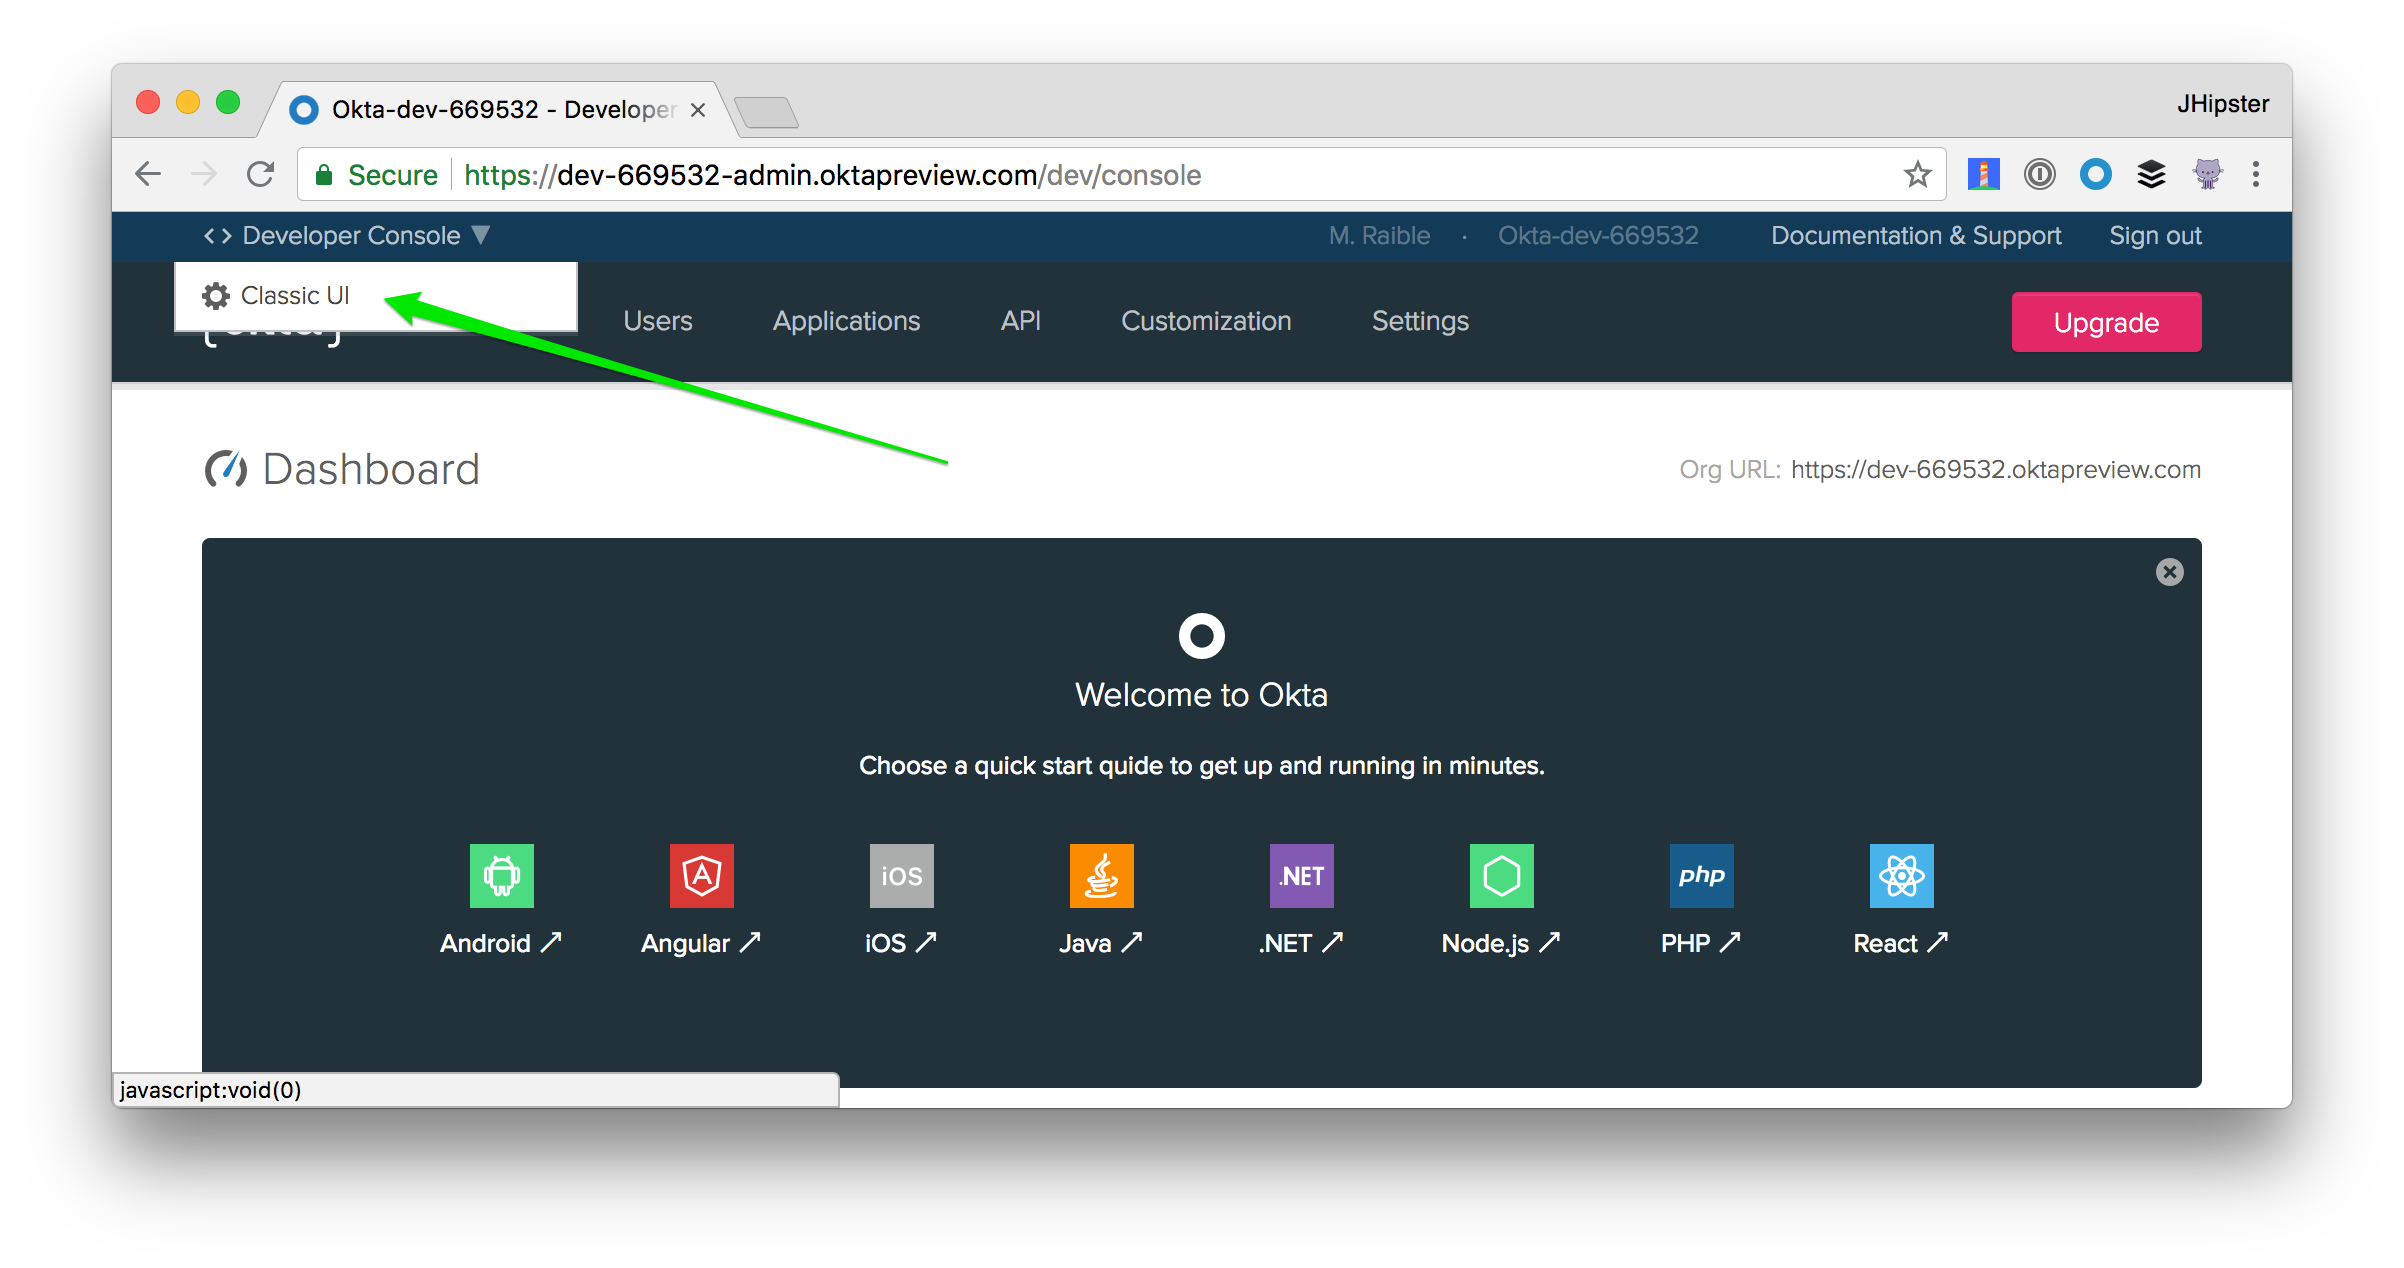
To enable self-service registration in Okta, you’ll need to navigate to the Classic UI from the Okta Developer Dashboard. There’s a link to toggle between the two in the top left corner of your screen.
Then navigate to Directory > Self-Registration and click Enable Registration. Set the default group to ROLE_USER, the Default redirect to a Custom URL with http://localhost:8080 as its value, and click Save.
NOTE: If you get an error that says 'http://localhost:8080' is not a valid redirect URI, it’s because you need to add http://localhost:8080 as a trusted redirect under Security > API > Trusted Origins. After making this change, navigate to Directory > Self-Service Registration and edit the settings to configure the custom URL again. It should work this time.
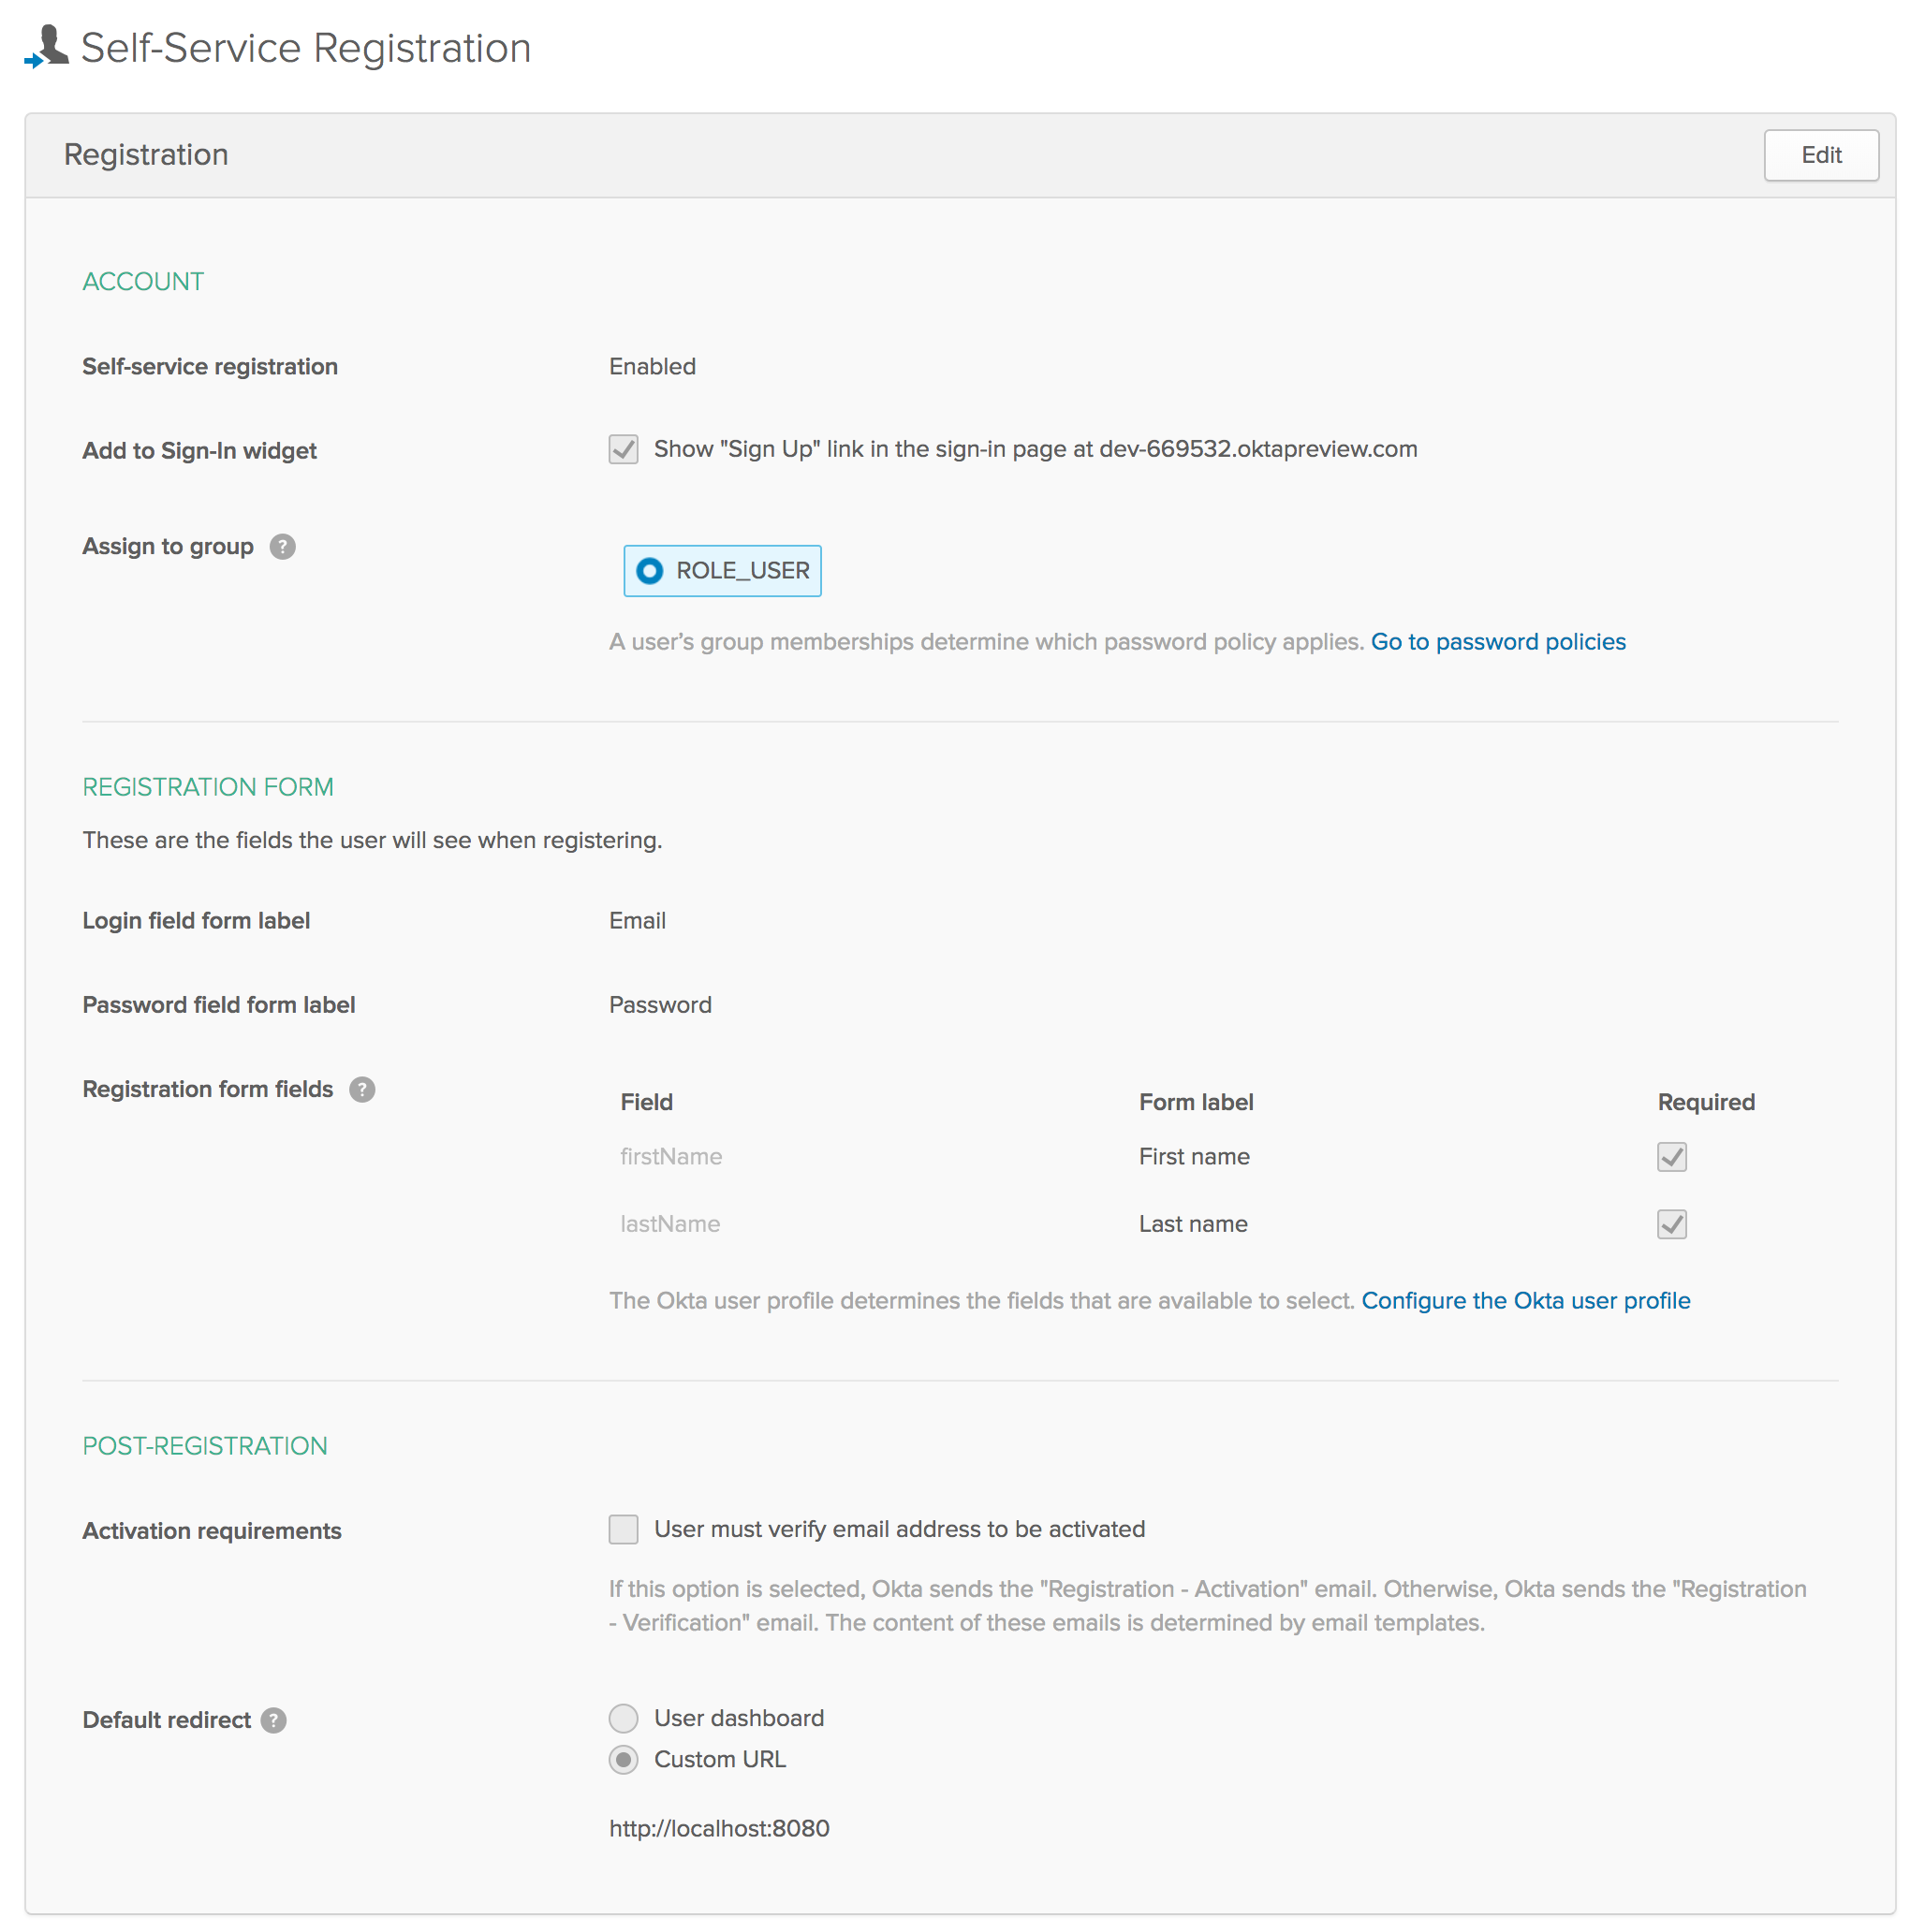
TIP: You’ll want to change the Default redirect to your production URL after you’ve deployed your app.
Okta Customization Options
In addition to allowing self-registration, Okta also allows you to customize the look and feel of its login screen, as well as use custom domains and emails. You can read more about this in our Sign-In Widget Guide.
You can also try customizing the widget in real-time using our handy-dandy live widget page.
Create Entities to allow CRUD on Your Photo Gallery
I’ve spent a lot of time talking about how to secure your application, now let’s actually build it! JHipster has a JDL (JHipster Domain Language) feature that allows you to model the data in your app, and generate entities from it. You can use its JDL Studio feature to do this online and save it locally once you’ve finished.
I created a data model for this app that has an Album, Photo, and Tag entities and set up relationships between them. Below is a screenshot of what it looks like in JDL Studio.
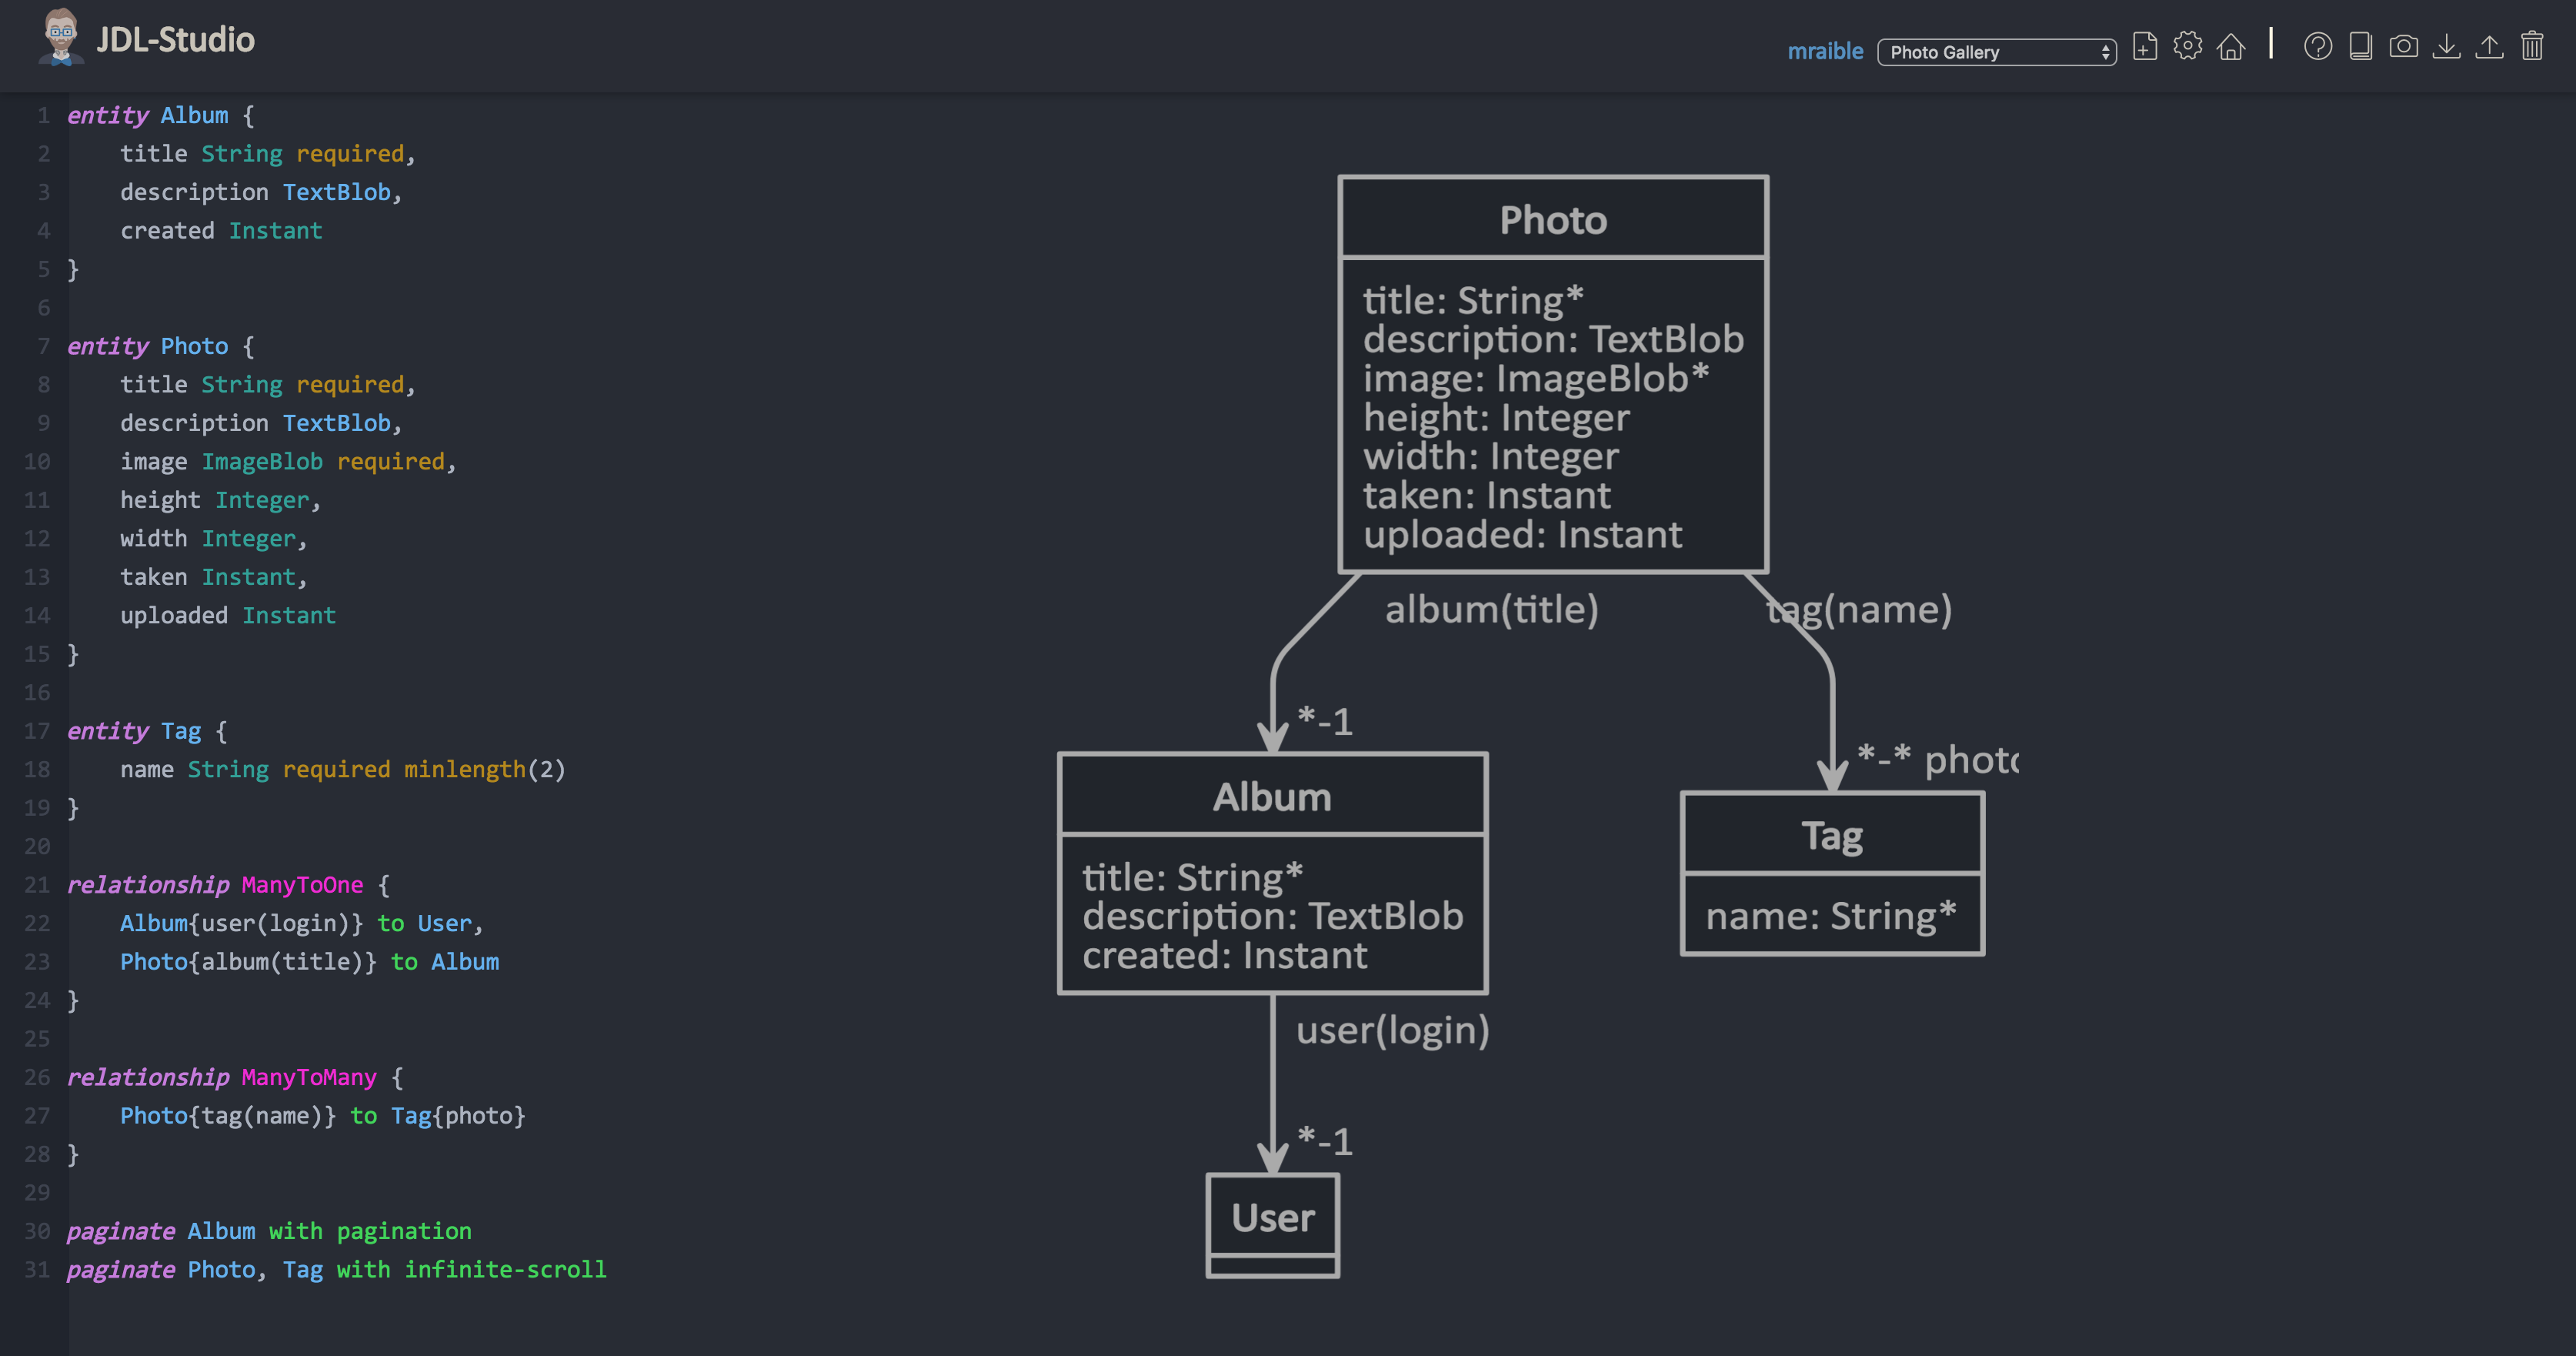
For your convenience, you can copy the JDL below and save it in a gallery.jh file in the root directory of your project.
entity Album {
    title String required,
    description TextBlob,
    created Instant
}

entity Photo {
    title String required,
    description TextBlob,
    image ImageBlob required,
    height Integer,
    width Integer,
    taken Instant,
    uploaded Instant
}

entity Tag {
    name String required minlength(2)
}

relationship ManyToOne {
    Album{user(login)} to User,
    Photo{album(title)} to Album
}

relationship ManyToMany {
    Photo{tag(name)} to Tag{photo}
}

paginate Album with pagination
paginate Photo, Tag with infinite-scroll
You can generate entities and CRUD code (Java for Spring Boot; TypeScript and JSX for React) using the following command:
jhipster import-jdl gallery.jh
When prompted, type a to allow overwriting of existing files.
This process will create Liquibase changelog files (to create your database tables), entities, repositories, Spring MVC controllers, and all the React code that’s necessary to create, read, update, and delete your data objects. It’ll even generate Jest unit tests and Protractor end-to-end tests!
After the process completes, you can restart your app (Ctrl+C the ./mvnw process and restart it) and run yarn e2e again to see a fast confirmation that everything generated correctly.
By now, you can see that JHipster is pretty powerful. It recognized that you had an image property of ImageBlob type and automatically created the plumbing you need to upload and store images in your database! Huzzah!
Add Image EXIF Processing in Your Spring Boot API
The Photo entity has a few properties that can be calculated by reading the EXIF (Exchangeable Image File Format) data from the uploaded photo. You might ask, how do you do that in Java?
Thankfully, Drew Noakes created a metadata-extractor library to do just that. Add a dependency on Drew’s library to your pom.xml:
<dependency>
    <groupId>com.drewnoakes</groupId>
    <artifactId>metadata-extractor</artifactId>
    <version>2.11.0</version>
</dependency>
Then modify the PhotoResource#createPhoto() method to set the metadata when an image is uploaded.
import com.drew.imaging.ImageMetadataReader;
import com.drew.imaging.ImageProcessingException;
import com.drew.metadata.Metadata;
import com.drew.metadata.MetadataException;
import com.drew.metadata.exif.ExifSubIFDDirectory;
import com.drew.metadata.jpeg.JpegDirectory;

import javax.xml.bind.DatatypeConverter;
import java.io.BufferedInputStream;
import java.io.ByteArrayInputStream;
import java.io.IOException;
import java.io.InputStream;

import java.time.Instant;
import java.util.Date;

public class PhotoResource {
    ...

    public ResponseEntity<Photo> createPhoto(@Valid @RequestBody Photo photo) throws Exception {
        log.debug("REST request to save Photo : {}", photo);
        if (photo.getId() != null) {
            throw new BadRequestAlertException("A new photo cannot already have an ID", ENTITY_NAME, "idexists");
        }

        try {
            photo = setMetadata(photo);
        } catch (ImageProcessingException ipe) {
            log.error(ipe.getMessage());
        }

        Photo result = photoRepository.save(photo);
        return ResponseEntity.created(new URI("/api/photos/" + result.getId()))
            .headers(HeaderUtil.createEntityCreationAlert(ENTITY_NAME, result.getId().toString()))
            .body(result);
    }

    private Photo setMetadata(Photo photo) throws ImageProcessingException, IOException, MetadataException {
        String str = DatatypeConverter.printBase64Binary(photo.getImage());
        byte[] data2 = DatatypeConverter.parseBase64Binary(str);
        InputStream inputStream = new ByteArrayInputStream(data2);
        BufferedInputStream bis = new BufferedInputStream(inputStream);
        Metadata metadata = ImageMetadataReader.readMetadata(bis);
        ExifSubIFDDirectory directory = metadata.getFirstDirectoryOfType(ExifSubIFDDirectory.class);

        if (directory != null) {
            Date date = directory.getDateDigitized();
            if (date != null) {
                photo.setTaken(date.toInstant());
            }
        }

        if (photo.getTaken() == null) {
            log.debug("Photo EXIF date digitized not available, setting taken on date to now...");
            photo.setTaken(Instant.now());
        }

        photo.setUploaded(Instant.now());

        JpegDirectory jpgDirectory = metadata.getFirstDirectoryOfType(JpegDirectory.class);
        if (jpgDirectory != null) {
            photo.setHeight(jpgDirectory.getImageHeight());
            photo.setWidth(jpgDirectory.getImageWidth());
        }

        return photo;
    }
    ...
}
Since you’re extracting the information, you can remove the fields from the UI and tests so the user cannot set these values.
In src/main/webapp/app/entities/photo/photo-update.tsx, add metadata and metadataRows variables, and logic that makes them hidden when adding a photo and read-only when updating one. Find the first line of the code block below and replace that line with the following code.
const { description, image, imageContentType } = photoEntity;

const metadata = (
  <div>
    <AvGroup>
      <Label id="heightLabel" for="height">
        <Translate contentKey="galleryApp.photo.height">Height</Translate>
      </Label>
      <AvField id="photo-height" type="number" className="form-control" name="height" readOnly />
    </AvGroup>
    <AvGroup>
      <Label id="widthLabel" for="width">
        <Translate contentKey="galleryApp.photo.width">Width</Translate>
      </Label>
      <AvField id="photo-width" type="number" className="form-control" name="width" readOnly />
    </AvGroup>
    <AvGroup>
      <Label id="takenLabel" for="taken">
        <Translate contentKey="galleryApp.photo.taken">Taken</Translate>
      </Label>
      <AvInput
        id="photo-taken"
        type="datetime-local"
        className="form-control"
        name="taken"
        readOnly
        value={isNew ? null : convertDateTimeFromServer(this.props.photoEntity.taken)}
      />
    </AvGroup>
    <AvGroup>
      <Label id="uploadedLabel" for="uploaded">
        <Translate contentKey="galleryApp.photo.uploaded">Uploaded</Translate>
      </Label>
      <AvInput
        id="photo-uploaded"
        type="datetime-local"
        className="form-control"
        name="uploaded"
        readOnly
        value={isNew ? null : convertDateTimeFromServer(this.props.photoEntity.uploaded)}
      />
    </AvGroup>
  </div>
);
const metadataRows = isNew ? '' : metadata;
Then, in the return block, remove the JSX between the image property and album property and replace it with {metadataRows}.
    <input id="file_image" type="file" onChange={this.onBlobChange(true, 'image')} accept="image/*" />
  </AvGroup>
</AvGroup>
{metadataRows}
<AvGroup>
  <Label for="album.title">
    <Translate contentKey="galleryApp.photo.album">Album</Translate>
  </Label>
In src/test/javascript/e2e/entities/photo/photo.spec.ts, remove the code that sets the data in these fields:
photoUpdatePage.setHeightInput('5');
expect(await photoUpdatePage.getHeightInput()).to.eq('5');
photoUpdatePage.setWidthInput('5');
expect(await photoUpdatePage.getWidthInput()).to.eq('5');
photoUpdatePage.setTakenInput('01/01/2001' + protractor.Key.TAB + '02:30AM');
expect(await photoUpdatePage.getTakenInput()).to.contain('2001-01-01T02:30');
photoUpdatePage.setUploadedInput('01/01/2001' + protractor.Key.TAB + '02:30AM');
expect(await photoUpdatePage.getUploadedInput()).to.contain('2001-01-01T02:30');
You can also remove all the getters and setters for these fields in src/test/javascript/e2e/entities/photo/photo-update.page-object.ts:
setHeightInput(height) {
  this.heightInput.sendKeys(height);
}

getHeightInput() {
  return this.heightInput.getAttribute('value');
}

setWidthInput(width) {
  this.widthInput.sendKeys(width);
}

getWidthInput() {
  return this.widthInput.getAttribute('value');
}

setTakenInput(taken) {
  this.takenInput.sendKeys(taken);
}

getTakenInput() {
  return this.takenInput.getAttribute('value');
}

setUploadedInput(uploaded) {
  this.uploadedInput.sendKeys(uploaded);
}

getUploadedInput() {
  return this.uploadedInput.getAttribute('value');
}
Stop your Maven process, run yarn webpack:build, start Maven again and then run yarn e2e to make sure everything still works. If you upload an image you took with your smartphone, the height, width, and taken values should all be populated. If they’re not, chances are your image doesn’t have the data in it.
Need some sample photos with EXIF data? You can download pictures of my 1966 VW Bus from an album on Flickr.
Add React Photo Gallery to Your React PWA
You’ve added metadata extraction to your backend, but your photos still display in a list rather than in a grid (like Flickr). To fix that, you can use React Photo Gallery component. Install it using Yarn:
yarn add react-photo-gallery@6.0.28
Or npm:
npm i --save-exact react-photo-gallery@6.0.28
NOTE: I first tried using Leisan Kazberova’s react-photo-feed, but found it caused compile errors after adding it to my project.
In src/main/webapp/app/entities/photo/photo.tsx, add an import for Gallery:
import Gallery from 'react-photo-gallery';
Then add a photoSet variable in the render() method, and the <Gallery> component right after the closing </h2>.
render() {
  const { photoList, match } = this.props;
  const photoSet = photoList.map(photo => ({
    src: `data:${photo.imageContentType};base64,${photo.image}`,
    width: photo.height > photo.width ? 3 : photo.height === photo.width ? 1 : 4,
    height: photo.height > photo.width ? 4 : photo.height === photo.width ? 1 : 3
  }));

  return (
    <div>
      <h2 id="photo-heading">
        ...
      </h2>
      <Gallery photos={photoSet} />
      ...
  );
}
Since you only modified the front end code, you can run yarn start to start an instance of webpack-dev-server that proxies requests to the backend and auto-refreshes your browser (using Browsersync) every time you change any React files.
Log in and navigate to Entities > Photos in the top nav bar. You should be able to upload photos and see the results in a nice grid at the top of the list.

You can also add a “lightbox” feature to the grid so you can click on photos and zoom in. The React Photo Gallery docs show how to do this. I’ve integrated it into the example for this post, but I won’t show the code here for the sake of brevity. You can see the final photo.tsx with Lightbox added on GitHub or a diff of the changes necessary.
Make Your React + Spring Boot App into a PWA
To be a PWA requires three features:
- Your app must be served over HTTPS
- Your app must register a service worker so it can cache requests and work offline
- Your app must have a webapp manifest with installation information and icons
For HTTPS, you can set up a certificate for localhost or (even better), deploy it to production! Cloud providers like Heroku and Cloud Foundry will provide you with HTTPS out-of-the-box, but they won’t force HTTPS. To force HTTPS, open src/main/java/com/okta/developer/config/SecurityConfiguration.java and add a rule to force a secure channel when an X-Forwarded-Proto header is sent.
@Override
protected void configure(HttpSecurity http) throws Exception {
    http
        ...
    .and()
        .headers()
        .frameOptions()
        .disable()
    .and()
        .requiresChannel()
        .requestMatchers(r -> r.getHeader("X-Forwarded-Proto") != null)
        .requiresSecure()
    .and()
        .authorizeRequests()
        ...
}
The workbox-webpack-plugin is configured already for generating a service worker, but it only works when running your app with a production profile. This is nice because it means your data isn’t cached in the browser when you’re developing.
To register a service worker, open src/main/webapp/index.html and uncomment the following block of code.
<script>
    if ('serviceWorker' in navigator) {
         navigator.serviceWorker
            .register('./service-worker.js')
            .then(function() { console.log('Service Worker Registered'); });
    }
</script>
The final feature — a webapp manifest — is included at src/main/webapp/manifest.webapp. It defines an app name, colors, and icons. You might want to adjust these to fit your app.
Deploy Your React + Spring Boot App to Heroku
To deploy your app to Heroku, you’ll first need to install the Heroku CLI. You can confirm its installed by running heroku --version.
If you don’t have a Heroku account, go to heroku.com and sign up. Don’t worry, it’s free, and chances are you’ll love the experience.
Run heroku login to log in to your account, then start the deployment process with JHipster:
jhipster heroku
This will start the Heroku sub-generator that asks you a couple questions about your app: what you want to name it and whether you want to deploy it to a US region or EU. Then it’ll prompt you to choose between building locally or with Git on Heroku’s servers. Choose Git, so you don’t have to upload a fat JAR, and the deployment process will begin.
If you have a stable and fast internet connection, your app should be live on the internet in around six minutes!
remote: -----> Compressing...
remote:        Done: 134.5M
remote: -----> Launching...
remote:        Released v5
remote:        https://gallery-pwa.herokuapp.com/ deployed to Heroku
remote:
remote: Verifying deploy... done.
To https://git.heroku.com/gallery-pwa.git
 * [new branch]      HEAD -> master

Your app should now be live. To view it run
    heroku open
And you can view the logs with this command
    heroku logs --tail
After application modification, redeploy it with
    jhipster heroku
Congratulations, JHipster execution is complete!
Execution time: 5 min. 31 s. sec
Configure Your React + Spring Boot App for Okta and Analyze Your PWA Score with Lighthouse
To configure your app to work with Okta on Heroku, run the following command to transfer your local Okta-related environment variables to Heroku.
heroku config:set \
  SECURITY_OAUTH2_CLIENT_ACCESS_TOKEN_URI="$SECURITY_OAUTH2_CLIENT_ACCESS_TOKEN_URI" \
  SECURITY_OAUTH2_CLIENT_USER_AUTHORIZATION_URI="$SECURITY_OAUTH2_CLIENT_USER_AUTHORIZATION_URI" \
  SECURITY_OAUTH2_RESOURCE_USER_INFO_URI="$SECURITY_OAUTH2_RESOURCE_USER_INFO_URI" \
  SECURITY_OAUTH2_CLIENT_CLIENT_ID="$SECURITY_OAUTH2_CLIENT_CLIENT_ID" \
  SECURITY_OAUTH2_CLIENT_CLIENT_SECRET="$SECURITY_OAUTH2_CLIENT_CLIENT_SECRET"
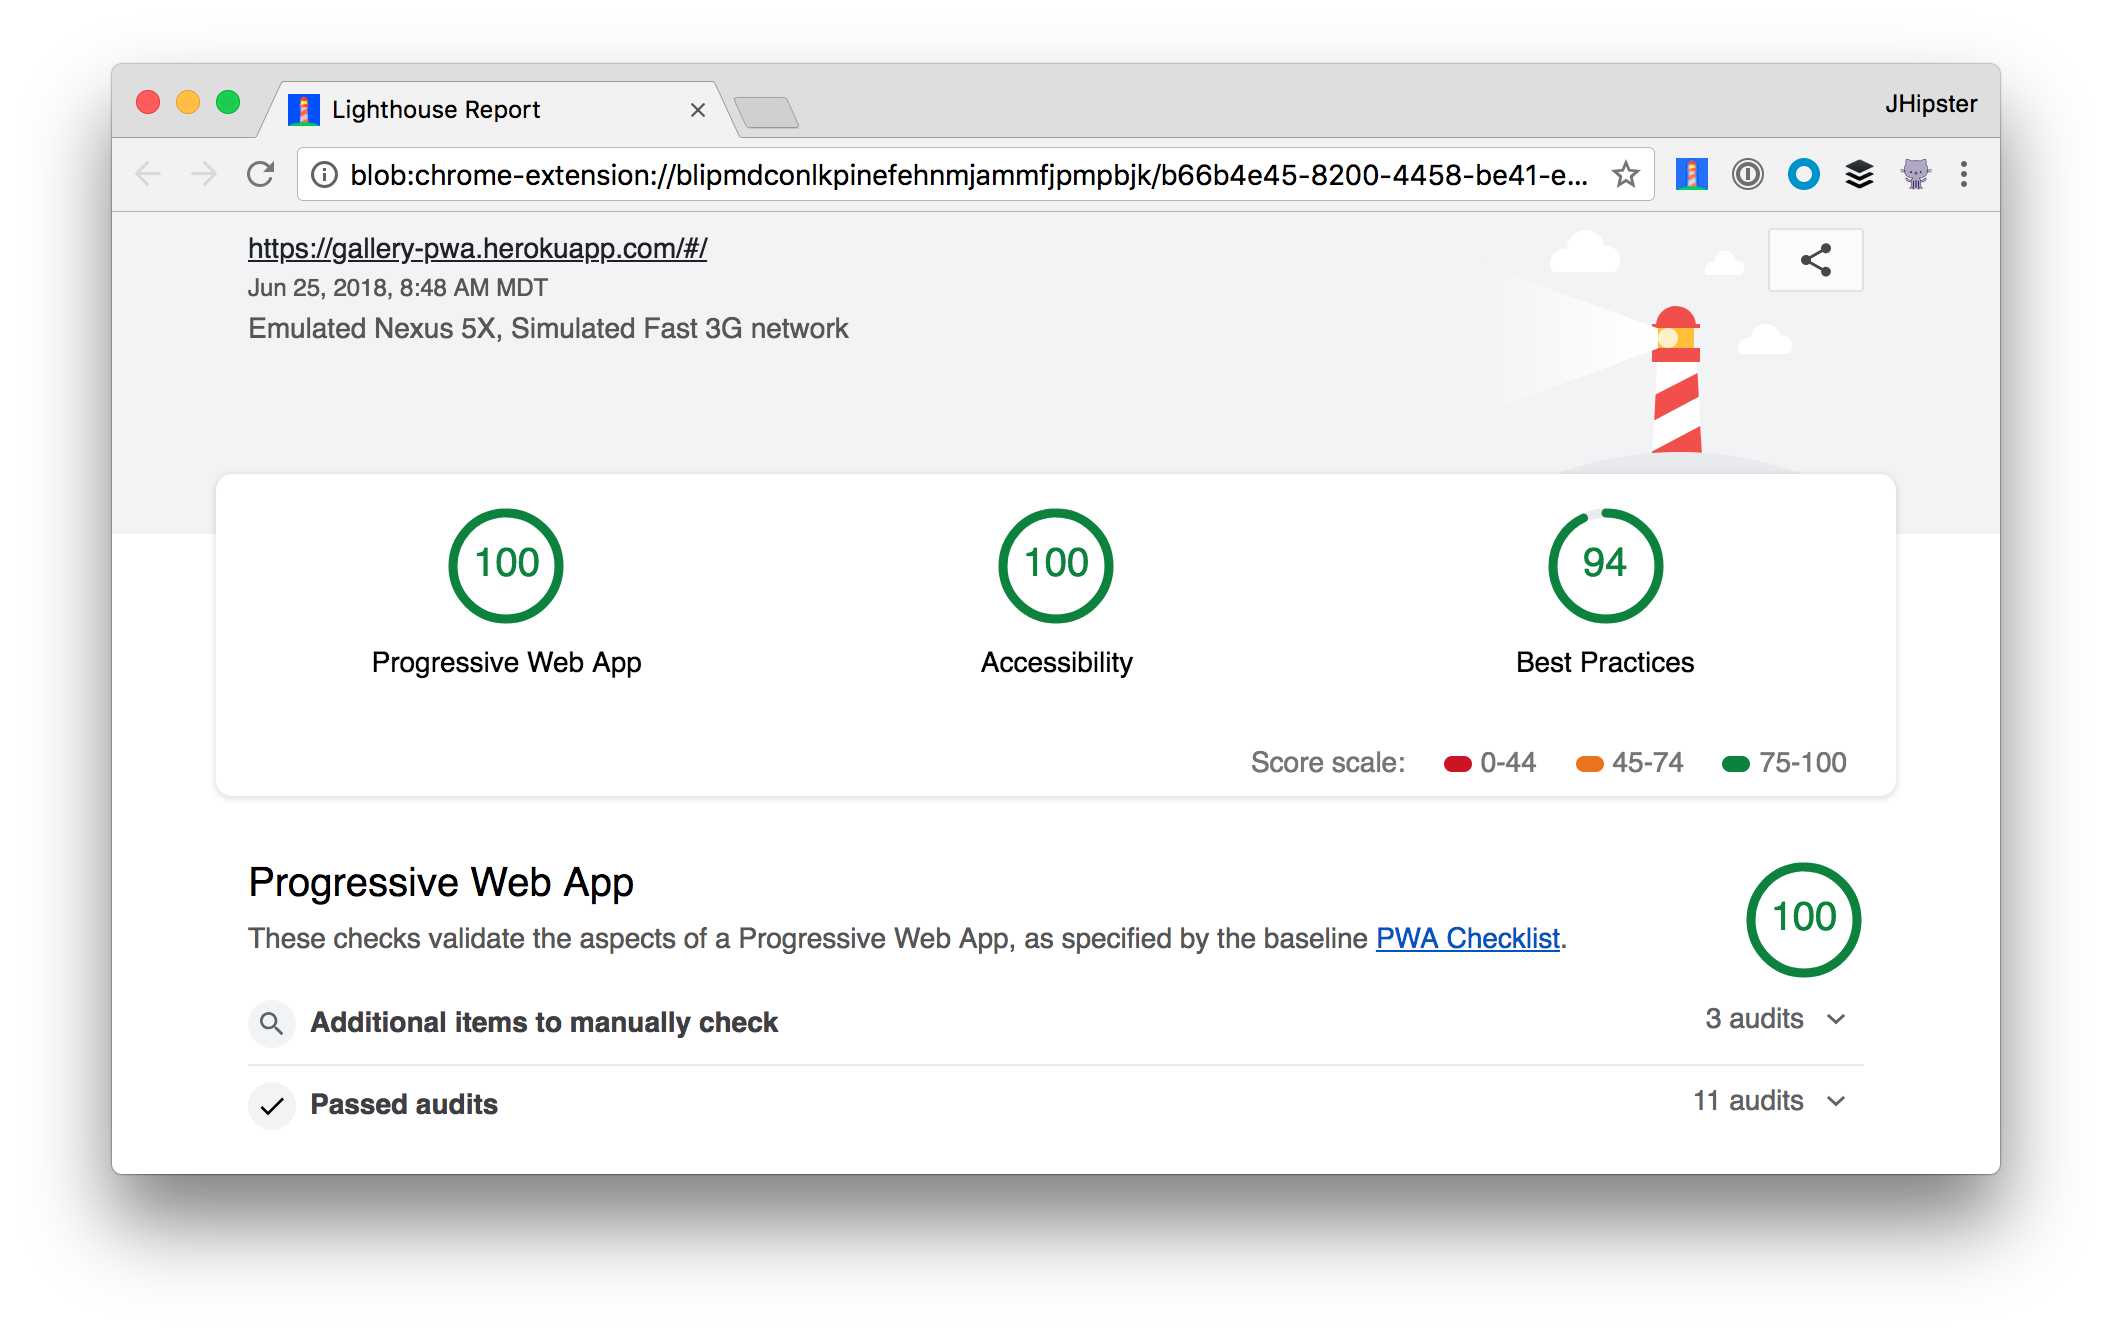
After Heroku restarts your app, log in, then test it with Lighthouse. Looks pretty good, eh?! 💯
Learn More about React, Spring Boot, JHipster, and OAuth
This tutorial has shown you how to develop a photo gallery PWA with Spring Boot, React, JHipster, and OIDC. It showed you some useful open source libraries to simplify the implementation and even generated tests.
You can find the source code for the example created in this post in the oktadeveloper/okta-react-photo-gallery-example repo on GitHub. I recorded a screencast to walk through creating it all too. Watch the embedded video below, or on YouTube.
If you’d like to learn more about React, Spring Boot, or OAuth 2.0, I’d suggest checking out the following resources:
- Bootiful Development with Spring Boot and React
- Use OpenID Connect Support with JHipster
- What is the OAuth 2.0 Authorization Code Grant Type?
- Using React (with Redux) from the JHipster Docs
- Developer a Microservices Architecture with OAuth 2.0 and JHipster
If you have any questions, please leave a comment below, ping me on Twitter @mraible, or post to our developer forums. If you liked this post, follow @oktadev to be notified when others like it are published.
Matt Raible is a well-known figure in the Java community and has been building web applications for most of his adult life. For over 20 years, he has helped developers learn and adopt open source frameworks and use them effectively. He's a web developer, Java Champion, and Developer Advocate at Okta. Matt has been a speaker at many conferences worldwide, including Devnexus, Devoxx Belgium, Devoxx France, Jfokus, and JavaOne. He is the author of The Angular Mini-Book, The JHipster Mini-Book, Spring Live, and contributed to Pro JSP. He is a frequent contributor to open source and a member of the JHipster development team. You can find him online @mraible and raibledesigns.com.
Okta Developer Blog Comment Policy
We welcome relevant and respectful comments. Off-topic comments may be removed.