How to Securely Manage Users in Your Node App
If you’re building a non-trivial website, chances are you’ll want some way to keep track of users. This can be quite complex and require a good deal of infrastructure, but one of the most secure and scalable ways is also one of the easiest. Using an OAuth 2.0 provider allows you to offload these tasks to an external provider, making your life as a developer so much simpler.
When using an OAuth provider, it’s simple to sign up and maintain users securely, but usually the only information you have about your users is their name and email address. This leaves you having to keep a separate database of information about your users, but isn’t that part of what you were trying to avoid?
Luckily, there’s a better way! Using Okta, you can not only connect users to your app, you can also store as much extra metadata as you’d like about your users. What site have you logged into recently that doesn’t give you the option of changing your profile information (name, date of birth, avatar, etc.)? There aren’t many these days.
In this post, I’ll show you how to create an app in Node that provides a dashboard for your users and gives them the ability to edit their profile information, all without ever setting up a database.
Note: In May 2025, the Okta Integrator Free Plan replaced Okta Developer Edition Accounts, and the Okta CLI was deprecated.
We preserved this post for reference, but the instructions no longer work exactly as written. Replace the Okta CLI commands by manually configuring Okta following the instructions in our Developer Documentation.
What is Okta?
Okta is a flexible service that makes it super easy for developers to connect users to all kinds of apps. Okta handles login, logout, registration, multi-factor authentication, as well as storing user information. You also get an amazing admin experience that lets you get up and running in a few minutes but can still be configured to your heart’s desire! From the developer console, you can disable users, create groups of users, edit user profiles, create admin tokens, require certain regions of users to use multi-factor authentication, and so much more.
I’ll be walking you through the few settings you need to get started in Okta, and the code you’ll need to get a Node app up and running. If you don’t already have an Okta account, the first step is to sign up for a forever-free developer account. Once you have an account you’ll get an organization URL (e.g. https://{yourOktaDomain}). You’ll use that later on in your Node app, and you’ll also need it to configure settings for your users.
Create a Simple Node Application with Express
The only real prerequisite to following this tutorial is node (I’ll also assume git because it’s the best thing since sliced bread. I recommend it for just about everything – I even keep my taxes in source control… but feel free to ignore that if you’re just following along for fun or use something else for source control). To keep things simple I’ll assume you have a *nix environment (Linux, MacOS, Bash in Windows). Also, I love modern JavaScript syntax, which I’ll be using later in the post, so if you’re not already running at least Node 8 (node --version), you can run the following script to install nvm (Node Version Manager) and then install the latest version of Node. There are ways to use modern JavaScript on an older Node engine, but it requires some additional build steps.
curl -o- https://raw.githubusercontent.com/creationix/nvm/v0.33.11/install.sh | bash
One of the great things about open source code is you don’t need to write everything from scratch. I’ve already written a starter app as part of another blog post, so we can continue where that left off by cloning the associated repository. Building off the existing app will allow you to focus on user management.
# Clone the repository using SSH into a new folder called manage-users

git clone --branch manage-users-tutorial git@github.com:oktadeveloper/okta-node-express-example.git manage-users

# If SSH doesn't work, you can use HTTPS

git clone --branch manage-users-tutorial https://github.com/oktadeveloper/okta-node-express-example.git manage-users

# Or, if you don't have git installed, you can download a zip of the repository

wget https://github.com/oktadeveloper/okta-node-express-example/archive/manage-users-tutorial.zip
unzip manage-users-tutorial.zip -d manage-users
If none of the above works for you, you can use this link to download the archive, then unzip it to a folder.
Collect Environment Variables
The starter app uses Okta for authentication and requires a few environment variables before you can run it, which you’ll collect from your Okta Dashboard (e.g. https://{yourOktaDomain}). I’ll also have you create a new API token for fetching and modifying user profiles. If you already have the sample app working (e.g. you followed along on the previous post), then you can skip ahead to create a new API token.
As you collect the variables, you’ll need to save them in a file called .env, in the following format:
ORG_URL=https://{yourOktaDomain}
HOST_URL=http://localhost:3000
APP_SECRET=123abc
CLIENT_ID={clientId}
CLIENT_SECRET={clientSecret}
REGISTRATION_TOKEN={yourRegistrationAPIToken}
USER_PROFILE_TOKEN={yourUserProfileAPIToken}
ORG_URL
This is the organization URL you got when signing up for Okta, in the form of https://{yourOktaDomain}. You can also use this link to sign in to your admin page.
HOST_URL
This is where the app is hosted. For now, just use http://localhost:3000. You would change this to the public URL if you were running the app in production.
APP_SECRET
This just needs to be something random. The following commands will generate some random text and add it to your .env file as the APP_SECRET variable.
npm install -g uuid-cli
echo "APP_SECRET=`uuid`" >> .env
CLIENT_ID and CLIENT_SECRET
Sign in to your Okta developer console using the ORG_URL above. After logging in, click on the Applications tab, then click on Add Application, then select the Web option.
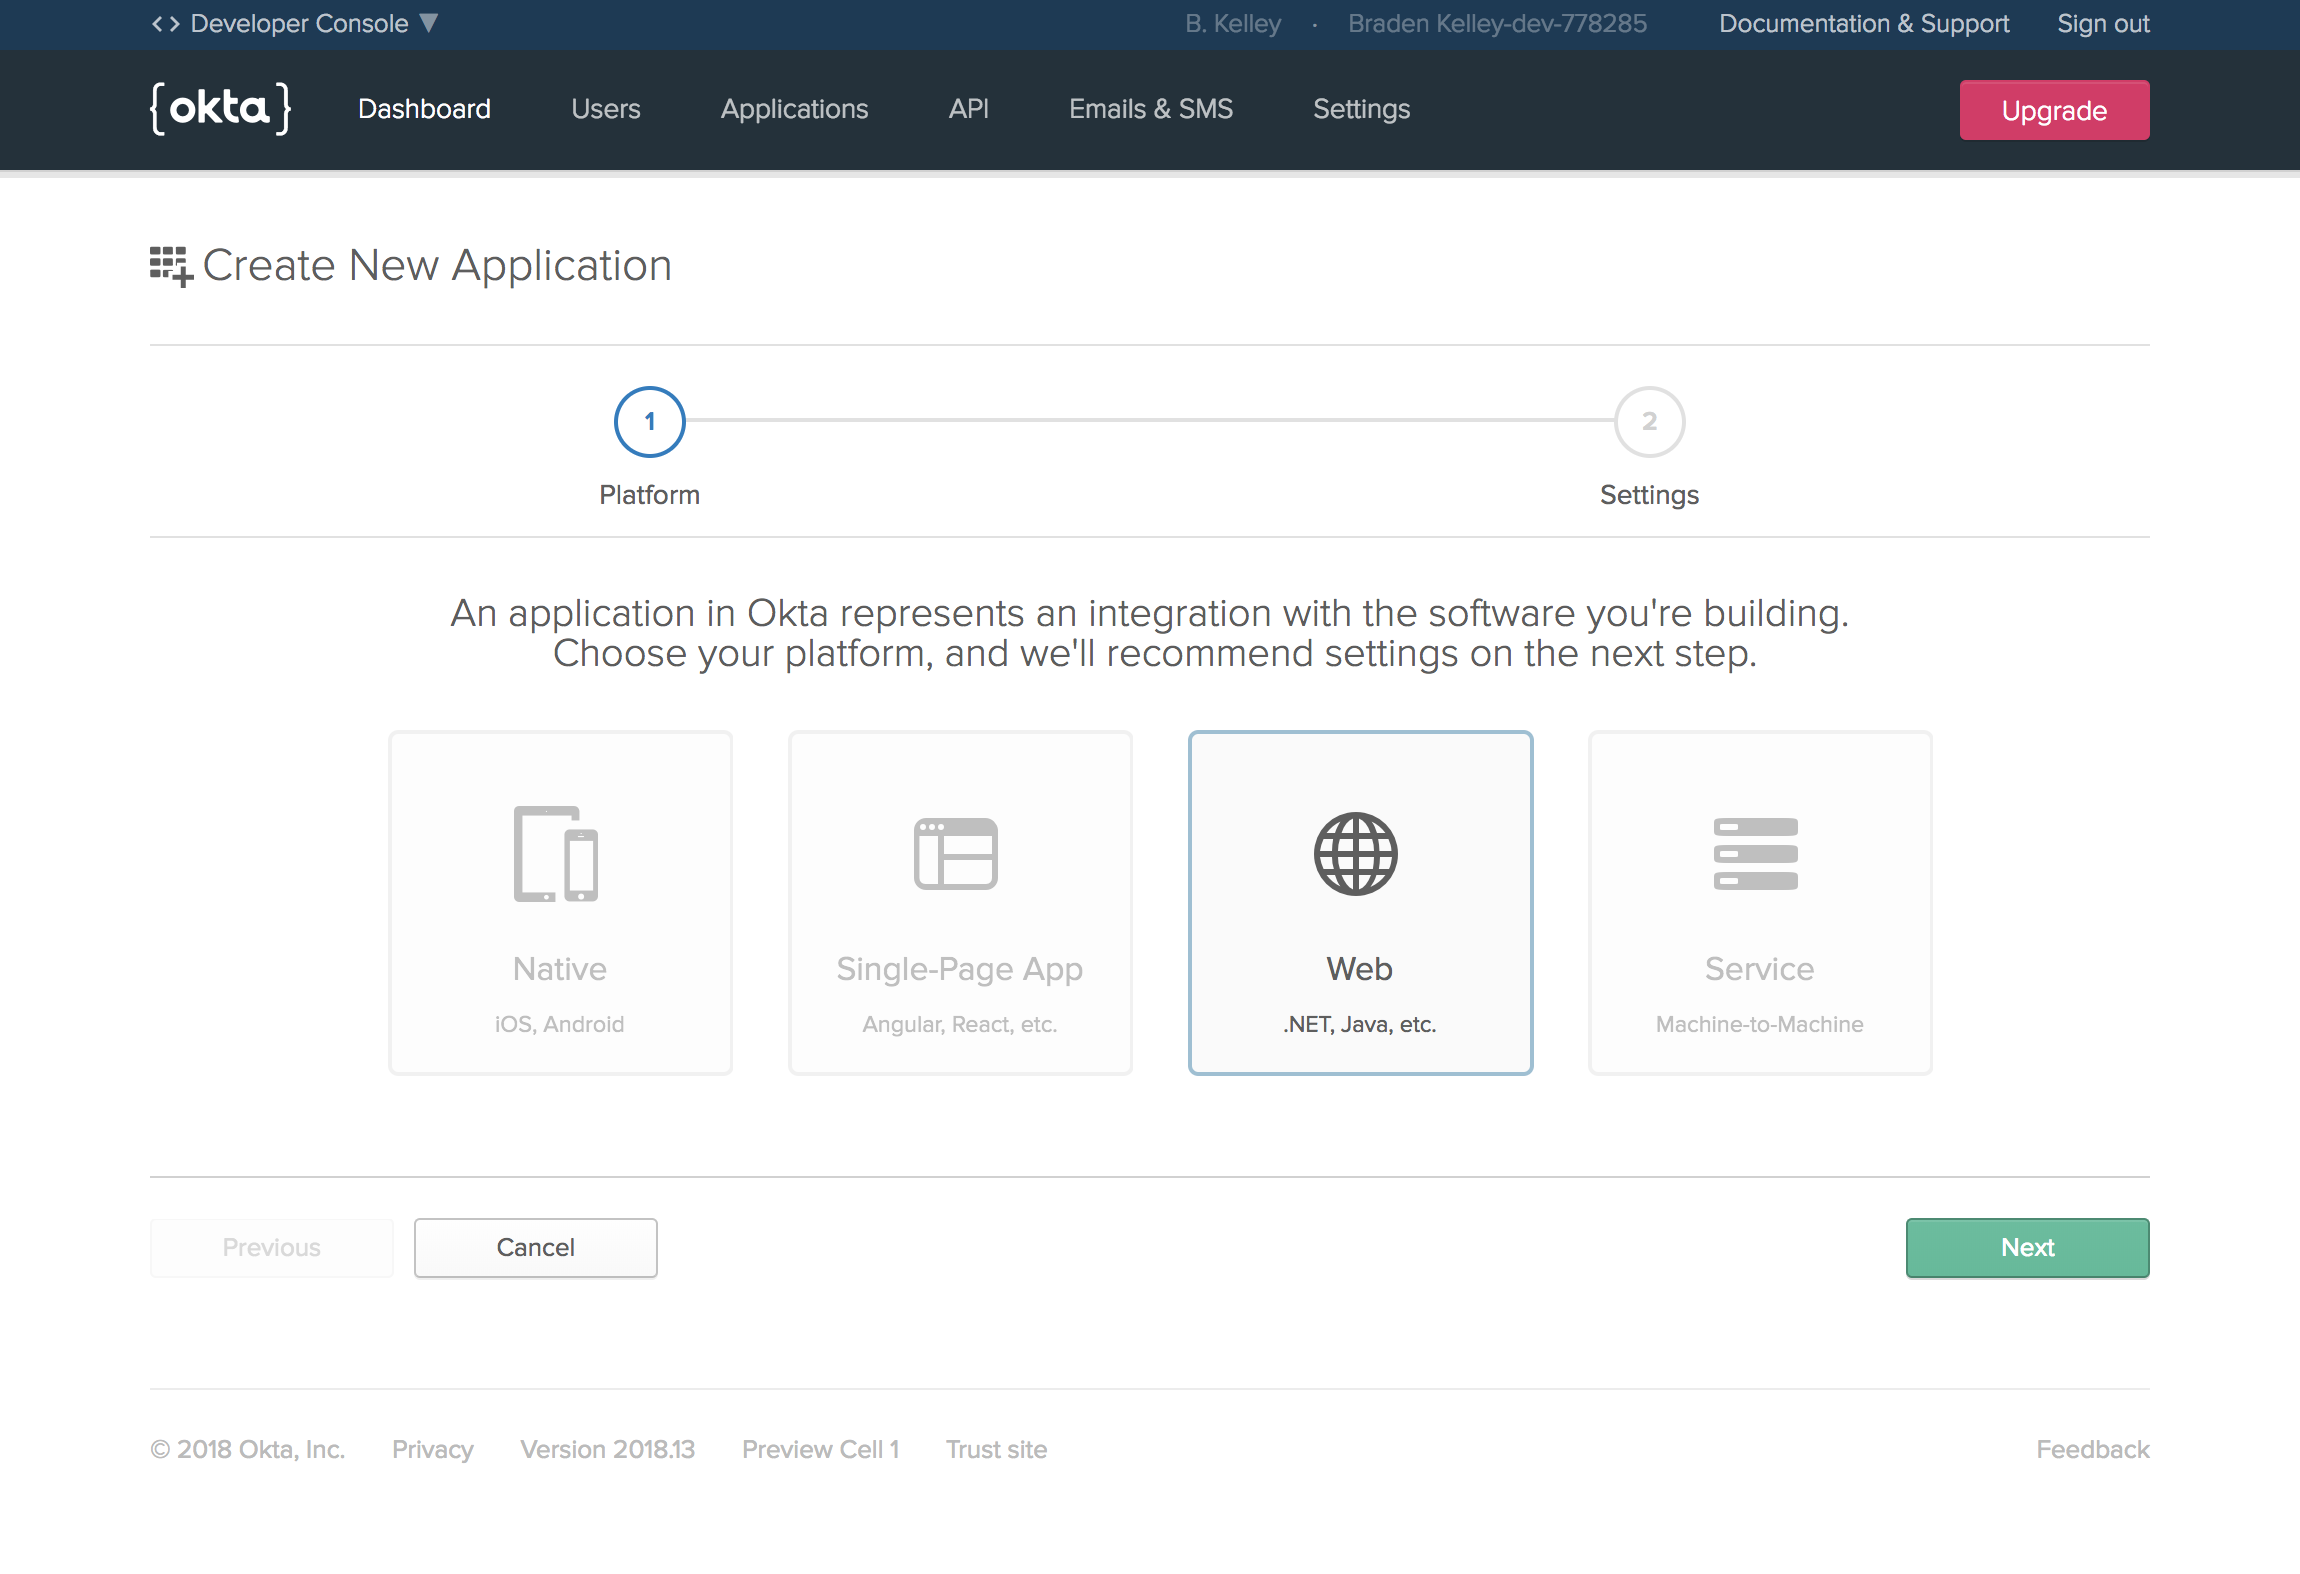
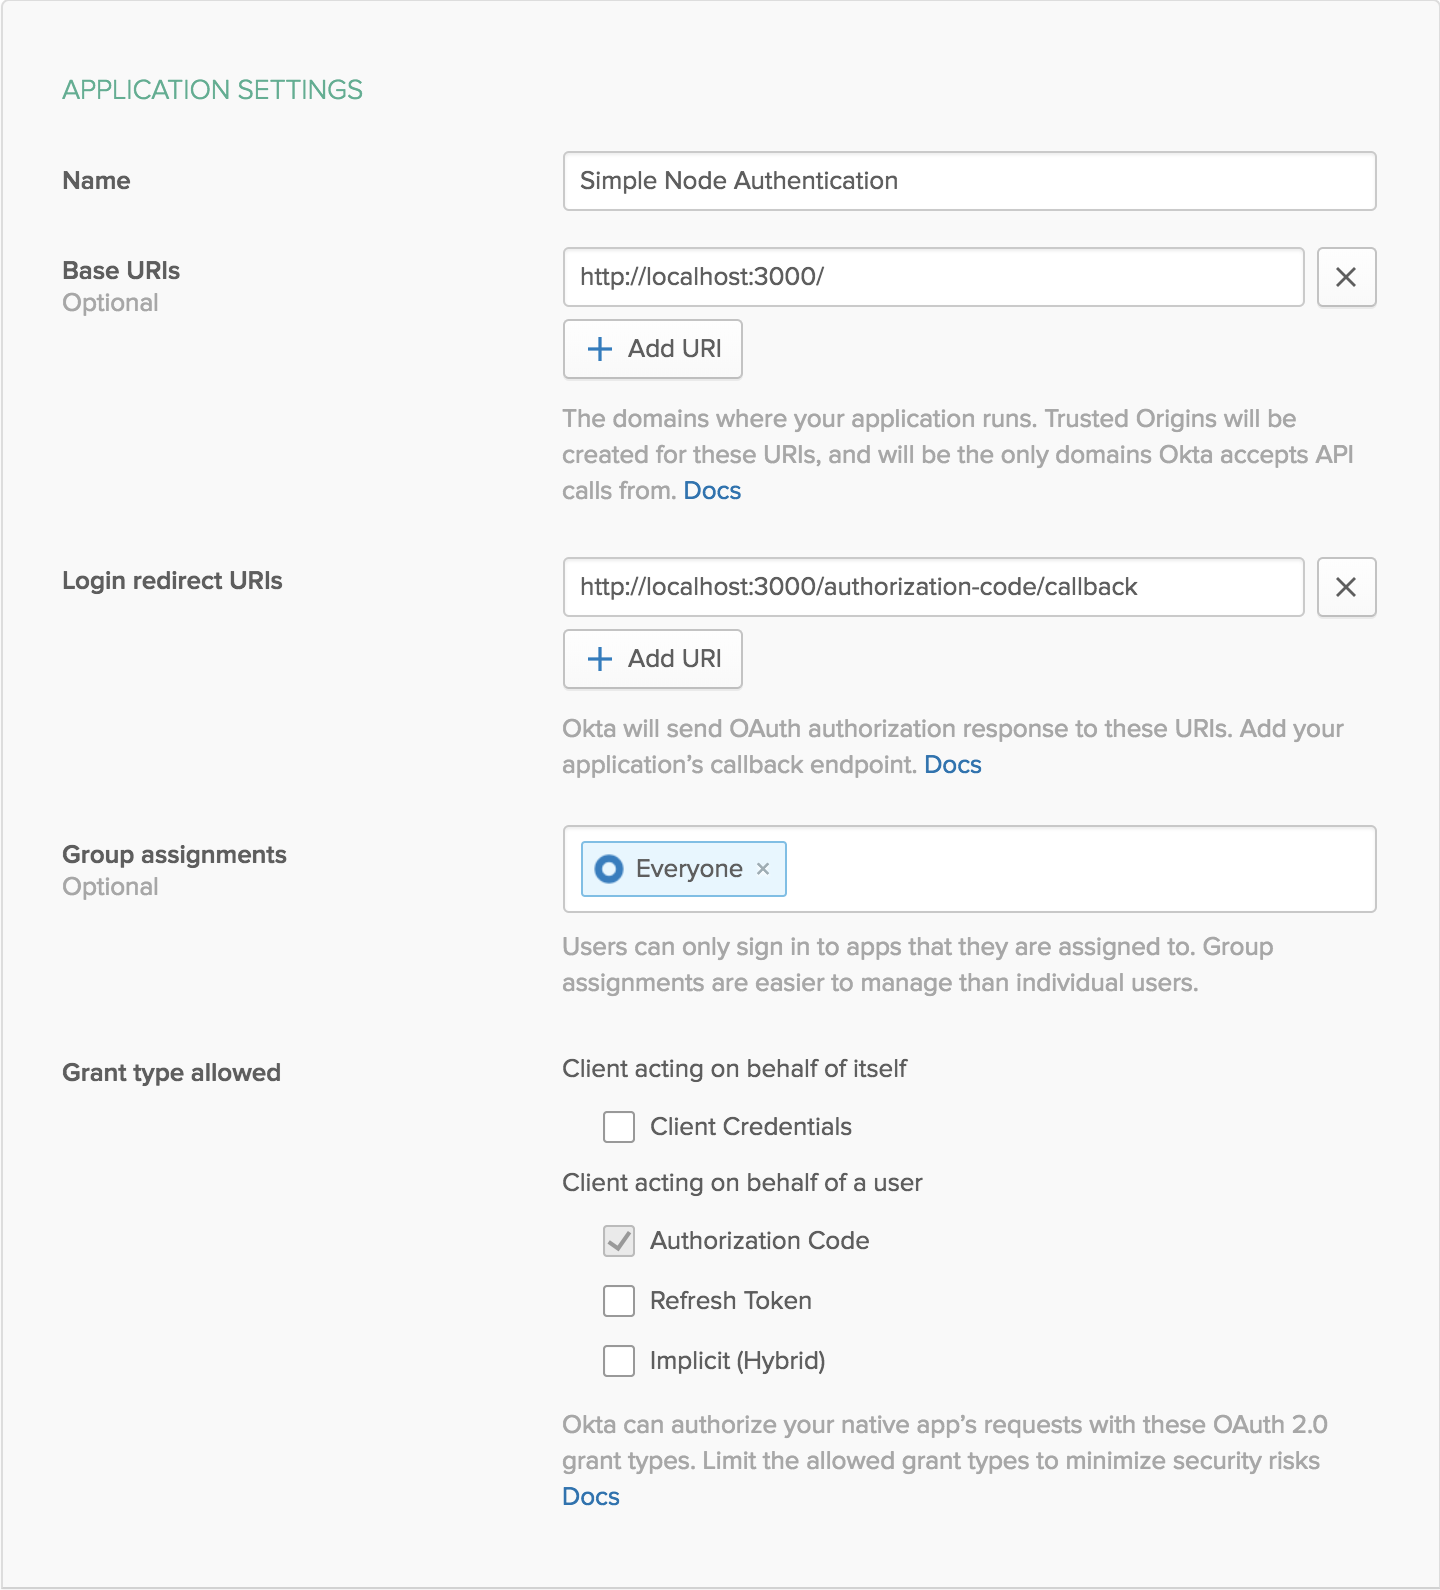
The example app uses the Express framework, which uses port 3000 by default. Pick a name for your application and change the ports, but leave all the other settings the same for now. If you were using this in production you would add URIs for a custom domain.
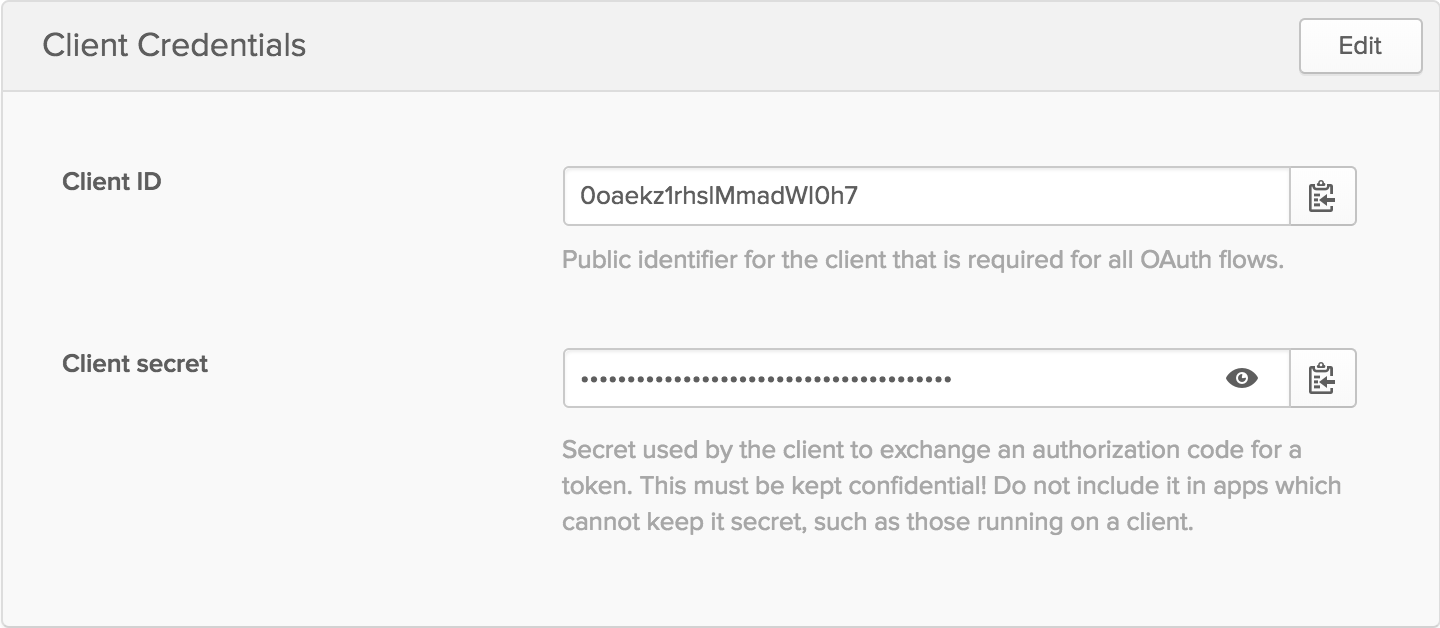
After creating your application, you’ll get access to your client credentials. Use the Client ID and Client Secret for CLIENT_ID and CLIENT_SECRET, respectively.
REGISTRATION_TOKEN
While still in the Okta developer console, navigate to API > Tokens from the menu then click the Create Token button. You can create multiple API tokens and use them for different parts of the app, so they can be used for tracking. This one will be used for registering new users, so you can use a name like “registration”.
You will then be given a token value, which will only be displayed this one time. If you lose it, you’ll need to create another API token.
USER_PROFILE_TOKEN
Again, from API > Tokens in your Okta developer console, click on Create Token to create another token. This one will be used for user profiles, so give it a name like “user profile”. Make sure to save the token value, as it will only be displayed this one time.
If you don’t really care about tracking API usage and don’t feel like making another token, you could really use the same token value for both in .env. I won’t tell you how to live your life.
Fetch User Profiles
You now have everything you need to run the existing app. From your terminal, run the following to start the app:
npm install
npm run dev
Whenever you make code changes now, the app will automatically restart. All you will need to do is refresh the page to see the changes appear. Open up http://localhost:3000 to see the app in action.
Okta’s Node SDK provides a simple way to fetch and modify user profiles, and Express allows you to modify the behavior of all your endpoints by adding middleware. Combining these tools, you can make it so that all routes have access to the user’s profile if they are authenticated. This will be similar to how req.userinfo already contains some user info, but this will have more detail.
Create a new file called okta.js. Here you’ll create a middleware that checks if the user is already authenticated. If so, it uses their unique ID (req.userinfo.sub) to look up their profile information, then stores it on the request (req) which can be accessed by other routes and middleware later.
okta.js
const okta = require('@okta/okta-sdk-nodejs')

const client = new okta.Client({
  orgUrl: process.env.ORG_URL,
  token: process.env.USER_PROFILE_TOKEN,
})

const middleware = async (req, res, next) => {
  if (req.userinfo) {
    try {
      req.user = await client.getUser(req.userinfo.sub)
    } catch (error) {
      console.log(error)
    }
  }

  next()
}

module.exports = { client, middleware }
In app.js you now need to add the middleware. You can do this right after the line app.use(oidc.router).
app.use(oidc.router)

// Add the following lines:

const okta = require('./okta')
app.use(okta.middleware)
Upgrade Routes in Node to Use the New User Profile
Instead of using req.userinfo in your routes, you’ll want to upgrade to using req.user. The main reason for this is the profiles are not 100% in sync. When making changes to a user’s profile, the Okta Node SDK and the OIDC Middleware use separate caches, so if you change your first name, for example, it won’t be reflected in req.userinfo until you log out and back in. However, req.user will be updated immediately.
Some of the syntax is a little different in the new version of the user profile (e.g. instead of given_name and family_name the new version uses firstName and lastName). You’ll need to change a few things to get them to line up correctly.
views/layout.hbs
       <h1>{{title}}</h1>
-      {{#if userinfo}}
+      {{#if user}}
         <div>
-          Signed in as {{userinfo.name}}
+          Signed in as {{user.profile.firstName}} {{user.profile.lastName}}
         </div>
       {{/if}}
-      {{#if userinfo}}
+      {{#if user}}
         <a href="/logout">Sign out</a>
views/dashboard.hbs
-<h1>{{userinfo.given_name}}'s Dashboard</h1>
+<h1>{{user.profile.firstName}}'s Dashboard</h1>
routes/index.js
-    userinfo: req.userinfo,
+    user: req.user,
Change the Dashboard route to use the new Profile. There’s no longer an updated_at key, so you can simplify this by getting rid of the Date object converter. You may also want to filter out empty profile data. In the end, your dashboard route should now look more like this:
routes/dashboard.js
const express = require('express')
const { startCase } = require('lodash')

const router = express.Router()

router.get('/', function (req, res, next) {
  const { profile } = req.user
  const descriptionList = Object.keys(profile).sort()
    .map(key => ({
      term: startCase(key),
      details: profile[key],
    }))
    .filter(({ details }) => details)

  res.render('dashboard', {
    title: 'Dashboard',
    descriptionList,
    user: req.user,
  })
})

module.exports = router
Customize the User Profile in Okta
Now if you visit the dashboard you’ll see a few different items. However, when a user creates their account they’re only asked for a first name, last name, and email address, so that’s all you’ll really see here. However, Okta provides a bunch of other attributes out of the box, plus you can create your own custom options.
In your Okta dashboard, navigate to Users > Profile Editor. The first one in the list will say user and have the Okta logo next to it. Click on the button in that row labeled with an edit icon and the word Profile.

You’re now taken to a page that shows you a long list of default attributes. You can’t edit these, but you can change a few options around on some of them. For example, you can restrict the username to a certain set of characters, or you can make certain attributes read-only.
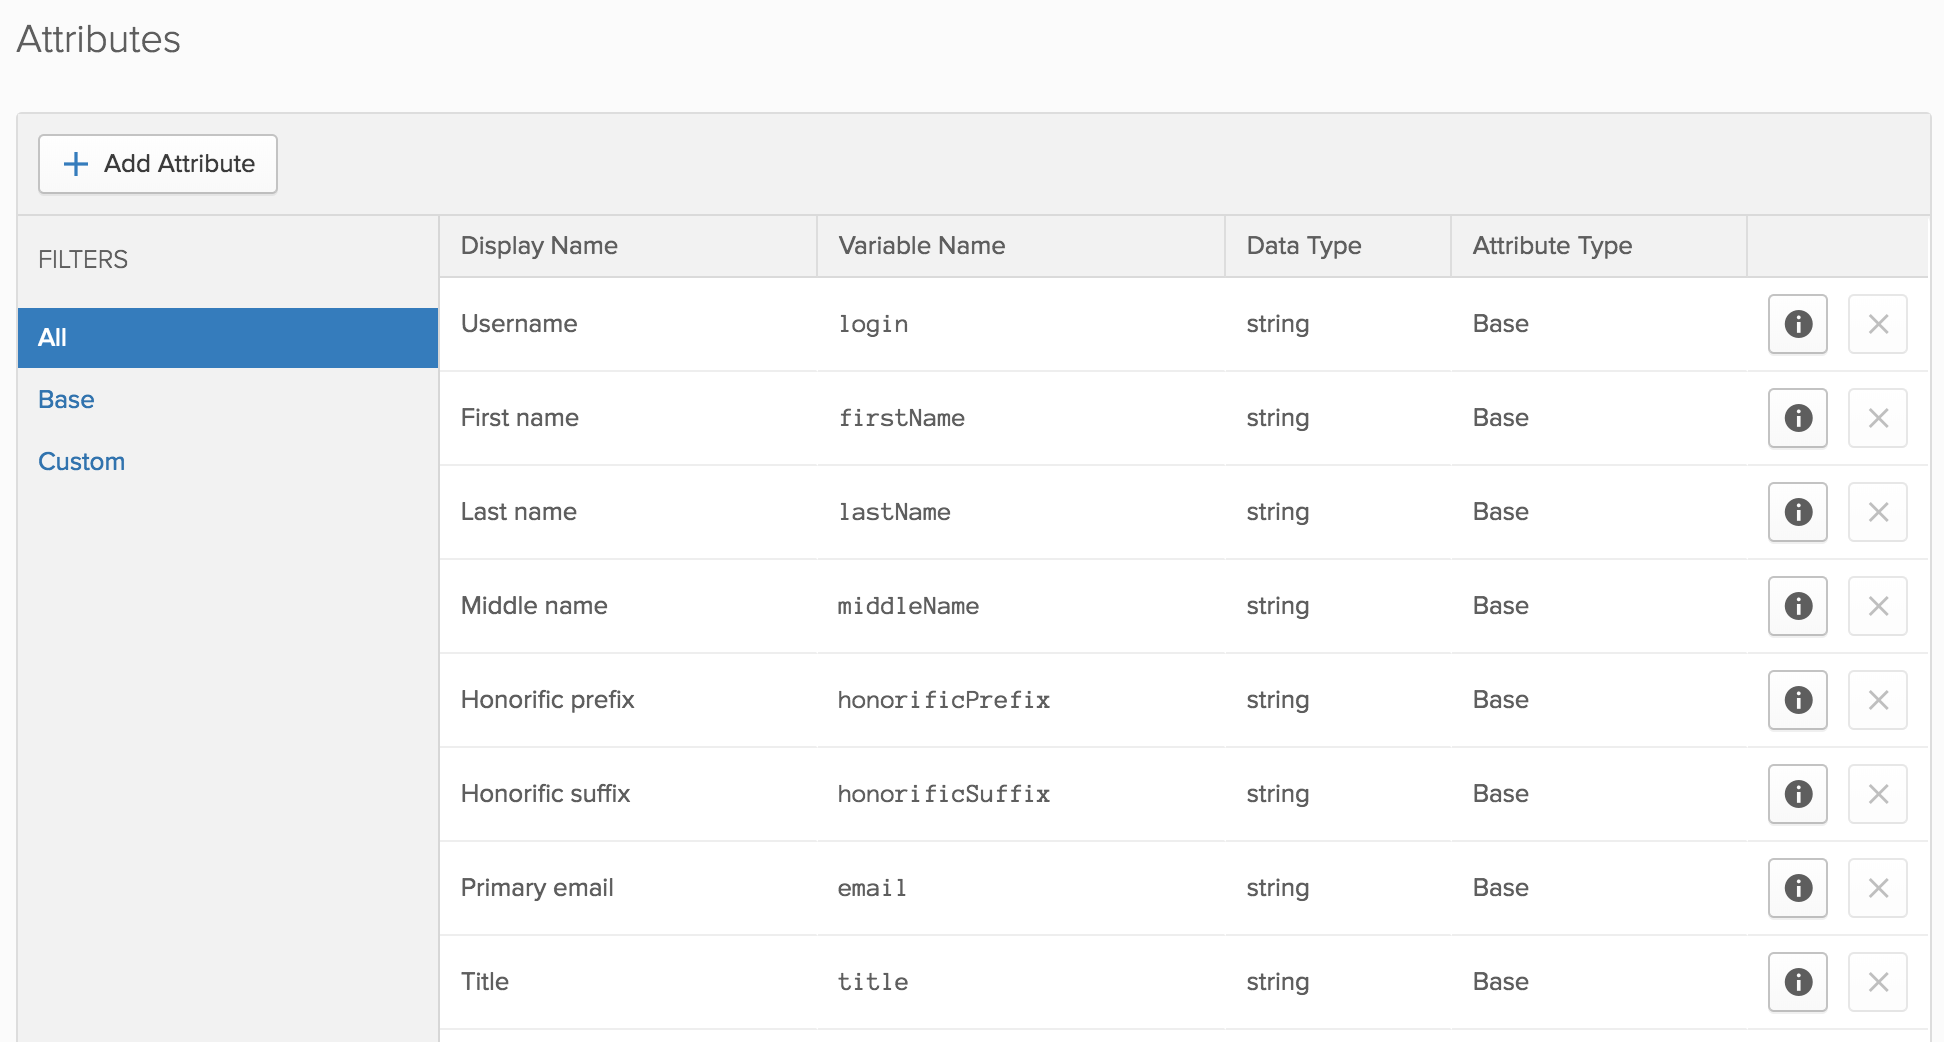
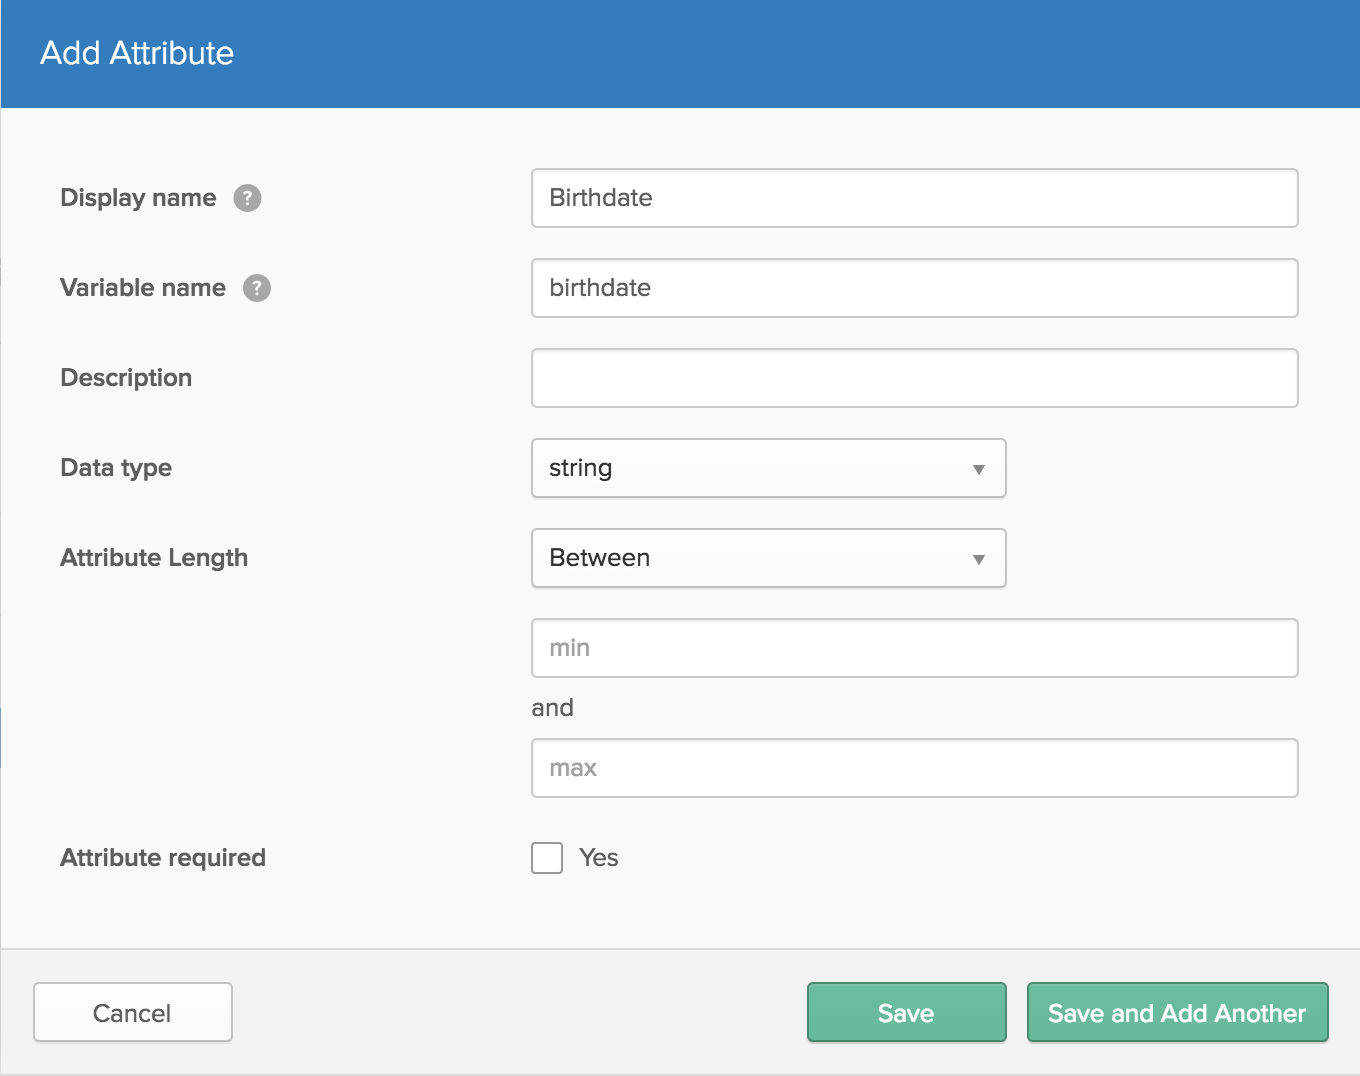
You can also create custom attributes by clicking on the Add Attribute button. For now, try creating custom string attributes of birthdate and favoriteColor.
Create a User Profile Page in Node
You now have everything you need set up to store user profile information within Okta. You just need a way for users to edit their information. You can do this by creating a new route and view in your app.
Handlebars lets you loop through an array of elements, so we can cut down on some form repetition by using one of these loops instead of copy-pasting a bunch of boilerplate for each item. Effectively, we can just write a single form item and have it work for each attribute.
views/profile.hbs
<form method="post">
  {{#each fields}}
    <div>
      <label for="{{this.name}}">
        {{this.label}}
        <input
          id="{{this.name}}"
          {{#if this.type}}type="{{this.type}}"{{/if}}
          name="{{this.name}}"
          {{#if this.required}}required{{/if}}
          value="{{this.value}}"
        />
      </label>
    </div>
  {{/each}}

  <button type="submit">Save</button>
</form>
In the context of the loop this refers to the item being looped through, so in this case each item of the fields array, which you’ll need to pass in via the route. It’ll assume each item has a name, which it uses for the name and id. If there is a special type, it’ll use that, otherwise the browser will assume the default value of text. Here, you want birthdate to be a date, so you can use the datepicker built in to modern browsers (if the browser doesn’t support it, you’ll just get a text field, which is good enough for this demo). You can also tell the browser that certain fields are required (e.g. first and last name).
Now to give it the context it needs to render the data, and map the GET and POST routes.
routes/profile.js
const express = require('express')
const router = express.Router()

// These are the basic field definitions - the values will be populated on demand
const fields = [
  // Required fields
  { label: 'First Name', name: 'firstName', required: true },
  { label: 'Last Name', name: 'lastName', required: true },

  // Some built-in attributes
  { label: 'Address', name: 'streetAddress' },
  { label: 'City', name: 'city' },
  { label: 'State', name: 'state' },
  { label: 'Zip Code', name: 'zipCode' },

  // Custom attributes
  { label: 'Birthday', name: 'birthdate', type: 'date' }, // Custom `date` type
  { label: 'Favorite Color', name: 'favoriteColor' },
]

/* This will update the user's profile on submit
 * It's only called for POST requests
 */
router.post('/', async (req, res, next) => {
  try {
    // Assign the values from the form to the user profile
    Object.assign(req.user.profile, req.body)

    // Send a request to Okta to update the user profile
    // This also updates the cache in Node, to avoid excess server requests
    await req.user.update()
  } catch (error) {
    console.log(error)
  }

  next() // Move on to the next route handler, below
})

// This will be called on all requests
router.use('/', (req, res, next) => {
  res.render('profile', {
    title: 'Profile',
    user: req.user,

    // create new objects containing the field data with the user's profile info
    fields: fields.map(field => ({
      // this es6 syntax copies the values from the field into the new object
      ...field,

      // pull the value from the user profile and add it to the field object
      value: req.user.profile[field.name],
    })),
  })
})

module.exports = router
Calling router.use tells the router to use that function for all requests. You’ll want to render the page for both POST and GET requests, so this lets you write the function once and use it for both versions of the page.
By adding a router.post call above the router.use call, you can specify that something special happens first when a POST request is made. In this case, the code saves the data before rendering the page. The call to next tells it that it’s OK to move on to the next function (rendering the page, in this case).
Now you need to tell the app when to use these routes. You can add this right after the dashboard. You want to make sure that the user is authenticated in order to view the page, so make sure to add the oidc.ensureAuthenciated() middleware.
app.js
app.use('/dashboard', oidc.ensureAuthenticated(), dashboardRouter)

// Add the following lines:

const profileRouter = require('./routes/profile')
app.use('/profile', oidc.ensureAuthenticated(), profileRouter)
You also need a way to make sure users can get to their profile page. One easy way to do this is from the layout view, so it’s built into every page as long as users are signed in.
views/layout.hbs
-        <div>
+        <a href="/profile">
           Signed in as {{user.profile.firstName}} {{user.profile.lastName}}
-        </div>
+        </a>
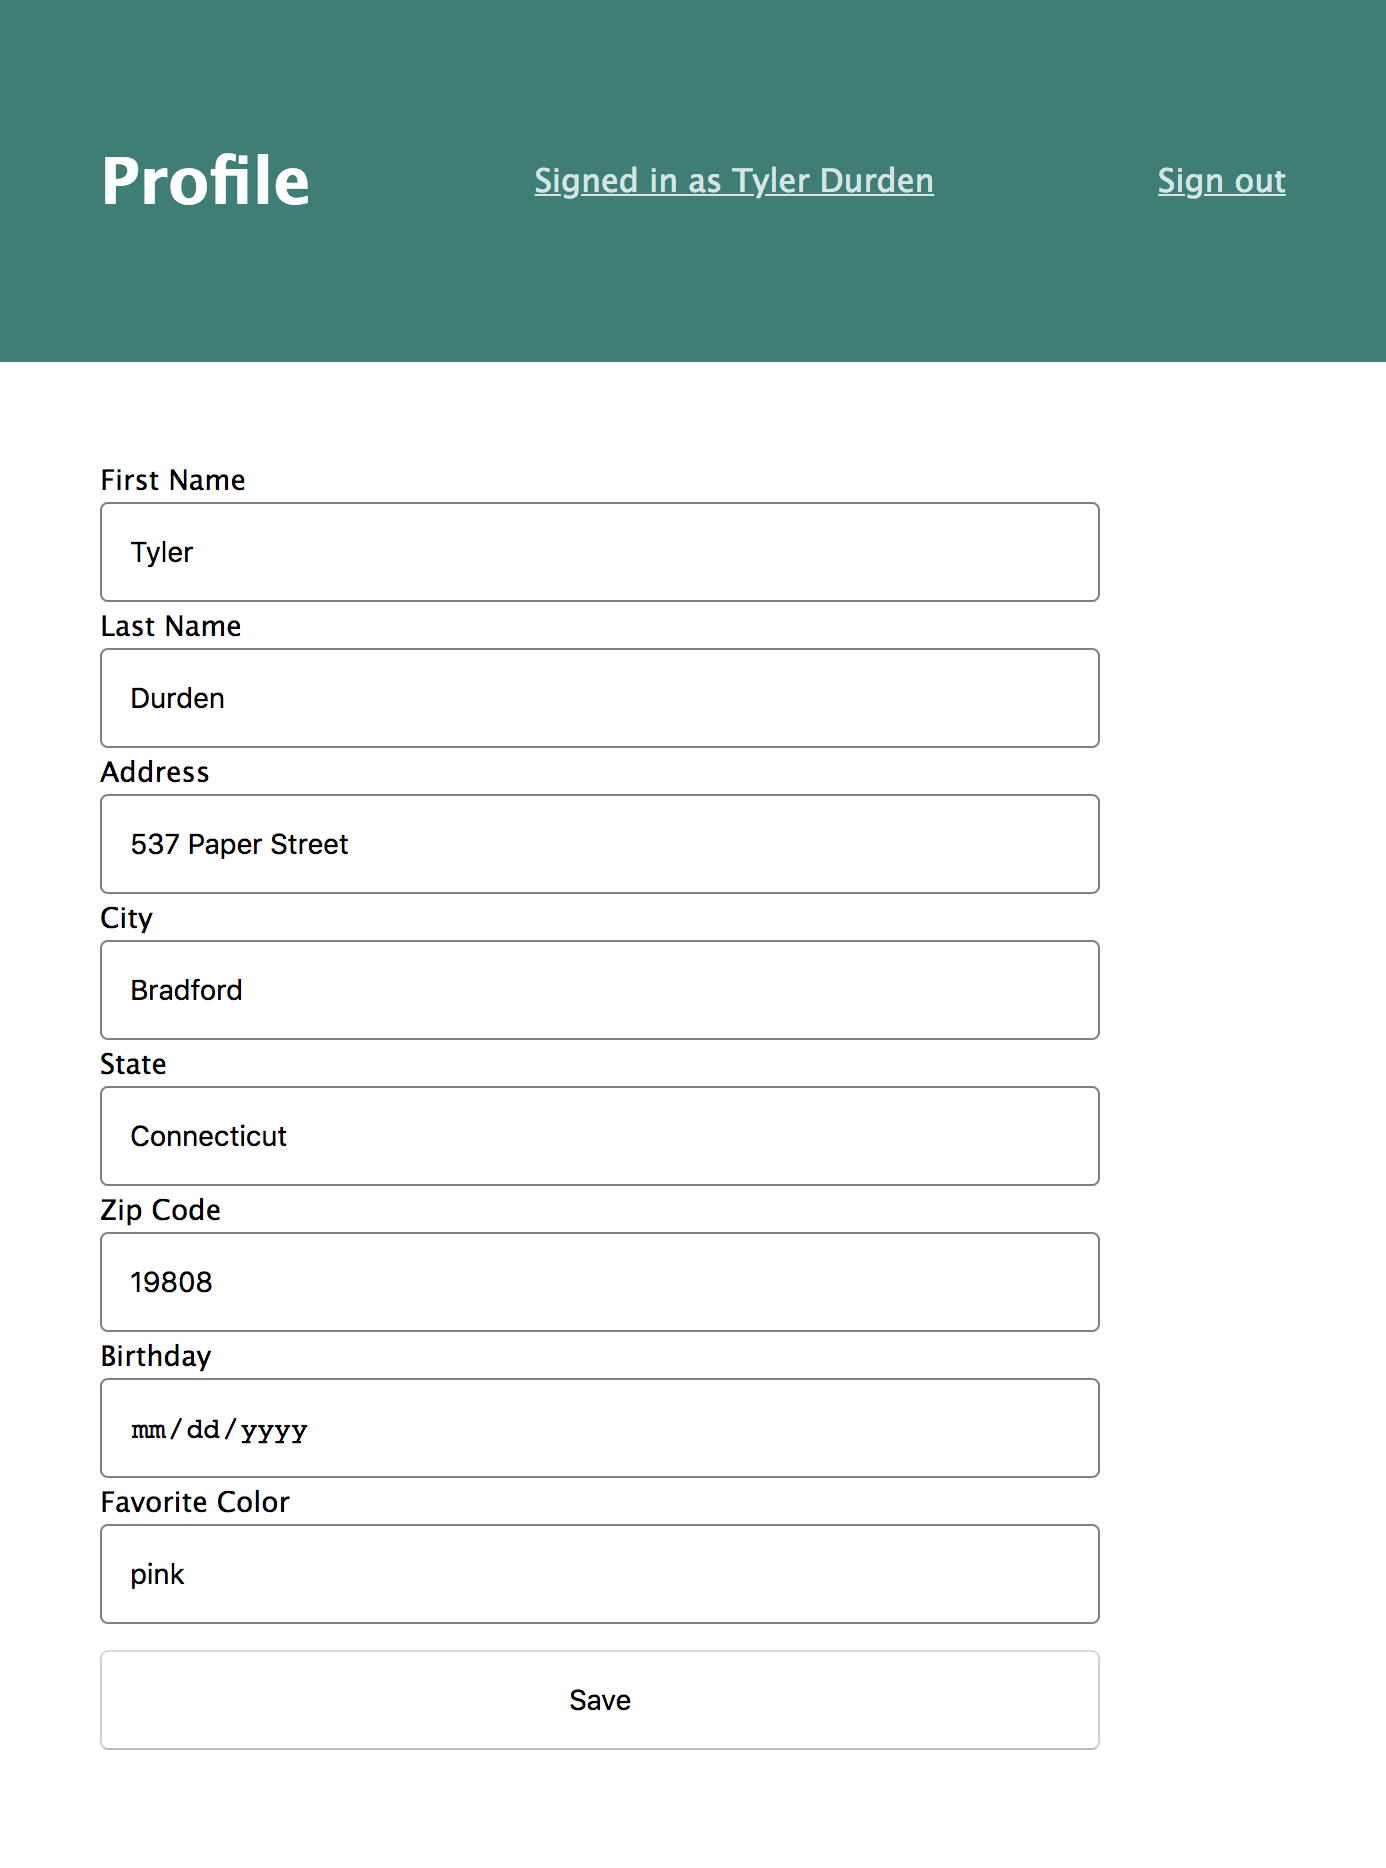
Now you can sign in and edit your profile to your heart’s desire!
Best Practices for User Management in Node
This can sometimes vary depending on who you talk to or what decade you’re in, but there are a generally accepted set of best practices when it comes to user management.
Disable Users
Rarely do you want to actually delete users. Doing so can turn your database into a nightmare. Assume for a second that you keep track of changes made to sensitive information and who made those changes. Maybe you have to keep information on employees for tax records and one of those employees resigns. Now you might be tempted to delete their account so they no longer have access to your system. If you delete their record, you no longer know who it was who made those changes, which could be a disaster come tax time.
Instead, it’s generally better to disable the user. Their information will be kept available for reports, but the user will not be able to sign in. Another advantage to that approach: perhaps your ex-employee gets rehired at some point, then you can simply reactivate their account.
One possible exception to this rule would be for a site where your users own all of their content. To avoid privacy concerns, it might actually be better to delete the account, as long as the user fully understands that their information will not be recoverable.
Okta gives you the option of either disabling or deleting users, but usually disabling is recommended.
Always Provide a Profile Management Page
Any time you have users on your site, you have some sort of information associated with them. Users need to be able to see what information you have on them and generally be able to edit it. Sometimes once you create an account you’re stuck with the username you used when signing in, but things like your name or address should definitely be editable.
Maybe your user made a typo when creating their account, or maybe they changed their legal name to Alexander Supertramp. Unless you’re writing the app for a government site maintaining legal names, you shouldn’t really care what a person wants to call themself. You should always set up some page, no matter how simple, for users to be able to view and edit their profile information.
Store a User’s Unique ID
It’s quite common that your app maintains a separate database of information somewhere and is just using a service like Okta for user management. You may need to associate the information in your database to a specific user. In that case, make sure to use the user’s unique ID.
The standard for services using JWT is sub, short for “Subject”, but really it could be stored anywhere depending on the provider. Using the Okta OIDC middleware, you can access the unique user ID using req.userinfo.sub. This never changes for any given user, so it’s safe to store just this information. All the rest can be looked up on demand, or cached (as is done in the Okta Node SDK).
If you relate users with something other than the user’s sub, you risk running into an issue where the data doesn’t match up. For example, if you use email and their email changes, you no longer have a valid record.
If you store excess information, such as a user’s name or address, you risk data getting out of sync. It would be pretty easy for different parts of your app to display different information until they’re synchronized, which just creates confusion.
Store Custom Profile Data in Okta
If you have any custom profile information, it’s best to store that data with the authentication provider like I showed you above with Favorite Color and Birthdate. This makes sure that all profile data is stored in the same place and keeps your application simpler.
Storing all your profile information with Okta also allows you to share users between multiple apps and make sure their data stays in sync. Instead of having to update multiple databases, your user can just make the change once and it propagates instantly to all apps. For example, you might have a website, an iOS app, and an Android app. You might use separate databases for each app and have different Okta applications for each, but you can share the same user base.
Learn More about Node, Express, or User Management with Okta
Hopefully I’ve helped to show you that you can have all the benefits of authentication, user management, and user profile storage without the need for any additional infrastructure. You can tie users into your existing app by just adding a single column to a database table.
Okta also provides an API to allow you to manage user profile schemas server-side, instead of using the Okta Developer platform. This could be really useful to keep the profile schema in source control and maybe even deploy changes with continuous deployment. For more information, check out the Schemas API.
If you’d like to learn more about Node and Secure User Management with Okta, I’d strongly encourage you to check out some of these articles, or browse the Okta developer blog:
- Simple Node Authentication (used as a starting point for this tutorial)
- Use Okta (Instead of Local Storage) to Store Your User’s Data Securely
- Build User Registration with Node, React, and Okta
- Build Secure Node Authentication with Passport.js and OpenID Connect
- Add Authentication to Any Web Page in 10 Minutes
And as always, we’d love to hear from you. Hit us up with questions or feedback in the comments, or on Twitter @oktadev.
Okta Developer Blog Comment Policy
We welcome relevant and respectful comments. Off-topic comments may be removed.