Build a Secure TypeScript MCP Client with Cross App Access (XAA)

Enterprise apps rarely work alone. Imagine this scenario: HR wants to ensure that a new employee completes their new hire onboarding, and they want this verification in the company’s HR app so it’s tied to the employee’s personnel file. But the onboarding tasks come from a task-tracking tool with requirements defined by each department, from a different vendor and on a different domain than the HR app. It’s on IT to bridge the two.
Wiring the two together normally costs the user an OAuth consent screen or costs IT a shared service account. Cross App Access (XAA) removes that step. The company’s identity provider vouches for the user across the boundary, under a policy the admin sets in advance. In this tutorial, you’ll build that flow end-to-end in TypeScript.
You’ll build a Model Context Protocol (MCP) requesting app: a web app that signs a user in through an enterprise Identity Provider (IdP), exchanges that identity for a delegation token called an Identity Assertion JWT Authorization Grant (ID-JAG), trades the ID-JAG for an access token, and calls a protected MCP server to fetch real data. You’ll use the MCP TypeScript SDK, which added first-class Cross App Access support, and you’ll test everything against xaa.dev, the free XAA playground from the Okta Dev Advocacy team.
By the end of this post, you can:
- Explain what XAA is and why AI agents and enterprise apps need it
- Read an ID-JAG and understand key claims in it
- Understand each step of the XAA flow through the SDK functions
- Let the SDK’s
CrossAppAccessProviderrun the whole flow for you
Prerequisites
- Node.js 20 or later
- npm, which ships with Node.js
- A free xaa.dev registration (email only)
- Familiarity with OAuth 2.0 concepts. If Proof Key for Code Exchange (PKCE) is new to you, read Secure Your Express App with OAuth 2.0, OIDC, and PKCE first.
The code in this tutorial runs against @modelcontextprotocol/client version 2.0.0-alpha.2, openid-client 6, Express 4, and the xaa.dev playground services. The MCP SDK version is a prerelease of the v2 line, and APIs can change between prereleases, so check the sample repository for the exact dependency versions.
Table of Contents
- What you’ll build: a TypeScript MCP requesting app
- Register your requesting app on xaa.dev
- Set up the TypeScript project
- Run your TypeScript MCP app with xaa.dev
- The four-step XAA flow
- Inspect the tokens in the dashboard
- ID-JAG: the token that carries identity across apps
- Why Cross App Access matters for AI agents
- The Model Context Protocol and its TypeScript SDK
- Inside the MCP TS SDK’s
crossAppAccessmodule - Walk through the XAA flow in TypeScript
- Where XAA fits in your real architecture
- Learn more about Cross App Access, ID-JAG, and MCP
What you’ll build: a TypeScript MCP requesting app
The sample app is an employee onboarding dashboard. After a single sign-in at the playground IdP, it fetches the user’s onboarding checklist from a protected MCP server and renders progress stats, an “up next” card, and the checklist itself. A “behind the scenes” panel shows all four XAA steps executing live, with timings and expandable decoded tokens, because watching the tokens flow is the best way to learn the protocol.
One naming note before the build: in this post, the MCP client and the requesting app are the same thing. The app is an MCP client toward the server it calls, and a requesting app in XAA terms, because it requests delegated access on behalf of the signed-in user.
The app spans four files:
src/server.ts: an Express server that handles the OpenID Connect sign-in withopenid-clientand streams the flow steps to the browser over server-sent events (SSE)src/xaa.ts: the XAA flow viaCrossAppAccessProvider, built on the MCP TypeScript SDKsrc/config.ts: environment variables and app configurationpublic/index.html: the dashboard
The complete project is on GitHub in the okta-xaa-typescript-mcp-sdk-example repository. Get it running first, then this post walks back through what each token in the chain does and how the SDK produces it.
Register your requesting app on xaa.dev
Rather than stand up an enterprise IdP and a protected resource yourself, you’ll code against xaa.dev, the free XAA playground from the Okta Dev Advocacy team. It hosts the three services you don’t have to build: the IdP (IdenX at https://idp.xaa.dev), the resource’s authorization server (https://auth.resource.xaa.dev), and a protected todo resource available as both a REST API and an MCP server (https://mcp.xaa.dev/mcp). You register your app once and get the credentials your project needs because XAA spans two trust domains: your app needs one identity at the IdP to sign users in and another at the resource’s authorization server to get access tokens. For a tour of the playground itself, read Introducing xaa.dev: A Playground for Cross App Access.
- Go to the requesting app registration page
- Enter your email address. It scopes which registered apps are visible to you; xaa.dev creates no account and sends no email.
- Select + Register New App and fill in the form:
- Application Name: any label, for example,
Onboarding App - Local Dev - Redirect URIs:
http://localhost:3001/callback(the match is exact, including scheme, host, port, and path) - Connect to Resource: select the Todo MCP server resource (
todo0-mcp) and keep thetodos.readandmcp.accessscopes
- Application Name: any label, for example,
- Save the credentials from the confirmation modal
Registration gives you at least two sets of credentials, and mixing them up is the most common XAA mistake:
| Client | Credentials | Identifies your app at |
|---|---|---|
| Main client | client_id / client_secret |
the IdP, for sign-in and for the token exchange |
| Resource client | resource_client_id / resource_client_secret (the ID looks like client_xxx-at-todo0-mcp) |
the resource’s authorization server |
Note: Why separate credentials? The IdP and the resource’s authorization server are separate trust domains, so your app holds a separate identity at each. Using the main client’s credentials at the resource’s authorization server results in an
invalid_clienterror.
Note: Some registrations also show a distinct pair for the token exchange itself. If yours does, keep it aside; the sample has a slot for it, and reuses the main client when you leave that slot empty.
Set up the TypeScript project
Clone the sample and install the dependencies:
git clone https://github.com/oktadev/okta-xaa-typescript-mcp-sdk-example.git
cd okta-xaa-typescript-mcp-sdk-example
npm install
cp .env.example .env
Fill in .env with the credentials from your registration:
# Main client: identifies your app at the IdP
XAA_CLIENT_ID=YOUR_CLIENT_ID
XAA_CLIENT_SECRET=YOUR_CLIENT_SECRET

# Token-exchange client, if your registration shows a separate pair for it.
# Leave both blank to reuse the main client above.
EXCHANGE_CLIENT_ID=
EXCHANGE_CLIENT_SECRET=

# Resource client: identifies your app at the resource's authorization server
MCP_CLIENT_ID=YOUR_RESOURCE_CLIENT_ID
MCP_CLIENT_SECRET=YOUR_RESOURCE_CLIENT_SECRET

# xaa.dev endpoints (no trailing slashes)
IDP_BASE_URL=https://idp.xaa.dev
AUTH_SERVER_URL=https://auth.resource.xaa.dev
MCP_SERVER_URL=https://mcp.xaa.dev/mcp

PORT=3001
BASE_URL=http://localhost:3001
XAA_SCOPE=todos.read mcp.access
Note: Keep the URLs free of trailing slashes. The IdP compares the
audiencevalue as an exact string, sohttps://auth.resource.xaa.dev/with a slash fails wherehttps://auth.resource.xaa.devsucceeds.
Note: The sample’s
.gitignoreexcludes.env. Never commit client secrets, ID tokens, ID-JAGs, or access tokens to version control.
Run your TypeScript MCP app with xaa.dev
Start the server and open the dashboard:
npm start
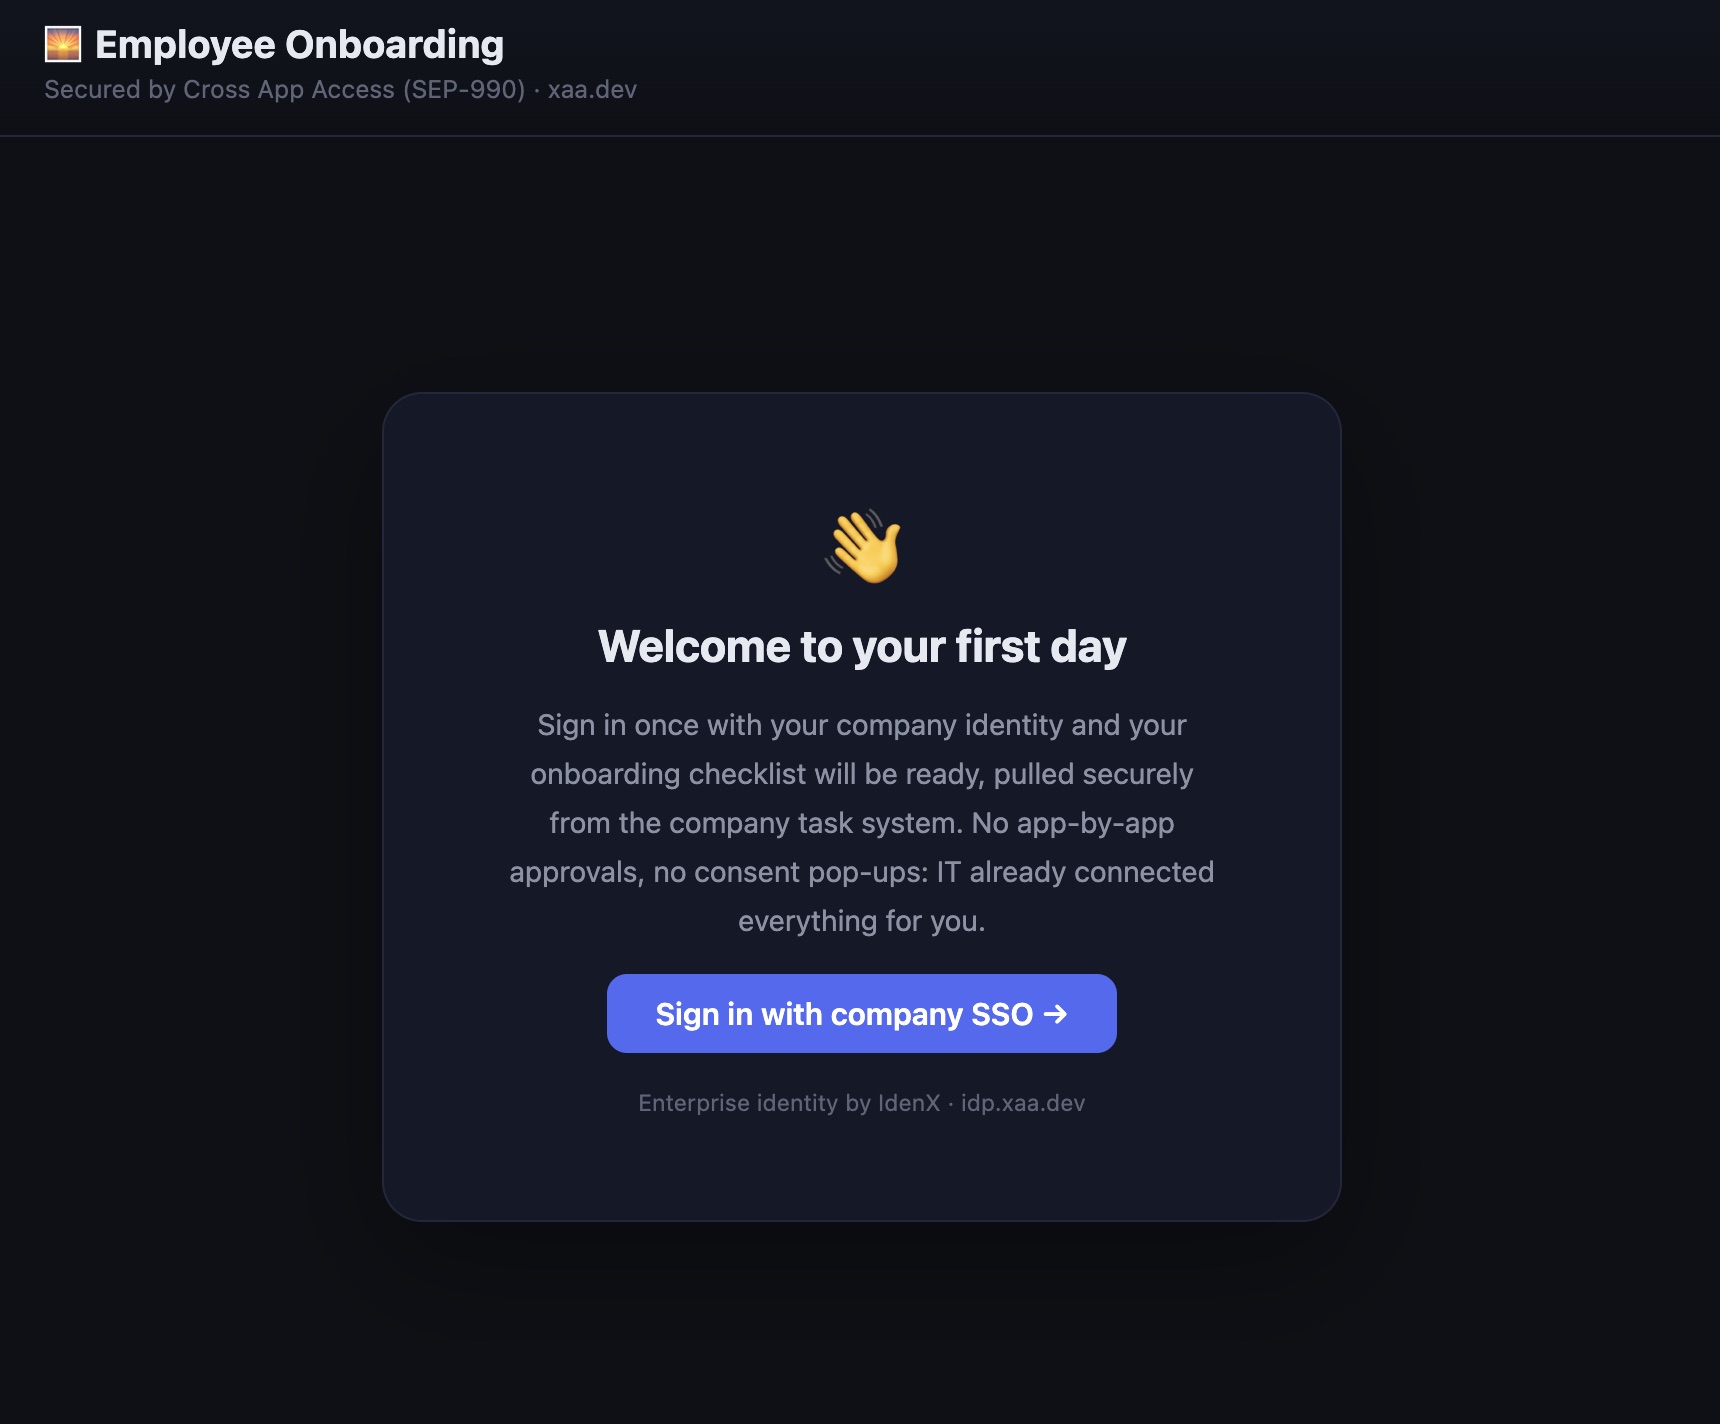
Go to http://localhost:3001 and select Sign in with company SSO.
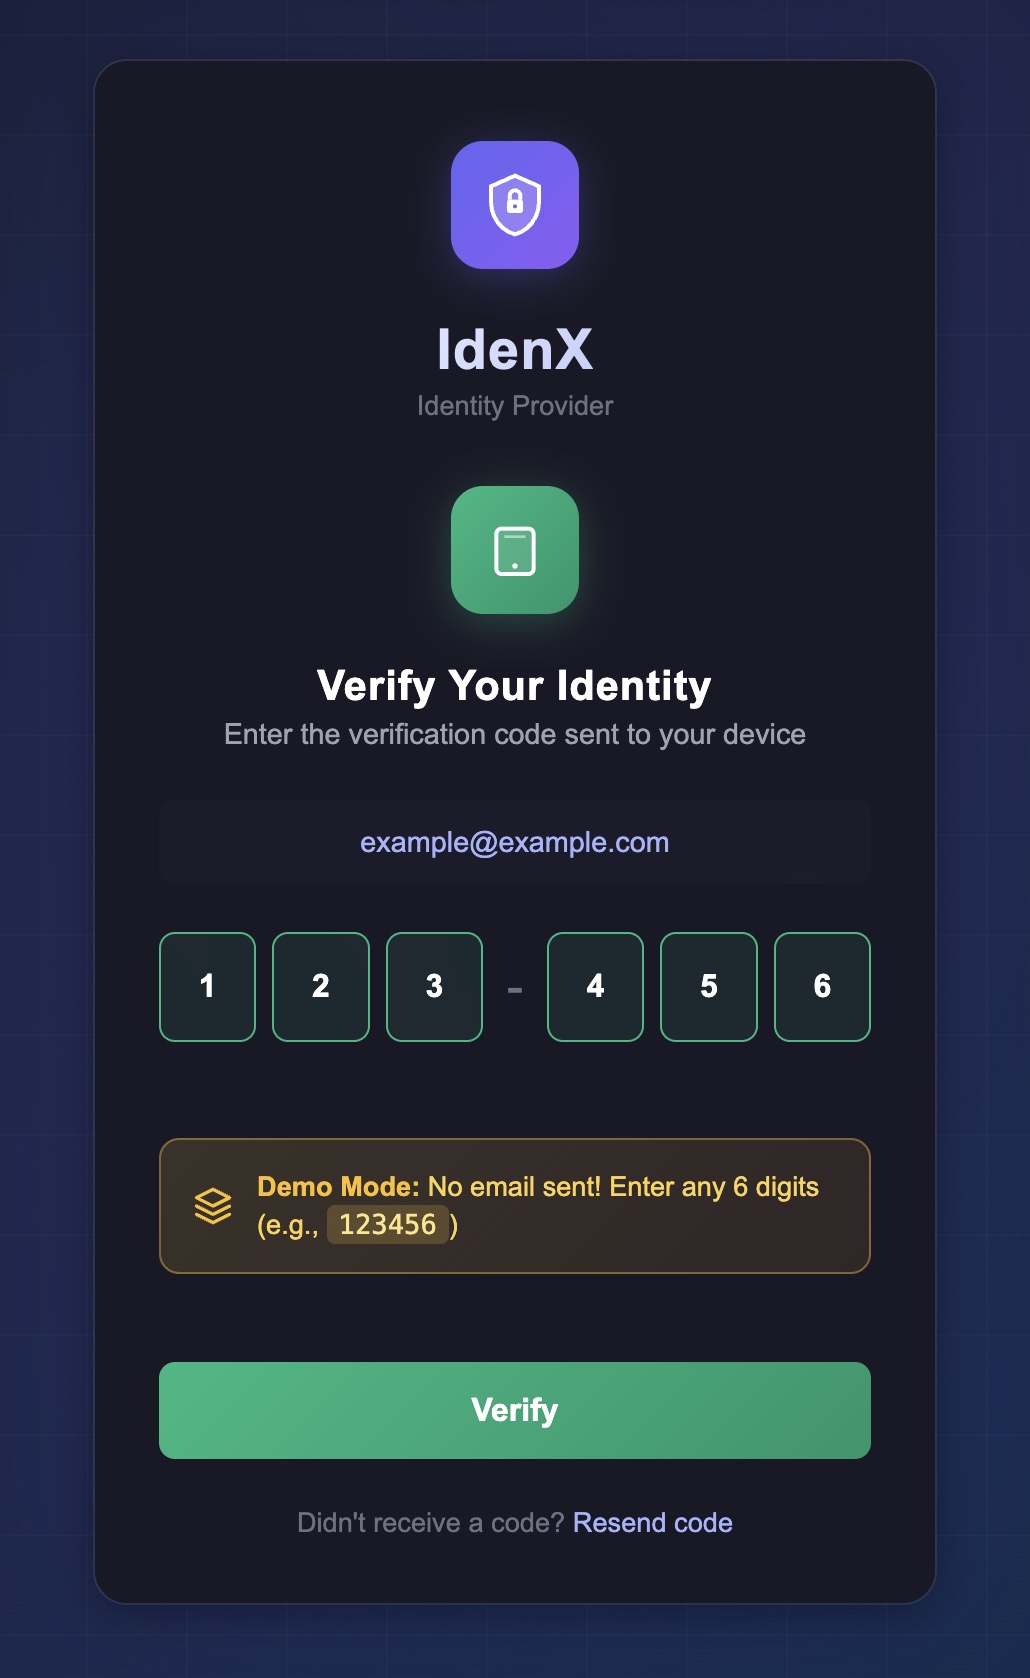
IdenX accepts any email address, so no real credentials are involved. It then shows a Verify Your Identity screen asking for a verification code. The playground runs in demo mode and sends no email, so enter any six digits.
After sign-in, the app runs the flow automatically: four steps light up in order in the “behind the scenes” panel with real timings, and the onboarding checklist renders as soon as the last one delivers the data.
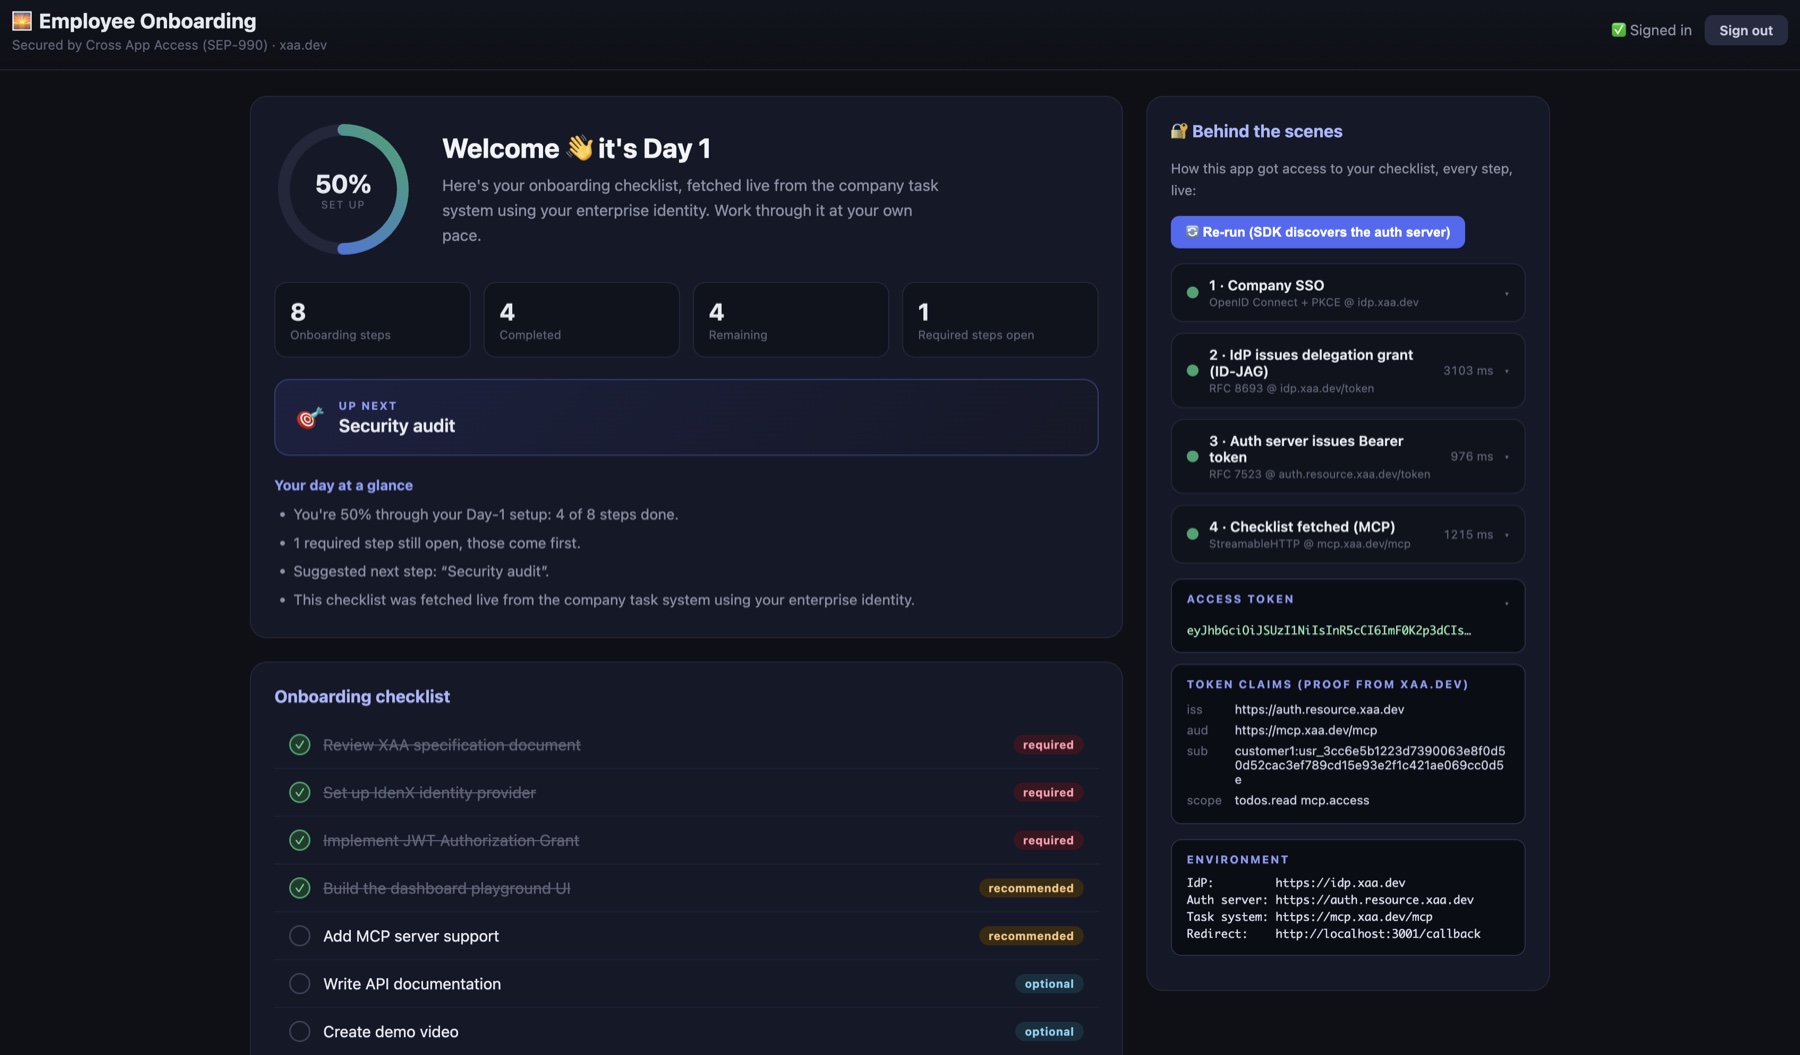
You never saw a consent screen, and your app never held a credential for the todo service. That’s the point of XAA, and the panel shows how it happened.
The four-step XAA flow
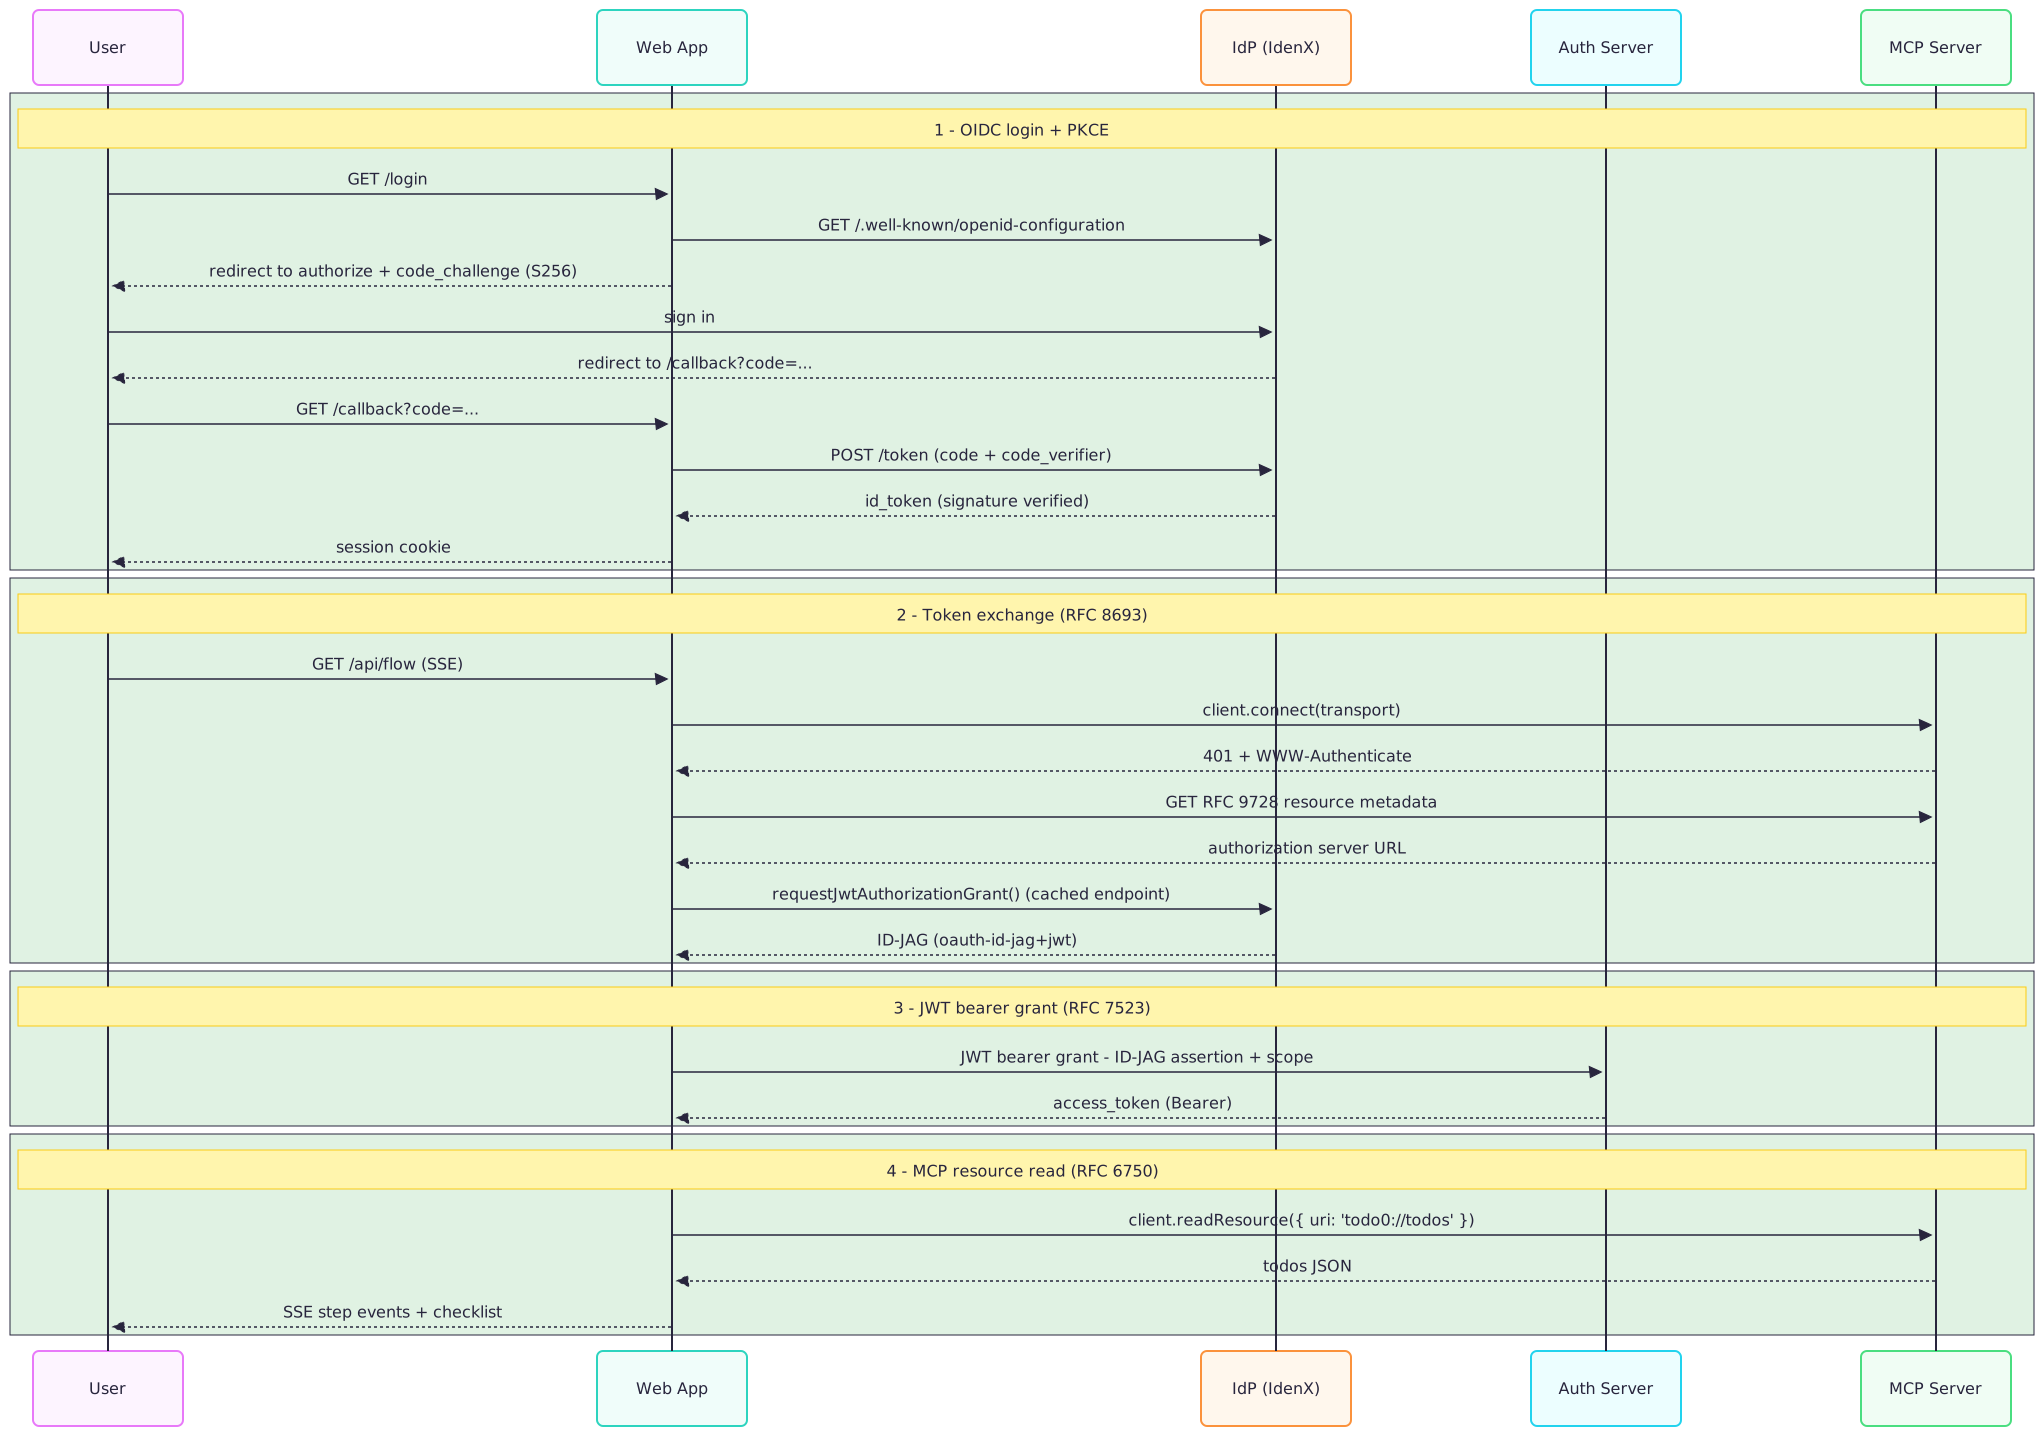
The panel’s four cards are the whole protocol. Steps 1, 3, and 4 are standard OAuth 2.0; step 2 is the exchange XAA adds.
Step 1: User signs in (OpenID Connect + PKCE)
  Browser -> IdP                            -> your app gets an ID token

Step 2: Token exchange (RFC 8693)
  Your app -> IdP token endpoint            -> ID-JAG

Step 3: JWT bearer grant (RFC 7523)
  Your app -> resource authorization server -> access token

Step 4: Call the resource (RFC 6750)
  Your app -> MCP server (Bearer token)     -> data
The user authenticates once with the IdP, and your app receives an ID token. Your app exchanges that ID token at the IdP for an ID-JAG using OAuth 2.0 Token Exchange (Request for Comments (RFC) 8693). Your app presents the ID-JAG to the resource’s authorization server using the JWT bearer grant (RFC 7523) and receives a scoped access token. Finally, your app calls the protected resource with that token as a standard Bearer credential (RFC 6750).
Inspect the tokens in the dashboard
Select any step card to expand its decoded token. The next section walks through what the ID-JAG’s claims mean; for now, the one thing worth confirming is that the access token’s aud matches the ID-JAG’s resource, byte for byte. That match is the delegation chain holding together, and a mismatch is the most common cause of a 401 from the resource server.
Below the flow steps, the ACCESS TOKEN card displays the Bearer token issued in step 3, with an expand toggle to inspect the full JWT. The TOKEN CLAIMS card decodes the same token and surfaces iss, aud, sub, and scope. Together, they confirm the right issuer signed the token, it targets the MCP server, it carries the user’s identity, and the authorization server granted the scopes you asked for.
Select 🔄 Re-run (SDK discovers the auth server) at any time to replay the flow and watch CrossAppAccessProvider handle discovery automatically.
Note: The dashboard’s token inspector exists for learning and local debugging. Keep raw tokens out of production interfaces and logs; when troubleshooting in production, log redacted identifiers and non-sensitive claims instead.
Note: This app is read-only by design. It requests
todos.readandmcp.access, and nothing else. Least privilege applies to AI agents and requesting apps the same way it applies to users.
ID-JAG: the token that carries identity across apps
The ID-JAG is a new token type introduced by XAA. It’s a signed JSON Web Token (JWT) that the IdP issues when your app exchanges the user’s ID token for it. Think of it as a sealed envelope from the IdP that says: “This app acts for this user, toward this specific resource, with these scopes, for the next five minutes.”
Here is a decoded ID-JAG from the app you just ran:
{
  "iss": "https://idp.xaa.dev",
  "sub": "usr_1a2b3c4d5e6f",
  "aud": "https://auth.resource.xaa.dev",
  "resource": "https://mcp.xaa.dev/mcp",
  "client_id": "client_1a2b3c4d-at-todo0-mcp",
  "scope": "todos.read mcp.access",
  "email": "user@example.com",
  "jti": "69586a9a-b962-4f5d-971f-40f12173bcf2",
  "iat": 1783333416,
  "exp": 1783333716
}
Most of those claims are standard JWT fields. Three decide whether your integration works:
audnames the token’s consumer: the authorization server that validates this ID-JAG. It isn’t the resource itself.resourcenames the target API. The authorization server copies this value into the access token’saudclaim, so whatever you put here is what the resource validates later.client_idis your app’s identity at the resource’s authorization server, not at the IdP. That’s the two-client model from registration, showing up in the token.
Get aud and resource backwards and the exchange either fails outright or succeeds into a token the resource server rejects, which is the error that costs the most debugging time.
The JWT header also carries "typ": "oauth-id-jag+jwt", and authorization servers reject anything else. That prevents attackers from replaying other JWTs, such as ID tokens, as authorization grants. The five-minute exp window and the one-time jti close off replay from the other direction.
Why Cross App Access matters for AI agents
You just watched one user action cross one app boundary. Enterprise software rarely stops at one. A single action fans out across many systems, and AI agents make the fan-out constant: an assistant reads a document, files a ticket, checks a calendar, and logs an audit event, all on behalf of one person.
Each of those hops needs the user’s identity. The traditional answer is a consent screen at every boundary. Users click through prompts they don’t read, and IT teams lose visibility into which app talks to which other app, because the authorization rests on personal consent. Some teams give up and share a service account, which puts a single overprivileged credential in front of everyone’s data.
XAA replaces that consent step with a policy the admin configures in advance. Your enterprise IdP already knows who the user is, because the user signed in this morning, so it vouches for that identity across the boundary with a short-lived signed token. The admin decides which app connects to which resource, with which scopes. The user signs in once, and every hop after that is an auditable cryptographic handoff.
Cross App Access is the industry term for a pattern built on the Identity Assertion Authorization Grant specification, an active Internet-Draft at the Internet Engineering Task Force (IETF) that defines the ID-JAG token and the exchange flow that XAA uses. To go deeper on the protocol itself, read Build Secure Agent-to-App Connections with Cross App Access (XAA).
The Model Context Protocol and its TypeScript SDK
Before diving into code, a quick word on the other protocol in this tutorial. The Model Context Protocol is an open standard created by Anthropic that continues to evolve, providing AI applications with a common way to connect to tools and data. An MCP server exposes capabilities (tools to call, resources to read, prompts to use), and an MCP client connects to those servers over a standard transport. Instead of building one custom integration per data source, build to one protocol so any MCP-capable AI application can use it. The MCP TypeScript SDK is the official implementation for JavaScript and TypeScript developers, handling protocol details such as transports, the initialization handshake, message schemas, and authorization.
The MCP community evolves the specification through Specification Enhancement Proposals (SEPs). Cross App Access support entered the protocol as Specification Enhancement Proposal (SEP) 990, Enterprise Managed Authorization, and the TypeScript SDK ships the implementation in its crossAppAccess module.
With SEP-990 implemented in the SDK, an XAA-enabled MCP client differs from a plain one by a single authProvider option and one callback, plus any compatibility adjustments your authorization server needs. The protocol work (discovery, token exchange, the JWT bearer grant, and retries) lives in the SDK rather than in your app.
Inside the MCP TS SDK’s crossAppAccess module
Three pieces of the TypeScript SDK matter for this tutorial:
discoverAndRequestJwtAuthGrant()performs step 2. It discovers the IdP’s token endpoint from its metadata, then sends an RFC 8693 token-exchange request and returns the ID-JAG. A sibling function,requestJwtAuthorizationGrant(), skips discovery when you already know the token endpoint.exchangeJwtAuthGrant()performs step 3: given the resource authorization server’s token endpoint, it presents the ID-JAG with the RFC 7523 JWT bearer grant and returns the access token. Unlike the step 2 function, it does no discovery of its own.CrossAppAccessProvideris the production path. It plugs into the SDK’s transport as anOAuthClientProviderand runs steps 2 through 4 automatically: it calls the MCP server, receives a401challenge, discovers the authorization server through protected resource metadata (RFC 9728), invokes your callback to obtain a fresh ID-JAG, exchanges it, and retries the request with the new access token.
You see discoverAndRequestJwtAuthGrant() in step 2 and the provider in the final section. exchangeJwtAuthGrant() is the standalone way to do step 3; the sample never calls it, because the provider builds that same JWT bearer request itself.
Walk through the XAA flow in TypeScript
The next four sections take each step in turn, so that you can trace every token in the chain. The fifth shows CrossAppAccessProvider, which drives steps 2 through 4 from one configuration. The code below is adapted from src/server.ts and src/xaa.ts, trimmed to the lines that matter for each step.
Sign the user in with OpenID Connect and PKCE
Step 1 is a standard OpenID Connect Authorization Code flow with PKCE, and standard means you shouldn’t write it yourself. The sample uses openid-client, which handles discovery, the PKCE challenge, and the code exchange. The piece XAA cares about is the ID token in the response, because it becomes the input to step 2.
Discovery returns a configuration object that the other calls take as their first argument. In src/server.ts:
import * as client from 'openid-client';

const config = await client.discovery(
  new URL('https://idp.xaa.dev'),
  process.env.XAA_CLIENT_ID,
  process.env.XAA_CLIENT_SECRET,
);
The /login route generates a fresh PKCE verifier, state, and nonce, stores them in the session, and builds the authorization URL:
const verifier = client.randomPKCECodeVerifier();
session.pkceVerifier = verifier;
session.state = client.randomState();
session.nonce = client.randomNonce();

const url = client.buildAuthorizationUrl(config, {
  redirect_uri: REDIRECT_URI,
  scope: 'openid email profile',
  state: session.state,
  nonce: session.nonce,
  code_challenge: await client.calculatePKCECodeChallenge(verifier),
  code_challenge_method: 'S256',
});

res.redirect(url.href);
The /callback route then exchanges the code for tokens in one call:
const tokens = await client.authorizationCodeGrant(
  config,
  new URL(req.originalUrl, BASE_URL),
  {
    pkceCodeVerifier: session.pkceVerifier,
    expectedState: session.state,
    expectedNonce: session.nonce,
  },
);

session.idToken = tokens.id_token;
session.claims = tokens.claims();
That one call verifies the ID token’s signature against the IdP’s published keys, checks the iss, aud, and exp claims, and confirms the state and nonce match what you stored. Hand-rolled sign-in code tends to decode the ID token payload without verifying any of it, which means trusting claims from a token you haven’t proven came from your IdP. Here, the ID token is the subject_token for step 2 and the root of the whole delegation chain, so that verification is load-bearing.
The app keeps the ID token in a server-side session. It never sends the ID token to the resource server; the token’s only job now is to prove the user’s identity to the IdP during token exchange.
Production note: Configure session cookies with
HttpOnly,Secure, and an appropriateSameSitevalue, and keep client secrets out of browser code. The sample stores sessions in memory, which is fine for a local demo and wrong for production: use a session store so tokens survive a restart and scale past one process.
Exchange the ID token for an ID-JAG
Step 2 is the XAA step. One SDK call performs the whole RFC 8693 token exchange:
import { discoverAndRequestJwtAuthGrant } from '@modelcontextprotocol/client';

const jag = await discoverAndRequestJwtAuthGrant({
  idpUrl: 'https://idp.xaa.dev',
  audience: 'https://auth.resource.xaa.dev', // who validates the ID-JAG
  resource: 'https://mcp.xaa.dev/mcp',       // what the access token targets
  idToken: session.idToken,
  clientId: process.env.XAA_CLIENT_ID,       // main client
  clientSecret: process.env.XAA_CLIENT_SECRET,
  scope: 'todos.read mcp.access',
});

console.log(jag.jwtAuthGrant); // the ID-JAG (a JWT)
console.log(jag.expiresIn);    // 300 seconds
Under the hood, the function discovers the IdP’s token endpoint from its metadata, then sends a form-encoded POST with grant_type=urn:ietf:params:oauth:grant-type:token-exchange, your ID token as the subject_token, and requested_token_type=urn:ietf:params:oauth:token-type:id-jag. The response’s access_token field carries the ID-JAG. The naming feels odd, but RFC 8693 reuses the standard token response shape, and the token_type value N_A signals that this token isn’t a bearer credential.
Pay attention to audience versus resource, because they answer different questions. audience names who validates this ID-JAG in step 3: the authorization server. resource names what your access token targets in step 4: the MCP server. The authorization server copies the resource verbatim into the access token’s aud claim, so an incorrect resource here later surfaces as a confusing 401 from the resource server.
One optimization worth noting: the discovery call incurs an extra network round trip on every run. If your server already fetched the IdP metadata (this app caches it during sign-in), call requestJwtAuthorizationGrant() with the known tokenEndpoint instead and skip rediscovery. Caching static configuration is fine; the tokens themselves are always requested live.
Exchange the ID-JAG for an access token
In step 3, your app presents the ID-JAG to the resource’s authorization server with the RFC 7523 JWT bearer grant, authenticating with the resource client credentials. The request posts grant_type=urn:ietf:params:oauth:grant-type:jwt-bearer with the ID-JAG as the assertion, and the response is an ordinary OAuth token response: an access_token, token_type of Bearer, and an expires_in lifetime worth reading rather than assuming.
You don’t write that request yourself. CrossAppAccessProvider makes it, and the last section of this walkthrough shows how to configure it. Two details about this step save you real debugging time:
- Client authentication method. Developer-registered clients on xaa.dev use
client_secret_post, which means credentials belong in the request body. The provider declaresclient_secret_basic(anAuthorization: Basicheader) by default, so the client information has to name the method explicitly. - Send the
scopeparameter. The provider only sends a scope when the authorization server’s metadata advertises one, and xaa.dev’s does not. Omit it and the authorization server issues an access token with an empty scope, after which the failure is quiet. The MCP server still completes the handshake,resources/liststill returns the resource names, and reading the todos still returns HTTP200with a JSON-RPC result. The rejection hides inside the resource payload:{"error":"Unauthorized","message":"Invalid or expired token"}. Nothing throws, so your app parses that error object instead of a todo list and renders an empty checklist. Request the scopes you need, then verify thescopeclaim in the decoded access token.
The resulting access token is itself a JWT. Its aud claim matches the resource you sent in step 2, its sub identifies the user, and its client_id is the resource client. This is the delegation chain made visible: user identity from step 1, admin policy from the resource connection, and app identity from your registration, all cryptographically bound into one credential.
Fetch data from the MCP server
With a token in hand, step 4 is regular MCP SDK code. Given a connected Client, which the next section builds, reading a resource takes one call:
const read = await client.readResource({ uri: 'todo0://todos' });

// A resource's contents can be text or binary, so narrow before parsing.
const first = read.contents[0];
const todos = first && 'text' in first ? JSON.parse(first.text) : [];
readResource() returns the user’s todo list as JSON. The playground’s MCP server exposes the todos as an MCP resource (read-only data at a URI) rather than a tool. Both primitives ride the same authenticated pipeline, so switching to a tool call is a one-line change to client.callTool() when your resource server offers tools.
Notice that the access token never appears in this code. You can attach it to the transport yourself through requestInit.headers, but the sample gives the transport an authProvider instead, and the SDK fetches the token, attaches it, and refreshes it when it expires.
CrossAppAccessProvider runs the whole flow
The sections above describe what each step sends and receives. Here is the code that runs all three, from src/xaa.ts:
import {
  Client,
  CrossAppAccessProvider,
  StreamableHTTPClientTransport,
  discoverAndRequestJwtAuthGrant,
  requestJwtAuthorizationGrant,
} from '@modelcontextprotocol/client';

const provider = new CrossAppAccessProvider({
  // Called when the transport needs an ID-JAG. The provider has already
  // discovered the authorization server and resource via RFC 9728.
  assertion: async (ctx) => {
    // idpTokenEndpoint is the IdP token endpoint this app cached during
    // sign-in, passed in by the caller. Falls back to discovery without it.
    const jagOptions = {
      audience: ctx.authorizationServerUrl.replace(/\/+$/, ''),
      resource: ctx.resourceUrl,
      idToken: await getIdTokenFromSession(),
      clientId: process.env.XAA_CLIENT_ID,
      clientSecret: process.env.XAA_CLIENT_SECRET,
      scope: ctx.scope ?? 'todos.read mcp.access',
      fetchFn: ctx.fetchFn,
    };
    const jag = idpTokenEndpoint
      ? await requestJwtAuthorizationGrant({ ...jagOptions, tokenEndpoint: idpTokenEndpoint })
      : await discoverAndRequestJwtAuthGrant({ ...jagOptions, idpUrl: 'https://idp.xaa.dev' });
    return jag.jwtAuthGrant;
  },
  clientId: process.env.MCP_CLIENT_ID,
  clientSecret: process.env.MCP_CLIENT_SECRET,
});

// Two adjustments for xaa.dev developer clients. First, they authenticate
// with client_secret_post, while the provider declares client_secret_basic
// by default. Declaring the method on the client information makes the SDK
// select the right one.
provider.saveClientInformation({
  client_id: process.env.MCP_CLIENT_ID,
  client_secret: process.env.MCP_CLIENT_SECRET,
  token_endpoint_auth_method: 'client_secret_post',
} as Parameters<typeof provider.saveClientInformation>[0]);

// Second, the provider only sends a scope when the server's metadata
// advertises one, and xaa.dev's does not. Without a scope parameter, the
// authorization server issues an empty-scope token, so add it here.
const prepareTokenRequest = provider.prepareTokenRequest.bind(provider);
provider.prepareTokenRequest = async (scope) => {
  const params = await prepareTokenRequest(scope ?? 'todos.read mcp.access');
  if (!params.has('scope')) params.set('scope', 'todos.read mcp.access');
  return params;
};

const transport = new StreamableHTTPClientTransport(
  new URL('https://mcp.xaa.dev/mcp'),
  { authProvider: provider },
);

const client = new Client({ name: 'xaa-requesting-app-typescript', version: '1.0.0' });
await client.connect(transport); // 401 -> discovery -> ID-JAG -> token -> retry
Walk through what the provider does on that one connect() call. It sends the first request without a token and receives a 401 with a WWW-Authenticate header pointing at the server’s protected resource metadata. It fetches that metadata, learns which authorization server protects this resource, and then fetches the authorization server’s metadata to find the token endpoint. It calls your assertion callback with the discovered URLs, exchanges the returned ID-JAG for an access token, stores the token, and then retries the original request. When the access token later expires, the next 401 response triggers the same sequence again, without any code from you. Both adjustments in the snippet come from testing this flow against the live playground.
Nothing in this snippet names auth.resource.xaa.dev. The provider discovered it, so the same client code works against any spec-compliant protected MCP server.
Where XAA fits in your real architecture
The playground stands in for real systems, and the mapping is direct. IdenX stands in for your production IdP. Okta offers Cross App Access as an Early Access feature, and the token exchange in this tutorial works the same way against an Okta org once you enable the feature; check the Okta Cross App Access documentation for current availability. To try it against a real org, sign up for an Okta Integrator Free Plan. The todo MCP server serves as an enterprise resource you can make available to agents and apps. Your requesting app serves as the AI agent or SaaS integration acting on the user’s behalf.
The read-only scope in this tutorial is a deliberate starting point, not a limitation of the protocol. Scopes are strings that your resource server defines and an admin grants. When you’re ready to build the other side of the boundary, the resource app guides show how to validate ID-JAGs and issue access tokens from your own authorization server, whether your app federates with OpenID Connect (OIDC) or Security Assertion Markup Language (SAML).
Learn more about Cross App Access, ID-JAG, and MCP
The complete source for this tutorial is in the okta-xaa-typescript-mcp-sdk-example repository. To keep exploring:
- Add Cross App Access to Your OIDC Requesting Application
- Identity Assertion Authorization Grant draft at the IETF
- OAuth 2.0 Token Exchange (RFC 8693)
- JWT bearer grant (RFC 7523)
- OAuth 2.0 Protected Resource Metadata (RFC 9728)
- Model Context Protocol documentation
Remember to follow us on LinkedIn, X, and subscribe to our YouTube channel for more exciting content. We also want to hear from you about the topics you’d like to see and any questions you may have. Leave us a comment below!
Akanksha has a developer background and experience building global developer communities. She has given talks on various technologies, hosted large-scale events and hackathons, advocated for developers, and fostered partnerships and open-source initiatives. Outside work, she loves dancing and traveling; you'll often find her capturing serene skies through her phone.
Okta Developer Blog Comment Policy
We welcome relevant and respectful comments. Off-topic comments may be removed.