Add Cross App Access to Your OIDC Requesting Application

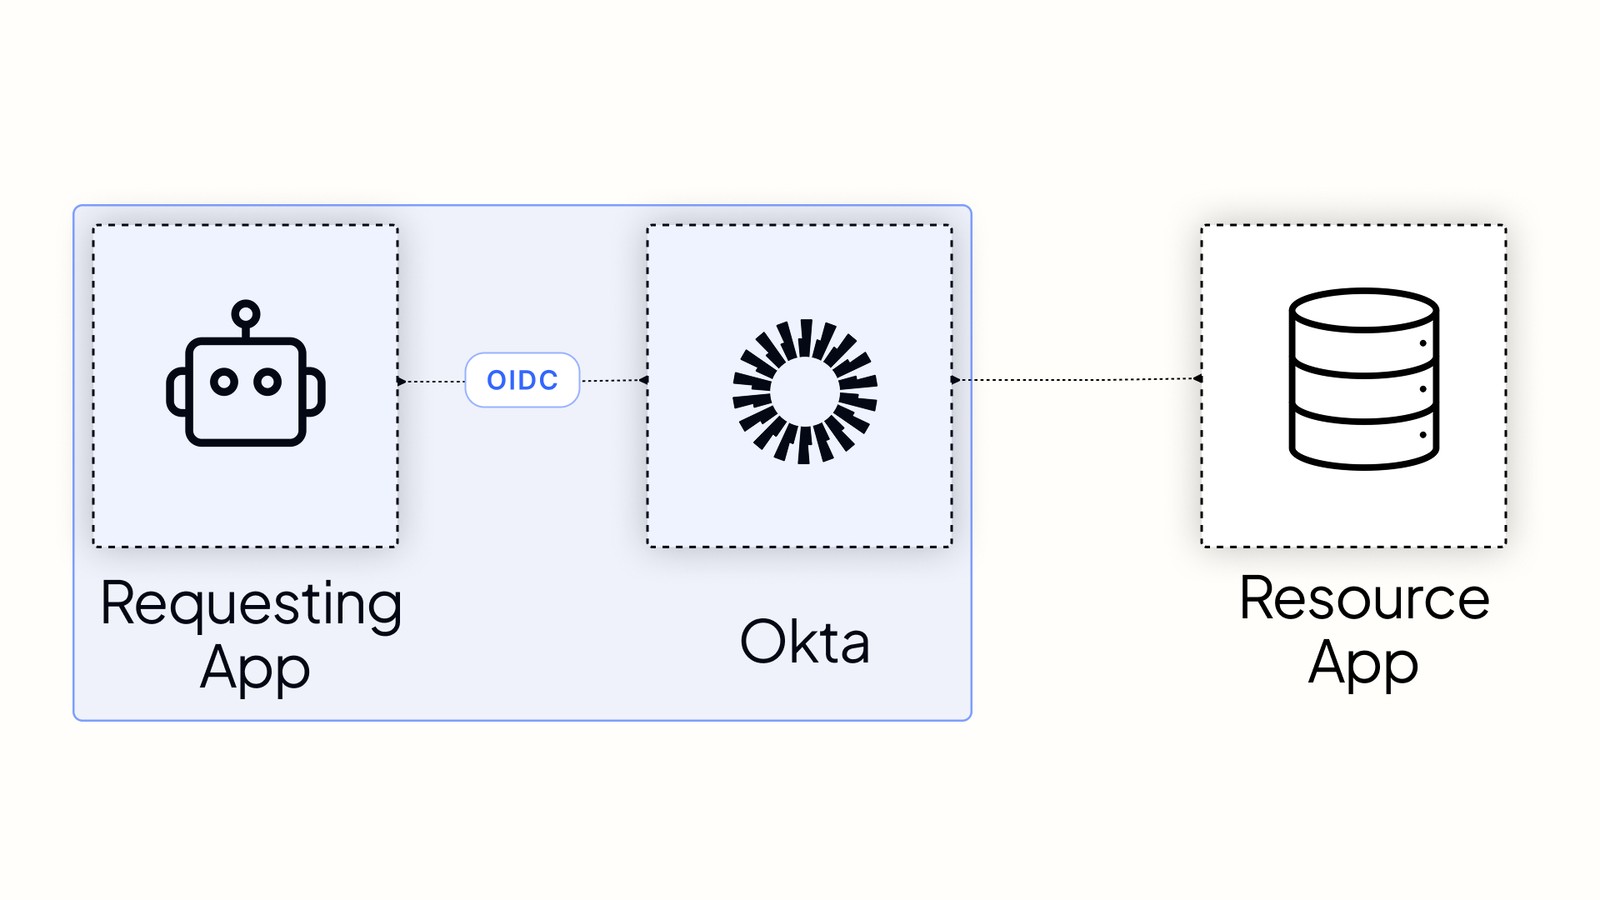
If you currently federate enterprise customers using OpenID Connect (OIDC) and want to connect with third-party applications, this Cross App Access (XAA) guide is for you.
The Identity Assertion Authorization Grant specification, the basis of XAA, was designed with OIDC in mind. Your app already holds an ID token after sign-in, but it’s the refresh token from that same sign-in that you exchange to reach a third-party app. This guide details what you need to support and how to make resource requests to a third-party app using XAA.
Table of Contents
- How XAA in OIDC works
- XAA implementation checklist for OIDC-federated applications
- Making cross-application requests from your OIDC app securely
- Configure your XAA OIDC requesting app in Okta
- Learn more about Cross App Access, OIDC, and OAuth 2.0
How XAA in OIDC works
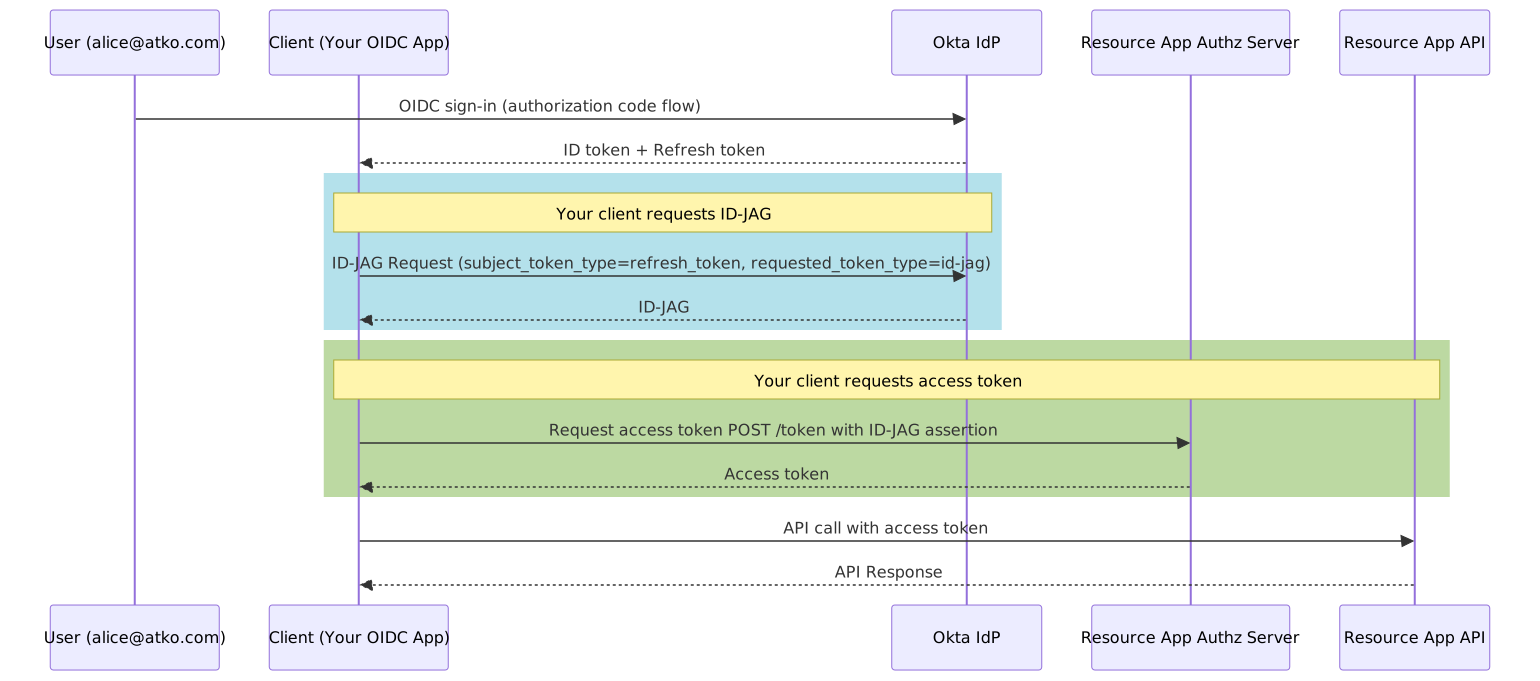
When an agent (like one running in Claude) needs API access, it presents an Identity Assertion Authorization Grant (ID-JAG). The ID-JAG is a short-lived JSON Web Token (JWT) issued by the Identity Provider (IdP) for your app’s user. You exchange the ID-JAG token for an access token to the resource application you’re connecting with.
The sequence diagram below describes the OIDC XAA flow and how your application fits into it. You’ll handle the flow in two parts: where your application requests the ID-JAG from the IdP using the refresh token, and where your app requests the access token from the ID-JAG from the third-party resource app’s authorization server.
XAA implementation checklist for OIDC-federated applications
Follow the guide in this section to support XAA in your OIDC application when your app connects to a third-party resource application. The XAA flow places the burden of token validation onto the IdP and the resource app’s authorization server. The initial sign-in step remains the same; however, you’ll add two requests before getting an access token to make the resource API call.
Once the user completes signing in, you’ll:
- Request the ID-JAG token from Okta using the refresh token
- Request the OAuth access token from the third-party resource app’s OAuth authorization server
- Use the access token to make the API request to the resource app
Request the ID-JAG token
Your OIDC application runs the authorization code flow as usual, requesting the offline_access scope, and receives an ID token and a refresh token at the callback. The ID token is still there for your app’s session, but the refresh token is the credential for the exchange, so hold on to it for the session.
When your application needs resources from a third-party app, exchange the refresh token for an ID-JAG at Okta’s /token endpoint. This exchange follows the OAuth 2.0 Token Exchange (RFC 8693) mechanism. Authenticate the request with the client credentials from your OIDC app using client_secret_post.
POST /oauth2/v1/token HTTP/1.1
Host: your-okta-domain.okta.com
Content-Type: application/x-www-form-urlencoded

grant_type=urn:ietf:params:oauth:grant-type:token-exchange&
subject_token=<the refresh token from sign-in>&
subject_token_type=urn:ietf:params:oauth:token-type:refresh_token&
requested_token_type=urn:ietf:params:oauth:token-type:id-jag&
audience=<the resource app's authorization server issuer URI>&
resource=<the resource app's API base URL>&
scope=<the resource app's required scopes>&
client_id=<your_client_id>&
client_secret=<your_client_secret>
The IdP responds with a short-lived, signed JSON Web Token (JWT), the ID-JAG, as the value in the access_token property within the payload.
Request the access token
Redeem the ID-JAG at the resource app’s authorization server’s token endpoint. The resource app’s authorization server handles the redemption request, not the IdP. This request uses the JWT Profile for OAuth 2.0 Client Authentication and Authorization Grants (RFC 7523). The ID-JAG is the assertion now, and you include the scopes required for the resource request. The scope matches the scopes requested in the ID-JAG request. The HTTP request looks something like:
POST /token HTTP/1.1
Host: the-resource-server.example.com
Content-Type: application/x-www-form-urlencoded
Authorization: Basic <base64(resource_as_client_id:resource_as_client_secret)>

grant_type=urn:ietf:params:oauth:grant-type:jwt-bearer&
assertion=<ID-JAG token>&
scope=todos.read
In the example HTTP request, the Authorization header uses the Basic scheme as a demo. Use the authorization scheme required by the resource application.
The response payload contains the access_token property, whose value is the access token.
Call the resource API
Use the access token to make the API resource request by using the value in the Authorization header. For example:
GET /api/todos/ HTTP/1.1
Host: the-resource-server.example.com
Authorization: Bearer <access_token>
Accept: application/json
Handle token expiration
ID-JAG tokens have a short timeline by design. When it expires, request a new ID-JAG using the same refresh token. Refresh tokens are long-lived, so you don’t need to send the user back to sign in again for every ID-JAG. Refresh tokens eventually expire or get revoked, too. If the IdP rejects it (you’ll see an invalid_grant error), send the user through sign-in again to get a fresh one.
Making cross-application requests from your OIDC app securely
With these steps complete, you’ve configured your OIDC application for Cross App Access. Your app can now obtain access tokens for third-party resource apps, using the federation you already run.
You can now use Okta to make cross-application requests from your OIDC app to third-party resource apps.
Before you configure anything, here’s who runs what in this walkthrough:
| Component | Role |
|---|---|
| Your requesting app and its code | Runs on your infrastructure. The application XAA let’s reach third-party resource apps |
| Your Okta org | The IdP. Authenticates your users and issues the ID-JAG |
| The Okta app integration representing your requesting app | A registration in Okta, not a running service. Let’s your users sign in and let’s Okta issue ID-JAGs on your app’s behalf |
| The Okta app integration representing the test resource app | A registration in Okta, not a running service. Holds the XAA configuration Okta uses to mint ID-JAGs for xaa.dev’s resource authorization server |
| xaa.dev’s resource authorization server | Runs on xaa.dev’s infrastructure, not yours. Mints and validates the access tokens the test resource app accepts |
| xaa.dev’s resource API server | Plays the test resource app for this walkthrough, running against your requesting app |
xaa.dev stands in for the third-party resource app so you can verify the requesting side, which is the only side you’re actually building. Ownership here is the reverse of the companion resource-app post: there, xaa.dev played the requesting side while you built the resource side; here, xaa.dev plays the resource side while you build the requesting side.
Configure your XAA OIDC requesting app in Okta
Let’s configure your OIDC requester application in Okta. Before you begin, you’ll need:
- Values from your app (we’ll walk through the values needed below)
- An Okta Integrator Free Plan account. Sign up for a new account to test out the XAA feature
- xaa.dev for testing your requesting app
Register the requesting app in Okta
Create the Okta app integration representing your requesting app by following the guide’s OIDC app creation steps, using these tutorial-specific values:
- App integration name: “Requesting App”
- Grant type: Authorization Code, plus Refresh Token under Core Grants. You’ll need a Refresh Token to request the ID-JAG
- Sign-in redirect URIs: the callback URL of your requesting app, e.g., “https://requester-app-uri/callback”
- Sign-out redirect URIs: the sign-out URL of your requesting app
- Assignments: keep Skip group assignments for now
After creating the app integration, copy the Client ID and Client secret from the General tab and add them to your requesting app. Your app uses these same credentials for sign-in and for the ID-JAG token exchange.
Assign your test user to the requesting app integration. See Assign an app integration to a user.
With your requesting app integration registered, you’ll need an Okta app integration representing the test resource app next.
Register the test resource app in Okta
Create the Okta app integration representing the test resource app by following the guide’s OIDC app creation steps, using these tutorial-specific values:
- App integration name: “Resource App for Testing”
- Sign-in redirect URIs:
https://idp.xaa.dev/oidc-resource/callback - Assignments: keep Skip group assignments for now
⚠️ Note: These values are for setup only; they don’t constitute a working single sign-on (SSO) connection to the test resource app.
Assign your test user to this app integration the same way you did for the requesting app integration above.
Machine Assignments extra configuration
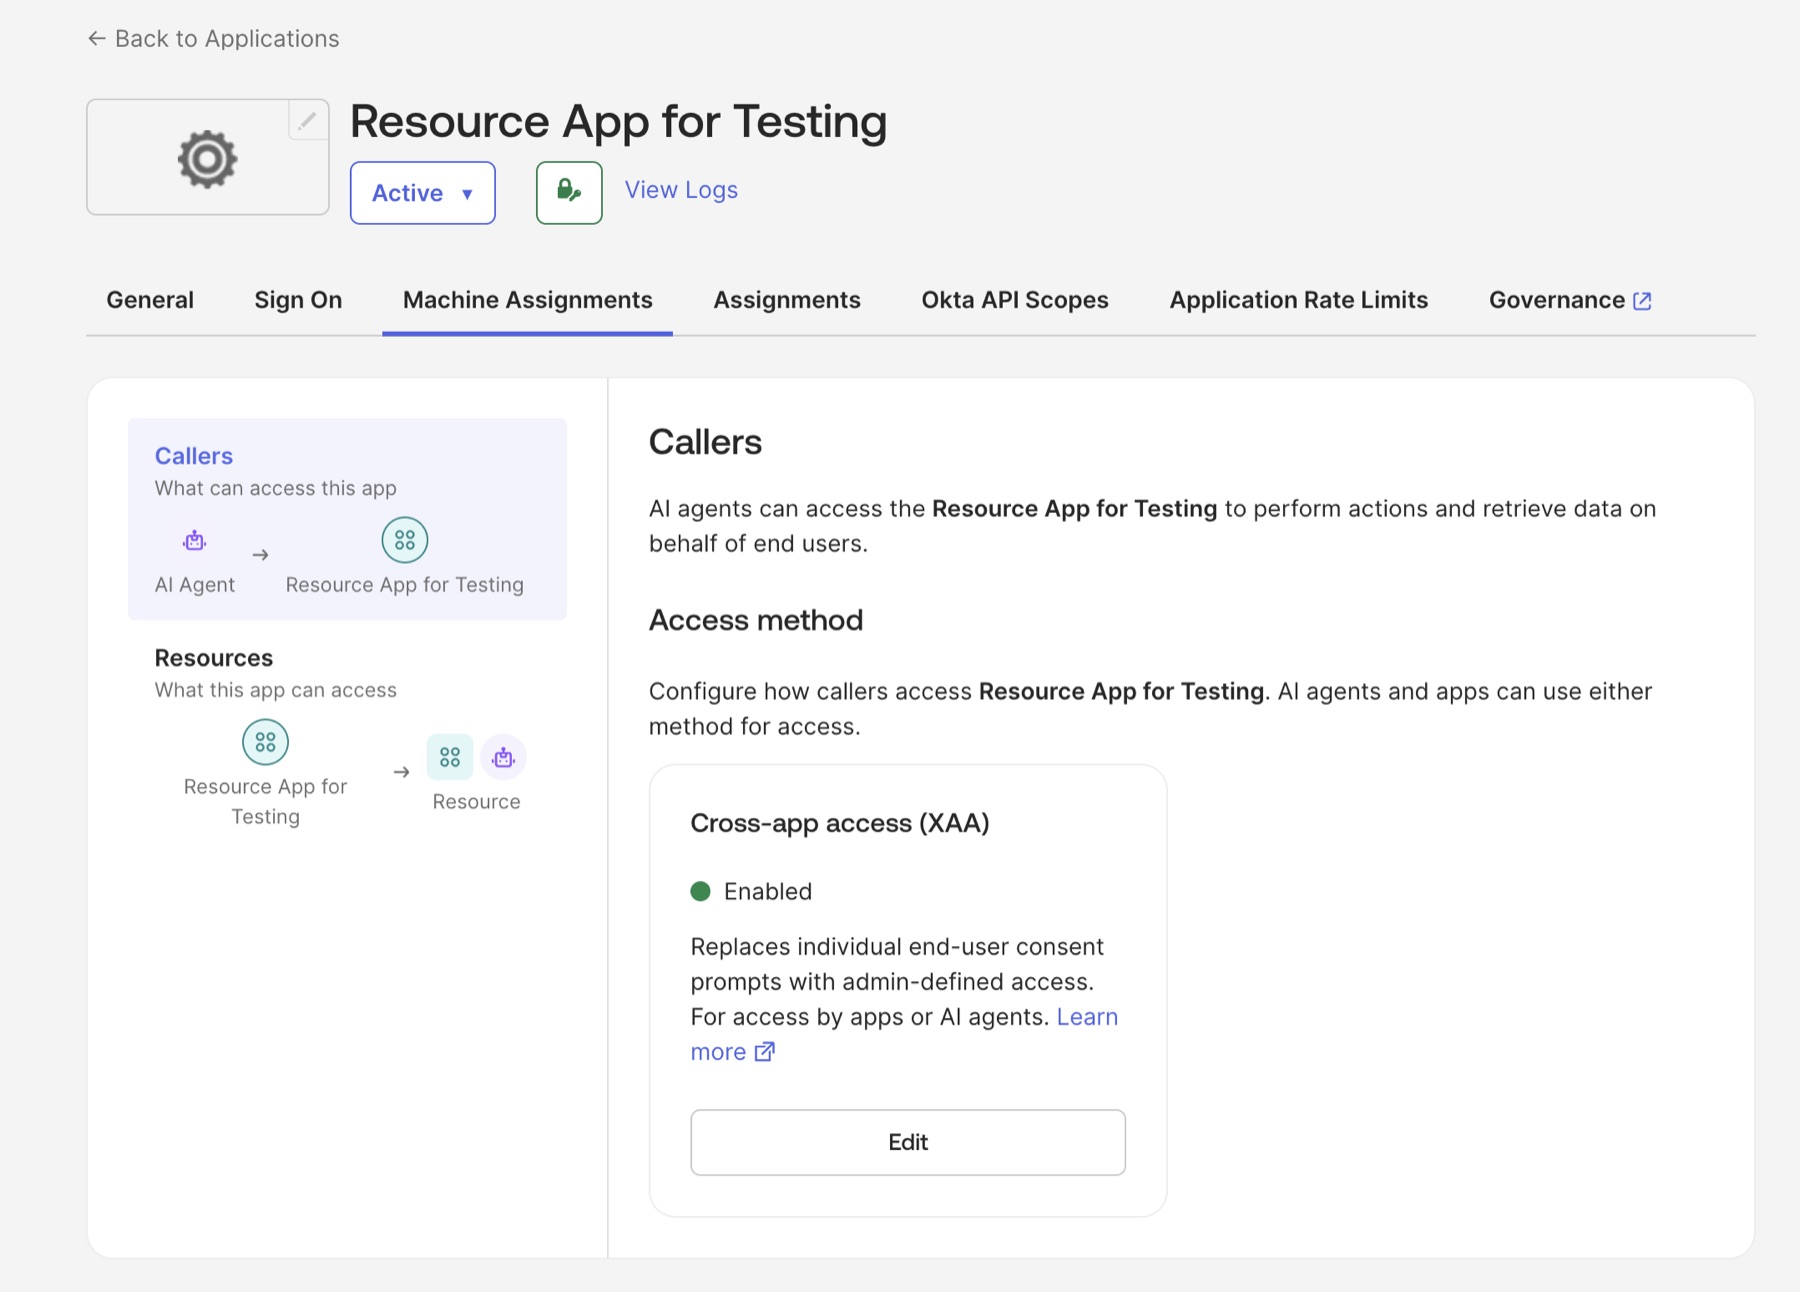
Enable Cross App Access (XAA) on this app integration:
- Select the Machine Assignments tab. Callers is selected by default.
- Under Access method, find the Cross-app access (XAA) card, which shows Disabled, and click Edit. The Edit access method panel opens on the right.
- Set the status dropdown to Enabled.
- Fill in the fields:
- Issuer URL: Use
https://auth.resource.xaa.dev. This is xaa.dev’s resource authorization server, not yours. Entering it here tells Okta which external server to mint ID-JAGs for - Audience/tenant ID: This is optional and not needed for this walkthrough
- Scopes: This is optional and not needed for this walkthrough
- Issuer URL: Use
- Click Save.
⚠️ Note: Use Audience/tenant ID when you have multiple tenants in your organization.
With the test resource app integration configured in Okta, register your requesting app at xaa.dev next.
Register your requesting app at xaa.dev
Go to Test your requesting app. Add your IdP issuer URL as your Okta Integrator account ID (i.e., https://your-okta-domain.okta.com). Put your email into the Test user identifier, for example, name1234…@okta.com. After you enter all values, click Register.
Registering here registers your requesting app as an OAuth client at xaa.dev’s resource authorization server, and returns a Client ID and Client Secret. Save them. Use this Client ID in the AI agent’s resource connection in the next section.
When you get to the token exchange later in this walkthrough, substitute these values:
audience:https://auth.resource.xaa.dev, xaa.dev’s resource authorization server (AS) issuer URLscope:todos.read, the scope required to call the test resource app’s APIresource:https://api.resource.xaa.dev, xaa.dev’s resource API base URL
Keep this site open; you’ll return to it to run the validation flow after the Okta configuration is complete.
Register and configure the AI Agent in Okta
With your requesting app integration and the test resource app integration configured, register a new AI Agent in Okta. During registration, you’ll link your requesting app integration under User access and authentication, register the agent’s own OAuth client, and then connect the test resource app integration as a Resource Connection.
Register the AI Agent and link your requesting app integration
Register the AI Agent and link its requesting app integration. Use these tutorial-specific values:
- Name: “Agent”
- Allow users to access this agent: Select an existing app, then choose your requesting app integration (e.g., “Requesting App”)
- Add owners: assign your test user as an individual owner
This linked app integration is what your users sign in through to reach the agent: they authenticate against it, and the agent then acts on their behalf.
Open the AI Agent you created, then go to the Client registration tab: you’ll see the agent uses the same credentials as the linked requesting app integration. You’ll use this client ID and secret to request an ID-JAG from the IdP.
Connect the test resource app integration
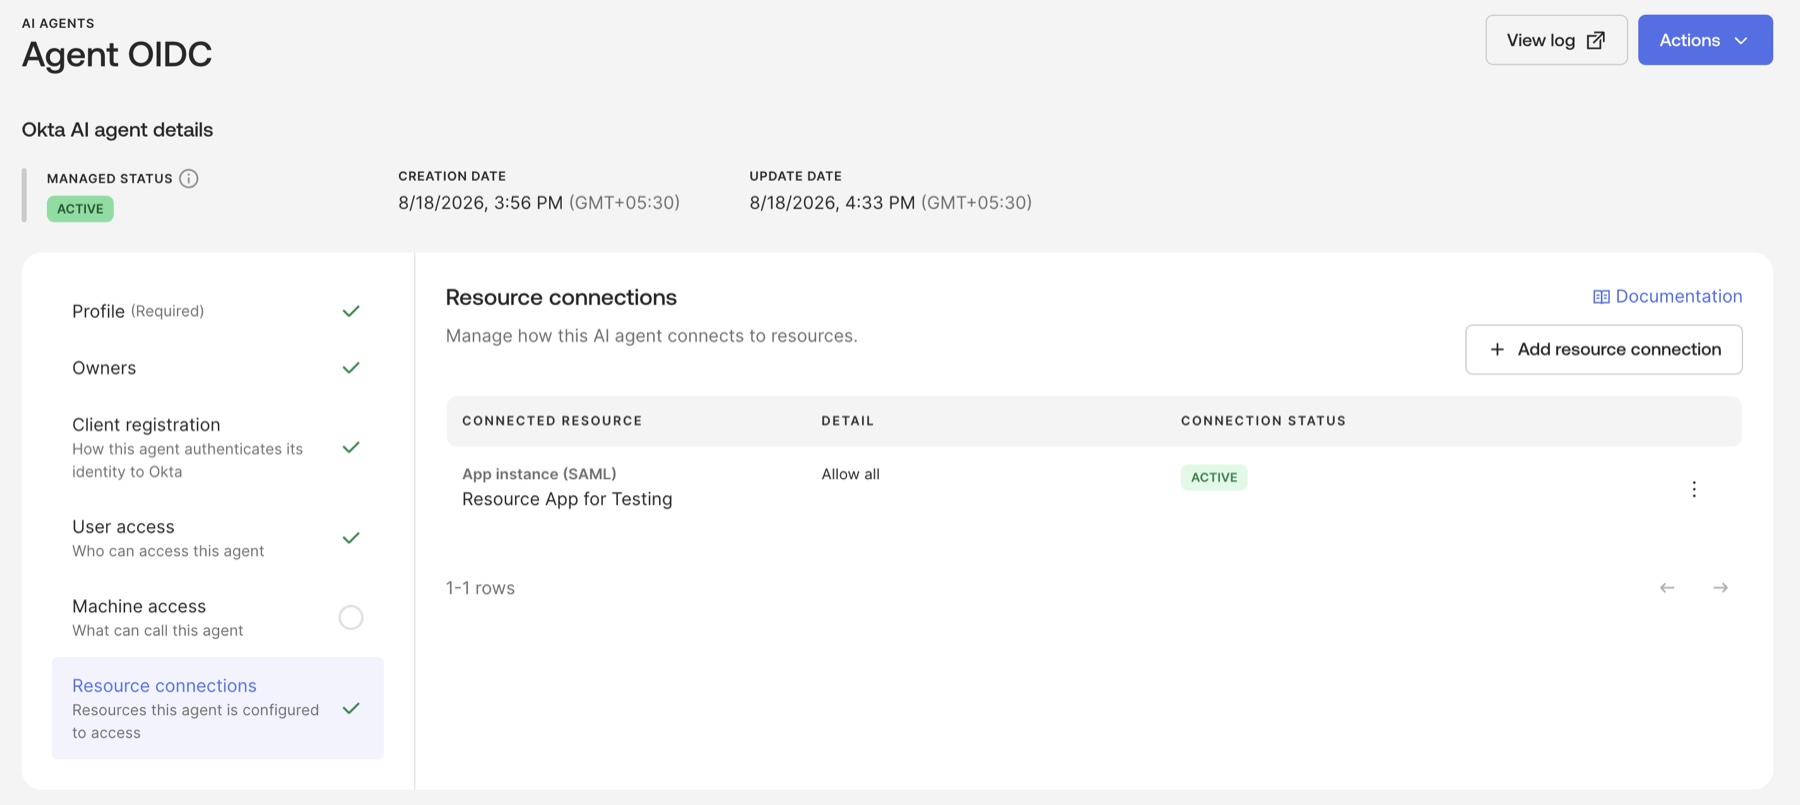
Add a resource connection to the AI agent. Use these tutorial-specific values:
- Application instance: “Resource App for Testing”
- AI agent’s client ID registered in this app: the Client ID from xaa.dev (it should look similar to
byora...) - Scopes: Allow any scope
Activate the AI Agent
Activating the linked requesting app integration usually activates the AI Agent. If the agent’s status is STAGED, activate it manually.
Once the AI Agent is active, the configuration is complete. Except for Machine access, all checkmarks on the agent configuration page must be green.
Validate the XAA connection end-to-end
Once the Okta setup is complete, sign in to your requesting app and trigger whatever action in your code path calls the test resource app, for example, a button that fetches its data. That single action should exercise all three checklist requests in sequence: your app requests the ID-JAG, redeems it for an access token at xaa.dev’s resource authorization server, and calls the test resource app’s API with that token.
Then return to xaa.dev and open the Live verification tab. A green Conformance passed panel appears. This confirms all steps:
- Auth Server accepted your ID-JAG
- An access token was issued
- Resource Server accepted your access token
- The API call to /api/todos/ was successful
In the companion resource-app post, xaa.dev acts as the client, and you observe the result. Here, your requesting app acts as the client, and xaa.dev observes it.
At this stage, the JSON conformance log has the complete details of the XAA flow. You can either download the log or share a URL with your IdP.

Learn more about Cross App Access, OIDC, and OAuth 2.0
If this guide helped you implement Cross App Access with OIDC, explore these resources:
- 📘 Cross App Access Documentation: Official guides for configuring and managing Cross App Access in production
- 🎙️ Developer Podcast on MCP and Cross App Access: Hear the backstory, use cases, and why this matters for developers
- 📋 How to Build and List Secure Cross App Access (XAA) Connections on Okta Integration Network (OIN)
Identity 101:
- What’s the Difference Between OAuth, OpenID Connect, and SAML?
- What are SAML, OAuth, and OIDC?
- Why You Should Migrate to OAuth 2.0 From Static API Tokens
- How to Get Going with the On-Demand SaaS Apps Workshops
Follow us on LinkedIn and X, and subscribe to our YouTube channel. Leave a comment below if you have any questions!
Sohail is a Senior Developer Advocate at Okta with roots in mobile app development and hands-on experience designing, building, and publishing APIs. Now, he helps developers secure their apps by turning complex OAuth and API topics into clear, actionable guides. When he's not coding or speaking at conferences, you'll find him on a quest for the perfect plate of biryani.
Okta Developer Blog Comment Policy
We welcome relevant and respectful comments. Off-topic comments may be removed.