Enabling Cross App Access for SAML-Based Resource Apps
If you currently federate enterprise customers using Security Assertion Markup Language (SAML) and want to allow applications to access your API without migrating to OpenID Connect (OIDC), this Cross App Access (XAA) guide is for you.
The Identity Assertion Authorization Grant specification, the basis of XAA, was originally designed with OIDC in mind. To use it in SAML applications, you must accommodate specific security and uniqueness requirements. This guide details what you need to support and how to verify SAML-derived claims at your resource authorization server.
Table of Contents
- How XAA in SAML works
- Analyzing the ID-JAG claims
- XAA implementation checklist for SAML-federated applications
- Making cross-application requests from your SAML app securely
- Configure your XAA SAML App in Okta
- Verify your Okta XAA setup on xaa.dev
- Takeaways for implementors who have both OIDC and SAML apps
- Learn more about Cross App Access, SAML, and OAuth 2.0
How XAA in SAML works
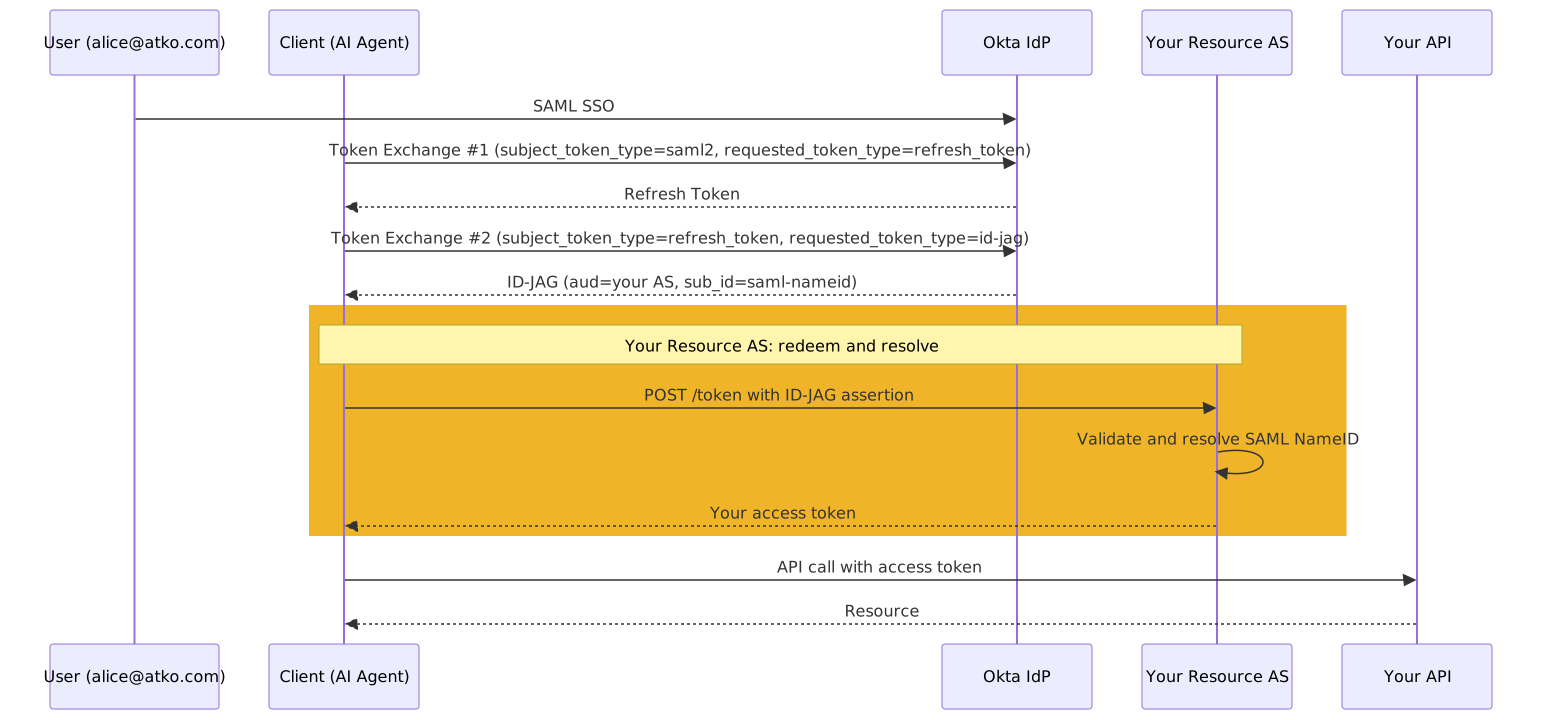
When an agent (like one running in Claude) needs API access, it presents an Identity Assertion Authorization Grant (ID-JAG). The ID-JAG is a short-lived JSON Web Token (JWT) issued by the customer’s Identity Provider (IdP) for your authorization server. Your resource server accepts the token, identifies the user, and issues your own access token, all while leaving the customer’s existing SAML integration untouched.
The sequence diagram shown below describes the SAML XAA flow. Notice that the SAML SSO flow stays the same; the only change is the section highlighted with the comment “Your Resource Authorization Server (AS): redeem and resolve”. You make a POST request to your resource’s authorization server with the ID-JAG, resolve the NameID, and return an access token that you use for resource requests.
⚠️ Note
You are not processing SAML here. The only artifact crossing from the IdP to your domain is the ID-JAG. All SAML-related tasks, such as SSO, assertion handling, and subject derivation, happen upstream. Your responsibility is to validate the ID-JAG, redeem it for an access token, and resolve the user from the claims.
Analyzing the ID-JAG claims
When you decode the ID-JAG, you see claims in the header and payload that impact how you process the access request:
// header
{
  "typ": "oauth-id-jag+jwt",
  ...
}

// payload
{
  "iss": "https://atko.okta.com",
  "sub": "00u1a2b3c4D5e6F7g8h9",
  "sub_id": {
    "format": "saml-nameid",
    "issuer": "http://www.okta.com/exk1fcia8zMValiD0h8",
    "nameid": "alice@atko.com",
    "nameid_format": "urn:oasis:names:tc:SAML:1.1:nameid-format:emailAddress",
    "sp_name_qualifier": "https://chat.example/saml/metadata"
  },
  "aud": "https://auth.chat.example",
  "client_id": "0oa8claudeMcpAtYourAS",
  "email": "alice@atko.com",
  "scope": "chat:read chat:write",
  "jti": "id-jag-7f3c9a21b8",
  ...
}
Focus on these key claims noted in the decoded ID-JAG payload:
sub_id: This is the primary field for user resolutionaud: Indicates the endpoint URL for the resource authorization serverclient_id: This is the client’s ID at your resource authorization server, which might differ from its ID at the IdPemail: Recommended by the specification for just-in-time provisioning if the user has not yet signed injti: This is the unique ID for the ID-JAG JWT that prevents replay attacks within the validity window
XAA implementation checklist for SAML-federated applications
To fully support Cross App Access, implement these four steps in sequence:
- Mapping user identity in the SAML
NameIDattribute - Validating the ID-JAG and resolving the user
- Issuing the access token
- Updating authorization server metadata
Mapping user identity in the SAML NameID attribute
Unlike OIDC apps, which typically resolve users from the sub claim, SAML-federated apps do not have a corresponding sub claim in their SAML assertion. Consequently, they often lack a direct way to map users without using the sub_id field.
You must compare every member of the saml-nameid identifier used as a subject key for a given SAML issuer. Do not resolve based on the NameID alone unless your local policy permits it.
The NameID field alone doesn’t uniquely identify a user, since two organizations could each have an employee named Alex Chen. This problem is analogous to resolving user uniqueness in multi-tenant applications.
Resolve on NameID + sp_name_qualifier together; the combination of both fields provides the unique user identity required.
⚠️ Note
Don’t assume the
NameIDis an email address; it is whatever the customer’s SSO emits. Your matching set must remain consistent across your deployment.
Validating the ID-JAG and resolving the user
The client posts the ID-JAG as a JWT authorization grant and authenticates with its credentials at your server. Below is an example HTTP request for requesting an access_token
POST /oauth2/v1/token HTTP/1.1
Host: chat.example
Authorization: Basic <base64(client_id:client_secret)>
Content-Type: application/x-www-form-urlencoded
grant_type=urn:ietf:params:oauth:grant-type:jwt-bearer
&assertion=eyJ0eXAiOiJvYXV0aC1pZC1qYWcrand0...
Before processing, you must bind the ID-JAG’s iss to a registered SAML connection to prevent forgery.
If you verify the signature before checking the issuer binding, an attacker can create their own IdP, sign a token, and use your customer’s SAML issuer as the sub_id.
Always resolve the connection from the iss first, then verify the signature against that connection’s key. You compare this using the JSON Web Key Set (JWKS) metadata.
Below is the pseudocode for implementing the validation and resolving a user:
connections = {
  "https://atko.okta.com": {
    jwks:            "https://atko.okta.com/oauth2/v1/keys",
    samlIssuer:      "http://www.okta.com/exk1fcia8zMValiD0h8",
    spNameQualifier: "https://chat.example/saml/metadata",
  },
}

redeem(idJag, authenticatedClient):
    // 1. Bind iss to a connection before trusting the signature.
    iss  = unverified_issuer(idJag)
    conn = connections[iss]
    if conn is none: reject "invalid_grant"

    // 2. Verify signature against the specific issuers JWKS.
    payload = verify_jwt(idJag, jwks = conn.jwks)
    if payload is invalid: reject "invalid_grant"

    // 3-5. Perform remaining checks.
    require payload.typ       == "oauth-id-jag+jwt"
    require payload.aud       == "resource_authorization_server_url"
    require payload.client_id == authenticatedClient.id

    user  = resolveSamlSubject(payload.sub_id, conn)
    scope = applyScopePolicy(user, payload.scope)
    return issueAccessToken(user, scope)

resolveSamlSubject(subId, conn):
    require subId and subId.format == "saml-nameid"
    require subId.issuer == conn.samlIssuer
    require subId.sp_name_qualifier == conn.spNameQualifier

    user = lookup_user_by_saml_nameid(subId.issuer, subId.nameid, subId.sp_name_qualifier)
    if user is none: reject "invalid_grant"
    return user
Issuing the access token
Once you resolve the user, issue an access_token scoped according to your local policy. Below is an example of an access_token returned after successfully validating the ID-JAG and resolving the user.
HTTP/1.1 200 OK
Content-Type: application/json;charset=UTF-8
Cache-Control: no-store

{
  "token_type": "Bearer",
  "access_token": "2YotnFZFEjr1zCsicMWpAA",
  "expires_in": 86400,
  "scope": "chat:read chat:write"
}
⚠️ Note
Do not issue a refresh token. If your authorization server issues a refresh token, the client has durable access to your resource server, and the IdP cannot revoke access.
The ID-JAG replaces the need for a refresh token. On access token expiry, the client resubmits the same ID-JAG to your token endpoint, and you mint a new access token against it. Only once the ID-JAG itself expires does the client request a new ID-JAG from the IdP using its own refresh token.
Updating authorization server metadata
Clients locate your XAA support via your authorization server metadata (/.well-known/oauth-authorization-server). Ensure you include the supported fields:
{
  "issuer": "https://chat.example",
  "token_endpoint": "https://auth.chat.example/oauth2/v1/token",
  "grant_types_supported": [
    "urn:ietf:params:oauth:grant-type:jwt-bearer"
  ],
  "authorization_grant_profiles_supported": [
    "urn:ietf:params:oauth:grant-profile:id-jag"
  ]
}
Making cross-application requests from your SAML app securely
With these four steps complete, your SAML application is configured for Cross App Access. Agents can now authorize requests against your API while maintaining your existing production federation, eliminating the need for protocol migration.
You can now use Okta to make cross-application requests with your SAML app.
Configure your XAA SAML App in Okta
Let’s test your SAML application in Okta. Before you begin, you need some configuration values from the xaa.dev site.
Navigate to https://xaa.dev. Under the heading “Ready to bring your own actors?” select the Resource App option. Select the Test it against a hosted Requesting App option. Now select the SAML option. Finally, select the Take me there > button. You may be prompted for an email address. Enter any valid formatted email, then press continue. You need two values: the Single Sign-On URL (Assertion Consumer Service, or ACS) URL and the Audience URI (SP Entity ID).
Keep this site open in your browser; you return to it throughout the setup.
Create the SAML 2.0 resource app in Okta
Before you begin this step, you need an Okta Integrator Free Plan account. Sign up for a new account to test out the XAA features.
If you don’t have an Okta SAML 2.0 application representing your resource app, create a custom SAML app integration.
Navigate to Applications and Resources > Applications.
Select Create App Integration. In the Create a new app integration modal, select SAML 2.0 and press Next.
In General Settings:
- App name: Enter a descriptive name for the app, for example, “Resource App”
In Configure SAML:
- Single sign-on URL: Use the ACS URL of your resource app, e.g., “https://idp.xaa.dev/saml-requester/acs”
- Audience URI (SP Entity ID): Use the SP Entity of your resource app, e.g., “https://idp.xaa.dev/saml-requester/metadata”
- Name ID format: select EmailAddress
- Application username: select Email
- Update application username on: select Create and update
Press Finish to create the Okta SAML 2.0 application.
After creating the app, you see more configuration options for your Okta SAML 2.0 app. You make changes in more than one tab.
Sign On configuration
Copy the Metadata URL from the Sign On tab, then paste it into the SAML app metadata URL field in xaa.dev and save.
It automatically discovers your SSO endpoint and token endpoint from the metadata.
Assignments configuration
Assign your user to the app on the Assignments tab.
Resource Server extra configuration
Enable Cross App Access (XAA) on the resource app integration from the Resource Server tab, and configure:
- Issuer URL: Use your resource authorization server issuer URL. This value becomes the
audclaim in the ID-JAG and cannot change without deleting and resetting the connection. - Audience/tenant ID: This is optional and not needed for this walkthrough
⚠️ Note
Use Audience/tenant ID when you have multiple tenants in your organization.
Create a SAML 2.0 requester app for testing
Return to xaa.dev. This is where you provide these two values: the Single Sign-On URL (the Assertion Consumer Service (ACS) URL) and the Audience URI (SP Entity ID).
Create a custom SAML app integration for your requester app in the Okta Admin Console.
Navigate to Applications and Resources > Applications.
Select Create App Integration. In the Create a new app integration modal, select SAML 2.0 and press Next.
In General Settings:
- App name: Enter a descriptive name for the app, for example, “Requesting App for Testing”
In Configure SAML:
- Single sign-on URL: Use the ACS URL from xaa.dev, e.g., “https://idp.xaa.dev/saml-requester/acs”
- Audience URI (SP Entity ID): Use the SP Entity from xaa.dev, e.g., “https://idp.xaa.dev/saml-requester/metadata”
- Name ID format: select EmailAddress
- Application username: select Email
- Update application username on: select Create and update
Press Finish to create the Okta SAML 2.0 application.
After creating the app, you see more configuration options for your Okta SAML 2.0 app. You make changes in more than one tab.
Sign On configuration
Copy the Metadata URL from the Sign On tab, then paste it into the SAML app metadata URL field in xaa.dev and save.
It automatically discovers your SSO endpoint and token endpoint from the metadata.
Assignments configuration
Assign your test user to the app on the Assignments tab.
Register and configure the AI Agent in Okta
With your Okta SAML 2.0 requesting app configured, register a new AI Agent in Okta. The AI Agent configuration represents the relationship between the Okta SAML 2.0 app you created and your Model Context Protocol (MCP) Resource Application. You configure credentials, link your requesting app during registration, and connect your MCP resource app as a Resource Connection.
In the Okta Admin Console, register the AI Agent and link your requesting app:
- Navigate to Directory > AI Agents
- Select Register AI Agent > Register Manually
- Under Profile, enter a Name, e.g., “Requesting Agent”, and an optional description, then press Next
- Under User access and authentication > Allow users to access this agent, select Select an existing app, then choose the Okta SAML requesting app you created earlier (e.g., “Requesting App for Testing”). This app acts as the requesting app for the XAA flow: your users sign in to the agentic app through it, and the agent then acts on their behalf. Press Next.
Select the AI agent you just created to open its configuration. Configure the agent across the following tabs:
- On the Client registration tab, choose a client registration method:
- Select the Public/private key section
- In the Define where keys are managed section, choose Okta
- Under the Add and manage keys section, select Add public key, then Generate new key. Under PEM, copy the private key into the Private key (PKCS8 PEM or private JWK) field in xaa.dev.
- Copy the KEY ID into the kid field at xaa.dev, then click Done
- In the Provide Client ID to AI agent builder or developer step, copy the Client ID, paste it into the Client ID field at xaa.dev, and save
- Under Activate for your AI agent, select Activate, then Enable
- On the User access tab
- In the App used for access configuration, select Select an existing SAML app, then your SAML Application, e.g., “Requesting App for Testing”
- On the Resource connections tab, add a resource connection to the AI Agent. Use these values:
- Application instance: your resource app (e.g., “Resource App”)
- AI agent’s client ID registered in this app: the Client ID
- Scopes: Allow any scope
- Activate the AI Agent: activating the linked requesting app integration usually activates the AI Agent. If the agent’s status is STAGED, go to the Actions drop-down menu at the top and select Activate.
Once the AI Agent is active, the configuration is complete. Except for Machine access, all checkmarks on the agent configuration page must be green.
Verify your Okta XAA setup on xaa.dev
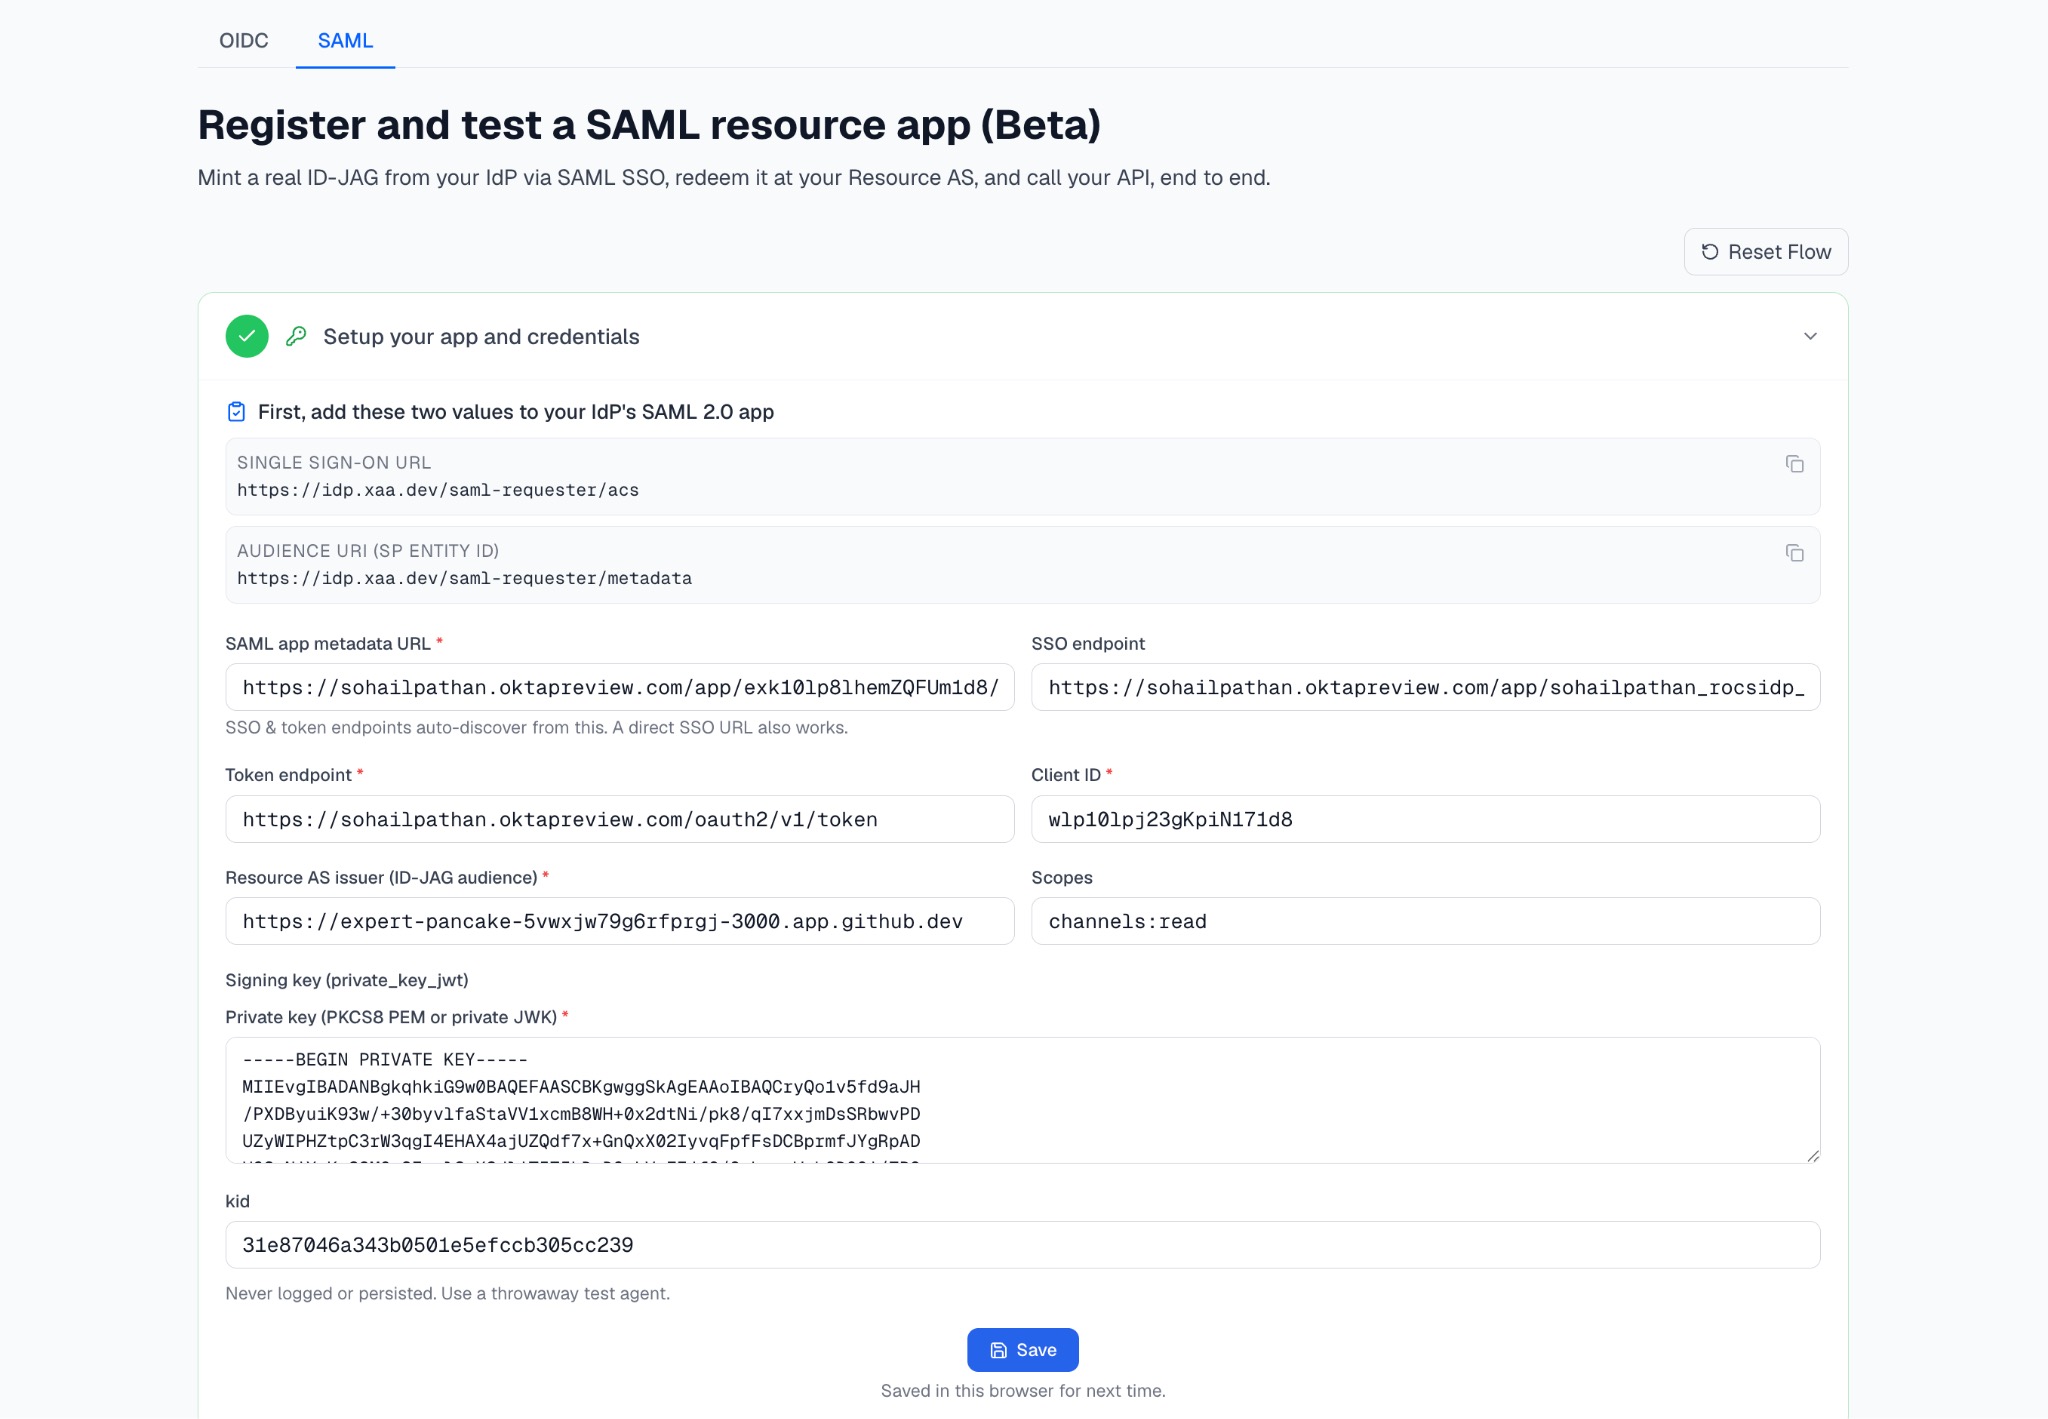
Before we get to the next section, make sure you have the resource app URL in the resource authorization issuer (ID-JAG audience). By this point, you have every value from the checklist and your one-time Okta setup in place (AI Agent, credentials, owner, delegation, and resource connection), so we add the values from Okta and the apps to walk through the flow step by step, one button per step.
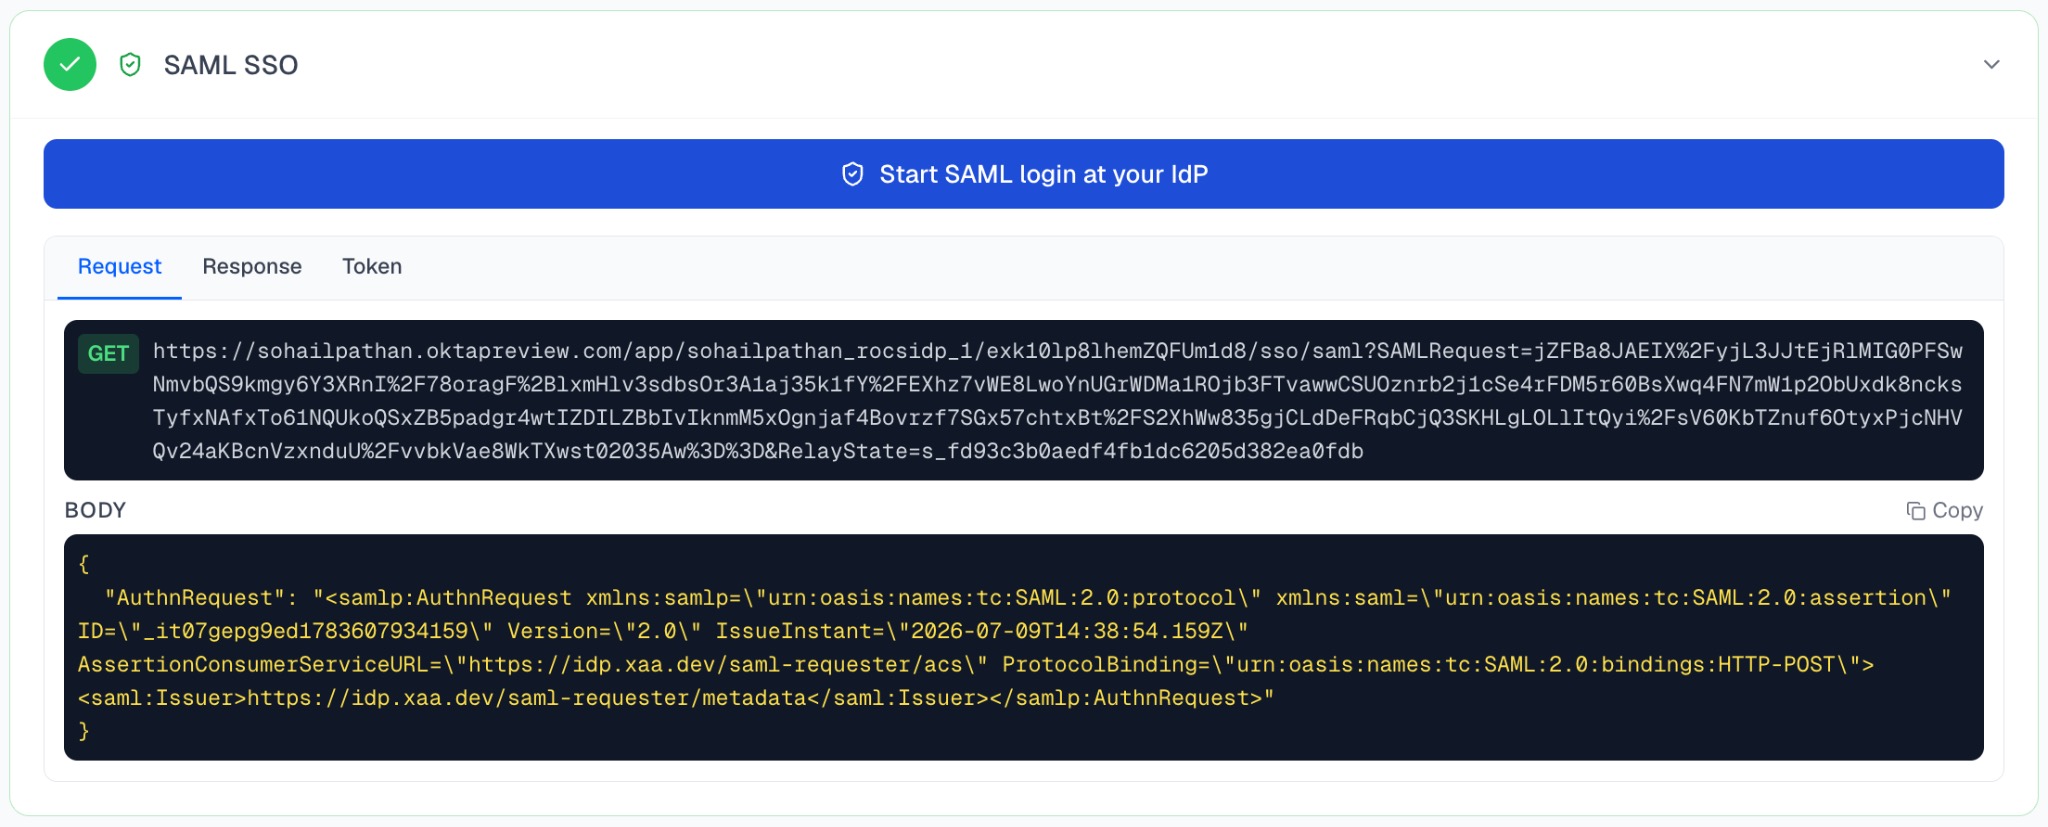
The screenshot below shows the SAML configuration values step on xaa.dev.
Configure SAML SSO
Press Start SAML login at your IdP and complete the login in the pop-up.
When it closes, the step turns green and shows a ✓ Auto-discovered SSO endpoint, confirming that the tester resolved the real .../sso/saml endpoint from your metadata and returned a signed SAML assertion.
Confirm the SAML Assertion exchange for a refresh token
Press Exchange assertion for refresh token. The tester posts the signed assertion to your IdP’s token endpoint, using private_key_jwt authentication. A 200 means the identity provider accepted the assertion, and you now hold an opaque refresh token.
Verify the refresh token exchange for an ID-JAG token
Press Exchange refresh token for ID-JAG. This action returns a decoded ID-JAG. Take a second to review it: aud must equal your Resource authorization issuer, and sub_id contains the SAML NameID of the user who logged in. The Resource authorization server then validates this token. A 200 OK indicates that the step succeeded.
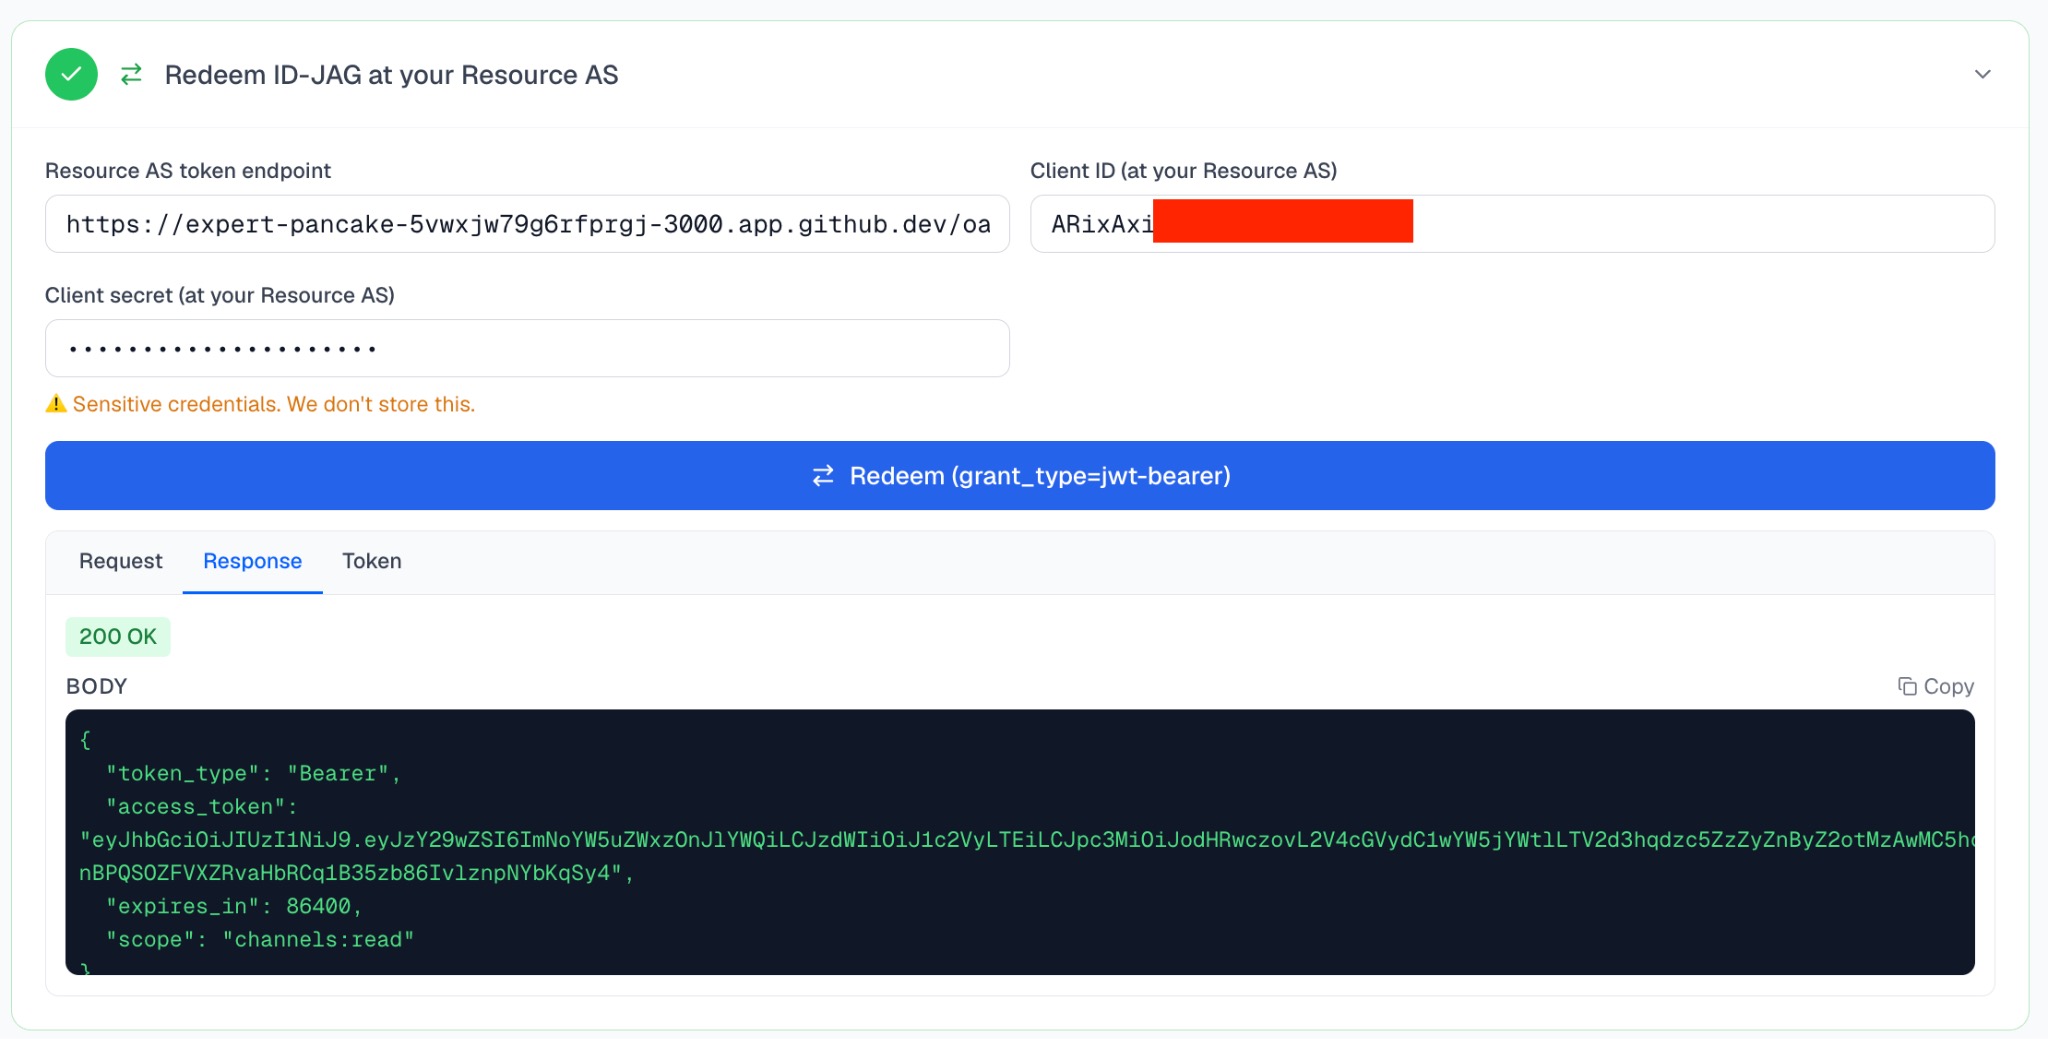
Redeem the ID-JAG for an access token at the resource authorization server
- Fill in your Resource AS token endpoint
- Client ID and client secret of the resource app from the Resource Authorization Server
Press Redeem (grant_type=jwt-bearer). If the request succeeds, you receive a 200 OK response with an access token. Inspect the token in the Token tab to verify that the iss, aud, and scope claims match the values configured in your resource authorization server. This validation confirms that the authorization server accepted the ID-JAG and issued its own access token.
Call the resource API with the access token
Select the request method and enter your API URL (The Authorization: Bearer header is added automatically, but you can add any other headers or a request body as needed), then press Send GET Request. A 200 response from your endpoint is the final proof: your API accepts the access token generated by the ID-JAG exchange.
Prove the XAA connection end-to-end
A green Conformance passed panel appears. Select Export conformance log (JSON) to download the test results. The export includes the signed ID-JAG, the access token returned by your resource authorization server, and the API response.
You can share this file with your IdP as proof that the Cross App Access integration works successfully.

Takeaways for implementors who have both OIDC and SAML apps
If you have already implemented XAA in your OIDC apps, here’s a quick checklist to convert your SAML apps:
- The subject comes from
sub_idinsaml-nameidformat, rather thansub - Match on every
saml-nameidmember (issuer+NameID+sp_name_qualifier), rather than justissandsub - Everything else, including token issuance rules and redemption checks, remains as is
Learn more about Cross App Access, SAML, and OAuth 2.0
If this guide helped you implement Cross App Access with SAML, explore these resources:
- 📘 Cross App Access Documentation: Official guides for configuring and managing Cross App Access in production.
-
🎙️ Developer Podcast on MCP and Cross App Access: Hear the backstory, use cases, and why this matters for developers.
- 📋 How to Build and List Secure Cross App Access (XAA) Connections on Okta Integration Network (OIN)
Identity 101:
- What’s the Difference Between OAuth, OpenID Connect, and SAML?
- What are SAML, OAuth, and OIDC?
- Why You Should Migrate to OAuth 2.0 From Static API Tokens
- How to Get Going with the On-Demand SaaS Apps Workshops
Follow us on LinkedIn and X, and subscribe to our YouTube channel. Leave a comment below if you have any questions!
Changelog:
- Jul 9, 2026: Added the steps to set up the requester app in Okta and generate a conformance report.

Sohail is a Senior Developer Advocate at Okta with roots in mobile app development and hands-on experience designing, building, and publishing APIs. Now, he helps developers secure their apps by turning complex OAuth and API topics into clear, actionable guides. When he's not coding or speaking at conferences, you'll find him on a quest for the perfect plate of biryani.

Alisa Duncan is a Senior Developer Advocate at Okta, a full-stack developer, and a community builder who loves the thrill of learning new things. She is a Google Developer Expert in Angular and organizes coding workshops and community events locally and internationally. Her background is primarily working on enterprise software platforms, and she is a fan of all things TypeScript and JavaScript.

Michael is the Manager of Builder Advocacy at Okta. He has been advocating developer technologies for over 25 years. Michael is a published author of technical books as well as online courses with Pluralsight. Previously, Michael evangelized "smart home" with the Amazon Alexa team, taught developers location data with HERE Technologies, and championed HTML5 while at Microsoft.

Akanksha has a developer background and experience building global developer communities. She has given talks on various technologies, hosted large-scale events and hackathons, advocated for developers, and fostered partnerships and open-source initiatives. Outside work, she loves dancing and traveling; you'll often find her capturing serene skies through her phone.
Okta Developer Blog Comment Policy
We welcome relevant and respectful comments. Off-topic comments may be removed.