A Secure and Themed Sign-in Page

Creating secure applications requires authentication. Delegating all the tedious details of the sign-in process to Okta is the most secure method to authenticate, not to mention speedier for development. So you’ll see us advocating for and using the Okta-hosted sign-in page in our blog posts.
But the default sign-in page can look too different from the personality you have in your application. And the login URL redirects to a domain outside your application, which is also different from what we want. Fortunately, you can add some flair to your Okta-hosted sign-in page, allowing your application’s character to carry through in the user authentication process while maintaining the highest level of security. In other words, winning with the best of both worlds.

This post walks you through how to customize your sign-in page using a custom domain and by selecting fun styles using Okta-hosted redirect model. We’ll use a pre-existing e-commerce cupcake site built using an Angular Micro frontend application and customize the sign-in page to be full of mouth-watering cupcakes. 😋
Note The process outlined in this post is not Angular-dependent, so feel free to substitute the web app with your favorite SPA application.
Prerequisites
Table of Contents
- Prepare your Okta account and Okta application
- Theme the Okta-hosted sign-in page
- Customize the sign-in URL with a custom domain
- Set up the Angular Micro-frontend site and add Okta
- Learn more about styling the sign-in page and creating web apps quickly
Note: In May 2025, the Okta Integrator Free Plan replaced Okta Developer Edition Accounts, and the Okta CLI was deprecated.
We preserved this post for reference, but the instructions no longer work exactly as written. Replace the Okta CLI commands by manually configuring Okta following the instructions in our Developer Documentation.
Prepare your Okta account and Okta application
You’ll need an Okta account. If you already have one and an Okta application you want to use for this tutorial, feel free to skip this section. Otherwise, let’s continue!
Before you begin, you’ll need a free Okta developer account. Install the Okta CLI and run okta register to sign up for a new account. If you already have an account, run okta login.
Then, run okta apps create. Select the default app name, or change it as you see fit.
Choose Single-Page App and press Enter.
Use http://localhost:4200/login/callback for the Redirect URI and set the Logout Redirect URI to http://localhost:4200.
What does the Okta CLI do?
The Okta CLI will create an OIDC Single-Page App in your Okta Org. It will add the redirect URIs you specified and grant access to the Everyone group. It will also add a trusted origin for http://localhost:4200. You will see output like the following when it’s finished:
Okta application configuration:
Issuer:    https://dev-133337.okta.com/oauth2/default
Client ID: 0oab8eb55Kb9jdMIr5d6
NOTE: You can also use the Okta Admin Console to create your app. See Create an Angular App for more information.
Note the Issuer and the Client ID. You’ll need those values to configure Okta in the web app.
Theme the Okta-hosted sign-in page
Let’s make the sign-in page more enticing by beautifying it with a cupcake or whatever theme sparks joy.
You can make these customizations in the Admin Console through the Okta Dashboard or API calls. We’ll use the Okta Dashboard in this post, but let me know in a comment below if you want to see the API calls’ instructions.
To get to the Okta Dashboard, navigate to developer.okta.com and sign in. Notice the sign-in page looks neutral. It will look much more delightful after we apply the customization changes.
Once you’ve authenticated, you’ll see your Okta Dashboard.
Access the Admin Console by pressing the Admin button in the toolbar at the top of the page. You’ll encounter a sign-in challenge, and once you emerge victorious, you’ll be in the Admin Console.
Navigate to Customizations > Branding on the sidebar. Here you can theme your login page. Select your primary and secondary colors used within the sign-in widget. Add a logo, a favicon, and optionally add a background image. Press the Edit button for Okta-hosted Sign-In Page, select your background style and save your changes.
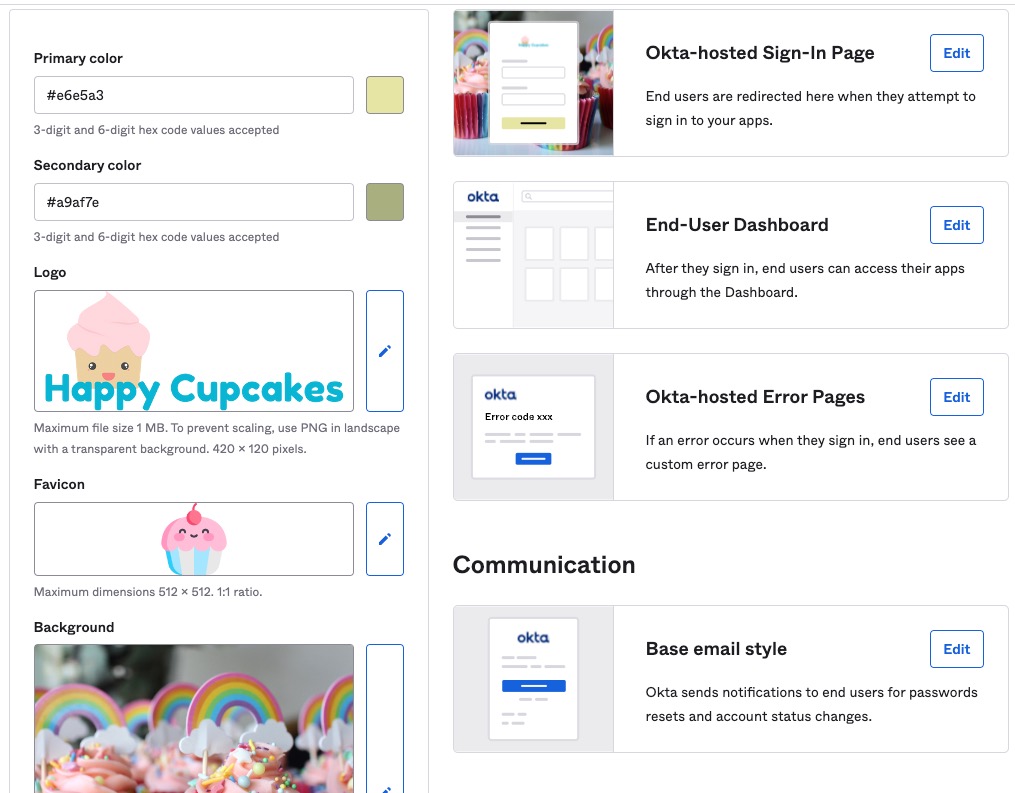
My selections are full of colorful, happy cupcakes — a theme that sparks joy for me and matches the personality of my cupcakes e-commerce site.
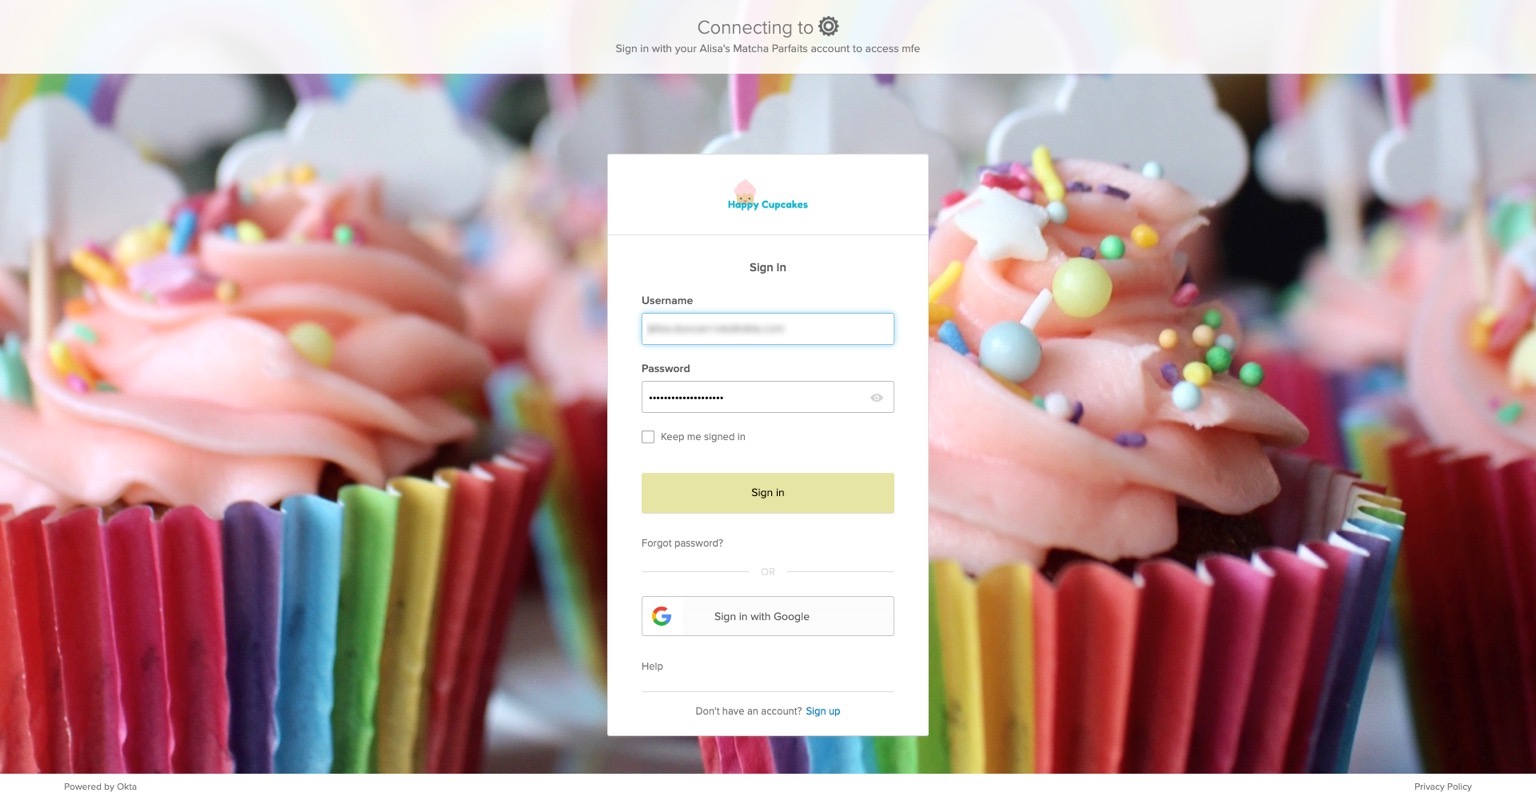
Sign out of the Okta Dashboard and sign back in to see your new sign-in page in action! My sign-in page makes me smile. 😊
Customize the sign-in URL with a custom domain
Next, let’s tackle the sign-in redirect URL to have a domain name that matches our application. Feel free to skip this section to see the themed sign-in page in a web application if you don’t have a custom domain.
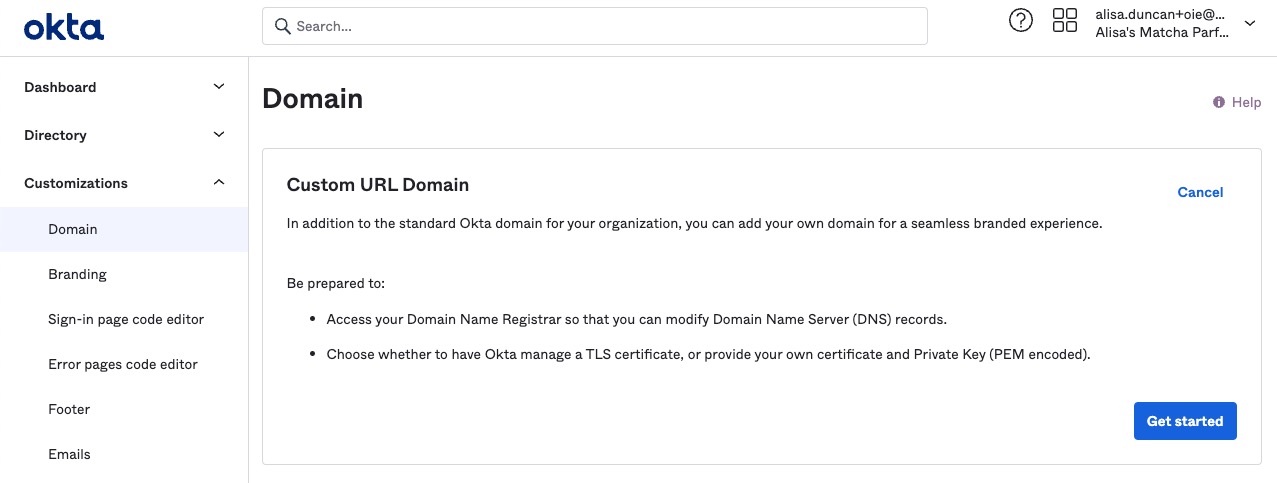
In the Admin Console, navigate to Customization > Domain in the sidebar. Press the Edit button to start the customized URL process. Be sure to have access to your Domain Name Registrar so you can make the required modifications. You will also need to allow Okta to manage a TLS certificate or provide your own. In the following steps, we’ll have Okta manage the certificate. Press the Get started button to continue.
In the next screen, add the domain name you want to use for the sign-in URL and select Okta-managed for your certificate. Staying true to my cupcake theme, I have a cupcake-based domain name and added a subdomain for the sign-in URL. Press Next.
The next screen has instructions for you to update the DNS records in your Domain Name Registrar. The instructions to do so depend on your registrar, so you’ll need to follow the instructions your registrar provides. 😅 You’ve got this! 💪
The final step to customize the URL for your domain is configuring your Okta application. In the Admin Console, navigate to Applications > Applications and find the Okta application you’re using in this tutorial. It might be the one you created earlier in the post or already had. Navigate to the Sign On tab. You’ll see a section for OpenID Connect ID Token where you’ll select the URL. Press Edit and choose your URL for the Issuer.

The DNS changes may take a few minutes to propagate, so prepare a soothing cup of tea to decompress from that DNS work while you wait. Let’s see how the sign-in page looks in a web app with a matching theme!
Set up the Angular Micro-frontend site and add Okta
To reduce the overhead of creating a web app, we’ll use an existing sample cupcake e-commerce app. Grab the pre-built Angular application from the GitHub repo by running the following commands in your terminal:
git clone --branch deploy https://github.com/oktadev/okta-angular-microfrontend-example.git
npm ci
Open the project in your favorite IDE.
The site already includes the libraries required to authenticate using Okta. You’ll need to configure the app with the Issuer and Client ID.
Open projects/shell/src/app/app.module.ts. Find the following code block and replace {yourDomain} and {yourClientID} with your Okta application values. If you used a custom domain, the {yourDomain} domain value is the issuer value from the previous step. If you didn’t set up a custom domain, {yourDomain} is the issuer value generated in the output of the Okta CLI.
const oktaAuth = new OktaAuth({
  issuer: 'https://{yourDomain}/oauth2/default',
  clientId: '{yourClientID}',
  redirectUri: window.location.origin + '/login/callback',
  scopes: ['openid', 'profile', 'email']
});
Now we can run the site. Start the app by running the following command:
npm run run:all
This command opens three tabs in your browser. Find the one running at port 4200 with beautiful pictures of cupcakes and try signing in. The Okta-hosted sign-in page looks more themed, and better matches the application! If you set up a custom domain, you’ll see the domain name matches your application too! 🧁
If you want to read about creating an Angular Micro frontend and sharing Okta authentication state across your micro frontend applications, check out the two post series starting with How to Build Micro Frontends Using Module Federation in Angular.
Learn more about styling the sign-in page and creating web apps quickly
If you liked this post, you might be interested in these links.
- Style the sign-in page guide
- Customize your Okta experience with the Brands API
- Customize domain and email address
- How to Build Micro Frontends Using Module Federation in Angular
- Quick JavaScript Authentication with OktaDev Schematics
Remember to follow us on Twitter and subscribe to our YouTube channel for more great tutorials. We’d also love to hear from you! Please comment below if you have any questions or want to share what tutorial you’d like to see next.
Alisa Duncan is a Senior Developer Advocate at Okta, a full-stack developer, and a community builder who loves the thrill of learning new things. She is a Google Developer Expert in Angular and organizes coding workshops and community events locally and internationally. Her background is primarily working on enterprise software platforms, and she is a fan of all things TypeScript and JavaScript.
Okta Developer Blog Comment Policy
We welcome relevant and respectful comments. Off-topic comments may be removed.