On this page
Style the sign-in page
This guide explains how to customize the sign-in page for both redirect and embedded deployment models.
Note: This document is for the second generation (Gen2) of the Okta Sign-In Widget. See Style the Sign-In Widget (third generation) (opens new window) for third generation (Gen3) styling information. See Migrate to the third generation (Gen3) of the Sign-In Widget to migrate from Gen2 to Gen3.
Learning outcomes
- Add style sheets and custom JavaScript.
- (Redirect authentication): Modify strings and customize localization content.
What you need
- Okta Integrator Free Plan org (opens new window)
- (Redirect authentication): Custom URL domain
- (Embedded authentication): Okta Sign-In Widget (opens new window) installed into your project with configured authentication scenarios
Sample code
About the sign-in page
The sign-in page is a JavaScript library that gives you a fully featured and customizable sign-in experience. Use it to authenticate users on any website. How you customize the sign-in page depends on whether Okta hosts it (redirect authentication) or you embed it in your app (embedded authentication).
Redirect authentication: Okta hosts the sign-in page that appears when your apps redirect to Okta to sign users in. You can customize the page using easy controls or a code editor that is provided. See Style for redirect authentication.
Embedded authentication: After you've installed the Okta Sign-In Widget (opens new window) in your project, configure the authentication scenarios that you want to support. Then you can customize the sign-in page. Match your branding using CSS and JavaScript to apply customizations. See Style for embedded authentication.
Style for redirect authentication
You can add HTML, CSS, or JavaScript to the sign-in page, customize it per app and for multiple brands. You can use variables and request context, and bypass the custom sign-in page.
Note: Before you can customize for redirect authentication, you must customize your Okta URL domain.
Accessibility compliance
The Sign-In Widget (Gen2) button text can be either white or black. By default, the Sign-In Widget uses white text. Sometimes the chosen primary color results in a contrast ratio against white text that's less than 4.5:1. When this happens, the Sign-In Widget changes the primary contrast color (text color) to black to ensure accessibility compliance.
Example: If you choose #6B8A16 as your primary color, its contrast ratio against #FFFFFF (white) is 3.98:1 (<4.5:1). The Gen2 Sign-In Widget therefore changes the primary contrast color to black #000000 (black) to achieve a contrast ratio of 5.27:1 (>4.5:1). See Understand Sign-In Widget color customization (opens new window).
Content Security Policy (CSP) for your custom domain
Set up a custom domain and customize your CSP (opens new window) if you also want to customize the sign-in page or error pages. CSP customizations only take effect on custom domains.
To analyze and detect potentially malicious IP addresses that seek to bypass your CSP, use Okta ThreatInsight (opens new window).
Known limitations
- Avoid using
metatags to customize the CSP.metatags impact the overall policy. It's easier to control CSP customizations by adding trusted external resources in the Admin Console. See Customize the Content Security Policy (CSP) for a custom domain (opens new window). See also Multiple content security policies (opens new window). - If you add too many trusted external resources to your custom CSP, the HTTP header size can exceed the limit allowed by some server software. Update the default server limits or reduce the number of trusted external resources.
- You can have a maximum of 20 URIs.
- If you add a trusted origin URL that redirects to a different URL, you need to include the redirect URL on the trusted origin list.
Configure the default CSP
In the Admin Console, go to Customizations > Brands.
In the Pages panel in the Sign-in Page section, click Configure.
Click Settings.
In the Content Security Policy panel, click Edit. Set the following:
- Trusted external resources: Add resources to the CSP. For example: mydomain.com, *.mydomain.com, or mydomain.com/images. Click Add.
Note: Okta adds these resources to all fetch-directives in the CSP.
- Report URI: Enter the URI to which you want to send violation report details. The URI entered here appears in the report-uri directive of the CSP.
- Enforcement:
- Select Enforced to block any resources that the CSP doesn't trust. The header is
content-security-policy. - Use Not enforced to leave the customized CSP in the report-only header (
content-security-policy-report-only). Use this option for testing and validation before turning on Enforced mode.
- Select Enforced to block any resources that the CSP doesn't trust. The header is
- Trusted external resources: Add resources to the CSP. For example: mydomain.com, *.mydomain.com, or mydomain.com/images. Click Add.
Click Save to draft.
Make changes directly in the editor. See steps 4 and 5 in Edit the sign-in page.
Edit the sign-in page
The Custom Sign-In Page offers basic and advanced customization options to transform the sign-in experience.
Use the code editor
Use the code editor to modify any HTML, CSS, or JavaScript on the sign-in page. See Customization examples for snippets that you can update and use.
In the Admin Console, go to Customizations > Brands, and then select the brand you want.
In the Pages tab, click Configure in the Sign-in page panel.
To open the code editor, turn on the toggle next to Code editor.
Note: You can only enable the code editor if you configure a custom domain.
Make changes directly in the editor. If you enter
{,(, or.you see a list of available variables that you can use. See Use variables.- Click Save to draft, then Preview, Revert, or Publish.
- Select Compare with published version to see the difference between your edited version and the published version. You can choose between a split view and a unified view.
Note: To discard your changes without publishing them, click Revert changes or turn off the toggle next to Code editor. Turning off the code editor restores the default HTML/CSS and JavaScript code.
Note: See the Customization examples section for examples that you can alter and use on your hosted sign-in page.
Use the Brands API
The Brands API (opens new window) allows you to set icons, images, and colors without needing to set a custom Okta URL domain. You can update the following:
- The Okta-hosted sign-in page
- Error pages
- Email templates
- The End-User Dashboard
Bypass the custom sign-in page
Use the /login/default backdoor sign-in URL to bypass the custom sign-in page. If, for example, something goes wrong with your customizations and your sign-in page doesn't load, add /login/default to the end of your Okta URL. It brings up the default sign-in page, then you can enter your credentials:
https://{yourOktaDomain}/login/default
This URL only bypasses changes that you have made to the HTML in the HTML editor. It doesn't bypass changes that you made using the controls on the left side of the page.
Use variables
The Okta sign-in page template is written with Mustache (opens new window) and uses predefined variables to insert relevant values into the sign-in page. To see variables in a code sample, refer to the default code of the error page. See Use the code editor.
Variables with double curly braces ({{) return escaped HTML by default. Escaping allows you to show "special" characters in HTML. For example, <p>hello</p> displays as a paragraph element and the <p> tags don't render. For the <p> tags to render, escape or replace the <p> tags by using <p> hello </p>. In this example, <p> escapes < and </p> escapes >.
Triple curly braces ({{{) are only used for the errorDescription variable to return unescaped HTML.
The following variables in the HTML contain the configuration parameters for certain page elements. These variables inject specific content or functionality automatically.
{{pageTitle}}
Inserts the page title.
Example:
<title>{{pageTitle}}</title>
{{{SignInWidgetResources}}}
Inserts the JavaScript and CSS files required to use the Okta sign-in page.
{{bgImageUrl}}
Inserts a URL to the background image configured in your Okta organization. This setting can be changed by selecting Customization, and then Appearance.
Example:
<style>
  #login-bg-image-id {
    background-image: {{bgImageUrl}}
  }
</style>
{{useSiwGen3}}
A conditional that allows you to set behaviors for a migration to Gen3 of the Sign-In Widget. See Migrate to the third generation (Gen3) of the Sign-In Widget.
Gen3 of the Sign-In Widget uses design tokens, unlike Gen2, so it requires different styling. Use useSiwGen3 to add specific code that works when you enable Gen3, but doesn't affect other code in the template if you need to roll back to Gen2.
Note: If your org uses Classic Engine, the
useSiwGen3variable appears in the code editor, but you can't use it.
The following example shows how to style the login-container for a migration to Gen3:
{{#useSiwGen3}}
    <style nonce="{{nonceValue}}">
        #okta-login-container {
            background-color: red !important;
        }
    </style>
{{/useSiwGen3}}
{{{OktaUtil}}}
Defines a global OktaUtil JavaScript object that contains methods used to complete the Okta sign-in flow. When an app uses the sign-in page to sign a user in, information called request context is available. The request context describes the target app and the request.
Use request context
By calling the OktaUtil.getRequestContext() method, JavaScript code on your sign-in page can do the following:
- Inspect the current request
- Act based on the target app or other details
Identity Engine users get the following object returned from OktaUtil.getRequestContext():
{
  "app": {
    "type": "object",
    "value": {
      "name": "sample_client",
      "label": "Demo App",
      "id": "0oadday782XUlHyp90h3"
    }
  },
  "authentication": {
    "type": "object",
    "value": {
      "request": {
        "max_age": -1,
        "scope": "openid",
        "display": "page",
        "response_type": "code",
        "redirect_uri": "https://example.com/enduser/callback",
        "state": "VqpCUgGCSYkbwuCfnqHLSehAJvI5En1XxtywWxfiGSXQ0bVeSNKMh4gscswtUhPa",
        "code_challenge_method": "S256",
        "nonce": "i2Q3rgA3fPGx3f9yfuglKc0PdzZRB8tODSoJFWMZSccH6Hi4dhIXGl6PNFj0pyUo",
        "code_challenge": "C0bfLXeyH61AWEyznLh-JsZP55uJTJqxGAhXBcH-lO8",
        "response_mode": "query"
      },
      "protocol": {},
      "issuer": {
        "name": "default",
        "uri": "https://{yourOktaDomain}/oauth2/default"
      }
    }
  }
}
Classic Engine users get the following object returned from OktaUtil.getRequestContext():
{
  "target": {
    "clientId": "0oadday782XUlHyp90h3",
    "name": "sample_client",
    "label": "Demo App"
  },
  "authentication": {
    "request": {
      "scope": "openid",
      "response_type": "code",
      "redirect_uri": "https://example.com/debug",
      "state": "asdf",
      "response_mode": "form_post"
    },
    "client": {
      "name": "Demo App",
      "id": "0oadday782XUlHyp90h3"
    },
    "issuer": {
      "name": "default",
      "id": "ausblkmh242Vtu5430h2",
      "uri": "https://{yourOktaDomain}/oauth2/default"
    }
  }
}
For an OpenID Connect app, the app's client ID is stored in the request context object and is retrievable using the following commands:
// Identity Engine
OktaUtil.getRequestContext().app.value.id
// Classic
OktaUtil.getRequestContext().target.clientId
There's more information available about the client app, such as label.
Note: The
getRequestContext()method only returns a value when the Okta-hosted sign-in page is loaded in the context of an app. For example, SP-initiated flows in SAML or the/authorizeroute for OpenID Connect. Otherwise, it returnsundefined.
See Per-application customization for an example of what you can do with request context.
Note: The following variables are only available when the Theme Builder feature is enabled in your org.
{{themedStylesUrl}}
Inserts the URL for the themed style sheet
Example:
<link href="{{themedStylesUrl}}" rel="stylesheet" type="text/css">
{{faviconUrl}}
Inserts the URL for the favicon
Example:
<link rel="shortcut icon" href="{{faviconUrl}}" type="image/x-icon"/>
Hide or suppress the transient Sign-In Widget
In Okta Identity Engine, the sign-in page uses a JavaScript redirect method (instead of HTTP 302).
There are two main impacts:
Visual: The Okta Sign-In Widget could appear briefly to end users during the transition, interrupting the custom branded experience.
Programmatic: Non-user (or back-end) authentication flows receive an
HTTP 200 OKresponse with a body, instead of anHTTP 302 Foundredirect status response. As a result, back-end coding doesn't detect the status response and the JavaScript method performs the redirect.
Resolve the visual impact
To suppress the brief appearance of the Sign-In Widget, use a custom domain and update some JavaScript/CSS:
- (Required) In the HTML header, add the following to remove the opacity of the
okta-login-container:
<style> #okta-login-container{ opacity:0; transition-delay:200ms; transition:opacity 500ms; -webkit-transition:opacity 500ms; /* Safari */ }</style>
- (Optional) You can add more context for the build-out. In the HTML header as part of the JavaScript code block, add the following:
var myContext = {
    isLoginHidden: true,
}
- (Required) In the HTML body, add the following to access the query string in JavaScript and to toggle the display based on presence:
// Get the login container.
var loginContainer = document.getElementById("okta-login-container")

// Utility: Get a Query String Parameters
var urlParams = new URLSearchParams(window.location.search);

// Detect the IDP param
if (urlParams.has("idp")) {
    console.log(urlParams.get('idp')); // just to capture... if more logic needed
    // Let the Default opacity remain;
} else {
    // Allow the login container to be seen;
    loginContainer.style.opacity = 1;
    myContext.isLoginHidden = false; // (OPTIONAL - if more Logic needed (would not set opacity)
}
- (Optional) You might need more context and there isn't any display of the Sign-In Widget at the bottom of the page. In the HTML body, add the following:
if (myContext.isLoginHidden) {
    // Make sure the login is displayed by default
    console.log('show the login!'); // Indicate login should not be hidden just in case it renders again.
    myContext.isLoginHidden = false; // Show the login container;
    loginContainer.style.opacity = 1;
}
Solutions for the programmatic impact
Consider alternative integrations within your app. Since the IdP is known, you can redirect for IdP verification for all authentication flows, or use the Web Finger API. However, your integration may be limited based on context.
Note: In Identity Engine, app sign-in policy rules (opens new window) include conditions about the device platform and the target app. The WebFinger API doesn't include device and app details in its responses.
Style for embedded authentication
This section discusses the customization options that you have when you're self-hosting the sign-in page.
Initial sign-in page
You can modify the look of the initial sign-in page using parameters in the config section of the main initialization block.
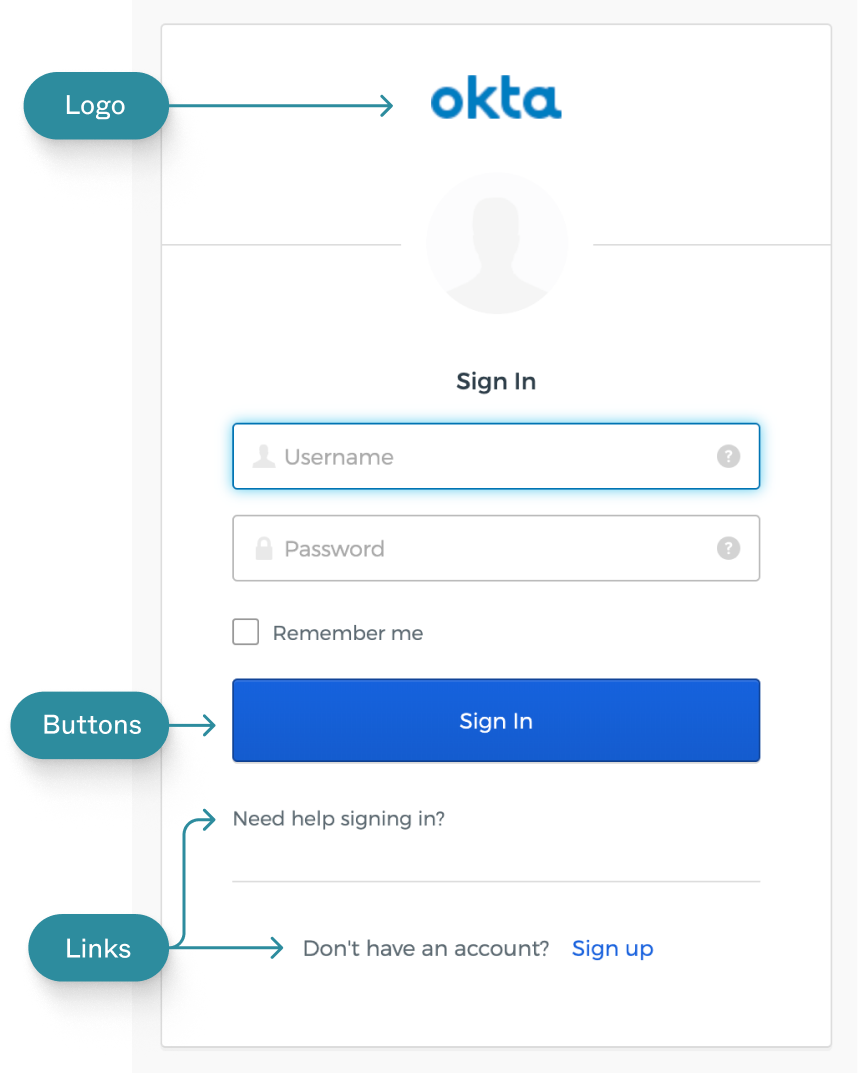
Logo
var config = {
  ...
  logo: '/path/to/logo.png',
  ...
};

var signIn = new OktaSignIn(config);
Custom buttons
You can add buttons below the Sign In button.
var config = {
  ...
  customButtons: [
    {
      title: 'Click Me 1',
      className: 'btn-customAuth',
      click: function() {
          // clicking on the button navigates to another page
          window.location.href = 'http://www.example1.com';
        }
    },
    {
      title: 'Click Me 2',
      className: 'btn-customAuth',
      click: function() {
          // clicking on the button navigates to another page
          window.location.href = 'http://www.example2.com';
      }
    }
  ],
  ...
};
Links
You can also change the Help, Forgot Password, and Unlock links, including both their text and URLs.
var config = {
  ...
  helpLinks: {
    help: 'https://example.com/help',
    forgotPassword: 'https://example.com/forgot-password',
    unlock: 'https://example.com/unlock-account',
    custom: [
      {
        text: 'What is Okta?',
        href: 'https://example.com/what-is-okta'
      },
      {
        text: 'Example Portal',
        href: 'https://example.com'
      }
    ]
  },
  ...
};
Modify the CSS
In addition to the parameters in the config of the sign-in page, you can also modify the CSS or override the default styles.
This section provides examples that you can use to make your own customizations to the sign-in page.
Background
#okta-sign-in.auth-container.main-container {
  background-color: red;
}

#okta-sign-in .beacon-blank {
  background-color: red;
}
Border color
#okta-sign-in.auth-container.main-container {
  border-color: red;
}

#okta-sign-in.auth-container .okta-sign-in-header {
  border-bottom-color: red;
}
Text color
All text:
#okta-sign-in * {
  color: red;
}
Sign In text:
#okta-sign-in.auth-container .o-form-head {
  color: red;
}
Link text:
#okta-sign-in.auth-container a.link:link {
  color: red;
}
Widget positioning + width
Width:
#okta-sign-in {
  width: 600px;
}
Position:
#okta-sign-in {
  margin: 100px auto 8px;
}
Identity Provider buttons
#okta-sign-in.auth-container .custom-style {
  background: url(logo.png) no-repeat 10px, linear-gradient(90deg, hotpink 50px, lightpink 0);
}
Modify strings
To modify strings on the sign-in page, you can override any of the properties set in login.properties (opens new window). Override these properties by adding new values for them. Configure the i18n object in the config section of the sign-in page.
You can add values for any of the labels found on the sign-in page.
var config = {
  ...
  i18n: {
      en: {
        // Labels
        'primaryauth.title': 'ExampleApp Login',
        'primaryauth.username.placeholder': 'ExampleApp ID',
        'primaryauth.username.tooltip': 'Enter your ExampleApp ID',
        'primaryauth.password.placeholder': 'Password',
        'primaryauth.password.tooltip': 'Super secret password',
        // Errors
        'error.username.required': 'Please enter an ExampleApp ID',
        'error.password.required': 'Please enter a password',
        'errors.E0000004': 'Sign in failed!'
      }
  }
  ...
};
For more information about these configuration options, see the Okta Sign-In Widget Reference page (opens new window).
Localization
If you want to display different strings depending on the user's language, you can specify this using the following structure:
lang: {
  'key': 'value'
}
lang: one of the i18n country abbreviations (opens new window)key: a string specified in login.properties (opens new window)value: A new value for that string
Example
var config = {
  baseUrl: 'https://{yourOktaDomain}',
  ...
  i18n: {
    'en': {
      'primaryauth.title': 'Sign in to ExampleApp'
    },
    'es': {
      'primaryauth.title': 'Iniciar sesión en ExampleApp'
    },
    'zh-CN': {
      'primaryauth.title': '登录 ExampleApp'
    },
    'zh-TW': {
      'primaryauth.title': '登錄入 ExampleApp'
    }
  },
  ...
};
Host your own language files
The i18n option lets you override specific strings in languages that Sign-In Widget already supports. If you need to support a language not in the default list, or want to serve language files from your own server instead of the Okta CDN, use assets.baseUrl and assets.languages.
assets.baseUrl: The base URL where your language files are served. The Sign-In Widget loadslabels/json/login_{lang}.jsonandcountry_{lang}.jsonrelative to this path.assets.languages: The list of language codes that you're hosting. This replaces Sign-In Widget's default supported-languages list. If a requested language isn't in the list, Sign-In Widget falls back toen.
var config = {
  baseUrl: 'https://{yourOktaDomain}',
  assets: {
    baseUrl: 'https://acme.com/assets/dist',
    languages: ['en', 'ja', 'fr'],
  },
};

var signIn = new OktaSignIn(config);
Notes:
- The language JSON source files are in the
dist/labels/jsonfolder of the@okta/okta-signin-widgetnpm package (opens new window).- Hosting your own language files is also supported in the Gen3 Sign-In Widget used with redirect authentication. See Style the Sign-In Widget (third generation).
Customization examples
Use the following examples to help you customize the sign-in page with your own CSS, scripts, and per-application branding.
Add your own style sheet
You can add your own style sheet to extend the look of the sign-in page. In the embedded HTML editor, add a link to your style sheet in the <head> section, below the {{{SignInWidgetResources}}} line.
Example:
<head>
    <meta http-equiv="Content-Type" content="text/html; charset=UTF-8">
    <meta name="viewport" content="width=device-width, initial-scale=1.0" />
    <meta name="robots" content="none" />
    <title>{{pageTitle}}</title>
    {{{SignInWidgetResources}}}

    <!-- Custom styles for your sign-in page -->
    <link rel="stylesheet" type="text/css" href="http://example.com/yourCustomStyleSheet.css">
</head>
...
Add your own scripts
You can add custom JavaScript code to the sign-in page. In the embedded HTML editor, add a script in the <head> section, below the {{{SignInWidgetResources}}} line.
Example:
<head>
    <meta http-equiv="Content-Type" content="text/html; charset=UTF-8">
    <meta name="viewport" content="width=device-width, initial-scale=1.0" />
    <meta name="robots" content="none" />
    <title>{{pageTitle}}</title>
    {{{SignInWidgetResources}}}

    <!-- Add your scripts here -->
    <script src="https://example.com/yourCustomScript.js"></script>

    <!-- Or, inline scripts -->
    <script>
      // Do something
    </script>
</head>
...
Per-application customization
The Sign-In Widget for embedded authentication is app aware. This means that your client-side customizations can understand which app caused the sign-in page to load. This is useful when you have multiple apps or brands that you want to support.
When the page renders, an object called OktaUtil exists on the page. By calling the OktaUtil.getRequestContext() method, scripts on the page can get details about the current request.
To access the app's ID (which uniquely identifies the app), write a function to safely get the app ID from the request context:
// Identity Engine
<script>
  function getAppId() {
    if (!OktaUtil) return undefined;

    var requestContext = OktaUtil.getRequestContext();
    if (requestContext && requestContext.app && requestContext.app.value.id) {
      return requestContext.app.value.id;
    }
  }
</script>

// Classic
<script>
  function getAppId() {
    if (!OktaUtil) return undefined;

    var requestContext = OktaUtil.getRequestContext();

    // OIDC Apps
    if (requestContext && requestContext.target && requestContext.target.clientId) {
      return requestContext.target.clientId;
    }

    // SAML Apps
    if (requestContext && requestContext.authentication && requestContext.authentication.issuer.id){
      return requestContext.authentication.issuer.id;
    }
  }
</script>
Note: For Classic Engine orgs, it's not possible to retrieve the app ID for Secure Web Authentication (SWA) or Bookmark apps from the
requestContext.
Using this method, inspect the app ID and modify the widget configuration or appearance when users sign in to the target app. For example, if you have a CSS file on your server that's for a particular OpenID Connect client's CSS:
- In the Admin Console, go to Applications > Applications.
- Select the app integration that you need the client ID for.
- On the General tab, copy the ID from the Client ID box in the Client Credentials section.
<script>
  var appId = getAppId();

  if (appId === '00exampleclientid'){
    // add application-specific CSS
    var head = document.head;
    var link = document.createElement('link');

    link.type = 'text/css';
    link.rel = 'stylesheet';
    link.href = 'https://example.com/styles/' + appId + '.css';
    head.appendChild(link);
  }
</script>
Enable Sign-In Widget features on the Okta-hosted sign-in page
The Okta-hosted sign-in page sets default feature flags (opens new window) on the Sign-In Widget that are required for certain flows to work correctly. For example, the password-reset email link flow depends on default feature settings that Okta configures at runtime.
To enable or disable a feature, use the OktaUtil.getSignInWidgetConfig() method to retrieve the existing config object, then set the individual feature property on it. Use the bracket notation (config['features.featureName']) or dot notation (config.features.featureName) to target a single flag:
var config = OktaUtil.getSignInWidgetConfig();
config['features.registration'] = true;
// or: config.features.registration = true;
// Then pass config to OktaSignIn as usual
Caution: Don’t override the entire
config.featuresobject. Assigning a new object toconfig.features(for example,config.features = { registration: true }) removes all of Okta's default feature settings and can break flows such as the password-reset email link. Always set individual feature flags as shown earlier.
About the Sign-In Widget version
The Okta-hosted sign-in page uses the Sign-In Widget (opens new window) component to interact with the user.
If you aren't familiar with the Sign-In Widget, Okta recommends that you select the highest Major Version and the latest Minor Version (default). For details, major and minor versions, and the Sign-In Widget capabilities they support, see the GitHub releases page (opens new window).
- To update the major and minor versions, select Edit in the Okta Sign-In Widget Version section header.
- Make your changes, and then click Save at the bottom of the page.
See also
For information about other Okta customization options: