Secure Your .NET 6 Web API

.NET 6 is here and many of us are making preparations to update .NET 5 codebases to .NET 6. As part of this review, today you will learn how to implement the client credentials flow in ASP.NET Core Web API.
Note: In May 2025, the Okta Integrator Free Plan replaced Okta Developer Edition Accounts, and the Okta CLI was deprecated.
We preserved this post for reference, but the instructions no longer work exactly as written. Replace the Okta CLI commands by manually configuring Okta following the instructions in our Developer Documentation.
What is the client credentials flow
The client credentials flow is a server-to-server flow that allows applications to request resources on behalf of itself rather than a user. The client credentials flow requires the client id and the client secret, and exchanges those for an access token.
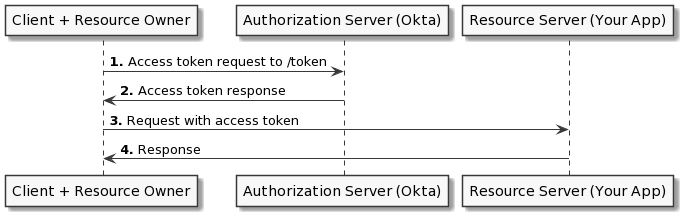
In this tutorial, you will use Okta to implement the client credentials flow in your .NET 6 API. To do this, you will set up your application in Okta’s admin portal. You will then learn how to retrieve the token from your authorization server. I will use an Advanced Rest Client to obtain the token, but you can use Postman or even write your own client. You will then write a JWT verifier in your .NET 6 application to protect your resource server. Finally, you will call your API using the JWT you obtained from your authorization server to access the resource requested.
If you wish you can follow along using the repository on Github.
Prerequisites
- Visual Studio 2022
- .NET 6
- A free Okta Developer Account (to handle your OAuth needs)
- Postman, Advanced Rest Client, or any other API Testing tool
Set up your Okta authorization server
The first thing you’ll need to do is set up your authorization server. Typically in a production environment, you would want to create a new authorization server, but the default server that comes with your Okta developer account should be sufficient for this demo. Navigate to the API section on the Security menu in your Okta admin portal.
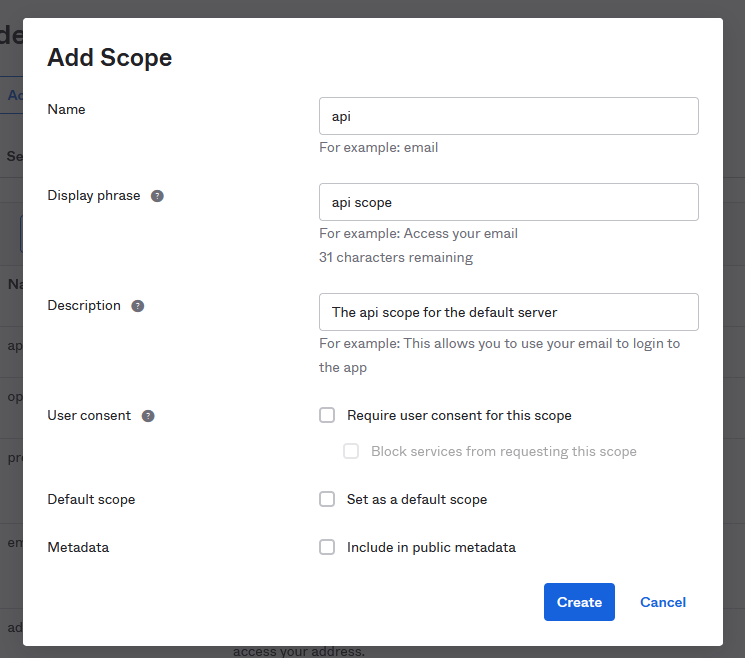
Note the Audience and Issuer URI of the default authorization server. You will need these in your application. Next, click on default and navigate to the Scopes tab. Add a new custom scope by clicking on Add Scope and give it the name api. Your Display phrase and Description can be anything you like.
Next, navigate to the Applications page under the Applications menu. Click Create App Integration and then select API Services. Give your application a meaningful name; I named mine ``. Make a note of your Client ID and your Client secret. You will need these to obtain the access code from your authorization server.
Create your web API
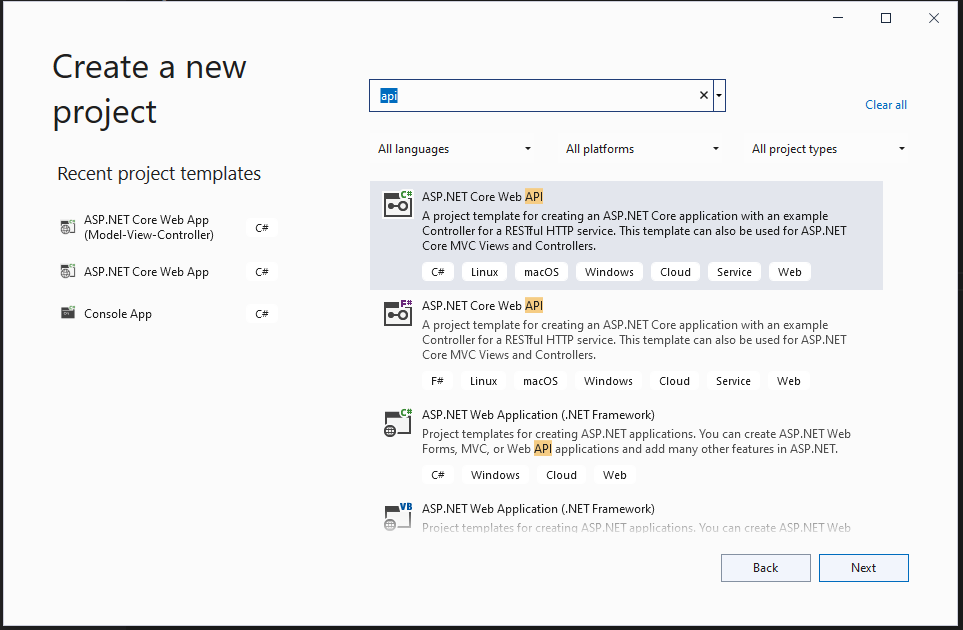
Next, you can begin work on your resource API. Open Visual Studio 2022 and select Create a new project. Find the option for ASP.NET Core Web API and press Next.
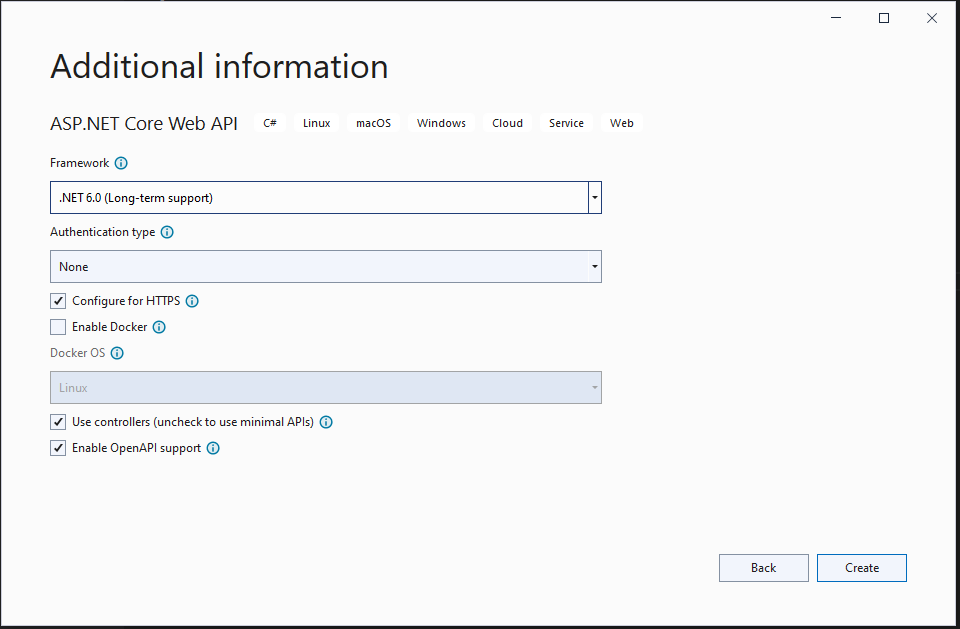
Name your application Okta_ClientFlowDotNetSix and click Next. Finally, under Additional Information select .NET 6.0 (Long-term support) as your framework. Click on Create and give VS a moment to scaffold your application.
Once Visual Studio has completed this process you will be presented with some boilerplate code, along with a brief sample for WeatherForecast. This WeatherForecastController serves as a demonstration for setting up your .NET 6 Web API. You are going to borrow this demo application and expand on it to properly implement the client credentials flow.
Install your dependencies
You’ll need three dependencies to make your JWT verification code work properly.
Install-Package Microsoft.IdentityModel.Protocols -Version 6.16.0
Install-Package Microsoft.IdentityModel.Protocols.OpenIdConnect -Version 6.16.0
At this time, Okta does not provide a JWT Verification library for .NET, but .NET itself does via the JwtSecurityTokenHandler object. To access the libraries required to make the JwtSecurityTokenHandler work, you will need the packages from Microsoft listed above.
Set up your appsettings.json files
Next, you’ll want to set up your configuration files. If you’ve pulled this code from GitHub you should have a file called appsettings.json with the code below in it.
{
  "Logging": {
    "LogLevel": {
      "Default": "Information",
      "Microsoft.AspNetCore": "Warning"
    }
  },
  "AllowedHosts": "*",
  "Okta": {
    "Issuer": ""
  }
}
This serves as a template for the appsettings.Development.json you will add shortly. If you started coding this program from scratch then appsettings.Development.json should already exist and you can replace the code with the following.
{
  "Logging": {
    "LogLevel": {
      "Default": "Information",
      "Microsoft.AspNetCore": "Warning"
    }
  },
  "AllowedHosts": "*",
  "Okta": {
    "Issuer": "{yourOktaDomain}/oauth2/default"
  }
}
The default endpoint in this URI refers to the authorization server. Assuming you used the default authorization server this should work. However, if you are using a custom authorization server you will want to obtain the Issuer from your Okta admin portal.
Add your API code
Start by adding a new folder to your solution called Okta and add the file IJwtValidator.cs to it. Replace the boilerplate code with the code below.
using System.Threading.Tasks;
using System.IdentityModel.Tokens.Jwt;

namespace Okta_ClientFlowDotNetSix.Okta
{
    public interface IJwtValidator
    {
        Task<JwtSecurityToken> ValidateToken(string token, CancellationToken ct = default(CancellationToken));
    }
}
Next, add the implementation for this interface in the same folder, but name it OktaJwtvalidation.cs. The code in this file is below.
using System.IdentityModel.Tokens.Jwt;
using Microsoft.Extensions.Options;
using Microsoft.IdentityModel.Protocols;
using Microsoft.IdentityModel.Protocols.OpenIdConnect;
using Microsoft.IdentityModel.Tokens;

namespace Okta_ClientFlowDotNetSix.Okta
{
    public class OktaJwtValidation : IJwtValidator
    {
        private readonly string _issuer;
        private readonly ConfigurationManager<OpenIdConnectConfiguration> _configurationManager;

        public OktaJwtValidation(IOptions<OktaJwtVerificationOptions> options)
        {
            _issuer = options.Value.Issuer;

            _configurationManager = new ConfigurationManager<OpenIdConnectConfiguration>(
                _issuer + "/.well-known/oauth-authorization-server",
                new OpenIdConnectConfigurationRetriever(),
                new HttpDocumentRetriever());
        }

        public async Task<JwtSecurityToken> ValidateToken(string token, CancellationToken ct = default(CancellationToken))
        {
            if (string.IsNullOrEmpty(token))
            {
                throw new ArgumentNullException(nameof(token));
            }

            if (string.IsNullOrEmpty(_issuer))
            {
                throw new ArgumentNullException(nameof(_issuer));
            }

            var discoveryDocument = await _configurationManager.GetConfigurationAsync(ct);
            var signingKeys = discoveryDocument.SigningKeys;

            var validationParameters = new TokenValidationParameters
            {
                RequireExpirationTime = true,
                RequireSignedTokens = true,
                ValidateIssuer = true,
                ValidIssuer = _issuer,
                ValidateIssuerSigningKey = true,
                IssuerSigningKeys = signingKeys,
                ValidateLifetime = true,
                ClockSkew = TimeSpan.FromMinutes(2),
                ValidateAudience = false,
            };

            try
            {
                var principal = new JwtSecurityTokenHandler()
                    .ValidateToken(token, validationParameters, out var rawValidatedToken);

                return (JwtSecurityToken)rawValidatedToken;
            }
            catch (Exception e)
            {
                // Logging, etc.

                return null;
            }
        }

    }
}
This implementation uses the ConfigurationManager to obtain the rotating signing keys from your Okta authorization server. With those keys, it can use the JwtSecurityTokenHandler provided by .NET to validate the token. If the token is invalid, the method will throw an exception and return null to the calling code.
The last piece you’ll need for the validation is the OktaJwtVerificationOptions you passed into this class using the IOptions pattern. Add a file for OktaJwtVerificationOptions.cs in the Okta folder and replace the code in there with the code below.
namespace Okta_ClientFlowDotNetSix.Okta
{
    public class OktaJwtVerificationOptions
    {
        public string Issuer { get; set; }
    }
}
Later, you will bind this class to your configuration to pass the Issuer from your appsettings.Development.json file to your OktaJwtValidation class.
Next, replace the code in Controllers.WeatherForecaseController.cs with the following.
using Microsoft.AspNetCore.Mvc;

namespace Okta_ClientFlowDotNetSix.Controllers
{
    [ApiController]
    [Route("[controller]")]
    public class WeatherForecastController : ControllerBase
    {
        private static readonly string[] Summaries = new[]
        {
        "Freezing", "Bracing", "Chilly", "Cool", "Mild", "Warm", "Balmy", "Hot", "Sweltering", "Scorching"
        };

        private readonly ILogger<WeatherForecastController> _logger;
        private readonly Okta.IJwtValidator _validationService;

        public WeatherForecastController(ILogger<WeatherForecastController> logger, Okta.IJwtValidator validationService)
        {
            _logger = logger;
            _validationService = validationService;
        }

        [HttpGet(Name = "GetWeatherForecast")]
        public async Task<IActionResult> Get()
        {
            var authToken = this.HttpContext.Request.Headers["Authorization"].ToString();

            if (String.IsNullOrEmpty(authToken))
            {
                return Unauthorized();
            }

            var validatedToken = await _validationService.ValidateToken(authToken.Split(" ")[1]);

            if(validatedToken == null)
            {
                return Unauthorized();
            }

            return new JsonResult(Enumerable.Range(1, 5).Select(index => new WeatherForecast
            {
                Date = DateTime.Now.AddDays(index),
                TemperatureC = Random.Shared.Next(-20, 55),
                Summary = Summaries[Random.Shared.Next(Summaries.Length)]
            })
            .ToArray());
        }
    }
}
As stated above, you are borrowing the WeatherForecast code that Microsoft provides as a demo. However, you are modifying the Get call to read the token from the authorization header and pass it to the _validationService you just wrote. If the token isn’t present, the controller will return an Unauthorized result. If the token is there, the controller will pass it to the _validationService. If that result is null, which is a product of the token being invalid, then you will return the Unauthorized result. Otherwise, you will return the weather data.
This implementation is a bit crude and not exactly fit for production. But using the OktaJwtValidation code you could wrap this in some middleware or create an attribute that uses the ValidateToken method if you wish to refine it.
Finally, replace the code in Program.cs with the following.
var builder = WebApplication.CreateBuilder(args);

// Add services to the container.

builder.Services.AddControllers();
// Learn more about configuring Swagger/OpenAPI at https://aka.ms/aspnetcore/swashbuckle
builder.Services.AddEndpointsApiExplorer();
builder.Services.AddSwaggerGen();

builder.Services.Configure<Okta_ClientFlowDotNetSix.Okta.OktaJwtVerificationOptions>(
    builder.Configuration.GetSection("Okta"));

builder.Services.AddTransient<Okta_ClientFlowDotNetSix.Okta.IJwtValidator, Okta_ClientFlowDotNetSix.Okta.OktaJwtValidation>();

var app = builder.Build();

// Configure the HTTP request pipeline.
if (app.Environment.IsDevelopment())
{
    app.UseSwagger();
    app.UseSwaggerUI();
}

app.UseHttpsRedirection();

app.UseAuthorization();

app.MapControllers();

app.Run();
In addition to the boilerplate code from Visual Studio, this class also configures your OktaJwtVerificationOptions and the dependency injection for the IJwtValidator.
Test your .NET 6 API
Now you are ready to see the flow come together. First, start your Web API in Visual Studio.
Next, open your API test tool of choice (such as Postman, or using the built in Swagger test page) and set up your request to the Okta authorization server.
- {yourOktaDomain}/oauth2/default/v1/token POST
- headers - Accept:
application/jsonAuthorization:Basic {yourBase64EncodedCredentials}Content-Type:application/x-www-form-urlencoded - body - grant_type:
client_credentialsscope:api
{yourBase64EncodedCredentials} is a base64 encoded string of the format {yourClientId}:{yourClientSecret}. You can also write a small C# application to this or follow along in our documentation on how to apply Base64 encoding.
You’ll remember that api was the custom scope you added to your authorization server above.
Send your request and you should receive a response that includes the access_token.
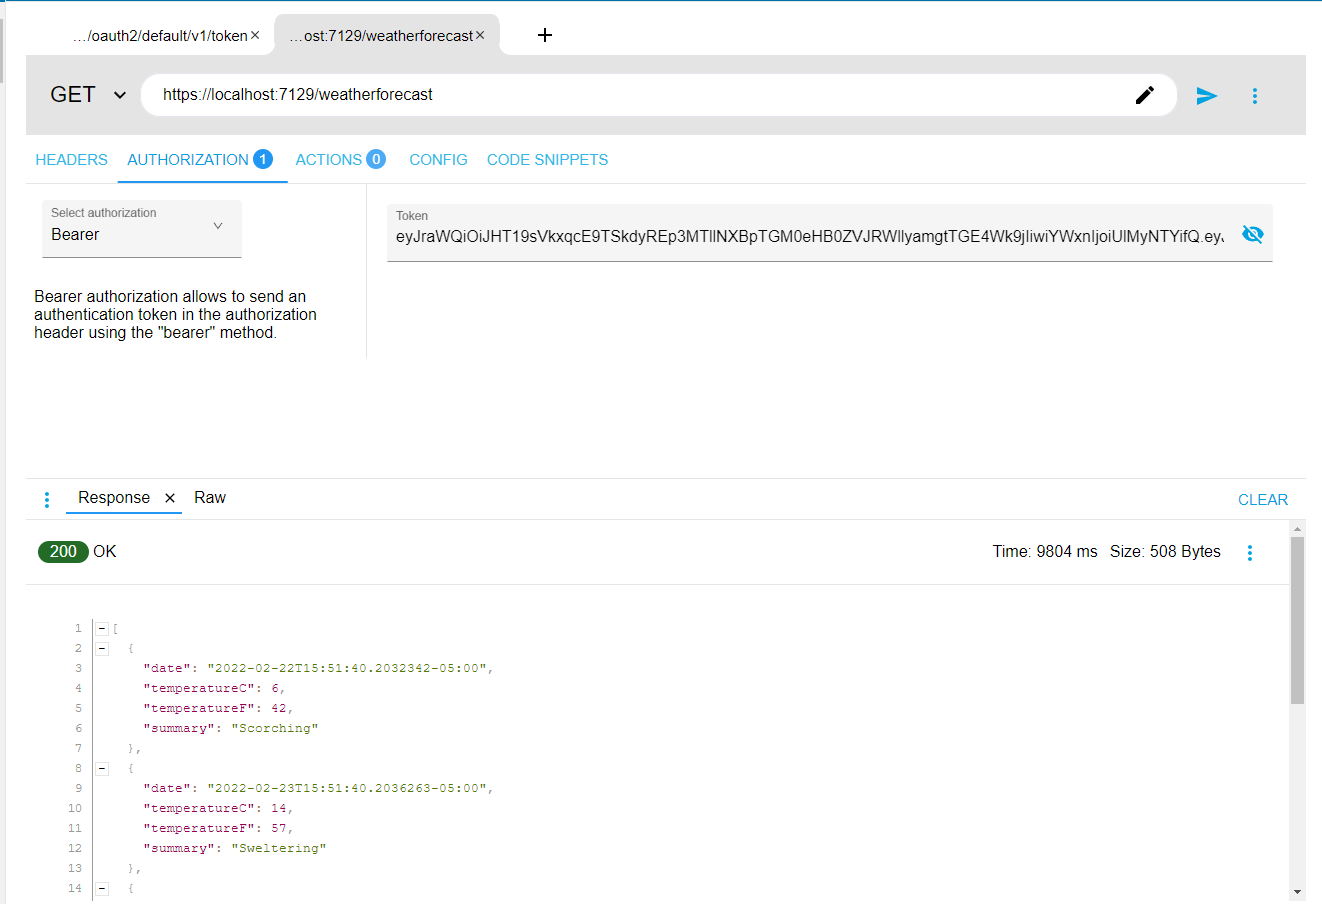
Create a new request in your API test tool and use the following setup.
- {yourWebAPIDomain}/weatherforecast GET
- headers - Authorization:
Bearer {yourAccessToken}
Send your request and you should be greeted with a weather forecast for the upcoming few days.
You can test the authorization functionality fully by replacing {yourAccessToken} with any random string or an empty string. You should see the web API return a 401 error.
Learn more about .NET and the client credentials flow
In this tutorial, you learned how to build an API with .NET 6 and secure that application using the client credentials flow in Okta. You learned how to implement your custom JWT validation class. Finally, you set up an authorization server on Okta to produce an access_token using the client credentials flow and how to pass that token to your web API.
Here are some related posts that you might find useful:
- Comparison of Dependency Injection in .NET
- Build a Basic CRUD App with ASP.NET Core 3.0 and MongoDB
- Build a CRUD App with ASP.NET Core and TypeScript
Make sure you follow us on Twitter, connect with us on LinkedIn and subscribe to our YouTube channel. If you have any questions, or you want to share what tutorial you’d like to see next, please comment below!
Okta Developer Blog Comment Policy
We welcome relevant and respectful comments. Off-topic comments may be removed.