Comparison of Dependency Injection in .NET

Why you should care about dependency injection
Dependency injection is a tried and proven design pattern for producing code that is testable, readable, and reusable. This is achieved by creating (or increasing) a separation of concerns, where each class has a dedicated area of responsibility.
Dependency injection is just one design pattern used to achieve inversion of control in which the calling code, or client, has no knowledge of the inner workings of the dependency, also called the service. The calling code only needs to know the interface of the dependency so it can call the dependency correctly. In dependency injection, the service is injected into the client class or function where it is used.
This makes it easier to test code by mocking—or stubbing—the service code for predictable results that the client can operate on. For example, if your service calls a database and returns an entity, you can mock this code to always return the entity and eliminate concerns such as the entity not being found, the connection to the database being unavailable, or other issues that may arise in the service. You can test the client code as though the service will always perform in a specific way, thus making the client code easier to write.
During the .NET Framework days, there were two major libraries used for supporting dependency injection; Ninject and Unity. Both libraries gave years of admirable service to developers and applications. Ninject was generally more popular because it was a little more feature-rich, with the ability to detect circular dependencies; Unity, however, was more performant. There were other libraries as well such as Castle.Windsor and Autofac. Each of these had its advantages and disadvantages.
While many of these libraries did extend support into .NET Core, these days the de facto way of achieving inversion of control is Microsoft’s implementation of dependency injection in .NET Core and beyond.
In this article, you will learn to use the default implementation of dependency injection that comes with .NET 5. You will see how to register services with different service lifetimes and understand the differences between those service lifetimes. You will also learn how to inject services into controllers, which is the most common usage of services in ASP.Net Core, and how to inject services into middleware. And I will show you how to write services so that they can be injected.
The example application will consist of a single page with three pieces of information; your application’s name with randomized upper and lower case letters, the number of requests made to the server, and a list of users from your Okta account. Each of these three pieces of information will be obtained from its respective service. Each service will have a different service lifetime.
Prerequisites
- Basic knowledge of .NET
- .NET 5
- Your favorite IDE (I’ll be using Visual Studio 2022)
- An Okta account
If you wish to download the code immediately you can do that on my GitHub repository.
Set up Okta for the SDK
Open your Okta admin console and navigate to the Tokens tab on the API page. Click on Create Token and give it a meaningful name. You will be shown the API key. Make note of this as you will need it in your application.
Create your ASP.NET Core application
If you are using Visual Studio 2022 you can follow the instructions below.
First, open Visual Studio and then click Create Project. In the Create a new project pane select ASP.Net Core Web App (Model-View-Controller) as your template.
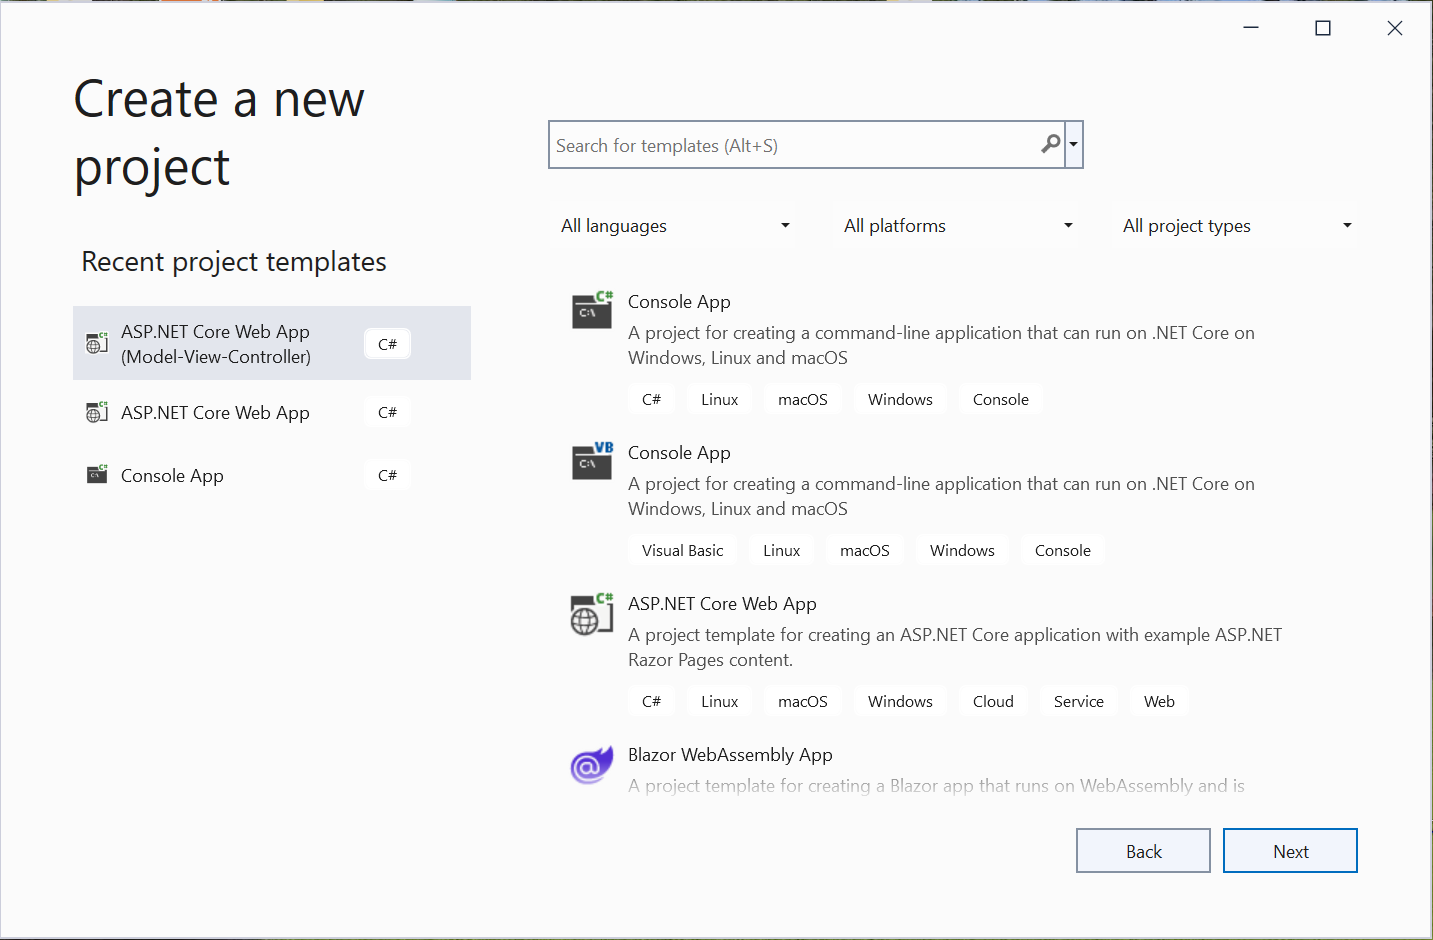
Click Next and under Configure your new project and name it OktaDependencyInjection and press Next.

Under additional info make sure you have .NET 5.0 selected as your framework. You can leave the other options as the default.

Click Create and give Visual Studio a moment to scaffold your project.
Install dependencies
For this project, you will only need one package from NuGet—the Okta SDK. This package will help facilitate communication between your application and your Okta admin server using the API token you created earlier.
Install-Package Okta.Sdk -Version 5.3.2
Set up your application settings
The first thing to do is select your settings. The only configuration needed is for Okta; in more advanced applications you may need more settings. First, you are going to modify the appsettings files that were created when Visual Studio scaffolded your application. Next, you provide a class to mimic the structure of that configuration. Finally, you will bind the configuration section to the class you created.
Add configuration to your appsettings
Next, you will want to set up your appsettings configuration files. Visual Studio should have added 2 files, appsettings.json and appsettings.Development.json. In my GitHub repository, I check in appsettings.json with the structure from appsettings.Development.json and no values. You can copy this convention if you want.
{
  "Logging": {
    "LogLevel": {
      "Default": "Information",
      "Microsoft": "Warning",
      "Microsoft.Hosting.Lifetime": "Information"
    }
  },
  "Okta": {
    "Domain": "",
    "Token": ""
  }
}
The code in appsettings.Development.json is not optional, however. This code contains the values required to run your application.
{
  "Logging": {
    "LogLevel": {
      "Default": "Information",
      "Microsoft": "Warning",
      "Microsoft.Hosting.Lifetime": "Information"
    }
  },
  "Okta": {
    "Domain": "",
    "Token": ""
  }
}
Add a class for your Okta configuration
Add a folder called Settings to the root of your project. In that folder add a class called OktaConfiguration with the following code.
namespace OktaDependencyInjection.Settings
{
    public class OktaConfiguration
    {
        public string Domain { get; set; }
        public string Token { get; set; }
    }
}
As mentioned before, this class mimics the structure of your Okta configuration section in your appsettings files. It’s possible to customize the configuration for more advanced binding but that isn’t necessary here.
The last step is to bind the configuration section to your class. You will do that when you start to work in your Startup.cs file.
Create your view and model
Next, you want to create the view that your users will see. In this application, you are only displaying one page to the user so this work is pretty light.
Add your view model
In the Models folder create a new file called HomeModel.cs. Add the following code to it.
using Okta.Sdk;
using System.Collections.Generic;

namespace OktaDependencyInjection.Models
{
    public class HomeModel
    {
        public string ApplicationName { get; set; }

        public List<User> Users { get; set; }

        public int NumberOfHits { get; set; }

        public HomeModel() { }

        public HomeModel(string applicationName, List<User> users, int numberOfHits)
        {
            ApplicationName = applicationName;
            Users = users;
            NumberOfHits = numberOfHits;
        }
    }
}
This model will contain the application name and a list of users associated with your Okta account. It will also have the number of times that a request has been made against your website since the last time the application was started.
Edit the home view
Open the file Views/Home/Index.cshtml and replace the code with the following.
@{
    ViewData["Title"] = "Home Page";
}

@model OktaDependencyInjection.Models.HomeModel


<h3>@Model.ApplicationName</h3>

<h4>A Small Demonstration of <b>Dependency Injection</b> in <a href="https://docs.microsoft.com/en-us/dotnet/core/whats-new/dotnet-5" target="_blank" rel="noreferrer">.NET 5</a></h4>

<p>Number of Hits Since Last Startup: @Model.NumberOfHits</p>

<p>
    Written by <a href="https://profile.fishbowlllc.com" target="_blank" rel="noreferrer">Nik Fisher</a> <br />
    Secured with <a href="https://www.okta.com/" target="_blank" rel="noreferrer">Okta</a>
</p>

<h3>My Current List of Users</h3>

<table class="table table-bordered">
    <thead>
        <tr>
            <th>Username</th>
            <th>Status</th>
        </tr>
    </thead>
    @foreach (var user in Model.Users)
    {
        <tr>
            <td>@user.Profile.Email</td>
            <td>@user.Status</td>
        </tr>
    }
</table>
This view is going to display your application name (with randomized upper and lower case numbers) and a list of your current users in Okta using the HomeModel you just created.
Update your layout
Finally, you will want to update your Views/Shared/_Layout.cshtml view. This step isn’t strictly necessary but if you want your page to match mine you will need to update it.
<!DOCTYPE html>
<html lang="en">
<head>
<meta charset="utf-8" />
<meta name="viewport" content="width=device-width, initial-scale=1.0" />
<title>@ViewData["Title"] - Okta With Dependency Injection</title>
<link rel="stylesheet" href="~/lib/bootstrap/dist/css/bootstrap.min.css" />
<link rel="stylesheet" href="~/css/site.css" />
</head>
<body>
<header>
<nav class="navbar navbar-expand-sm navbar-toggleable-sm navbar-light bg-white border-bottom box-shadow mb-3">
<div class="container">
<a class="navbar-brand" asp-area="" asp-controller="Home" asp-action="Index">OktaDependencyInjection</a>
<button class="navbar-toggler" type="button" data-toggle="collapse" data-target=".navbar-collapse" aria-controls="navbarSupportedContent"
aria-expanded="false" aria-label="Toggle navigation">
<span class="navbar-toggler-icon"></span>
</button>
<div class="navbar-collapse collapse d-sm-inline-flex justify-content-between">
<ul class="navbar-nav flex-grow-1">
<li class="nav-item">
<a class="nav-link text-dark" asp-area="" asp-controller="Home" asp-action="Index">Home</a>
</li>
<li class="nav-item">
<a class="nav-link text-dark" asp-area="" asp-controller="Home" asp-action="Privacy">Privacy</a>
</li>
</ul>
</div>
</div>
</nav>
</header>
<div class="container">
<main role="main" class="pb-3">
@RenderBody()
</main>
</div>
<footer class="border-top footer text-muted">
<div class="container">
© 2022 - <a href="https://profile.fishbowlllc.com" target="_blank" rel="noreferrer">Nik Fisher</a>
</div>
</footer>
<script src="~/lib/jquery/dist/jquery.min.js"></script>
<script src="~/lib/bootstrap/dist/js/bootstrap.bundle.min.js"></script>
<script src="~/js/site.js" asp-append-version="true"></script>
@await RenderSectionAsync("Scripts", required: false)
</body>
</html>
Setting up the dependency injection
This is the last piece of code you can write before you start to focus on the dependency injection. Now, to populate your model and keep track of the number of hits, you will need to set up some middleware and services.
Write your services
First, you want to write the services. As mentioned above, the client needs access to an interface so it knows what to call on the service, even though it doesn’t know about the implementation. Since C# gives us access to interfaces, you can separate your services into interfaces and concrete implementations. Later you will bind the implementation to the interface to make it available for clients.
Start by creating a folder called Services in your project and add a folder called Interfaces to the Services folder.
Add an interface called INumberOfHitsService with the following code.
namespace OktaDependencyInjection.Services.Interfaces
{
    public interface INumberOfHitsService
    {
        public int NumberOfHits { get; set; }
    }
}
The interface will just have an integer called NumberOfHits that exposes the getter and setter. This will enable the middleware to set the value and enable the controller to access it.
In the Services folder add a file called NumberOfHitsService with the implementation in it.
namespace OktaDependencyInjection.Services
{
    public class NumberOfHitsService : Interfaces.INumberOfHitsService
    {
        public int NumberOfHits { get; set; }
    }
}
Next, add an interface in the same folder called IOktaService. Add in the code below.
using Okta.Sdk;
using System.Collections.Generic;
using System.Threading.Tasks;

namespace OktaDependencyInjection.Services.Interfaces
{
    public interface IOktaService
    {
        Task<List<User>> GetUsersAsync();
    }
}
This interface defines a method for GetUsersAsync whose implementation will reach out to your Okta server using the Okta SDK.
Add the implementation by adding a file called OktaService to the Services folder with the following code.
using OktaDependencyInjection.Settings;
using Microsoft.Extensions.Options;
using Okta.Sdk;
using Okta.Sdk.Configuration;
using System.Collections.Generic;
using System.Linq;
using System.Threading.Tasks;

namespace OktaDependencyInjection.Services
{
    public class OktaService : Interfaces.IOktaService
    {
        private OktaClient _client;

        public OktaService(IOptions<OktaConfiguration> options)
        {
            _client = new OktaClient(new OktaClientConfiguration()
            {
                OktaDomain = options.Value.Domain,
                Token = options.Value.Token
            });
        }

        public async Task<List<User>> GetUsersAsync()
        {
            var users = await _client.Users.ToListAsync();
            return users.Select(r => r as User).ToList();
        }
    }
}
Here you are using the options pattern which, like dependency injection, helps with the separation of concerns. The options object contains the configuration items from your appsettings file. It uses these values to create an OktaClient, which can then be called to get the users from your Okta account.
The last service to add is the RandomUpperAndLowerService. Start by adding the IRandomUpperAndLowerService.cs file to the Services/Interfaces folder with the code below.
namespace OktaDependencyInjection.Services.Interfaces
{
    public interface IRandomUpperAndLowerService
    {
        string RandomizeString(string input);
    }
}
Now add its implementation to the Services folder. Call this file RandomUpperAndLowerService.cs and add the code below to it.
using System;
using System.Collections.Generic;

namespace OktaDependencyInjection.Services
{
    public class RandomUpperAndLowerService : Interfaces.IRandomUpperAndLowerService
    {
        public string RandomizeString(string input)
        {
            List<char> chars = new();
            var rand = new Random();

            foreach (var c in input.ToCharArray())
            {
                var next = rand.Next(0, 2);
                chars.Add(next == 0 ? char.ToUpper(c) : char.ToLower(c));
            }

            return new string(chars.ToArray());
        }
    }
}
Although it’s a silly function, this class will take a string and randomize if the text should be uppercase or lowercase. It will pRodUCe STriNgS lIkE THiS.
Register your services
It’s time to register your services so that you can use them in your application. Start by opening Startup.cs and replacing the code with the following.
using Microsoft.AspNetCore.Builder;
using Microsoft.AspNetCore.Hosting;
using Microsoft.AspNetCore.HttpsPolicy;
using Microsoft.Extensions.Configuration;
using Microsoft.Extensions.DependencyInjection;
using Microsoft.Extensions.Hosting;

namespace OktaDependencyInjection
{
    public class Startup
    {
        public Startup(IConfiguration configuration)
        {
            Configuration = configuration;
        }

        public IConfiguration Configuration { get; }

        // This method gets called by the runtime. Use this method to add services to the container.
        public void ConfigureServices(IServiceCollection services)
        {
            services.AddControllersWithViews();

            services.Configure<Settings.OktaConfiguration>(Configuration.GetSection("Okta"));

            services.AddTransient<Services.Interfaces.IRandomUpperAndLowerService, Services.RandomUpperAndLowerService>();
            services.AddSingleton<Services.Interfaces.INumberOfHitsService, Services.NumberOfHitsService>();
            services.AddScoped<Services.Interfaces.IOktaService, Services.OktaService>();
        }

        // This method gets called by the runtime. Use this method to configure the HTTP request pipeline.
        public void Configure(IApplicationBuilder app, IWebHostEnvironment env)
        {
            if (env.IsDevelopment())
            {
                app.UseDeveloperExceptionPage();
            }
            else
            {
                app.UseExceptionHandler("/Home/Error");
                // The default HSTS value is 30 days. You may want to change this for production scenarios, see https://aka.ms/aspnetcore-hsts.
                app.UseHsts();
            }
            app.UseHttpsRedirection();
            app.UseStaticFiles();

            app.UseRouting();

            app.UseMiddleware<Middleware.HitTracker>();

            app.UseAuthorization();

            app.UseEndpoints(endpoints =>
            {
                endpoints.MapControllerRoute(
                    name: "default",
                    pattern: "{controller=Home}/{action=Index}/{id?}");
            });
        }
    }
}
By default Startup.cs has 2 methods: a constructor (with a service injected into it!) and a property for Configuration.
The first question you may have is “Who injected IConfiguration into this class?” That work is handled by the boilerplate in Program.cs. Many developers never touch or look at this file. This is the application that calls CreateDefaultBuilder, which make IHostEnvironment, IConfiguration, and IWebHostEnvironment available to the Startup class. ConfigureWebHostDefaults will configure the IHostBuilder with the defaults for hosting a web application, including configuring the startup file to use.
The two methods in Startup.cs can cause some confusion.
Initially, ConfigureServices is called by the runtime, typically when the application first starts. This method will add services to the app container. The boilerplate code calls the extension method services.AddControllersWithViews();. Under the hood, there is nothing special about this code. You can follow it in the Asp.NET Core source code. You’ll see that, eventually, this adds several services related to rendering and displaying views, binding models and attributes to controllers, and controlling many other operations found in a web application. For example, you can follow the data annotations code to find a line of code that reads services.TryAddSingleton<IValidationAttributeAdapterProvider, ValidationAttributeAdapterProvider>();. This line looks remarkably similar to the code where you will add your services.
Next, you can configure your simple configuration. Set up the Okta section.
services.Configure<Settings.OktaConfiguration>(Configuration.GetSection("Okta"));
This is the magic that will make your OktaConfiguration available in the options pattern you learned about above.
Finally, you have to register your three services. Each of these services has been registered with a different service lifetime.
First, you register the RandomUpperAndLowerService using the AddTransient extension method.
services.AddTransient<Services.Interfaces.IRandomUpperAndLowerService, Services.RandomUpperAndLowerService>();
Transient services are created every time they are requested from the service container. These are recommended for lightweight, stateless services. At the end of each request, any transient services will be disposed of. In this example, the RandomUpperAndLowerService is stateless and lightweight, so transient is a lifetime for it.
Next, you registered the NumberOfHitsService as a singleton.
services.AddSingleton<Services.Interfaces.INumberOfHitsService, Services.NumberOfHitsService>();
Singletons are created the first time they are requested. They are disposed of when the application is shut down. This means that the same instance of NumberOfHitsService will be available on every request. This is why you can store the number of hits in this class and have it keep count as long as your application continues to run. If you add a service as a singleton you must ensure that it is thread-safe. Also, singletons are more susceptible to memory leaks since they are only disposed of when the application is closed.
The OktaServiceis the final service you’ll register for. It is added as a Scoped service.
services.AddScoped<Services.Interfaces.IOktaService, Services.OktaService>();
A scoped service will be created when it’s requested and will be disposed of after each request is completed. This is common when using services like external APIs or Entity Framework. The same instance of the OktaService will be used for each request to the server. For example, if you queried information about each user by creating a GetUser method in the OktaService and called it for every year, you would still only use one instance of the OktaService. Once the response is sent to the client, the service is disposed of and is not recreated until a new request for the service is received.
Configure is used to configure your HTTP request pipeline. Essentially, each request will be impacted by the Use* statement in this pipeline. This code is boilerplate except for the line app.UseMiddleware<Middleware.HitTracker>();. At this moment, it will appear as aa compiler error for you, but you will fix that shortly. This is an extension method that configures your application to use custom middleware called HitTracker. You can write that next.
Using your services in middleware
Add a new folder called Middleware to your project. In it, add a file called HitTracker.cs and add the following middleware code.
using System.Threading.Tasks;
using Microsoft.AspNetCore.Http;

using OktaDependencyInjection.Services.Interfaces;

namespace OktaDependencyInjection.Middleware
{
    public class HitTracker
    {
        private readonly RequestDelegate _next;
        private readonly INumberOfHitsService _numberOfHitsService;

        public HitTracker(RequestDelegate next, INumberOfHitsService numberOfHitsService)
        {
            _next = next;
            _numberOfHitsService = numberOfHitsService;
        }

        public async Task InvokeAsync(HttpContext context)
        {
            _numberOfHitsService.NumberOfHits += 1;
            await _next(context);
        }
    }
}
Middleware is code that executes in your request pipeline. For example, authorizing a user is middleware. Before any controller code is called, your application will attempt to authorize the user and if that fails, it will handle an unauthorized user as instructed. If the user is unauthorized, there is no need to tie up resources calling controller code.
In Asp.NET Core, a middleware class is required to contain a public constructor with a parameter of type RequestDelegate and a public Method called Invoke or InvokeASync. This must return a task and accept a first parameter type of HttpContext.
Inject services from your service container into this by injecting them into the controller, unless they are scoped dependencies. Middleware is constructed at app startup and has an application lifetime, which makes it a singleton. Scope validation dictates that you cannot inject a scoped dependency into a singleton, because it may unintentionally make the singleton not thread-safe. If you need to inject a scoped dependency like the OktaService you’ll need to inject it into the Invoke or InvokeAsync method, whichever you were using.
You are free to inject the NumberOfHitsService here because you can inject a singleton into a singleton. And because the NumberOfHitsService is a singleton, as long as your application doesn’t close, this code will keep track of the number of requests against the application since it began running. After updating the number of hits it will then call _next, which indicates to the app that it should run the next piece of middleware.
Using your services in controllers
The last step is to set up your HomeController. You will need to inject all of your services into this class to build the model for your home page.
Replace the code in Controllers/HomeController.cs with the following.
using Microsoft.AspNetCore.Mvc;
using Microsoft.Extensions.Logging;

using OktaDependencyInjection.Models;

using System.Diagnostics;
using System.Threading.Tasks;

using OktaDependencyInjection.Services.Interfaces;

namespace OktaDependencyInjection.Controllers
{
    public class HomeController : Controller
    {
        private readonly ILogger<HomeController> _logger;
        private readonly INumberOfHitsService _numberOfHitsService;
        private readonly IOktaService _oktaService;
        private readonly IRandomUpperAndLowerService _randomUpperAndLowerService;

        public HomeController(
            ILogger<HomeController> logger,
            INumberOfHitsService numberOfHitsService,
            IOktaService oktaService,
            IRandomUpperAndLowerService randomUpperAndLowerService)
        {
            _logger = logger;
            _numberOfHitsService = numberOfHitsService;
            _oktaService = oktaService;
            _randomUpperAndLowerService = randomUpperAndLowerService;
        }

        public async Task<IActionResult> IndexAsync()
        {
            var users = await _oktaService.GetUsersAsync();
            var hits = _numberOfHitsService.NumberOfHits;

            var appName = _randomUpperAndLowerService.RandomizeString("dependency injection with okta");

            HomeModel model = new HomeModel(appName, users, hits);

            return View(model);
        }

        public IActionResult Privacy()
        {
            return View();
        }

        [ResponseCache(Duration = 0, Location = ResponseCacheLocation.None, NoStore = true)]
        public IActionResult Error()
        {
            return View(new ErrorViewModel { RequestId = Activity.Current?.Id ?? HttpContext.TraceIdentifier });
        }
    }
}
The ILogger is boilerplate for all controller code. The other services are injected through the constructor like the middleware you set up. Controllers can accept singleton, transient, and scoped services. The first thing to do is grab a list of users from your OktaService. Next, get the NumberOfHits from the NumberOfHitsService. Finally, randomize a string for the title of your application. Return this in a model and let your view code handle the presentation.
Test your application
Start your application and you should see your homepage.
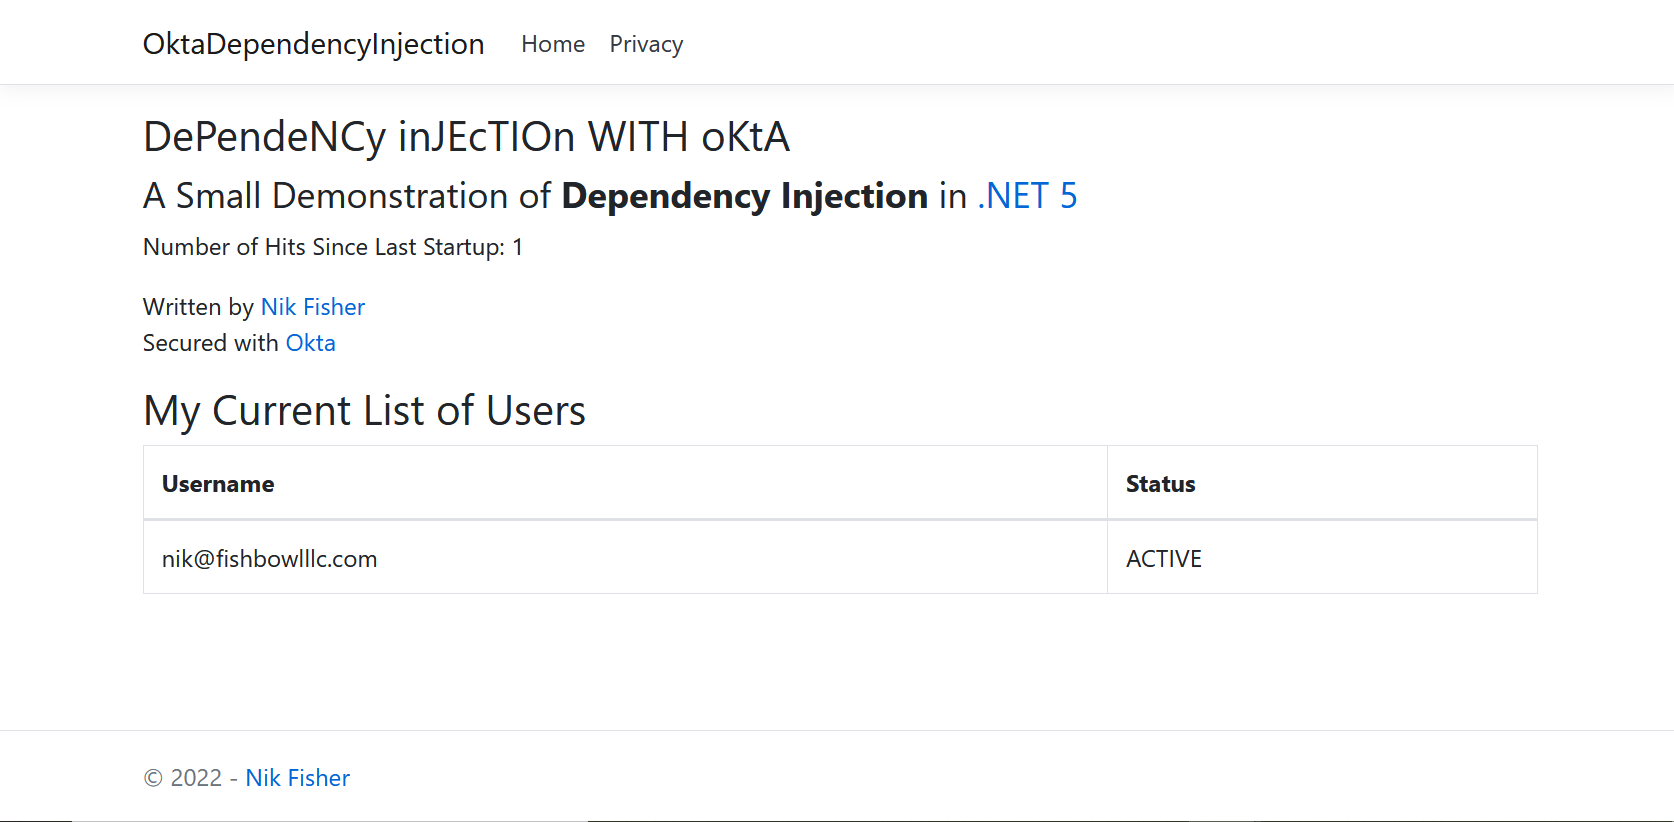
As you can see, the first time you visit the page you are presented with a wacky-looking title, a banner telling you that there has been one hit so far, and a list of users. In my case, I only have one user in my Okta account so it’s just me. Refresh this page five or six times.
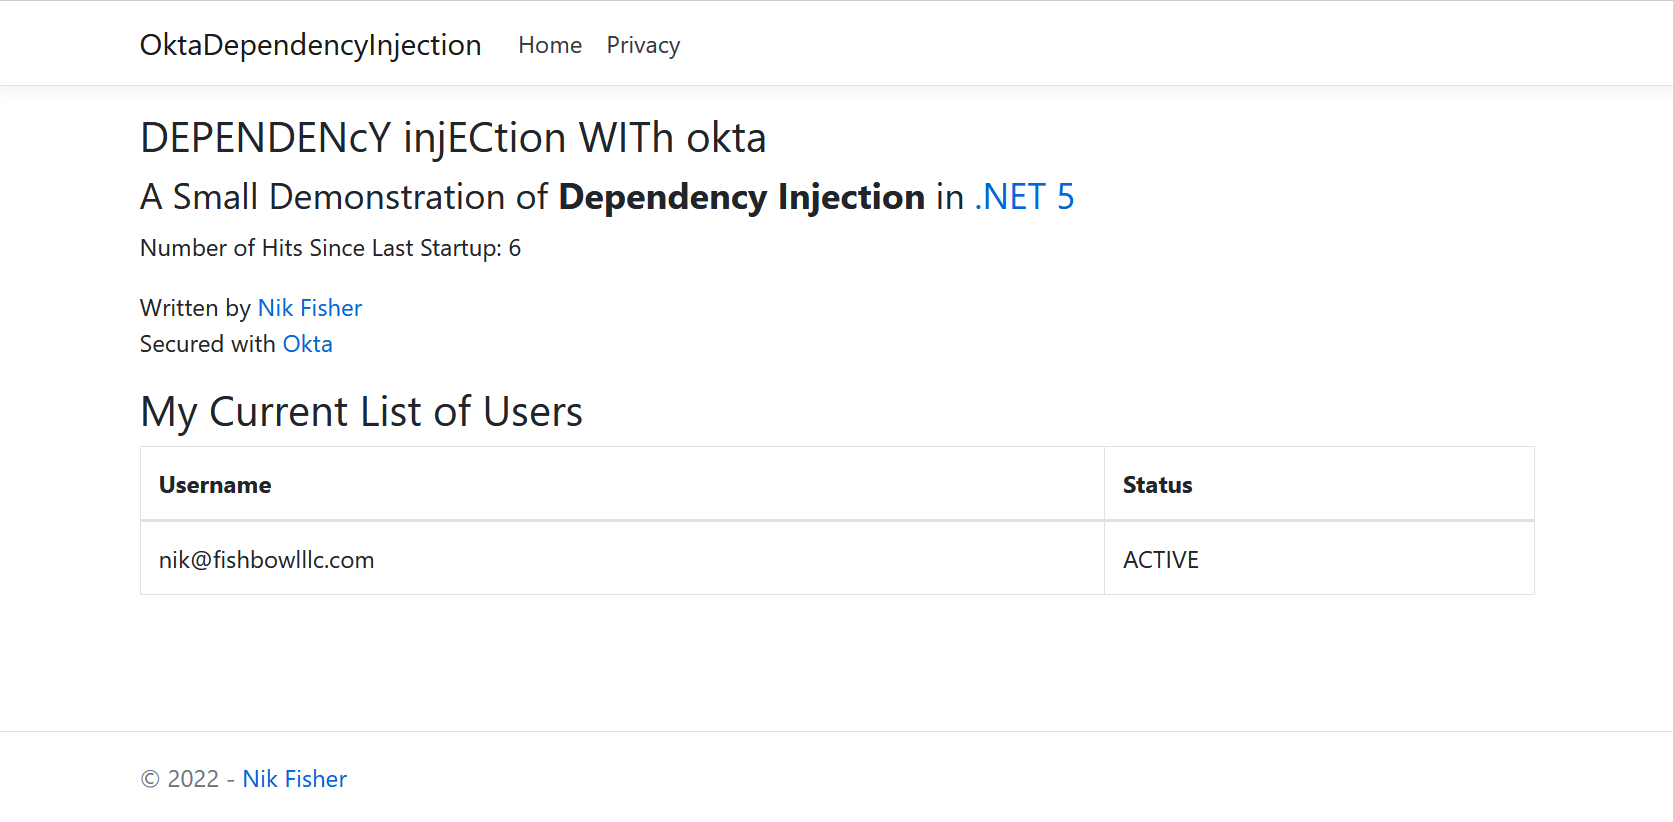
Now you can see that the number of hits counter is up to six and the uppercase and lowercase letters on the title of the application are randomized differently. Success! All your services are set up correctly and working as intended.
Learn more about ASP.NET Core and .NET 5
In this tutorial, you learned a bit about the structure of an ASP.NET Core application. You learned what dependency injection is and how to use it. You saw how to write services in C# and how to register them in your app’s startup code. You also learned about service lifetimes and when to use each one. Finally, you learned how to use your services in middleware and controllers.
If you liked this tutorial, there’s a good chance you’ll enjoy these too:
- Build Single Sign-on for Your ASP.NET MVC App
- ASP.NET Core 3.0 MVC Secure Authentication
- Migrate Your ASP.NET Framework to ASP.NET Core with Okta
Make sure to follow us on Twitter and subscribe to our YouTube channel. If you have any questions or want to share what tutorial you’d like to see next, please comment below.
Okta Developer Blog Comment Policy
We welcome relevant and respectful comments. Off-topic comments may be removed.