Authenticate from the Command Line with Java
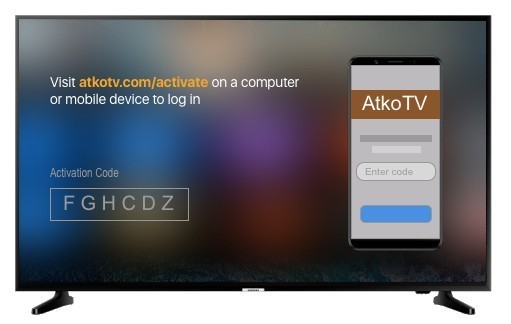
Anyone who has tried to type a password using a television remote can tell you what a pain it is. Not only will you be frustrated with the keyboard, but it’s not secure; everyone else in the room can see what you are typing. Fortunately, the OAuth 2.0 Device Authorization Grant gives you an easier way to sign in. The name is a mouthful, but if you have ever logged in to a TV by scanning a QR code or typing a short code, you’ve already used this flow.
The great thing about this authentication flow is that it isn’t just for televisions. It works with any "input restricted" internet-connected device, including alarm clocks, Arduinos, and even command-line tools.
In this post, I’ll walk through how the OAuth 2.0 Device Authorization Grant works and build a basic Java console application!
If you want to skip the text and jump directly into the example code, you can find it on our GitHub repo.
Prerequisites:
How does the OAuth 2.0 Device Authorization Grant work?
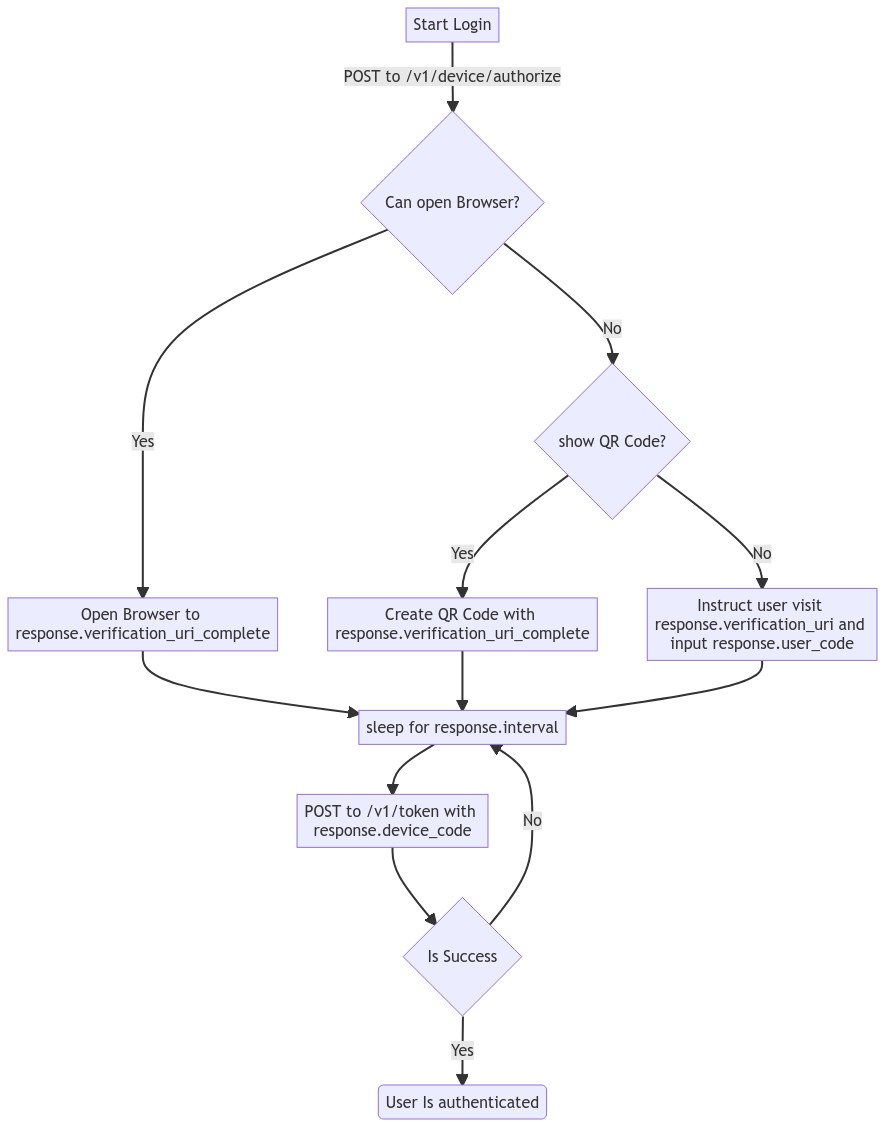
At a high level, the flow works like this:
-
A device or application initiates the flow
POST /v1/device/authorize -
The IdP responds with a "device code", "user code", and a URL.
-
The user is instructed to visit the URL, enter the "user code", and authenticate.
-
The application polls the IdP using the "device code" until the user has logged in.
-
The IdP responds with an access token.
| This example will work the same with any Identity Provider (IdP) that supports the flow, but you may need to tweak the URLs. |
OAuth 2.0 from the command line
You might not think of your terminal as an "input restricted device", but that doesn’t mean you should type a website’s passwords into your console. There are a few problems to be aware of related to this:
-
You should ONLY enter a password into the website it was created for.
-
Your terminal doesn’t support the same factors your browser does.
-
You may be ssh’d into another computer.
| The Authorization Device Grant requires a user. If you are trying to call APIs from an automated process or other server-to-server communication, check out the OAuth 2.0 Client Credential Flow. |
Set up Okta
First, you need to create an Okta application that supports the Device Grant.
-
In Applications→Applications, click Create App Integration. In the pop-up, choose OIDC - OpenID Connect, then Native Application. The Device Grant is only available for Native Applications.
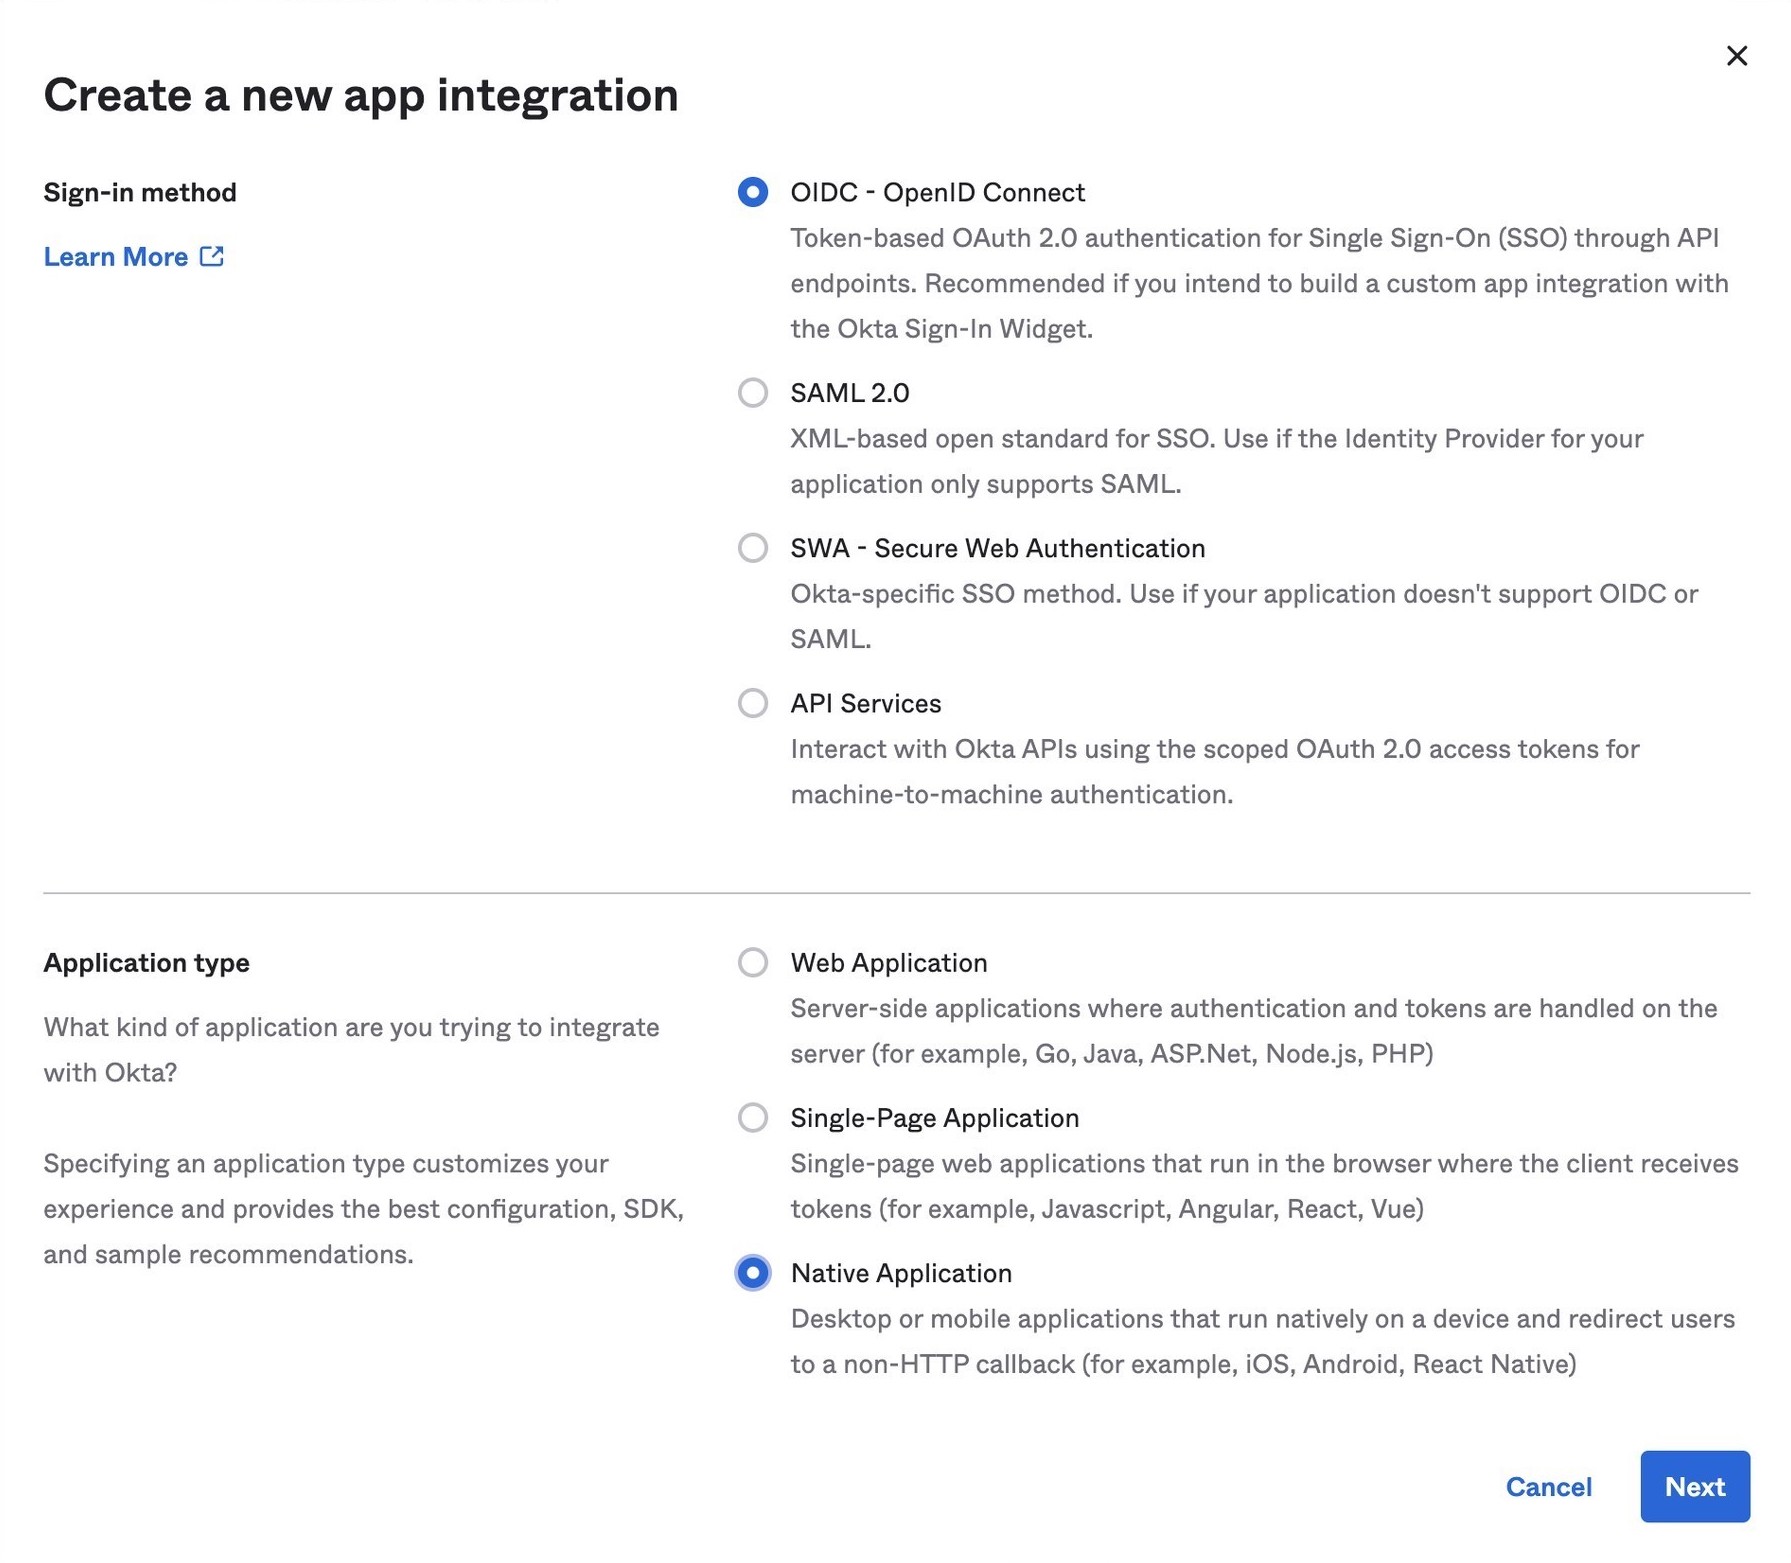
-
In the next step, check Device Authorization in the Grant type section.
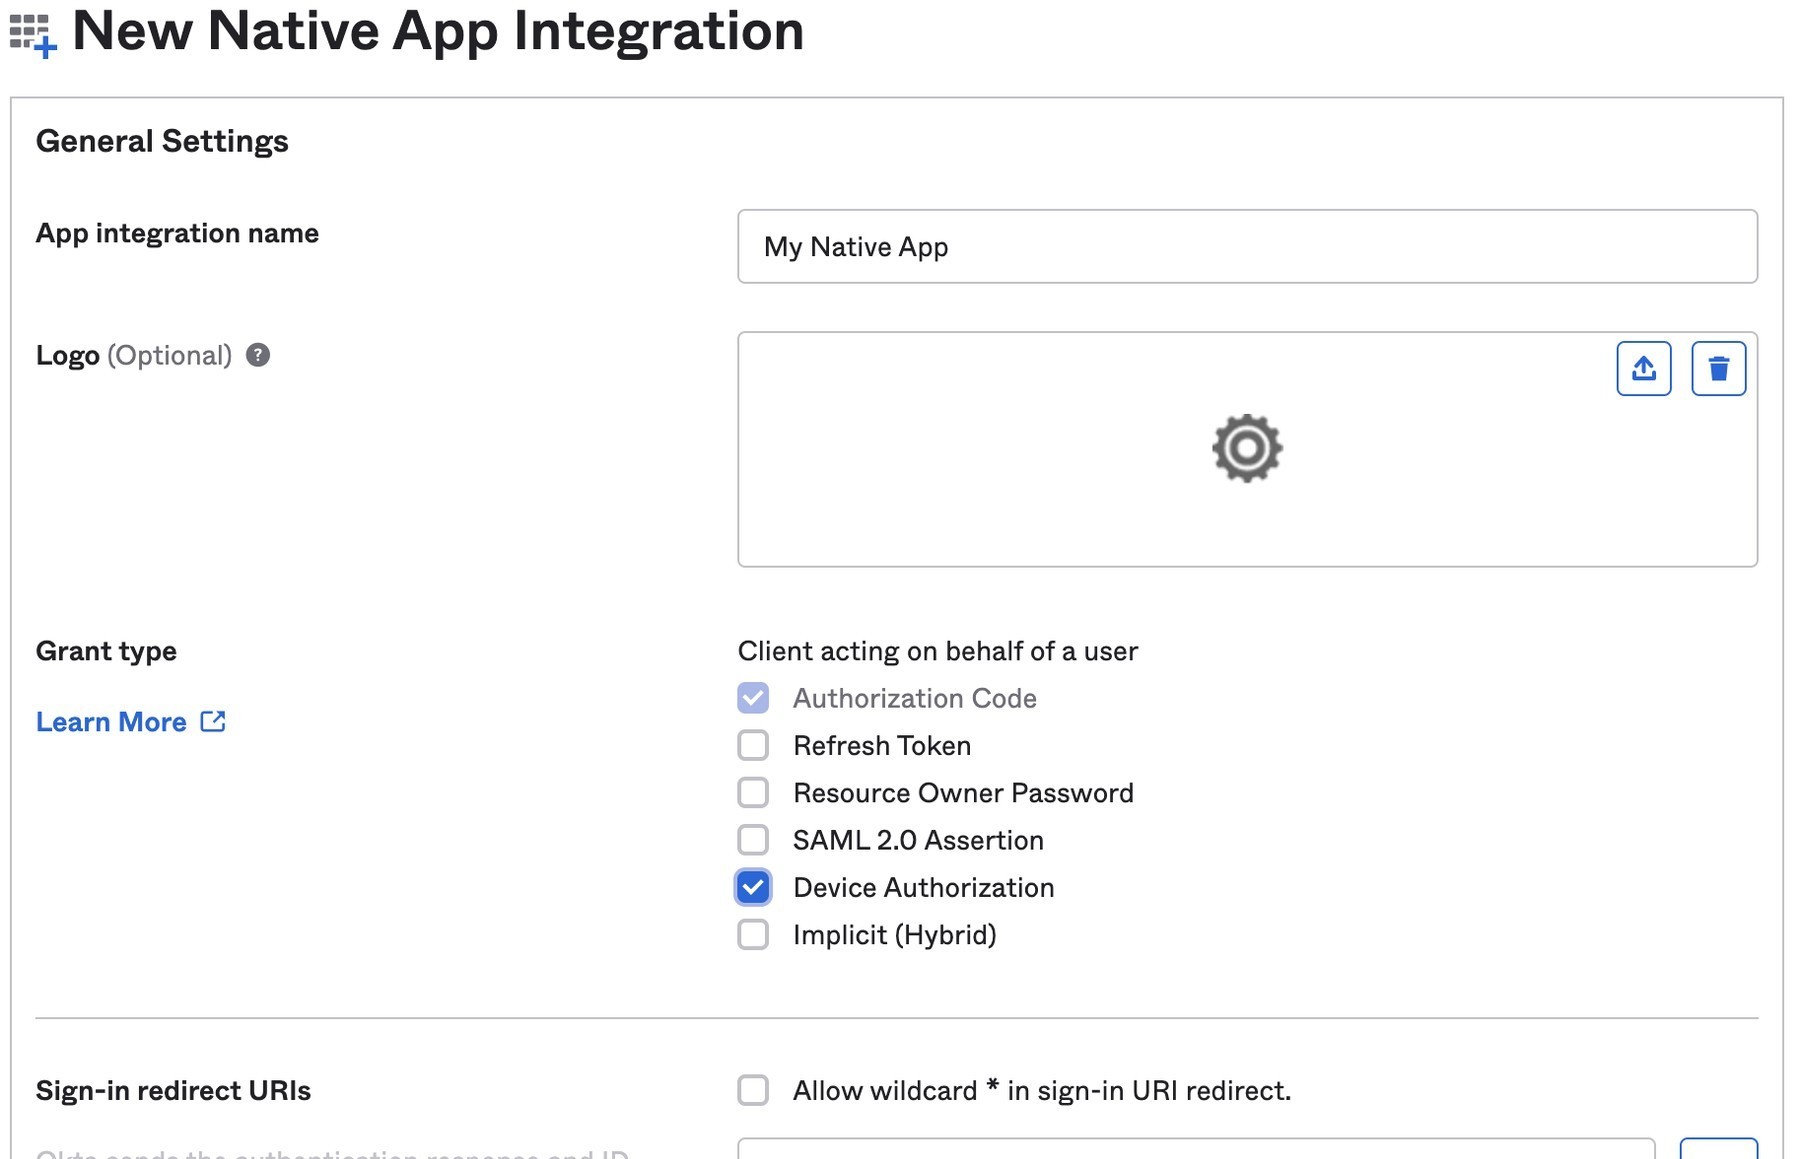
Make a note of the Client ID, you will need it below.
If you are using an Okta Authorization Server, you also need to enable the grant type in the authorization server’s policy interface:
-
Go to Security→API.
-
Select the authorization server you want to use (for example, "default").
-
Click the Access Policies tab, and edit the rule for your policy. Make sure to select the Device Authorization check box.
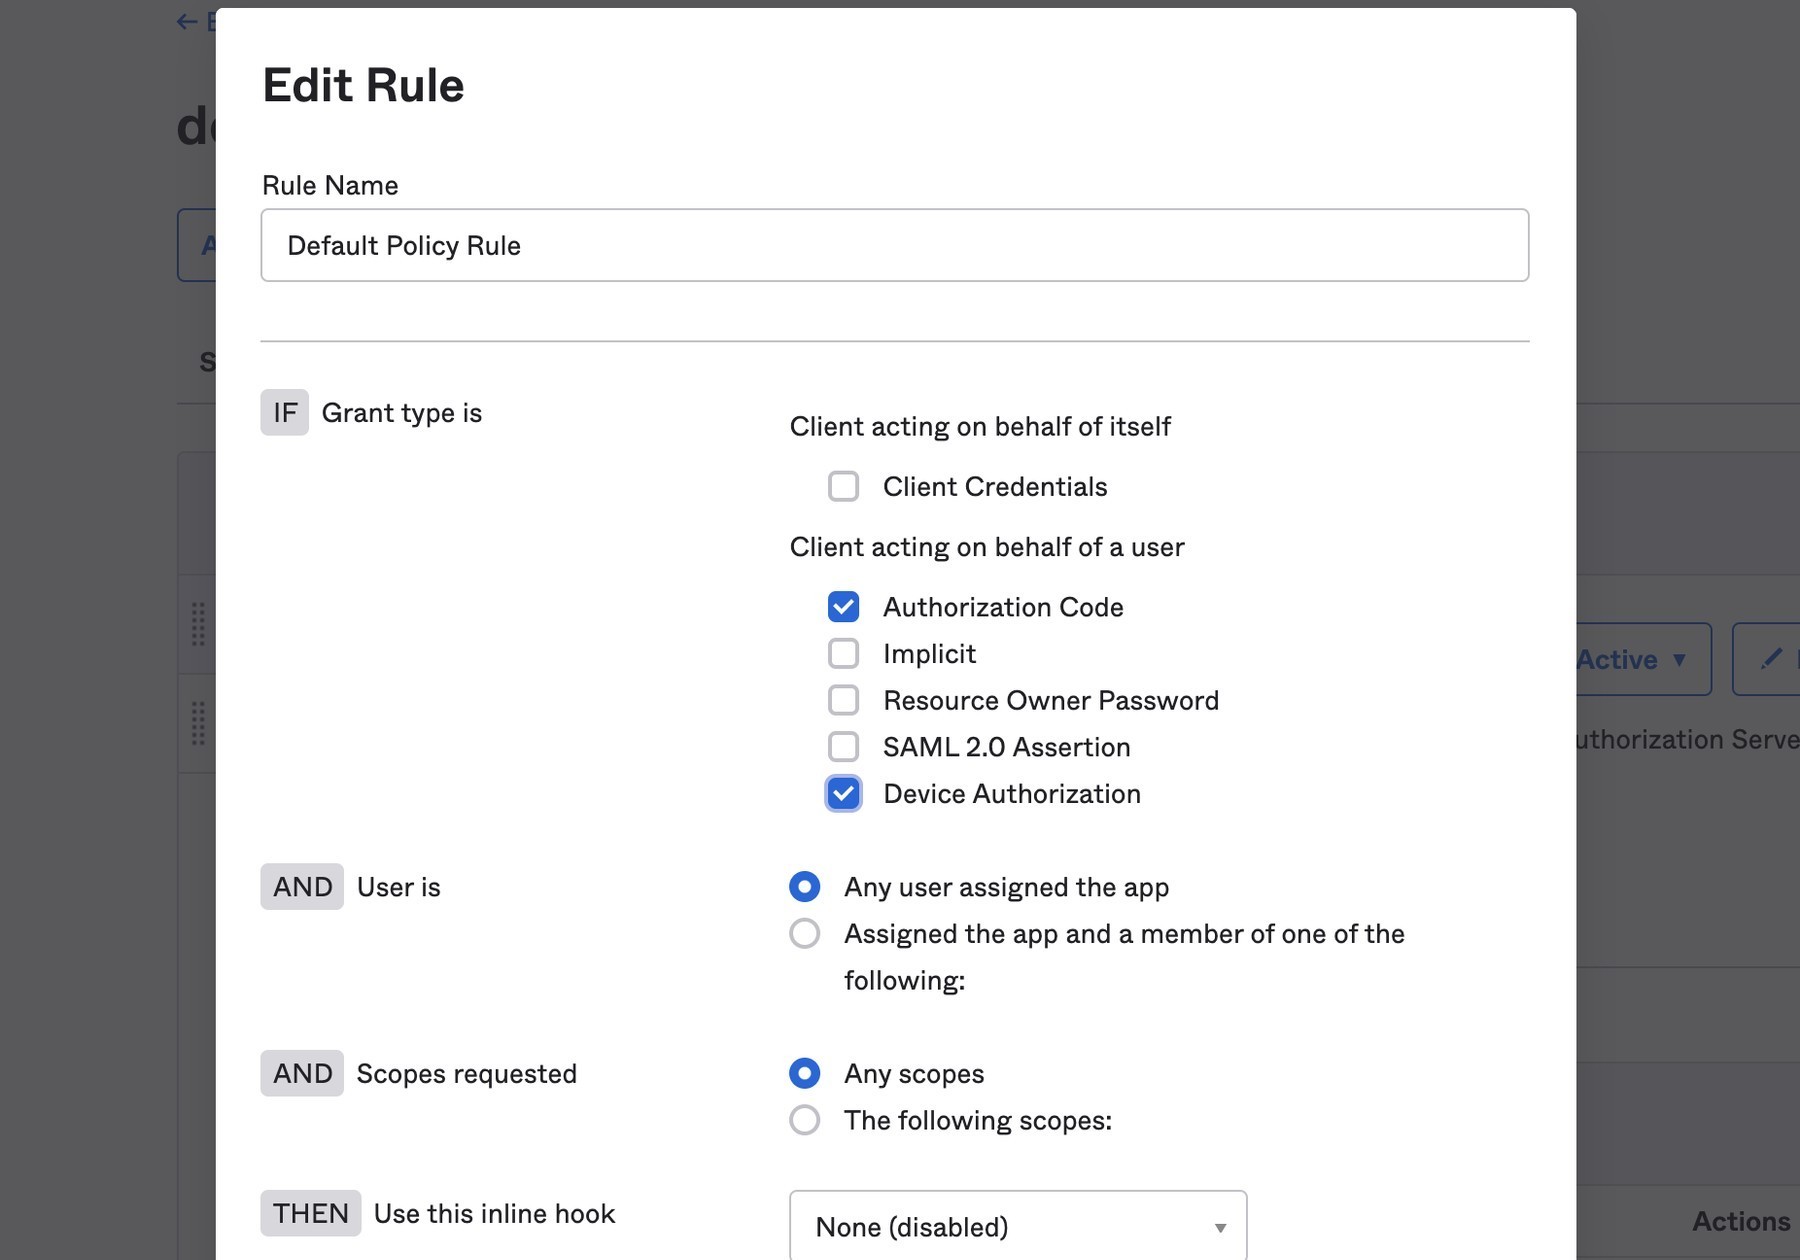
Make note of your Issuer URI. If you are using an Okta Custom Authorization Server, it will look something like this (updating the hostname to match your Okta Org):
https://dev-133337.okta.com/api/v1/authorizationServers/defaultOtherwise, it will be the same as your Okta URL:
https://dev-133337.okta.comCreate a Java application
On to the fun part, writing some code!
Create a new project in your favorite IDE. (I’m a fan of IntelliJ IDEA.) The code below uses the java.net.http.HttpClient, make sure our target Java is set to at least 11.
The HttpClient API is much easier to use than its predecessor URLConnection, but Java is still no way to parse JSON out of the box. Add a dependency on Jackson Databind to fix that.
To keep things all contained in a single java file, I’ll use JBang. If you haven’t used JBang before, here’s the TL;DR: JBang makes it easy to create Java… scripts. It’s a scripting tool that lets you run Java application with minimal setup. Your project dependencies get added to the top of the java file.
Create a new DeviceGrant.java and add jackson-databind as a dependency:
//DEPS com.fasterxml.jackson.core:jackson-databind:2.13.2 (1)

import com.fasterxml.jackson.databind.ObjectMapper; (2)

import java.awt.*; (3)
import java.io.IOException;
import java.io.UncheckedIOException;
import java.net.URI;
import java.net.URLEncoder;
import java.net.http.HttpClient;
import java.net.http.HttpRequest;
import java.net.http.HttpResponse;
import java.nio.charset.StandardCharsets;
import java.time.Duration;
import java.util.Map;

import static java.util.stream.Collectors.joining;

public class DeviceGrant {

    public static void main(String[] args) throws Exception {

    }
}| 1 | Make sure there is no space between the // and DEPS. |
| 2 | Add the following imports, they will be used below. |
| 3 | AWT? Yes, keep reading I’ll get to that 😉 |
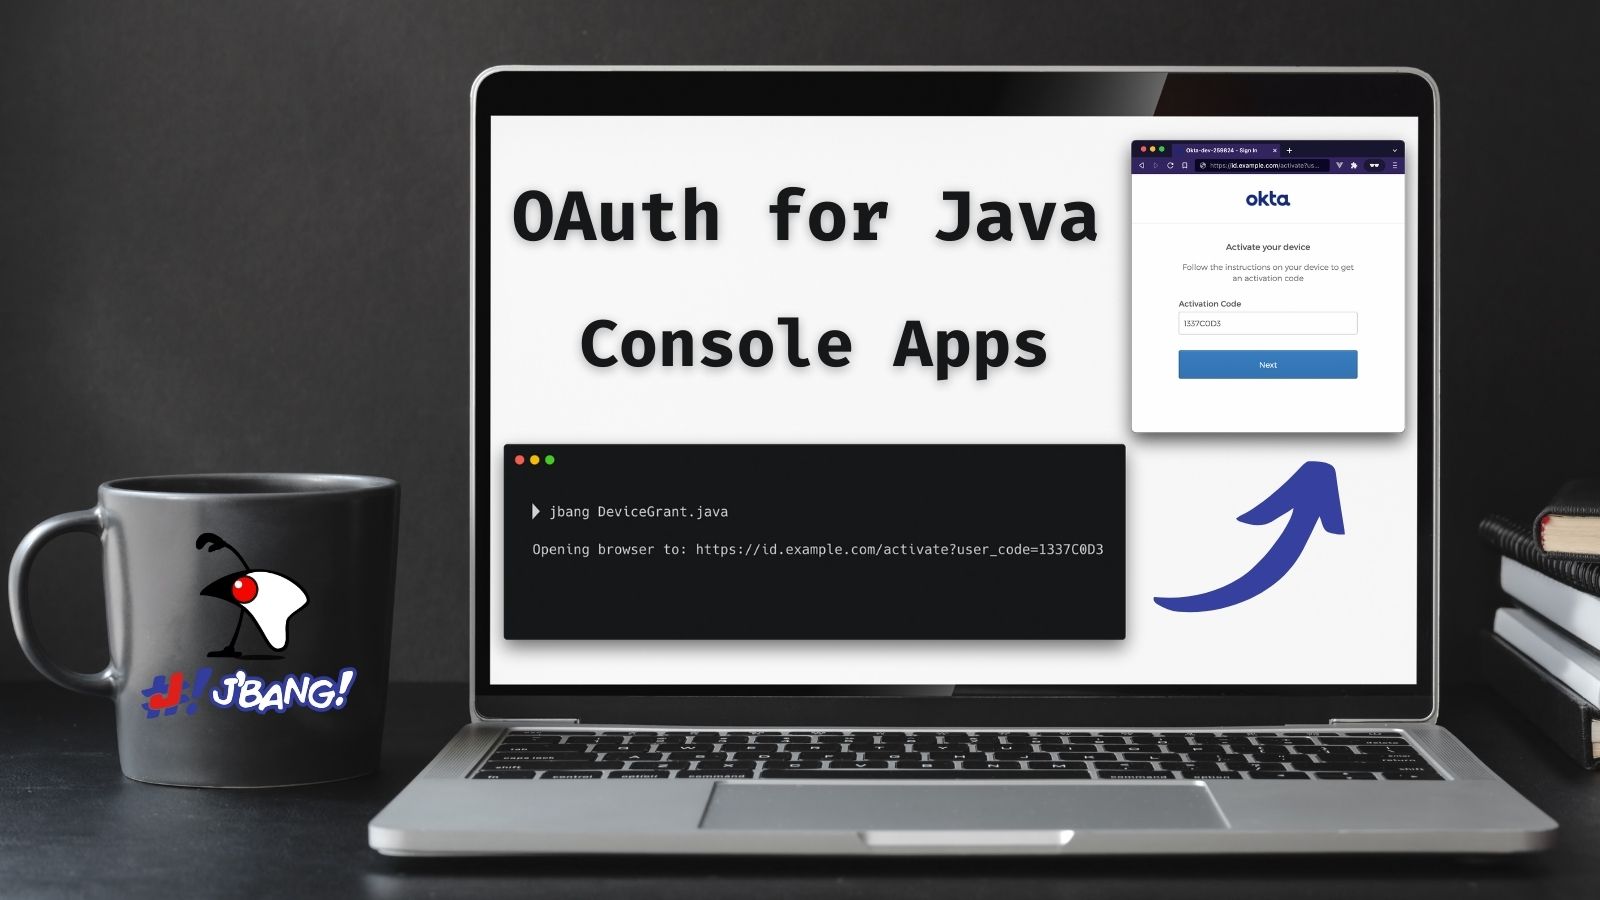
Execute the application from the command line using:
jbang DeviceGrant.javaThis application doesn’t do anything yet. We can fix the in the next few steps!
A little more boilerplate
The fluent HttpClient is handy, but along with not having JSON support, it also doesn’t have direct support for form-encoded requests. Fortunately, both issues are easy to fix by adding a couple of helper methods.
In DeviceGrant.java add the following two methods:
// Convert a map into a encoded form body
private static HttpRequest.BodyPublisher formBody(Map<String, String> params) {
    // Wrap an encoded String in a BodyPublisher
    return HttpRequest.BodyPublishers.ofString(
        // url encode <key>=<value>&
        params.entrySet().stream()
            .map(entry -> URLEncoder.encode(entry.getKey(), UTF_8)
                          + "="
                          + URLEncoder.encode(entry.getValue(), UTF_8))
            .collect(joining("&")));
}

// parse a response body using Jackson
public static <W> HttpResponse.BodySubscriber<W> parseJson(Class<W> targetType) {
    return HttpResponse.BodySubscribers.mapping(
        HttpResponse.BodySubscribers.ofByteArray(),
        (byte[] bytes) -> {
            try {
                ObjectMapper objectMapper = new ObjectMapper();
                return objectMapper.readValue(bytes, targetType);
            } catch (IOException e) {
                throw new UncheckedIOException(e);
            }
        });
}
Initiate the authorization request
From the above Set up Okta section you have a public "client id" and "issuer" URI. For the sake of convenience, set those as String variables:
public static void main(String[] args) throws Exception {

    String clientId = "your-client-id-here" ;
String issuer = "https://dev-l33337.okta.com/oauth2/default";| These values are public, meaning they are safe to bundle in your application. |
// Create a client
HttpClient client = HttpClient.newHttpClient();

// List of scopes requested by your application (oauth scopes are space separated)
String scopes = String.join(" ", "openid", "profile", "offline_access");

// HTTP POST form arguments
Map<String, String> authArgs = Map.of(
    "client_id", clientId,
    "scope", scopes); // the arg name IS the singular form of scope
Using the fluent API, create a post request to ${issuer}/v1/device/authorize, including the client ID and scopes.
HttpRequest request = HttpRequest.newBuilder()
    .uri(URI.create(issuer + "/v1/device/authorize"))
    .POST(formBody(authArgs))
    .header("Accept", "application/json")
    .header("Content-Type", "application/x-www-form-urlencoded")
    .build();

// execute the request
HttpResponse<Map> httpResponse = client.send(request, rs -> parseJson(Map.class));

// Fail on anything except a 200 response
if (httpResponse.statusCode() != 200) {
    System.err.println("Error: " + httpResponse);
    throw new RuntimeException("Failed to initialize device grant authorization, likely " +
                               "caused by an invalid IdP configuration");
}

Map authorizationResponse = httpResponse.body();

String deviceCode = (String) authorizationResponse.get("device_code");
String verificationUri = (String) authorizationResponse.get("verification_uri");
String userCode = (String) authorizationResponse.get("user_code");
String verificationUriComplete = (String) authorizationResponse.get("verification_uri_complete");
Duration interval = Duration.ofSeconds((int) authorizationResponse.get("interval"));
Duration expiresIn = Duration.ofSeconds((int) authorizationResponse.get("expires_in"));| To keep the steps minimal in this post, I’m parsing the JSON to a map, but you could create a typed object to avoid any of the above casting. |
Assuming all went well, the response returned from the IdP will be a JSON block (parsed into the above values) that looks like this:
{
  "device_code": "a-random-device-code", (1)
  "user_code": "ABCD1234", (2)
  "verification_uri": "https:/dev-l33337.okta.com/activate", (3)
  "verification_uri_complete": "https:/dev-l33337.okta.com/activate?user_code=ABCD1234", (4)
  "expires_in": 600, (5)
  "interval": 5 (6)
}| 1 | device_code - A secret known by the device/application, it will be used in the following steps. |
| 2 | user_code - Shown to the user, and ties a different browser session to this device/application. |
| 3 | verification_uri- URL the user needs to visit and type enter the user_code before logging in. |
| 4 | verification_uri_complete - A URL combining the verification_uri and user_code which can be shown directly to the user (if they can copy and paste) or rendered as a QR code (on a TV). |
| 5 | expires_in - Number of seconds the user has to finish the flow before the codes expire. |
| 6 | interval - Minimum frequency in seconds the application should wait while polling the server to see if the user has been authorized. |
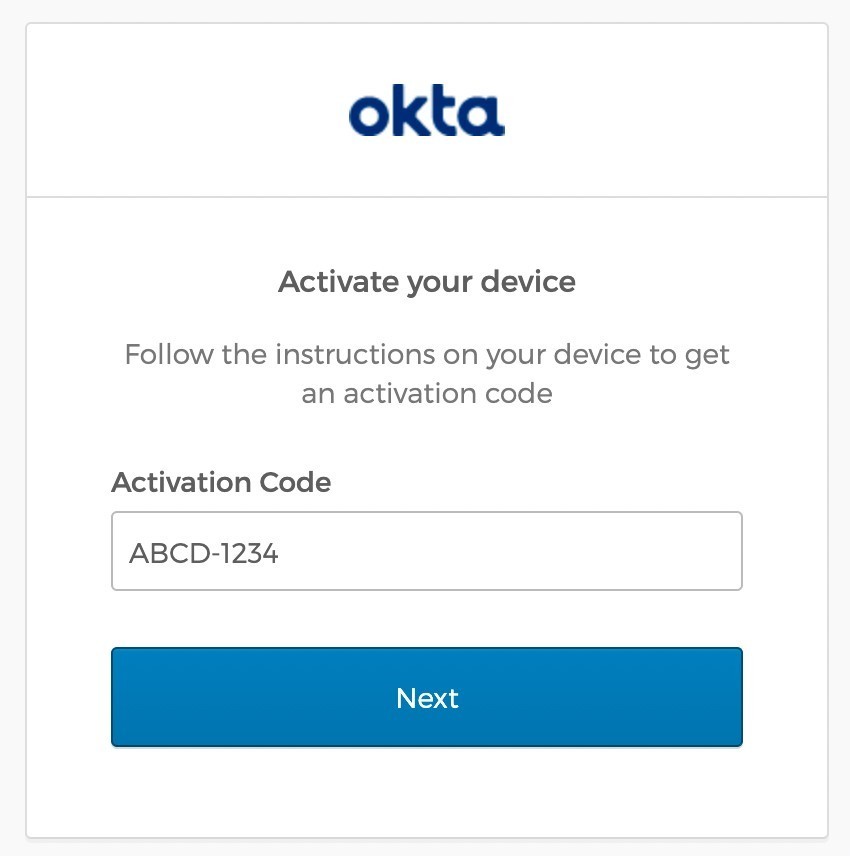
User login via a browser
The end user needs to open a browser to log in, how they do that is up to your application. For the best user experience, you may want to open a browser automatically. However, that might not be possible, so always fall back to showing the URL and code.
// check if a browser can be opened
if (!GraphicsEnvironment.isHeadless() && Desktop.getDesktop().isSupported(Desktop.Action.BROWSE)) {
    System.out.println("Opening browser to: " + verificationUriComplete);
    Desktop.getDesktop().browse(URI.create(verificationUriComplete));
} else {
    System.out.println("Open a browser and go to: " + verificationUri +
                       "  enter the code: "+ userCode);
}
The Abstract Window Toolkit (AWT) is Java’s original platform-independent UI framework. If you are building a JavaFX application, you may want to avoid mixing AWT and use the JavaFX HostServices instead.
|
If you are building an application for a television, you may want to render the value of verificationUriComplete as a QR code, so the user can scan it with a mobile device.
Whichever method you choose, the user will need to confirm the activation code before authenticating.
Get an access token
While the user is logging in, the application will continue making requests to the IdP, checking if the user has authorized the application.
Using the device_code from the initial request, continue to poll the IdP for the authorization status until the code expires.
long pollUntilMillis = System.currentTimeMillis() + expiresIn.toMillis();
while (System.currentTimeMillis() < pollUntilMillis) {

    // first sleep, give the user time to log in!
    System.out.println("Sleeping for " + interval.getSeconds() + " seconds");
    Thread.sleep(interval.toMillis()); (1)

    Map<String, String> tokenArgs = Map.of("client_id", clientId,
        "grant_type","urn:ietf:params:oauth:grant-type:device_code", (2)
        "device_code", deviceCode);

    HttpRequest tokenRequest = HttpRequest.newBuilder() (3)
        .uri(URI.create(issuer + "/v1/token"))
        .POST(formBody(tokenArgs))
        .header("Accept", "application/json")
        .header("Content-Type", "application/x-www-form-urlencoded")
        .build();

    HttpResponse<Map> tokenResponse =
        client.send(tokenRequest, rs -> parseJson(Map.class));

    if (tokenResponse.statusCode() == 200) { (4)
        // Do something with the tokens
        System.out.println("Authorization complete!");
        System.out.println(tokenResponse.body());
        break;
    } else {
        // error, keep polling until timeout
        System.out.println("Error: " + tokenResponse.body());
        System.out.println(tokenResponse);
    }
}| 1 | Wait for the interval to avoid spamming the server, it’s going to take a bit for the user to log in anyway. |
| 2 | Set the grant_type to the URN for the device grant. |
| 3 | Make a request to /v1/token to check the authorization status. |
| 4 | If the response is a 200 inspect the body for an access token, otherwise continue the polling loop. |
If the user has not yet logged in, an error is returned with the authorization_pending message:
{
  "error": "authorization_pending",
  "error_description": "The device authorization is pending. Please try again later."
}
Otherwise, if the user has already logged in, a response containing an access token will be returned:
{
  "token_type": "Bearer",
  "expires_in": 3600,
  "access_token": "...",
  "scope": "openid profile offline_access",
  "id_token": "..."
}
This access token would be used to make application-specific REST requests on behalf of the user, typically by setting the Authorization header in an HTTP request. For example:
|
HttpRequest.newBuilder()
        .header("Authorization", "Bearer " + accessToken)
Putting it all together
If you haven’t already skipped ahead to run the finished application, run it now:
jbang DeviceGrant.javaThis will open a browser and display a code. Make sure this code matches what is displayed in your terminal, and continue logging in.
Learn more about OAuth
How you authenticate and authorize a user changes based on the capabilities of your application. This post has shown how to build a command-line Java application that authenticates a user with two simple HTTP requests, while allowing them to authenticate using the device and browser of their choice.
Learn more about building secure applications by reading these posts:
Please comment below with any questions. For more interesting content, follow @oktadev on Twitter, find us on LinkedIn, or subscribe to our YouTube channel.
Brian Demers is a Developer Advocate at Okta and a PMC member for the Apache Shiro project. He spends much of his day contributing to OSS projects in the form of writing code, tutorials, blogs, and answering questions. Along with typical software development, Brian also has a passion for fast builds and automation. Away from the keyboard, Brian is a beekeeper and can likely be found playing board games. You can find him on Twitter at @briandemers.
Okta Developer Blog Comment Policy
We welcome relevant and respectful comments. Off-topic comments may be removed.