A Quick Guide to Elasticsearch with Spring Data and Spring Boot

You’ve probably heard of Elasticsearch or the Elastic Stack. The project started as a search engine based on Lucene, an open-source search engine library built by Shay Banon to index his wife’s cooking recipes. Since its early days, Elasticsearch has come a long way and has evolved into the Elastic Stack, a great suite for taking data from any source, in order to search, analyze, and visualize it in near real-time.
Elasticsearch is a distributed document store; data is serialized as JSON documents and stored in a distributed way across cluster nodes. The inverted index is a data structure that lists every unique word that appears in any document, and also lists the documents in which each word appears. This enables fast full-text searches, a feature not supported or only partially supported by database engines. The index is a collection of documents and each document is a collection of fields. In turn, each field can be indexed in an optimal data structure; for example, an inverted index for text fields, but a BKD tree for a numeric field.
How can be Elasticsearch integrated into a Spring Boot application? What are the options for adding Elasticsearch to a Java app? This post will give you a quick introduction to Elasticsearch integration options.
This tutorial was created with the following frameworks and tools:
Table of Contents
- Elasticsearch integration options for Spring Boot
- Hello Spring Data Elasticsearch!
- Build an application with Spring Data Elasticsearch
- Inspecting Elasticsearch index mapping
- Key components in reactive Spring Data Elasticsearch
- Learn more about Elasticsearch, Spring Boot, and JHipster
Note: In May 2025, the Okta Integrator Free Plan replaced Okta Developer Edition Accounts, and the Okta CLI was deprecated.
We preserved this post for reference, but the instructions no longer work exactly as written. Replace the Okta CLI commands by manually configuring Okta following the instructions in our Developer Documentation.
Elasticsearch integration options for Spring Boot
For Java applications including Spring Boot applications, Elasticsearch provides the following clients for integration:
-
Java Transport Client: Deprecated in Elasticsearch 7.0.0. Provides a client object to execute all operations asynchronously, accepting a listener or returning a future.
-
Java REST Client: Composed of the Low Level REST Client and the High Level REST Client. The Low Level Client provides load balancing, failover, persistent connections, and request/response trace logging. The High Level Client works on top of the Low Level Client and is the replacement for the
TransportClient. It depends on the Elasticsearch core and provides synchronous and asynchronous APIs. -
Java API Client: The new client library, independent of Elasticsearch core, provides strongly typed requests and responses, blocking and asynchronous versions for all APIs, fluent builders and functional patterns, as well as jackson and JSON-b support.
Hello Spring Data Elasticsearch!
Spring Data Elasticsearch is another integration option that adds the Spring repository abstraction at the search layer, providing access and search functionality for domain objects stored in Elasticsearch. Operations are sent through a client connected to the Elasticsearch node. With Spring Data, the High Level REST Client is the default client, although Elasticsearch documentation states that it’s been deprecated in favor of the Java API Client since version 7.15. The Java API Client is not listed as a supported client yet. In the meantime, the Java Transport Client is still supported in Spring Data, but the general recommendation is to use the High Level Client.
Instead of calling the Elasticsearch APIs directly, the repository and REST template abstractions provide a simplified interface for document operations, encapsulating API request/response processing, and exposing a query interface that has multiple implementations for different levels of query complexity. Through the starter dependency, it can also handle client autoconfiguration and automatic document index mapping for simple use cases.
Besides the high-level REST client support, Spring Data provides the Reactive Client, a non-official driver based on WebClient, with calls operated directly on the Reactive Stack. The Reactive Client also depends on the Elasticsearch core, as it is designed for handling Elasticsearch request/response types.
Build an application with Spring Data Elasticsearch
JHipster provides the Elasticsearch option to add search capabilities on top of your database. The integration is based on Spring Data Elasticsearch repositories, so let’s generate a reactive blog application to explore what the generator provides. The blog application built in this tutorial is based on the JHipster sample reactive-ms.jdl, but adding Maven, MongoDB (Elasticsearch integration only works with SQL databases and MongoDB), Bootstrap pagination, Okta authentication, and Kibana for index mapping inspection.
JHipster has a quick setup you can follow to set up your environment. For installing Node.js, I like NVM (Node Version Manager)
wget -qO- https://raw.githubusercontent.com/nvm-sh/nvm/v0.39.1/install.sh | bash
nvm install 14.18.3
Install JHipster with the following line:
npm install -g generator-jhipster@7.6.0
Verify the JHipster version with the following line:
jhipster --version
INFO! Using JHipster version installed globally
7.6.0
Once your environment is ready, create a spring-data-elasticsearch folder for the project, fetch the application JDL from the GitHub repository, and generate the application with JHipster:
mkdir spring-data-elasticsearch
cd spring-data-elasticsearch
https -d raw.githubusercontent.com/oktadev/okta-spring-data-elasticsearch-example/main/blog-reactive-ms.jdl
jhipster jdl blog-reactive-ms.jdl
Before you begin, you’ll need a free Okta developer account. Install the Okta CLI and run okta register to sign up for a new account. If you already have an account, run okta login.
Then, run okta apps create jhipster. Select the default app name, or change it as you see fit.
Then, change the Redirect URIs to:
http://localhost:8080/login/oauth2/code/oidc,http://localhost:8081/login/oauth2/code/oidc,http://localhost:8761/login/oauth2/code/oidc
Use http://localhost:8080,http://localhost:8081,http://localhost:8761 for the Logout Redirect URIs.
What does the Okta CLI do?
The Okta CLI streamlines configuring a JHipster app and does several things for you:
- Creates an OIDC app with the correct (see above, below are the default values) redirect URIs:
- login:
http://localhost:8080/login/oauth2/code/oidcandhttp://localhost:8761/login/oauth2/code/oidc - logout:
http://localhost:8080andhttp://localhost:8761
- login:
- Creates
ROLE_ADMINandROLE_USERgroups that JHipster expects - Adds your current user to the
ROLE_ADMINandROLE_USERgroups - Creates a
groupsclaim in your default authorization server and adds the user’s groups to it
NOTE: The http://localhost:8761* redirect URIs are for the JHipster Registry, which is often used when creating microservices with JHipster. The Okta CLI adds these by default.
You will see output like the following when it’s finished:
Okta application configuration has been written to: /path/to/app/.okta.env
Run cat .okta.env (or type .okta.env on Windows) to see the issuer and credentials for your app. It will look like this (except the placeholder values will be populated):
export SPRING_SECURITY_OAUTH2_CLIENT_PROVIDER_OIDC_ISSUER_URI="https://{yourOktaDomain}/oauth2/default"
export SPRING_SECURITY_OAUTH2_CLIENT_REGISTRATION_OIDC_CLIENT_ID="{clientId}"
export SPRING_SECURITY_OAUTH2_CLIENT_REGISTRATION_OIDC_CLIENT_SECRET="{clientSecret}"
NOTE: You can also use the Okta Admin Console to create your app. See Create a JHipster App on Okta for more information.
The JHipster Registry is also a Spring Cloud Config server, and by default, it is configured with the profiles dev and native, which means the configuration will be provided from the location docker-compose/central-server-config. Update docker-compose/central-server-config/application.yml with the OIDC settings to be shared with all microservices. Set the values from the .okta.env file the Okta CLI created. To avoid copy/paste errors, you can do it from the command line:
source .okta.env
echo \"
spring:
  security:
    oauth2:
      client:
        provider:
          oidc:
            issuer-uri: $SPRING_SECURITY_OAUTH2_CLIENT_PROVIDER_OIDC_ISSUER_URI
        registration:
          oidc:
            client-id: $SPRING_SECURITY_OAUTH2_CLIENT_REGISTRATION_OIDC_CLIENT_ID
            client-secret: $SPRING_SECURITY_OAUTH2_CLIENT_REGISTRATION_OIDC_CLIENT_SECRET\" >> docker-compose/central-server-config/application.yml
For the experiment in this tutorial, configure the Kibana interface for Elasticsearch, which will allow visualizations of the Elasticsearch data.
Edit docker-compose/docker-compose.yml and add the Kibana service like this:
services:
  ...
  blog-kibana:
     image: docker.elastic.co/kibana/kibana:7.15.2
     ports:
       - 5601:5601
     environment:
       ELASTICSEARCH_URL: http://blog-elasticsearch:9200
       ELASTICSEARCH_HOSTS: '["http://blog-elasticsearch:9200"]'
NOTE: The Kibana version must match the version of Elasticsearch that’s used by the blog-elasticsearch image.
Also add the following additional configuration to the blog-elasticsearch service, to expose the ports to the local host for sending APIs requests:
services:
  blog-elasticsearch:
    ...
    ports:
      - 9200:9200
Remove the Keycloak service at the bottom, as Okta will be used as the identity provider (IdP).
Create each application’s container image:
cd blog
./mvnw -DskipTests -ntp -Pprod verify jib:dockerBuild
cd gateway
./mvnw -DskipTests -ntp -Pprod verify jib:dockerBuild
Run all your images with Docker Compose:
cd ../docker-compose
docker compose up
Access the JHipster Registry at http://localhost:8761 and sign in with your Okta credentials. When you see all services up and green, go to http://localhost:8080 and sign in with your Okta account.
IMPORTANT NOTE: There is a potential issue observed for the blog service. As Kubernetes probes are enabled by default, the blog application might change its state to OUT_OF_SERVICE during start up and Eureka might discard the following heartbeats with state UP. In this case, disable Kubernetes probes in the docker-compose.yml with the following environment variable:
services:
  blog:
    image: blog
    environment:
      ...
      - MANAGEMENT_ENDPOINT_HEALTH_PROBES_ENABLED=false
Restart your microservices stack using Ctrl+C and run docker compose up again.
Inspecting Elasticsearch index mapping
During startup, Spring Data Elasticsearch will create the index for the entities annotated with @Document, deriving the mappings from the entity’s annotations. But for the properties, if the field type is not specified, it will default to FieldType.Auto. This means that no mapping entry is written for the property and that Elasticsearch will add a mapping entry dynamically when the first data for this property is stored.
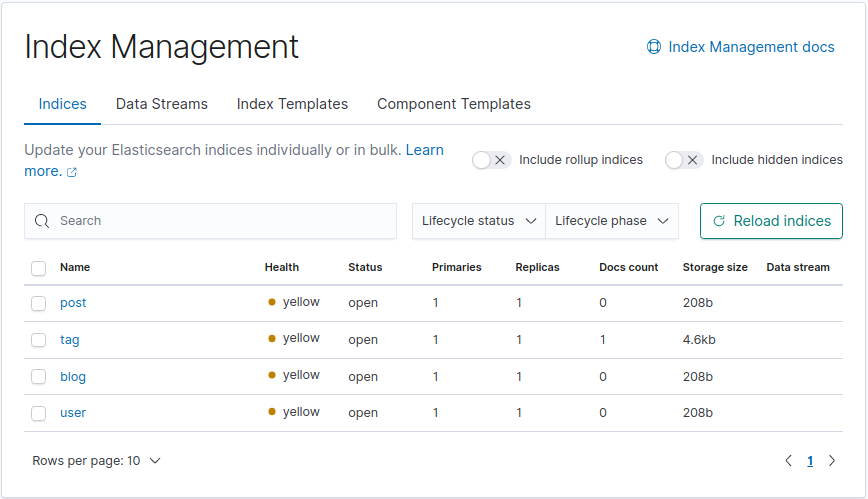
As our Kibana interface was configured in Docker Compose, before creating any entities, let’s inspect the index mappings that were automatically created for the blog microservice. Go to http://localhost:5601, the Kibana dashboard. On the top left menu, go to Management > Stack Management > Index Management > Indices tab. Besides the user index, an index per entity should be listed.
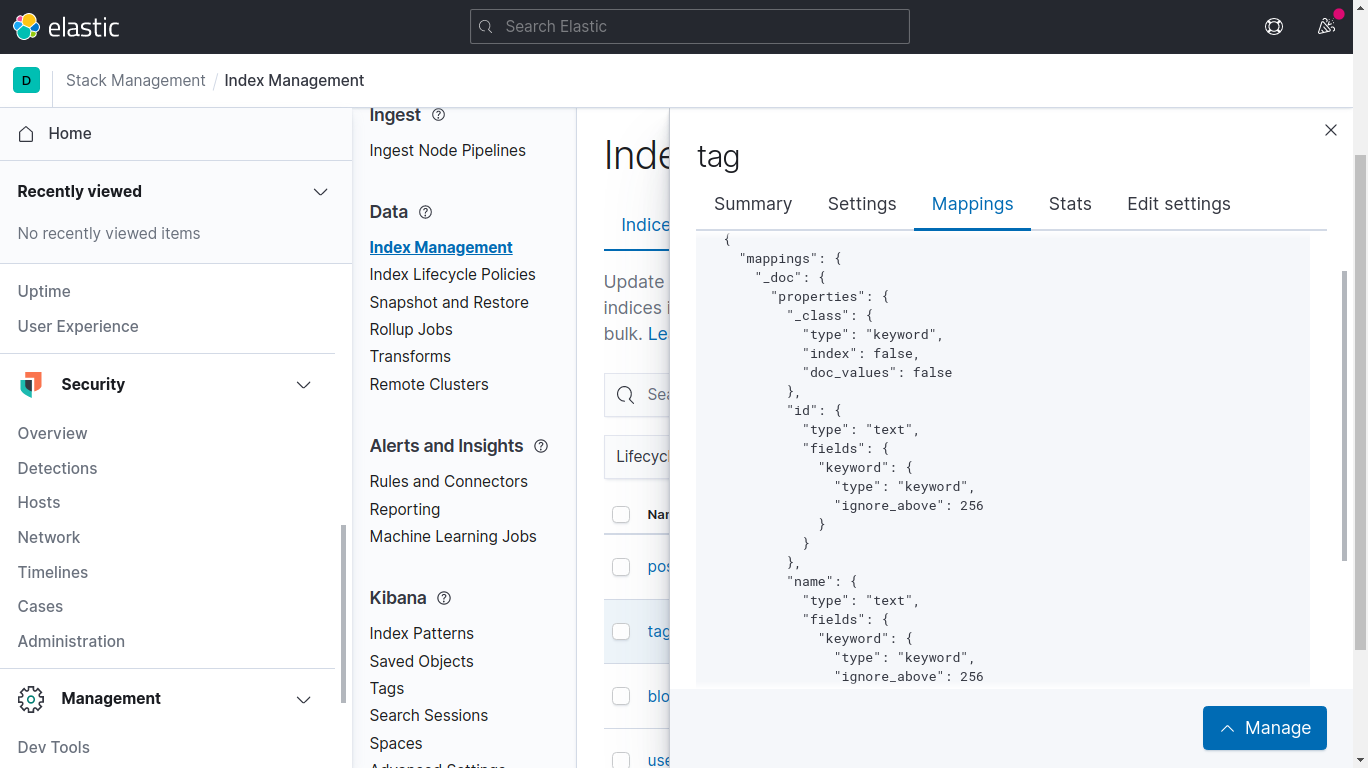
Choose for example the tag index. Before persisting any instance, the Mappings tab will look like the following:
{
  "mappings": {
    "_doc": {
      "properties": {
        "_class": {
          "type": "keyword",
          "index": false,
          "doc_values": false
        }
      }
    }
  }
}
As you can see, properties are not mapped yet.
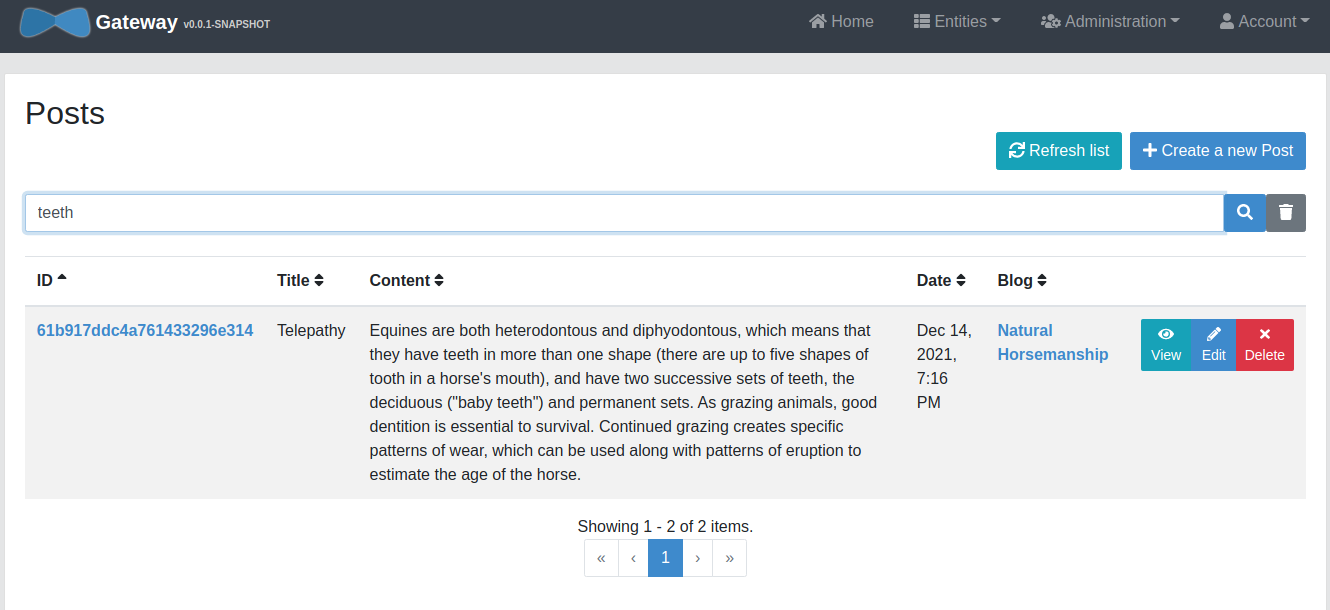
Go back to the application, and in the top-right menu go to Entities > Tag and create some Tag entities. Then create some Blog and Post entities as well. You’ll see that a search box is present on the entity list page. Go ahead and test the search functionality. The results page will return the matches with pagination.
Go back to Kibana, and display the Tag mappings after persistence:
{
  "mappings": {
    "_doc": {
      "properties": {
        "_class": {
          "type": "keyword",
          "index": false,
          "doc_values": false
        },
        "id": {
          "type": "text",
          "fields": {
            "keyword": {
              "type": "keyword",
              "ignore_above": 256
            }
          }
        },
        "name": {
          "type": "text",
          "fields": {
            "keyword": {
              "type": "keyword",
              "ignore_above": 256
            }
          }
        }
      }
    }
  }
}
Now the id and name properties have been dynamically mapped with multi-field mapping. For example, the name field is defined with type text, for full-text searches, and it defines a name.keyword subfield for aggregations and sorting:
"name": {
  "type": "text",
  "fields": {
    "keyword": {
      "type": "keyword",
      "ignore_above": 256
    }
  }
}
It is often useful to index the same field in different ways for different purposes. Text fields are searchable by default, but by default are not available for aggregations, sorting, unless multi-field mapping is in place. There is another option for enabling sorting for text fields, which is the fielddata mapping parameter. This option will not be covered in our tutorial, as it is discouraged in the Elasticsearch documentation, because of high memory consumption.
Elasticsearch exposes several APIs, and the Index APIs allow managing individual indices, index settings, aliases, mappings, and index templates. Although Kibana is a user-friendly front-end, you can also query the index mappings through the Index APIs, with an HTTPie command like the following:
http :9200/tag/_mapping
The output should look the same as the mapping visualized in Kibana:
Key components in reactive Spring Data Elasticsearch
As mentioned before, the blog application is reactive, and that’s because the JDL file had reactive true in its gateway and blog application configurations.
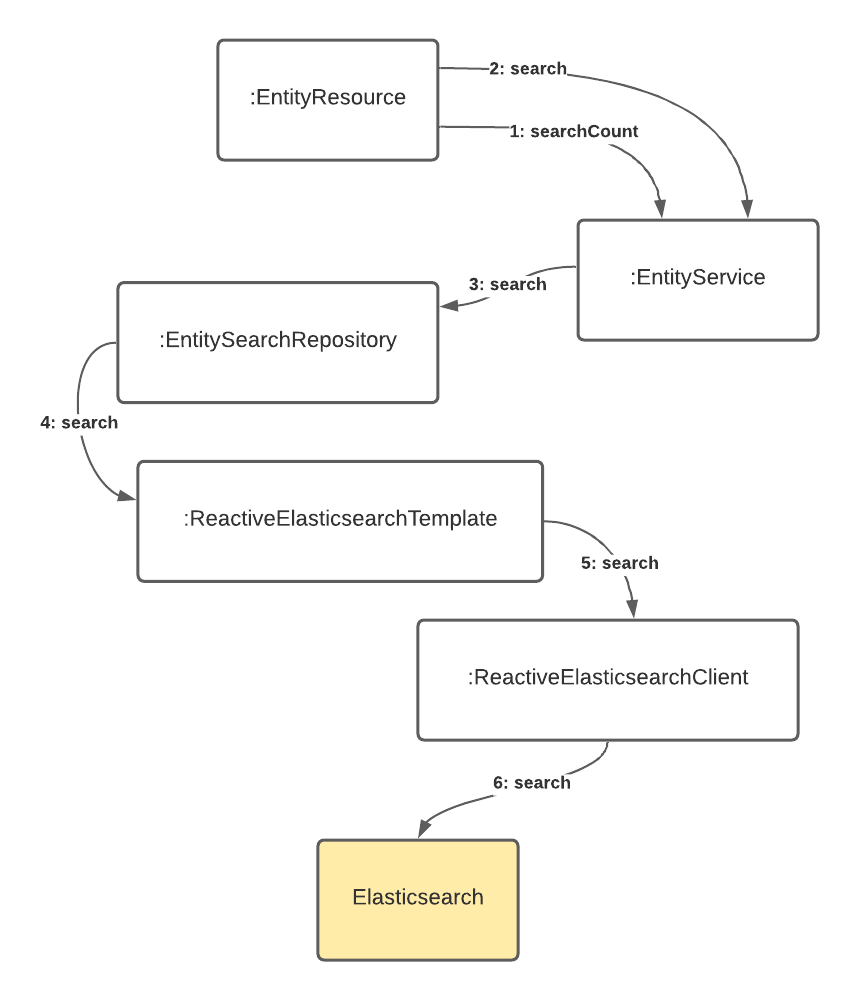
This config also tells JHipster to include the Elasticsearch dependencies in the blog microservice. JHipster generates the web layer with the entity resource class, and it optionally generates the service class too. Two of the key components that enable the Elasticsearch reactive integration are the ReactiveElasticsearchClient and the ReactiveElasticsearchOperations. A client is required to connect to an Elasticsearch cluster or node, and *Operations is the interface for the execution of CRUD and query commands. The third component is the entity ReactiveElasticsearchRepository, which can provide domain-specific search methods.
When using the starter dependency, ReactiveElasticsearchRestClientAutoConfiguration configures the reactive Elasticsearch client from the Spring Elasticsearch properties. ElasticsearchDataAutoConfiguration is the root configuration class that triggers the reactive search template initialization. Let’s briefly describe each of the mentioned components.
The reactive client
The ReactiveElasticsearchClient is based on Spring’s WebClient and calls are directly operated on the reactive stack. The reactive client sends and receives high-level request and response objects. In this example, the reactive client is initialized from spring.elasticsearch.* properties. You can verify the Elasticsearch endpoints are set in the docker-compose.yml file for the blog service.
blog:
  image: blog
  environment:
    ...
    - SPRING_ELASTICSEARCH_URIS=http://blog-elasticsearch:9200
    ...
The operations abstraction
ReactiveElasticsearchOperations is the gateway for executing high-level commands against an Elasticsearch cluster using the ReactiveElasticsearchClient.
The ReactiveElasticsearchTemplate is the default implementation of ReactiveElasticsearchOperations. Some high-level operations are save, get, delete and search, which accept the Spring Data Query types as parameters.
The entity search repository
The entity search repository enables the document CRUD and search operations in the application. The search repository extends ReactiveElasticsearchRepository, the persistence technology-specific abstraction, that builds on the core repository support utilizing operations provided through the ReactiveElasticsearchTemplate executed by the ReactiveElasticsearchClient. JHipster generates a search repository for the entities specified in the search option in the JDL. In the example, all entities are set to be searchable in Elasticsearch:
application {
  config {
    baseName blog
    reactive true
    ...
    searchEngine elasticsearch
  }
  ...
  search * with elasticsearch
}
When the entity in the JDL definition requires the Elasticsearch engine, and also pagination, the entity search repository is generated with pagination and sorting options. For example, the generated TagSearchRepository adds a custom search() method that assembles a native search query and passes it to the ReactiveElasticsearchTemplate:
public interface TagSearchRepository extends ReactiveElasticsearchRepository<Tag, String>, TagSearchRepositoryInternal {}

interface TagSearchRepositoryInternal {
    Flux<Tag> search(String query, Pageable pageable);
}

class TagSearchRepositoryInternalImpl implements TagSearchRepositoryInternal {

    private final ReactiveElasticsearchTemplate reactiveElasticsearchTemplate;

    TagSearchRepositoryInternalImpl(ReactiveElasticsearchTemplate reactiveElasticsearchTemplate) {
        this.reactiveElasticsearchTemplate = reactiveElasticsearchTemplate;
    }

    @Override
    public Flux<Tag> search(String query, Pageable pageable) {
        List<FieldSortBuilder> builders = new SortToFieldSortBuilderConverter().convert(pageable.getSort());

        NativeSearchQueryBuilder queryBuilder = new NativeSearchQueryBuilder()
            .withQuery(queryStringQuery(query))
            .withPageable(PageRequest.of(pageable.getPageNumber(), pageable.getPageSize()));

        builders
            .stream()
            .forEach(builder -> {
                queryBuilder.withSort(builder);
            });

        NativeSearchQuery nativeSearchQuery = queryBuilder.build();
        return reactiveElasticsearchTemplate.search(nativeSearchQuery, Tag.class).map(SearchHit::getContent);
    }
}
Learn more about Elasticsearch, Spring Boot, and JHipster
JHipster helps to simplify the setup of Spring Boot applications or microservices with search capabilities. I hope you enjoyed this quick introduction to Elasticsearch integration options, and could taste the advantages of the Spring Data repository abstraction for encapsulating some basic Elasticsearch operations. Remember to check the compatibility matrix to match the right Spring Data Elasticsearch dependency for your Elasticsearch version.
Keep learning, and for more examples and recipes on Elasticsearch and Okta integrations for Spring Boot, check out the following links:
- Full Stack Java with React, Spring Boot, and JHipster
- Kubernetes to the Cloud with Spring Boot and JHipster
- Spring Boot and Okta in 2 Minutes
- Reactive Java Microservices with Spring Boot and JHipster
- Elasticsearch Clients
- Get Started with the ELK Stack
You can find the source code for this tutorial in the @oktadev/okta-spring-data-elasticsearch-example repository on GitHub.
Be sure to follow us on Twitter and subscribe to our YouTube Channel so that you never miss any of our excellent content!
Okta Developer Blog Comment Policy
We welcome relevant and respectful comments. Off-topic comments may be removed.