Better Integration Testing With Spring Cloud Contract

Spring Cloud Contract was created as a way to help test interconnected microservices. Generally speaking, there are two options when testing microservices: 1) you can deploy the entire mesh of services in your integration tests and test against that, or 2) you can mock each service in your integration tests. Both of these options have serious drawbacks.
The first, deploying the entire mesh of microservices for testing, has the obvious drawback of being difficult, if not impossible, in many environments. It’s simply not always feasible to deploy a whole mesh of services just for integration testing. The second solution, writing separate mocks for each projects’ integration tests, has the problem of being potentially unreliable. This is because integration tests are written in a separate service from the code actually governing the function that the test is modeling, and as such, can easily drift away from the desired behavior.
Table of Contents
- Bootstrap the producer project using Spring Initialzr
- Create the producer contract
- Generate the stubs and test the producer
- Add identity with Okta
- Generate a JWT and test the secure app
- Create the consumer application
- Import the producer stubs into the consumer project and create integration tests
- Learn more about Spring Boot and Spring Cloud Contract
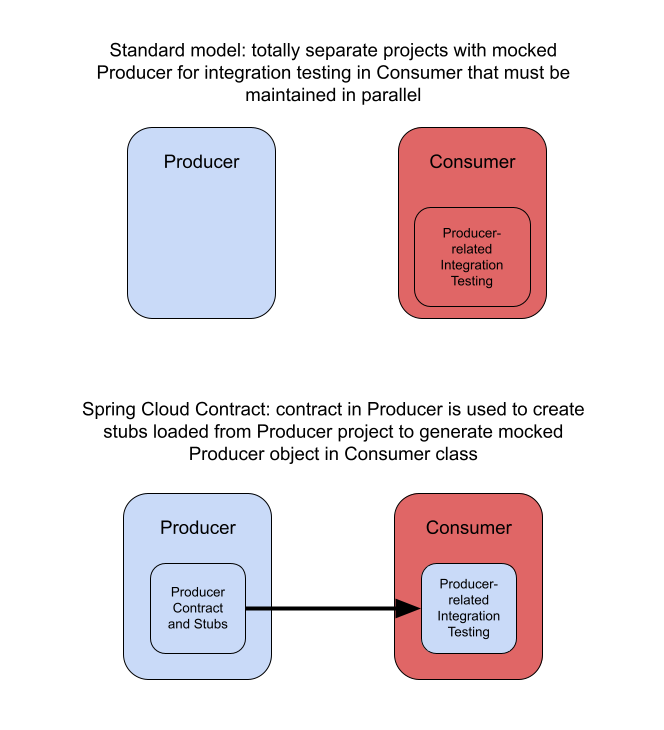
Imagine a simple microservice with a producer and a consumer. When writing tests in the consumer project, you have to write mocks or stubs that model the behavior of the producer project. Conversely, when you write tests in the producer project, you have to write mocks or stubs that model the behavior of the consumer project. As such, multiple sets of related, redundant code have to be maintained in parallel in disconnected projects.
For every change made to the producer project, the developer needs to go to the consumer project – a totally separate code base – and make sure that the integration tests there reflect the new behavior producer. Keeping this up across a complex system with many different services, at best, requires a lot of discipline, and at worst, is unlikely. It’s very easy for integration tests to give a false sense of security and not actually reflect the reality of the service being tested.
What is needed is a way to ensure that the mocked (or stubbed) behavior of the test objects is connected to the actual behavior of the objects being modeled. Ideally, these mocked objects would be defined in the project they represent.
Spring Cloud Contract does exactly this. It provides a way of specifying specific behavior for a service – the “contract” – and testing for compliance with this contract within that project itself while allowing other projects to load these contracts as stubs that can be mocked for integration testing.
A brief aside on “mocks” and “stubs”. “Mock” gets used in ways online that is somewhat generic, meaning any fake object used for testing, and this can get confusing when differentiating “mocks” from “stubs”. However, specifically, a “mock” is an object that tests for behavior by registering expected method calls before a test run. In contrast, a “stub” is a testable version of the object with callable methods that return pre-set values. Thus, a mock checks to see if the object being tested makes an expected sequence of calls to the object being mocked, and throws an error if the behavior deviates (that is, makes any unexpected calls). A stub does not do any testing itself, per se, but instead will return canned responses to pre-determined methods to allow tests to run. (Of course, a stub can throw an error if unexpected calls are made as well, so stubs do constrain behavior in that sense as well.)
In this tutorial, you’re going to create a simple Spring Boot producer that serves hats and a Spring Boot consumer that presents hats to the user (really hat specification object instances). The consumer will retrieve the hats from the producer before presenting them. You will use Spring Cloud Contract to write a contract that describes what the producer service should return based on certain resource queries. Spring Cloud Contract will automatically generate integration tests from the producer contract, which will verify that the producer is behaving according to the specification of the contract. It will also generate stubs that can be imported into other projects to assist in integration testing. Next, on the consumer side, you will import these stubs into the consumer’s integration tests as a mocked object that can be used in testing the consumer. You will also see how Okta can be used as an OAuth 2.0 and OpenID Connect (OIDC) provider to add security to the Spring Boot project.
Prerequisites:
Before you get started, you’ll need to make sure you have a few tools installed.
-
Okta CLI: The Okta CLI is an easy way to create projects that use Okta for security. Follow the installation instructions on the Okta CLI project website. You should log in to your existing account or register for a new account using the CLI before continuing with the tutorial.
-
Java 11: This project uses Java 11. OpenJDK 11 will work just as well. Installation instructions can be found on the OpenJDK website. OpenJDK can also be installed using Homebrew. Alternatively, SDKMAN is another excellent option for installing and managing Java versions.
-
HTTPie: This is a powerful command-line HTTP request utility you’ll use to test both Spring Boot resource servers. Install it according to the docs on their site.
Note: In May 2025, the Okta Integrator Free Plan replaced Okta Developer Edition Accounts, and the Okta CLI was deprecated.
We preserved this post for reference, but the instructions no longer work exactly as written. Replace the Okta CLI commands by manually configuring Okta following the instructions in our Developer Documentation.
Bootstrap the producer project using Spring Initialzr
You’ll use the Spring Initializr project to bootstrap the Producer project. Open this link to access the pre-configured starter project.
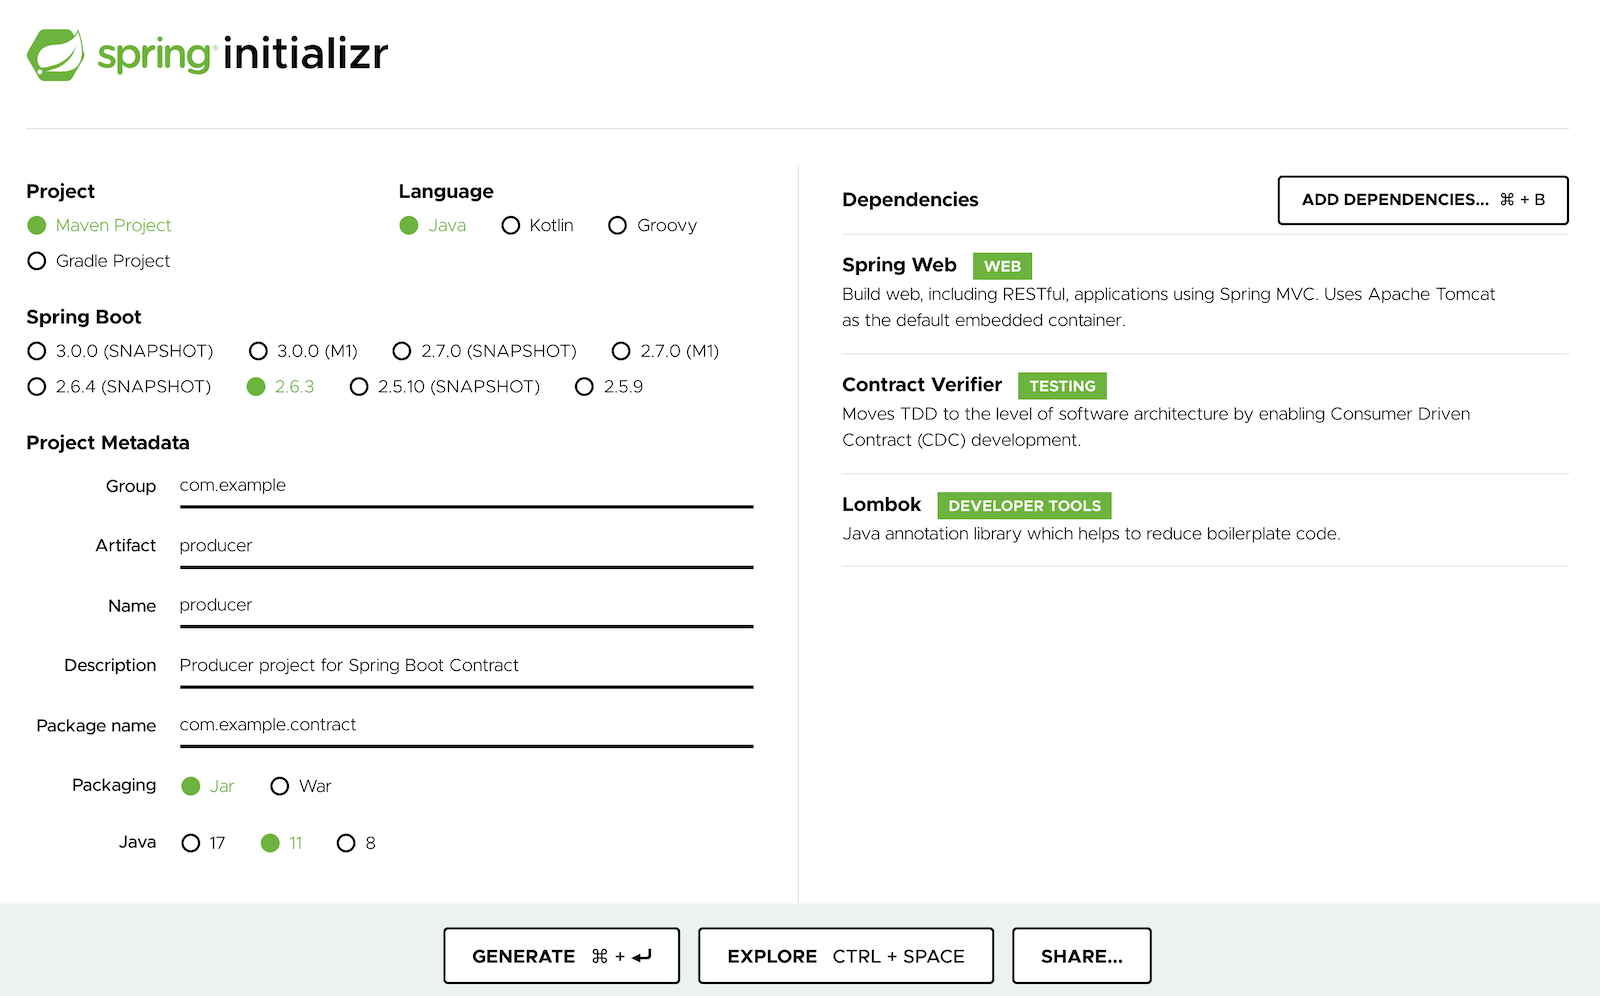
You are creating a Java project – Java 11 – using Maven as the build system. The Spring Boot version was 2.6.3 when I wrote this tutorial. You are including three dependencies:
- Spring Web: adds the basic HTTP/web capabilities to build a REST API.
- Contract Verifier: brings in Spring Cloud Contract project by enabling Consumer Drive Contracts and stub generation.
- Lombok: is a helper project that will generate some getters, setters, and constructors.
When you’re ready, click Generate and save the zip file in an appropriate parent directory. You’ll be making two Spring Boot projects (as mentioned, a producer and a consumer), so it probably makes sense to have a parent directory named something like Spring Cloud Contract Tutorial or spring-cloud-contract-tutorial (if you dislike spaces in directory names).
Unzip the file and open the directory in your favorite editor or IDE. (I’m an IDE/IntelliJ man myself – hopefully that’s not disappointing to y’all – because in the immortal words of Buckaroo Banzai “Life is too short for vim”.)
Let’s start by building the hat producer. Both the producer and consumer projects will be Spring Boot resource servers that use Spring MVC to implement a simple REST API.
Create a Hat.java file that is the data model for the hats the producer will serve.
src/main/java/com/example/contract/Hat.java
package com.example.contract;

import lombok.AllArgsConstructor;
import lombok.Data;

@Data
@AllArgsConstructor
public class Hat {
    private Long id;
    private String name;
    private Long size;
    private String color;
}
The hat has four attributes, an id as well as name, size, and color. Notice the two annotations. These are what Lombok helps us with. The @Data annotation generates getters and setters as well as a toString() and a constructor for all required arguments (check out the docs). The @AllArgsConstructor annotation generates a constructor for all fields in the class. I really like it because it de-clutters the data model classes and saves some time generating all of the ‘ceremony’ methods.
Next create a HatService.java. This is in lieu of using JPA and an actual database to persist the Hat object instances. It’s just for demonstration purposes and simply creates two hats – a large, red sombrero and a smaller blue beanie – and serves them by ID.
src/main/java/com/example/contract/HatService.java
package com.example.contract;

import org.springframework.stereotype.Service;

import java.util.HashMap;
import java.util.Map;

@Service
public class HatService {
    private final Map<Long, Hat> hatMap;
    public HatService() {
        hatMap = new HashMap<>();
        hatMap.put(1L, new Hat(1L, "Sombrero", 30L, "red"));
        hatMap.put(2L, new Hat(2L, "Beanie", 5L, "blue"));
    }
    Hat findHatById(Long id) {
        return hatMap.get(id);
    }
}
Lastly, create a HatController.java that is what exposes your single resource endpoint.
src/main/java/com/example/contract/HatController.java
package com.example.contract;

import org.springframework.http.HttpStatus;
import org.springframework.web.bind.annotation.GetMapping;
import org.springframework.web.bind.annotation.PathVariable;
import org.springframework.web.bind.annotation.RestController;
import org.springframework.web.server.ResponseStatusException;

@RestController
public class HatController {
    private final HatService hatService;

    public HatController(HatService hatService) {
        this.hatService = hatService;
    }

    @GetMapping("hat/{id}")
    public Hat findHatById(@PathVariable("id") Long id) {
        Hat hat = hatService.findHatById(id);
        if (hat == null) {
            throw new ResponseStatusException(
                    HttpStatus.NOT_FOUND, "Not Found"
            );
        }
        return hat;
    }
}
The HatController uses Spring’s dependency injection to get the HatService as a bean. It then uses the service to lookup hats by ID and serve them to the consumer of the REST service endpoint at /hat/{id}.
You now have a working hat producer. Start the project with the following command:
./mvnw spring-boot:run
Once the service has started, you can open a second terminal and use HTTPie to test it.
http :8080/hat/1
HTTP/1.1 200
...
{
    "color": "red",
    "id": 1,
    "name": "Sombrero",
    "size": 30
}
Create the producer contract
Next, you need to write the contracts that define the interservice agreement to govern the behavior of the producer. This is where Spring Cloud Contract comes in and things get interesting.
You’re going to create three contracts under src/test/resources/contracts. The contracts can be written in YAML or as a Groovy, Java, or Kotlin DSL script. In this tutorial I’ve chosen to go with the Groovy. These contracts could also be in a single file instead of separate files. See the docs.
Create the first contract in your src/test/resources directory.
src/test/resources/contracts/find_hat_by_id.groovy
package contracts

import org.springframework.cloud.contract.spec.Contract

Contract.make {
    description "should return hat by id=1"

    request {
        url "/hat/1"
        method GET()
    }

    response {
        status OK()
        headers {
            contentType applicationJson()
        }
        body (
                id: 1,
                name: "Test Hat 1",
                size: 10,
                color: "striped"
        )
    }

}
In the request block, this contract defines the request method at GET and the request URL as /hat/1. In the response block, this contract specifies that the status should be OK, the headers should be applicationJson, and the attributes of the red sombrero should be returned. This contract is pretty simple, but the DSL has a lot of power. Take a look at the docs to dig deeper.
The second contract is similar, except for the blue beanie.
src/test/resources/contracts/find_hat_by_id2.groovy
package contracts

import org.springframework.cloud.contract.spec.Contract

Contract.make {
    description "should return hat by id=2"

    request {
        url "/hat/2"
        method GET()
    }

    response {
        status OK()
        headers {
            contentType applicationJson()
        }
        body (
                id: 2,
                name: "Test Hat 2",
                size: 7,
                color: "green"
        )
    }

}
The last contract defines a 404 error message for hat ID 3.
src/test/resources/contracts/find_hat_by_id3.groovy
package contracts

import org.springframework.cloud.contract.spec.Contract

Contract.make {
    description "should return 404 for hat id=3"

    request {
        url "/hat/3"
        method GET()
    }

    response {
        status 404
    }

}
For the integration tests generated from these contracts to work, you need to define a base class and add the base class to the pom.xml.
Create a BaseClass.java test class (notice that this is in src/test not src/main).
src/test/java/com/example/contract/BaseClass.java
package com.example.contract;

import io.restassured.module.mockmvc.RestAssuredMockMvc;
import org.junit.jupiter.api.BeforeEach;
import org.mockito.Mockito;
import org.springframework.beans.factory.annotation.Autowired;
import org.springframework.boot.test.context.SpringBootTest;
import org.springframework.boot.test.mock.mockito.MockBean;

@SpringBootTest(classes = ProducerApplication.class)
public abstract class BaseClass {

    @Autowired
    HatController hatController;

    @MockBean
    HatService hatService;

    @BeforeEach
    public void setup() {
        RestAssuredMockMvc.standaloneSetup(hatController);
        Mockito.when(hatService.findHatById(1L))
                .thenReturn(new Hat(1L, "Test Hat 1", 10L, "striped"));
        Mockito.when(hatService.findHatById(2L))
                .thenReturn(new Hat(2L, "Test Hat 2", 7L, "green"));
    }
}
In the pom.xml, you need to define the configuration entry for the base test class. Add the following entry:
<baseClassForTests>com.example.contract.BaseClass</baseClassForTests>
… in the <configuration> block of the spring-cloud-contract-maven-plugin plugin.
<build>
    <plugins>
        <plugin>
            <groupId>org.springframework.cloud</groupId>
            <artifactId>spring-cloud-contract-maven-plugin</artifactId>
            <version>3.1.0</version>
            <extensions>true</extensions>
            <configuration>
                ...
                <baseClassForTests>com.example.contract.BaseClass</baseClassForTests>
            </configuration>
        </plugin>
        ...
    </plugins>
</build>
You might notice that the stubbed service created in the base test class above is returning different hats than the hats served by the producer application itself. Don’t get confused. The contract and the base test class define testing behavior. The application is defining live, production behavior (of course, here it’s pretty simplistic and test-like since the implementation is really just for demonstration purposes). Thus integration tests will be expecting /hat/1 to return Test Hat 1 while, as you’ll see below, when you run the application, the same endpoint will return Sombrero.
Generate the stubs and test the producer
To generate the stubs and the integration tests for the contracts, run the following Maven command.
./mvnw install
The most important thing this command does (in the context of this tutorial) is that it generates the stubs and installs them in the local .m2 (Maven) repo. In a production scenario, you might want to install the stubs in a remote repository instead. Take a look at the Spring Cloud docs to see how that is accomplished.
If you read through the console output, you’ll see a lot of information about the generated integration tests and the stubs. For example, look at the following lines.
[INFO] --- spring-cloud-contract-maven-plugin:3.1.0:generateTests (default-generateTests) @ producer ---
[INFO] Generating server tests source code for Spring Cloud Contract Verifier contract verification
[INFO] Will use contracts provided in the folder [.../producer/src/test/resources/contracts]
[INFO] Directory with contract is present at [.../producer/src/test/resources/contracts]
[INFO] Test Source directory: .../producer/target/generated-test-sources/contracts added.
[INFO] Using [com.example.contract.BaseClass] as base class for test classes, [null] as base package for tests, [null] as package with base classes, base class mappings []
[INFO] Creating new class file [.../producer/target/generated-test-sources/contracts/com/example/contract/ContractVerifierTest.java]
[INFO] Generated 1 test classes.
These lines tell you that Spring found the contracts in the src/test/resources/contracts folder, used the base test class defined in the pom.xml, and generated integration tests based on the contracts.
If you look at the generated integration tests, they’ll look like the following. The Groovy DSL contract has been turned into testable assertions. This is where the producer contract is tested against the actual behavior of the producer.
package com.example.contract;

...

@SuppressWarnings("rawtypes")
public class ContractVerifierTest extends BaseClass {

    @Test
    public void validate_find_hat_by_id() throws Exception {
        // given:
            MockMvcRequestSpecification request = given();


        // when:
            ResponseOptions response = given().spec(request)
                    .get("/hat/1");

        // then:
            assertThat(response.statusCode()).isEqualTo(200);
            assertThat(response.header("Content-Type")).matches("application/json.*");

        // and:
            DocumentContext parsedJson = JsonPath.parse(response.getBody().asString());
            assertThatJson(parsedJson).field("['id']").isEqualTo(1);
            assertThatJson(parsedJson).field("['name']").isEqualTo("Test Hat 1");
            assertThatJson(parsedJson).field("['size']").isEqualTo(10);
            assertThatJson(parsedJson).field("['color']").isEqualTo("striped");
    }

    @Test
    public void validate_find_hat_by_id2() throws Exception {
        // given:
            MockMvcRequestSpecification request = given();


        // when:
            ResponseOptions response = given().spec(request)
                    .get("/hat/2");

        // then:
            assertThat(response.statusCode()).isEqualTo(200);
            assertThat(response.header("Content-Type")).matches("application/json.*");

        // and:
            DocumentContext parsedJson = JsonPath.parse(response.getBody().asString());
            assertThatJson(parsedJson).field("['id']").isEqualTo(2);
            assertThatJson(parsedJson).field("['name']").isEqualTo("Test Hat 2");
            assertThatJson(parsedJson).field("['size']").isEqualTo(7);
            assertThatJson(parsedJson).field("['color']").isEqualTo("green");
    }

    @Test
    public void validate_find_hat_by_id3() throws Exception {
        // given:
            MockMvcRequestSpecification request = given();


        // when:
            ResponseOptions response = given().spec(request)
                    .get("/hat/3");

        // then:
            assertThat(response.statusCode()).isEqualTo(404);
    }

}
You’ll also see lines like the following, showing that the producer stubs have been created from the contracts.
[INFO] Converting from Spring Cloud Contract Verifier contracts to WireMock stubs mappings
[INFO]      Spring Cloud Contract Verifier contracts directory: /home/andrewcarterhughes/Development/okta/2021/spring-cloud-contracts/QA1/producer/src/test/resources/contracts
[INFO] Stub Server stubs mappings directory: /home/andrewcarterhughes/Development/okta/2021/spring-cloud-contracts/QA1/producer/target/stubs/META-INF/com.example/producer/0.0.1-SNAPSHOT/mappings
[INFO] Creating new stub [/home/andrewcarterhughes/Development/okta/2021/spring-cloud-contracts/QA1/producer/target/stubs/META-INF/com.example/producer/0.0.1-SNAPSHOT/mappings/find_hat_by_id.json]
[INFO] Creating new stub [/home/andrewcarterhughes/Development/okta/2021/spring-cloud-contracts/QA1/producer/target/stubs/META-INF/com.example/producer/0.0.1-SNAPSHOT/mappings/find_hat_by_id2.json]
[INFO] Creating new stub [/home/andrewcarterhughes/Development/okta/2021/spring-cloud-contracts/QA1/producer/target/stubs/META-INF/com.example/producer/0.0.1-SNAPSHOT/mappings/find_hat_by_id3.json]
And toward the end of the console output, you’ll see that the stubs jar has been installed in the local Maven repo along with the producer application jar and the POM.
[INFO] Installing /home/andrewcarterhughes/Development/okta/2021/spring-cloud-contracts/QA1/producer/target/producer-0.0.1-SNAPSHOT.jar to /home/andrewcarterhughes/.m2/repository/com/example/producer/0.0.1-SNAPSHOT/producer-0.0.1-SNAPSHOT.jar
[INFO] Installing /home/andrewcarterhughes/Development/okta/2021/spring-cloud-contracts/QA1/producer/pom.xml to /home/andrewcarterhughes/.m2/repository/com/example/producer/0.0.1-SNAPSHOT/producer-0.0.1-SNAPSHOT.pom
[INFO] Installing /home/andrewcarterhughes/Development/okta/2021/spring-cloud-contracts/QA1/producer/target/producer-0.0.1-SNAPSHOT-stubs.jar to /home/andrewcarterhughes/.m2/repository/com/example/producer/0.0.1-SNAPSHOT/producer-0.0.1-SNAPSHOT-stubs.jar
These stubs are what you will, in a few minutes, import into the consumer application for integration testing. Notice how, because of the autogenerated integration testing, the behavior of the stubs is guaranteed to match the behavior tested and defined by the contract. This is awesome. However, bear in mind, “the devil is in the contract,” as they say.
This tool will only be as good as the quality of the contract (and thus the tests derived from the contract). It provides a lightweight way to test and link behavior between two services without having to link their code or maintain redundant, separate code bases (mocks and stubs vs the actual object). But still, you have to be intelligent about what you define in the contract and ensure that the contract reflects the required behavior of the service.
Start the service by running the following command.
./mvnw spring-boot:run
You should see console output that ends with something like the following.
...
2021-12-19 09:33:30.651  INFO 26154 --- [           main] w.s.c.ServletWebServerApplicationContext : Root WebApplicationContext: initialization completed in 475 ms
2021-12-19 09:33:30.852  INFO 26154 --- [           main] o.s.b.w.embedded.tomcat.TomcatWebServer  : Tomcat started on port(s): 8080 (http) with context path ''
2021-12-19 09:33:30.859  INFO 26154 --- [           main] c.example.contract.ProducerApplication   : Started ProducerApplication in 0.918 seconds (JVM running for 1.095)
In a separate window, use HTTPie to make a few requests on the service.
http :8080/hat/1
HTTP/1.1 200
...
{
    "color": "red",
    "id": 1,
    "name": "Sombrero",
    "size": 30
}
http :8080/hat/2
HTTP/1.1 200
...
{
    "color": "blue",
    "id": 2,
    "name": "Beanie",
    "size": 5
}
http :8080/hat/3
HTTP/1.1 404
...
{
    "error": "Not Found",
    "path": "/hat/3",
    "status": 404,
    ...
}
Remember that here you are seeing the “live” data, not the test data that is defined in the base test class and the contracts. In production, this live data would likely be complex data structures residing in a database and would not be so easily generated as is being done in the HatService class.
Add identity with Okta
Now you are going to add Okta JSON Web Token (JWT) auth to the application. You should have already installed the CLI and signed up for a free Okta developer account. If you have not, please follow the installation instructions on the Okta CLI project website and run okta register.
Add the dependency for Okta’s Spring Boot starter to the pom.xml file. This project adds the necessary dependencies to use Okta as an OAuth 2.0 and OIDC provider. Take a look at the project’s GitHub page for more info.
<dependencies>
    ...
    <dependency>
        <groupId>com.okta.spring</groupId>
        <artifactId>okta-spring-boot-starter</artifactId>
        <version>2.1.4</version>
    </dependency>
    ...
</dependencies>
Update the ProducerApplication.java class to the following. This will configure the producer service to use JWT authentication and to authenticate all requests.
src/main/java/com/example/contract/ProducerApplication.java
package com.example.contract;

import org.springframework.boot.SpringApplication;
import org.springframework.boot.autoconfigure.SpringBootApplication;
import org.springframework.security.config.annotation.web.builders.HttpSecurity;
import org.springframework.security.config.annotation.web.configuration.EnableWebSecurity;
import org.springframework.security.config.annotation.web.configuration.WebSecurityConfigurerAdapter;

@SpringBootApplication
public class ProducerApplication {

   public static void main(String[] args) {
      SpringApplication.run(ProducerApplication.class, args);
   }

   @EnableWebSecurity
   public class OAuth2ResourceServerSecurityConfiguration extends WebSecurityConfigurerAdapter {

      @Override
      protected void configure(HttpSecurity http) throws Exception {
         http.authorizeRequests()
             .anyRequest().authenticated()
             .and()
             .oauth2ResourceServer().jwt();
      }
   }
}
Finally, you need to add the Issuer URI to your application.properties file. You need to replace {yourOktaDomain} in the line below with your Okta domain.
src/main/resources/application.properties
okta.oauth2.issuer=https://{yourOktaDomain}/oauth2/default
You can find your Okta URI by typing okta login from the command line. It should print out something like the following.
Okta Org already configured: https://dev-123456.okta.com/
You can also find your Issuer URI by opening your Okta Admin Console and navigating to Security > API and looking at the Issuer URI for the default authorization server.
Start the application (or, if it is still running, use control-c to stop it and restart it).
./mvnw spring-boot:run
Generate a JWT and test the secure app
To generate a valid JWT, you need to create an OpenID Connect (OIDC) application on Okta and use the OIDC Debugger application to request a JWT from the OIDC application.
Run okta apps create. Select the default app name, or change it as you see fit.
Choose Single-Page App and press Enter.
Use https://oidcdebugger.com/debug for the Redirect URI and set the Logout Redirect URI to https://oidcdebugger.com/.
What does the Okta CLI do?
The Okta CLI will create an OIDC Single-Page App in your Okta Org. It will add the redirect URIs you specified and grant access to the Everyone group. It will also add a trusted origin for https://oidcdebugger.com/. You will see output like the following when it’s finished:
Okta application configuration:
Issuer:    https://dev-133337.okta.com/oauth2/default
Client ID: 0oab8eb55Kb9jdMIr5d6
NOTE: You can also use the Okta Admin Console to create your app. See Create a Single-Page App for more information.
An easy way to get an access token is to generate one using OpenID Connect Debugger. Open the site in a new window or tab. Fill in your client ID, and use https://{yourOktaDomain}/oauth2/default/v1/authorize for the Authorize URI. Select code for the response type and Use PKCE.
Click Send Request to continue.
Once you have the access token’s value, save it in a shell variable (in the terminal window where you are going to run the HTTPie command to test the authenticated application).
TOKEN=eyJraWQiOiJDVkdzamc2MDBCNVFXR3VSdVRDckJuLVhLa2J...
Test the authenticated application using the token.
http :8080/hat/1 "Authorization: Bearer $TOKEN"
Make sure you use double quotes in the command above, otherwise the variable will not be expanded.
You should get the first hat returned.
HTTP/1.1 200
...
{
    "color": "red",
    "id": 1,
    "name": "Sombrero",
    "size": 30
}
One of the benefits of the Spring Cloud Contract project is that the mocked and stubbed test objects bypass authentication. This is super helpful (as long as you are not testing application security, of course). You can run ./mvnw clean install or ./mvnw test and you will see that the integration tests still pass and that the stubs are still being generated and deployed.
Create the consumer application
The next step is to create the consumer application. This will simulate a public-facing service to retrieve hats from the producer and serve them to the clients. The key point in this tutorial is to see how the stubs generated from the producer project can be imported into the consumer project and used to verify application behavior.
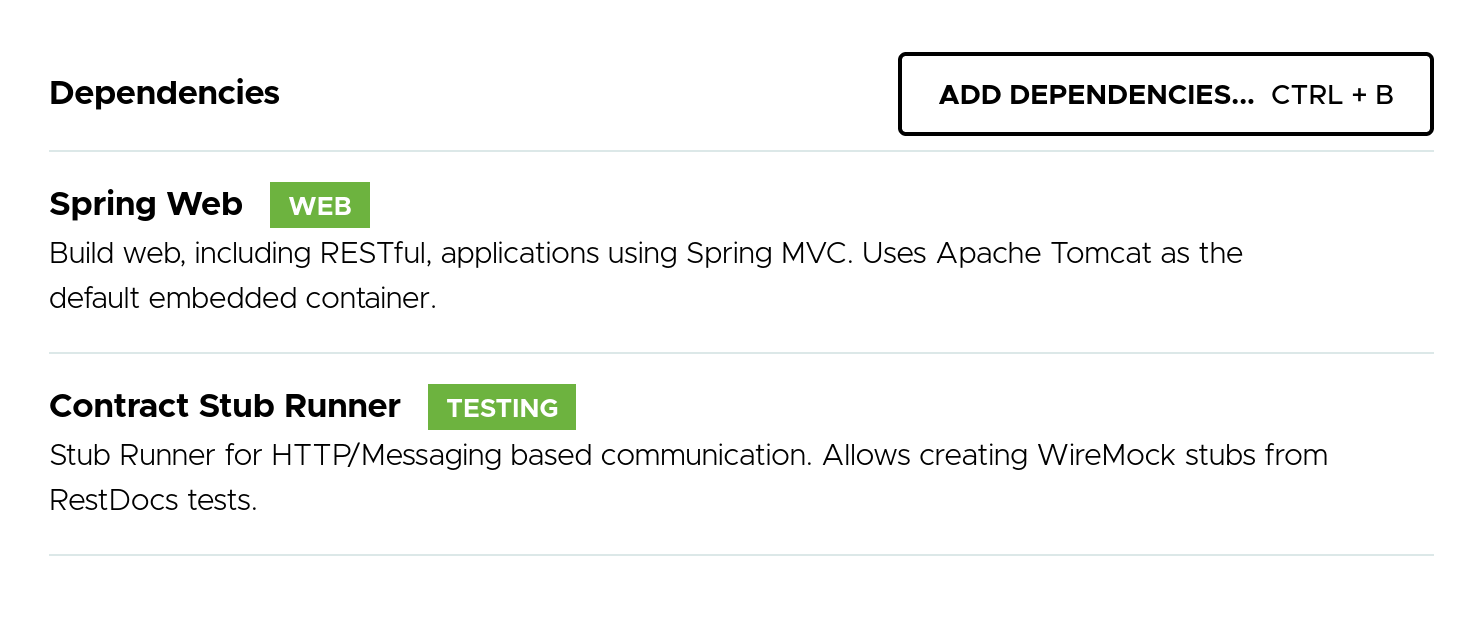
Use the Spring Initializr to create the starter project by following this link.
The project is very similar to the producer project except that the included dependencies are different. Here you are including Spring Web and Contract Stub Runner (in place of the Contract Verifier).
Unzip the project and open it in the IDE or editor of your choice.
Create a Hat.java class that will model the hat returned from the producer.
src/main/java/com/example/consumer/Hat.java
package com.example.consumer;

import lombok.AllArgsConstructor;
import lombok.Data;
import lombok.NoArgsConstructor;

@Data
@AllArgsConstructor
@NoArgsConstructor // needed for Jackson serialization
public class Hat {
    private Long id;
    private String name;
    private Long size;
    private String color;
}
Update the ConsumerApplication.java class.
src/main/java/com/example/consumer/ConsumerApplication.java
package com.example.consumer;

import org.springframework.beans.factory.annotation.Value;
import org.springframework.boot.SpringApplication;
import org.springframework.boot.autoconfigure.SpringBootApplication;
import org.springframework.boot.web.client.RestTemplateBuilder;
import org.springframework.http.HttpEntity;
import org.springframework.http.HttpHeaders;
import org.springframework.http.HttpMethod;
import org.springframework.http.ResponseEntity;
import org.springframework.web.bind.annotation.PathVariable;
import org.springframework.web.bind.annotation.RequestHeader;
import org.springframework.web.bind.annotation.RequestMapping;
import org.springframework.web.bind.annotation.RestController;
import org.springframework.web.client.RestTemplate;

@SpringBootApplication
public class ConsumerApplication {

    public static void main(String[] args) {
        SpringApplication.run(ConsumerApplication.class, args);
    }

    @RestController
    public class HatConsumerResource {

        @Value( "${producer.port}" )
        private Integer producerPort;

        private final RestTemplate restTemplate;

        HatConsumerResource(RestTemplateBuilder restTemplateBuilder) {
            this.restTemplate = restTemplateBuilder.build();
        }

        @RequestMapping("/wearhat/{hatId}")
        String getMessage(@PathVariable("hatId") Long personId, @RequestHeader("authorization") String authorizationHeader) {

            HttpHeaders headers = new HttpHeaders();
            headers.set("Authorization", authorizationHeader);
            HttpEntity<Void> requestEntity = new HttpEntity<>(headers);

            ResponseEntity<Hat> response = restTemplate.exchange("http://localhost:"+producerPort+"/hat/{hatId}", HttpMethod.GET, requestEntity, Hat.class, personId);
            Hat hat = response.getBody();

            return "Enjoy your new " + hat.getName();
        }

    }
}
Add a line to the application.properties file to change the application port from the default, 8080, to 8081 so that it does not conflict with the producer application. You’re also going to specify the producer port in the properties file so that the integration tests can use a different port for the mocked service. (You’ll see why in a bit.)
src/main/resources/application.properties
server.port=8081
producer.port=8080
This is a very simple consumer service. It makes a request to the producer for a hat by ID, simply passing along the Authorization header. The project could be made more realistic by adding security to the consumer as well. (The process would be exactly as described above for the producer.) And in a live scenario, this service would probably be pulling data from multiple other services and performing some sort of business logic before returning a value. However, here, the goal here is to demonstrate the stubs and integration testing, so I’m keeping the consumer itself as basic as possible.
Make sure your producer application is still running. In a new shell, run the consumer application.
./mvnw spring-boot:run
Once the application is running, you can use the access token you created earlier to make a request on the consumer (which will pass along the request to the secured producer).
http :8081/wearhat/1 "Authorization: Bearer $TOKEN"
You should see the following.
HTTP/1.1 200
...

Enjoy your new Sombrero
Import the producer stubs into the consumer project and create integration tests
Now, the exciting part. You’re going to import the stubs generated from the producer project into the consumer project and use them for integration tests.
First, create an application.properties file in the src/test/resources folder. Notice that you are changing the producer.port to 8100. This is the port on which the stubbed producer will run. It’s helpful if this is different than the actual port on which the producer runs.
src/test/resources/application.properties
server.port=8081
producer.port=8100
Create your first test file called ContractIntegrationTest.java.
src/test/java/com/example/consumer/ContractIntegrationTest.java
package com.example.consumer;

import org.junit.jupiter.api.Test;
import org.springframework.boot.test.context.SpringBootTest;
import org.springframework.cloud.contract.stubrunner.spring.AutoConfigureStubRunner;
import org.springframework.cloud.contract.stubrunner.spring.StubRunnerProperties;
import org.springframework.http.HttpStatus;
import org.springframework.http.ResponseEntity;
import org.springframework.web.client.HttpClientErrorException;
import org.springframework.web.client.RestTemplate;
import static org.assertj.core.api.Assertions.assertThat;

@SpringBootTest
@AutoConfigureStubRunner(ids = {"com.example:producer:+:stubs:8100"}, stubsMode = StubRunnerProperties.StubsMode.LOCAL)
public class ContractIntegrationTest {

    @Test
    public void get_hat1() {
        RestTemplate restTemplate = new RestTemplate();
        ResponseEntity<Hat> responseEntity = restTemplate.getForEntity("http://localhost:8100/hat/1", Hat.class);
        assertThat(responseEntity.getStatusCodeValue()).isEqualTo(200);
        Hat hat = responseEntity.getBody();
        assertThat(hat.getId()).isEqualTo(1);
        assertThat(hat.getName()).isEqualTo("Test Hat 1");
        assertThat(hat.getSize()).isEqualTo(10);
        assertThat(hat.getColor()).isEqualTo("striped");
    }

    @Test
    public void get_hat2() {
        RestTemplate restTemplate = new RestTemplate();
        ResponseEntity<Hat> responseEntity = restTemplate.getForEntity("http://localhost:8100/hat/2", Hat.class);
        assertThat(responseEntity.getStatusCodeValue()).isEqualTo(200);
        Hat hat = responseEntity.getBody();
        assertThat(hat.getId()).isEqualTo(2);
        assertThat(hat.getName()).isEqualTo("Test Hat 2");
        assertThat(hat.getSize()).isEqualTo(7);
        assertThat(hat.getColor()).isEqualTo("green");
    }

    @Test
    public void get_hat3() {
        try {
            RestTemplate restTemplate = new RestTemplate();
            ResponseEntity<Hat> responseEntity = restTemplate.getForEntity("http://localhost:8100/hat/3", Hat.class);
        }
        catch (HttpClientErrorException ex) {
            assertThat(ex.getStatusCode()).isEqualTo(HttpStatus.NOT_FOUND);
        }
    }
}
The producer stubs are imported with this line:
@AutoConfigureStubRunner(ids = {"com.example:producer:+:stubs:8100"}, stubsMode = StubRunnerProperties.StubsMode.LOCAL)
You’re specifying the com.example:producer project, with the latest version, the stubs (not the jar), and telling the stub runner to start the stubbed service on port 8100. Putting the stub runner in LOCAL mode means that it will look in the local Maven repo instead of looking online, which can be configured using the REMOTE value here. With that single annotation, Spring will create a service on port 8100 based on the stubs and generated from the contracts in the producer project.
You also define three tests that match the expected behavior defined in the contracts.
Next, create a more realistic integration test on the consumer in a new file, ConsumerIntegrationTest.java.
src/test/java/com/example/consumer/ConsumerIntegrationTest.java
package com.example.consumer;

import org.junit.jupiter.api.Test;
import org.springframework.beans.factory.annotation.Autowired;
import org.springframework.boot.test.autoconfigure.web.servlet.AutoConfigureMockMvc;
import org.springframework.boot.test.context.SpringBootTest;
import org.springframework.cloud.contract.stubrunner.spring.AutoConfigureStubRunner;
import org.springframework.cloud.contract.stubrunner.spring.StubRunnerProperties;
import org.springframework.test.web.servlet.MockMvc;
import static org.hamcrest.Matchers.containsString;
import static org.springframework.test.web.servlet.request.MockMvcRequestBuilders.get;
import static org.springframework.test.web.servlet.result.MockMvcResultHandlers.print;
import static org.springframework.test.web.servlet.result.MockMvcResultMatchers.content;
import static org.springframework.test.web.servlet.result.MockMvcResultMatchers.status;

@SpringBootTest
@AutoConfigureMockMvc
@AutoConfigureStubRunner(ids = {"com.example:producer:+:stubs:8100"}, stubsMode = StubRunnerProperties.StubsMode.LOCAL)
public class ConsumerIntegrationTest {

    @Autowired
    private MockMvc mockMvc;

    @Test
    public void shouldReturnDefaultMessage() throws Exception {
        this.mockMvc.perform(
                get("/wearhat/1").header("authorization", "dummyvalue"))
                .andDo(print())
                .andExpect(status().isOk())
                .andExpect(content().string(containsString("Enjoy your new Test Hat 1")));
    }

}
This is why you specified the producer port in the application.properties file. By using different ports in src/test/java and src/main/java you are able to direct the tests to the stubbed producer, which allows you to create a true integration test. In the test above, the mocked consumer calls the stubbed producer and returns the result, which is checked against the expected value. Otherwise, when you ran the test above, it would try and call the producer on port 8080, which would call the actual producer running on that port.
You can run these tests in your IDE or from the command line with ./mvnw test. All tests should pass.
[INFO] Results:
[INFO]
[INFO] Tests run: 5, Failures: 0, Errors: 0, Skipped: 0
[INFO]
[INFO] ------------------------------------------------------------------------
[INFO] BUILD SUCCESS
[INFO] ------------------------------------------------------------------------
Learn more about Spring Boot and Spring Cloud Contract
In this tutorial you saw how Spring Cloud Contract can be used with Spring Boot to improve integration testing of Java-based microservices. You also saw how Okta can be used to implement OAuth 2.0 and OIDC security in a Spring Boot application.
You can find the source code for this example in our okta-spring-cloud-contract-example repository.
If you liked this post, there’s a good chance you might like some of our other ones.
- How to Use Client Credentials Flow with Spring Security
- Java Records: A WebFlux and Spring Data Example
- Learn How to Build a Single-Page App with Vue and Spring Boot
- Full Stack Java with React, Spring Boot, and JHipster
If you have any questions about this post, please add a comment below. For more awesome content, follow @oktadev on Twitter, like us on Facebook, or subscribe to our YouTube channel.
Changelog:
- Feb 2, 2022: Fixed mistake that said putting multiple contracts in one file caused an error. See okta-blog#1064 and okta-blog#1065 for the changes made in this post.
Okta Developer Blog Comment Policy
We welcome relevant and respectful comments. Off-topic comments may be removed.