A Quick Guide to Angular and GraphQL

Over the past five years, GraphQL has established itself as the most popular alternative to REST APIs. GraphQL has several advantages over traditional REST-based services. First of all, GraphQL makes the query schema available to the clients. A client that reads the schema immediately knows what services are available on the server. On top of that, the client is able to perform a query on a subset of the data.
Both of these features make the API much more flexible. The server can freely extend the API or make different parts of it available to different clients without breaking any client code. Another major advantage is the ability to perform complex queries. This reduces the number of API calls a client has to perform, and therefore improves performance.
In this tutorial, I will show you how to consume GraphQL in an Angular client. First, I will create a simple GraphQL server using Express. Then I will use the Apollo library to create a service in Angular that connects to the API and performs queries on it. I will implement a simple application that lets you browse the characters of the Star Wars franchise and look up details about their races and home planets. I will not assume any prior knowledge of Express, Angular, or GraphQL. I will assume that you are familiar with JavaScript and Node and have an up-to-date version of the npm package manager installed on your computer.
Prerequisites:
Table of Contents
- Implement a GraphQL server with Express
- Create an Angular GraphQL client
- Integrate OIDC for auth
- Learn more about Angular, GraphQL, and single-page applications
Note: In May 2025, the Okta Integrator Free Plan replaced Okta Developer Edition Accounts, and the Okta CLI was deprecated.
We preserved this post for reference, but the instructions no longer work exactly as written. Replace the Okta CLI commands by manually configuring Okta following the instructions in our Developer Documentation.
Implement a GraphQL server with Express
In this section, I will show you how to implement the GraphQL server using the Express framework. To start, open your terminal in an empty folder of your choice. This will be the folder that will contain the server project. Inside that folder, run the following command to initialize your Express project.
npm init -y
This will create a package.json in your folder containing the project information and dependencies. Next, you need to install the dependencies required for this project. In your terminal, run the following command.
npm i -E express@4.17.1 graphql@15.6.1 express-graphql@0.12.0 cors@2.8.5 \
  body-parser@1.19.0 csv-parse@4.16.3
To make the server work, you will need some data. I have chosen to keep it simple and use existing CSV data from Kaggle, a machine learning and data science community. Joe Young has put together Star Wars character data from the Fandom Wiki and made it freely available at this link https://www.kaggle.com/jsphyg/star-wars. You will need only two files from his collection for this project characters.csv and species.csv. You might have to create a Kaggle account to download the data. Place the files into your project folder.
GraphQL uses a global schema to define the queries allowed on the API and the data they return. Create a file schema.graphql and paste the following contents into it.
type Query {
  characters(offset: Int = 0, limit: Int = 10): CharactersResult
  character(name: String!): Character
  species(name: String!): Species
}

type CharactersResult {
  count: Int
  characters: [Character]
}

type Character {
  name: String
  height: Int
  mass: String
  hair_color: String
  skin_color: String
  eye_color: String
  birth_year: String
  gender: String
  homeworld: String
  species: String
}

type Species {
  name: String
  classification: String
  designation: String
  average_height: String
  skin_colors: String
  hair_colors: String
  eye_colors: String
  average_lifespan: String
  language: String
  homeworld: String
}
The Query type defines the entry point of the schema. It defines three queries: characters, character, and species. The data returned by these queries is defined in separate types in the schema file. Now, create a new file app.js, and fill it with the code below.
const express = require('express');
const cors = require('cors');
const { json } = require('body-parser');
const fs = require('fs');
const { graphqlHTTP } = require('express-graphql');
const { buildSchema } = require('graphql');
const parse = require('csv-parse/lib/sync');

const app = express()
  .use(cors())
  .use(json());

const schema = buildSchema(fs.readFileSync('schema.graphql', 'utf8'));
const characters = parse(fs.readFileSync('characters.csv', 'utf8'), { columns: true });
const species = parse(fs.readFileSync('species.csv', 'utf8'), { columns: true });

const root = {
  characters: (args) => {
    return {
      count: characters.length,
      characters: characters.slice(args.offset, args.offset + args.limit)
    };
  },
  character: (args) => {
    return characters.find((ch) => ch.name === args.name);
  },
  species: (args) => {
    return species.find((ch) => ch.name === args.name);
  },
};

app.use('/graphql', graphqlHTTP({
  schema,
  rootValue: root,
  graphiql: true,
}));

app.listen(4201, (err) => {
  if (err) {
    return console.log(err);
  }
  return console.log('Server listening on port 4201');
});
This is all the code you need to write to create the GraphQL server. The graphqlHTTP middleware registers the handlers on the /graphql route of the express server. The root object defines so-called reducers that will be called whenever a client queries the API. They are responsible for collecting and returning the data.
The nice thing about GraphQL is that you can immediately try it out. In your terminal, run the following command.
node app.js
Now open your browser at http://localhost:4201/graphql and you will be presented with an interactive console.
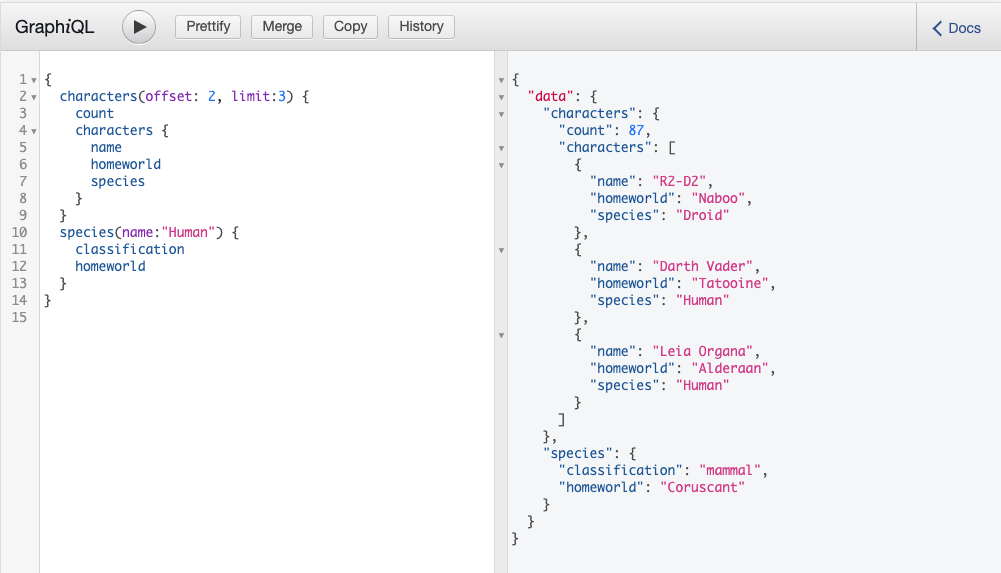
On the left side, you can try out queries. Give it a go by pasting the following query into the query editor in the browser and pressing the play button at the top.
{
  characters(offset: 2, limit:3) {
    count
    characters {
      name
      homeworld
      species
    }
  }
  species(name:"Human") {
    classification
    homeworld
  }
}
You should see this result on the right side of the screen.
{
  "data": {
    "characters": {
      "count": 87,
      "characters": [
        {
          "name": "R2-D2",
          "homeworld": "Naboo",
          "species": "Droid"
        },
        {
          "name": "Darth Vader",
          "homeworld": "Tatooine",
          "species": "Human"
        },
        {
          "name": "Leia Organa",
          "homeworld": "Alderaan",
          "species": "Human"
        }
      ]
    },
    "species": {
      "classification": "mammal",
      "homeworld": "Coruscant"
    }
  }
}
Create an Angular GraphQL client
Angular provides a command-line tool that makes it easy for anybody to set up and maintain an Angular project. The Angular CLI tool can be installed globally using npm by running the following command.
npm install -g @angular/cli@12.2.10
This package provides the global ng command. With this, open the terminal in a folder of your choice and create a new project by running the command below.
ng new graphql-client --routing --style=css
This will create a folder graphql-client, install the Angular framework into it, set up all the necessary toolchains, and create a default application skeleton that you can extend.
The Apollo library offers a convenient GraphQL client. Navigate into the new project folder and add it to the project by running the following command.
ng add apollo-angular
When asked to confirm the installation of the library, answer with y. Next, you will be asked to provide the endpoint URI. Type in http://localhost:4201/graphql and press enter. Now that the basic setup is done, you are ready to create a few components.
Start by creating three components: a Navbar for the page navigation, Home for the home page, and Browse, containing a page to let you browse through the query results. In the terminal, run the following commands.
ng generate component navbar --module=app
ng generate component home --module=app
ng generate component browse --module=app
In an editor of your choice, open src/app/app.component.html and replace its content with the following two lines.
<app-navbar></app-navbar>
<router-outlet></router-outlet>
There are only two components here. The first will show the navigation bar. The <router-outlet> is a special component in Angular. The Angular router is responsible for reading the navigation URL and deciding which component to show based on the requested path. The <router-outlet> will then show that component.
Next, open src/app/navbar/navbar.component.html and paste the code below into the file.
<div class="navbar">
  <div>
    GraphQL Angular App
  </div>
  <nav>
    <ul>
      <li><a routerLink="/">Home</a></li>
      <li><a routerLink="/browse">Browse</a></li>
    </ul>
  </nav>
</div>
Notice the routerLink properties on the anchor tags. These links are similar to relative links inside regular HTML. But instead of reloading the page, they instruct the router to replace the active component in the router-outlet.
The navigation bar could use some styling. Open src/app/navbar/navbar.component.css and fill in the CSS code below.
.navbar {
  padding: 8px 16px;
  background-color: #333333;
  color: #ffffff;
  display: flex;
  justify-content: space-between;
  align-items: center;
}

nav ul {
  display: flex;
  list-style: none;
  padding: 0;
}

nav li {
  margin-left: 8px;
  margin-right: 8px;
}

a {
  color: #ffffff;
  text-decoration: none;
}
Now, update the Home component by pasting the following line into src/app/home/hone.component.html.
<h1>Consuming GraphQL with Angular</h1>
To style the component, open src/app/home/hone.component.css and add the following code.
h1 {
  text-align: center;
  margin: 4rem;
}
Before you can start work on the Browse component, you need a service class that encapsulates the calls to the GraphQL API. This class is the core part of this application and demonstrates just how easy it is to communicate with the server using GraphQL. Open the terminal in your project folder and run the following command.
ng generate service characters
This will create a new file src/app/characters.service.ts. Open this file in your editor and replace its contents with the code below.
import { Injectable } from '@angular/core';
import { Apollo, gql, QueryRef } from 'apollo-angular';

export interface Character {
  name: string;
  homeworld: string;
  species: string;
}

export interface CharacterDetail extends Character {
  height: number;
  mass: string;
  hair_color: string;
  skin_color: string;
  eye_color: string;
  birth_year: string;
  gender: string;
}

export interface CharactersResult {
  count: number;
  characters: Character[];
}

export interface Species {
  name: string;
  classification: string;
  designation: string;
  average_height: string;
  skin_colors: string;
  hair_colors: string;
  eye_colors: string;
  average_lifespan: string;
  language: string;
  homeworld: string;
}

@Injectable({
  providedIn: 'root'
})
export class CharactersService {

  private charactersQuery: QueryRef<{characters: CharactersResult}, { offset: number}>;
  private findCharacterQuery: QueryRef<{character: CharacterDetail}, { name: string}>;
  private findSpeciesQuery: QueryRef<{species: Species}, { name: string}>;

  constructor(private apollo: Apollo) {
    this.charactersQuery = this.apollo.watchQuery({
      query: gql`query characters($offset: Int!) {
        characters(offset: $offset) {
          count
          characters {
            name
            homeworld
            species
          }
        }
      }`
    });

    this.findCharacterQuery = this.apollo.watchQuery({
      query: gql`query character($name: String!) {
        character(name: $name) {
          name
          height
          mass
          hair_color
          skin_color
          eye_color
          birth_year
          gender
          homeworld
          species
        }
      }`
    });

    this.findSpeciesQuery = this.apollo.watchQuery({
      query: gql`query species($name: String!) {
        species(name: $name) {
          name
          classification
          designation
          average_height
          skin_colors
          hair_colors
          eye_colors
          average_lifespan
          language
          homeworld
        }
      }`
    });
  }

  async getCharacters(offset: number): Promise<CharactersResult> {
    const result = await this.charactersQuery.refetch({ offset });
    return result.data.characters;
  }

  async findCharacter(name: string): Promise<CharacterDetail> {
    const result = await this.findCharacterQuery.refetch({ name });
    return result.data.character;
  }

  async findSpecies(name: string): Promise<Species> {
    const result = await this.findSpeciesQuery.refetch({ name });
    return result.data.species;
  }
}
This implementation of the service consists of three parts. At the top of the file, I declared the TypeScript types related to this service. Each type represents the result of a query. The second part is the constructor. Here, the Apollo queries are defined. The queries make use of the gql tag to template strings. This tag translates the strings to GraphQL documents. Finally, the member functions of the service make the queries publicly available to components in your application.
The queries are asynchronous and return promises that resolve the query result once a response from the server has been received.
With this, you can now implement the Browse component. Open src/app/browse/browse.component.ts and change its content to match the following code.
import { Component, OnInit } from '@angular/core';
import { Character, CharactersService } from '../characters.service';

@Component({
  selector: 'app-browse',
  templateUrl: './browse.component.html',
  styleUrls: ['./browse.component.css']
})
export class BrowseComponent implements OnInit {
  offset: number = 0;
  count: number = 0;
  characters: Character[] = [];

  constructor(private charactersService: CharactersService) {}

  async ngOnInit(): Promise<void> {
    await this.updateCharacters();
  }

  async updateCharacters() {
    const result = await this.charactersService.getCharacters(this.offset);
    this.count = result.count;
    this.characters = result.characters;
  }

  showPrevious() {
    return this.offset > 0;
  }

  showNext() {
    return this.offset + 10 < this.count;
  }

  async onPrevious() {
    this.offset -= 10;
    await this.updateCharacters();
  }

  async onNext() {
    this.offset += 10;
    await this.updateCharacters();
  }
}
The function updateCharacters() uses the CharactersService to obtain a list of characters from the server. The functions onPrevious() and onNext() are callbacks that can be used to page through the results. Now, open src/app/browse/browse.component.html and copy the following contents into it.
<div class="browse">
  <h1>Browse Characters</h1>
  <table>
    <tr>
      <th>Name</th>
      <th>Homeworld</th>
      <th>Species</th>
    </tr>
    <tr *ngFor="let character of characters">
      <td><a [routerLink]="['/character']" [queryParams]="{name: character.name}">{{character.name}}</a></td>
      <td>{{character.homeworld}}</td>
      <td><a [routerLink]="['/species']" [queryParams]="{name: character.species}">{{character.species}}</a></td>
    </tr>
  </table>
  <div class="pager">
    <button class="prev" *ngIf="showPrevious()" (click)="onPrevious()"> prev </button>
    <button class="next" *ngIf="showNext()" (click)="onNext()"> next </button>
  </div>
</div>
The component displays the character data in a table and provides navigation buttons to page through the results. It also provides links to routes that will display details of a character or its species. You will be implementing those routes later.
The CSS file src/app/browse/browse.component.css can be used to provide some styling to the browse component. Update the contents to the code below.
.browse {
  width: 100%;
  display: flex;
  flex-direction: column;
  align-items: center;
}

.browse > * {
  width: 100%;
  max-width: 800px;
}

table {
  margin-top: 16px;
  margin-bottom: 16px;
  border-collapse: collapse;
  border: 1px solid #bbbbbb;
}

tr:nth-child(odd) {
  background-color: #dddddd;
}

th, td {
  padding: 4px 8px;
  border-right: 1px solid #bbbbbb;
  border-left: 1px solid #bbbbbb;
}

.prev {
  float: left;
}

.next {
  float: right;
}
Now, create the two components that will display the character and species details. Open the terminal again and type in the following commands.
ng generate component character --module=app
ng generate component species --module=app
This will create the files for the two components. Open src/app/character/character.component.ts and paste the following code into it.
import { Component, OnInit } from '@angular/core';
import { ActivatedRoute } from '@angular/router';
import { CharacterDetail, CharactersService } from '../characters.service';

@Component({
  selector: 'app-character',
  templateUrl: './character.component.html',
  styleUrls: ['./character.component.css']
})
export class CharacterComponent implements OnInit {
  character!: CharacterDetail;

  constructor(private route: ActivatedRoute, private characterService: CharactersService) { }

  ngOnInit(): void {
    this.route.queryParams.subscribe(async (params) => {
      this.character = await this.characterService.findCharacter(params.name);
    });
  }
}
This is a simple component that reads the character’s name from the query parameters in the URL and then uses CharactersService to obtain the character detail. The corresponding template simply shows the queried data. Open src/app/character/character.component.html and copy the following contents into it.
<div *ngIf=character>
  <p><strong>Name:</strong> {{character.name}}</p>
  <p><strong>Mass:</strong> {{character.mass}}</p>
  <p><strong>Hair Color:</strong> {{character.hair_color}}</p>
  <p><strong>Skin Color:</strong> {{character.skin_color}}</p>
  <p><strong>Eye Color:</strong> {{character.eye_color}}</p>
  <p><strong>Birth Year:</strong> {{character.birth_year}}</p>
  <p><strong>Gender:</strong> {{character.gender}}</p>
</div>
<a [routerLink]="['/browse']">Back</a>
The component showing the species information follows the same pattern. Open src/app/species/species.component.ts and update the content to match the code below.
import { Component, OnInit } from '@angular/core';
import { ActivatedRoute } from '@angular/router';
import { CharactersService, Species } from '../characters.service';

@Component({
  selector: 'app-species',
  templateUrl: './species.component.html',
  styleUrls: ['./species.component.css']
})
export class SpeciesComponent implements OnInit {
  species!: Species;

  constructor(private route: ActivatedRoute, private characterService: CharactersService) { }

  ngOnInit(): void {
    this.route.queryParams.subscribe(async (params) => {
      this.species = await this.characterService.findSpecies(params.name);
    });
  }
}
Next, open src/app/species/species.component.html and paste in the code below.
<div *ngIf=species>
  <p><strong>Name:</strong> {{species.name}}</p>
  <p><strong>Classification:</strong> {{species.classification}}</p>
  <p><strong>Designation:</strong> {{species.designation}}</p>
  <p><strong>Hair Colors:</strong> {{species.hair_colors}}</p>
  <p><strong>Skin Colors:</strong> {{species.skin_colors}}</p>
  <p><strong>Eye Colors:</strong> {{species.eye_colors}}</p>
  <p><strong>Average Lifespan:</strong> {{species.average_lifespan}}</p>
  <p><strong>Language:</strong> {{species.language}}</p>
  <p><strong>Homeworld:</strong> {{species.homeworld}}</p>
</div>
<a [routerLink]="['/browse']">Back</a>
I already mentioned how the Angular router is responsible for deciding which component to render, based on the path in the URL. In the file src/app/app-routing.module.ts you can define these associations.
import { NgModule } from '@angular/core';
import { RouterModule, Routes } from '@angular/router';
import { HomeComponent } from './home/home.component';
import { BrowseComponent } from './browse/browse.component';
import { CharacterComponent } from './character/character.component';
import { SpeciesComponent } from './species/species.component';

const routes: Routes = [
  {
    path: '',
    component: HomeComponent
  },
  {
    path: 'browse',
    component: BrowseComponent,
  },
  {
    path: 'character',
    component: CharacterComponent,
  },
  {
    path: 'species',
    component: SpeciesComponent,
  },
];

@NgModule({
  imports: [RouterModule.forRoot(routes)],
  exports: [RouterModule]
})
export class AppRoutingModule { }
You are now ready to test the application. Make sure your server is running as described in the previous section. Then open a terminal in the client Angular project folder and run the following command.
ng serve
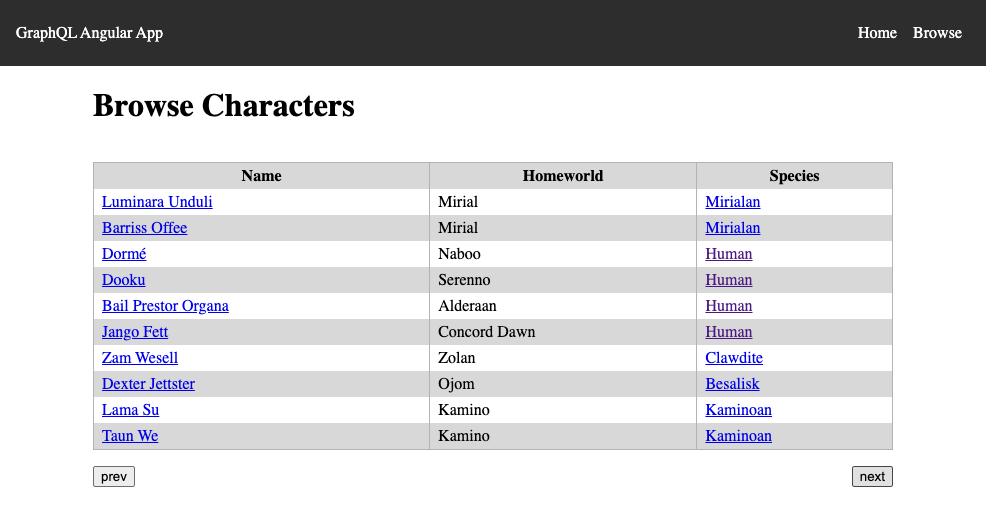
Open your browser, navigate to http://localhost:4200 and you should see the homepage of your app. You can use the navigation bar to go to the browse page. You should see something like the image below.
Integrate OIDC for auth
Every good application needs some user control. Okta lets you add user authentication easily to your application.
Before you begin, you’ll need a free Okta developer account. Install the Okta CLI and run okta register to sign up for a new account. If you already have an account, run okta login.
Then, run okta apps create. Select the default app name, or change it as you see fit.
Choose Single-Page App and press Enter.
Use http://localhost:4200/login/callback for the Redirect URI and set the Logout Redirect URI to http://localhost:4200.
What does the Okta CLI do?
The Okta CLI will create an OIDC Single-Page App in your Okta Org. It will add the redirect URIs you specified and grant access to the Everyone group. It will also add a trusted origin for http://localhost:4200. You will see output like the following when it’s finished:
Okta application configuration:
Issuer:    https://dev-133337.okta.com/oauth2/default
Client ID: 0oab8eb55Kb9jdMIr5d6
NOTE: You can also use the Okta Admin Console to create your app. See Create an Angular App for more information.
Make a note of the Issuer and the Client ID. You will need them in the next steps.
Add JWT authentication to the server
Adding authentication to the server is easy. Open a terminal in the server’s project folder and install a few more dependencies by running the following command.
npm i -E @okta/jwt-verifier@2.3.0 express-bearer-token@2.4.0
Now, create a new file auth.js with the content below.
const OktaJwtVerifier = require('@okta/jwt-verifier');

const oktaJwtVerifier = new OktaJwtVerifier({
  clientId: '{yourClientID}',
  issuer: 'https://{yourOktaDomain}/oauth2/default'
});

module.exports = async function oktaAuth(req, res, next) {
  try {
    const token = req.token;
    if (!token) {
      return res.status(401).send('Not Authorized');
    }
    await oktaJwtVerifier.verifyAccessToken(token, 'api://default');
    next();
  }
  catch (err) {
    return res.status(401).send(err.message);
  }
};
This module exports an Express middleware that checks the bearer token of an incoming request and verifies its validity. To use this middleware, open app.js and add the following require statements to the top of the file.
const bearerToken = require('express-bearer-token');
const oktaAuth = require('./auth');
Then, update the creation of the Express server with the declaration of the middleware to match the following.
const app = express()
  .use(cors())
  .use(json())
  .use(bearerToken())
  .use(oktaAuth);
The bearerToken middleware extracts the bearer token from a request header. oktaAuth then checks the token. You can now run node app.js again to start the server. Only now, if you try to access the API you will get a 401 Unauthorized error response from the server.
Add Okta to Angular
To allow the client to access the GraphQL API, you need to also add Okta authentication to the Angular application. Open a terminal in the client’s project folder and install the okta-angular dependency by running the following command.
npm install -E @okta/okta-angular@4.1.0 @okta/okta-auth-js@5.6.0
Open src/app/app.module.ts and create an OktaAuth instance by adding the following lines after the existing import statements.
import { OKTA_CONFIG, OktaAuthModule } from '@okta/okta-angular';
import { OktaAuth } from '@okta/okta-auth-js';

const config = {
  issuer: 'https://{yourOktaDomain}/oauth2/default',
  clientId: '{yourClientID}',
  redirectUri: window.location.origin + '/login/callback'
}
const oktaAuth = new OktaAuth(config);
Make sure to replace the {...} placeholders with your OIDC app settings.
Next, add OktaAuthModule to the array of imports in the NgModule configuration.
@NgModule({
  ...
  imports: [
    ...
    OktaAuthModule
  ],
  ...
})
Also, create a new providers property that configures the module by pasting the code below after the imports array.
providers: [{ provide: OKTA_CONFIG, useValue: { oktaAuth }}],
You now need to configure the router to accept the login callback from Okta. Open src/app/app-routing.module.ts and add the following import statement to the top of the file.
import { OktaAuthGuard, OktaCallbackComponent } from '@okta/okta-angular';
Update the routes configuration object to match the code below.
const routes: Routes = [
  {
    path: '',
    component: HomeComponent
  },
  {
    path: 'browse',
    component: BrowseComponent,
    canActivate: [ OktaAuthGuard ]
  },
  {
    path: 'character',
    component: CharacterComponent,
    canActivate: [ OktaAuthGuard ]
  },
  {
    path: 'species',
    component: SpeciesComponent,
    canActivate: [ OktaAuthGuard ]
  },
  {
    path: 'login/callback',
    component: OktaCallbackComponent
  },
];
Here you have added the OktaAuthGuard to the three routes that display character data. When a user who isn’t logged in attempts to access these routes, they will now automatically be redirected to the Okta sign-in page before gaining access.
In the last section, you added authentication to the server. This means that any access to the server now needs to provide an access token. To provide this token, open src/app/graphql.module.ts and replace the existing createApollo function with the implementation below.
import { setContext } from '@apollo/client/link/context';
import { OktaAuth } from '@okta/okta-auth-js';

const uri = 'http://localhost:4201/graphql';
export function createApollo(httpLink: HttpLink, oktaAuth: OktaAuth): ApolloClientOptions<any> {
  const http = httpLink.create({ uri });
  const auth = setContext(async (_, { headers }) => {
    const token = oktaAuth.getAccessToken();

    return token ? { headers: { Authorization: `Bearer ${token}` } } : {};
  });

  return {
    link: auth.concat(http),
    cache: new InMemoryCache()
  };
}
The function now expects an OktaAuth instance as the second argument. This means that you have to add it to the deps array in the NgModule provider for the Apollo options. Update the deps array to match the following.
deps: [HttpLink, OktaAuth]
Finally, you want to provide feedback to the user’s sign-in status and also provide manual ways of logging in and out of the application. Open src/app/navbar/navbar.component.ts and replace its contents with the code below.
import { Component } from '@angular/core';
import { OktaAuthStateService } from '@okta/okta-angular';
import { OktaAuth } from '@okta/okta-auth-js';

@Component({
  selector: 'app-navbar',
  templateUrl: './navbar.component.html',
  styleUrls: ['./navbar.component.css']
})
export class NavbarComponent {

  constructor(public authStateService: OktaAuthStateService, private oktaAuth: OktaAuth) {}

  async login() {
    await this.oktaAuth.signInWithRedirect();
  }

  async logout() {
    await this.oktaAuth.signOut();
  }

}
The OktaAuthStateService can be queried to provide the user’s status. The callbacks login() and logout() can be used to sign the user in and out. Now, open src/app/navbar/navbar.component.html and add the following lines as the first element inside the <nav> element.
<div>
  <button *ngIf="!(authStateService.authState$ | async)?.isAuthenticated" (click)="login()">Login</button>
  <button *ngIf="(authStateService.authState$ | async)?.isAuthenticated" (click)="logout()">Logout</button>
</div>
This will show a Login button if the user is not logged in and a Logout button if the user is logged in.
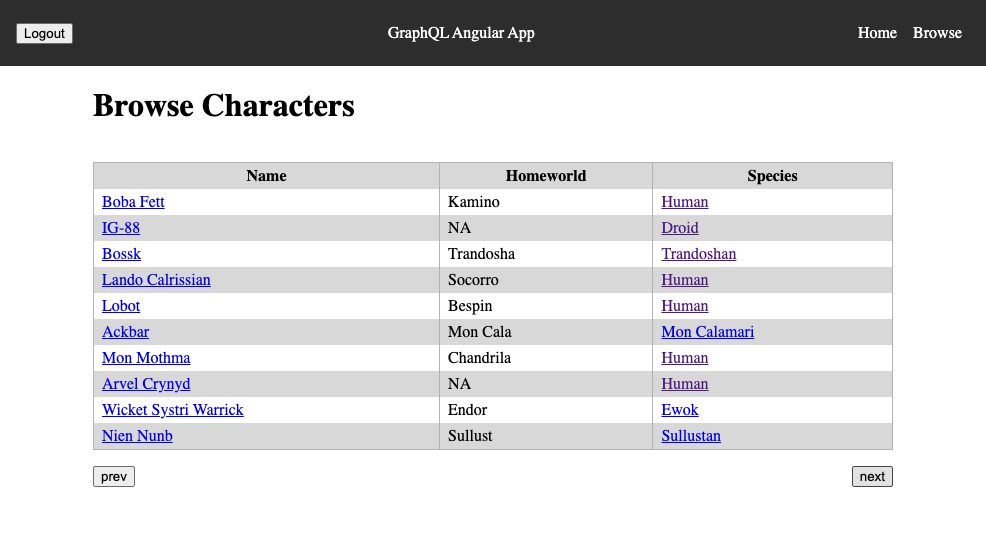
Congratulations! You have completed the implementation of an Angular app that consumes GraphQL from a Node/Express server. The application is secured with Okta’s authentication service. You can now start the app by running ng serve in your project folder. Make sure the server is also running as described above. Open your browser to http://localhost:4200 to open the app. When you click on Browse in the navigation bar, you will be taken to the Okta sign-in page. Once you logged in, you will be redirected to the character browser. You should see something like the image below.
Learn more about Angular, GraphQL, and single-page applications
In this tutorial, I have shown you how to create a single-page application that consumes a GraphQL API using Angular. You’ve seen how to create a GraphQL schema that describes the queries and the results that the server supplies.
GraphQL provides a flexible way of implementing APIs that can be extended without breaking existing clients. Clients can specify the data they want to receive and can combine multiple requests into a single query. This makes GraphQL faster than traditional REST APIs because the number of API calls can be greatly reduced.
The app you have written consists of a server and a client. The server uses Express to parse incoming requests before passing them to the GraphQL middleware. The client is built using Angular and uses the Apollo library to interface with the GraphQL API. If you want to learn more about GraphQL, Angular, or single-page apps in general, feel free to follow the links below.
- What Is Angular Ivy and Why Is It Awesome?
- Quickly Consume a GraphQL API from React
- Build a secure GraphQL API with Node.js
- Stop Writing Server-Based Web Apps
You can find the code for this tutorial on GitHub at https://github.com/oktadev/okta-angular-graphql-example.
If you liked this tutorial, chances are you like others we publish. Please follow @oktadev on Twitter and subscribe to our YouTube channel to get notified when we publish new developer tutorials.
Okta Developer Blog Comment Policy
We welcome relevant and respectful comments. Off-topic comments may be removed.