Quickly Consume a GraphQL API from React

React.js is one of the most popular front-end javascript frameworks today. For most of its life, React has connected to REST APIs to fetch or save data on a server. GraphQL is a query language that aims to replace REST APIs by providing consumers with a clear description of the data in the API. By combining these two technologies, you can quickly connect to an API with your React.js application. There are many packages available for connecting to a GraphQL API. One of the most popular is Apollo, however you can also use Axios, or even the built-in JavaScript fetch function. For this application, you will use Axios, but I encourage you to check out Apollo or any other GraphQL/React packages available.
To secure your application, you will be using Okta’s single sign-on provider. Okta provides a great set of tools to make integrating its service into a React application as simple as installing an npm package.
In React, you will learn to build an application using the public GraphQL API provided by Everbase. The data in this API contains some information regarding exchange rates in various currencies, as well as information about countries in which those currencies are used. For this application, you will allow the user to convert his/her money into another currency. Then you will show the user some information about what countries accept that currency.
Table of Contents
- Set Up GraphQL Server as a Service
- Set Up Authentication for Your React Application
- Scaffold Your React Application
- Build Your GraphQL React Application
- Test Your GraphQL React Application
- Learn More About GraphQL and React
Note: In May 2025, the Okta Integrator Free Plan replaced Okta Developer Edition Accounts, and the Okta CLI was deprecated.
We preserved this post for reference, but the instructions no longer work exactly as written. Replace the Okta CLI commands by manually configuring Okta following the instructions in our Developer Documentation.
Set Up GraphQL Server as a Service
The first thing you need to do is sign up for an Everbase account and option an API Key. This can be done on the API Keys section of their site. You can log in with your GitHub account or create an account on their site.
Set Up Authentication for Your React Application
Before you begin, you’ll need a free Okta developer account. Install the Okta CLI and run okta register to sign up for a new account. If you already have an account, run okta login.
Then, run okta apps create. Select the default app name, or change it as you see fit.
Choose Single-Page App and press Enter.
Use http://localhost:3000/callback for the Redirect URI and accept the default Logout Redirect URI of http://localhost:3000.
What does the Okta CLI do?
The Okta CLI will create an OIDC Single-Page App in your Okta Org. It will add the redirect URIs you specified and grant access to the Everyone group. It will also add a trusted origin for http://localhost:3000. You will see output like the following when it’s finished:
Okta application configuration:
Issuer:    https://dev-133337.okta.com/oauth2/default
Client ID: 0oab8eb55Kb9jdMIr5d6
NOTE: You can also use the Okta Admin Console to create your app. See Create a React App for more information.
Make note of your Client ID in the Okta CLI output, as you will need it in your application.
Scaffold Your React Application
Next, you can start to frame out your web application. To start, access the create-react-app toolchain with the command npx create-react-app exchange-rates in the terminal. This will take a minute, so now is the perfect time for a coffee break! Once the command has finished running, you can start to install your packages for the application.
First, you will use bootstrap for the HTML framework. To make bootstrap easier to use with React, you will also include the react-bootstrap package.
cd exchange-rates
npm i bootstrap@4.5.0
npm i react-bootstrap@1.0.1
As mentioned before, you will use the promise based Axios for your HTTP client.
npm i axios@0.21.1
Dotenv will store your environment variables. You can add the .env file to your gitignore for security.
npm i dotenv@8.2.0
React-router-dom will provide some functionality for adding routes to your application, including the secure routes you will set up under authentication.
npm i react-router-dom@5.2.0
Finally, you will need to install the necessary Okta-React packages to make integration to Okta as easy as possible.
npm i @okta/okta-auth-js@4.8.0
npm i @okta/okta-react@5.1.1
npm i @okta/okta-signin-widget@5.5.3
Build Your GraphQL React Application
First, you can add a file to the root of your application named .env. Add the following code to it:
REACT_APP_OKTA_CLIENTID={yourOktaClientId}
REACT_APP_OKTA_URL_BASE=https://{yourOktaDomain}
REACT_APP_OKTA_APP_BASE_URL=http://localhost:3000
REACT_APP_EVERBASE_API_KEY={yourEverbaseApiKey}
Here you have your necessary Okta information and your Okta Application Setup, along with your Everbase API Key.
App With Router Access and App.js
In your src directory, add a new file called AppWithRouterAccess.jsx. Add the following code to it:
import React from 'react';
import { Route, useHistory, } from 'react-router-dom';
import { Security, SecureRoute, LoginCallback } from '@okta/okta-react';
import { OktaAuth, toRelativeUrl } from '@okta/okta-auth-js';

import ExchangeRates from './Pages/ExchangeRate'
import Home from './Pages/Home'
import Login from './Pages/Login'

const AppWithRouterAccess = () => {
  const history = useHistory();
  const onAuthRequired = () => {
      history.push('/login');
  };
  const restoreOriginalUri = async (_oktaAuth, originalUri) => {
    history.replace(toRelativeUrl(originalUri, window.location.origin));
  };

  const baseDomain = process.env.REACT_APP_OKTA_URL_BASE;
  const issuer = baseDomain + '/oauth2/default'
  const clientId = process.env.REACT_APP_OKTA_CLIENTID;
  const redirect = process.env.REACT_APP_OKTA_APP_BASE_URL + '/callback';

  const loggedIn = true;

  const config = {
    issuer: issuer,
    clientId: clientId,
    redirectUri: redirect
  };

  const oktaAuth = new OktaAuth(config);

  return (
    <Security oktaAuth={oktaAuth} restoreOriginalUri={restoreOriginalUri}>
        <Route path='/' exact={true} component={Home} />
        <SecureRoute path='/ExchangeRates' component={ExchangeRates} />
        <Route path='/login' render={() => <Login baseUrl={baseDomain} issuer={issuer} />} />
        <Route path='/callback' component={LoginCallback} />
    </Security>
  );
};

export default AppWithRouterAccess;
The primary job of this file is to define the routes in your application. This file is also where you will set up your Okta client and integrate it into your application. You will notice the ExchangeRates route is defined as SecureRoute. This way, the application will enforce authentication on that route. You also need to define a route for /callback to ensure that Okta’s login redirect URI has a place to land.
Next, you will need to update your App.js page with some custom code to replace the boilerplate from create-react-app.
import React from 'react';
import { BrowserRouter as Router } from 'react-router-dom';
import AppWithRouterAccess from './AppWithRouterAccess';
import 'bootstrap/dist/css/bootstrap.min.css';

const App = () => {
  return (
    <Router>
      <AppWithRouterAccess/>
    </Router>
  );
}

export default App;
This code will tell your application to use your new AppWithRouterAccess page. You are also importing bootstrap here, as react-bootstrap requires the CSS to be imported. This only needs to be imported once.
Add a Header Component
Add a new folder to the src directory called Components. Add a file called Header.jsx to this folder and add the following code:
import React from 'react';
import { useOktaAuth } from '@okta/okta-react';
import { Navbar, Nav, Form, Button } from 'react-bootstrap'

const Header = () => {
  const { oktaAuth, authState } = useOktaAuth();

  if (authState.isPending) {
    return <div>Loading...</div>;
  }

  const button = authState.isAuthenticated ?
    <Button variant="secondary" onClick={() => { oktaAuth.signOut() }}>Logout</Button> :
    <Button variant="secondary" onClick={() => { oktaAuth.onAuthRequired() }}>Login</Button>

  return (
    <Navbar bg="light" expand="lg">
      <Navbar.Brand href="/">Lets Escape</Navbar.Brand>
      <Navbar.Toggle aria-controls="basic-navbar-nav" />
      <Navbar.Collapse id="basic-navbar-nav">
        <Nav className="mr-auto">
          <Nav.Link href="/">Home</Nav.Link>
          <Nav.Link href="/ExchangeRates">Exchange Currency</Nav.Link>
        </Nav>
        <Form inline>
          {button}
        </Form>
      </Navbar.Collapse>
    </Navbar>
  );
};

export default Header;
The header will be used on every page, which is why you create it as a component. The component itself is fairly simple. There are a couple navigation links to the pages you will implement shortly. There is also a button that will change between Login or Logout, depending on the authentication status of the user.
Create a Home Page
Next, you will provide a short landing page for users entering the site. Add a new folder called Pages under the src directory, and add a file called Home.jsx. Add the following code to that file:
import React from 'react';
import { Link, Redirect } from 'react-router-dom';
import Header from '../Components/Header'
import { Container, Row, Col, Card } from 'react-bootstrap'
import { useOktaAuth } from '@okta/okta-react';

const Home = () => {

  const { authState } = useOktaAuth();

  return (authState.isAuthenticated ?

    <Redirect to={{ pathname: '/ExchangeRates' }} /> :

    <Container>
      <Header></Header>
      <Row>
        <Col sm={12} className="text-center">
          <h3>Let's Escape</h3>
          <h4>Connect.  Exchange.  Move.</h4>
          <h5>A React Demo Use Okta and GraphGL</h5>
          <h5><a href="https://www.everbase.co/editor">GraphQL Data Available here</a></h5>
        </Col>
      </Row>
      <br></br>
      <Row >
        <Col sm={12} className="text-center">
          <Card style={{ width: '21.5em', margin: '0 auto' }}>
            <Card.Header>
              Already have an Okta Account?
            </Card.Header>
            <Card.Body>
              <Link to='/ExchangeRates'>Login Here</Link>
            </Card.Body>
          </Card>
        </Col>
      </Row>
    </Container>
  );
};

export default Home;
The one trick here is if the user is already authenticated, you will need to redirect that user to the ExchangeRate route defined earlier.
Create a Login Page and Login Form
The next step is to provide a login page for your users to use when they attempt to access the site. First, add a new file to the Components folder called LoginForm.jsx. The code is as follows:
import React, { useState } from 'react';
import OktaAuth from '@okta/okta-auth-js';
import { useOktaAuth } from '@okta/okta-react';
import { Form, Button, Row, Col } from 'react-bootstrap'

const LoginForm = ({ baseUrl, issuer }) => {

  const { oktaAuth } = useOktaAuth();
  const [sessionToken, setSessionToken] = useState();
  const [username, setUsername] = useState();
  const [password, setPassword] = useState();

  const handleSubmit = (e) => {
    e.preventDefault();
    const oktaAuth = new OktaAuth({ url: baseUrl, issuer: issuer });
    oktaAuth.signIn({ username, password })
      .then(res => setSessionToken(res.sessionToken))
      .catch(err => console.log('Found an error', err));
  };

  const handleUsernameChange = (e) => {
    setUsername(e.target.value);
  };

  const handlePasswordChange = (e) => {
    setPassword(e.target.value);
  };

  if (sessionToken) {
    oktaAuth.signInWithRedirect({ sessionToken });
    return null;
  }

  return (
    <Row>
      <Col sm={3}>
        <Form onSubmit={handleSubmit}>

          <Form.Group controlId="username">
            <Form.Label>Username</Form.Label>
            <Form.Control type="text" placeholder="Enter Username" value={username} onChange={handleUsernameChange} />
          </Form.Group>

          <Form.Group controlId="password">
            <Form.Label>Password</Form.Label>
            <Form.Control type="password" placeholder="password" value={password} onChange={handlePasswordChange} />
          </Form.Group>

          <Button variant="primary" type="submit">
            Login
        </Button>

        </Form>
      </Col>
    </Row>
  );
};

export default LoginForm;
In this file, you are providing a simple login form to the user. The trick is to override the submit function with the Okta logic. If the user logs in successfully, you can set the session token and let the user continue.
Next, add a new file in the Pages folder called Login.jsx.
import React from 'react';
import { Redirect } from 'react-router-dom';
import LoginForm from '../Components/LoginForm'
import { useOktaAuth } from '@okta/okta-react';
import { Container } from 'react-bootstrap'
import Header from '../Components/Header'

const Login = ({ baseUrl, issuer }) => {
  const { authState } = useOktaAuth();

  if (authState.isPending) {
    return <div>Loading...</div>;
  }
  return authState.isAuthenticated ?
    <Redirect to={{ pathname: '/ExchangeRates' }} /> :

    <Container>
      <Header></Header>
      <br></br>
      <h4>Please Login with your Okta Account</h4>
      <LoginForm baseUrl={baseUrl} issuer={issuer} />
    </Container>;
};

export default Login;
Again, you are checking to see if the user is already logged in. If they are, you can redirect them to the ExchangeRates page, otherwise present the Login Form.
Add an Exchange Rate Page
The last step is to implement the ExchangeRate page itself. In Pages, add a new file called ExchangeRate.jsx.
import React, { Component } from 'react';
import Header from '../Components/Header'
import { Container, Row, Col, Table, Form, Button } from 'react-bootstrap'
import axios from 'axios';

class ExchangeRates extends Component {

  constructor(props, context) {
    super(props, context);

    this.state = {
      loading: false,
      currencies: [],
      user: {
        username: 'nik',
        currentCurrencyIso: 'USD',
        currentAmount: 50.00,
        currentCurrency: {}
      },
      targetIso: 'AUD',
      targetAmount: 0.00,
      countries: []
    }
  }

  componentDidMount() {

    this.setState({
        loading: true
    });

    var c = this.sendQuery(this.getCurrenciesQuery())
      .then(response => {
        var u = this.state.user;
        u.currentCurrency = response.data.data.currencies.filter(currency => currency.isoCode == this.state.user.currentCurrencyIso)[0];
        this.setState({
            currencies: response.data.data.currencies.filter(currency => currency.convert != null),
            loading: false,
            user: u
        });
        this.updateTarget('AUD');
      })
      .catch(err => {
        console.log(err);
      });
  }

  sendQuery(query, variables) {
    return axios.post('https://api.everbase.co/graphql?apikey=' +  process.env.REACT_APP_EVERBASE_API_KEY, {
      query
    });
  }

  getCurrenciesQuery() {

    return '{               \
      currencies            \
      {                     \
        id                  \
        isoCode             \
        name                \
        unitSymbols         \
        convert(to: "USD")  \
      }                     \
    }';
  }

  getCurrencyCountryQuery(isoCode) {
    return '{                                                   \
      currencies(where: {isoCode: {eq: "' + isoCode + '"}}) {   \
        countries {                                             \
          capitalName                                           \
          population                                            \
          name                                                  \
          vatRate                                               \
        }                                                       \
      }                                                         \
    }';
  }

  handleTargetChange(e) {
    var isoCode = e.target.value;
    this.updateTarget(isoCode);
  }

  updateTarget(isoCode) {
    var t = this.state.currencies.filter(c => c.isoCode === isoCode)[0];

    if (t) {
      var amt = this.state.user.currentAmount / t.convert;

      this.setState({
        targetIso: t.isoCode,
        targetAmount: amt.toFixed(2)
      });

      this.sendQuery(this.getCurrencyCountryQuery(t.isoCode))
        .then(resp => {
            this.setState({
                countries: resp.data.data.currencies[0].countries
            });
        })
    }
  }

  render() {

  if (this.state.loading) {
    return <Container>
      <Header></Header>
      <h4>Loading, please wait.</h4>
    </Container>
  }

  return (
    <Container>
      <Header></Header>
        <Row>
          <Col>
            <h3>{this.state.user.username} - {this.state.user.currentCurrency.unitSymbols} {this.state.user.currentAmount}</h3>
            <h4>Current Currency: {this.state.user.currentCurrency.isoCode} - {this.state.user.currentCurrency.name}</h4>
          </Col>
        </Row>

        <Row>
          <Col lg="3">
            <Form.Control type="text" value={this.state.user.currentAmount} readonly="readonly"></Form.Control>
          </Col>
          <Col lg="1">
            In
          </Col>
          <Col lg="6">
            <Form.Control disabled as="select" value={this.state.user.currentCurrency.isoCode}>
              {this.state.currencies.map((currency, i) => {
                return (
                  <option key={currency.isoCode} value={currency.isoCode}>
                    {currency.isoCode} - { currency.name}
                  </option>
                )
              })}
            </Form.Control>
          </Col>
        </Row>
        <Row>
          <Col lg="1" >To</Col>
        </Row>
        <Row>
          <Col lg="3">
              <Form.Control type="text" readonly="readonly" value={this.state.targetAmount}></Form.Control>
          </Col>
          <Col lg="1">
              In
          </Col>
          <Col lg="6">
            <Form.Control as="select" onChange={this.handleTargetChange.bind(this)}>
              {this.state.currencies.map((currency, i) => {
                return (
                  <option key={currency.isoCode} value={currency.isoCode}>
                    {currency.isoCode} - { currency.name}
                  </option>
                )
              })}
            </Form.Control>
          </Col>
        </Row>
        <Row className="pt-4">
          <Col>
            <h4>Country Facts</h4>
            <Table>
              <thead>
                <tr>
                  <th>Country</th>
                  <th>Capital</th>
                  <th>Population</th>
                  <th>Vat Rate</th>
                </tr>
              </thead>
              <tbody>
                {this.state.countries.map((country, i) => {
                  return (
                    <tr>
                      <td>{country.name}</td>
                      <td>{country.capitalName}</td>
                      <td>{country.population}</td>
                      <td>{country.vatRate}</td>
                    </tr>
                  )
                })}
              </tbody>
            </Table>
          </Col>
      </Row>
    </Container >
    );
  }
}

export default ExchangeRates;
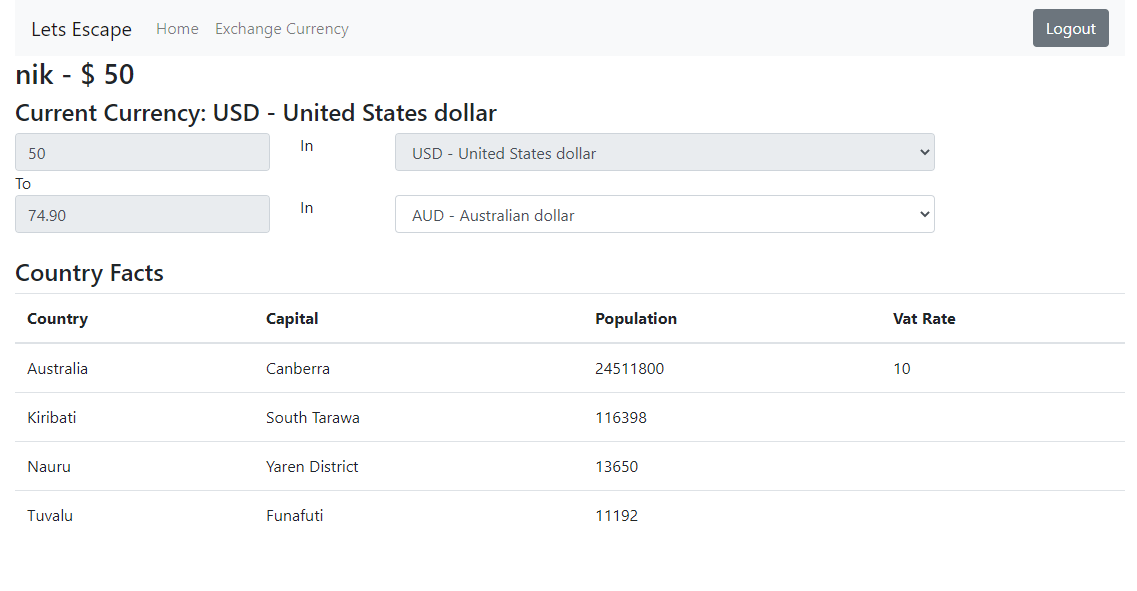
Here you are presenting the user with an exchange rate calculator and some information about the countries in which the target currency is used.
To populate the dropdown boxes the user will set, you will first need to grab the data from Everbase. This is where you can use Axios to make a call to the Everbase server. In this case, there are a couple helper methods to create the query and one for calling the Everbase server. Since Axios is promise-based, you can use then rather than callbacks for processing the data that is returned. First, you will obtain a list of currencies. Here you are filtering the currencies to ensure that a conversion rate exists. (Some of the currencies do not have a conversion to USD.) Once you have that list, you can populate the dropdowns with them. When the user changes the target drop down, the target amount is updated to reflect the exchange rate between the two currencies.
The second task when the user changes the dropdown is to obtain some data about the currency from Everbase. This data will include the countries that use the currency, their capitals, populations, and the VAT rate.
Test Your GraphQL React Application
All your code is complete and you can now test your application. In the terminal, use npm start to kickoff your application. You should be presented with the Home page upon navigating to localhost:3000. Click on Login Here, and you will be presented with the login page. Enter your Okta credentials and explore the exchange rates.
Learn More About GraphQL and React
You have successfully consumed a GraphQL API from a React application. You can now take this application to the next level by introducing new features to it. You can also work on building your own GraphQL API for your application!
You can find the example code for this tutorial on GitHub, in the okta-graphql-api-react-example repository.
If you’re interested in learning more about GraphQL or React, follow these links below:
- Build a secure GraphQL API with Node.js
- Build a Simple React Application Using Hooks
- A Quick Guide to Integrating React and GraphQL
Make sure you follow us on Twitter and subscribe to our YouTube channel. If you have any questions, or you want to share what tutorial you’d like to see next, please comment below.
Okta Developer Blog Comment Policy
We welcome relevant and respectful comments. Off-topic comments may be removed.