Build a secure GraphQL API with Node.js

GraphQL is a query language for APIs that provides a clear description of the data and allows clients to specify what data they need, Benefits of using GraphQL include: reduced overhead,improved performance, and reduced risk of potential errors as the API evolves. If the API enhances its functionality, existing clients won’t be affected unless they want to opt in to the new features.
Clients can also obtain many resources with a single request. Typical REST APIs require the client to query multiple resources as more details are required. If, for example, a user needed information about a book, the client would reach out to a book endpoint. If the client then required more information about the author of that book, he/she would need to query the author endpoint. With GraphQL, this can be summarized in one request to the GraphQL server.
Express is one of the most popular Node.js frameworks today. Clean and simple, it offers high performance and rapid development. In this tutorial, you will learn how to implement a GraphQL API into your Express server. You will use the npm packages provided by the GraphQL to create a new endpoint where queries can be sent. Then you will implement those queries in your Express server and return the requested data.
You will also need to ensure that your API is protected by proper authentication. For this task, you will use Okta’s easy and secure Single Sign-on provider to create an authorization server. This server will supply the client with a JWT that can be validated by the Express server to ensure the user has permission to access the API. To validate the token, you will use Okta’s jwt-verifier. This library from Okta makes authenticating the requests to your GraphQL server quick and painless.
Note: In May 2025, the Okta Integrator Free Plan replaced Okta Developer Edition Accounts, and the Okta CLI was deprecated.
We preserved this post for reference, but the instructions no longer work exactly as written. Replace the Okta CLI commands by manually configuring Okta following the instructions in our Developer Documentation.
Set up Your Okta Authentication Server
Before you begin, you’ll need a free Okta developer account. Install the Okta CLI and run okta register to sign up for a new account. If you already have an account, run okta login.
Then, run okta apps create service. Select the default app name, or change it as you see fit.
What does the Okta CLI do?
The Okta CLI will create an OAuth 2.0 Service App in your Okta Org. You will see output like the following when it’s finished:
Okta application configuration has been written to: /path/to/app/.okta.env
Run cat .okta.env (or type .okta.env on Windows) to see the issuer and credentials for your app.
export OKTA_OAUTH2_ISSUER="https://dev-133337.okta.com/oauth2/default"
export OKTA_OAUTH2_CLIENT_ID="0oab8eb55Kb9jdMIr5d6"
export OKTA_OAUTH2_CLIENT_SECRET="NEVER-SHOW-SECRETS"
Your Okta domain is the first part of your issuer, before /oauth2/default.
NOTE: You can also use the Okta Admin Console to create your app. See Create a Service App for more information.
Next, run okta login and open the resulting URL in your browser. Sign in to the Okta Admin Console with your account user and password. Click on Security > API in the left menu and check out the Authorization Servers. Okta will add an authorization for you named default. This is the one you will be using for this tutorial. Click on default and then select Scopes. Click on Add Scope and name it api. You can use api for the display name as well and give it a meaningful description. For now, you don’t need to check the User Consent, Default Scope, or Metadata Publish options. Click Create to finalize the scope. Click on the Settings tab and note your Issuer URL. You will need this in your application as well.
Create your Web Application
Next, open your favorite IDE and create a new folder with the command mkdir. Open this folder and run the command npm init -y.
Install Your Dependencies
Now you can begin installing your dependencies.
First, install Express. This is the backbone of your application.
npm i express@4.17.1
Next, you will want to install the packages that will help support your GraphQL infrastructure. You must get both the core GraphQL package and the Express-Graphql adapter.
npm i graphql@15.3.0
npm i express-graphql@0.11.0
Next, install Okta’s JWT-verifier, which will do the heavy lifting validating the JWTs coming from the client.
npm i @okta/jwt-verifier@1.0.0
Finally, you will want to install dotenv to have a place to store your secure variables.
npm i dotenv@8.2.0
Build Your Node.js and GraphQL Web Application
First, add a file called .env to the root of your project. Add the following code to it.
OKTA_CLIENT_ID={yourClientID}
OKTA_ISSUER={yourOktaIssuer}
OKTA_AUDIENCE='api://default'
APP_BASE_PORT=3000
Here you are using the client Id and the issuer that you obtained from your authorization server. You are also specifying which port the application will run on.
Add a file to your root called jwtVerifier.js. This file will act as a wrapper around the Okta JWT verifier library. Add the following code to it:
const OktaJwtVerifier = require('@okta/jwt-verifier')

const oktaJwtVerifier = new OktaJwtVerifier({
    issuer: process.env.OKTA_ISSUER,
    clientId: process.env.OKTA_CLIENT_ID
})

module.exports = async (request, response, next) => {

    const { authorization } = request.headers;

    if (!authorization) {
        return response.status(401).send();
    }

    const [authType, token] = authorization.trim().split(' ');

    try {
        const { claims } = await oktaJwtVerifier.verifyAccessToken(token, process.env.OKTA_AUDIENCE)

        if (!claims) {
            return response.status(401).send();
        }
        if (!claims.scp.includes('api')) {
            return response.status(401).send();
        }

        return next();
    }
    catch (err) {
        console.log(err);
        return response.status(401).send();
    }
}
The Okta JWT Verifier will produce an exception when the token is invalid, so you will need to catch the error and handle it in a way that is appropriate for your application. You also want to check to ensure the authorization header is present on the request and that a token has been issued. Finally, you want to ensure the claim contains a scope for api that you added earlier in your authorization server.
Next, add a file called server.js. This file will be the meat of your application. Add the following code to it:
'use strict';

const express = require('express');

const { graphqlHTTP } = require('express-graphql');
const { buildSchema } = require('graphql')

const jwtVerifier = require('./jwtVerifier')

const start = function (options) {
    return new Promise(function (resolve, reject) {
        process.on("unhandledRejection", (reason, p) => {
            console.log("Unhandled Rejection at: Promise", p, "reason:", reason);
        });

        if (!options.port) {
            reject(new Error("no port specificed"));
        }

        const app = express();

        app.use(function (error, request, response, next) {
            console.log(error);
            reject(new Error("something went wrong" + error));
            response.status(500).send("something went wrong");
        });

        const schema = buildSchema(`

                            type Employee {
                                id: Int
                                first_name: String
                                last_name: String
                                email: String
                                gender: String
                                ip_address: String
                            }

                            type Employees {
                                employees: [Employee]
                            }

                            type Query {
                                employees: Employees,
                                employee(id: Int!): Employee
                            }
                    `);

        const root = {
            employees: () => {
                return data;
            },
            employee: (i) => {
                return data.employees.filter((r) => r.id == i.id)[0]
            }
        };

        app.use("/graphQl", ensureAuthenticated, graphqlHTTP({
            schema: schema,
            rootValue: root,
            graphiql: true,
        }));

        const server = app.listen(options.port, function () {
            resolve(server);
        });
    });
};

function ensureAuthenticated (request, response, next) {
    return jwtVerifier(request, response, next);
}

const data = {
    "employees": [
        {
            "id": 1,
            "first_name": "Jeanette",
            "last_name": "Penddreth",
            "email": "jpenddreth0@census.gov",
            "gender": "Female",
            "ip_address": "26.58.193.2"
        },
        {
            "id": 2,
            "first_name": "Giavani",
            "last_name": "Frediani",
            "email": "gfrediani1@senate.gov",
            "gender": "Male",
            "ip_address": "229.179.4.212"
        },
        {
            "id": 3,
            "first_name": "Noell",
            "last_name": "Bea",
            "email": "nbea2@imageshack.us",
            "gender": "Female",
            "ip_address": "180.66.162.255"
        },
        {
            "id": 4,
            "first_name": "Willard",
            "last_name": "Valek",
            "email": "wvalek3@vk.com",
            "gender": "Male",
            "ip_address": "67.76.188.26"
        }
    ]
}

module.exports = Object.assign({}, { start });
This file kicks off your Express server with the start function. To use GraphQL you must bring in the GraphQL module and tell your application to use it. You can specify whatever endpoint you like. Here you have set it to /GraphQL. At the bottom of the file is some sample data. The trick now is to connect the sample data to your GraphQL endpoint.
You do this by building a schema. The schema has definitions for your objects and object types. Here you have an Employees class, which is an array of Employee objects. Employee itself has several primitive fields attached to it. You also must define your query. Here is where you tell the client what functions are available to it via the server. In this case, you have an employees function that will return the full list of employees and an employee function that will return one employee based on a required id parameter. In the root object, you define handlers for these functions. For employees, you are just returning the sample data provided. For employee, you must collect the parameters and find the employee’s data based on the id property of the query.
You are also using the ensureAuthenticated middleware in the GraphQL endpoint. This will call your jwtVerifier and check the token presented in the Authorization header. Clients that don’t provide a valid JWT will be rejected with a 401 (unauthorized) HTTP code.
Lastly, you need to provide an entry point for your application. Create a new file called index.js and add the following code to it:
'use strict'

require('dotenv').config();

const server = require('./server')

const port = process.env.APP_BASE_PORT;

server.start({
    port: port
}).then(app => {
    console.log('Application is now running on port ' + port);
})
This file does two notable things. First, it calls dotenv’s config() function. Per the documentation, this should be placed as early in the application as possible. Second, it kicks off the server using the server file you just created.
Test Your GraphQL API
You can now start your application using node index.js from the console. To test this, I like to use Advanced Rest Client, but Postman is another popular option.
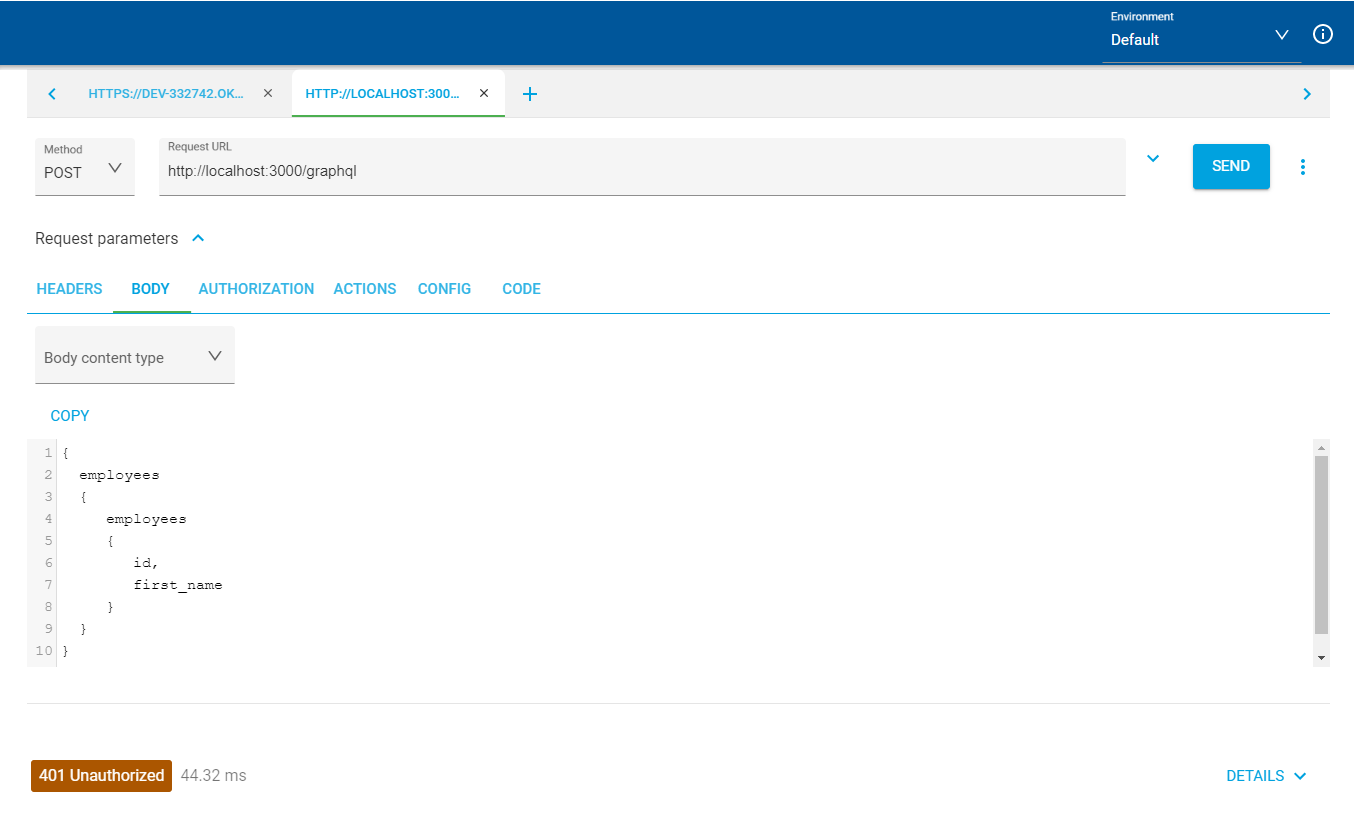
First, ensure your authorization is working correctly. Create a new POST request targeting the GraphQL endpoint. Set your Content-Type to application/graphql. Add the following code to your body:
{
    employees
    {
        employees
        {
            id,
            first_name
        }
    }
}
Submit the request, and you should receive a 401 back from the server.
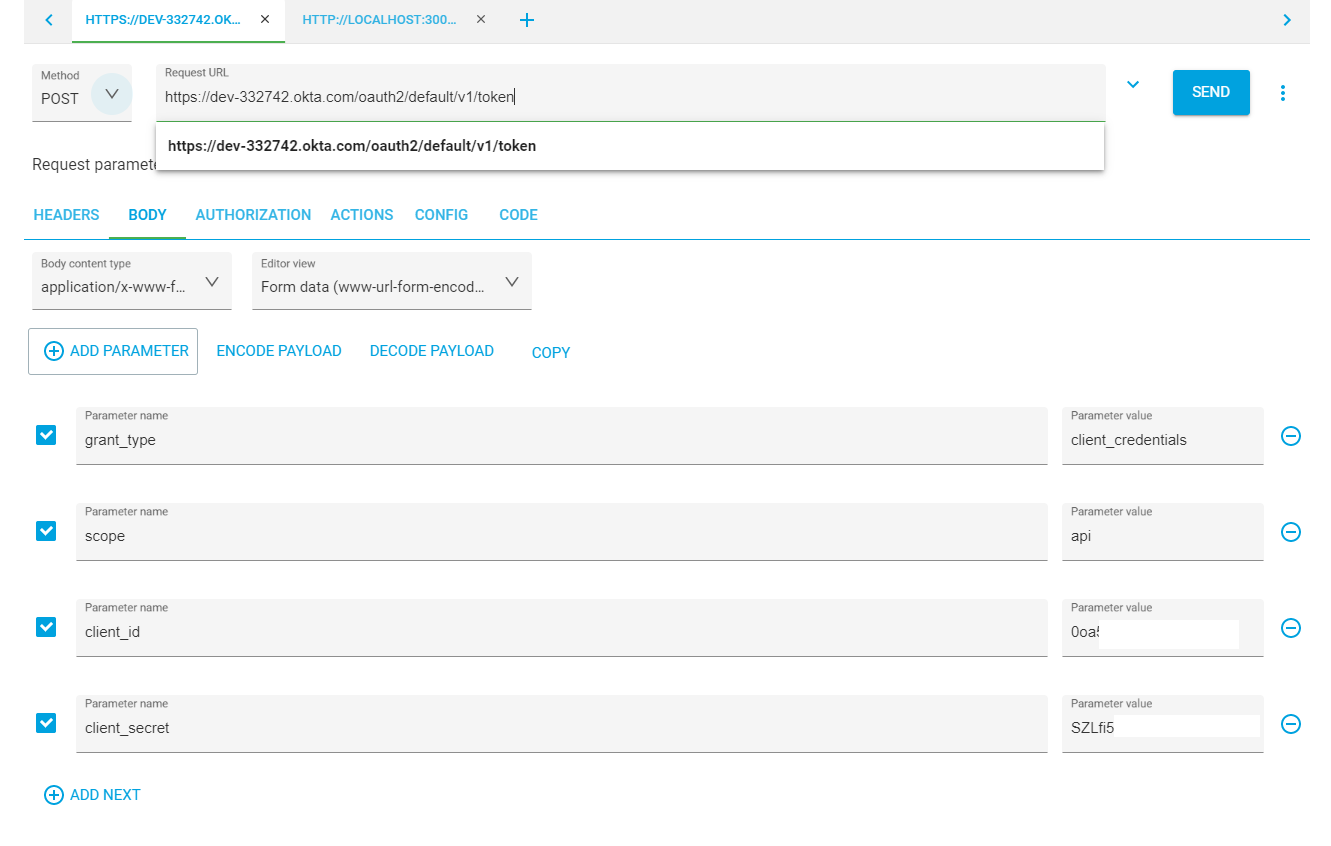
To resolve this, you first need to query your authorization server from Okta that you created at the beginning of this tutorial. Set up a new POST request to {yourOktaDomain}/oauth2/default/v1/token. You will need to add a Content-Type header with the value application/x-www-form-urlencoded. You will also need to pass the following parameters in the body: grant_type should be set to client_credentials; scope will be set to api and client_id should be set to {yourClientId} and client_secret to {yourClientSecret}. Once you have these fields complete, you can make a request to the Okta authorization server, which should return a valid JWT to you.
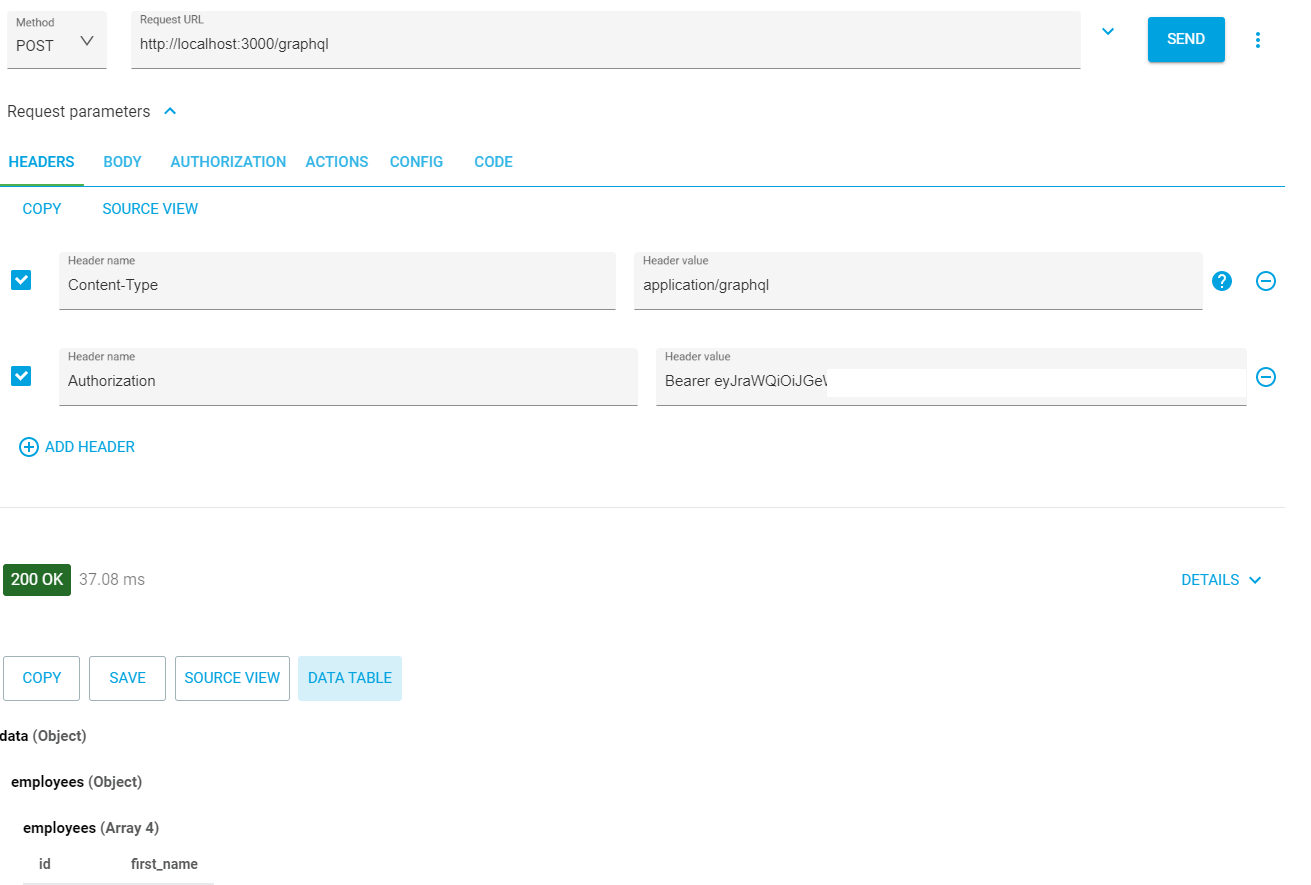
With your JWT, head back to your request for the GraphQL endpoint and add an authorization header. The value should be Bearer {yourJWTToken}. Post your request again, and you should have the results passed back to you.
Learn More About GraphQL and Node.js
You have successfully built your GraphQL API and integrated it into Express on your Node.JS server. You can enhance your API without impacting users already using this version on your GraphQL API by simply adding new fields or functionality to your schema. You have also learned how to secure the API using Okta’s JWT Verification and authorization server.
If you liked this content, check out these similar posts:
- Build a CRUD App with Node.js and GraphQL
- Build a GraphQL API with ASP.NET Core
- Develop Secure Apps with WebSockets and Node.js
For more awesome content like this, don’t forget to follow us on Twitter and subscribe to our YouTube channel. If you have any questions, or you want to share what tutorial you’d like to see next, please comment below.
Okta Developer Blog Comment Policy
We welcome relevant and respectful comments. Off-topic comments may be removed.