Build a CRUD App with Node.js and GraphQL

There are so many options when it comes to building out a simple CRUD (Create, Read, Update, Delete) app. The most refreshing data access layer to work with recently by far has been GraphQL. It’s great because the developer can use a simple, strongly typed language to define models and their relationships, then provide functions to define how each piece should be resolved. The user can then pick and choose which pieces they want and the GraphQL server pulls together just the information necessary to service the request.
GraphQL is not only a really powerful tool, but it’s fun for both backend and frontend developers to use. Today I’ll show you how to create a simple CRUD app using GraphQL to be able to query and edit a set of quotes. Using Okta, I’ll also show you how to authenticate users within GraphQL to prevent anonymous users from editing existing quotes.
Note: In May 2025, the Okta Integrator Free Plan replaced Okta Developer Edition Accounts, and the Okta CLI was deprecated.
We preserved this post for reference, but the instructions no longer work exactly as written. Replace the Okta CLI commands by manually configuring Okta following the instructions in our Developer Documentation.
Create the GraphQL Server for Your Node.js App
To get started, you’ll need to set up a package.json for Node.js to control your dependencies. It’s also a good idea to install eslint to help you catch errors in your code ahead of time. Most editors have some sort of eslint plugin so you can see errors right in your code as you write.
mkdir node-graphql
cd node-graphql
npm init -y
npm install --save-dev eslint@5.16.0
Create a new file .eslintrc in this directory to add some basic settings so eslint knows a little about the environment you’re using:
{
  "extends": "eslint:recommended",
  "parserOptions": {
    "ecmaVersion": 2018
  },
  "env": {
    "es6": true,
    "node": true
  }
}
Now edit your package.json file so the scripts section looks like this:
{
  "start": "node .",
  "test": "eslint ."
}
Your editor should give you warnings inline, but you can now also run npm test at any time to get a full list of errors and warnings.
For the GraphQL server, Apollo Server is a great way to get up and running quickly. You’ll also want to create distinct IDs to keep track of your quotes, so you can use uuid for that. Install these dependencies with the following:
npm install apollo-server@2.5.0 graphql@14.3.0 uuid@3.3.2
Now create a new file index.js that will be the main file for your server. Here’s what it should look like:
const { ApolloServer, gql } = require('apollo-server');
const uuid = require('uuid/v4');
const typeDefs = gql`
type Quote {
id: ID!
phrase: String!
quotee: String
}
type Query {
quotes: [Quote]
}
`;
const quotes = {};
const addQuote = quote => {
const id = uuid();
return quotes[id] = { ...quote, id };
};
// Start with a few initial quotes
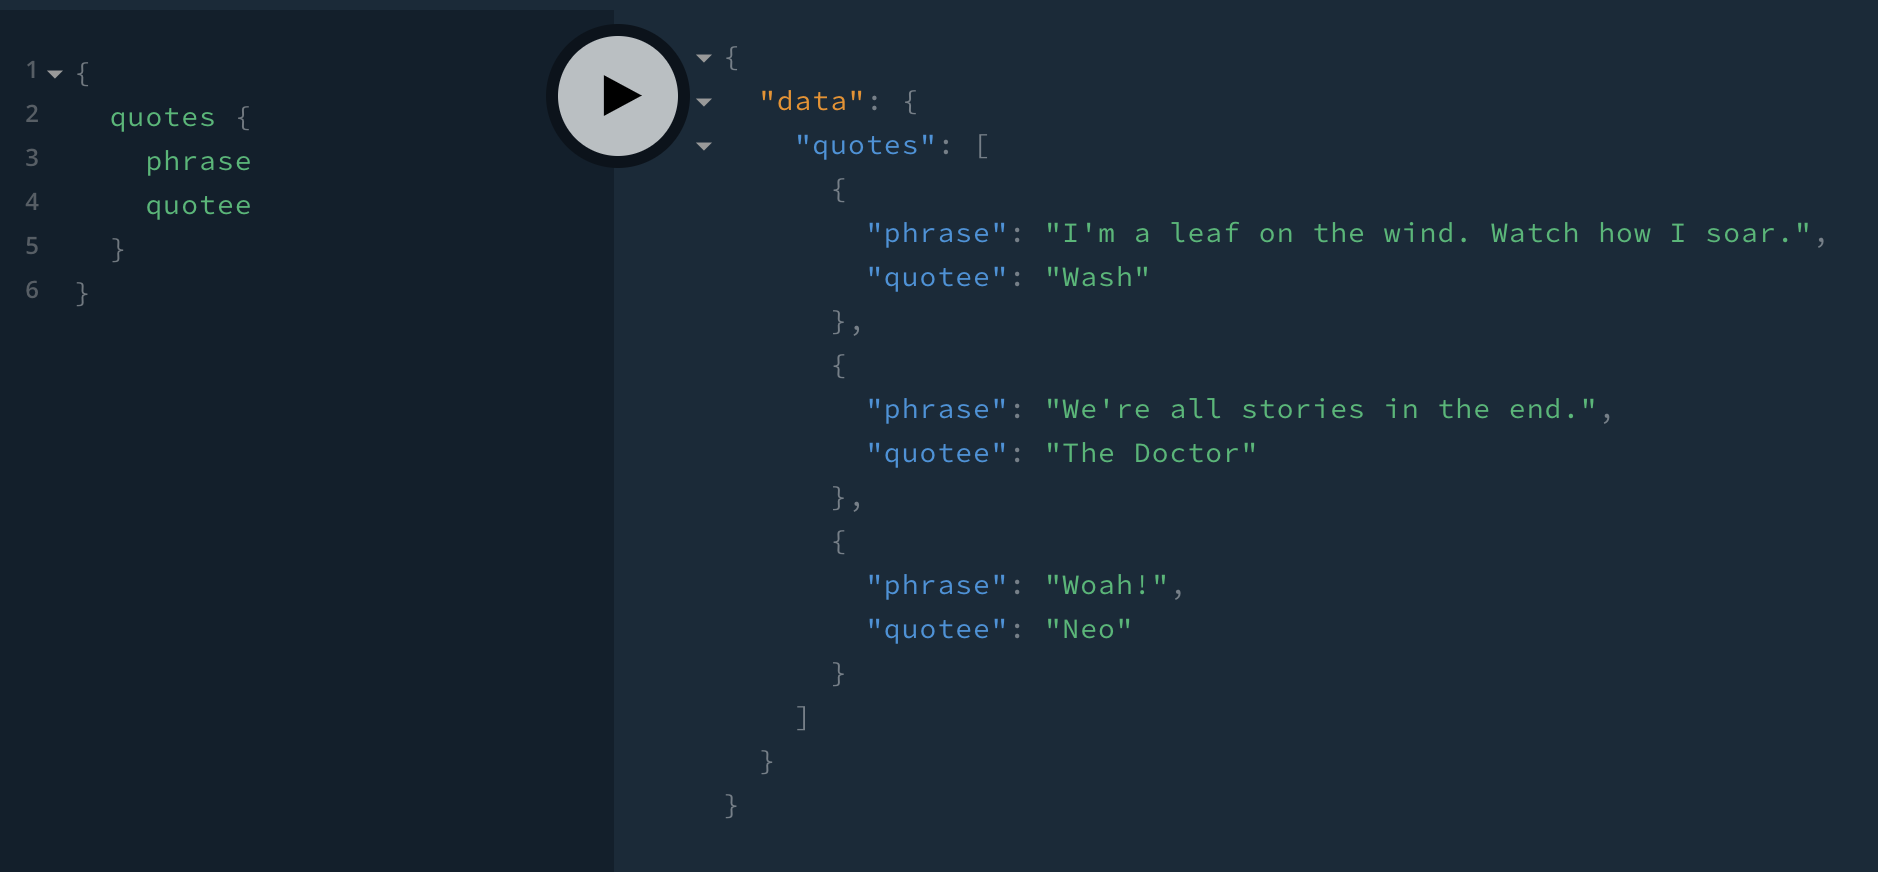
addQuote({ phrase: "I'm a leaf on the wind. Watch how I soar.", quotee: "Wash" });
addQuote({ phrase: "We're all stories in the end.", quotee: "The Doctor" });
addQuote({ phrase: "Woah!", quotee: "Neo" });
const resolvers = {
Query: {
quotes: () => Object.values(quotes),
},
};
const server = new ApolloServer({ typeDefs, resolvers });
server.listen().then(({ url }) => {
console.log(`🚀 Server ready at ${url}`); // eslint-disable-line no-console
});
The typeDefs define the structure of your data. This will generate some sweet documentation for your users and makes it easy to reason about objects and their relationships. The Query type is a special one that tells GraphQL what a user can query, what params, if any, they can pass in, and what will be returned.
The next big piece to a GraphQL server is how to actually resolve those queries. These are known as resolvers and is simply a set of functions that return data or a data model. Here we’re just returning plain objects and GraphQL will only display what is asked for. You could also use a class object with getters that would only be run when asked for that, so more complex calculations don’t necessarily need to be executed if the user isn’t asking for that information.
Here we’re just using a simple JavaScript object to get things going quickly, so all our quotes will be stored in memory. You could also piece together parts from multiple places in the resolvers. For example, you could fetch data from a database or some external API.
Your server is now ready to go. In order to start it, run npm start from within your project folder. This will start up a server at http://localhost:4000. This will take you to a playground that inspects your typeDefs to automatically add some documentation you can search through. It has all kinds of other features, like autocomplete and showing errors as you go.
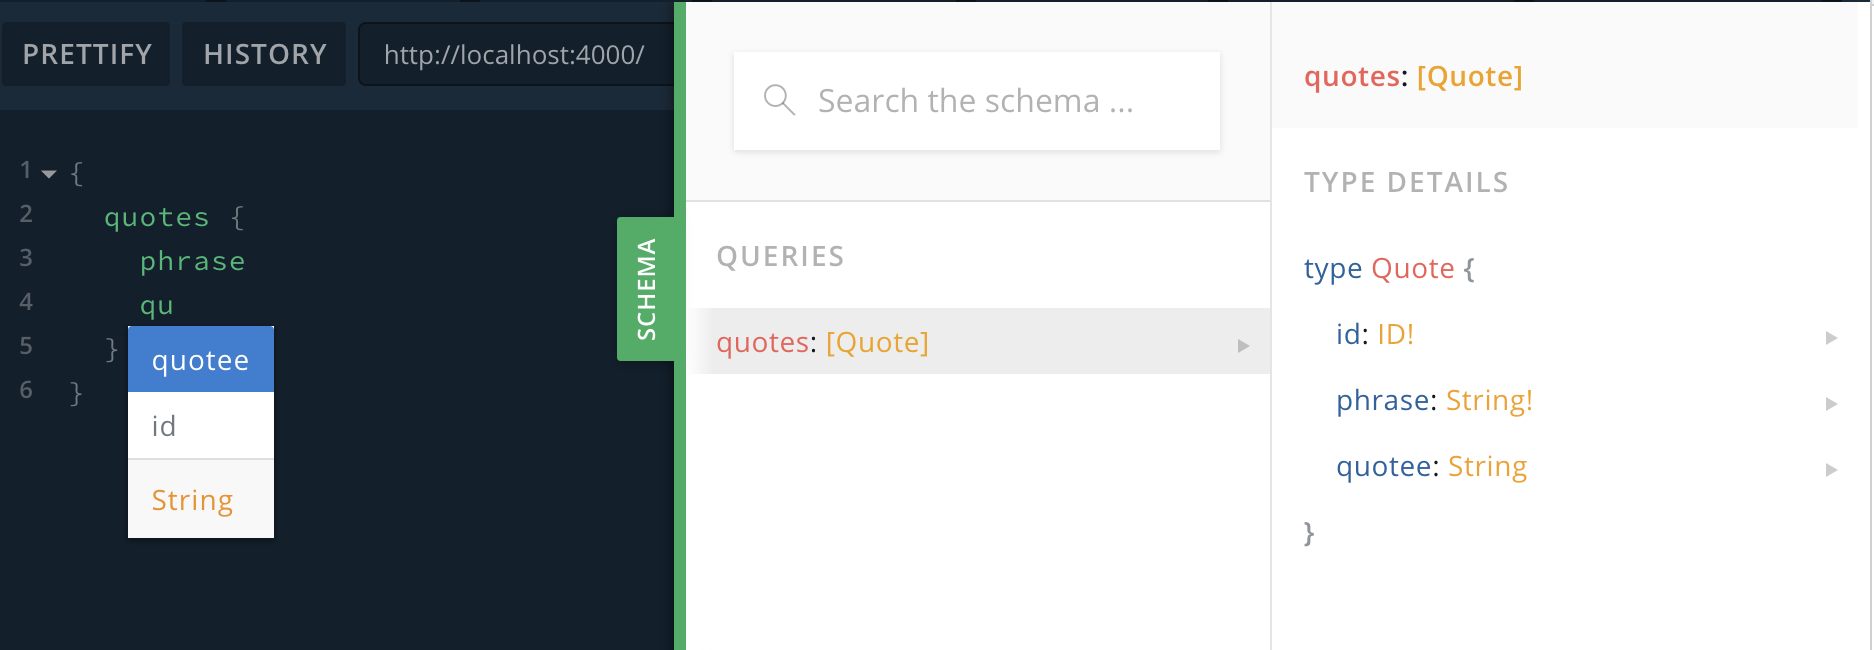
Go check it out and try running a simple query to view the existing quotes.
Add the CUD part of CRUD to Your GraphQL Node.js App
You’re now able to read data from the server, but in order to have a full CRUD app, you’ll need to be able to create, update, and delete. In GraphQL, editing data is done via a Mutation. Start by defining a few new types in typeDefs.
  type Mutation {
    addQuote(phrase: String!, quotee: String): Quote
    editQuote(id: ID!, phrase: String, quotee: String): Quote
    deleteQuote(id: ID!): DeleteResponse
  }

  type DeleteResponse {
    ok: Boolean!
  }
You’ll then need to add resolvers to handle those types. You already have an addQuote function, so that resolver will be the simplest. The resolvers will need to return the new/edited quote, except in the instance of deleteQuote. Since the quote no longer exists, it doesn’t make sense to return it, so instead, you can just return an ok of either true or false depending on whether the delete was successful or not.
const resolvers = {
  // Add below existing Query resolver
  Mutation: {
    addQuote: async (parent, quote) => {
      return addQuote(quote);
    },
    editQuote: async (parent, { id, ...quote }) => {
      if (!quotes[id]) {
        throw new Error("Quote doesn't exist");
      }

      quotes[id] = {
        ...quotes[id],
        ...quote,
      };

      return quotes[id];
    },
    deleteQuote: async (parent, { id }) => {
      const ok = Boolean(quotes[id]);
      delete quotes[id];

      return { ok };
    },
  },
};
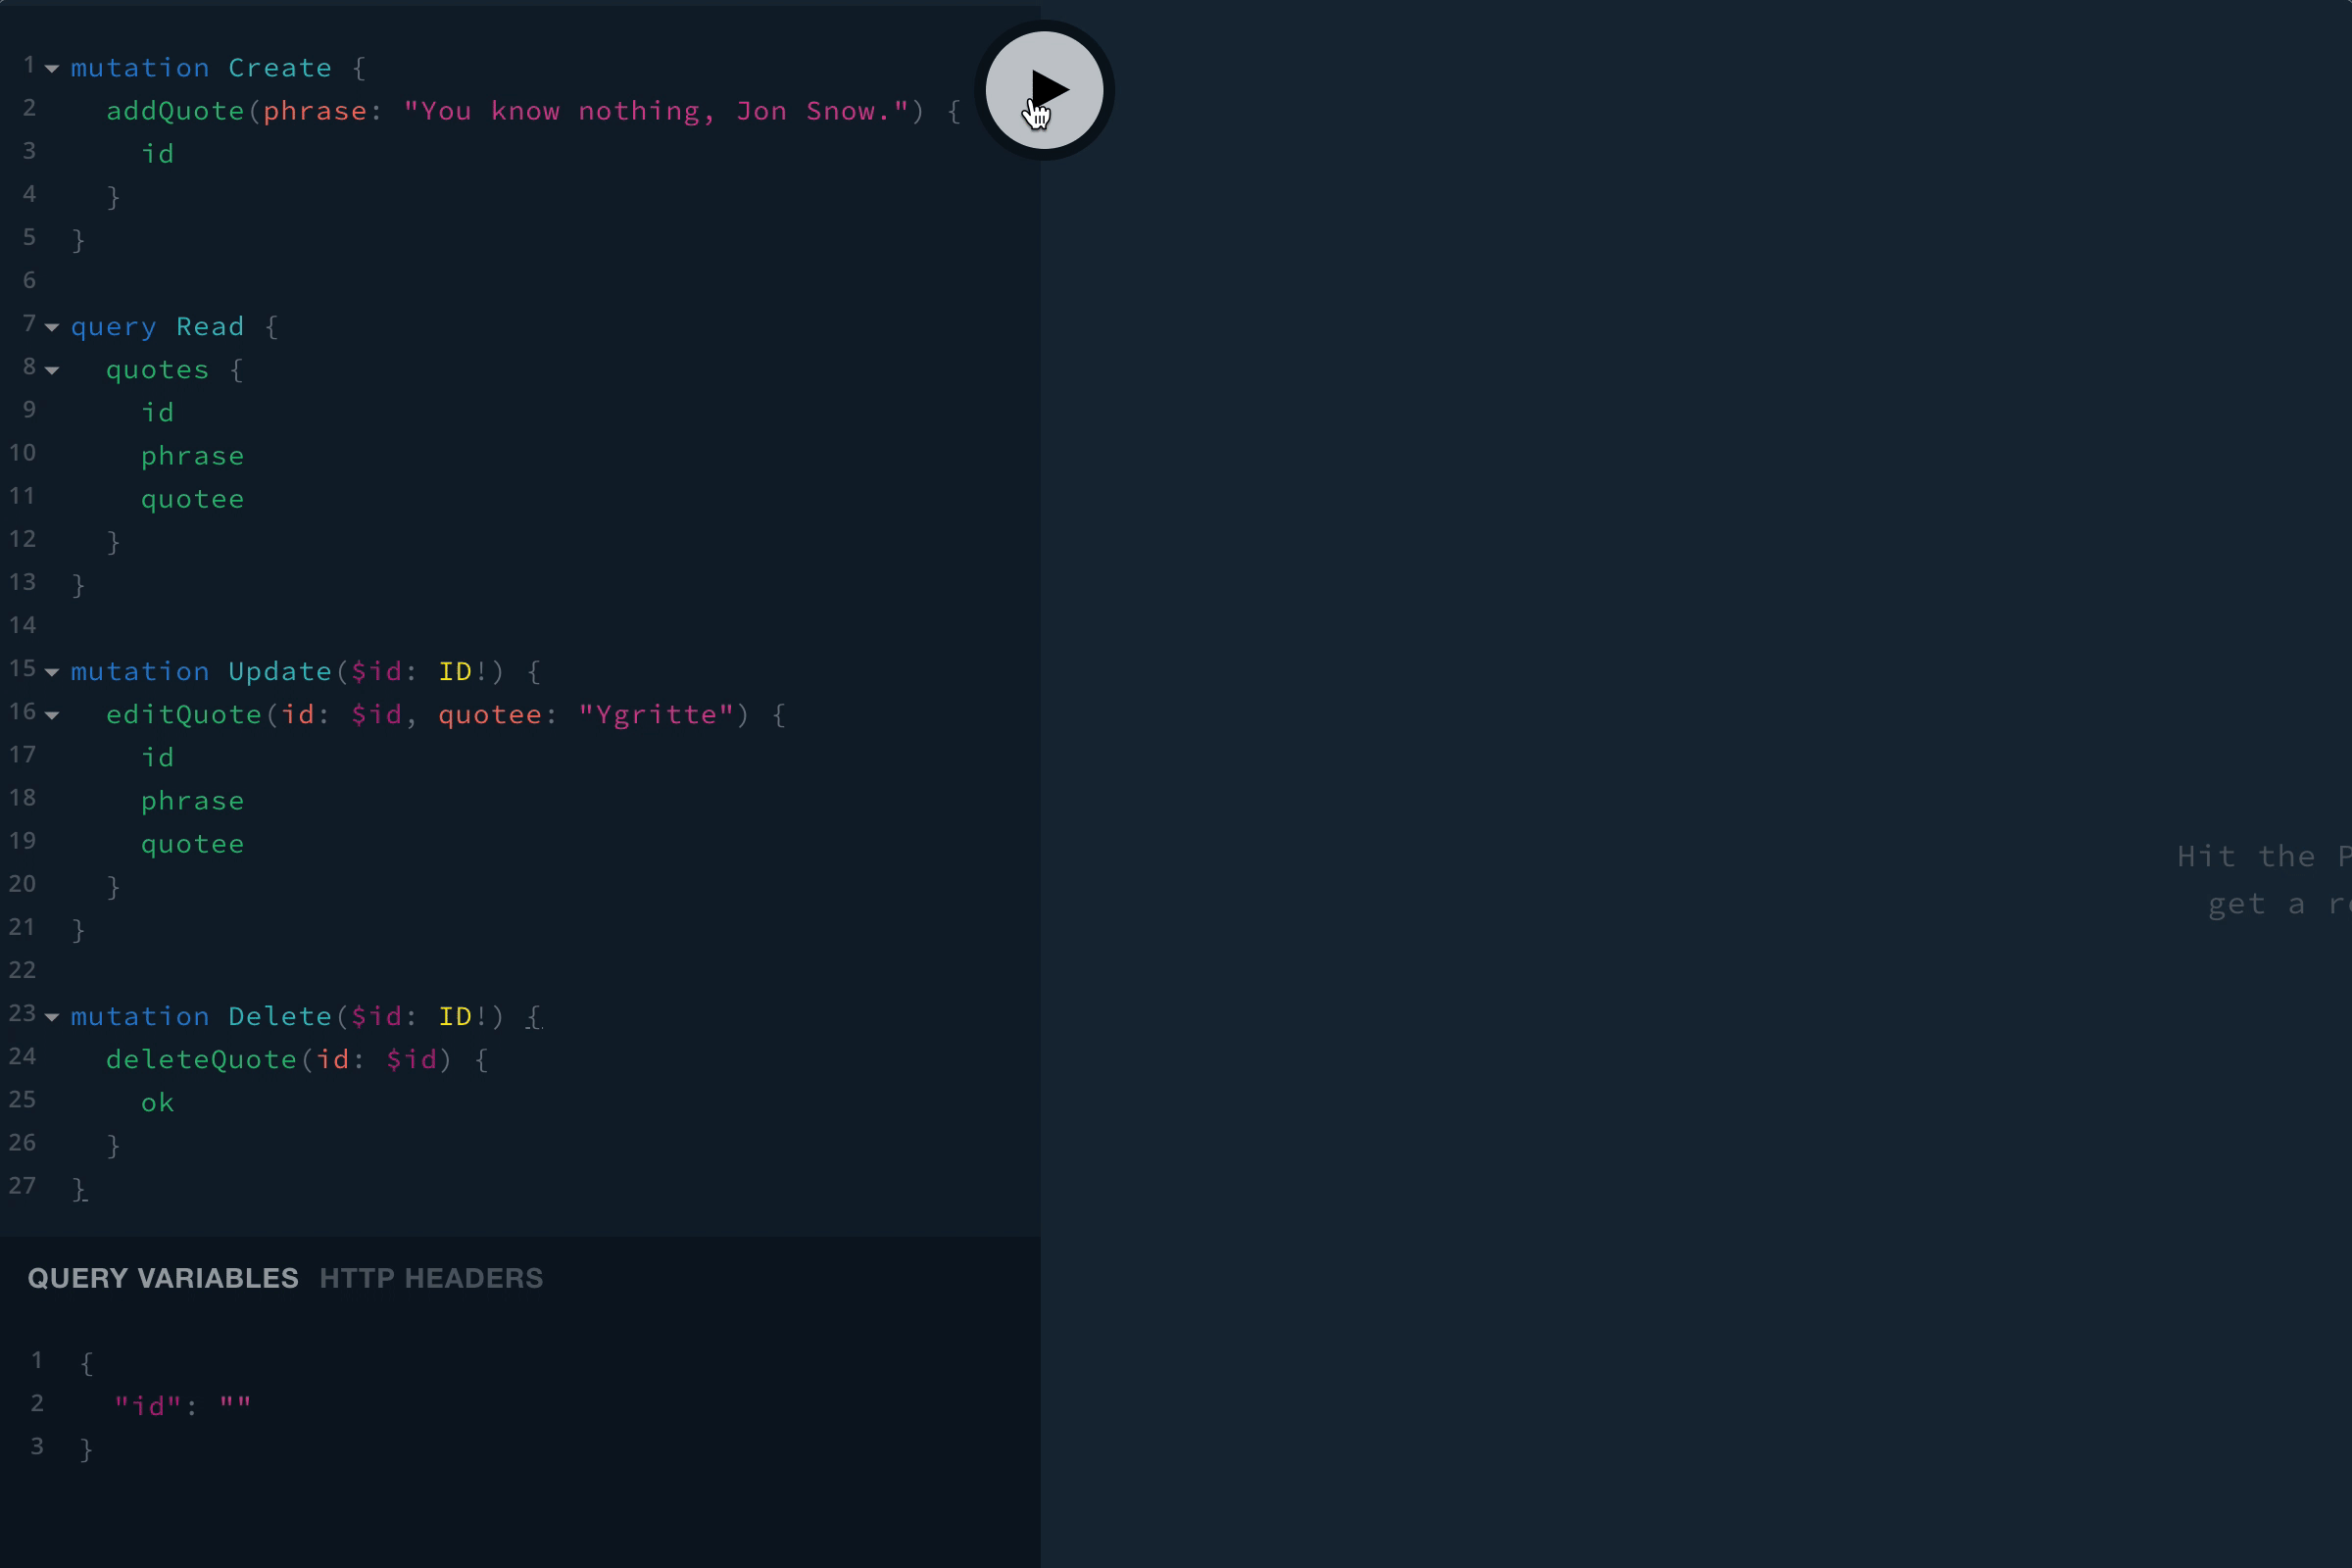
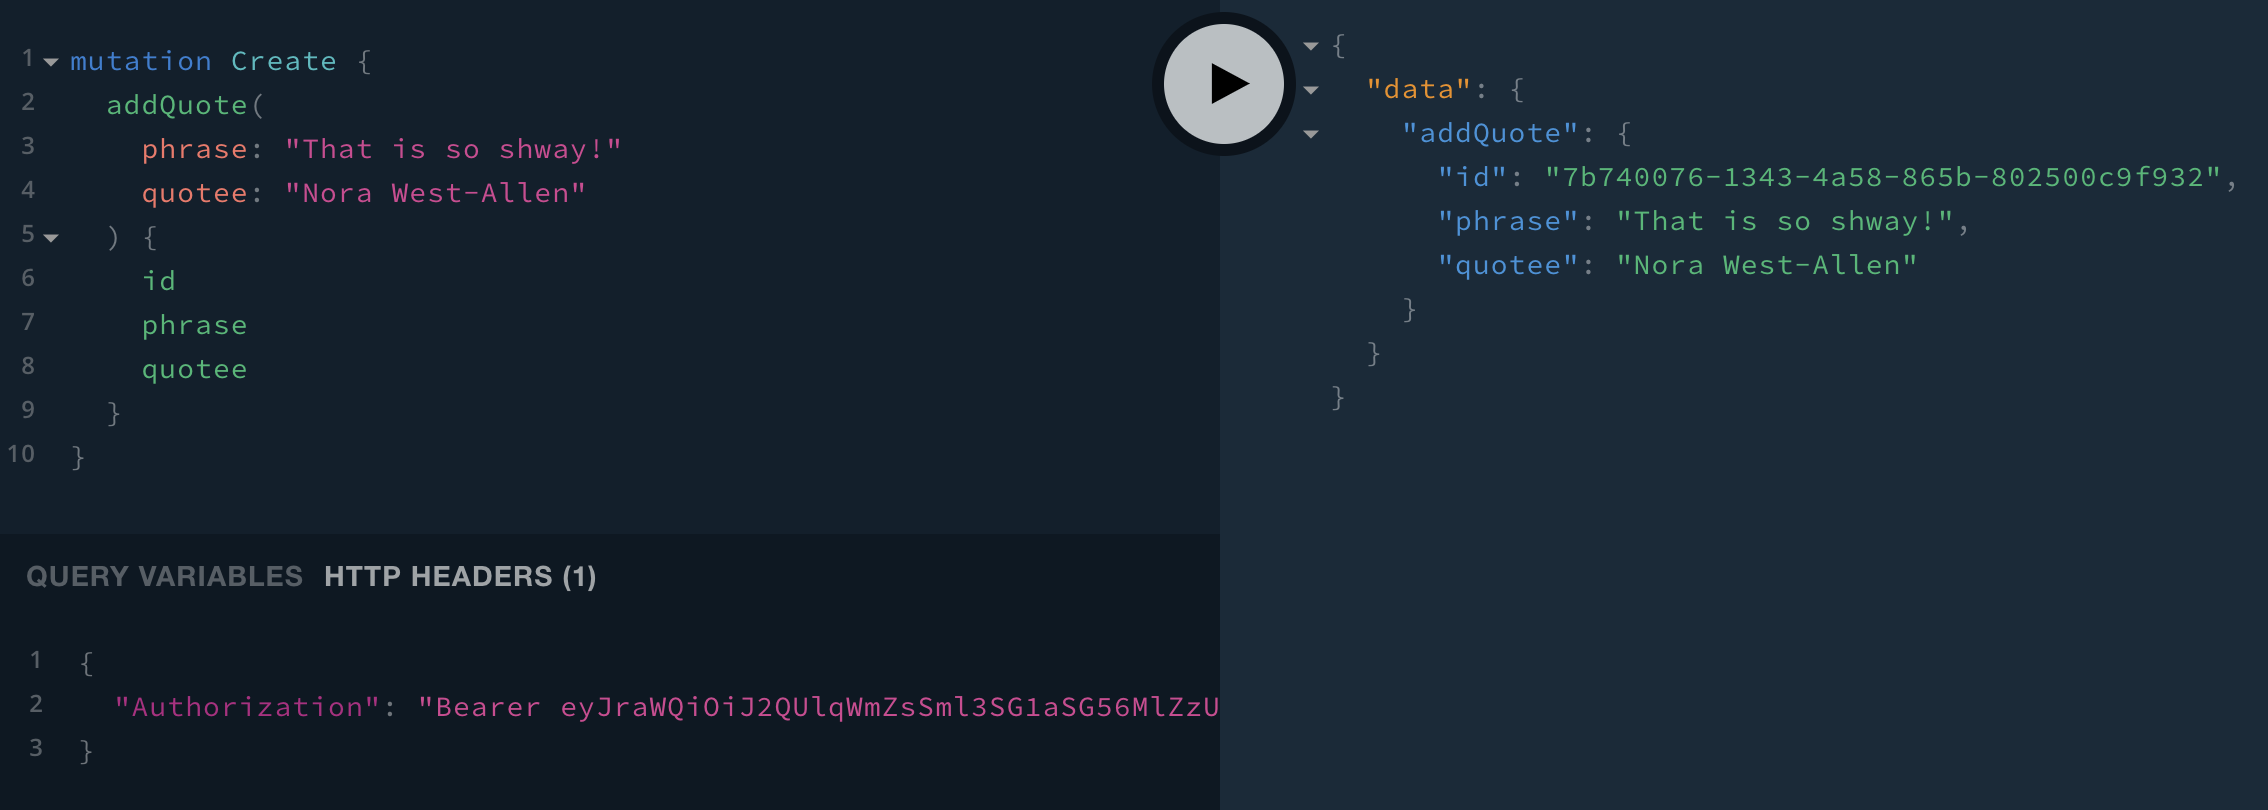
Restart the server (you can use ctrl-c to stop it, then re-run npm start), then go ahead and give it a shot. Here are some sample queries and mutations:
mutation Create {
  addQuote(phrase: "You know nothing, Jon Snow.") {
    id
  }
}

query Read {
  quotes {
    id
    phrase
    quotee
  }
}

mutation Update($id: ID!) {
  editQuote(id: $id, quotee: "Ygritte") {
    id
    phrase
    quotee
  }
}

mutation Delete($id: ID!) {
  deleteQuote(id: $id) {
    ok
  }
}
Note: Once you get the id of something you want to update or delete, you’ll need to pass the id in as a variable. You can click the QUERY VARIABLES link at the bottom of the page to expand the variable editor, then you’ll just need to use JSON to pass in variables. For example:
{
  "id": "4ef19b4b-0348-45a5-9a9f-6f68ca9a62e6"
}
Add User Authentication to Your Node.js App
A pretty common flow is to allow anybody to read at least a subset of data, but only allow authenticated users to write to modify the data. You’ve already implemented the whole CRUD part of the app, but it’s pretty simple to add authentication so you can block off certain parts of the app from anonymous users.
This is where Okta comes in to play. Okta is a cloud service that allows developers to create, edit, and securely store user accounts and user account data, and connect them with one or multiple applications. Our API enables you to:
- Authenticate and authorize your users
- Store data about your users
- Perform password-based and social login
- Secure your application with multi-factor authentication
- And much more! Check out our product documentation
If you don’t already have one, sign up for a forever-free developer account.
You’re going to need to save some information to use in the app. Create a new file named .env. In it, enter in your organization URL.
OKTA_ORG_URL=https://{yourOktaOrgUrl}
Next, log in to your developer console, navigate to Applications, then click Add Application. Select Native, then click Next. Don’t worry that it only mentions iOS and Android for Native applications. This will be necessary to be able to authenticate directly from GraphQL. The GraphQL server will have a client secret it uses to generate a secure JWT, and it won’t be exposed to users.
On the next page, give your application a name, and make sure to select Resource Owner Password before clicking Done.
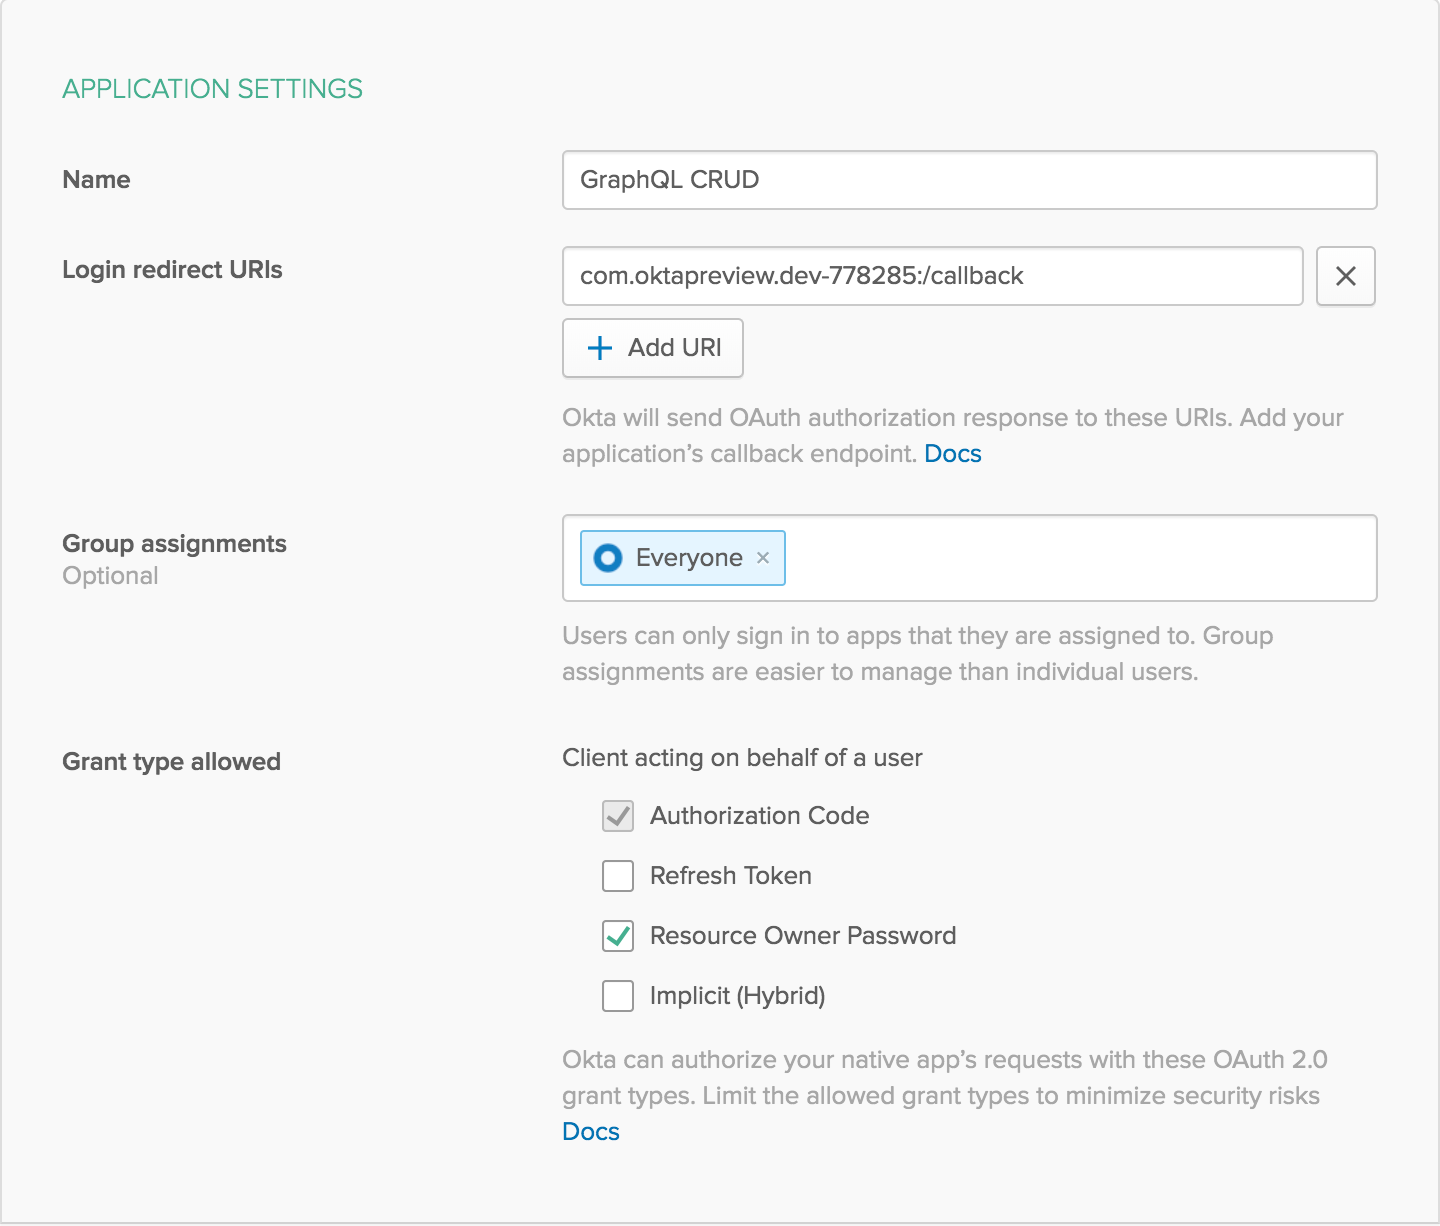
After creating the application, click Edit in the Client Credentials section. Change the Client authentication to Use Client Authentication. This will generate a client secret.
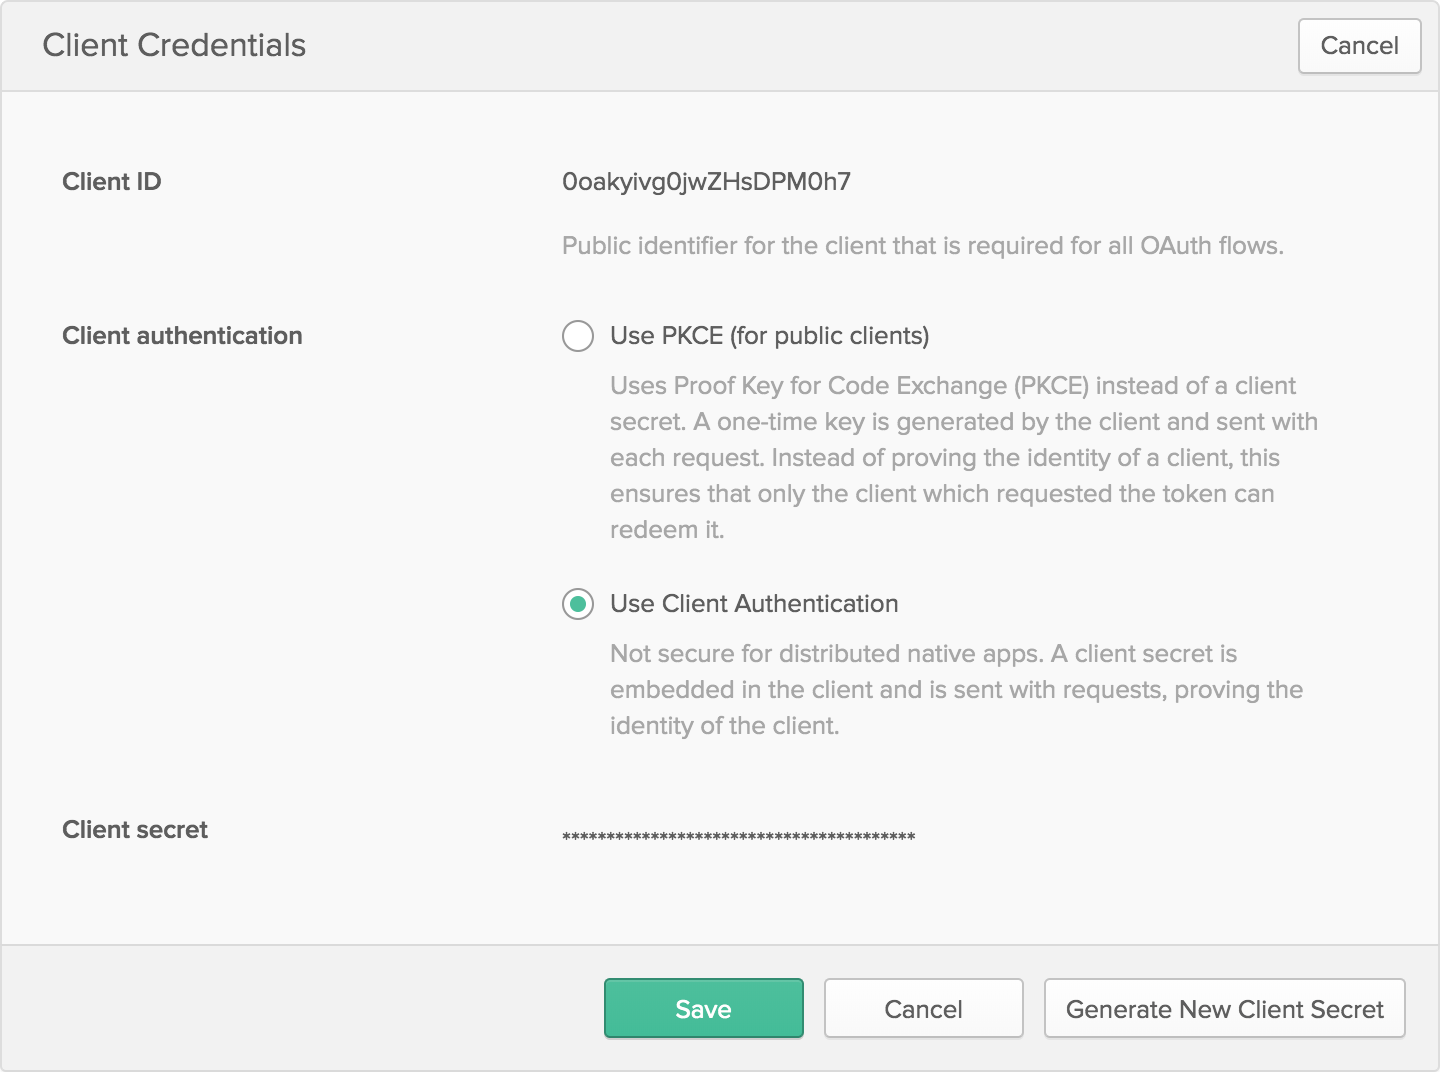
Save both the client ID and secret to your .env file:
OKTA_CLIENT_ID={yourClientID}
OKTA_CLIENT_SECRET={yourClientSecret}
The last piece of information you need from Okta is an API token. In your developer console, navigate to API -> Tokens, then click on Create Token. You can have many tokens, so just give this one a name that reminds you what it’s for, like “GraphQL Quotes”. You’ll be given a token that you can only see right now. If you lose the token, you’ll have to create another one. Add this to .env also.
OKTA_TOKEN={yourOktaAPIToken}
In order for your code to load up the .env file, you’ll need to install a new dependency called dotenv. Run the following:
npm install dotenv@8.0.0
Then at the very top of your index.js file, add the following line:
require('dotenv').config();
Now create a new file named auth.js. This is where you’ll create a few utility functions needed to generate a token for a user, authenticate a provided token, and get more information about a user.
You’ll need to pull in a few more dependencies:
npm install @okta/jwt-verifier@0.0.15 @okta/okta-sdk-nodejs@2.0.0 node-fetch@2.6.0
At the start of your auth.js file, add the following require statements:
const fetch = require('node-fetch');
const { AuthenticationError } = require('apollo-server');
const JWTVerifier = require('@okta/jwt-verifier');
const okta = require('@okta/okta-sdk-nodejs');
You’ll need a function to generate a token for a user. The user will provide their username and password, which you’ll then forward on to Okta’s API and return a token. If authentication fails, throw an error that the user will see:
const basicAuth = Buffer.from(
  [
    process.env.OKTA_CLIENT_ID,
    process.env.OKTA_CLIENT_SECRET,
  ].join(':')
).toString('base64');

const getToken = async ({ username, password }) => {

  const response = await fetch(`${process.env.OKTA_ORG_URL}/oauth2/default/v1/token`, {
    method: 'POST',
    headers: {
      authorization: `Basic ${basicAuth}`,
      'accept': 'application/json',
      'content-type': 'application/x-www-form-urlencoded',
    },
    body: new URLSearchParams({
      username,
      password,
      grant_type: 'password',
      scope: 'openid',
    }).toString(),
  });

  const { error_description, access_token } = await response.json();

  if (error_description) throw new AuthenticationError(error_description);

  return access_token;
};
Once a user has logged in, they’ll use their token as authentication instead of their username and password. You’ll need a way to verify that the token is legit (e.g. has a valid signature and isn’t expired). This function will return the user ID of a valid, authenticated user. Otherwise, it will return undefined.
const verifier = new JWTVerifier({
  issuer: `${process.env.OKTA_ORG_URL}/oauth2/default`,
  clientId: process.env.OKTA_CLIENT_ID,
});

const getUserIdFromToken = async (token) => {
  if (!token) return;

  try {
    const jwt = await verifier.verifyAccessToken(token)
    return jwt.claims.sub;
  } catch (error) {
    // ignore
  }
};
You may also want more detailed information about your user, such as their name. You can get this using Okta’s Node SDK:
const client = new okta.Client({
  orgUrl: process.env.OKTA_ORG_URL,
  token: process.env.OKTA_TOKEN,
});

const getUser = async (userId) => {
  if (!userId) return;

  try {
    const user = await client.getUser(userId);
    return user.profile;
  } catch (error) {
    // ignore
  }
};
You’ll also need to export these functions for use in index.js:
module.exports = { getToken, getUserIdFromToken, getUser };
Here’s what the final auth.js file should look like:
const fetch = require('node-fetch');
const { AuthenticationError } = require('apollo-server');
const JWTVerifier = require('@okta/jwt-verifier');
const okta = require('@okta/okta-sdk-nodejs');

const basicAuth = Buffer.from(
  [
    process.env.OKTA_CLIENT_ID,
    process.env.OKTA_CLIENT_SECRET,
  ].join(':')
).toString('base64');

const getToken = async ({ username, password }) => {

  const response = await fetch(`${process.env.OKTA_ORG_URL}/oauth2/default/v1/token`, {
    method: 'POST',
    headers: {
      authorization: `Basic ${basicAuth}`,
      'accept': 'application/json',
      'content-type': 'application/x-www-form-urlencoded',
    },
    body: new URLSearchParams({
      username,
      password,
      grant_type: 'password',
      scope: 'openid',
    }).toString(),
  });

  const { error_description, access_token } = await response.json();

  if (error_description) throw new AuthenticationError(error_description);

  return access_token;
};

const verifier = new JWTVerifier({
  issuer: `${process.env.OKTA_ORG_URL}/oauth2/default`,
  clientId: process.env.OKTA_CLIENT_ID,
});

const getUserIdFromToken = async (token) => {
  if (!token) return;

  try {
    const jwt = await verifier.verifyAccessToken(token)
    return jwt.claims.sub;
  } catch (error) {
    // ignore
  }
};

const client = new okta.Client({
  orgUrl: process.env.OKTA_ORG_URL,
  token: process.env.OKTA_TOKEN,
});

const getUser = async (userId) => {
  if (!userId) return;

  try {
    const user = await client.getUser(userId);
    return user.profile;
  } catch (error) {
    // ignore
  }
};

module.exports = { getToken, getUserIdFromToken, getUser };
Now back in index.js, you’ll need to add the user to the context so that your resolvers can easily see who’s trying to make the request. Import the new functions near the top of your file (typically all imports are done before any other code, and local imports are done after imports from external dependencies). You’re also going to be throwing an AuthenticationError when a user isn’t logged in during an edit, so make sure to import that as well:
const { ApolloServer, AuthenticationError, gql } = require('apollo-server');
const uuid = require('uuid/v4');

const { getToken, getUserIdFromToken, getUser } = require('./auth');
Create a new mutation for your users to log in, by adding this to your typeDefs:
type Mutation {
  # ...
  login(username: String!, password: String!): Authentication
}

type Authentication {
  token: String!
}
Your login mutation resolver should look like this:
  login: async (parent, { username, password }) => ({
    token: await getToken({ username, password }),
  }),
In order for resolvers to know whether or not a user is authenticated, the recommended way is to add the user to the context. The context is built before any resolvers are hit and then passed along to each resolver so authentication only needs to happen at the start of any request. Create a new context function, and pass it into the Apollo server.
const context = async ({ req }) => {
  const [, token] = (req.headers.authorization || '').split("Bearer ");

  return {
    user: await getUser(await getUserIdFromToken(token)),
  };
};

const server = new ApolloServer({ typeDefs, resolvers, context });
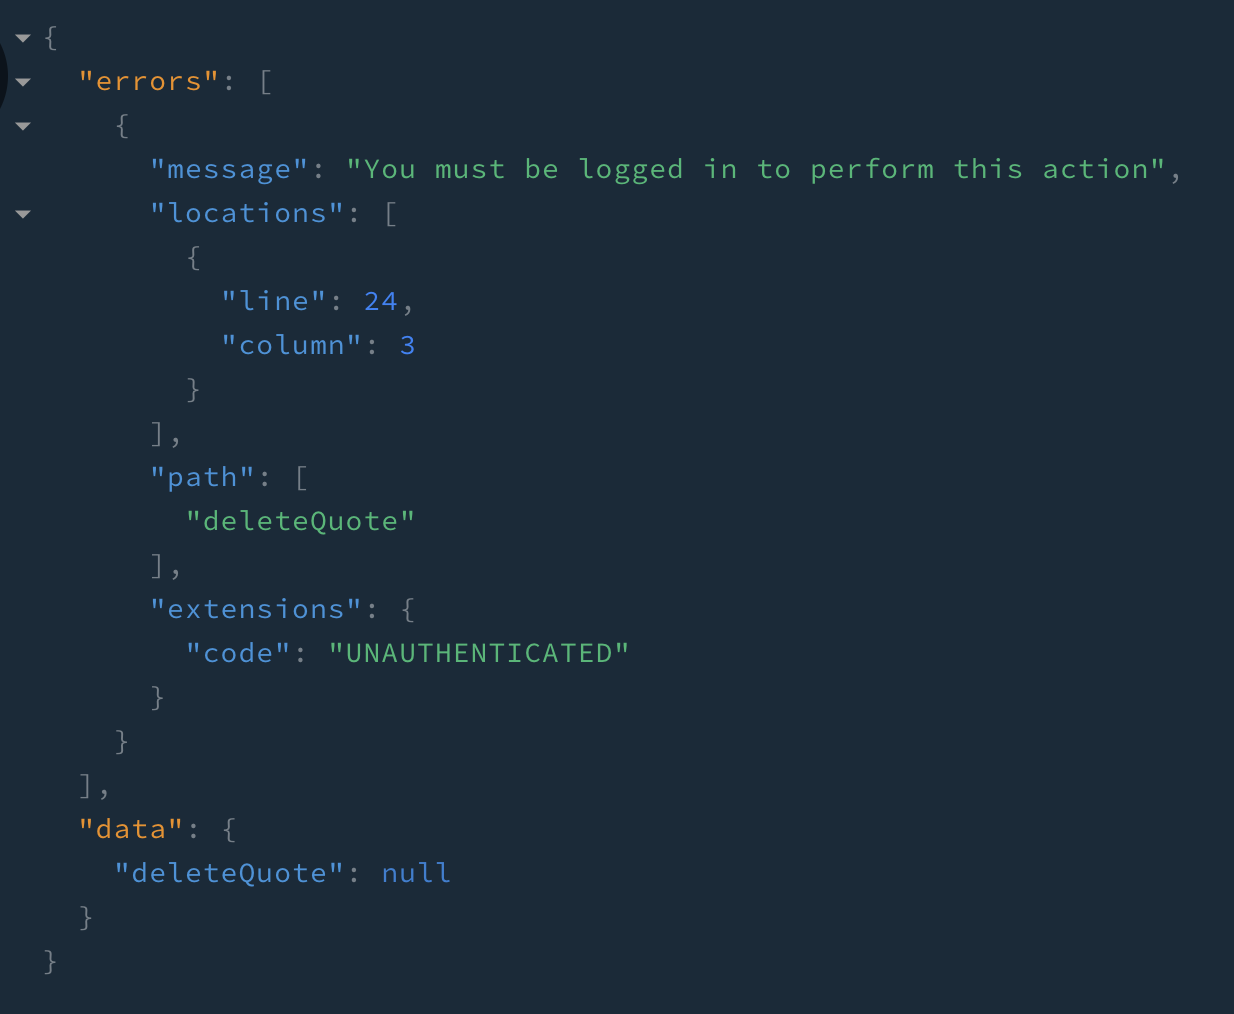
To piece this all together, you can now throw an error in your add, edit, and delete mutations before actually performing any work, unless of course the user is properly logged in. In order to check for the user, you’ll need to add context as a third input parameter to the resolvers.
  addQuote: async (parent, quote, context) => {
    if (!context.user) throw new AuthenticationError("You must be logged in to perform this action");
    // ...etc
  },
  editQuote: async (parent, { id, ...quote }, context) => {
    if (!context.user) throw new AuthenticationError("You must be logged in to perform this action");
    // ...etc
  },
  deleteQuote: async (parent, { id }, context) => {
    if (!context.user) throw new AuthenticationError("You must be logged in to perform this action");
    // ...etc
  },
At the end of the day, your index.js file should look like the following:
require('dotenv').config();

const { ApolloServer, AuthenticationError, gql } = require('apollo-server');
const uuid = require('uuid/v4');

const { getToken, getUserIdFromToken, getUser } = require('./auth');

const typeDefs = gql`
  type Quote {
    id: ID!
    phrase: String!
    quotee: String
  }

  type Query {
    quotes: [Quote]
  }

  type Mutation {
    login(username: String!, password: String!): Authentication
    addQuote(phrase: String!, quotee: String): Quote
    editQuote(id: ID!, phrase: String, quotee: String): Quote
    deleteQuote(id: ID!): DeleteResponse
  }

  type Authentication {
    token: String!
  }

  type DeleteResponse {
    ok: Boolean!
  }
`;

const quotes = {};
const addQuote = quote => {
  const id = uuid();
  return quotes[id] = { ...quote, id };
};

addQuote({ phrase: "I'm a leaf on the wind. Watch how I soar.", quotee: "Wash" });
addQuote({ phrase: "We're all stories in the end.", quotee: "The Doctor" });
addQuote({ phrase: "Woah!", quotee: "Neo" });

const resolvers = {
  Query: {
    quotes: () => Object.values(quotes),
  },
  Mutation: {
    login: async (parent, { username, password }) => ({
      token: await getToken({ username, password }),
    }),
    addQuote: async (parent, quote, context) => {
      if (!context.user) throw new AuthenticationError("You must be logged in to perform this action");

      return addQuote(quote);
    },
    editQuote: async (parent, { id, ...quote }, context) => {
      if (!context.user) throw new AuthenticationError("You must be logged in to perform this action");

      if (!quotes[id]) {
        throw new Error("Quote doesn't exist");
      }

      quotes[id] = {
        ...quotes[id],
        ...quote,
      };

      return quotes[id];
    },
    deleteQuote: async (parent, { id }, context) => {
      if (!context.user) throw new AuthenticationError("You must be logged in to perform this action");

      const ok = Boolean(quotes[id]);
      delete quotes[id];

      return { ok };
    },
  },
};

const context = async ({ req }) => {
  const [, token] = (req.headers.authorization || '').split("Bearer ");

  return {
    user: await getUser(await getUserIdFromToken(token)),
  };
};

const server = new ApolloServer({ typeDefs, resolvers, context });

server.listen().then(({ url }) => {
  console.log(`🚀  Server ready at ${url}`); // eslint-disable-line no-console
});
Test Your Authentication
Restart your server and everything should be ready to go now. Try running some mutations and you’ll find that you get an error at first. You’ll get a stack trace if you’re in development mode, but if you were running in production (e.g. with NODE_ENV=production npm start) you would just see the error code.
In order to log in, run the login mutation. You can provide the input inline like this:
mutation {
  login(username: "myusername@example.com", password: "hunter2") {
    token
  }
}
Or you can use variables instead:
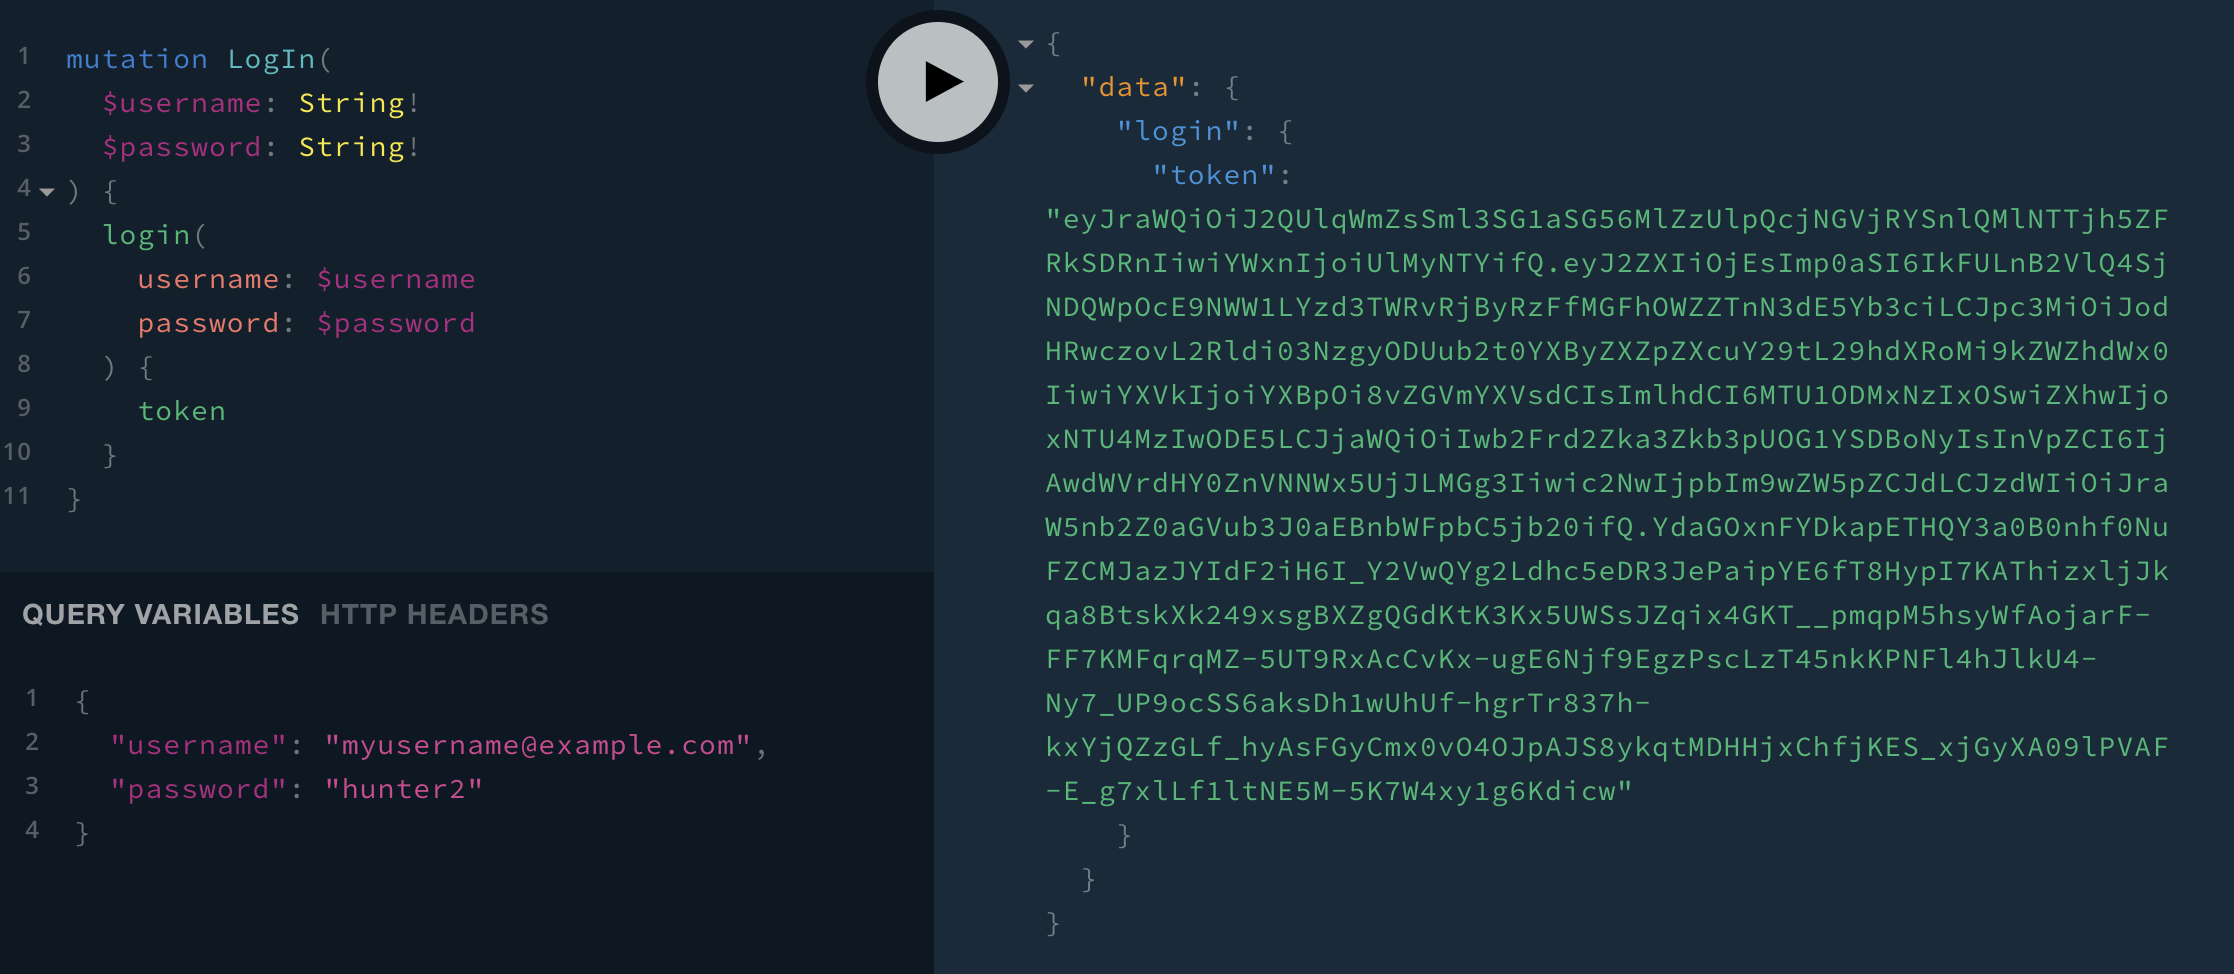
If you provide the right username and password, you’ll get a token back. Copy this token, then click on HTTP HEADERS at the bottom of the screen and enter in { "Authorization": "Bearer eyJraWQiOi...1g6Kdicw" } (although use the full, much longer, token you received from the login mutation).
Try again and you should be able to successfully edit quotes.
Learn More about GraphQL, Node.js, and Secure Authentication
I hope you’ve had fun learning about GraphQL and experimenting with the Playground. There weren’t a lot of complex parts to this project, and yet you have authentication, are able to read and write to a dataset, and have great documentation for anyone you share the API with. You can hopefully see how easily you could extend the type definitions and resolvers to build something a lot more substantial.
If you want to see the final sample code, you can find it on github.
If you’d like to learn more about GraphQL or Node, check out some of these other articles on the Okta developer blog:
- Build a Health Tracking App with React, GraphQL, and User Authentication
- Build and Understand a Simple Node.js Website with User Authentication
- Build a Simple Web App with Express, React, and GraphQL
- Tutorial: Build a Basic CRUD App with Node.js
- Build a Simple API Service with Express and GraphQL
If you have any questions about this post, please add a comment below. For more awesome content, follow @oktadev on Twitter, like us on Facebook, or subscribe to our YouTube channel.
Okta Developer Blog Comment Policy
We welcome relevant and respectful comments. Off-topic comments may be removed.