Create a Secure Chat Application with Socket.IO and React

The HTTP protocol powers the web. Traditionally, HTTP is a request-response protocol. This means that a client requests data from a server, and the server responds to that request. In this model, a server will never send data to a client without having been queried first.
This approach is suitable for many use cases that the web is used for. It allows loose coupling between clients and servers without the need to keep a persistent connection. But for real-time applications, the request-response model has its drawbacks. When some state on the server changes, the client isn’t informed immediately. Within the HTTP protocol, the client needs to use regular polling to request data from the server. This is not ideal because the data will not arrive at the server in real-time, and shorter polling intervals will increase network traffic.
Most modern browsers nowadays support WebSockets. The WebSocket protocol builds on top of the HTTP protocol to provide a persistent bi-directional connection between the client and the server. Websockets can be used directly using JavaScript in the browser, but the API is low-level, making it complicated to create even a simple application.
Socket.IO is a JavaScript library that provides a high-level API around WebSockets. This makes it easy to create real-time web applications with only a few lines of code. As an additional extra, Socket.IO falls back to a technique called long-polling in case a WebSocket connection can’t be established between the client and the server.
This tutorial will show you how to create a simple chat application using Socket.IO, React for the front-end, and Node/Express for the back-end. I won’t assume any prior knowledge except some familiarity with JavaScript. I will assume that you have an up-to-date version of Node installed on your system.
Prerequisites:
Table of Contents
- Create a Chat Server with Express and Socket.IO
- Implement the Socket.IO Client Using React
- Add User Authentication with OpenID Connect
- Learn More About WebSockets and JavaScript
If you would rather follow along by watching a video, check out the screencast below from our YouTube channel.
Note: In May 2025, the Okta Integrator Free Plan replaced Okta Developer Edition Accounts, and the Okta CLI was deprecated.
We preserved this post for reference, but the instructions no longer work exactly as written. Replace the Okta CLI commands by manually configuring Okta following the instructions in our Developer Documentation.
Create a Chat Server with Express and Socket.IO
I will start by showing you how to implement the server. In a folder of your choice, open a terminal. Execute the following command to create a chat server project.
npx express-generator --no-view chat-server
The npx command is part of your Node.js installation and lets you run scripts from the npmjs repository. The express-generator script creates a new Express-based server project. The command above will create a new folder chat-server. In the terminal, navigate into that folder and install the dependencies and then some additional packages by running the following two commands.
npm install
npm install -E socket.io@4.4.0 uuid@8.3.2 cors@2.8.5
The one dependency to note here is socket.io. This is the Socket.IO library that you will be using to provide the communication between client and server. Now, open up an editor of your choice and create a new file chat.js in the project folder. Paste the following contents into the file.
const uuidv4 = require('uuid').v4;

const messages = new Set();
const users = new Map();

const defaultUser = {
  id: 'anon',
  name: 'Anonymous',
};

const messageExpirationTimeMS = 5*60 * 1000;

class Connection {
  constructor(io, socket) {
    this.socket = socket;
    this.io = io;

    socket.on('getMessages', () => this.getMessages());
    socket.on('message', (value) => this.handleMessage(value));
    socket.on('disconnect', () => this.disconnect());
    socket.on('connect_error', (err) => {
      console.log(`connect_error due to ${err.message}`);
    });
  }

  sendMessage(message) {
    this.io.sockets.emit('message', message);
  }

  getMessages() {
    messages.forEach((message) => this.sendMessage(message));
  }

  handleMessage(value) {
    const message = {
      id: uuidv4(),
      user: users.get(this.socket) || defaultUser,
      value,
      time: Date.now()
    };

    messages.add(message);
    this.sendMessage(message);

    setTimeout(
      () => {
        messages.delete(message);
        this.io.sockets.emit('deleteMessage', message.id);
      },
      messageExpirationTimeMS,
    );
  }

  disconnect() {
    users.delete(this.socket);
  }
}

function chat(io) {
  io.on('connection', (socket) => {
    new Connection(io, socket);
  });
};

module.exports = chat;
To understand this module, it is probably best to start at the bottom. The module exports a single function chat that takes the Socket.IO server instance as a parameter. When a client requests a connection, the callback will create a new Collection instance and pass the Socket.IO server instance and the new socket to the constructor. The constructor of the Connection class sets up callbacks on events coming from the socket. The disconnect and connection_error are predefined events that are triggered when the socket disconnects, or when an error happens during the connection. The message event will be triggered by the client whenever a new message has been posted in the chat. The getMessages event will be used by new clients to retrieve all existing messages from the server.
The chat room holds two global data structures, messages and users. The users map is intended to hold user information indexed by the socket connection. At the moment, users are never added to this map. I will come back to this later when I show you how to implement user management. The messages object is a set that simply contains all messages together with some metadata.
When a new message arrives, handleMessage() creates a message object and adds it to messages. It will then call sendMessage() which uses the Socket.IO server to send the message to all sockets that are currently connected. It is this call that will update all clients simultaneously. handleMessage() also creates a time-out callback that will delete the message again after some fixed time has elapsed.
To use the chat module, open the bin/www file in your editor. At the top of the file, add the following two imports.
var chat = require('../chat');
var socketio = require('socket.io');
Now modify the section under the comment Create HTTP Server to look like the code below.
/**
 * Create HTTP server.
 */

var server = http.createServer(app);
var io = socketio(server,{
  cors: {
    origin: '*',
    methods: ['GET', 'POST']
  }
});
chat(io);
Finally, you need to add CORS support to the Express server. Open app.js and add the cors import to the top of the file.
var cors = require('cors');
Then, add the cors middleware to the Express server by adding the following line directly after the app instance has been created.
var app = express();
app.use(cors()); // add this line
You can now start the server in the terminal by running the following command in the project folder.
npm start
You should not receive any error messages but you also will not see much at this point because the server is not connecting to any client yet.
Implement the Socket.IO Client Using React
In this section, I will show you how to create the client for the chat application. I will be using React to implement the front-end. In a folder of your choice, open the terminal and run the following command.
npx create-react-app chat-client
This will create a new folder chat-client and initialize a React application inside it. Navigate into the new folder and install the Socket.IO client library.
cd chat-client
npm install -E socket.io-client@4.4.0
In the editor of your choice, open the file src/App.js and replace its contents with the code below.
import React, { useEffect, useState } from 'react';
import io from 'socket.io-client';
import Messages from './Messages';
import MessageInput from './MessageInput';

import './App.css';

function App() {
  const [socket, setSocket] = useState(null);

  useEffect(() => {
    const newSocket = io(`http://${window.location.hostname}:3000`);
    setSocket(newSocket);
    return () => newSocket.close();
  }, [setSocket]);

  return (
    <div className="App">
      <header className="app-header">
        React Chat
      </header>
      { socket ? (
        <div className="chat-container">
          <Messages socket={socket} />
          <MessageInput socket={socket} />
        </div>
      ) : (
        <div>Not Connected</div>
      )}
    </div>
  );
}

export default App;
The main application connects to the server using the Socket.IO client library. Inside the useEffect() hook a connection is established. Once connected, the socket state is updated via the setSocket function. The component then renders a page that contains a header. If a socket has already been established, it will also render two components Messages and MessageInput. Both of these components need the socket to work so it is being passed in as a parameter.
To give the component some styling, open src/App.css and replace its contents with the CSS below.
.app-header {
  padding: 10px;
  background-color: #282c34;
  color: white;
}

.app-header > div {
  display: flex;
  flex-direction: row;
  align-items: center;
  justify-content: space-between;
}

.chat-container {
  display: flex;
  flex-direction: column;
  align-items: center;
  padding: 16px;
}
Now it’s time to start creating the Messages and MessageInput components. Start by creating a file src/Messages.js. Paste the following code into it.
import React, { useEffect, useState } from 'react';
import './Messages.css';

function Messages({ socket }) {
  const [messages, setMessages] = useState({});

  useEffect(() => {
    const messageListener = (message) => {
      setMessages((prevMessages) => {
        const newMessages = {...prevMessages};
        newMessages[message.id] = message;
        return newMessages;
      });
    };

    const deleteMessageListener = (messageID) => {
      setMessages((prevMessages) => {
        const newMessages = {...prevMessages};
        delete newMessages[messageID];
        return newMessages;
      });
    };

    socket.on('message', messageListener);
    socket.on('deleteMessage', deleteMessageListener);
    socket.emit('getMessages');

    return () => {
      socket.off('message', messageListener);
      socket.off('deleteMessage', deleteMessageListener);
    };
  }, [socket]);

  return (
    <div className="message-list">
      {[...Object.values(messages)]
        .sort((a, b) => a.time - b.time)
        .map((message) => (
          <div
            key={message.id}
            className="message-container"
            title={`Sent at ${new Date(message.time).toLocaleTimeString()}`}
          >
            <span className="user">{message.user.name}:</span>
            <span className="message">{message.value}</span>
            <span className="date">{new Date(message.time).toLocaleTimeString()}</span>
          </div>
        ))
      }
    </div>
  );
}

export default Messages;
When the component is created, event handlers for the message and the deleteMessage events are set up for the Socket.IO connection. The messages state is a plain object that contains each message indexed by the message ID. Using React hooks, this state is updated inside the event handlers to reflect the changes provided by the server. The component then displays all messages sorted by the timestamp at which they were created.
This component also needs some styling. Create a new file src/Messages.css with the following CSS code.
.message-list {
  max-width: 500px;
  width: 100%;
}

.message-container {
  display: flex;
  flex-direction: row;
  padding: 0.5rem;
  border-bottom: 1px solid #eeeeee;
}

.user, .date {
  font-size: 0.625rem;
  color: #888888;
}

.user {
  min-width: 120px;
}

.message {
  flex-grow: 1;
}
The last component is the MessageInput component. This will be the text input you can use to send messages. Create a file src/MessageInput.js and add the code below.
import React, { useState } from 'react';
import './MessageInput.css';

const NewMessage = ({socket}) => {
  const [value, setValue] = useState('');
  const submitForm = (e) => {
    e.preventDefault();
    socket.emit('message', value);
    setValue('');
  };

  return (
    <form onSubmit={submitForm}>
      <input
        autoFocus
        value={value}
        placeholder="Type your message"
        onChange={(e) => {
          setValue(e.currentTarget.value);
        }}
      />
    </form>
  );
};

export default NewMessage;
This is a simple form with only one input element. Submission of the form triggers the submitForm() handler. The handler emits a message event on the socket, passing the field value. Finally, add some styling to this component. Create a file src/MessageInput.css and paste the following CSS into it.
form {
  max-width: 500px;
  width: 100%;
}

input {
  width: 100%;
  padding: 0.5rem;
}
This completes the implementation of the client.
Before you can test the client together with the chat server, you will need to override the default port for the client development server. By default, both the Express server from the previous section and the React testing server run on port 3000. To change the port for the client, create a file .env in your client project folder and copy the following line into it.
PORT=8080
Now you can run the client by opening the terminal running the following command.
npm start
If you also run the server as described in the previous section, you should see the chat application opening up in your browser. You can test it by typing messages into the input field and pressing enter. The message should show up immediately in the area above the input but disappear after a few minutes. If you open multiple tabs, you can see that messages are always kept up-to-date in all tabs.
So far, all messages appear to be written by Anonymous and not by the current user. This will be fixed in the following sections, where you will learn how to add user authentication to the chat app.
Add User Authentication with OpenID Connect
To manage users in your chat application, you will need to register the application with Okta.
Before you begin, you’ll need a free Okta developer account. Install the Okta CLI and run okta register to sign up for a new account. If you already have an account, run okta login.
Then, run okta apps create. Select the default app name, or change it as you see fit.
Choose Single-Page App and press Enter.
Use http://localhost:8080/login/callback for the Redirect URI and set the Logout Redirect URI to http://localhost:8080.
What does the Okta CLI do?
The Okta CLI will create an OIDC Single-Page App in your Okta Org. It will add the redirect URIs you specified and grant access to the Everyone group. It will also add a trusted origin for http://localhost:8080. You will see output like the following when it’s finished:
Okta application configuration:
Issuer:    https://dev-133337.okta.com/oauth2/default
Client ID: 0oab8eb55Kb9jdMIr5d6
NOTE: You can also use the Okta Admin Console to create your app. See Create a React App for more information.
You will also need to generate a token so that your chat server can communicate with the Okta authentication service. Run okta login, open the resulting URL in your browser, sign-in, and navigate to Security > API.
Select the Tokens tab. Click on Create Token and type in a name for the token. In the following popup, you will be shown the token that has been generated. Copy it to a secure place; you will need it later.
Add Okta to the Socket.IO Chat Server
The next step is to add user management with Okta to the server of the chat application. Open a terminal in the project folder of the chat server and install the packages that you will need to interface with Okta.
npm install -E @okta/jwt-verifier@2.3.0 @okta/okta-sdk-nodejs@6.1.0
Open your editor in the project folder and open chat.js. Add the following code after the imports at the top of the file.
const OktaJwtVerifier = require('@okta/jwt-verifier');
const okta = require('@okta/okta-sdk-nodejs');

const jwtVerifier = new OktaJwtVerifier({
  clientId: '{yourClientID}',
  issuer: 'https://{yourOktaDomain}/oauth2/default',
});

const oktaClient = new okta.Client({
  orgUrl: 'https://{yourOktaDomain}',
  token: '{yourOktaAPIToken}',
});

async function authHandler(socket, next) {
  const {token = null} = socket.handshake.query || {};
  if (token) {
    try {
      const [authType, tokenValue] = token.trim().split(' ');
      if (authType !== 'Bearer') {
        throw new Error('Expected a Bearer token');
      }

      const {claims: {sub}} = await jwtVerifier.verifyAccessToken(tokenValue, 'api://default');
      const user = await oktaClient.getUser(sub);

      users.set(socket, {
        id: user.id,
        name: [user.profile.firstName, user.profile.lastName].filter(Boolean).join(' '),
      });
    } catch (error) {
      console.log(error);
    }
  }

  next();
}
This defines the authHandler() middleware for the Socket.IO connection. In this code, {yourClientID} is the client ID that you obtained from the Okta admin console. Similarly, {yourOktaDomain} is the Okta domain and {yourOktaAPIToken} is the Okta API token you obtained earlier.
The authentication handler first checks for a JWT token and then verifies it using the OktaJwtVerifier. After this, the information contained in the JWT token is used to obtain the user information using the Okta client. To use the authentication handler add the following command as the first line in the chat function in the same file.
io.use(authHandler);
This tells Socket.IO to use the authentication handler whenever a connection from the client is requested. Just as before, you can start the server by running npm start in the project folder.
Add Okta to the Socket.IO Client
Now that you have added user management to the server, it is time to add it to the client as well. In the terminal, navigate to the client project folder and install the following dependencies.
npm install -E @okta/okta-react@6.3.0 @okta/okta-auth-js@5.9.1 \
    react-dom@17.0.2 react-router-dom@5.3.0
Since the React application is already configured to use a .env file, open it and add the following two key-value pairs.
REACT_APP_OKTA_ORG_URL=https://{yourOktaDomain}
REACT_APP_OKTA_CLIENT_ID={yourClientID}
Any definitions here starting with REACT_APP_ will become available in the client code through the process.env global. Make sure you don’t add the API token here. The token should be kept secret, and these properties will be visible to the client. Now, open src/index.js and add the following code just after the existing module imports.
import { BrowserRouter as Router, Route, useHistory } from 'react-router-dom';
import { LoginCallback, Security } from '@okta/okta-react';
import { OktaAuth, toRelativeUrl } from '@okta/okta-auth-js';

const oktaAuth = new OktaAuth({
  issuer: `${process.env.REACT_APP_OKTA_ORG_URL}/oauth2/default`,
  clientId: process.env.REACT_APP_OKTA_CLIENT_ID,
  redirectUri: `${window.location.origin}/login/callback`,
});

function SecuredRoutes(props) {
  const history = useHistory();
  const restoreOriginalUri = async (_oktaAuth, originalUri) => {
    history.replace(toRelativeUrl(originalUri || '/', window.location.origin));
  };

  return (
    <Security oktaAuth={oktaAuth} restoreOriginalUri={restoreOriginalUri}>
      <Route path="/" exact component={App} />
      <Route path="/login/callback" component={LoginCallback} />
    </Security>
  );
}
Next, replace the call to ReactDOM.render() with the code below.
ReactDOM.render(
  <React.StrictMode>
    <Router>
      <SecuredRoutes />
    </Router>
  </React.StrictMode>,
  document.getElementById('root')
);
The Security component wraps any components that want to use Okta authentication. A /login/callback route has been added. This route will be called after a user has logged in on the Okta website and is responsible for setting any application data related to the user’s identity.
Next, create a new file src/auth.js and paste the following contents into it.
import { useEffect, useState } from 'react';
import { useOktaAuth } from '@okta/okta-react';

export const useAuth = () => {
  const { oktaAuth, authState } = useOktaAuth();
  const [user, setUser] = useState(null);
  const [token, setToken] = useState(null);

  useEffect(() => {
    if (authState?.isAuthenticated) {
      if (!user) {
        oktaAuth.getUser().then(setUser);
      }
      setToken(`Bearer ${authState.accessToken.accessToken}`);
    } else {
      setUser(null);
      setToken(null);
    }
  }, [authState, user, oktaAuth]);

  return [user, token];
};
The function useAuth() will be used as a React hook in the main application component to set the user information and the JWT token value. Now, open the App.js file and import the handler at the top of the file.
import { useOktaAuth } from '@okta/okta-react';
import { useAuth } from './auth';
In the same file, at the start of the App function add the following code.
const { oktaAuth, authState } = useOktaAuth();

const login = async () => oktaAuth.signInWithRedirect('/');
const logout = async () => oktaAuth.signOut('/');

const [user, token] = useAuth();
The function useOktaAuth() is a hook provided by the okta-react package. It manages the authentication state of the user. This hook is only available for components that live within the Security component.
Now, modify the useEffect() hook to send the token when connecting to the server. The code should look as follows.
useEffect(() => {
    const newSocket = io(`http://${window.location.hostname}:3000`, token && { query: { token } });
    setSocket(newSocket);
    return () => newSocket.close();
  }, [setSocket, token]);
Finally, replace the <header> component with the following code.
<header className="app-header">
{ !authState? (
    <div>Loading...</div>
) : (user ? (
    <div>
      <div>Signed in as {user.name}</div>
      <button onClick={logout}>Sign out</button>
    </div>
) : (
    <div>
      <div>Not signed in</div>
      <button onClick={login}>Sign in</button>
    </div>
)
)}
</header>
The header shows the authentication state. If a user is logged on, it will show the user’s name, and a Sign out button; otherwise, it will show that the user is not signed in and show a Sign in button that lets the user log in. You are ready to test the application. Start the server as described above, then open a terminal in the client project folder and run the following command.
npm start
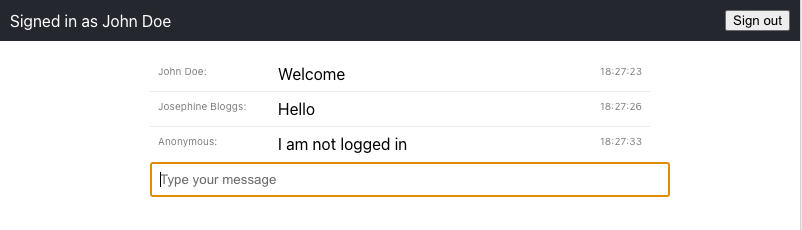
Congratulations, you created a simple real-time chat application! Your browser should open with the chat application, and you should see something similar to the screenshot below.
Learn More About WebSockets and JavaScript
This tutorial shows you how to create a simple real-time chat application using JavaScript and Socket.IO. In contrast to the traditional request-response model of communication that has powered the web, Socket.IO makes use of WebSockets. These provide a bi-directional persistent connection between the client and the server. The server can push data to the client and up-to-date information can be shown to the user without having to wait for the client to request data from the server. Socket.IO has many use-cases apart from chat applications, ranging from real-time financial applications to multiplayer games.
The chat application in this tutorial is split into two parts. The client makes use of React for rendering the user interface. The server uses Express to manage connections and configure the HTTP server. The use of Express shows that you can combine Socket.IO based communication with traditional REST-style APIs in the same server. If you want to learn more about any of these topics, feel free to follow the links below.
- Build a React App with Styled Components
- Use TypeScript to Build a Node API with Express
- Develop Secure Apps with WebSockets and Node.js
- Build a Next.js Application with TypeScript
You can find the code for this tutorial on GitHub at https://github.com/oktadev/okta-socket-io-chat-example.
If you liked this tutorial, chances are you like others we publish. Please follow @oktadev on Twitter and subscribe to our YouTube channel to get notified when we publish new developer tutorials.
Changelog:
- Dec 15, 2021: Updated to use Socket.IO v4.4.0 and Okta React v6.3.0. See this post’s changes in okta-blog#1001 and the example app changes in okta-socket-io-chat-example#3.
Okta Developer Blog Comment Policy
We welcome relevant and respectful comments. Off-topic comments may be removed.