Build a Secure NestJS Back End for Your React Application
NestJS is a node.js framework that boasts the ability to build efficient, reliable, and scalable applications. A NestJS application can serve as the backend for your SPA.
In this tutorial, you will use React, one of the most popular javascript front-end libraries available to build your SPA, and then use NestJS for your server. To secure everything, you will level Okta’s simple and powerful single sign-on provider.
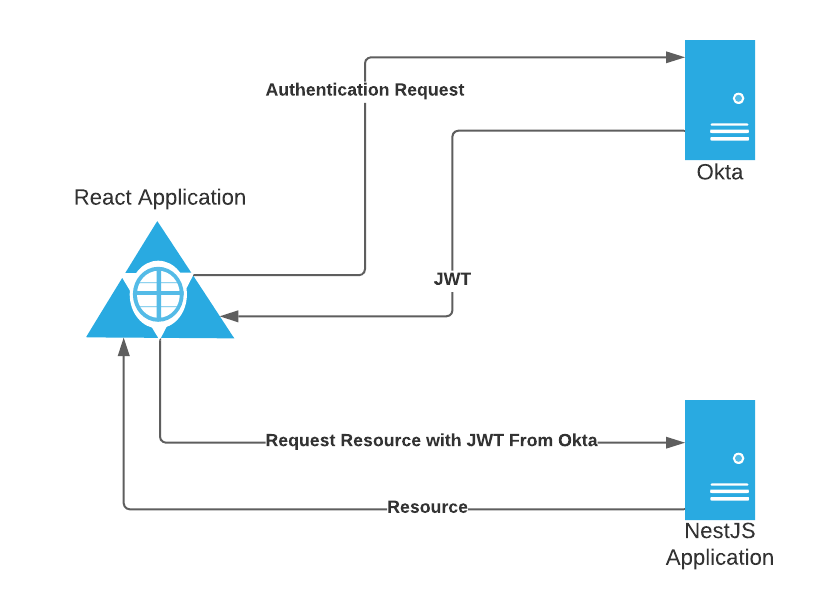
You will learn how to authenticate a user to React using Okta. Okta will then issue a JWT to your SPA, which you can relay to the NestJS application. NestJS is built with external libraries in mind, meaning it’s straightforward to use Okta’s JWT verifier to validate the JWT and ensure the user is authorized to access the resources on your server.
Note: In May 2025, the Okta Integrator Free Plan replaced Okta Developer Edition Accounts, and the Okta CLI was deprecated.
We preserved this post for reference, but the instructions no longer work exactly as written. Replace the Okta CLI commands by manually configuring Okta following the instructions in our Developer Documentation.
Create your Okta Application
To start, you will need a forever-free Okta developer’s account. If you don’t have one, you can sign up here. For this tutorial, you will be creating your application using Okta’s new CLI tool. If you haven’t used it before, I highly encourage you to check out this tutorial or check out the official documentation.
Once you are logged into the CLI, run okta apps create and begin the setup. Give your application a meaningful name; I called my nest-js. Next select Single Page App. Change your Redirect URI to http://localhost:3000/callback and your Post Logout Redirect URI to http://localhost:3000/. The CLI will return your Issuer and Client ID. Make note of both of these as you will need them in your applications.
Create your React Application
Now that you have your application set up in Okta, you can create your React application. For this, you can use the create-react-app task runner. Use npx create-react-app nestjs-frontend to begin your application set up. For this project, I named my react app nestjs-frontend, but you can name yours whatever you like.
After the task runner has scaffolded React for you it’s time to install a few packages. First, install bootstrap since it’s a nice, easy CSS library.
npm i bootstrap@4.5.3
Okta provides a couple of useful libraries to help facilitate securing your application. You will want to install these next.
npm i @okta/okta-auth-js@4.7.2
npm i @okta/okta-react@4.1.0
You’ll also be using a library that allows you to use a local file to store properties that will be read as environment variables in React, called dotenv.
npm i dotenv@8.2.0
The last step before coding your application is to set up your .env file. Add a new file called .env to the root of your front-end application and add the following values to it.
REACT_APP_OKTA_CLIENTID={yourOktaClientId}
REACT_APP_OKTA_URL_BASE={yourOktaDomain}
REACT_APP_OKTA_APP_BASE_URL=http://localhost:3000
REACT_APP_SERVER_BASE_URL=http://localhost:3001
PORT=3000
You will plug in the Okta CLI client ID you received earlier and your Okta organization URL (e.g. https://dev-123456.okta.com).
Next, add a file to your src folder called AppWithRouterAccess.jsx. Add the following code to it.
import React from 'react';
import { Route } from 'react-router-dom';
import { Security, LoginCallback } from '@okta/okta-react';
import { OktaAuth } from '@okta/okta-auth-js';

import Home from './Pages/Home'

const AppWithRouterAccess = () => {
  const issuer =  process.env.REACT_APP_OKTA_URL_BASE + '/oauth2/default'
  const clientId = process.env.REACT_APP_OKTA_CLIENTID;
  const redirect = process.env.REACT_APP_OKTA_APP_BASE_URL + '/callback';

  const oktaAuth = new OktaAuth({
    issuer: issuer,
    clientId: clientId,
    redirectUri: redirect
  });

  return (
    <Security oktaAuth={oktaAuth}>
      <Route path='/' exact={true} component={Home} />
      <Route path='/callback' component={LoginCallback} />
    </Security>
  );
};
export default AppWithRouterAccess;
This class provides the setup for your application’s authentication. It wraps your application in a Security component that’s initialized with your Okta settings. That way you will have access to the oktaAuth object on any of the paths defined within.
Next, open your app.js file and replace the code with the following.
import React from 'react';
import { BrowserRouter as Router } from 'react-router-dom';
import AppWithRouterAccess from './AppWithRouterAccess';
import 'bootstrap/dist/css/bootstrap.min.css';

const App = () => {
  return (
    <Router>
      <AppWithRouterAccess/>
    </Router>
  );
}

export default App;
Here you are using the AppWithRouterAccess you just created. This is also the appropriate place to import bootstrap to use with your application.
Next, add a folder called Components and add a file called Header.jsx. Add the following code to it.
import React from "react";
import { useOktaAuth } from "@okta/okta-react";

const Header = () => {
  const { oktaAuth, authState } = useOktaAuth();

  if (authState.isPending) {
    return <div>Loading...</div>;
  }

  const button = authState.isAuthenticated ? (
    <button
      className="btn btn-secondary"
      onClick={() => {
        oktaAuth.signOut("/");
      }}
      >
      Logout
    </button>
    ) : (
    <button
      className="btn btn-secondary"
      onClick={() => {
        oktaAuth.signInWithRedirect();
      }}
    >
      Login
    </button>
  );

  return (
    <div className="navbar" bg="light" expand="lg">
      <div className="navbar" href="/">
        NestJS To Do List
      </div>
      <div className="navbar" aria-controls="basic-navbar-nav"></div>
      <div className="navbar" id="basic-navbar-nav">
        <div className="navbar mr-auto"></div>
        <form className="inline">{button}</form>
      </div>
    </div>
  );
};
export default Header;
This header provides a title for the website and a button for logging in or out, depending on the value of authState.isAuthenticated. The button then uses the oktaAuth object to call signOut or signInWithRedirect, depending on which is appropriate. The signInWithRedirect function will redirect the user to the Okta-hosted login page and return the authentication information to the callback you defined in AppWithRouterAccess before. Once the user signs in, you will have access to the requested authentication details.
In that same folder, add a file called ToDoList.jsx and add the following code.
import React from "react";

const ToDoList = ({ authState, list, onCompleteItem }) => {
  if (!authState.isAuthenticated) {
    return (
      <div>
        <p>
          Hey there, it looks like you aren't logged in yet. To log in, click here.
        </p>
      </div>
    );
  } else if (!list) {
    return <div className="container">Loading....</div>;
  }

  return (
    <div className="container">
      <table className="table table-striped">
        <thead>
          <tr>
            <th>Task</th>
            <th width="15%">Complete</th>
          </tr>
        </thead>
        <tbody>
        {list.map((item, i) => {
          return (
            <tr key={i}>
              <td>{item.text}</td>
              <td>
                <button className="btn btn-primary" onClick={() => onCompleteItem(item)}>
                  Complete
                </button>
              </td>
            </tr>
          );
        })}
      </tbody>
    </table>
  </div>
  );
};
export default ToDoList;
This component does a couple of things. First, it checks if the user is authenticated and, if not, directs them to log in. In practice, the user should never see this because the Home page you will implement shortly will prevent this. It also checks if list is populated. If not, it displays a message that your application is loading. Finally, if the list exists then, it shows it in a simple table. The table has a column with a button for marking the items complete. The logic for this will also be on your Home page.
You will want to implement that next. Add a folder called Pages and add a file to that folder called Home.jsx. This is a relatively simple application, and you will only have one page. Add the following code to that file.
import React, { Component } from "react";
import { withOktaAuth } from "@okta/okta-react";
import ToDoList from "../Components/ToDoList";
import Header from "../Components/Header";

export default withOktaAuth(class Home extends Component {
  constructor(props, context) {
    super(props, context);

    this.state = {
      list: undefined,
      loadingList: false,
    };

    this.markItemAsComplete = this.markItemAsComplete.bind();
  }

  componentDidMount = () => {
    this.getCurrentItems();
  };

  componentDidUpdate = (prevProps, prevState, snapshot) => {
    this.getCurrentItems();
  };

  getCurrentItems() {
    if (
      this.props.authState.isAuthenticated &&
      !this.state.list &&
      !this.state.loadingList
    ) {
      this.setState({
        loadingList: true,
      });

      var itemsUrl = process.env.REACT_APP_SERVER_BASE_URL + "/todolist";

      fetch(itemsUrl, {
        method: "get",
        headers: new Headers({
          Authorization: "bearer " + this.props.authState.accessToken.value,
        }),
      })
      .then((res) => res.json())
      .then((result) => {
          this.setState({ list: result, loadingList: false });
        },
        (error) => {
          console.log(error);
          this.setState({ loadingList: false });
        }
      );
    }
  }

  markItemAsComplete = (item) => {
    var itemsUrl = process.env.REACT_APP_SERVER_BASE_URL + "/todolist";

    var data = {
      id: item.id
    };

    fetch(itemsUrl, {
      method: "post",
      headers: new Headers({
        Authorization: "bearer " + this.props.authState.accessToken.value,
        "Content-Type": "application/json",
      }),
      body: JSON.stringify(data),
    })
    .then((res) => res.json())
    .then((result) => {
      if (result.success) {
        var list = this.state.list.filter(function (i) {
          return i.id !== item.id;
        });

        this.setState({ list: list });
      }
    },
    (error) => {
      console.log(error);
    });
  };

  render() {
    var body = this.props.authState.isAuthenticated ? (
      <ToDoList
        authState={this.props.authState}
        list={this.state.list}
        onCompleteItem={this.markItemAsComplete}
      ></ToDoList>
      ) : (
      <div>
        <div className="row">
          <div className="text-center col-lg-12">
            <h3>Yet Another ToDo List! </h3>
            <br></br>
            <h5>
              A React Demo Using{" "}
              <a target="_blank" rel="noreferrer" href="https://nestjs.com/">
                NestJS
              </a>
              <br />
              Secured With{" "}
              <a
                target="_blank"
                rel="noreferrer"
                href="https://www.okta.com/"
              >
                Okta{" "}
              </a>
            </h5>
          </div>
        </div>
      </div>
    );

    return (
      <div className="container">
        <div className="row" style={{ minHeight: "500px" }}>
          <div className="col-lg-12">
            <Header
              authState={this.props.authState}
              oktaAuth={this.props.oktaAuth}
            ></Header>
            {body}
          </div>
        </div>
        <footer className="text-muted text-center">
          <div className="container">
            <p>
              A Small demo using{" "}
              <a target="_blank" rel="noreferrer" href="https://nestjs.com/">
                Nest JS{" "}
              </a>{" "}
              Secured by{" "}
              <a
                target="_blank"
                rel="noreferrer"
                href="https://www.okta.com/"
              >
                Okta{" "}
              </a>
            </p>
            <p>
              By <a href="https://profile.fishbowlllc.com">Nik Fisher</a>
            </p>
          </div>
        </footer>
      </div>
    );
  }
});
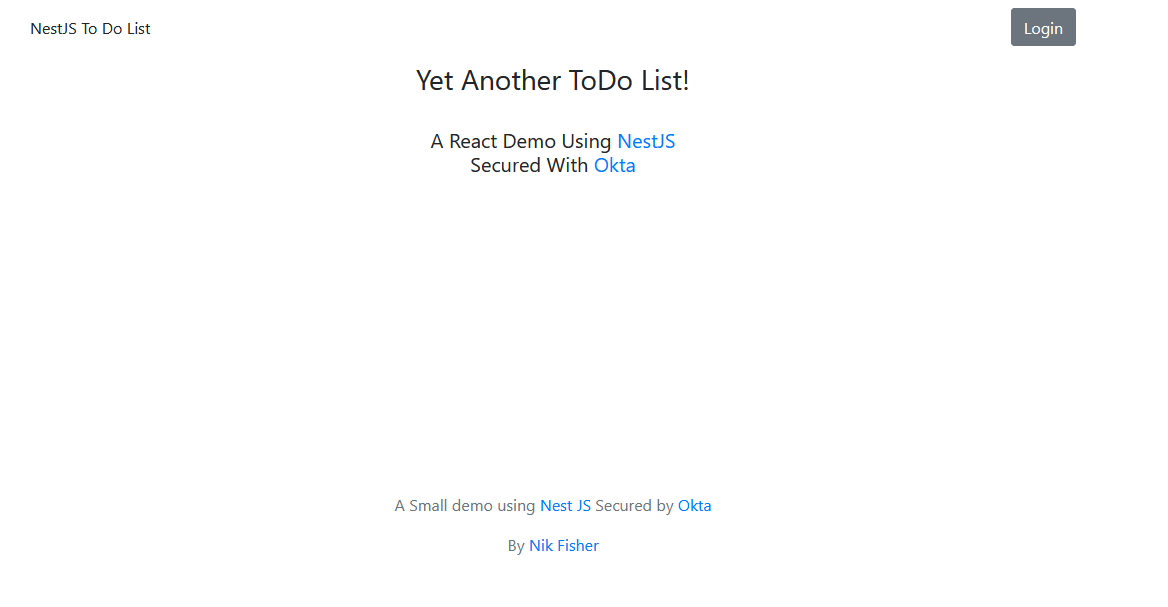
Here you have a getCurrentItems() function that gets called when the component is loaded. This uses fetch() to contain the server you defined in your .env file. That server isn’t operational yet, but that’s where your NestJS application will be. Similarly, there is a function for markItemAsComplete(). This function will also call your NestJS application and request the item selected to be marked as complete; then, it will remove the item from the table. This is injected into the ToDoList.jsx component from before. Finally, if your user isn’t authenticated, you will display a small welcome page for the user.
At this point, you can now run npm run start and let your application load. Your lists won’t load, but you should be able to see the application.
Create your NestJS Application
Now it’s time to get the backend written for your application. Navigate back to your root directory. If you haven’t installed the NestJS CLI yet, then now is the time. Run npm i -g @nestjs/cli and wait for that to complete. Next, run nest new nestjs-backend to create a new nest project next to your frontend React app. I named mine nestjs-backend, but you can call yours whatever is meaningful to you. You’ll be asked to choose which package manager you want to use. Choose npm to use all the commands that follow.
NOTE: You may get some
WARNINGmessages when running the NestJS CLI or installing dependencies. This seems to be related to npm version 7+ and doesn’t seem to affect the application.
This process takes a moment, but you can begin to install your packages once it’s complete.
First, as usual, install dotenv.
npm i dotenv@8.2.0
Next, you will need a few packages for authenticating your user and setting up the auth modules. To do this, you will level passport and Okta’s jwt verifier. You can install these now.
npm i passport@0.4.1
npm i passport-http-bearer@1.0.1
npm i @nestjs/passport@7.1.5
npm i @okta/jwt-verifier@1.0.1
Next, add a file to the root of your backend directory called .env and add the following code.
OKTA_CLIENTID={yourOktaClientId}
OKTA_ISSUER={yourOktaIssuer}
OKTA_AUDIENCE=api://default
APP_DOMAIN=http://localhost:3001
You will plug in your client ID and issuer you received from the Okta CLI earlier.
Now, open your src folder. The rest of this tutorial will take place there.
In src you’ll see a file called main.ts. Replace the code in there with the following.
import { NestFactory } from '@nestjs/core';
import { AppModule } from './app.module';

async function bootstrap() {
  const app = await NestFactory.create(AppModule);
  app.enableCors();
  await app.listen(3001);
}
bootstrap();
console.log('app started');
Most of this code is boilerplate from NestJS, although you are also enabling CORS so that your React application can make requests to this server. To avoid conflicts, you changed the port this application is running on to 3001. This should match what your React application is expecting to call.
Next, open app.service.ts and replace the code with the following.
import { Injectable } from '@nestjs/common';

@Injectable()
export class AppService {
  getToDoList(): any[] {
    return [
      {
        id: 1,
        text: 'Clean the dishes',
      },
      {
        id: 2,
        text: 'Cook Dinner',
      },
      {
        id: 3,
        text: 'Take out the trash',
      },
      {
        id: 4,
        text: 'Legdrop off the ropes',
      },
      {
        id: 5,
        text: 'Brush your teeth',
      },
    ];
  }

  markAsComplete(id: any): any {
    console.log(id);

    return {
      success: true,
      error: '',
    };
  }
}
The service component here defines the logic for the markAsComplete() and getToDoList() methods. These are stubbed out, but you can connect them to a persistent storage if you want.
Next, replace the code in app.module.ts with the following.
import { Module } from '@nestjs/common';
import { AppController } from './app.controller';
import { AppService } from './app.service';
import { AuthModule } from './auth/auth.module';

@Module({
  imports: [AuthModule],
  controllers: [AppController],
  providers: [AppService],
})
export class AppModule {}
The change here from the stock code is that you are now listing AuthModule as an import. This should throw an error at this point since you haven’t created the auth module yet.
Finally, edit your app.controller.ts to the code below.
import { Controller, Get, Post, UseGuards, Body } from '@nestjs/common';
import { AppService } from './app.service';
import { AuthGuard } from '@nestjs/passport';

@Controller()
export class AppController {
  constructor(private readonly appService: AppService) {}

  @Get('/todolist')
  @UseGuards(AuthGuard('bearer'))
  getToDoList(): any[] {
    return this.appService.getToDoList();
  }

  @Post('/todolist')
  @UseGuards(AuthGuard('bearer'))
  markAsComplete(@Body() id: any): any {
    return this.appService.markAsComplete(id);
  }
}
Here you are defining your routes and the logic within them. The syntax here is pretty self-explanatory. You can decorate methods with @Get or @Post (or, of course, any HTTP Method) and provide a route in the argument. Next, you are using the AuthGuard() guard. You have injected the app.service.ts class with the app.module.ts and, in the constructor of this controller, you’ve accepted that argument. Now you can call the getToDoList() or markAsComplete() methods in the service.
Now, you will need to set up your auth module. First, you need to access the config variables found in .env. NestJS prefers you inject the configuration rather than accessing with process.env, so start by creating a folder under src called config.
Add a file for config.module.ts and add the following code.
import { Module } from '@nestjs/common';

import { ConfigService } from './config.service';

@Module({
  providers: [
    {
      provide: ConfigService,
      useValue: new ConfigService(`${process.env.NODE_ENV || ''}.env`),
    },
  ],
  exports: [ConfigService],
})
export class ConfigModule {}
This class allows you to inject the ConfigService into other classes that need access to it. Create the config.service.ts file in the same directory and add the ConfigService code found below.
import * as dotenv from 'dotenv';
import * as fs from 'fs';

export class ConfigService {
  private readonly envConfig: { [key: string]: string };

  constructor(filePath: string) {
    this.envConfig = dotenv.parse(fs.readFileSync(filePath));
  }

  get(key: string): string {
    return this.envConfig[key];
  }
}
This class provides the logic for getting the values from the .env file by parsing the file and returning the value based on the key.
You are all set up now to complete the authentication portion of your application. Under your src folder, add a folder called auth and add a file for auth.module.ts with the following code.
import { Module } from '@nestjs/common';

import { ConfigModule } from '../config/config.module';
import { AuthService } from './auth.service';
import { HttpStrategy } from './http.strategy';

@Module({
  imports: [ConfigModule],
  providers: [HttpStrategy, AuthService],
})
export class AuthModule {}
This should start becoming a pattern for you. The module defines the imports and providers for the class. Next, add the auth.service.ts file to the same folder and add the following code.
import { Injectable } from '@nestjs/common';
import * as OktaJwtVerifier from '@okta/jwt-verifier';

import { ConfigService } from '../config/config.service';

@Injectable()
export class AuthService {
  private oktaVerifier: any;
  private audience: string;

  constructor(private readonly config: ConfigService) {
    this.oktaVerifier = new OktaJwtVerifier({
      issuer: config.get('OKTA_ISSUER'),
      clientId: config.get('OKTA_CLIENTID'),
    });

    this.audience = config.get('OKTA_AUDIENCE');
  }

  async validateToken(token: string): Promise<any> {
    const jwt = await this.oktaVerifier.verifyAccessToken(token, this.audience);
    return jwt;
  }
}
Once again, the service will contain the actual logic for your module. Here you are using Okta’s JWT verifier to verify the token. You don’t even need to parse any information from the token. If the token is invalid, then oktaVerifier will throw an exception that you can catch later on. This piece simply takes your issuer, clientId, audience and validates your token against it.
Finally, add http.strategy.ts to the same folder. The code for this is below.
import { HttpException, Injectable } from '@nestjs/common';
import { PassportStrategy } from '@nestjs/passport';
import { Strategy } from 'passport-http-bearer';

import { AuthService } from './auth.service';

@Injectable()
export class HttpStrategy extends PassportStrategy(Strategy) {
  constructor(private readonly authService: AuthService) {
    super();
  }

  async validate(
    token: string,
    done: (error: HttpException, value: boolean | string) => any,
  ) {
    try {
      return await this.authService.validateToken(token);
    } catch (error) {
      done(error, 'The token is not valid');
    }
  }
}
This class ties everything together. It is registered as a provider for the auth module, which is injected into the app controller, which uses the AuthGuard that looks for a passport strategy to tell it how to authenticate the user. In this case, using your auth service class that knows how to use the Okta JWT Verifier.
Now you can run nest start, and this application should be ready to start.
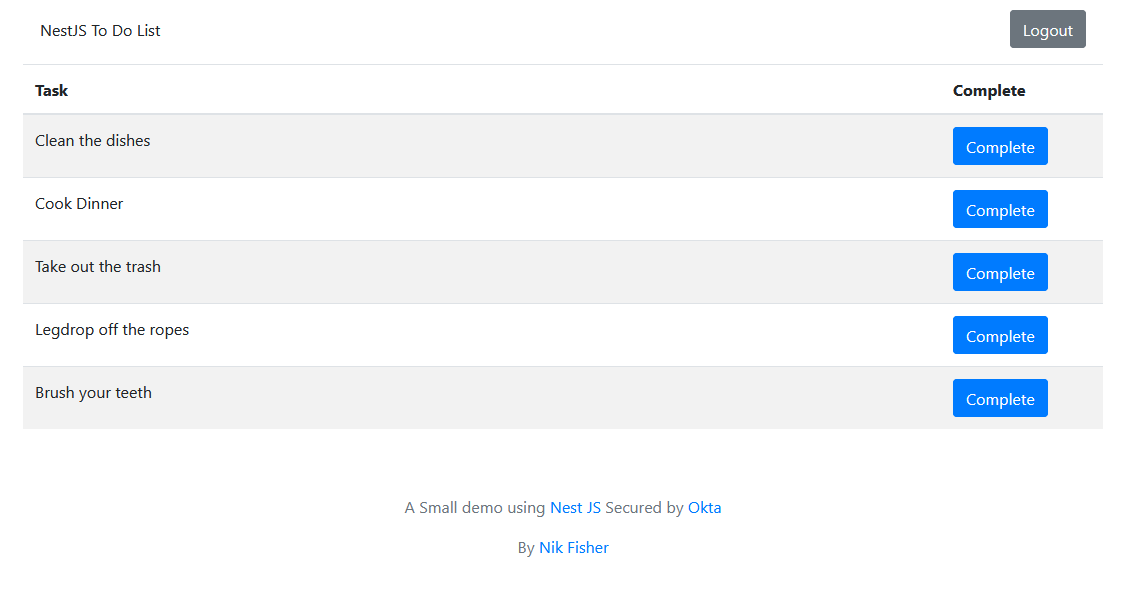
Test and Run
You can now go back to your React application and login with your Okta account information. Once you do that, you will be showing the to-do list with the items that you stubbed out in the app service class.
Learn More
NestJS is capable of making clean, scalable backends to support your SPA in reactions. The simplicity of it makes it very easy to use. As you’ve learned, it also integrates very easily with Okta’s secure Single Sign-On Provider. These three toolsets can help you build beautiful applications in no time.
- Build a Secure NestJS API with Postgres
- Quickly Consume a GraphQL API from React
- Build a Simple React Application Using Hooks
Make sure you follow us on Twitter and subscribe to our YouTube channel. If you have any questions, or you want to share what tutorial you’d like to see next, please comment below.
Okta Developer Blog Comment Policy
We welcome relevant and respectful comments. Off-topic comments may be removed.