Build a Modern API using Fastify and Node.js

Fastify is just as the name implies, fast. Not just in terms of development speed—its low overhead means the server is fast as well. When writing APIs, speed on both sides is paramount. Fastify is a web framework for Node.js that was designed for efficiency. Fastify is fully extensible with hooks, plugins, and decorators. It is schema-based, meaning you can define your response and request objects in your routes and have Fastify do the data validation for you. This feature isn’t mandatory, but it is useful. On the request side, it adds easy data validation. On the response side, this means you can shape your data for even lower overhead by not pushing down extraneous data to the client. Fastify is also TypeScript friendly. However, in this tutorial you will use JavaScript.
For this tutorial, you will create a secure API that returns some information regarding employees. To authenticate users, you will use Okta as an authentication server which will produce a JSON Web Token (JWT) after authenticating the user. The client will then send that JWT as part of the request to the server which will handle the validation logic. You will use Okta’s JWT verifier to quickly set up the authentication on your server.
Create your Okta application
The first thing you will need to do is create an application in Okta to act as your authentication server. This highlights the simplicity and streamlined process Okta authentication provides. Navigate to your Okta Developer Console and click Applications. Next click Add Application. For application type, select Service Machine-to-Machine. Give your application a meaningful name and click Done. Once your application is set up you will be presented with a Client ID and a Client secret. Make note of these as you will need them in your web application.
Next click on API in the header and the navigate to Authorization Servers. Okta will add an authorization server for you named default. This server is fine to use for development or testing. Click on Default and then click on Scopes. Click the button that says Add Scope and name it api. Click on Settings and note your Issuer URL as this is the base endpoint for requesting tokens.
Create your web server
Open your favorite IDE and navigate to the folder where you wish to store your project. Run the command mkdir *folder* where folder is your desired folder name. Next, run the command cd *folder* to navigate to your newly created project folder. Finally, create a new application by running the command npm init. Follow the wizard to help set up your project.
Now you will want to install your dependencies. You will only need a few for this project. First, you will need Fastify.
npm i fastify@3.3.0
Next, you will need Okta’s JWT Verifier. As I mentioned, this will handle the internal logic of interpreting the JWT provided by Okta’s authentication server and determining if it is valid.
npm i @okta/jwt-verifier@1.0.0
Finally, you will want to get dotenv to store your sensitive data.
npm i dotenv@8.2.0
Once you have installed these, you should add a new file called .env to your root directory. Add the following code to it.
OKTA_CLIENT_ID={yourClientID}
OKTA_ISSUER=https://{yourOktaOrgUrl}/oauth2/default
OKTA_AUDIENCE='api://default'
PORT=3000
Replace {yourClientId} with the Client ID from your Okta application’s settings page. Replace {yourOktaOrgUrl} with your Okta organization URL. This can be found on your Okta Developer Dashboard with the label Org URL.
To provide data to the client you will need data on your server. For this, add a new file called sample-data.json and add the following.
{
  "Employees": [
    {
      "userId": "rirani",
      "jobTitleName": "Developer",
      "firstName": "Romin",
      "lastName": "Irani",
      "preferredFullName": "Romin Irani",
      "employeeCode": "E1",
      "region": "CA",
      "phoneNumber": "408-1234567",
      "emailAddress": "romin.k.irani@gmail.com"
    },
    {
      "userId": "nirani",
      "jobTitleName": "Developer",
      "firstName": "Neil",
      "lastName": "Irani",
      "preferredFullName": "Neil Irani",
      "employeeCode": "E2",
      "region": "CA",
      "phoneNumber": "408-1111111",
      "emailAddress": "neilrirani@gmail.com"
    },
    {
      "userId": "thanks",
      "jobTitleName": "Program Directory",
      "firstName": "Tom",
      "lastName": "Hanks",
      "preferredFullName": "Tom Hanks",
      "employeeCode": "E3",
      "region": "CA",
      "phoneNumber": "408-2222222",
      "emailAddress": "tomhanks@gmail.com"
    }
  ]
}
There’s nothing special about this data, but it gives you something to work with.
Next, add a file called server.js. The code for this file follows.
"use strict";

require( "dotenv" ).config();
const jwtVerifier = require( "./jwtVerifier" );

const fastify = require( "fastify" )( { logger: true } );
const fs = require( "fs" );
const util = require( "util" );

const readFile = util.promisify( fs.readFile );

fastify.route( {
  method: "GET",
  url: "/employees",
  schema: {
    response: {
      200: {
        type: "array",
        properties: {
          userId: { type: "string" }
        }
      }
    }
  },
  preHandler: async ( request, reply ) => {
    return jwtVerifier( request, reply );
  },
  handler: async ( request, reply ) => {
    const obj = JSON.parse( await readFile( "sample-data.json", "utf8" ) );
    return obj.Employees;
  }
} );

fastify.route( {
  method: "GET",
  url: "/employees/:userId",
  schema: {
    querystring: {
      userId: { type: "string" }
    }
  },
  preHandler: async ( request, reply ) => {
    return jwtVerifier( request, reply );
  },
  handler: async ( request, reply ) => {
    const obj = JSON.parse( await readFile( "sample-data.json", "utf8" ) );
    const employee = obj.Employees.find( r => r.userId === request.params.userId );

    if ( !employee )
      return reply.code( 404 ).send();

    return employee;
  }
} );

const start = async () => {
  try {
    await fastify.listen( process.env.PORT );
    fastify.log.info( `server listening on ${ fastify.server.address().port }` );
  } catch ( err ) {
    fastify.log.error( err );
    process.exit( 1 );
  }
};

start();
Here is the entire code you need to run an API with Fastify. First, you register dotenv with your application. Per their instructions, you should call the config() function at the earliest point possible in the application.
Next, you are defining two GET routes. The first will return all the employees and the second will return a specific employee. Both contain an option for preHandler where you will call your jwtVerifier. You will create this object shortly, but the trick here is that before the handler is called you will authenticate the user. In the route for /employees/:userId you are defining userId as a string however if your data was an integer or array you could define this argument that way. Also notice that since this is a GET you are defining the parameters in the queryString option. For POST or PUT, there is an option for body if needed. The handlers are straight forward. Both read the JSON data from your sample-data file and return the appropriate entity.
Finally, you start the server by calling fastify.listen on your desired port. Here you are using 3000 as defined in your .env file.
To verify the token you need to add a file called jwtVerifier.js. Add the code below to it.
"use strict";

const OktaJwtVerifier = require( "@okta/jwt-verifier" );

const oktaJwtVerifier = new OktaJwtVerifier( {
  issuer: process.env.OKTA_ISSUER,
  clientId: process.env.OKTA_CLIENT_ID
} );

module.exports = async ( request, response ) => {
  const { authorization } = request.headers;

  if ( !authorization ) {
    response.code( 401 ).send();
  }

  const [ authType, token ] = authorization.trim().split( " " );

  try {
    const { claims } = await oktaJwtVerifier.verifyAccessToken( token, process.env.OKTA_AUDIENCE );

    if ( !claims ) {
      response.code( 401 ).send();
    }
    if ( !claims.scp.includes( "api" ) ) {
      response.code( 401 ).send();
    }
  }
  catch ( err ) {
    console.log( err );
    response.code( 401 ).send();
  }
};
This code is mostly just a wrapper around the @okta/jwt-verifier package. You are splitting out the header and obtaining the token from it. Then pass the token to the OktaJwtVerifier along with the desired audience. The verifier will throw an exception if the token is invalid and then it can be caught and a 401 can be returned to the client indicating it is unauthenticated.
Test your service
Run the command npm start and see your API come to life. You will want to run a few tests to ensure the data returned is correct and the request is being authenticated properly. Open your favorite rest client. I use Advanced Rest Client; Postman is another popular option.
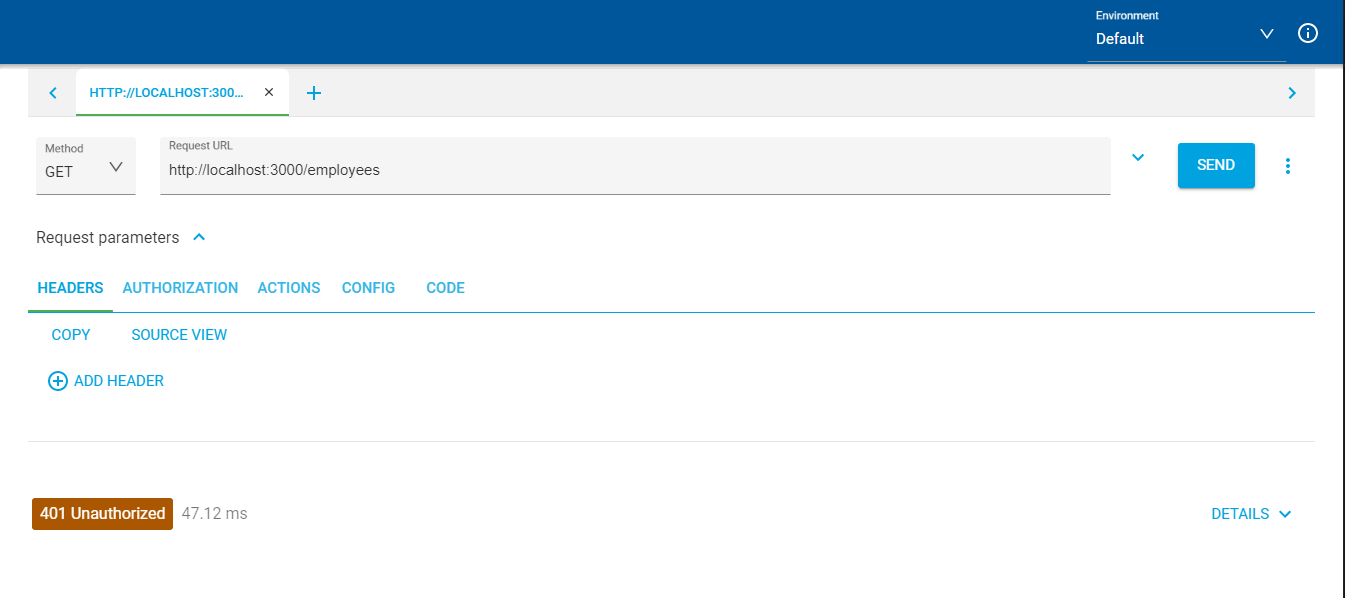
First, try to call GET http://localhost:3000/employees without any authentication headers. You should receive a 401 Unauthorized as a response.
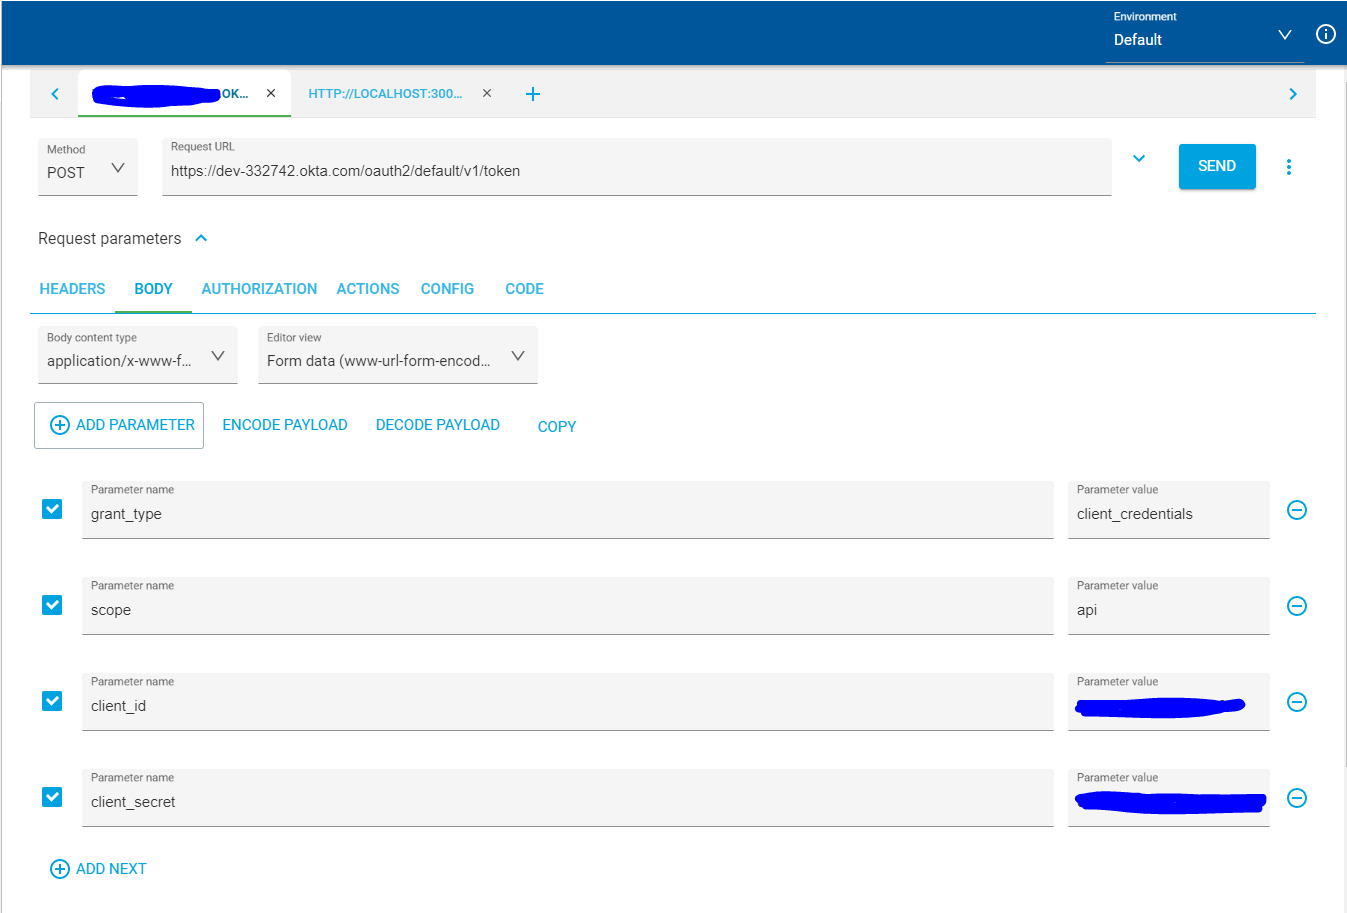
Next, call Okta’s authentication server token endpoint. You will need to set the Content-Type to application/x-www-form-urlencoded and include the following parameters: grant_type = client_credentials, scope= api, client_id = {yourOktaClientId}, client_secret={yourOktaClientSecret}. Sending this request should return a JWT with some additional information about the token.
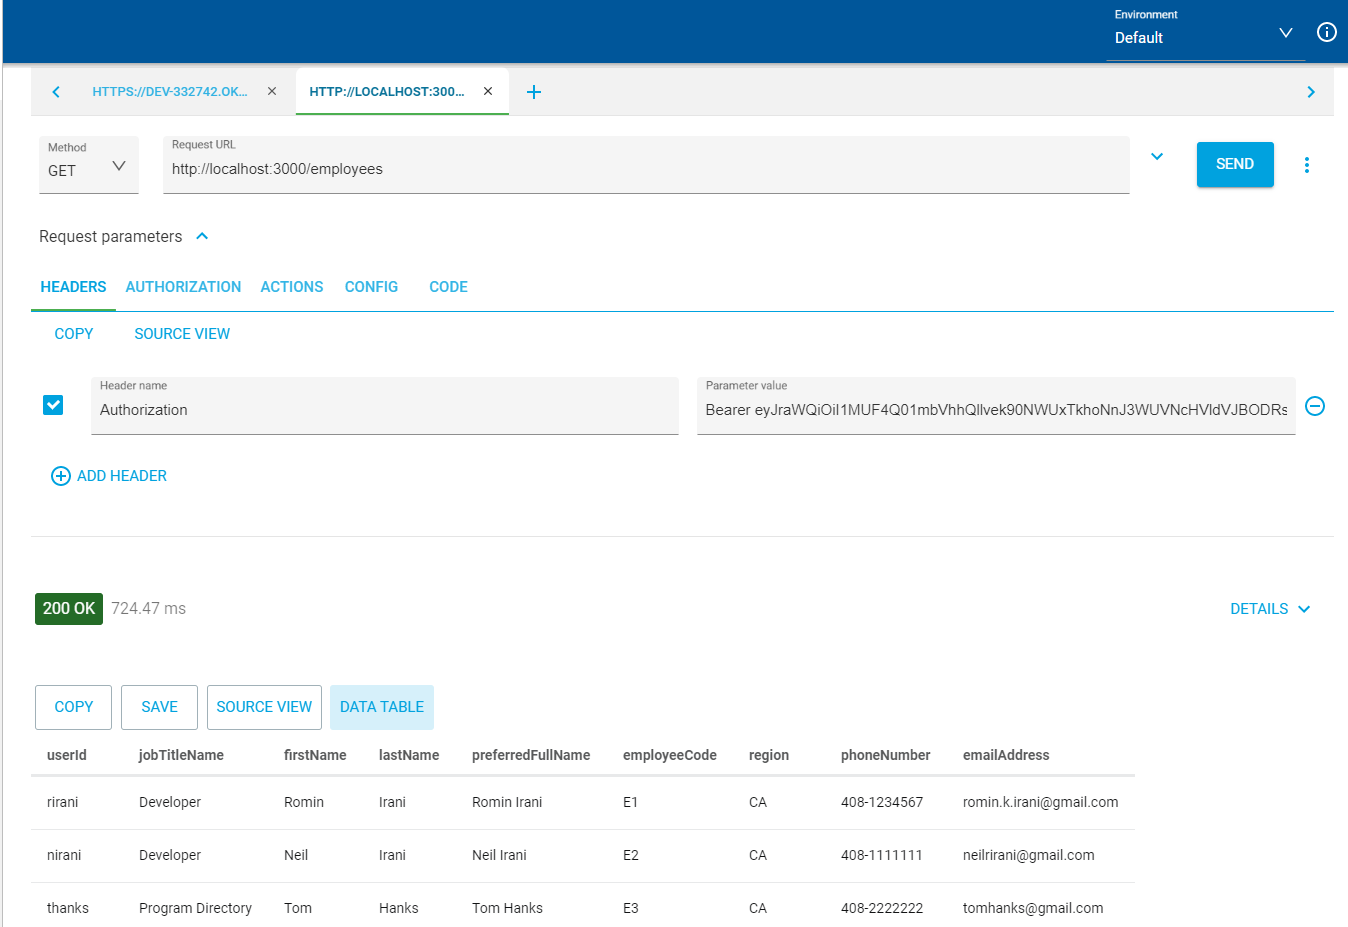
Now with the JWT in hand, you can call localhost:3000/employees/GET again, but this time include the access_token as an authorization header using the Bearer prefix. Now your request should be authenticated.
The complete source code for this project is available on GitHub.
Learn More
To continue learning about building APIs in Node.js, check out these links:
- Build a Simple REST API with Node and OAuth 2.0
- Build A Secure Node.js API with KoaJS
- Build a REST API with Node and Postgres
If you like this blog post and want to see more like it, follow @oktadev on Twitter, subscribe to our YouTube channel, or follow us on LinkedIn. As always, please leave a comment below if you have any questions.
Okta Developer Blog Comment Policy
We welcome relevant and respectful comments. Off-topic comments may be removed.