A Quick Guide to Spring Cloud Stream

In this tutorial, you’ll learn how to create a Spring Cloud Stream application that interacts with a messaging service, such as RabbitMQ or Apache Kafka. You’re going to do this using functional, reactive code by utilizing Spring’s WebFlux and by taking advantage of Spring Cloud Stream’s functional binding model.
You’ll create an application that contains a publisher, a processor, and a consumer. The app will use two topics to publish a stream of integers, process the integers to calculate a running total, and consume the processed data. Initially, the messages will be simple types— strings and integers—but you’ll also see how easy Spring Cloud Stream makes mapping POJOs (Plain Old Java Objects) to messages using JSON mapping.
If all of that technical jargon made sense to you, feel free to skip to the requirements section. Otherwise, I’m going to take a few paragraphs to introduce the technologies.
Note: In May 2025, the Okta Integrator Free Plan replaced Okta Developer Edition Accounts, and the Okta CLI was deprecated.
We preserved this post for reference, but the instructions no longer work exactly as written. Replace the Okta CLI commands by manually configuring Okta following the instructions in our Developer Documentation.
What is Spring Cloud Stream?
Spring describes Spring Cloud Stream as “a framework for building highly scalable event-driven microservices connected with shared messaging systems.” This means that the Spring team created Spring Cloud Stream to work with messaging services like RabbitMQ or Apache Kafka. It works in distributed microservices that respond to streams of incoming data (data being the “events” in “event-driven”). It’s built on top of Spring Boot, works well with Spring MVC or Spring WebFlux, and can be used to create highly scalable messaging and stream processing applications.
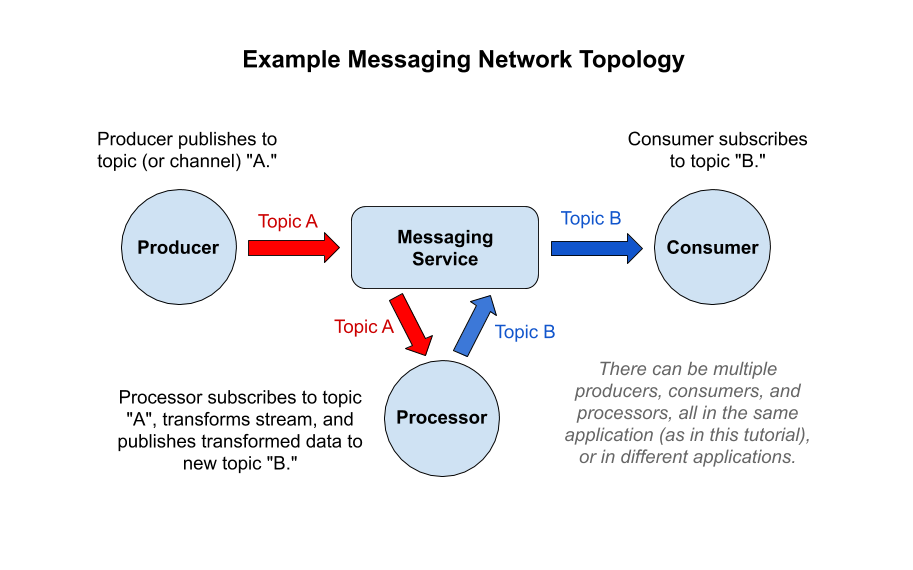
RabbitMQ and Apache Kafka are messaging applications. They distribute a stream of messages from producers to consumers. They both easily support the simple publish-subscribe (pub-sub) strategy that we will be using in this tutorial; however, they are divergent technologies with different strengths and weaknesses. Very, very briefly: RabbitMQ is a great general-purpose message broker that pushes data from the messaging service to the consumers. Apache Kafka uses a hybrid model (combining aspects of pub-sub and message queuing) that allows you to scale and distribute processing. It excels in stream processing and allows for message storage and replay.
The simple messaging strategy you’re going to use here is called pub-sub, or publish and subscribe. A consumer subscribes to a topic (generally just identified by a text name). Publishers push messages to the topic, and the platform sends the message to all subscribed consumers. A processor subscribes to a topic and republishes the transformed data to a new topic.
In this tutorial, you will use RabbitMQ in a Docker container. However, you can use Apache Kafka simply by replacing the docker-compose.yml file and by changing the Spring Cloud Stream binding dependency.
Functional programming is a huge departure from the object-oriented model that dominated programming (especially Java) until the last decade. In functional programming, functions, not object instances and classes, are the main organizational unit of code execution. This decouples data and logic in a way that has benefits for applications, such as stream processing, and allows for powerful chaining and composition of functions.
Spring WebFlux is Spring’s functional web framework that is equivalent to object-oriented Spring MVC. It uses functional programming techniques to build web services. It natively supports reactive programming, which Spring describes as:
Reactive programming is a programming paradigm that promotes an asynchronous, non-blocking, event-driven approach to data processing. Reactive programming involves modeling data and events as observable data streams and implementing data processing routines to react to the changes in those streams.
Reactive programming is a set of tools and techniques that have evolved to treat data as a continuous stream of data, like water flowing through a pipe, rather than viewing them as discrete events to handle individually. In reactive programming, you define potentially complex transformations and mappings that you apply to the stream. They sometimes return a new stream and sometimes return a reduced result. Functional programming is not necessarily reactive, but reactive programming tools almost always use functional programming paradigms.
Set Up a Spring Cloud Stream Development Environment
To do this tutorial, you’ll need a few tools:
- Java 11: This tutorial uses Java 11. OpenJDK 11 will work just as well. You can find instructions on the OpenJDK website. You can install OpenJDK using Homebrew. Alternatively, SDKMAN is another great option for installing and managing Java versions.
- Maven: You need to install Maven to bootstrap the project. Install it according to the instructions on their website or use SDKMAN or Homebrew.
- Okta Developer Account: You’ll be using Okta as an OAuth/OIDC provider to add JWT authentication and authorization to the application. You can go to our developer site and sign up for a free developer account. Or you can wait and use the Okta Maven Plugin to create an account from the shell.
- HTTPie: This is a powerful command-line HTTP request utility that you’ll use to test the WebFlux server. Install it according to the docs on their site.
- Docker and Docker Compose: You’ll use Docker and Docker Compose to run the RabbitMQ service. First, you need to install Docker. On Mac and Windows, you can install the desktop client. On Linux, you’ll need to install Docker Machine directly. Take a look at the Docker docs for installation instructions for your operating system. Once you install Docker, follow the instructions to install Docker Compose.
You can test the docker-compose installation by opening a shell and running the following command:
docker-compose --version
You may need to run the command as a root user using sudo:
sudo docker-compose --version
You should get something like:
docker-compose version 1.25.4, build 01110ad01
Bootstrap Your Spring Cloud Stream Project
Spring has a great project called the Spring Initializr that you can use to quickly build starter Spring Boot projects. You can take a look at the project website. However, here you’re going to use the REST API to download a pre-configured project.
Open a shell and run the commands below.
curl https://start.spring.io/starter.tgz -d dependencies=webflux,okta,cloud-stream,amqp,lombok \
  -d bootVersion=2.2.5.RELEASE \
  -d groupId=okta.springcloudstreams \
  -d baseDir=okta-spring-cloud-streams | tar -xzvf -
cd okta-spring-cloud-streams
This creates a Spring Boot project configured with five additional dependencies:
webflux: Spring Boot WebFlux, the functional and reactive web frameworkokta: Okta’s Spring Boot Starter that simplifies integrating OAuth 2.0 and OIDCcloud-stream: Spring Cloud Stream the main dependencyamqp: RabbitMQ binders for Spring Cloud Streamlombok: Project Lombok, a set of helper annotation that generates boilerplate code
Create an Okta Maven Plugin YAML File
If you already have an Okta developer account, create a configuration file at ~/.okta/okta.yaml with your account information. If you skip this step, the Okta Maven Plugin will create a new Okta Org for you.
If you do not already have an account, you can skip this step and go on to the next section: Configure the OIDC Settings.
~/.okta/okta.yaml
okta:
  client:
    orgUrl: https://{yourOktaDomain}
    token: {yourApiToken}
You’ll need to create an API token. From the Okta developer console, go to API and Tokens. Click Create Token. Give the token a name. Copy the token value and place it in the ~/.okta/okta.yaml file along with your Okta domain.
If you do not have an Okta developer account, don’t worry about the okta.yaml file. The Okta Maven Plugin will configure it for you.
Configure OIDC for Your Spring Cloud Stream App
You should now have an open shell and be in the project root directory. The next step is to use the Okta Maven Plugin to configure the OAuth 2.0 and OIDC settings. This plugin is great for tutorials like this because it will simplify signing up for an account, if you don’t already have one, and will create an appropriately configured OIDC application straight from the command line.
Change the application.properties file to a YAML file using the following command (or using your IDE). You’re doing this so that the Okta Maven Plugin creates a .yml file instead of a .properties file. This step actually doesn’t matter all that much, but it’s more succinct to configure the streams binders using YAML.
mv src/main/resources/application.properties src/main/resources/application.yml
Now run the Okta Maven Plugin.
mvn com.okta:okta-maven-plugin:register
Follow the prompts to either create a new account or log in to your existing account.
Then, create an app on Okta and configure Spring Boot to use it.
mvn com.okta:okta-maven-plugin:spring-boot
You should see some lines like this:
Current OrgUrl: https://dev-447850.okta.com
Configuring a new OIDC, almost done:
Created OIDC application, client-id: 0oa30gk10KNOMD0wZ4x6

[INFO] Dependency: 'com.okta.spring:okta-spring-boot-starter' found in project.
[INFO] ------------------------------------------------------------------------
[INFO] BUILD SUCCESS
[INFO] ------------------------------------------------------------------------
[INFO] Total time:  5.099 s
[INFO] Finished at: 2020-04-13T13:54:23-08:00
[INFO] ------------------------------------------------------------------------
And you should see something like this in your src/main/resources/application.yml file:
okta:
  oauth2:
    client-secret: NHOilIaQPsgz5uOotjwm7p4v6MtHVTFyTT90wQ6p
    client-id: 0oa30gk10KNOMD0wZ4x6
    issuer: https://dev-123456.okta.com/oauth2/default
At this point you can run the Spring Boot application using the following shell command:
./mvnw spring-boot:run
And get something like this:
...
2020-04-13 13:59:29.769  INFO 1664 --- [           main] o.s.i.channel.PublishSubscribeChannel    : Channel 'application.errorChannel' has 1 subscriber(s).
2020-04-13 13:59:29.769  INFO 1664 --- [           main] o.s.i.endpoint.EventDrivenConsumer       : started bean '_org.springframework.integration.errorLogger'
2020-04-13 13:59:29.842  INFO 1664 --- [           main] o.s.b.web.embedded.netty.NettyWebServer  : Netty started on port(s): 8080
2020-04-13 13:59:29.845  INFO 1664 --- [           main] o.s.demo.DemoApplication                 : Started DemoApplication in 2.074 seconds (JVM running for 2.236)
Notice that the output says Netty started on port(s): 8080. Netty is the default web server for Spring WebFlux applications (not Jetty or Tomcat, which are typical for SpringMVC). Since the Spring team designed WebFlux to be asynchronous and event-driven, Netty is the obvious choice because it uses the exact same model.
If you make a request on the running server, you’ll get a 404 - Not Authorized.
Use HTTPie to give it a try. Open a new shell and run:
$ http :8080

HTTP/1.1 401 Unauthorized
Cache-Control: no-cache, no-store, max-age=0, must-revalidate
...
You get the 401 because by including the Okta Spring Boot Starter you auto-configured OAuth SSO (single sign-on), and by default all requests require authentication. I’m pointing this out simply because at this point all you’ve done is include a dependency—without any configuration—so it might seem a little confusing.
Create a RabbitMQ Pub-Sub Messaging Service
You’re going to use Docker Compose to create a RabbitMQ messaging service. It’s ridiculously easy (assuming you have Docker and Docker Compose working).
Create a docker-compose.yml file in the project root directory.
version: '3'
services:
  rabbitmq:
    image: rabbitmq:management
    ports:
      - 5672:5672
      - 15672:15672
Open a new shell (simply because you’re going to want to leave this shell open) and run the following command.
docker-compose up
You may need to run the command as root:
sudo docker-compose up
You could also run it as a daemon and not have to leave the shell window open using -d. I like having the log files visible, so I prefer to run it in its own window.
Assuming all went well, you’ll see some output like this:
...
rabbitmq_1  | 2020-04-13 22:12:32.121 [info] <0.677.0> Management plugin: HTTP (non-TLS) listener started on port 15672
rabbitmq_1  | 2020-04-13 22:12:32.122 [info] <0.783.0> Statistics database started.
rabbitmq_1  | 2020-04-13 22:12:32.122 [info] <0.782.0> Starting worker pool 'management_worker_pool' with 3 processes in it
rabbitmq_1  | 2020-04-13 22:12:32.198 [info] <0.8.0> Server startup complete; 3 plugins started.
rabbitmq_1  |  * rabbitmq_management
rabbitmq_1  |  * rabbitmq_management_agent
rabbitmq_1  | * rabbitmq_web_dispatch
rabbitmq_1  |  completed with 3 plugins.
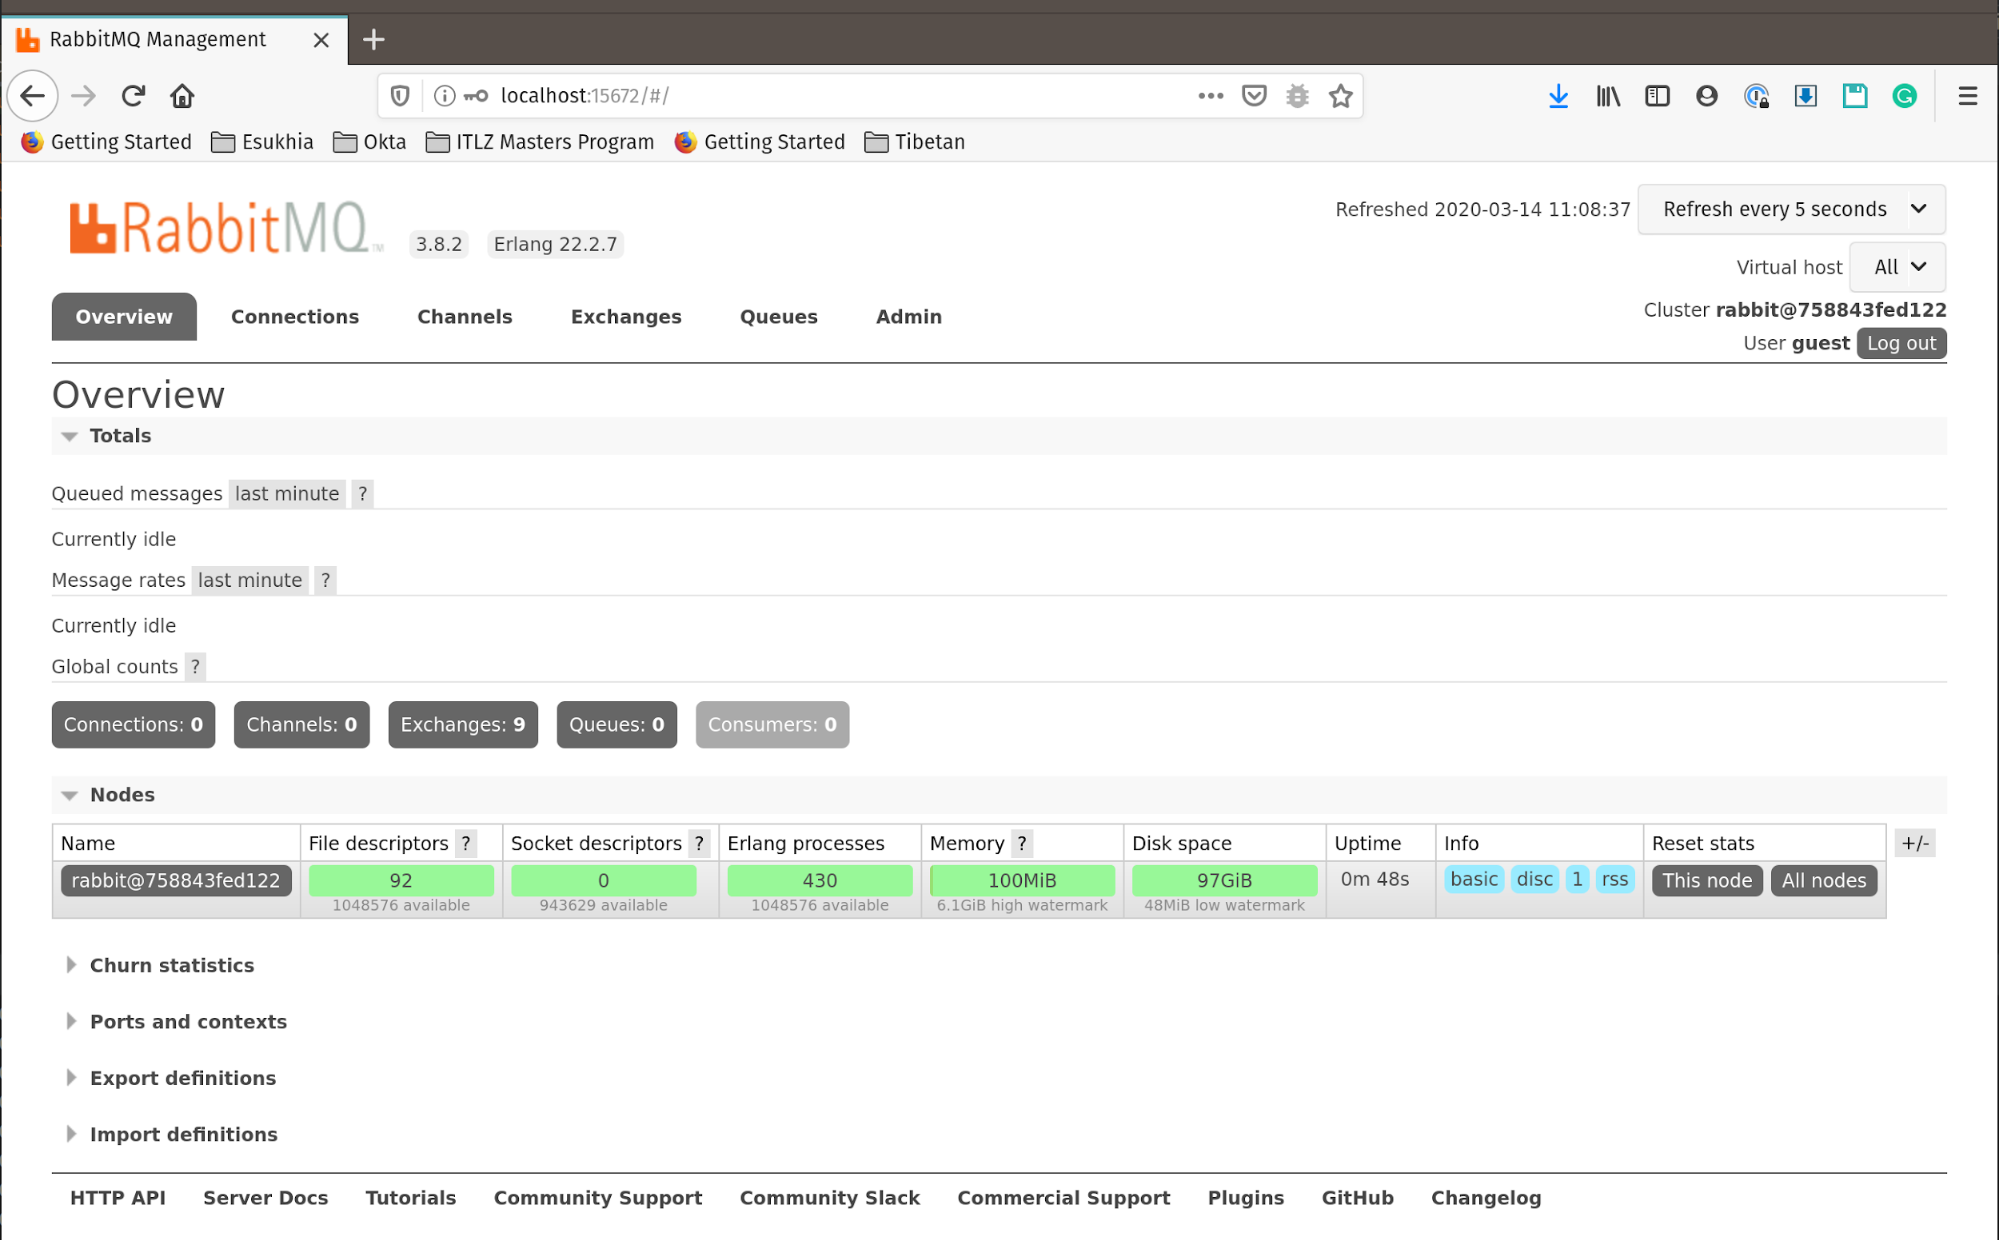
Leave that process running, as that’s your RabbitMQ messaging service. You’ll notice that there are two ports the docker-compose file exposed: 15672 and 5672. 5672 is the port for the messaging service itself. 15672 exposes a web management page that you can check out by opening a browser, navigating to http://localhost:15672, and using the credentials guest:guest.
Build a Spring Cloud Stream Application
Now you can create a Spring Cloud Stream application by replacing the DemoApplication.java class file with the following contents.
src/main/java/okta/springcloudstreams/demo/DemoApplication.java
package okta.springcloudstreams.demo;
import org.slf4j.Logger;
import org.slf4j.LoggerFactory;
import org.springframework.boot.SpringApplication;
import org.springframework.boot.autoconfigure.SpringBootApplication;
import org.springframework.context.annotation.Bean;
import org.springframework.security.config.annotation.method.configuration.EnableReactiveMethodSecurity;
import org.springframework.security.config.annotation.web.reactive.EnableWebFluxSecurity;
import org.springframework.security.config.web.server.ServerHttpSecurity;
import org.springframework.security.web.server.SecurityWebFilterChain;
import java.util.Random;
import java.util.concurrent.atomic.AtomicInteger;
import java.util.function.Consumer;
import java.util.function.Function;
import java.util.function.Supplier;
@SpringBootApplication
@EnableWebFluxSecurity
@EnableReactiveMethodSecurity
public class DemoApplication {
// Using the default logger
private static Logger logger = LoggerFactory.getLogger(DemoApplication.class);
// Standard entrypoint into the Spring Boot application
public static void main(String[] args) {
SpringApplication.run(DemoApplication.class, args);
}
// Configure web security to allow all transactions
@Bean
public SecurityWebFilterChain securityWebFilterChain(ServerHttpSecurity http) {
http.authorizeExchange().anyExchange().permitAll();
return http.build();
}
// Publishes a random integer to the "ints" channel (as defined
// in the application.yml file) every second.
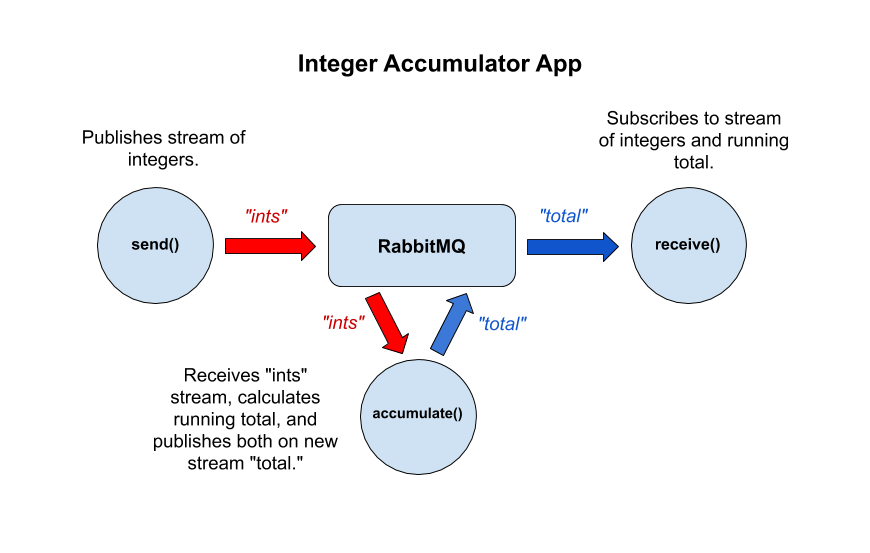
static class Source {
private Random random = new Random();
@Bean
public Supplier<Integer> send() {
return () -> random.nextInt(100);
}
}
// Subscribe to the "total" channel and log the results
static class Sink {
@Bean
public Consumer<String> receive() {
return payload -> {
logger.info(payload);
};
}
}
// Subscribes to the "ints" channel, calculating an
// accumulated total, and publishing both to the "total" channel
static class Accumulator {
private AtomicInteger count = new AtomicInteger(0);
@Bean
public Function<Integer, String> accumulate() {
return payload -> "Current value: " + payload + ", Total: " + this.count.addAndGet(payload);
}
}
}
Add the following to your src/main/resources/application.yml file (leaving the Okta OAuth section alone):
spring:
  cloud:
    stream:
      function:
        definition: accumulate;receive;send
      bindings:
        send-out-0:
          destination: ints
        receive-in-0:
          destination: total
        accumulate-in-0:
          destination: ints
        accumulate-out-0:
          destination: total
Let’s talk about that code for a minute. First, notice that you defined the bindings in the application.yml file instead of using annotations. As of Spring Cloud Stream 3.0, Spring considers annotation-based configuration legacy and moved toward functional binding names configured in properties or yml files. Take a look at their docs on the functional binding paradigm for complete info.
In the application.yml file above, you configured three functions with four bindings (one in, one out, and one with in and out).
spring.cloud.stream.function.definitionis a list of the function names that you will bind to Spring Cloud Stream channels.spring.cloud.stream.bindingsis where you actually bind the functions to the input and output channels.
This follows a naming convention:
input: <functionName> + -in- + <function parameter index>
output: <functionName> + -out- + <function parameter index>
For example, accumulate-in-0 in the example above defines a binding for function accumulate that is an input that subscribes to a channel with the data it receives in the first input parameter (index 0).
Notice how the three bound functions, accumulate;receive;send, match the three functions in the DemoApplication class. Don’t get distracted by the static class structures. That was just a way to make the state local to the functions and to organize things—it would all have worked just as well to make the function beans methods of DemoApplication itself.
The application itself is very simple. send is bound to the ints channel, to which it is going to send a random integer every second. This, by the way, is a property of Spring’s implementation of the Supplier interface; Spring triggers it automatically every second, so it’s a great tool for testing and developing streams. accumulate receives the random integers from the ints channel, calculates a running total, and publishes both together as a String on the total channel. receive listens to the total channel and logs the messages.
The last thing I’ll mention is the security configuration, which you do in securityWebFilterChain(ServerHttpSecurity http). Here you are telling Spring WebFlux and Spring Security to allow all transactions. By default, Spring Security requires all requests to be authenticated, which is great, but you’re not there yet, so for the moment, you’re essentially turning off security. You’ll re-enable it later.
There are two annotations that, along with the okta-spring-boot-starter dependency, activate WebFlux security: @EnableWebFluxSecurity and @EnableReactiveMethodSecurity. The first turns on security generally, and the second allows for method-level security. The Okta starter dependency, okta-spring-boot-starter, brings in the necessary dependencies for Spring Security, so you don’t have to do that separately.
Try it out. First, make sure you have your RabbitMQ service running with Docker Compose. Then, from the project root directory, run the Spring Boot app using Maven:
./mvnw spring-boot:run
If all goes well, you’ll see output like below, showing a running list of random numbers and a running total.
...
2020-03-14 10:10:33.493  INFO 21276 --- [           main] o.s.b.web.embedded.netty.NettyWebServer  : Netty started on port(s): 8080
2020-03-14 10:10:33.495  INFO 21276 --- [           main] o.s.demo.DemoApplication                 : Started DemoApplication in 2.336 seconds (JVM running for 2.497)
2020-03-14 10:10:34.368  INFO 21276 --- [KyCe9nxFnKiTg-1] o.s.demo.DemoApplication                 : Current value: 56, Total: 112
2020-03-14 10:10:35.373  INFO 21276 --- [KyCe9nxFnKiTg-1] o.s.demo.DemoApplication                 : Current value: 13, Total: 125
2020-03-14 10:10:36.376  INFO 21276 --- [KyCe9nxFnKiTg-1] o.s.demo.DemoApplication                 : Current value: 15, Total: 140
...
Press Control-C to stop the Spring Boot application, but leave the Rabbit server running.
Add a Streaming REST Resource to the Application
In this section, you’re going to do a couple of things that highlight how easy Spring Boot, Spring Webflux, and Spring Cloud Stream make handling streams. First, instead of simply passing a string with the current value and accumulated total, you’re going to encapsulate that data in a Java class that Spring will automatically serialize to and deserialize from JSON. Second, you’re going to use WebFlux stream processing to return an event stream from a REST endpoint, which you’ll be able to view using HTTPie.
Add the POJO (Plain Old Java Object) mapping class: AccumulatorMessage.
src/main/java/okta/springcloudstreams/demo/AccumulatorMessage.java
package okta.springcloudstreams.demo;

import lombok.Data;

@Data
public class AccumulatorMessage {
    int currentValue;
    int total;
    AccumulatorMessage(int currentValue, int total) {
        this.currentValue = currentValue;
        this.total = total;
    }
}
This class takes advantage of Lombok’s @Data annotation, which means you don’t have to write getters and setters for the class properties—the program generates them automatically.
The next class is the REST resource class: RestResource.
src/main/java/okta/springcloudstreams/demo/RestResource.java
package okta.springcloudstreams.demo;

import org.slf4j.Logger;
import org.slf4j.LoggerFactory;
import org.springframework.context.annotation.Bean;
import org.springframework.http.MediaType;
import org.springframework.web.bind.annotation.GetMapping;
import org.springframework.web.bind.annotation.RestController;
import reactor.core.publisher.EmitterProcessor;
import reactor.core.publisher.Flux;

import java.util.function.Consumer;

@RestController
public class RestResource {

    private static Logger logger = LoggerFactory.getLogger(RestResource.class);

    private final EmitterProcessor<String> streamProcessor = EmitterProcessor.create();

    @GetMapping(value = "/sse", produces = MediaType.TEXT_EVENT_STREAM_VALUE)
    public Flux<String> getSee() {
        return this.streamProcessor;
    }

    @Bean
    public Consumer<Flux<String>> receiveSse() {
        return recordFlux ->
                recordFlux
                        .doOnNext(this.streamProcessor::onNext)
                        .doOnNext(value -> logger.info("*" +value))
                        .subscribe();
    }
}
This class receives events from the total channel (which you will configure in a moment), logs them, and places them in an EmitterProcessor. It also defines a REST endpoint that returns this EmitterProcessor as a stream of String events. This is the endpoint you’ll be able to GET using HTTPie.
You need to update application.yml to the following (but leave the Okta OAuth section alone). This adds the input binding for the new receiveSse() method.
src/main/resources/application.yml
spring:
  cloud:
    stream:
      function:
        definition: accumulate;receive;send;receiveSse
      bindings:
        send-out-0:
          destination: ints
        receiveSse-in-0:
          destination: total
        receive-in-0:
          destination: total
        accumulate-in-0:
          destination: ints
        accumulate-out-0:
          destination: total
You also need to update DemoApplication so that it uses the new AccumulatorMessage class instead of sending Strings over the total channel. Notice that all you have to do is specify the appropriate return and parameter types and Spring maps the Java class to and from JSON.
src/main/java/okta/springcloudstreams/demo/DemoApplication.java
package okta.springcloudstreams.demo;

import org.slf4j.Logger;
import org.slf4j.LoggerFactory;
import org.springframework.boot.SpringApplication;
import org.springframework.boot.autoconfigure.SpringBootApplication;
import org.springframework.context.annotation.Bean;
import org.springframework.security.config.annotation.method.configuration.EnableReactiveMethodSecurity;
import org.springframework.security.config.annotation.web.reactive.EnableWebFluxSecurity;
import org.springframework.security.config.web.server.ServerHttpSecurity;
import org.springframework.security.web.server.SecurityWebFilterChain;

import java.util.Random;
import java.util.concurrent.atomic.AtomicInteger;
import java.util.function.Consumer;
import java.util.function.Function;
import java.util.function.Supplier;

@SpringBootApplication
@EnableWebFluxSecurity
@EnableReactiveMethodSecurity
public class DemoApplication {

    private static Logger logger = LoggerFactory.getLogger(DemoApplication.class);

    public static void main(String[] args) {
        SpringApplication.run(DemoApplication.class, args);
    }

    @Bean
    public SecurityWebFilterChain securityWebFilterChain(ServerHttpSecurity http) {
        http.authorizeExchange().anyExchange().permitAll();
        return http.build();
    }

    static class Accumulator {

        private AtomicInteger count = new AtomicInteger(0);

        @Bean
        public Function<Integer, AccumulatorMessage> accumulate() {
            return payload -> new AccumulatorMessage(payload ,this.count.addAndGet(payload));
        }

    }

    static class Source {

        private Random random = new Random();

        @Bean
        public Supplier<Integer> send() {
            return () -> random.nextInt(100);
        }
    }

    static class Sink {

        @Bean
        public Consumer<AccumulatorMessage> receive() {
            return payload -> {
                logger.info(payload.toString());
            };
        }
    }
}
Run the Spring Boot application again.
./mvnw spring-boot:run
This time you’ll see a bunch of messages like this: AccumulatorMessage(currentValue=48, total=79). This is from the toString() method Lombok generated and logged in the receive method.
Leave the Spring Boot application running and open a new shell. You’re going to use HTTPie to subscribe to the streaming REST endpoint.
http --stream :8080/sse
You’ll see streaming data:
...
data:{"currentValue":60,"total":589}
data:{"currentValue":22,"total":611}
data:{"currentValue":38,"total":649}
data:{"currentValue":34,"total":683}
data:{"currentValue":89,"total":772}
data:{"currentValue":23,"total":795}
data:{"currentValue":90,"total":885}
...
Secure the App Using JWT OAuth & OIDC
The last step is to secure the /sse endpoint. It’s going to be beguilingly simple. Okta’s Spring Boot Starter has done a fair amount of work for you. Take a look at the project GitHub page for more info. We’ve done our best to make it easy to secure Spring MVC and Spring WebFlux applications.
In DemoApplication.java, replace the method securityWebFilterChain(ServerHttpSecurity http) with the following:
@Bean
public SecurityWebFilterChain securityWebFilterChain(ServerHttpSecurity http) {
    http
        .authorizeExchange(authorizeExchange ->
            authorizeExchange.anyExchange().authenticated())
        .oauth2ResourceServer().jwt();
    return http.build();
}
This configures Spring Security to authorize all requests and to set up an OAuth 2.0 resource server using JSON Web Token (JWT) authentication.
Stop the Spring Boot application, if you need to, using Control-C, and restart it.
./mvnw spring-boot:run
It now requires authentication. If you try and request the /sse endpoint again, you’ll get a 401 Unauthorized error.
$ http -S :8080/sse

HTTP/1.1 401 Unauthorized
Cache-Control: no-cache, no-store, max-age=0, must-revalidate
...
Generate a Token Using OIDC Debugger
To access the protected endpoint, you need a valid JWT. Fortunately, we have OIDC Debugger, which is a simple webpage designed to help test OIDC applications. Before you can use it, however, you need to add the OIDC Debugger redirect URL to your Okta OIDC application.
Open your Okta developer account. If you auto-created it using the Maven plugin, look at the issuer URL in the application.yml file and open the base URL in a browser (without the /oauth2/default). It will be something like: https://dev-123456.okta.com.
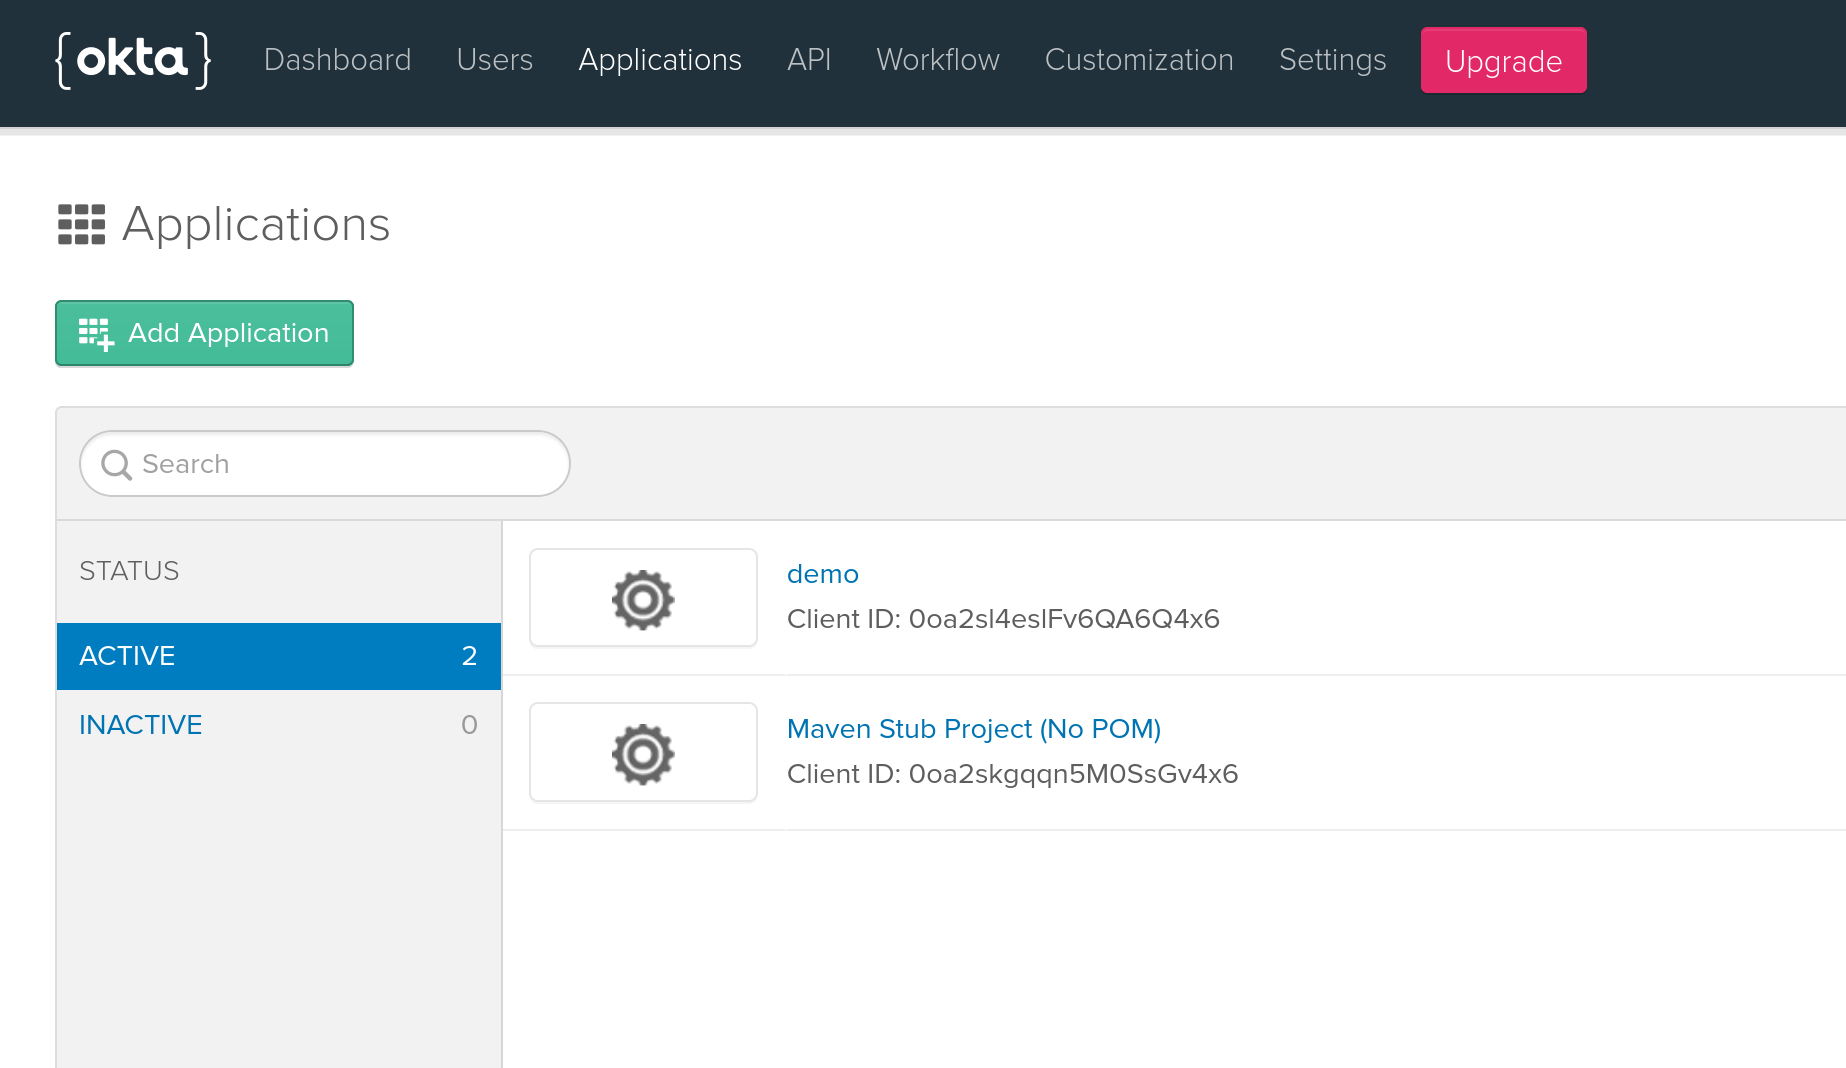
Once you’re in the Okta developer dashboard, from the top menu, go to Applications. You’ll see the demo application that the Maven plugin created for you.
Click on the demo application. Select the General tab. Click Edit.
Under the Login section, add a new URL to Login redirect URIs: https://oidcdebugger.com/debug
You need to do this to whitelist the OIDC Debugger redirect URI so that it can generate and receive your token.
You also need to change the Allowed grant types. Check the Implicit (Hybrid) checkbox, and check the sub-check box below it: Allow Access Token with implicit grant type.
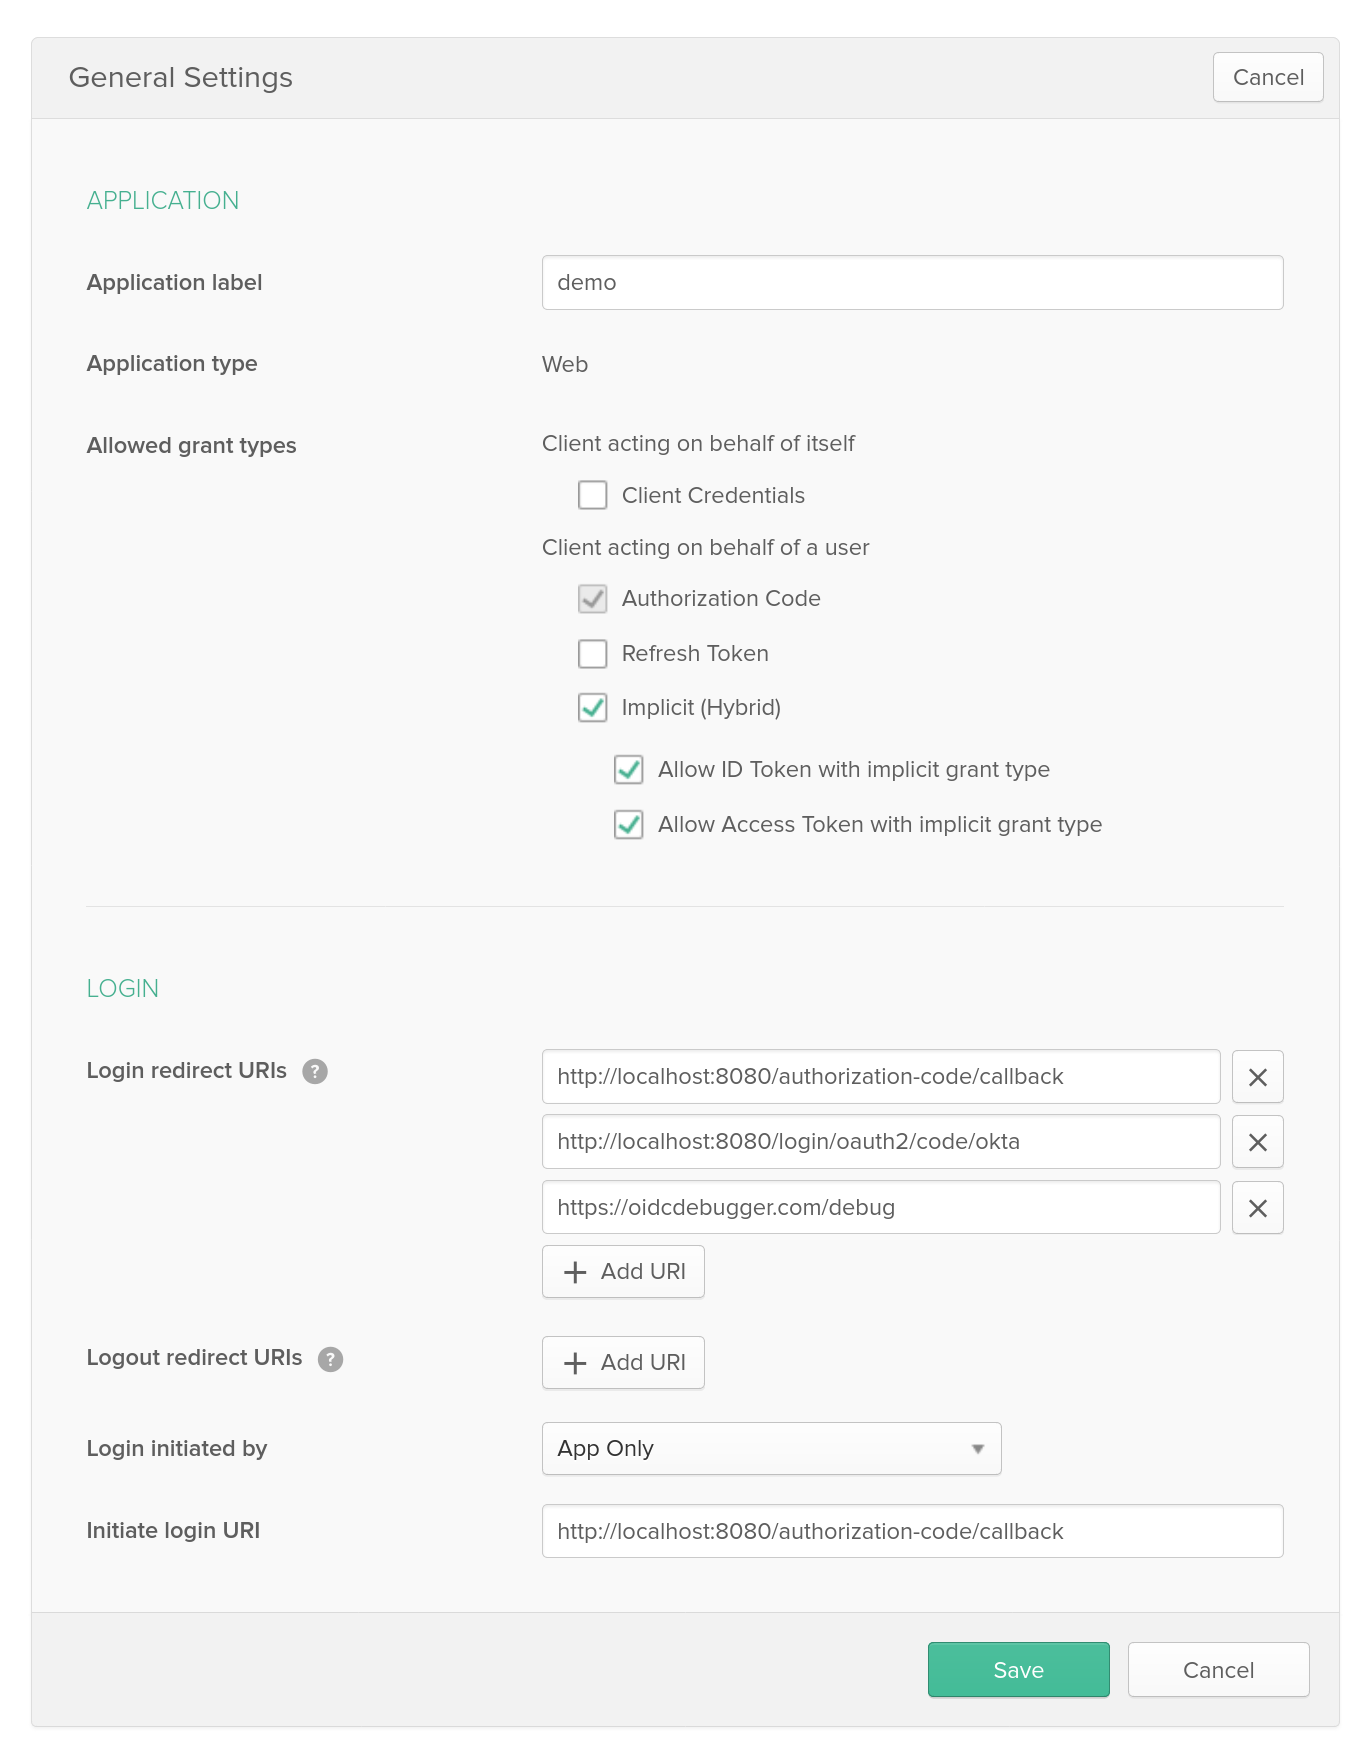
While you’re there, take note of the Client ID, as you’ll need it in just a moment. Or leave this window open.
Open the OIDC Debugger website. You need to fill in a few values.
Authorize URI: https://{yourOktaUri}/oauth2/default/v1/authorize – You need to fill in your Okta URI. You can find it by looking at the okta.oauth2.issuer value in the application.yml file.
Client ID: fill in the value from your Okta OIDC application.
State: this can be any string value. In production, you typically use it to protect against cross-site request forgery attacks.
Response type: make sure you checked the token checkbox.
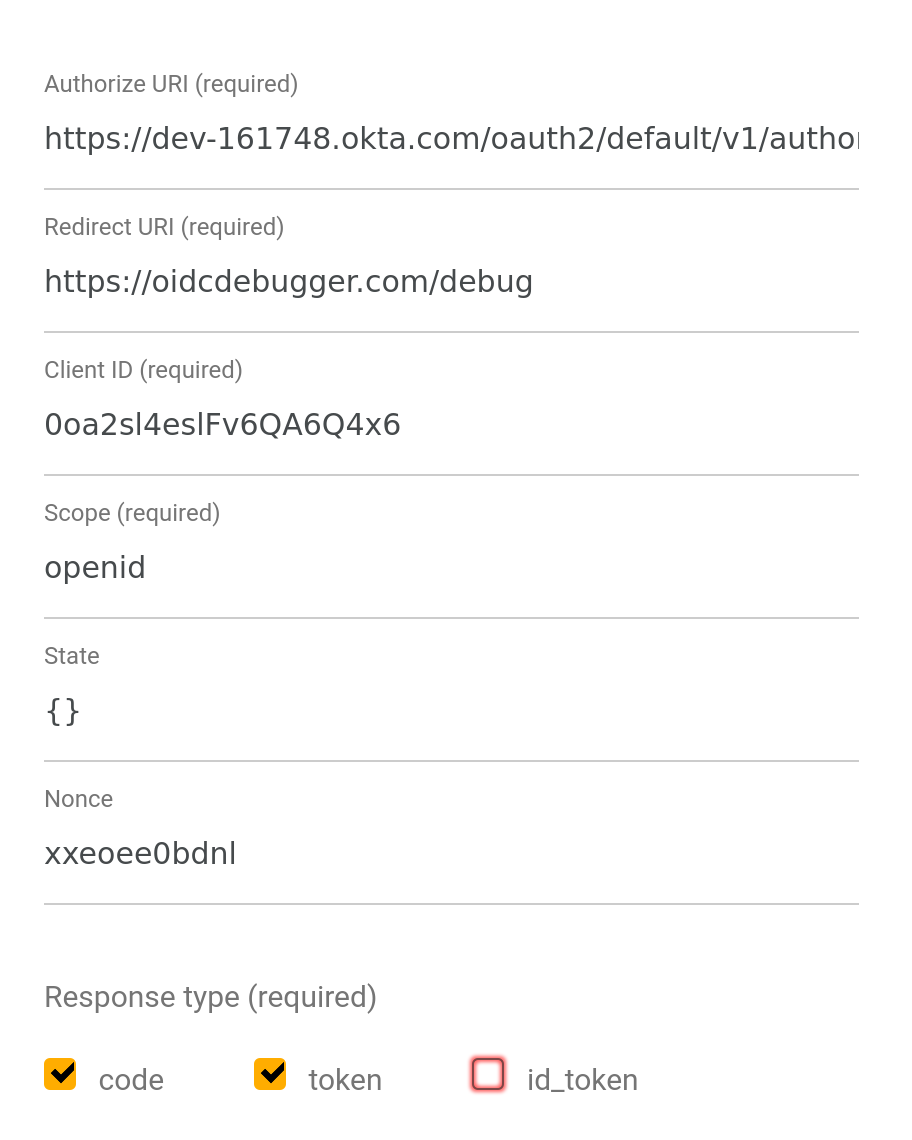
Click Send Request and you should get a success page that shows you the returned access token. Copy it to the clipboard and store it in a shell variable in the shell window you’re using to run HTTPie.
TOKEN=eyJraWQiOiJxaUNtVGFJYnVIeXBLakRpTjZ3LWU...
Test JWT Token Authentication
Now that you’ve got your token, you’re ready to use it on your secured endpoint. Make sure your Spring Boot application is still running, then test the endpoint using your JWT and HTTPie.
http -S :8080/sse "Authorization: Bearer ${TOKEN}"
You should see your streaming data.
...
data:{"currentValue":57,"total":6055}
data:{"currentValue":1,"total":6056}
data:{"currentValue":2,"total":6058}
data:{"currentValue":10,"total":6068}
data:{"currentValue":62,"total":6130}
data:{"currentValue":29,"total":6159}
data:{"currentValue":85,"total":6244}
data:{"currentValue":84,"total":6328}
...
That’s it! You created a secure Spring Cloud Stream application.
The astute out there might object that the RabbitMQ server itself isn’t secured. That’s true, and there are various methods for securing it, chiefly using TLS and SSL certificates, but including that in this tutorial greatly expands the scope. We have a tutorial that demonstrates end-to-end security using Quarkus and Apache Kafka Streams, including how to generate all of the necessary SSL certificates and Java keyfiles.
Learn More About Reactive Programming and Spring Boot
All done. You created a Spring Cloud Stream application that publishes and subscribes to multiple channels. You used Docker to quickly and easily launch a RabbitMQ messaging service. You used reactive, functional programming and saw how to use Spring’s new functional binding model. You used Spring WebFlux to publish the data to a web stream and used HTTPie to stream the data from the command line. Finally, you used Okta’s Spring Boot Starter and to add OAuth 2.0 and OIDC authentication to the application.
You can find the source code for this tutorial on GitHub at oktadeveloper/okta-spring-cloud-streams-example.
If you liked this tutorial, chances are you’ll like some of our other ones:
- Secure Reactive Microservices with Spring Cloud Gateway
- Communicate Between Microservices with Apache Kafka
- OAuth 2.0 Java Guide: Secure Your App in 5 Minutes
- A Quick Guide to Spring Boot Login Options
- OpenID Connect Logout Options with Spring Boot
If you have any questions, please leave a comment below. You can also follow us @oktadev on Twitter. We have a popular YouTube channel too—check it out!
Okta Developer Blog Comment Policy
We welcome relevant and respectful comments. Off-topic comments may be removed.